This step-by-step tutorial will walk you through creating a multi-platform content generator from scratch. Beyond basic LLM integration, you’ll discover how to use powerful Dify nodes to orchestrate sophisticated AI applications faster with less effort. By the end of this tutorial, you’ll have a workflow that takes whatever content you throw at it (text, documents, or images), adds your preferred voice and tone, and spits out polished, platform-specific social media posts in your chosen language. The complete workflow is shown below. Feel free to refer back to this as you build to stay on track and see how all the nodes work together. Quick Start Workflow Overview

Step 1: Create a New Workflow

  1. Go to Studio, then select Create from blank > Workflow.
  2. Name the workflow Multi-platform content generator and click Create. You’ll automatically land on the workflow canvas to start building.

Step 2: Add and Configure Workflow Nodes

Keep any unmentioned settings at their default values.
Give nodes and variables clear, descriptive names to make them easier to identify and reference in the workflow.

1. User Input Node: Collect User Inputs

First, we need to define what information to gather from users, such as the draft text, target platforms, desired tone, and any reference materials.The User Input node is where we can easily set this up. Each input field we add here becomes a variable that all downstream nodes can reference and use.
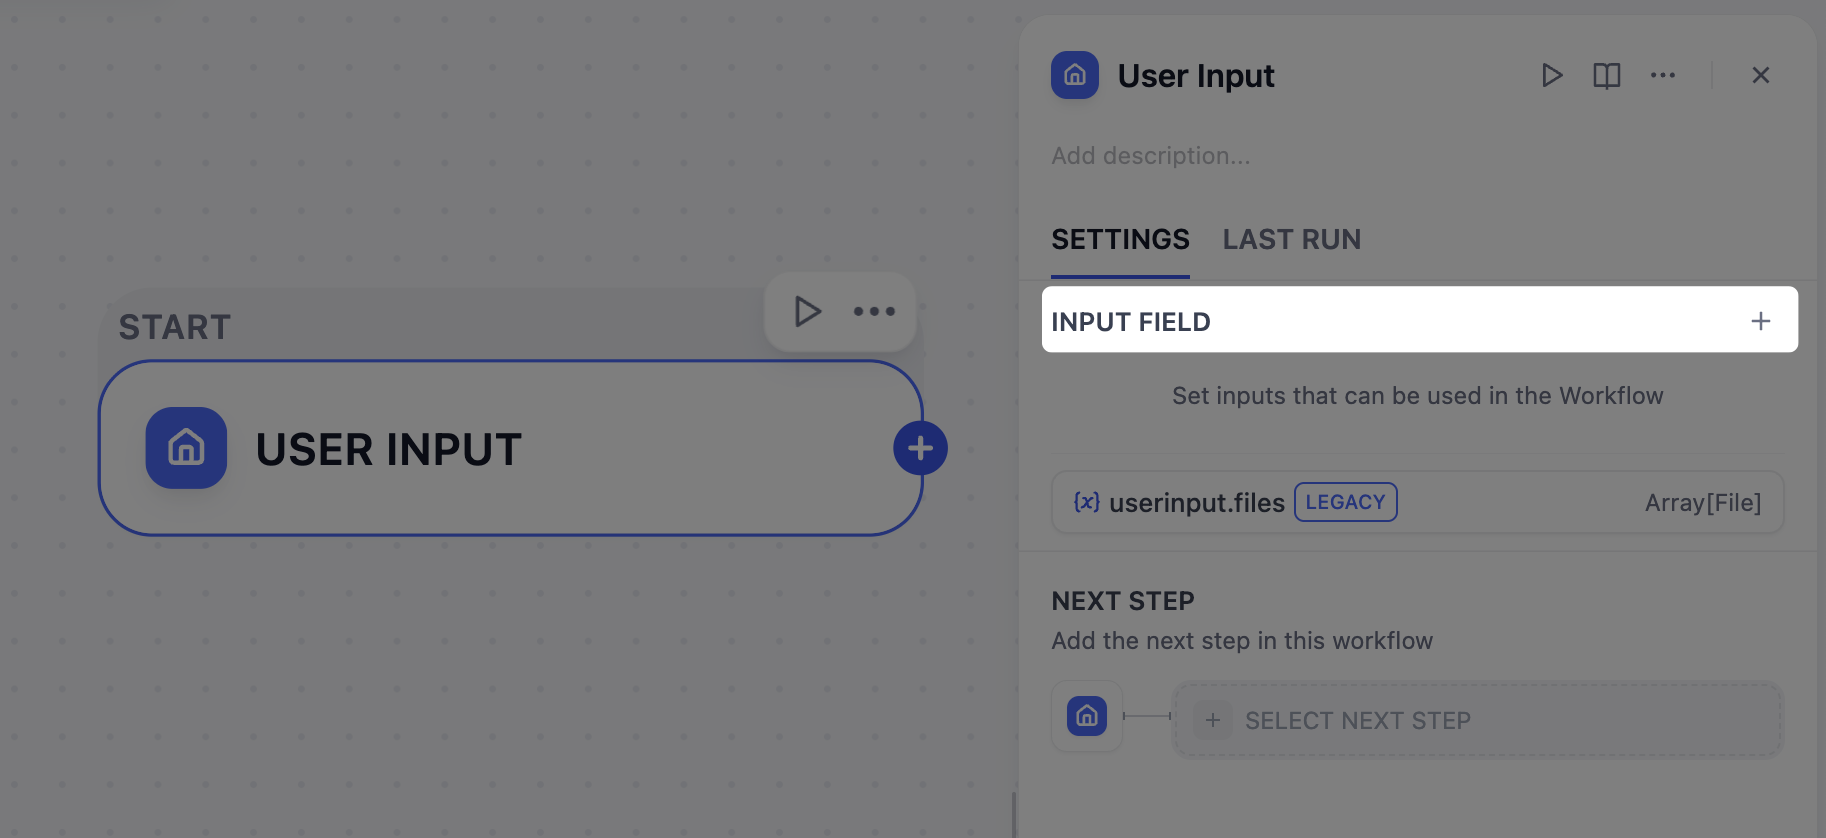
User Input Node Click the User Input node to open its configuration panel, then add the following input fields.
  • Field type: Paragraph
  • Variable Name: draft
  • Label Name: Draft
  • Max length: 2048
  • Required: No
  • Field type: File list
  • Variable Name: user_file
  • Label Name: Upload File (≤ 10)
  • Support File Types: Document, Image
  • Upload File Types: Both
  • Max number of uploads: 10
  • Required: No
  • Field type: Paragraph
  • Variable Name: voice_and_tone
  • Label Name: Voice & Tone
  • Max length: 2048
  • Required: No
  • Field type: Short Text
  • Variable Name: platform
  • Label Name: Target Platform (≤ 10)
  • Max length: 256
  • Required: Yes
  • Field type: Select
  • Variable Name: language
  • Label Name: Language
  • Options:
    • English
    • 日本語
    • 简体中文
  • Default value: English
  • Required: Yes

2. Parameter Extractor Node: Identify Target Platforms

Since our platform field accepts free-form text input, users might type in various ways: x and linkedIn, post on Twitter and LinkedIn, or even Twitter + LinkedIn please. However, we need a clean and structured list, like ["Twitter", "LinkedIn"], that downstream nodes can work with reliably.This is the perfect job for the Parameter Extractor node. It uses an LLM to analyze users’ natural language, recognize all these variations, and output a standardized array.
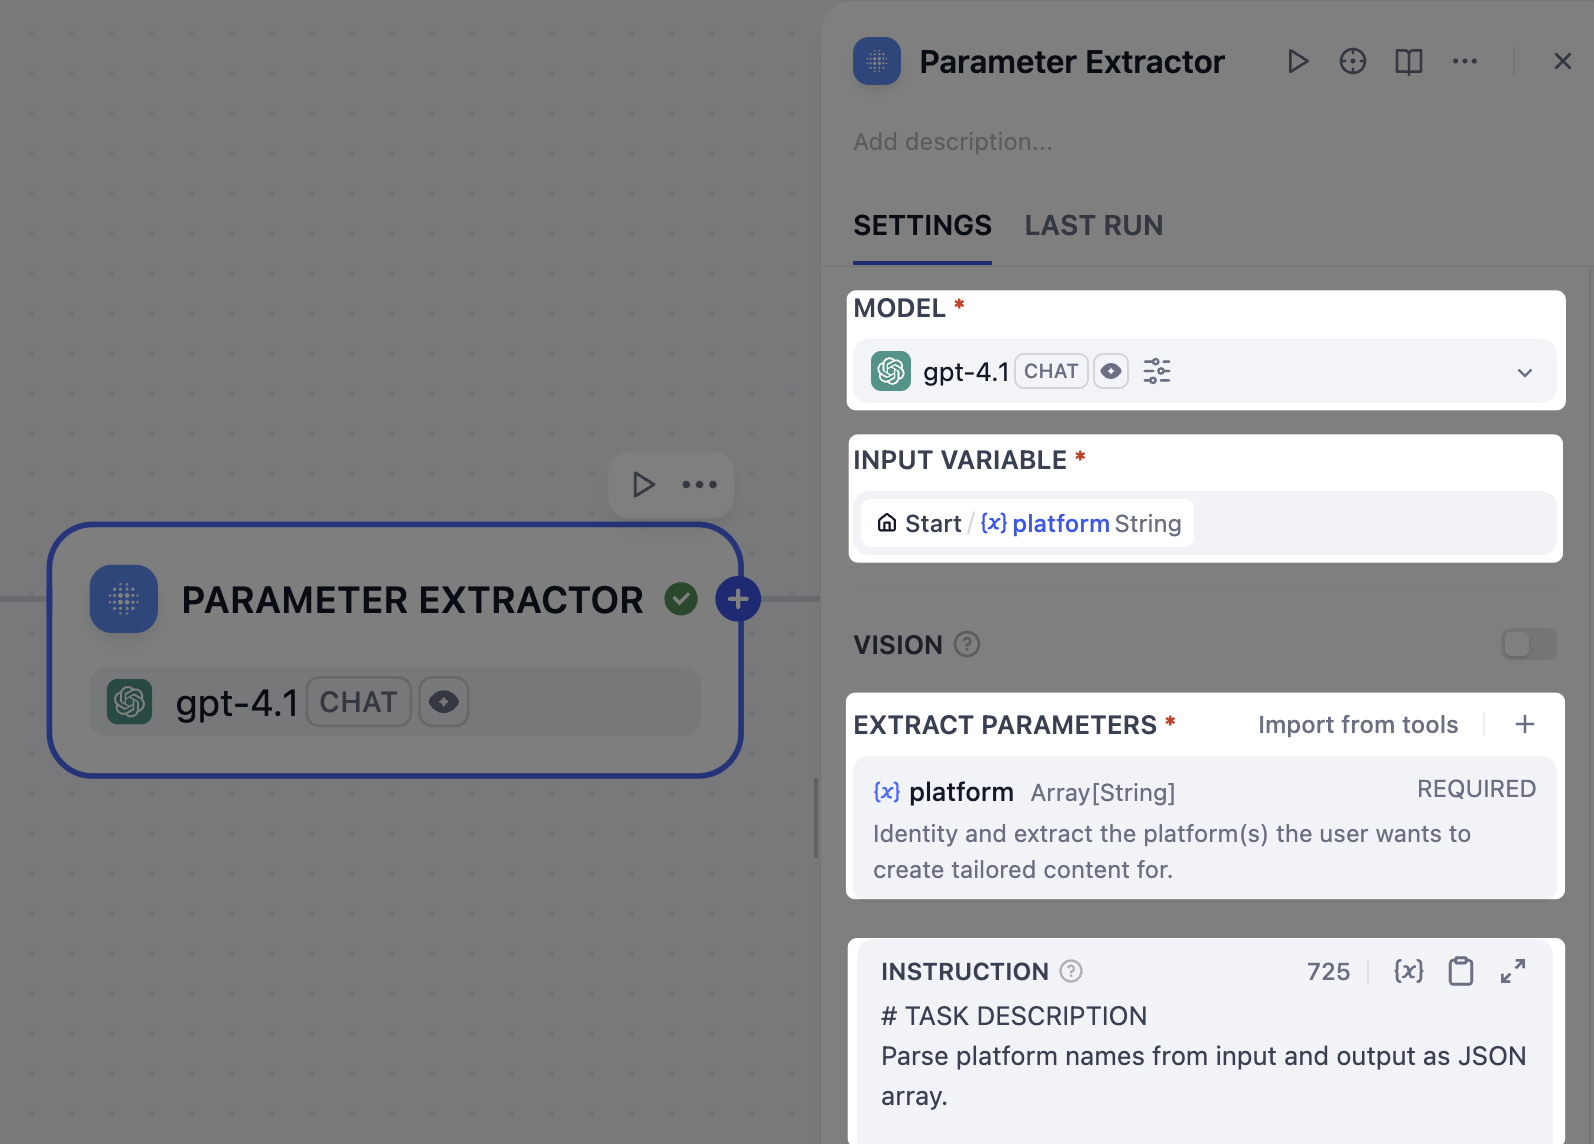
Paramater Extractor After the User Input node, add a Parameter Extractor node and configure it:
  1. Choose a model.
  2. Set User Input/platform as the input variable.
  3. Add an extract parameter:
    1. Name: platform
    2. Type: Array[String]
    3. Description: Identify and extract the platform(s) for which the user wants to create tailored content.
    4. Required: Yes
  4. In the instruction field, paste the following to guide the LLM in parameter extraction:
    INSTRUCTION
    # TASK DESCRIPTION
    Parse platform names from input and output as a JSON array.
    
    ## PROCESSING RULES
    - Support multiple delimiters: commas, semicolons, spaces, line breaks, "and", "&", "|", etc.
    - Standardize common platform name variants (twitter/X→Twitter, insta→Instagram, etc.)
    - Remove duplicates and invalid entries
    - Preserve unknown but reasonable platform names
    
    ## OUTPUT REQUIREMENTS
    - Success: ["Platform1", "Platform2"] 
    - No platforms found: [No platforms identified. Please enter a valid platform name.]
    
    ## EXAMPLES
    - Input: "twitter, linkedin" → ["Twitter", "LinkedIn"]
    - Input: "x and insta" → ["Twitter", "Instagram"]
    - Input: "invalid content" → [No platforms identified. Please enter a valid platform name.]
    
    Note that we’ve instructed the LLM to output a specific error message for invalid inputs, which will serve as the end trigger for our workflow in the next step.

3. IF/ELSE Node: Validate Platform Extraction Results

What if a user enters an invalid platform name, like ohhhhhh or BookFace? We don’t want to waste time and tokens generating useless content.In such cases, we can use an IF/ELSE node to create a branch that stops the workflow early. We’ll set a condition that checks for the error message from the Parameter Extractor node; if that message is detected, the workflow will route directly to an Output node and end.
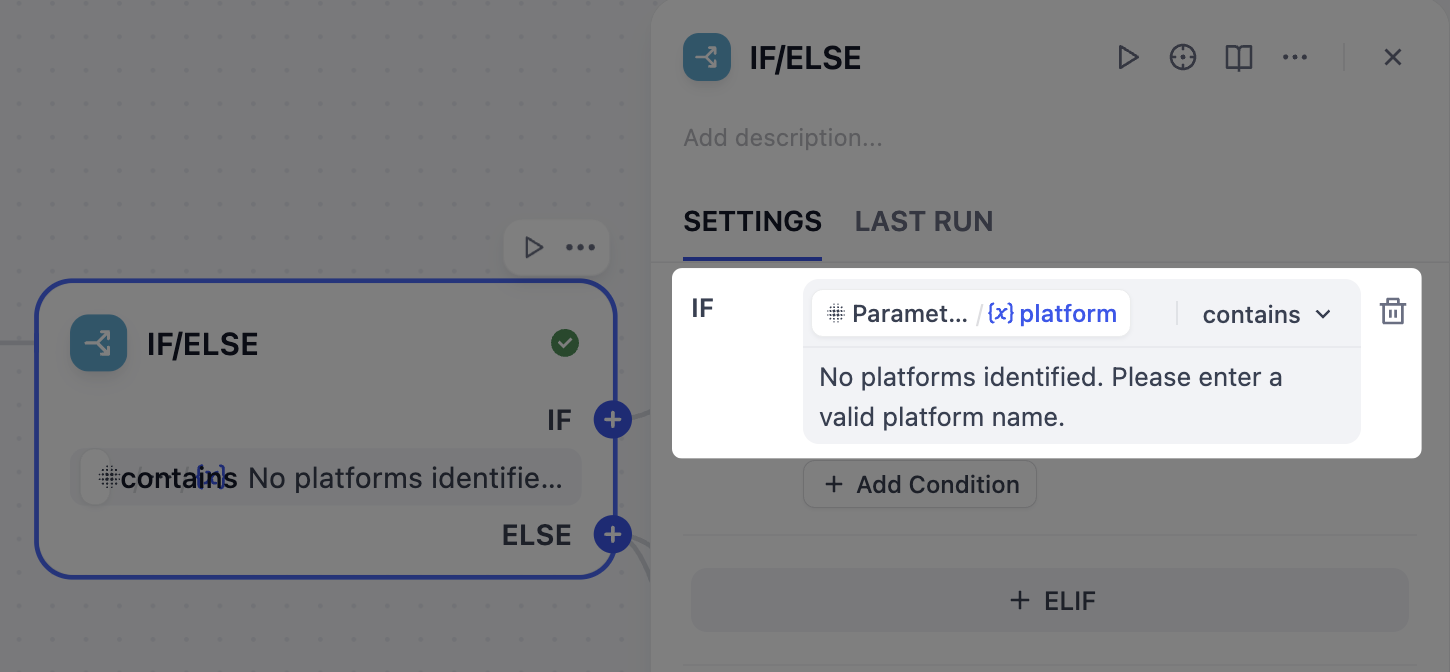
If Condition
  1. After the Parameter Extractor node, add an IF/ELSE node.
  2. On the IF/ELSE node’s panel, define the IF condition: IF Parameter Extractor/platform contains No platforms identified. Please enter a valid platform name.
  3. After the IF/ELSE node, add an Output node to the IF branch.
  4. On the Output node’s panel, set Parameter Extractor/platform as the output variable.

4. List Operator Node: Separate Uploaded Files by Type

Our users can upload both images and documents as reference materials, but these two types require different handling: images can be interpreted directly by vision-enabled models, while documents must first be converted to text for an LLM to understand their content.To manage this, we’ll use two List Operator nodes to filter and split the uploaded files into separate branches—one for images and one for documents.
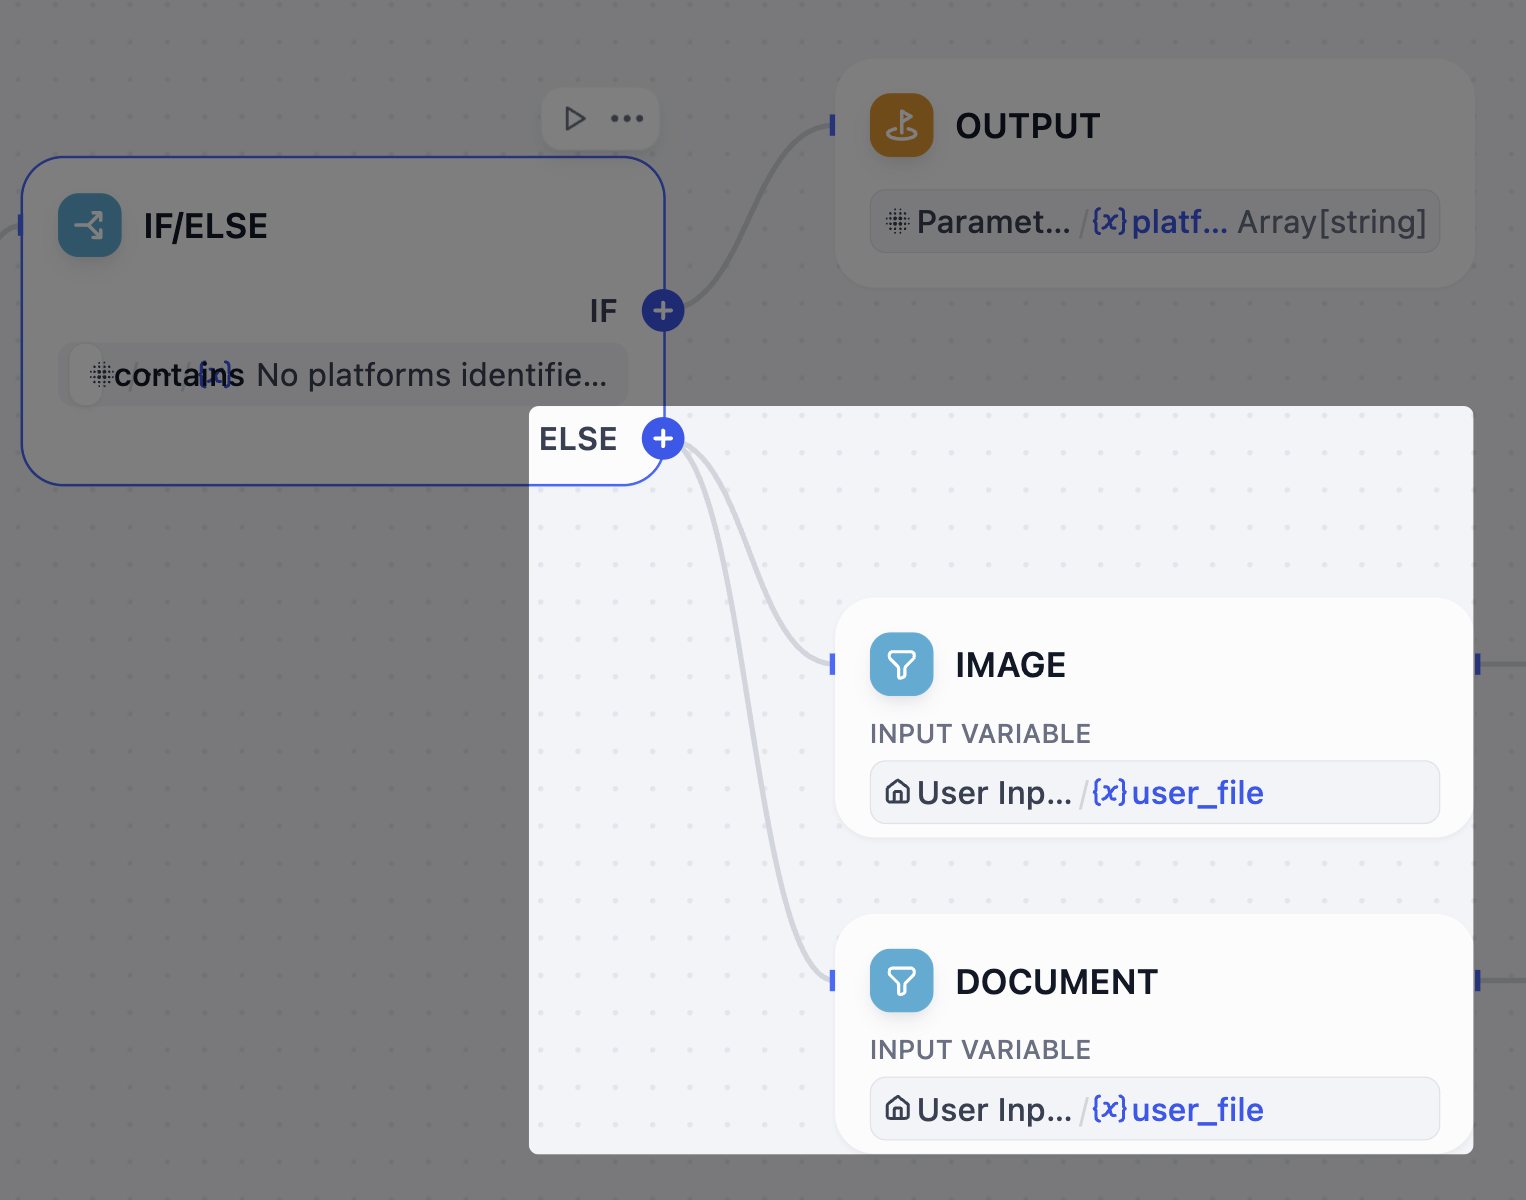
List Operator
  1. After the IF/ELSE node, add two List Operator nodes to the ELSE branch.
  2. Rename one node to Image and the other to Document.
  3. Configure the Image node:
    1. Set User Input/user_file as the input variable.
    2. Enable the filter condition: {x}type in Image
  4. Configure the Document node:
    1. Set User Input/user_file as the input variable.
    2. Enable the filter condition: {x}type in Doc.

5. Doc Extractor Node: Extract Text from Documents

LLMs can’t directly read uploaded files like PDF or DOCX. To use the information in these documents, we must first convert them into plain text that LLMs can process.This is exactly what a Doc Extractor node does. It takes document files as input and outputs clean, usable text for the next steps.
  1. After the Document node, add a Doc Extractor node.
  2. On the Doc Extractor node’s panel, set Document/result as the input variable.

6. LLM Node: Integrate All Reference Materials

When users provide multiple reference types—draft text, documents, and images—simultaneously, we need to consolidate them into a single, coherent summary.An LLM node will handle this task by analyzing all the scattered pieces to create a comprehensive context that guides subsequent content generation.
Integrate Information
  1. After the Doc Extractor node, add an LLM node.
  2. Connect the Image node to this LLM node as well.
  3. Click the LLM node to configure it:
    1. Rename it to Integrate Info.
    2. Choose a model that supports vision (indicated by an eye icon).
    3. Enable VISION and set Image/result as the vision variable.
    4. In the system prompt field, paste the following:
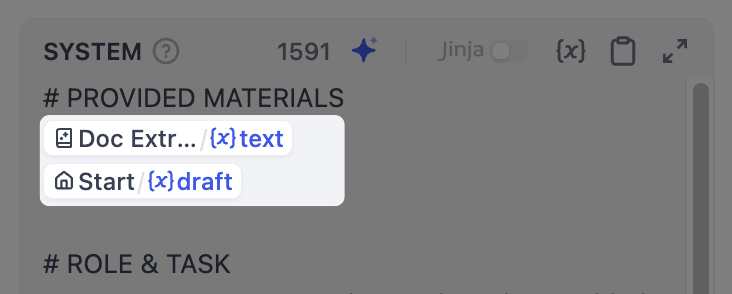
      In the prompt, to reference the Doc Extractor/text and User Input/draft variables in PROVIDED MATERIALS, type { or / and select from the list.Reference Variable
      SYSTEM
      # PROVIDED MATERIALS
      Doc Extractor/text
      User Input/draft
      
      # ROLE & TASK
      You are a content strategist. Analyze the provided materials and create a comprehensive content foundation for multi-platform social media optimization.
      
      # ANALYSIS PRINCIPLES
      - Work exclusively with provided information—no external assumptions
      - Focus on extraction, synthesis, and strategic interpretation
      - Identify compelling and actionable elements
      - Prepare insights adaptable across different platforms
      
      # REQUIRED ANALYSIS
      Deliver structured analysis with:
      
      ## 1. CORE MESSAGE
      - Central theme, purpose, objective
      - Key value or benefit being communicated
      
      ## 2. ESSENTIAL CONTENT ELEMENTS
      - Primary topics, facts, statistics, data points
      - Notable quotes, testimonials, key statements
      - Features, benefits, characteristics mentioned
      - Dates, locations, contextual details
      
      ## 3. STRATEGIC INSIGHTS
      - What makes content compelling/unique
      - Emotional/rational appeals present
      - Credibility factors, proof points
      - Competitive advantages highlighted
      
      ## 4. ENGAGEMENT OPPORTUNITIES
      - Discussion points, questions emerging
      - Calls-to-action, next steps suggested
      - Interactive/participation opportunities
      - Trending themes touched upon
      
      ## 5. PLATFORM OPTIMIZATION FOUNDATION
      - High-impact: Quick, shareable formats
      - Professional: Business-focused discussions
      - Community: Interaction and sharing
      - Visual: Enhanced with strong visuals
      
      ## 6. SUPPORTING DETAILS
      - Metrics, numbers, quantifiable results
      - Direct quotes, testimonials
      - Technical details, specifications
      - Background context available
      

7. Iteration Node: Create Customized Content for Each Platform

Now that the integrated references and target platforms are ready, let’s generate a tailored post for each platform using an Iteration node.The node will loop through the list of platforms and run a sub-workflow for each: first analyze the specific platform’s style guidelines and best practices, then generate optimized content based on all available information.
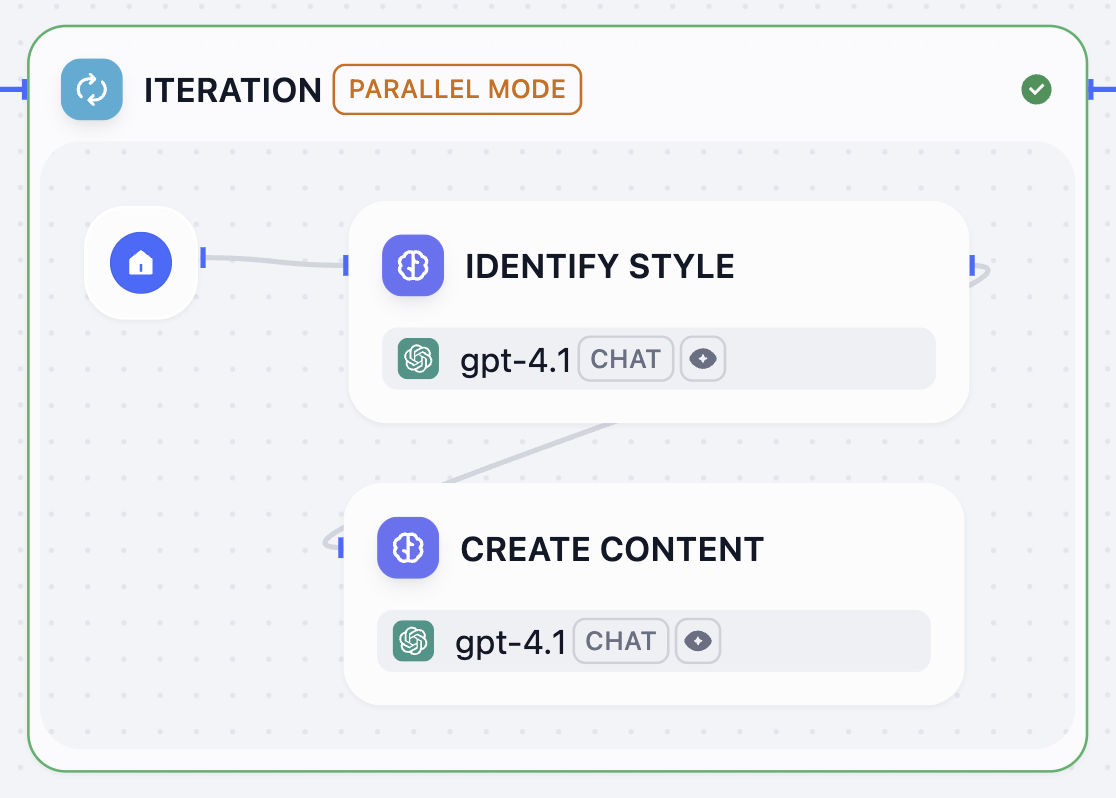
Iteration Node
  1. After the Integrate Info node, add an Iteration node.
  2. Inside the Iteration node, add an LLM node and configure it:
    1. Rename it to Identify Style.
    2. Choose a model.
    3. In the system prompt field, paste the following:
      In the prompt, to reference the Current Iteration/item variable in ROLE & TASK and OUTPUT FORMAT EXAMPLES, type { or / and select from the list.
      SYSTEM
      # ROLE & TASK
      You are a social media expert. Analyze the platform "Current Iteration/item" and provide content creation guidelines.
      
      # ANALYSIS REQUIRED
      For the given platform, provide:
      
      ## 1. PLATFORM PROFILE
      - Platform type and category
      - Target audience characteristics
      
      ## 2. CONTENT GUIDELINES
      - Optimal content length (characters/words)
      - Recommended tone (professional/casual/conversational)
      - Formatting best practices (line breaks, emojis, etc.)
      
      ## 3. ENGAGEMENT STRATEGY
      - Hashtag recommendations (quantity and style)
      - Call-to-action best practices
      - Algorithm optimization tips
      
      ## 4. TECHNICAL SPECS
      - Character/word limits
      - Visual content requirements
      - Special formatting needs
      
      ## 5. PLATFORM-SPECIFIC NOTES
      - Unique features or recent changes
      - Industry-specific considerations
      - Community engagement approaches
      
      # OUTPUT REQUIREMENTS
      - For recognized platforms: Provide specific guidelines
      - For unknown platforms: Base recommendations on similar platforms
      - Focus on actionable, practical advice
      - Be concise but comprehensive
      
      # OUTPUT FORMAT EXAMPLES
      ```json  
      {  
        "platform_name": "Current Iteration/item",  
        "platform_type": "social_media/professional_network/visual_platform/microblogging",  
        "content_guidelines": {  
          "max_length": "character/word limit",  
          "optimal_length": "recommended range",  
          "tone": "professional/casual/conversational/authoritative",  
          "hashtag_strategy": "quantity and placement guidelines",  
          "formatting": "line breaks, emojis, mentions guidelines",  
          "engagement_focus": "comments/shares/likes/retweets",  
          "call_to_action": "appropriate CTA style"  
        },  
        "special_considerations": "Any unique platform requirements or recent changes",  
        "confidence_level": "high/medium/low based on platform recognition"  
      }
      
  3. After the Identity Style node, add another LLM node and configure it:
    1. Rename it to Create Content.
    2. Choose a model.
    3. In the system prompt field, paste the following:
      In the prompt, to reference the following variables, type { or / and select from the list.
      • Identify Style/text in PLATFORM GUIDELINES
      • Integrate Info/text in SOURCE INFORMATION
      • User Input/voice_and_tone in VOICE & TONE (OPTIONAL)
      • User Input/language in LANGUAGE REQUIREMENT
      SYSTEM
      # ROLE & TASK
      You are an expert social media content creator. Generate publication-ready content that matches platform guidelines, incorporates source information, and follows specified voice/tone and language requirements.
      
      # INPUT MATERIALS
      ## 1. PLATFORM GUIDELINES
      Identify Style/text
      
      ## 2. SOURCE INFORMATION
      Integrate Info/text
      
      ## 3. VOICE & TONE (OPTIONAL)
      User Input/voice_and_tone
      
      ## 4. LANGUAGE REQUIREMENT
      - Generate ALL content exclusively in: User Input/language
      - No mixing of languages whatsoever
      - Adapt platform terminology to the specified language
      
      # CONTENT REQUIREMENTS
      - Follow platform guidelines exactly (format, length, tone, hashtags)
      - Integrate source information effectively (key messages, data, value props)
      - Apply voice & tone consistently (if provided)
      - Optimize for platform-specific engagement
      - Ensure cultural appropriateness for the specified language
      
      # OUTPUT FORMAT
      - Generate ONLY the final social media post content. No explanations or meta-commentary. Content must be immediately copy-paste ready.
      - Maximum heading level: ## (H2) - never use # (H1)
      - No horizontal dividers: avoid ---
      
      # QUALITY CHECKLIST
      ✅ Platform guidelines followed
      ✅ Source information integrated  
      ✅ Voice/tone consistent (when provided)
      ✅ Language consistency maintained
      ✅ Engagement optimized
      ✅ Publication ready
      
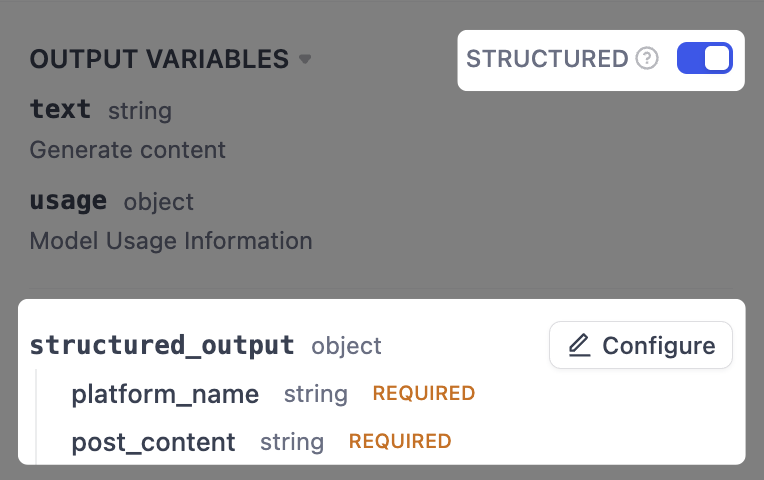
    4. Enable structured output. Structured Output
      1. Next to OUTPUT VARIABLES, toggle STRUCTURED on. The structured_output variable will appear below.
      2. Next to structured_output, click Configure.
      3. In the pop-up schema editor, click Import From JSON in the top-right corner, and paste the following:
        {   
          "platform_name": "string",
          "post_content": "string"   
        }
        
  4. Click the Iteration node to configure it:
    1. Set Parameter Extractor/platform as the input variable.
    2. Set Create Content/structured_output as the output variable.
    3. Enable PARALLEL MODE and set the maximum parallelism to 10.
      This is why we included (≤10) in the label name for the target platform field back in the User Input node.

8. Template Node: Format the Final Output

The Iteration node generates a post for each platform, but its output is a raw array of data (e.g., [{"platform_name": "Twitter", "post_content": "..."}]) that isn’t very readable. We need to present the results in a clearer format.That’s where the Template node comes in—it allows us to format this raw data into well-organized text using Jinja2 templating, ensuring the final output is user-friendly and easy to understand.
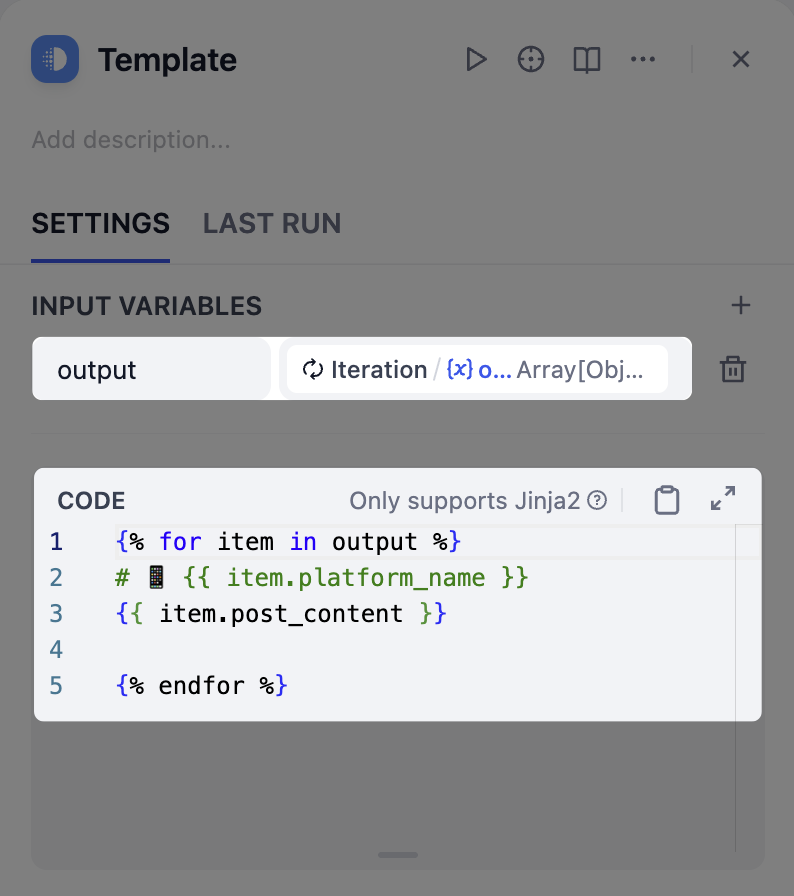
Template Node
  1. After the Iteration node, add a Template node.
  2. On the Template node’s panel, set Iteration/output as the input variable.
  3. Paste the following Jinja2 code (remember to delete the comments).
    {% for item in output %}        # Loop through each platform-content pair in the input array
    # 📱 {{ item.platform_name }}   # Display the platform name as an H1 heading with a phone emoji
    {{ item.post_content }}        # Display the generated content for this platform
                                   # Add a blank line between platforms for better readability
    {% endfor %}                   # End the loop
    
    While LLMs can handle output formatting as well, their outputs can be inconsistent and unpredictable. For rule-based formatting that requires no reasoning, the Template node gets things done in a more stable and reliable way at zero token cost.LLMs are incredibly powerful, but knowing when to use the right tool is key to building more reliable and cost-effective AI applications.

9. Output Node: Return the Results to Users

  1. After the Template node, add an Output node.
  2. On the Output node’s panel, set the Template/output as the output variable.

Step 3: Test

Your workflow is now complete! Let’s test it out.
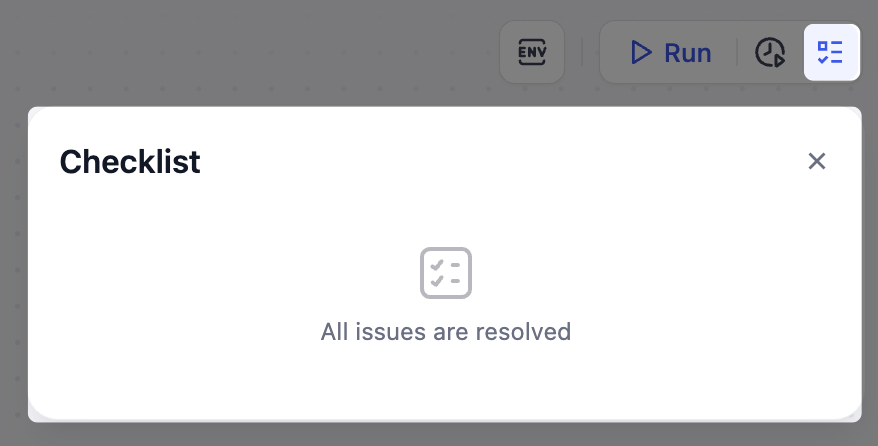
  1. Make sure your Checklist is clear. Check Clecklist
  2. Check your workflow against the reference diagram provided at the beginning to ensure all nodes and connections match.
  3. Click Test Run in the top-right corner, fill in the input fields, then click Start Run. To run a single node with cached inputs, click the Run this step icon at the top of its configuration panel.
    To test how a node reacts to different inputs from previous nodes, you don’t need to re-run the entire workflow. Just click View cached variables at the bottom of the canvas, find the variable you want to change from the list, and edit its value.
    If you encounter any errors, check the LAST RUN logs of the corresponding node to identify the exact cause of the problem.

Step 4: Publish & Share

Once the workflow runs as expected and you’re happy with the results, click Publish > Publish Update to make it live and shareable.
If you make any changes later, always remember to publish again so the updates take effect.
After publishing, you can run a quick end-to-end test in the live environment to confirm that everything works the same as in Studio.