# App Toolkit
Source: https://docs.dify.ai/en/use-dify/build/additional-features
Optional features that make your Dify apps more useful
Dify apps come with optional features you can enable to improve the end-user experience. Open the **Features** panel of the builder to see what's available for your app type.
![Features Panel in Chatbots, Agents, and Text Generators]()
![Features Panel in Chatflows]() ## Conversation Opener
Set an opening message that greets users at the start of each conversation, with optional suggested questions to guide them toward what the app does well.
You can insert variables into the opening message and suggested questions to personalize the experience.
* In the opening message, type `{` or `/` to insert variables from the picker.
* In suggested questions, type variable names manually in `{{variable_name}}` format.
## Conversation Opener
Set an opening message that greets users at the start of each conversation, with optional suggested questions to guide them toward what the app does well.
You can insert variables into the opening message and suggested questions to personalize the experience.
* In the opening message, type `{` or `/` to insert variables from the picker.
* In suggested questions, type variable names manually in `{{variable_name}}` format.
![Configuration]()
![WebApp]() ## Follow-up
When enabled, the LLM automatically suggests 3 follow-up questions after each response, helping users continue the conversation. This feature is a simple toggle—no additional configuration is needed.
Follow-up questions are generated by a separate LLM call using your workspace's system reasoning model (set in **Settings** > **Model Provider** > **Default Model Settings**), not the model configured in your app.
## Text to Speech
Convert AI responses to audio. You can configure the language and voice to match your app's audience, and enable **Auto Play** to stream audio automatically as the AI responds.
**Text to Speech** uses your workspace's text-to-speech model (set in **Settings** > **Model Provider** > **Default Model Settings**).
The feature only appears in the **Features** panel when a default TTS model is configured.
## Speech to Text
Enable voice input for the chat interface. When enabled, your end users can dictate messages instead of typing by clicking the microphone button.
**Speech to Text** uses your workspace's speech-to-text model (set in **Settings** > **Model Provider** > **Default Model Settings**).
The feature only appears in the **Features** panel when a default STT model is configured.
## File Upload
Allow end users to send files at any point during a conversation. You can configure which file types to accept, the upload method, and the maximum number of files per message.
For self-hosted deployments, you can adjust file size limits via the following environment variables:
* `UPLOAD_IMAGE_FILE_SIZE_LIMIT` (default: 10 MB)
* `UPLOAD_FILE_SIZE_LIMIT` (default: 15 MB)
* `UPLOAD_AUDIO_FILE_SIZE_LIMIT` (default: 50 MB)
* `UPLOAD_VIDEO_FILE_SIZE_LIMIT` (default: 100 MB)
See [Environment Variables](/en/self-host/configuration/environments) for details.
## Citations and Attributions
Show the source documents behind AI responses. When enabled, responses that draw from a connected knowledge base display numbered citations linking back to the original documents and chunks.
## Follow-up
When enabled, the LLM automatically suggests 3 follow-up questions after each response, helping users continue the conversation. This feature is a simple toggle—no additional configuration is needed.
Follow-up questions are generated by a separate LLM call using your workspace's system reasoning model (set in **Settings** > **Model Provider** > **Default Model Settings**), not the model configured in your app.
## Text to Speech
Convert AI responses to audio. You can configure the language and voice to match your app's audience, and enable **Auto Play** to stream audio automatically as the AI responds.
**Text to Speech** uses your workspace's text-to-speech model (set in **Settings** > **Model Provider** > **Default Model Settings**).
The feature only appears in the **Features** panel when a default TTS model is configured.
## Speech to Text
Enable voice input for the chat interface. When enabled, your end users can dictate messages instead of typing by clicking the microphone button.
**Speech to Text** uses your workspace's speech-to-text model (set in **Settings** > **Model Provider** > **Default Model Settings**).
The feature only appears in the **Features** panel when a default STT model is configured.
## File Upload
Allow end users to send files at any point during a conversation. You can configure which file types to accept, the upload method, and the maximum number of files per message.
For self-hosted deployments, you can adjust file size limits via the following environment variables:
* `UPLOAD_IMAGE_FILE_SIZE_LIMIT` (default: 10 MB)
* `UPLOAD_FILE_SIZE_LIMIT` (default: 15 MB)
* `UPLOAD_AUDIO_FILE_SIZE_LIMIT` (default: 50 MB)
* `UPLOAD_VIDEO_FILE_SIZE_LIMIT` (default: 100 MB)
See [Environment Variables](/en/self-host/configuration/environments) for details.
## Citations and Attributions
Show the source documents behind AI responses. When enabled, responses that draw from a connected knowledge base display numbered citations linking back to the original documents and chunks.
![Citations and Attributions]() ## Content Moderation
Filter inappropriate content in user inputs, AI outputs, or both. Choose a moderation provider based on your needs:
* **OpenAI Moderation**: Use OpenAI's dedicated moderation model to detect harmful content across multiple categories.
* **Keywords**: Define a list of blocked terms. Any match triggers the preset response.
* **API Extension**: Connect a custom moderation endpoint for your own filtering logic.
When content is flagged, the app replaces it with a preset response that you define.
## Annotation Reply
Define curated Q\&A pairs that take priority over LLM responses. When a user's query **semantically** matches an annotation above the score threshold (how closely a query must match), the curated answer is returned directly without calling the LLM.
You can configure the score threshold and the embedding model used for semantic matching.
To create and manage your annotations:
* Convert existing conversations into annotations directly from **Debug & Preview** or **Logs** by clicking the **Add Annotation** icon on any LLM response.
Once a message is annotated, the icon changes to **Edit**, so you can modify the annotation in place.
## Content Moderation
Filter inappropriate content in user inputs, AI outputs, or both. Choose a moderation provider based on your needs:
* **OpenAI Moderation**: Use OpenAI's dedicated moderation model to detect harmful content across multiple categories.
* **Keywords**: Define a list of blocked terms. Any match triggers the preset response.
* **API Extension**: Connect a custom moderation endpoint for your own filtering logic.
When content is flagged, the app replaces it with a preset response that you define.
## Annotation Reply
Define curated Q\&A pairs that take priority over LLM responses. When a user's query **semantically** matches an annotation above the score threshold (how closely a query must match), the curated answer is returned directly without calling the LLM.
You can configure the score threshold and the embedding model used for semantic matching.
To create and manage your annotations:
* Convert existing conversations into annotations directly from **Debug & Preview** or **Logs** by clicking the **Add Annotation** icon on any LLM response.
Once a message is annotated, the icon changes to **Edit**, so you can modify the annotation in place.
![Add Annotation Icon]() * In the **Logs & Annotations** > **Annotations** tab, manually add new Q\&A pairs, manage existing annotations, and view hit history. Click `...` to bulk import or bulk export.
* In the **Logs & Annotations** > **Annotations** tab, manually add new Q\&A pairs, manage existing annotations, and view hit history. Click `...` to bulk import or bulk export.
![Bulk Annotation Operation]() ## More Like This
Generate alternative outputs for the same input. Once enabled, each generated result includes a button to produce a variation, so you can explore different responses without re-entering your query.
## More Like This
Generate alternative outputs for the same input. Once enabled, each generated result includes a button to produce a variation, so you can explore different responses without re-entering your query.
![More Like This]() You can generate up to 2 variations per result. Each variation uses additional tokens.
# Agent
Source: https://docs.dify.ai/en/use-dify/build/agent
Chat-style apps where the model can reason, make decisions, and use tools autonomously
Agents are chat-style apps where the model can reason through a task, decide what to do next, and use tools when needed to complete the user's request.
Use it when you want the model to autonomously decide how to approach a task using available tools, without designing a multi-step workflow. For example, building a data analysis assistant that can fetch live data, generate charts, and summarize findings on its own.
Agents keep up to 500 messages or 2,000 tokens of history per conversation. If either limit is exceeded, the oldest messages will be removed to make room for new ones.
Agents support optional features like conversation openers, follow-up suggestions, and more. See [App Toolkit](/en/use-dify/build/additional-features) for details.
## Configure
### Write the Prompt
The prompt tells the model what to do, how to respond, and what constraints to follow. For an agent, the prompt also guides how the model reasons through tasks and decides when to use tools, so be specific about the workflow you expect.
Here are some tips for writing effective prompts:
* **Define the persona**: Describe who the model should act as and the expertise it should draw on.
* **Specify the output format**: Describe the structure, length, or style you expect.
* **Set constraints**: Tell the model what to avoid or what rules to follow.
* **Guide tool usage**: Mention specific tools by name and describe when they should be used.
* **Outline the workflow**: Break down complex tasks into logical steps the model should follow.
#### Create Dynamic Prompts with Variables
To adapt the agent to different users or contexts without rewriting the prompt each time, add variables to collect the necessary information upfront.
Variables are placeholders in the prompt—each one appears as an input field that users fill in before the conversation starts, and their values are injected into the prompt at runtime. Users can also update variable values mid-conversation, and the prompt will adjust accordingly.
For example, a data analysis agent might use a domain variable so users can specify which area to focus on:
```text wrap theme={null}
You are a data analyst specializing in {{domain}}. Help users explore and understand their data.
When asked a question, use available data tools to fetch the relevant information. If the result suits a visual format, generate a chart. Explain your findings in plain language.
Keep responses concise. If a question is ambiguous, ask for clarification before fetching data.
```
While drafting the prompt, type `/` > **New Variable** to quickly insert a named placeholder. You can configure its details in the **Variables** section later.
Choose the variable type that matches the input you expect:
Accepts up to 256 characters. Use it for names, email addresses, titles, or any brief text input that fits on a single line.
Allows long-form text without length restrictions. It gives users a multi-line text area for detailed descriptions.
Displays a dropdown menu with predefined options.
Restricts input to numerical values only—ideal for quantities, ratings, IDs, or any data requiring mathematical processing.
Provides a simple yes/no option. When a user checks the box, the output is `true`; otherwise, it's `false`. Use it for confirmations or any case that requires a binary choice.
Fetches variable values from an external API at runtime instead of collecting them from users.
Use it when your prompt needs dynamic data from an external source, such as live weather conditions or database records. See [API Extension](/en/use-dify/workspace/api-extension/api-extension) for details.
**Label Name** is what end users see for each input field.
#### Generate or Improve the Prompt with AI
If you're unsure where to start or want to refine the existing prompt, click **Generate** to let an LLM help you draft it.
Describe what you want from scratch, or reference `current_prompt` and specify what to improve. For more targeted results, add an example in **Ideal Output**.
Each generation is saved as a version, so you can experiment and roll back freely.
### Extend the Agent with Dify Tools
Add [Dify tools](/en/use-dify/workspace/tools) to enable the model to interact with external services and APIs for tasks beyond text generation, such as fetching live data, searching the web, or querying databases.
The model decides when and which tools to use based on each query. To guide this more precisely, mention specific tool names in your prompt and describe when they should be used.
You can generate up to 2 variations per result. Each variation uses additional tokens.
# Agent
Source: https://docs.dify.ai/en/use-dify/build/agent
Chat-style apps where the model can reason, make decisions, and use tools autonomously
Agents are chat-style apps where the model can reason through a task, decide what to do next, and use tools when needed to complete the user's request.
Use it when you want the model to autonomously decide how to approach a task using available tools, without designing a multi-step workflow. For example, building a data analysis assistant that can fetch live data, generate charts, and summarize findings on its own.
Agents keep up to 500 messages or 2,000 tokens of history per conversation. If either limit is exceeded, the oldest messages will be removed to make room for new ones.
Agents support optional features like conversation openers, follow-up suggestions, and more. See [App Toolkit](/en/use-dify/build/additional-features) for details.
## Configure
### Write the Prompt
The prompt tells the model what to do, how to respond, and what constraints to follow. For an agent, the prompt also guides how the model reasons through tasks and decides when to use tools, so be specific about the workflow you expect.
Here are some tips for writing effective prompts:
* **Define the persona**: Describe who the model should act as and the expertise it should draw on.
* **Specify the output format**: Describe the structure, length, or style you expect.
* **Set constraints**: Tell the model what to avoid or what rules to follow.
* **Guide tool usage**: Mention specific tools by name and describe when they should be used.
* **Outline the workflow**: Break down complex tasks into logical steps the model should follow.
#### Create Dynamic Prompts with Variables
To adapt the agent to different users or contexts without rewriting the prompt each time, add variables to collect the necessary information upfront.
Variables are placeholders in the prompt—each one appears as an input field that users fill in before the conversation starts, and their values are injected into the prompt at runtime. Users can also update variable values mid-conversation, and the prompt will adjust accordingly.
For example, a data analysis agent might use a domain variable so users can specify which area to focus on:
```text wrap theme={null}
You are a data analyst specializing in {{domain}}. Help users explore and understand their data.
When asked a question, use available data tools to fetch the relevant information. If the result suits a visual format, generate a chart. Explain your findings in plain language.
Keep responses concise. If a question is ambiguous, ask for clarification before fetching data.
```
While drafting the prompt, type `/` > **New Variable** to quickly insert a named placeholder. You can configure its details in the **Variables** section later.
Choose the variable type that matches the input you expect:
Accepts up to 256 characters. Use it for names, email addresses, titles, or any brief text input that fits on a single line.
Allows long-form text without length restrictions. It gives users a multi-line text area for detailed descriptions.
Displays a dropdown menu with predefined options.
Restricts input to numerical values only—ideal for quantities, ratings, IDs, or any data requiring mathematical processing.
Provides a simple yes/no option. When a user checks the box, the output is `true`; otherwise, it's `false`. Use it for confirmations or any case that requires a binary choice.
Fetches variable values from an external API at runtime instead of collecting them from users.
Use it when your prompt needs dynamic data from an external source, such as live weather conditions or database records. See [API Extension](/en/use-dify/workspace/api-extension/api-extension) for details.
**Label Name** is what end users see for each input field.
#### Generate or Improve the Prompt with AI
If you're unsure where to start or want to refine the existing prompt, click **Generate** to let an LLM help you draft it.
Describe what you want from scratch, or reference `current_prompt` and specify what to improve. For more targeted results, add an example in **Ideal Output**.
Each generation is saved as a version, so you can experiment and roll back freely.
### Extend the Agent with Dify Tools
Add [Dify tools](/en/use-dify/workspace/tools) to enable the model to interact with external services and APIs for tasks beyond text generation, such as fetching live data, searching the web, or querying databases.
The model decides when and which tools to use based on each query. To guide this more precisely, mention specific tool names in your prompt and describe when they should be used.
![Tool Name]() You can disable or remove added tools, and modify their configuration. If a tool requires authentication, select an existing credential or create a new one.
To change the default credential, go to **Tools** or **Plugins**.
#### Maximum Iterations
**Maximum Iterations** in **Agent Settings** limits how many times the model can repeat its reasoning-and-action cycle (think, call a tool, process the result) for a single request.
Increase this value for complex, multi-step tasks that require multiple tool calls. Higher values increase latency and token costs.
### Ground Responses in Your Own Data
To ground the model's responses in your own data rather than general knowledge, add a knowledge base.
The model evaluates each user query against your knowledge base descriptions and decides whether retrieval is needed—you don't need to mention knowledge bases in your prompt.
**The more detailed your knowledge base description, the better the model can determine relevance**, leading to more accurate and targeted retrieval.
#### Configure App-Level Retrieval Settings
To fine-tune how retrieval results are processed, click **Retrieval Setting**.
There are two layers of retrieval settings—the knowledge base level and the app level.
Think of them as two consecutive filters: the knowledge base settings determine the initial pool of results, and the app settings further rerank the results or narrow down the pool.
* **Rerank Settings**
* **Weighted Score**
The relative weight between semantic similarity and keyword matching during reranking. Higher semantic weight favors meaning relevance, while higher keyword weight favors exact matches.
Weighted Score is available only when all added knowledge bases are indexed with **High Quality** mode.
* **Rerank Model**
The rerank model to re-score and reorder all the results based on their relevance to the query.
If any multimodal knowledge bases are added, select a multimodal rerank model (marked with a **Vision** tag) as well. Otherwise, retrieved images will be excluded from reranking and the final output.
* **Top K**
The maximum number of top results to return after reranking.
When a rerank model is selected, this value will be automatically adjusted based on the model's maximum input capacity (how much text the model can process at once).
* **Score Threshold**
The minimum similarity score for returned results. Results scoring below this threshold are excluded. Use higher thresholds for stricter relevance or lower thresholds to include broader matches.
#### Search Within Specific Documents
By default, retrieval searches across the entire knowledge base. To restrict retrieval to specific documents, enable manual or automatic metadata filtering.
This improves retrieval precision, especially when your knowledge base is large or contains content for different contexts.
For creating and managing document metadata, see [Metadata](/en/use-dify/knowledge/metadata).
### Process Multimodal Inputs
To allow end users to upload files, select a model with the corresponding multimodal capabilities. The relevant file type toggles—**Vision**, **Audio**, or **Document**—appear once the model supports them, and you can enable each as needed.
You can quickly identify a model's supported modalities by its tags.
You can disable or remove added tools, and modify their configuration. If a tool requires authentication, select an existing credential or create a new one.
To change the default credential, go to **Tools** or **Plugins**.
#### Maximum Iterations
**Maximum Iterations** in **Agent Settings** limits how many times the model can repeat its reasoning-and-action cycle (think, call a tool, process the result) for a single request.
Increase this value for complex, multi-step tasks that require multiple tool calls. Higher values increase latency and token costs.
### Ground Responses in Your Own Data
To ground the model's responses in your own data rather than general knowledge, add a knowledge base.
The model evaluates each user query against your knowledge base descriptions and decides whether retrieval is needed—you don't need to mention knowledge bases in your prompt.
**The more detailed your knowledge base description, the better the model can determine relevance**, leading to more accurate and targeted retrieval.
#### Configure App-Level Retrieval Settings
To fine-tune how retrieval results are processed, click **Retrieval Setting**.
There are two layers of retrieval settings—the knowledge base level and the app level.
Think of them as two consecutive filters: the knowledge base settings determine the initial pool of results, and the app settings further rerank the results or narrow down the pool.
* **Rerank Settings**
* **Weighted Score**
The relative weight between semantic similarity and keyword matching during reranking. Higher semantic weight favors meaning relevance, while higher keyword weight favors exact matches.
Weighted Score is available only when all added knowledge bases are indexed with **High Quality** mode.
* **Rerank Model**
The rerank model to re-score and reorder all the results based on their relevance to the query.
If any multimodal knowledge bases are added, select a multimodal rerank model (marked with a **Vision** tag) as well. Otherwise, retrieved images will be excluded from reranking and the final output.
* **Top K**
The maximum number of top results to return after reranking.
When a rerank model is selected, this value will be automatically adjusted based on the model's maximum input capacity (how much text the model can process at once).
* **Score Threshold**
The minimum similarity score for returned results. Results scoring below this threshold are excluded. Use higher thresholds for stricter relevance or lower thresholds to include broader matches.
#### Search Within Specific Documents
By default, retrieval searches across the entire knowledge base. To restrict retrieval to specific documents, enable manual or automatic metadata filtering.
This improves retrieval precision, especially when your knowledge base is large or contains content for different contexts.
For creating and managing document metadata, see [Metadata](/en/use-dify/knowledge/metadata).
### Process Multimodal Inputs
To allow end users to upload files, select a model with the corresponding multimodal capabilities. The relevant file type toggles—**Vision**, **Audio**, or **Document**—appear once the model supports them, and you can enable each as needed.
You can quickly identify a model's supported modalities by its tags.
![Model Tags]() Click **Settings** under **Vision** to configure how files are accepted and processed. Upload settings apply across all enabled file types.
* **Resolution**: Controls the detail level for **image** processing only.
* **High**: Better accuracy for complex images but uses more tokens
* **Low**: Faster processing with fewer tokens for simple images
* **Upload Method**: Choose whether users can upload from their device, paste a URL, or both.
* **Upload Limit**: The maximum number of files a user can upload per message.
For self-hosted deployments, you can adjust file size limits via the following environment variables:
* `UPLOAD_IMAGE_FILE_SIZE_LIMIT` (default: 10 MB)
* `UPLOAD_FILE_SIZE_LIMIT` (default: 15 MB)
* `UPLOAD_AUDIO_FILE_SIZE_LIMIT` (default: 50 MB)
See [Environment Variables](/en/self-host/configuration/environments) for details.
## Debug & Preview
In the preview panel on the right, test your agent in real time. Select a model, type a message, and send it to see how the agent responds.
You can adjust a model's parameters to control how it generates responses. Available parameters and presets vary by model.
To compare outputs across different models, click **Debug as Multiple Models** to run up to 4 models simultaneously.
Click **Settings** under **Vision** to configure how files are accepted and processed. Upload settings apply across all enabled file types.
* **Resolution**: Controls the detail level for **image** processing only.
* **High**: Better accuracy for complex images but uses more tokens
* **Low**: Faster processing with fewer tokens for simple images
* **Upload Method**: Choose whether users can upload from their device, paste a URL, or both.
* **Upload Limit**: The maximum number of files a user can upload per message.
For self-hosted deployments, you can adjust file size limits via the following environment variables:
* `UPLOAD_IMAGE_FILE_SIZE_LIMIT` (default: 10 MB)
* `UPLOAD_FILE_SIZE_LIMIT` (default: 15 MB)
* `UPLOAD_AUDIO_FILE_SIZE_LIMIT` (default: 50 MB)
See [Environment Variables](/en/self-host/configuration/environments) for details.
## Debug & Preview
In the preview panel on the right, test your agent in real time. Select a model, type a message, and send it to see how the agent responds.
You can adjust a model's parameters to control how it generates responses. Available parameters and presets vary by model.
To compare outputs across different models, click **Debug as Multiple Models** to run up to 4 models simultaneously.
![Debug with Multiple Models]() We recommend selecting models that are strong at **reasoning** and **natively support tool calling**.
An agent needs to judge *when* to use a tool, *which tool* fits the task, and *how* to interpret the result—this depends on the model's reasoning ability. Models with built-in tool-call support also execute these decisions more reliably.
You can verify your model's tool-call support in **Agent Settings**, where the system automatically displays the agent mode:
* **Function Calling** for models with native support, meaning they can call tools directly.
* **ReAct** for others, so Dify guides them to use tools through a prompting strategy.
## Publish
When you're happy with the results, click **Publish** to make your app available. See [Publish](/en/use-dify/publish/README) for the full list of publishing options.
# Chatbot
Source: https://docs.dify.ai/en/use-dify/build/chatbot
The simplest way to build a conversational app with a model and a prompt
Chatbots are conversational apps where users interact with the model through a chat interface.
Use it for tasks that benefit from back-and-forth interaction but don't require tool calls or a multi-step workflow—for example, building an internal Q\&A assistant grounded in your team's knowledge base.
Chatbots keep up to 500 messages or 2,000 tokens of history per conversation. If either limit is exceeded, the oldest messages will be removed to make room for new ones.
Chatbots also support optional features like conversation openers, follow-up suggestions, and more. See [App Toolkit](/en/use-dify/build/additional-features) for details.
## Configure
### Write the Prompt
The prompt tells the model what to do, how to respond, and what constraints to follow. It shapes how the model behaves throughout the conversation, so think of it as defining a consistent persona rather than describing a one-off task.
Here are some tips for writing effective prompts:
* **Define the persona**: Describe who the model should act as and the tone it should use.
* **Specify the output format**: Describe the structure, length, or style you expect.
* **Set constraints**: Tell the model what to avoid or what rules to follow.
#### Create Dynamic Prompts with Variables
To adapt your chatbot to different users or contexts without rewriting the prompt each time, add variables to collect the necessary information upfront.
Variables are placeholders in the prompt—each one appears as an input field that users fill in before the conversation starts, and their values are injected into the prompt at runtime. Users can also update variable values mid-conversation, and the prompt will adjust accordingly.
For example, an onboarding assistant might use `role` and `language` to tailor its responses:
```text wrap theme={null}
You are an onboarding assistant for new {{role}} hires. Answer questions about company processes and policies. Keep answers friendly and concise, and respond in {{language}}.
```
While drafting the prompt, type `/` > **New Variable** to quickly insert a named placeholder. You can configure its details in the **Variables** section later.
Choose the variable type that matches the input you expect:
Accepts up to 256 characters. Use it for names, email addresses, titles, or any brief text input that fits on a single line.
Allows long-form text without length restrictions. It gives users a multi-line text area for detailed descriptions.
Displays a dropdown menu with predefined options.
Restricts input to numerical values only—ideal for quantities, ratings, IDs, or any data requiring mathematical processing.
Provides a simple yes/no option. When a user checks the box, the output is `true`; otherwise, it's `false`. Use it for confirmations or any case that requires a binary choice.
Fetches variable values from an external API at runtime instead of collecting them from users.
Use it when your prompt needs dynamic data from an external source, such as live weather conditions or database records. See [API Extension](/en/use-dify/workspace/api-extension/api-extension) for details.
**Label Name** is what end users see for each input field.
#### Generate or Improve the Prompt with AI
If you're unsure where to start or want to refine the existing prompt, click **Generate** to let an LLM help you draft it.
Describe what you want from scratch, or reference `current_prompt` and specify what to improve. For more targeted results, add an example in **Ideal Output**.
Each generation is saved as a version, so you can experiment and roll back freely.
### Ground Responses in Your Own Data
To ground the model's responses in your own data rather than general knowledge, add a knowledge base.
Each time a user sends a message, it is used as the search query to retrieve relevant content from the knowledge base, which is then injected into the prompt as context for the model.
#### Configure App-Level Retrieval Settings
To fine-tune how retrieval results are processed, click **Retrieval Setting**.
There are two layers of retrieval settings—the knowledge base level and the app level.
Think of them as two consecutive filters: the knowledge base settings determine the initial pool of results, and the app settings further rerank the results or narrow down the pool.
* **Rerank Settings**
* **Weighted Score**
The relative weight between semantic similarity and keyword matching during reranking. Higher semantic weight favors meaning relevance, while higher keyword weight favors exact matches.
Weighted Score is available only when all added knowledge bases are indexed with **High Quality** mode.
* **Rerank Model**
The rerank model to re-score and reorder all the results based on their relevance to the query.
If any multimodal knowledge bases are added, select a multimodal rerank model (marked with a **Vision** tag) as well. Otherwise, retrieved images will be excluded from reranking and the final output.
* **Top K**
The maximum number of top results to return after reranking.
When a rerank model is selected, this value will be automatically adjusted based on the model's maximum input capacity (how much text the model can process at once).
* **Score Threshold**
The minimum similarity score for returned results. Results scoring below this threshold are excluded. Use higher thresholds for stricter relevance or lower thresholds to include broader matches.
#### Search Within Specific Documents
By default, retrieval searches across the entire knowledge base. To restrict retrieval to specific documents, enable manual or automatic metadata filtering.
This improves retrieval precision, especially when your knowledge base is large or contains content for different contexts.
For creating and managing document metadata, see [Metadata](/en/use-dify/knowledge/metadata).
### Process Multimodal Inputs
To allow end users to upload files, select a model with the corresponding multimodal capabilities. The relevant file type toggles—**Vision**, **Audio**, or **Document**—appear once the model supports them, and you can enable each as needed.
You can quickly identify a model's supported modalities by its tags.
We recommend selecting models that are strong at **reasoning** and **natively support tool calling**.
An agent needs to judge *when* to use a tool, *which tool* fits the task, and *how* to interpret the result—this depends on the model's reasoning ability. Models with built-in tool-call support also execute these decisions more reliably.
You can verify your model's tool-call support in **Agent Settings**, where the system automatically displays the agent mode:
* **Function Calling** for models with native support, meaning they can call tools directly.
* **ReAct** for others, so Dify guides them to use tools through a prompting strategy.
## Publish
When you're happy with the results, click **Publish** to make your app available. See [Publish](/en/use-dify/publish/README) for the full list of publishing options.
# Chatbot
Source: https://docs.dify.ai/en/use-dify/build/chatbot
The simplest way to build a conversational app with a model and a prompt
Chatbots are conversational apps where users interact with the model through a chat interface.
Use it for tasks that benefit from back-and-forth interaction but don't require tool calls or a multi-step workflow—for example, building an internal Q\&A assistant grounded in your team's knowledge base.
Chatbots keep up to 500 messages or 2,000 tokens of history per conversation. If either limit is exceeded, the oldest messages will be removed to make room for new ones.
Chatbots also support optional features like conversation openers, follow-up suggestions, and more. See [App Toolkit](/en/use-dify/build/additional-features) for details.
## Configure
### Write the Prompt
The prompt tells the model what to do, how to respond, and what constraints to follow. It shapes how the model behaves throughout the conversation, so think of it as defining a consistent persona rather than describing a one-off task.
Here are some tips for writing effective prompts:
* **Define the persona**: Describe who the model should act as and the tone it should use.
* **Specify the output format**: Describe the structure, length, or style you expect.
* **Set constraints**: Tell the model what to avoid or what rules to follow.
#### Create Dynamic Prompts with Variables
To adapt your chatbot to different users or contexts without rewriting the prompt each time, add variables to collect the necessary information upfront.
Variables are placeholders in the prompt—each one appears as an input field that users fill in before the conversation starts, and their values are injected into the prompt at runtime. Users can also update variable values mid-conversation, and the prompt will adjust accordingly.
For example, an onboarding assistant might use `role` and `language` to tailor its responses:
```text wrap theme={null}
You are an onboarding assistant for new {{role}} hires. Answer questions about company processes and policies. Keep answers friendly and concise, and respond in {{language}}.
```
While drafting the prompt, type `/` > **New Variable** to quickly insert a named placeholder. You can configure its details in the **Variables** section later.
Choose the variable type that matches the input you expect:
Accepts up to 256 characters. Use it for names, email addresses, titles, or any brief text input that fits on a single line.
Allows long-form text without length restrictions. It gives users a multi-line text area for detailed descriptions.
Displays a dropdown menu with predefined options.
Restricts input to numerical values only—ideal for quantities, ratings, IDs, or any data requiring mathematical processing.
Provides a simple yes/no option. When a user checks the box, the output is `true`; otherwise, it's `false`. Use it for confirmations or any case that requires a binary choice.
Fetches variable values from an external API at runtime instead of collecting them from users.
Use it when your prompt needs dynamic data from an external source, such as live weather conditions or database records. See [API Extension](/en/use-dify/workspace/api-extension/api-extension) for details.
**Label Name** is what end users see for each input field.
#### Generate or Improve the Prompt with AI
If you're unsure where to start or want to refine the existing prompt, click **Generate** to let an LLM help you draft it.
Describe what you want from scratch, or reference `current_prompt` and specify what to improve. For more targeted results, add an example in **Ideal Output**.
Each generation is saved as a version, so you can experiment and roll back freely.
### Ground Responses in Your Own Data
To ground the model's responses in your own data rather than general knowledge, add a knowledge base.
Each time a user sends a message, it is used as the search query to retrieve relevant content from the knowledge base, which is then injected into the prompt as context for the model.
#### Configure App-Level Retrieval Settings
To fine-tune how retrieval results are processed, click **Retrieval Setting**.
There are two layers of retrieval settings—the knowledge base level and the app level.
Think of them as two consecutive filters: the knowledge base settings determine the initial pool of results, and the app settings further rerank the results or narrow down the pool.
* **Rerank Settings**
* **Weighted Score**
The relative weight between semantic similarity and keyword matching during reranking. Higher semantic weight favors meaning relevance, while higher keyword weight favors exact matches.
Weighted Score is available only when all added knowledge bases are indexed with **High Quality** mode.
* **Rerank Model**
The rerank model to re-score and reorder all the results based on their relevance to the query.
If any multimodal knowledge bases are added, select a multimodal rerank model (marked with a **Vision** tag) as well. Otherwise, retrieved images will be excluded from reranking and the final output.
* **Top K**
The maximum number of top results to return after reranking.
When a rerank model is selected, this value will be automatically adjusted based on the model's maximum input capacity (how much text the model can process at once).
* **Score Threshold**
The minimum similarity score for returned results. Results scoring below this threshold are excluded. Use higher thresholds for stricter relevance or lower thresholds to include broader matches.
#### Search Within Specific Documents
By default, retrieval searches across the entire knowledge base. To restrict retrieval to specific documents, enable manual or automatic metadata filtering.
This improves retrieval precision, especially when your knowledge base is large or contains content for different contexts.
For creating and managing document metadata, see [Metadata](/en/use-dify/knowledge/metadata).
### Process Multimodal Inputs
To allow end users to upload files, select a model with the corresponding multimodal capabilities. The relevant file type toggles—**Vision**, **Audio**, or **Document**—appear once the model supports them, and you can enable each as needed.
You can quickly identify a model's supported modalities by its tags.
![Model Tags]() Click **Settings** under **Vision** to configure how files are accepted and processed. Upload settings apply across all enabled file types.
* **Resolution**: Controls the detail level for **image** processing only.
* **High**: Better accuracy for complex images but uses more tokens
* **Low**: Faster processing with fewer tokens for simple images
* **Upload Method**: Choose whether users can upload from their device, paste a URL, or both.
* **Upload Limit**: The maximum number of files a user can upload per message.
For self-hosted deployments, you can adjust file size limits via the following environment variables:
* `UPLOAD_IMAGE_FILE_SIZE_LIMIT` (default: 10 MB)
* `UPLOAD_FILE_SIZE_LIMIT` (default: 15 MB)
* `UPLOAD_AUDIO_FILE_SIZE_LIMIT` (default: 50 MB)
See [Environment Variables](/en/self-host/configuration/environments) for details.
## Debug & Preview
In the preview panel on the right, test your chatbot in real time. Select a model that best fits your task, type a message, and send it to see how the model responds.
After selecting a model, you can adjust its parameters to control how it generates responses. Available parameters and presets vary by model.
To compare outputs across different models, click **Debug as Multiple Models** to run up to 4 models simultaneously.
Click **Settings** under **Vision** to configure how files are accepted and processed. Upload settings apply across all enabled file types.
* **Resolution**: Controls the detail level for **image** processing only.
* **High**: Better accuracy for complex images but uses more tokens
* **Low**: Faster processing with fewer tokens for simple images
* **Upload Method**: Choose whether users can upload from their device, paste a URL, or both.
* **Upload Limit**: The maximum number of files a user can upload per message.
For self-hosted deployments, you can adjust file size limits via the following environment variables:
* `UPLOAD_IMAGE_FILE_SIZE_LIMIT` (default: 10 MB)
* `UPLOAD_FILE_SIZE_LIMIT` (default: 15 MB)
* `UPLOAD_AUDIO_FILE_SIZE_LIMIT` (default: 50 MB)
See [Environment Variables](/en/self-host/configuration/environments) for details.
## Debug & Preview
In the preview panel on the right, test your chatbot in real time. Select a model that best fits your task, type a message, and send it to see how the model responds.
After selecting a model, you can adjust its parameters to control how it generates responses. Available parameters and presets vary by model.
To compare outputs across different models, click **Debug as Multiple Models** to run up to 4 models simultaneously.
![Debug with Multiple Models]() ## Publish
When you're happy with the results, click **Publish** to make your app available. See [Publish](/en/use-dify/publish/README) for the full list of publishing options.
# Using MCP Tools
Source: https://docs.dify.ai/en/use-dify/build/mcp
Connect external tools from [MCP servers](https://modelcontextprotocol.io/docs/getting-started/intro) to your Dify apps. Instead of just built-in tools, you can use tools from the growing [MCP ecosystem](https://mcpservers.org/).
This covers using MCP tools in Dify. To publish Dify apps as MCP servers, see [here](/en/use-dify/publish/publish-mcp).
Only supports MCP servers with [HTTP transport](https://modelcontextprotocol.io/docs/learn/architecture#transport-layer) right now.
## Adding MCP servers
Go to **Tools** → **MCP** in your workspace.
## Publish
When you're happy with the results, click **Publish** to make your app available. See [Publish](/en/use-dify/publish/README) for the full list of publishing options.
# Using MCP Tools
Source: https://docs.dify.ai/en/use-dify/build/mcp
Connect external tools from [MCP servers](https://modelcontextprotocol.io/docs/getting-started/intro) to your Dify apps. Instead of just built-in tools, you can use tools from the growing [MCP ecosystem](https://mcpservers.org/).
This covers using MCP tools in Dify. To publish Dify apps as MCP servers, see [here](/en/use-dify/publish/publish-mcp).
Only supports MCP servers with [HTTP transport](https://modelcontextprotocol.io/docs/learn/architecture#transport-layer) right now.
## Adding MCP servers
Go to **Tools** → **MCP** in your workspace.
![MCP Server List]() Click **Add MCP Server (HTTP)**:
Click **Add MCP Server (HTTP)**:
![MCP Add Server Dialog]() **Server URL**: Where the MCP server lives (like `https://api.notion.com/mcp`)
**Name & Icon**: Call it something useful. Dify tries to grab icons automatically.
**Server ID**: Unique identifier (lowercase, numbers, underscores, hyphens, max 24 chars)
Never change the server ID once you start using it. This will break any apps that use tools from this server.
## What happens next
Dify automatically:
1. Connects to the server
2. Handles any OAuth stuff
3. Gets the list of available tools
4. Makes them available in your app builder
You'll see a server card once it finds tools:
**Server URL**: Where the MCP server lives (like `https://api.notion.com/mcp`)
**Name & Icon**: Call it something useful. Dify tries to grab icons automatically.
**Server ID**: Unique identifier (lowercase, numbers, underscores, hyphens, max 24 chars)
Never change the server ID once you start using it. This will break any apps that use tools from this server.
## What happens next
Dify automatically:
1. Connects to the server
2. Handles any OAuth stuff
3. Gets the list of available tools
4. Makes them available in your app builder
You'll see a server card once it finds tools:
![MCP Server Card]() ## Managing servers
Click any server card to:
**Update Tools**: Refresh when the external service adds new tools
## Managing servers
Click any server card to:
**Update Tools**: Refresh when the external service adds new tools
![MCP Server Tools List]() **Re-authorize**: Fix auth when tokens expire
**Edit Settings**: Change server details (but not the ID!)
**Remove**: Disconnect the server (this breaks apps using its tools)
## Using MCP tools
Once connected, MCP tools show up everywhere you'd expect:
**In agents**: Tools appear grouped by server ("Notion MCP » Create Page")
**In workflows**: MCP tools become available as nodes
**In agent nodes**: Same as regular agents
## Customizing tools
When you add an MCP tool, you can customize it:
**Re-authorize**: Fix auth when tokens expire
**Edit Settings**: Change server details (but not the ID!)
**Remove**: Disconnect the server (this breaks apps using its tools)
## Using MCP tools
Once connected, MCP tools show up everywhere you'd expect:
**In agents**: Tools appear grouped by server ("Notion MCP » Create Page")
**In workflows**: MCP tools become available as nodes
**In agent nodes**: Same as regular agents
## Customizing tools
When you add an MCP tool, you can customize it:
![MCP Tool Settings]() **Description**: Override the default description to be more specific
**Parameters**: For each tool parameter, choose:
* **Auto**: Let the AI decide the value
* **Fixed**: Set a specific value that never changes
**Example**: For a search tool, set `numResults` to 5 (fixed) but keep `query` on auto.
## Sharing apps
When you export apps that use MCP tools:
* The export includes server IDs
* To use the app elsewhere, add the same servers with identical IDs
* Document which MCP servers your app needs
## Troubleshooting
**"Unconfigured Server"**: Check the URL and re-authorize
**Missing tools**: Hit "Update Tools"
**Broken apps**: You probably changed a server ID. Add it back with the original ID.
## Tips
* Use permanent, descriptive server IDs like `github-prod` or `crm-system`
* Keep the same MCP setup across dev/staging/production
* Set fixed values for config stuff, auto for dynamic inputs
* Test MCP integrations before deploying
# Flow Logic
Source: https://docs.dify.ai/en/use-dify/build/orchestrate-node
## Serial vs. Parallel execution
Flows execute differently depending on how you connect the nodes.
When you connect nodes one after another, they execute in sequence. Each node waits for the previous one to finish before starting. Each node may use variables from any node that ran before it in the chain.

When you connect multiple nodes to the same starting node, they all run at the same time. Nodes may not reference parallel node outputs.
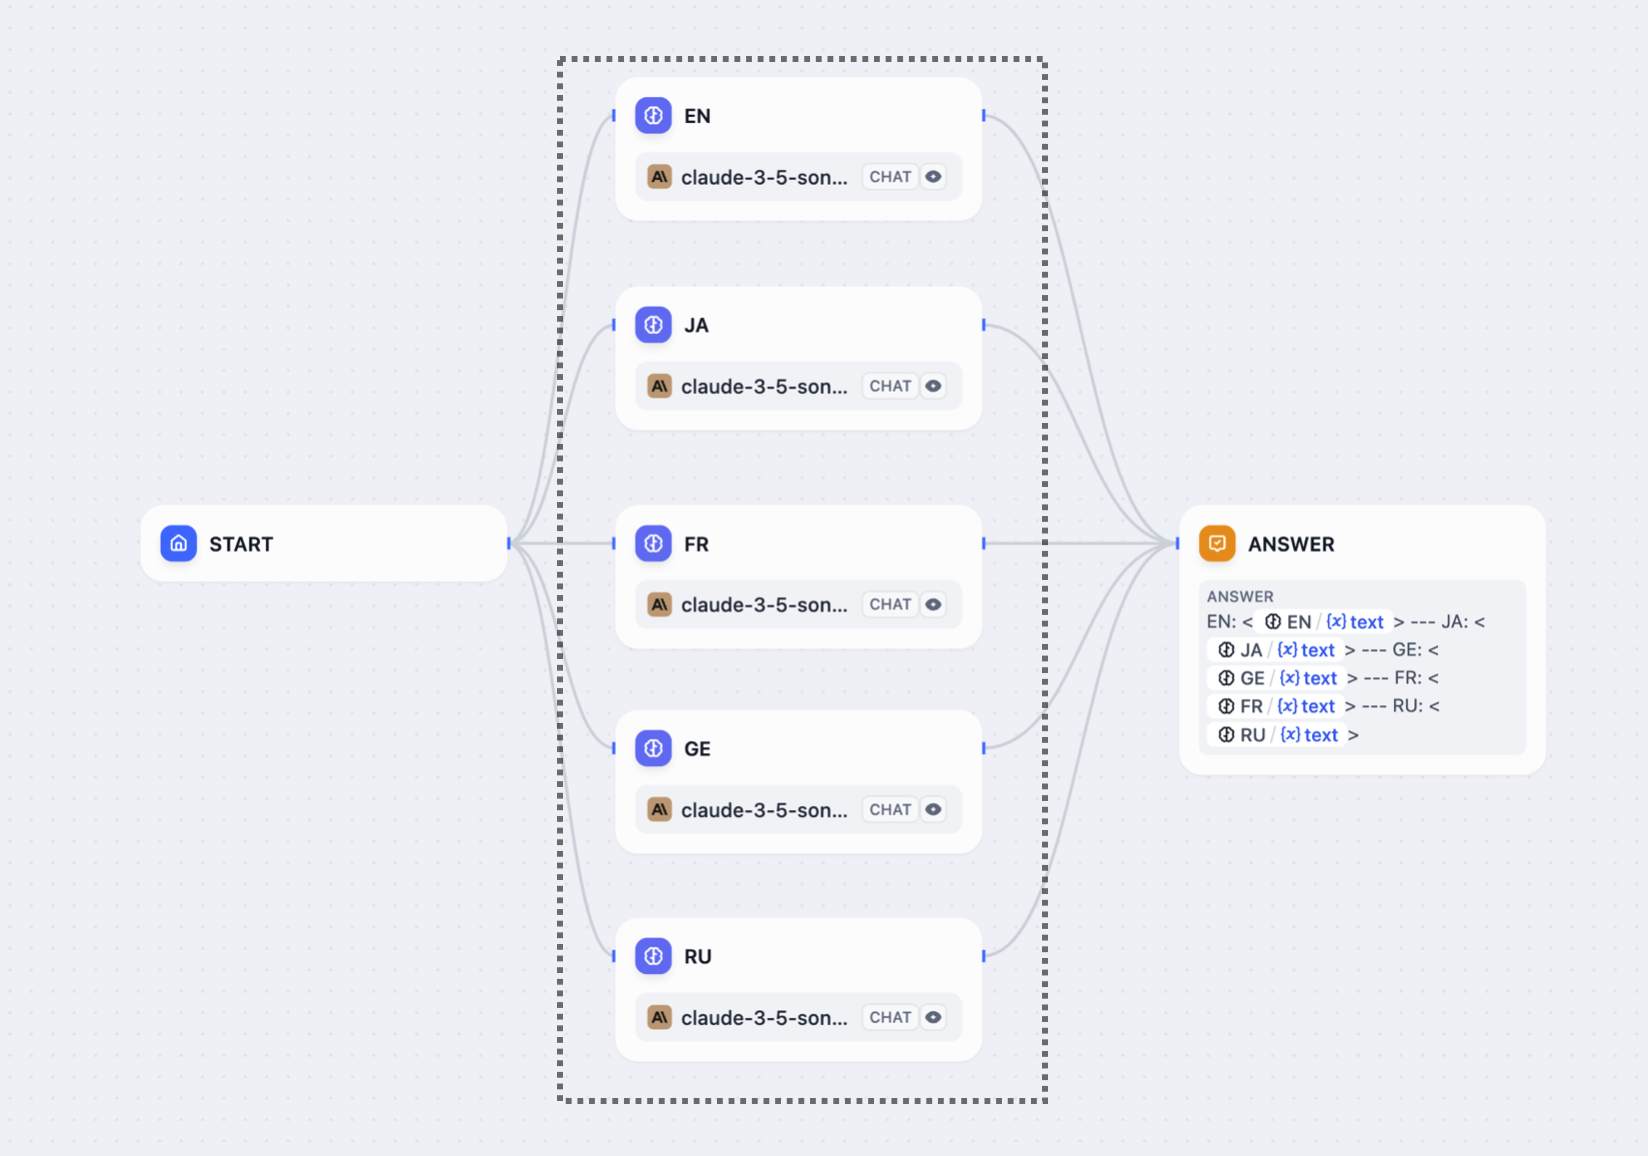
You can have a maximum of 10 parallel branches from one node, and up to 3 levels of nested parallel structures.
## Variable access
In serial flows, nodes can access variables from any previous node in the chain.
In parallel flows, nodes can access variables from nodes that ran before the parallel split, but they cannot access variables from other parallel nodes since they're running simultaneously.
After parallel branches finish, downstream nodes can access variables from all the parallel outputs.
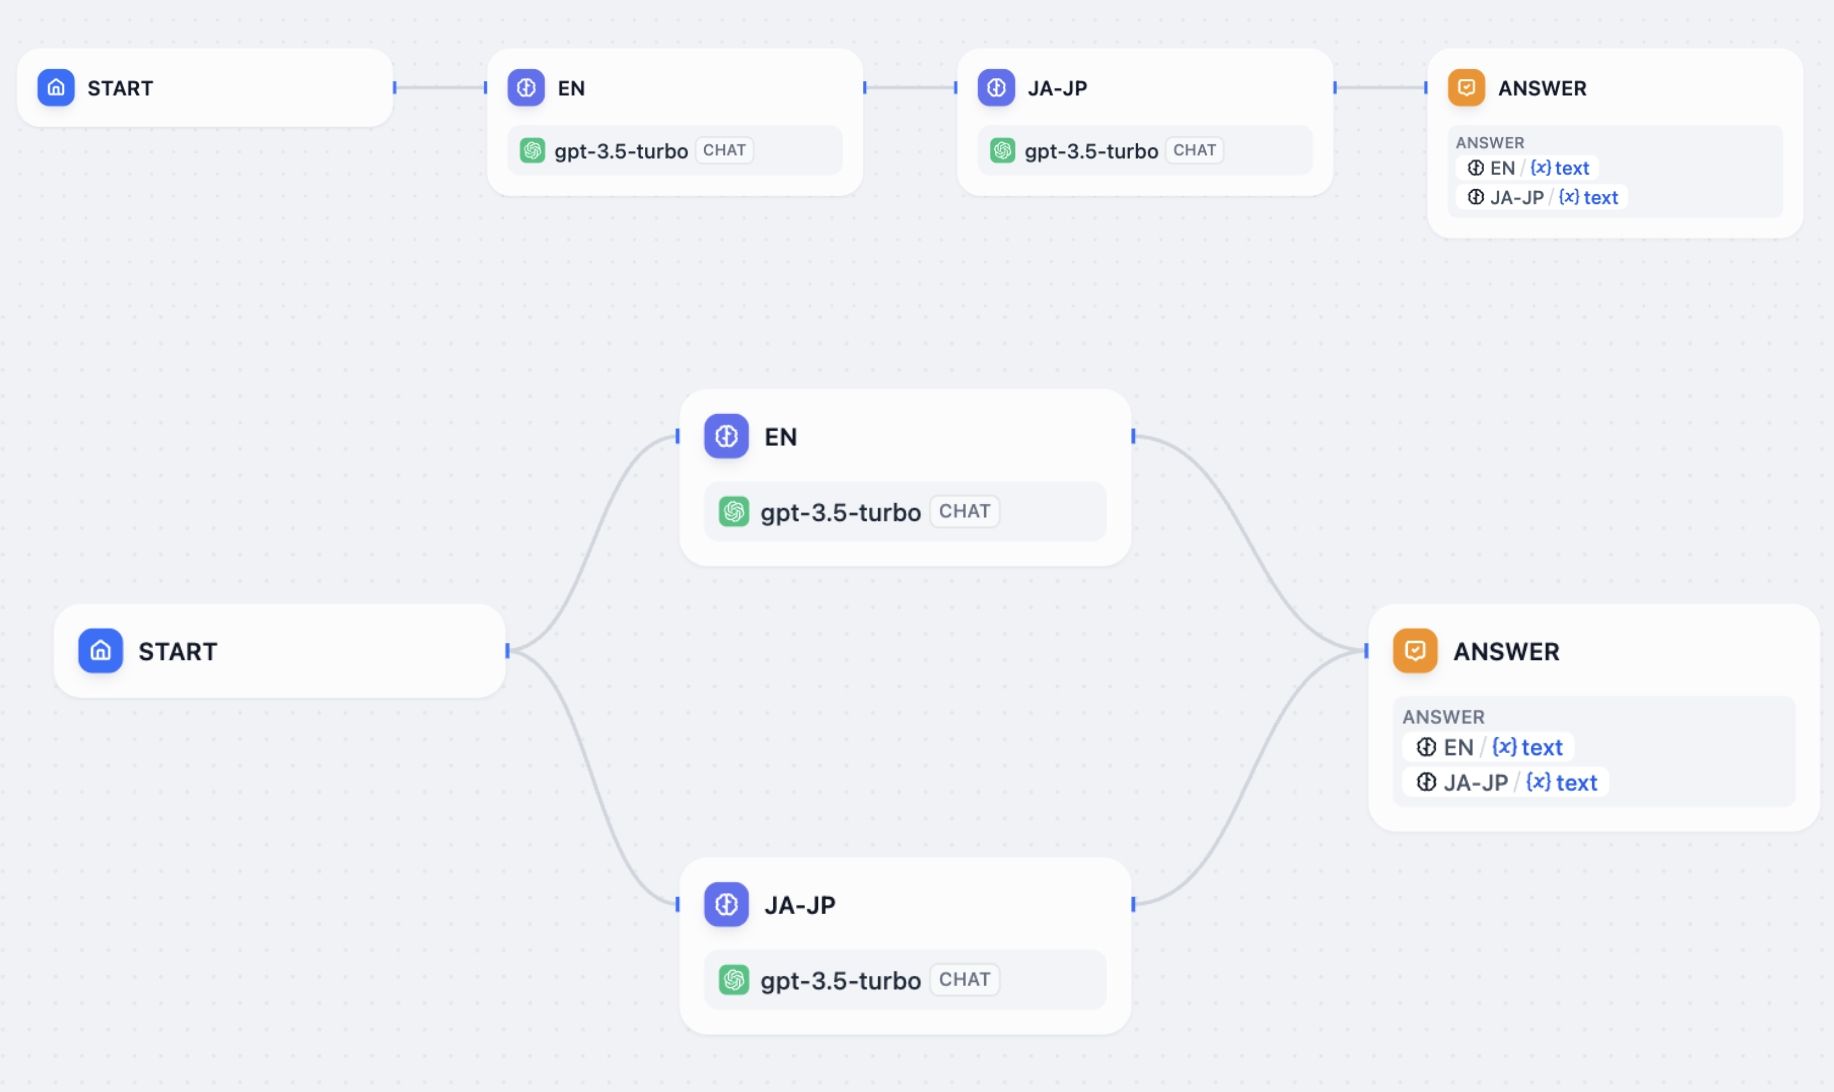
## Answer node streaming
Answer nodes handle parallel outputs differently. When an Answer node references variables from multiple parallel branches, it streams content progressively:
* Content streams up to the first unresolved variable
* Once that variable's node completes, streaming continues to the next unresolved variable
* The order of variables in the Answer node determines the streaming sequence, not the node execution order
For example, in a flow where `Node A -> Node B -> Answer` with the Answer containing `{{B}}` then `{{A}}`, the Answer will wait for Node B before streaming any content, even if Node A completes first.
# Handling Errors
Source: https://docs.dify.ai/en/use-dify/build/predefined-error-handling-logic
[LLM](/en/use-dify/nodes/llm), [HTTP](/en/use-dify/nodes/http-request), [Code](/en/use-dify/nodes/code), and [Tool](/en/use-dify/nodes/tools)
nodes support error handling out-of-box. When a node fails, it can take one of the three behaviors below:
The default behavior. When a node fails, the whole workflow stops. You get the original error message.
Use this when:
* You're testing and want to see what broke
* The workflow can't continue without this step
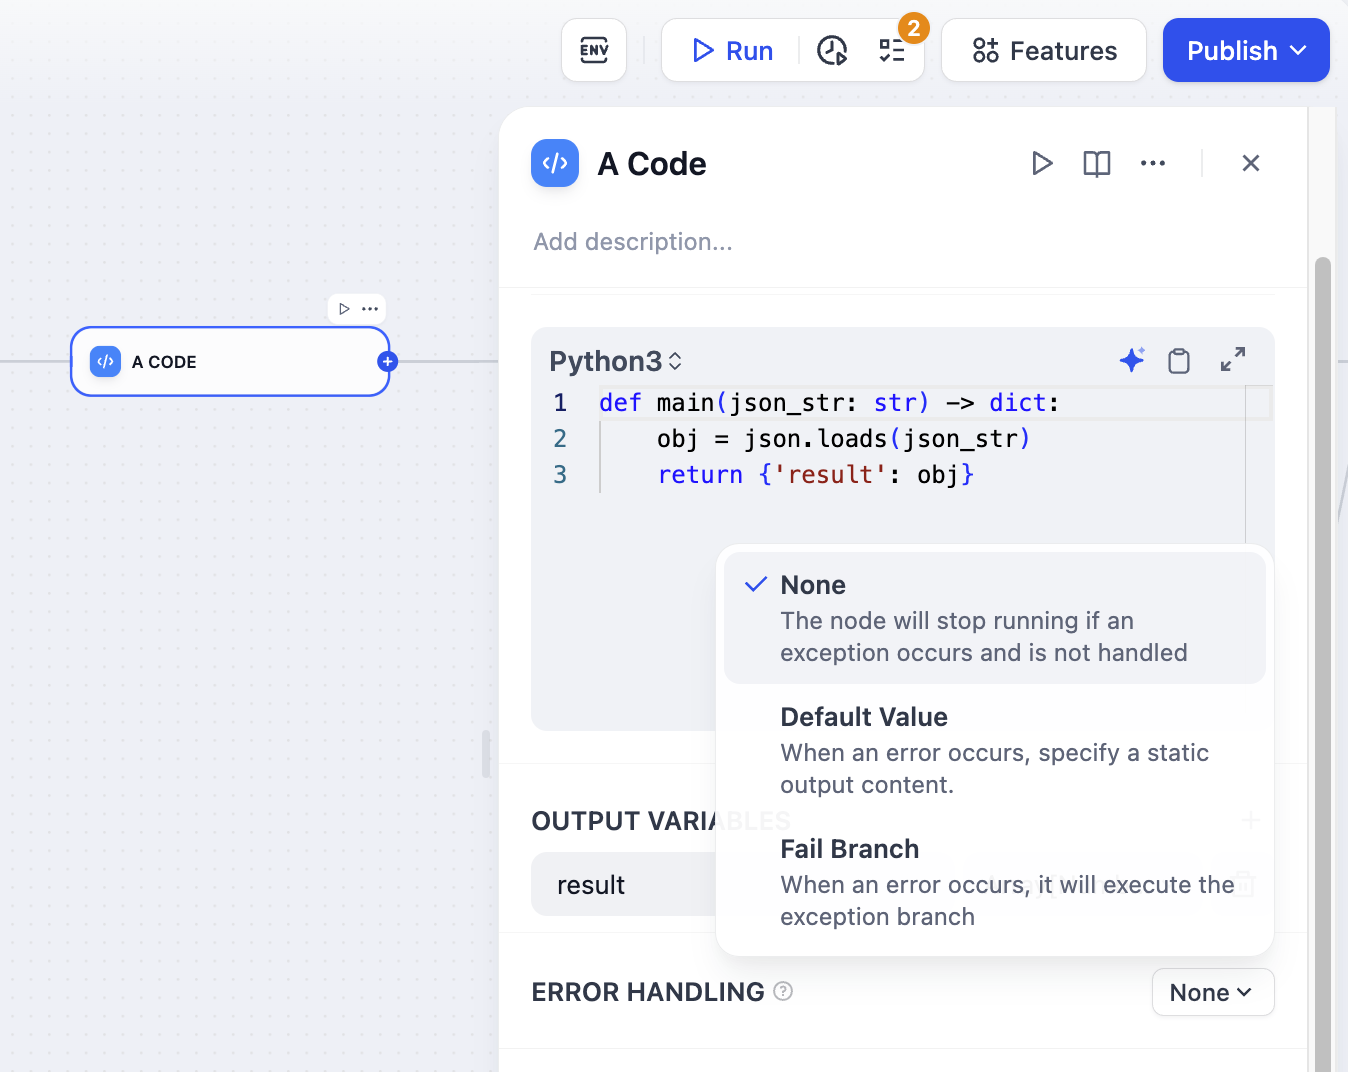
When a node fails, use a backup value instead. The workflow keeps running.

**Requirements**
* The default value must match the node's output type -- if it outputs a string, your default must be a string.
**Example**
Your LLM node normally returns analysis, but sometimes it fails due to rate limits. Set a default value like:
```
"Sorry, I'm temporarily unavailable. Please try again in a few minutes."
```
Now users get a helpful message instead of a broken workflow.
When a node fails, trigger a separate flow to handle the error.
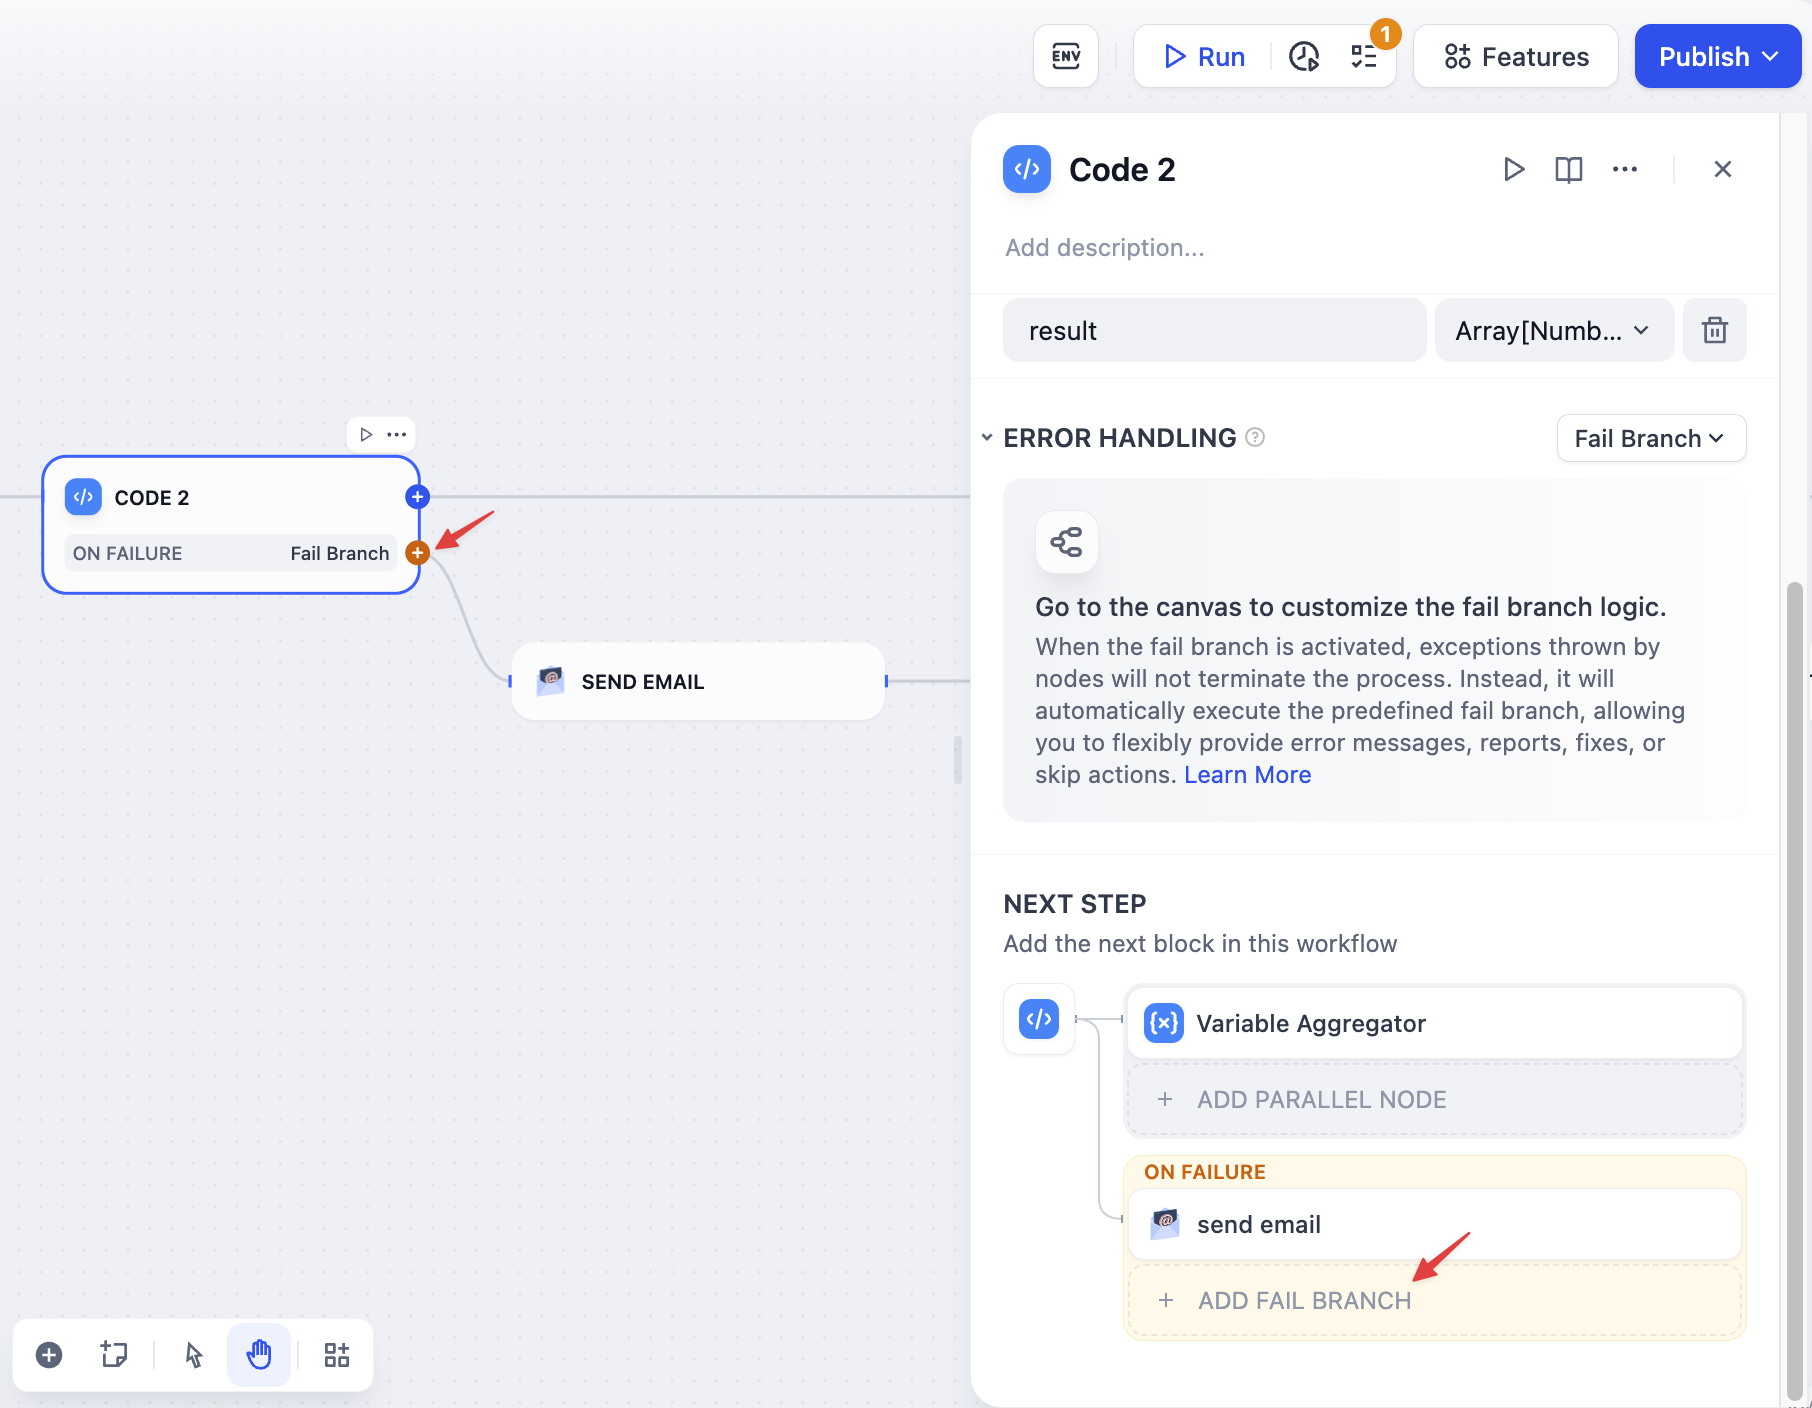
The fail branch is highlighted in orange. You can:
* Send error notifications
* Try a different approach
* Log the error for debugging
* Use a backup service
**Example**
Your main API fails, so the fail branch calls a backup API instead. Users never know there was a problem.
## Error in Loop/Iteration Nodes
When child nodes fail inside loops and iterations, these control flow nodes have their own error behaviors.
**Loop nodes** always stop immediately when any child node fails. The entire loop terminates and returns the error, preventing any further iterations from running.
**Iteration nodes** let you choose how to handle child node failures through the error handling mode setting:
* `terminated` - Stops processing immediately when any item fails (default)
* `continue-on-error` - Skips the failed item and continues with the next one
* `remove-abnormal-output` - Continues processing but filters out failed items from the final output
When you set an iteration to `continue-on-error`, failed items return `null` in the output array. When you use `remove-abnormal-output`, the output array only contains successful results, making it shorter than the input array.
## Error variables
When using default value or fail branch, you get two special variables:
* `error_type` - What kind of error happened (see [Error Types](/en/use-dify/debug/error-type))
* `error_message` - The actual error details
Use these to:
* Show users helpful messages
* Send alerts to your team
* Choose different recovery strategies
* Log errors for debugging
**Example**
```
{% if error_type == "rate_limit" %}
Too many requests. Please wait a moment and try again.
{% else %}
Something went wrong. Our team has been notified.
{% endif %}
```
# Hotkeys
Source: https://docs.dify.ai/en/use-dify/build/shortcut-key
Speed up your workflow building with keyboard shortcuts.
**[Go to Anything](/en/use-dify/build/goto-anything)**: Press `Cmd+K` (macOS) or `Ctrl+K` (Windows) anywhere in Dify to search and jump to everything—apps, plugins, knowledge bases, even workflow nodes. Use slash commands like `/theme` to change appearance, `/language` to switch languages, or `/help` to access documentation.
**Description**: Override the default description to be more specific
**Parameters**: For each tool parameter, choose:
* **Auto**: Let the AI decide the value
* **Fixed**: Set a specific value that never changes
**Example**: For a search tool, set `numResults` to 5 (fixed) but keep `query` on auto.
## Sharing apps
When you export apps that use MCP tools:
* The export includes server IDs
* To use the app elsewhere, add the same servers with identical IDs
* Document which MCP servers your app needs
## Troubleshooting
**"Unconfigured Server"**: Check the URL and re-authorize
**Missing tools**: Hit "Update Tools"
**Broken apps**: You probably changed a server ID. Add it back with the original ID.
## Tips
* Use permanent, descriptive server IDs like `github-prod` or `crm-system`
* Keep the same MCP setup across dev/staging/production
* Set fixed values for config stuff, auto for dynamic inputs
* Test MCP integrations before deploying
# Flow Logic
Source: https://docs.dify.ai/en/use-dify/build/orchestrate-node
## Serial vs. Parallel execution

Flows execute differently depending on how you connect the nodes.
When you connect nodes one after another, they execute in sequence. Each node waits for the previous one to finish before starting. Each node may use variables from any node that ran before it in the chain.

When you connect multiple nodes to the same starting node, they all run at the same time. Nodes may not reference parallel node outputs.

You can have a maximum of 10 parallel branches from one node, and up to 3 levels of nested parallel structures.
## Variable access
In serial flows, nodes can access variables from any previous node in the chain.
In parallel flows, nodes can access variables from nodes that ran before the parallel split, but they cannot access variables from other parallel nodes since they're running simultaneously.
After parallel branches finish, downstream nodes can access variables from all the parallel outputs.
## Answer node streaming
Answer nodes handle parallel outputs differently. When an Answer node references variables from multiple parallel branches, it streams content progressively:
* Content streams up to the first unresolved variable
* Once that variable's node completes, streaming continues to the next unresolved variable
* The order of variables in the Answer node determines the streaming sequence, not the node execution order
For example, in a flow where `Node A -> Node B -> Answer` with the Answer containing `{{B}}` then `{{A}}`, the Answer will wait for Node B before streaming any content, even if Node A completes first.
# Handling Errors
Source: https://docs.dify.ai/en/use-dify/build/predefined-error-handling-logic

[LLM](/en/use-dify/nodes/llm), [HTTP](/en/use-dify/nodes/http-request), [Code](/en/use-dify/nodes/code), and [Tool](/en/use-dify/nodes/tools)
nodes support error handling out-of-box. When a node fails, it can take one of the three behaviors below:
The default behavior. When a node fails, the whole workflow stops. You get the original error message.
Use this when:
* You're testing and want to see what broke
* The workflow can't continue without this step
When a node fails, use a backup value instead. The workflow keeps running.

**Requirements**
* The default value must match the node's output type -- if it outputs a string, your default must be a string.
**Example**
Your LLM node normally returns analysis, but sometimes it fails due to rate limits. Set a default value like:
```
"Sorry, I'm temporarily unavailable. Please try again in a few minutes."
```
Now users get a helpful message instead of a broken workflow.
When a node fails, trigger a separate flow to handle the error.

The fail branch is highlighted in orange. You can:
* Send error notifications
* Try a different approach
* Log the error for debugging
* Use a backup service
**Example**
Your main API fails, so the fail branch calls a backup API instead. Users never know there was a problem.
## Error in Loop/Iteration Nodes
When child nodes fail inside loops and iterations, these control flow nodes have their own error behaviors.
**Loop nodes** always stop immediately when any child node fails. The entire loop terminates and returns the error, preventing any further iterations from running.
**Iteration nodes** let you choose how to handle child node failures through the error handling mode setting:
* `terminated` - Stops processing immediately when any item fails (default)
* `continue-on-error` - Skips the failed item and continues with the next one
* `remove-abnormal-output` - Continues processing but filters out failed items from the final output
When you set an iteration to `continue-on-error`, failed items return `null` in the output array. When you use `remove-abnormal-output`, the output array only contains successful results, making it shorter than the input array.
## Error variables
When using default value or fail branch, you get two special variables:
* `error_type` - What kind of error happened (see [Error Types](/en/use-dify/debug/error-type))
* `error_message` - The actual error details
Use these to:
* Show users helpful messages
* Send alerts to your team
* Choose different recovery strategies
* Log errors for debugging
**Example**
```
{% if error_type == "rate_limit" %}
Too many requests. Please wait a moment and try again.
{% else %}
Something went wrong. Our team has been notified.
{% endif %}
```
# Hotkeys
Source: https://docs.dify.ai/en/use-dify/build/shortcut-key
Speed up your workflow building with keyboard shortcuts.
**[Go to Anything](/en/use-dify/build/goto-anything)**: Press `Cmd+K` (macOS) or `Ctrl+K` (Windows) anywhere in Dify to search and jump to everything—apps, plugins, knowledge bases, even workflow nodes. Use slash commands like `/theme` to change appearance, `/language` to switch languages, or `/help` to access documentation.
![Command+K Search Interface]() ## Node operations
With any selected node(s) on canvas:
## Node operations
With any selected node(s) on canvas:
| Windows |
macOS |
Action |
Ctrl + C |
Cmd + C |
Copy nodes |
Ctrl + V |
Cmd + V |
Paste nodes |
Ctrl + D |
Cmd + D |
Duplicate nodes |
Delete |
Delete |
Delete selected nodes |
Ctrl + O |
Cmd + O |
Auto-arrange nodes |
Shift |
Shift |
Visualize variable dependencies (single node only) |
## Canvas navigation
| Windows |
macOS |
Action |
Ctrl + 1 |
Cmd + 1 |
Fit to view |
Ctrl + - |
Cmd + - |
Zoom out |
Ctrl + = |
Cmd + = |
Zoom in |
Shift + 1 |
Shift + 1 |
Reset to 100% |
Shift + 5 |
Shift + 5 |
Set to 50% |
H |
H |
Hand tool (pan) |
V |
V |
Select tool |
## History
| Windows |
macOS |
Action |
Ctrl + Z |
Cmd + Z |
Undo |
Ctrl + Y |
Cmd + Y |
Redo |
Ctrl + Shift + Z |
Cmd + Shift + Z |
Redo |
## Testing
| Windows |
macOS |
Action |
Alt + R |
Option + R |
Run workflow |
# Text Generator
Source: https://docs.dify.ai/en/use-dify/build/text-generator
Simple single-turn apps for generating text from a prompt and user inputs
Text Generators are simple single-turn apps: you write a prompt, provide inputs, and the model generates a response.
It's a good fit for tasks that don't require multi-turn conversation, tool calls, or a multi-step workflow. Just a clear input, one model call, and a ready-to-use output.
Text Generators support optional features like generating multiple outputs at once, text to speech, and content moderation. See [App Toolkit](/en/use-dify/build/additional-features) for details.
## Configure
### Write the Prompt
The prompt tells the model what to do, how to respond, and what constraints to follow.
Since a Text Generator runs in a single turn with no conversation history, the prompt is the model's only source of context—include everything it needs to produce the right output in one pass.
Here are some tips for writing effective prompts:
* **Define the task clearly**: State what the model should produce (e.g., a translation, a summary, a SQL statement).
* **Specify the output format**: Describe the structure, length, or style you expect.
* **Set constraints**: Tell the model what to avoid or what rules to follow.
Because a Text Generator always requires user input to run, a paragraph-type `query` variable is automatically inserted into the prompt when you create a new app. You can rename `query` or change its type.
Variables are placeholders—each one becomes an input field that users fill in before running the app, and their values are substituted into the prompt at runtime. For example:
```text wrap theme={null}
You are a professional editor. Summarize the following text into 3 concise bullet points. Use neutral tone and avoid adding information not present in the original text.
{{query}}
```
While drafting the prompt, type `/` > **New Variable** to quickly insert a named placeholder. You can configure its details in the **Variables** section later.
Choose the variable type that matches the input you expect:
Accepts up to 256 characters. Use it for names, email addresses, titles, or any brief text input that fits on a single line.
Allows long-form text without length restrictions. It gives users a multi-line text area for detailed descriptions.
Displays a dropdown menu with predefined options.
Restricts input to numerical values only—ideal for quantities, ratings, IDs, or any data requiring mathematical processing.
Provides a simple yes/no option. When a user checks the box, the output is `true`; otherwise, it's `false`. Use it for confirmations or any case that requires a binary choice.
Fetches variable values from an external API at runtime instead of collecting them from users.
Use it when your prompt needs dynamic data from an external source, such as live weather conditions or database records. See [API Extension](/en/use-dify/workspace/api-extension/api-extension) for details.
**Label Name** is what end users see for each input field.
#### Create Dynamic Prompts with Variables
To adapt your app to different users or contexts without rewriting the prompt each time, add more variables.
Each variable collects a specific piece of information upfront and injects it into the prompt at runtime.
For example, an SQL generator might use `database_type` to adapt the output dialect while `query` captures the user's natural language request:
```text wrap theme={null}
You are an SQL generator. Translate the following natural language query into a {{database_type}} SQL statement: {{query}}
```
#### Generate or Improve the Prompt with AI
If you're unsure where to start or want to refine the existing prompt, click **Generate** to let an LLM help you draft it.
Describe what you want from scratch, or reference `current_prompt` and specify what to improve. For more targeted results, add an example in **Ideal Output**.
Each generation is saved as a version, so you can experiment and roll back freely.
### Ground Responses in Your Own Data
To ground the model's responses in your own data rather than general knowledge, add a knowledge base and select an existing variable as the **Query Variable**.
When a user runs the app and fills in that field, its value is used as the search query to retrieve relevant content from the knowledge base. The retrieved content is then injected into the prompt as context, so the model can generate a more informed response.
For example, suppose your knowledge base contains style guides for different content types—blog posts, social media captions, product descriptions, and so on.
In a content writing app, set `content_type` as the **Query Variable**. When a user selects a content type, the app retrieves the matching style guide and generates copy that follows the corresponding writing standards.
Your prompt might look like this:
```text wrap theme={null}
You are a brand content writer. Write a {{content_type}} based on the following brief: {{brief}}
Follow the style and tone guidelines provided in the context.
```
#### Configure App-Level Retrieval Settings
To fine-tune how retrieval results are processed, click **Retrieval Setting**.
There are two layers of retrieval settings—the knowledge base level and the app level.
Think of them as two consecutive filters: the knowledge base settings determine the initial pool of results, and the app settings further rerank the results or narrow down the pool.
* **Rerank Settings**
* **Weighted Score**
The relative weight between semantic similarity and keyword matching during reranking. Higher semantic weight favors meaning relevance, while higher keyword weight favors exact matches.
Weighted Score is available only when all added knowledge bases are indexed with **High Quality** mode.
* **Rerank Model**
The rerank model to re-score and reorder all the results based on their relevance to the query.
If any multimodal knowledge bases are added, select a multimodal rerank model (marked with a **Vision** tag) as well. Otherwise, retrieved images will be excluded from reranking and the final output.
* **Top K**
The maximum number of top results to return after reranking.
When a rerank model is selected, this value will be automatically adjusted based on the model's maximum input capacity (how much text the model can process at once).
* **Score Threshold**
The minimum similarity score for returned results. Results scoring below this threshold are excluded. Use higher thresholds for stricter relevance or lower thresholds to include broader matches.
#### Search Within Specific Documents
By default, retrieval searches across the entire knowledge base. To restrict retrieval to specific documents, enable manual or automatic metadata filtering.
This improves retrieval precision, especially when your knowledge base is large or contains content for different contexts.
For creating and managing document metadata, see [Metadata](/en/use-dify/knowledge/metadata).
### Process Multimodal Inputs
To allow end users to upload files, select a model with the corresponding multimodal capabilities. The relevant file type toggles—**Vision**, **Audio**, or **Document**—appear once the model supports them, and you can enable each as needed.
You can quickly identify a model's supported modalities by its tags.
![Model Tags]() Click **Settings** under **Vision** to configure how files are accepted and processed. Upload settings apply across all enabled file types.
* **Resolution**: Controls the detail level for **image** processing only.
* **High**: Better accuracy for complex images but uses more tokens
* **Low**: Faster processing with fewer tokens for simple images
* **Upload Method**: Choose whether users can upload from their device, paste a URL, or both.
* **Upload Limit**: The maximum number of files a user can upload per run.
For self-hosted deployments, you can adjust file size limits via the following environment variables:
* `UPLOAD_IMAGE_FILE_SIZE_LIMIT` (default: 10 MB)
* `UPLOAD_FILE_SIZE_LIMIT` (default: 15 MB)
* `UPLOAD_AUDIO_FILE_SIZE_LIMIT` (default: 50 MB)
See [Environment Variables](/en/self-host/configuration/environments) for details.
## Debug & Preview
In the preview panel on the right, test your app in real time. Select a model that best fits your task, fill in the input fields, and click **Run** to see the output.
After selecting a model, you can adjust its parameters to control how it generates responses. Available parameters and presets vary by model.
To compare outputs across different models, click **Debug as Multiple Models** to run up to 4 models simultaneously.
Click **Settings** under **Vision** to configure how files are accepted and processed. Upload settings apply across all enabled file types.
* **Resolution**: Controls the detail level for **image** processing only.
* **High**: Better accuracy for complex images but uses more tokens
* **Low**: Faster processing with fewer tokens for simple images
* **Upload Method**: Choose whether users can upload from their device, paste a URL, or both.
* **Upload Limit**: The maximum number of files a user can upload per run.
For self-hosted deployments, you can adjust file size limits via the following environment variables:
* `UPLOAD_IMAGE_FILE_SIZE_LIMIT` (default: 10 MB)
* `UPLOAD_FILE_SIZE_LIMIT` (default: 15 MB)
* `UPLOAD_AUDIO_FILE_SIZE_LIMIT` (default: 50 MB)
See [Environment Variables](/en/self-host/configuration/environments) for details.
## Debug & Preview
In the preview panel on the right, test your app in real time. Select a model that best fits your task, fill in the input fields, and click **Run** to see the output.
After selecting a model, you can adjust its parameters to control how it generates responses. Available parameters and presets vary by model.
To compare outputs across different models, click **Debug as Multiple Models** to run up to 4 models simultaneously.
![Debug with Multiple Models]() ## Publish
When you're happy with the results, click **Publish** to make your app available. See [Publish](/en/use-dify/publish/README) for the full list of publishing options.
When running the web app, end users can save individual outputs for future reference.
## Publish
When you're happy with the results, click **Publish** to make your app available. See [Publish](/en/use-dify/publish/README) for the full list of publishing options.
When running the web app, end users can save individual outputs for future reference.
![Save Output]() # Version Control
Source: https://docs.dify.ai/en/use-dify/build/version-control
Track changes and manage versions in Chatflow and Workflow apps.
Only available for Chatflow and Workflow apps right now.
## How it works
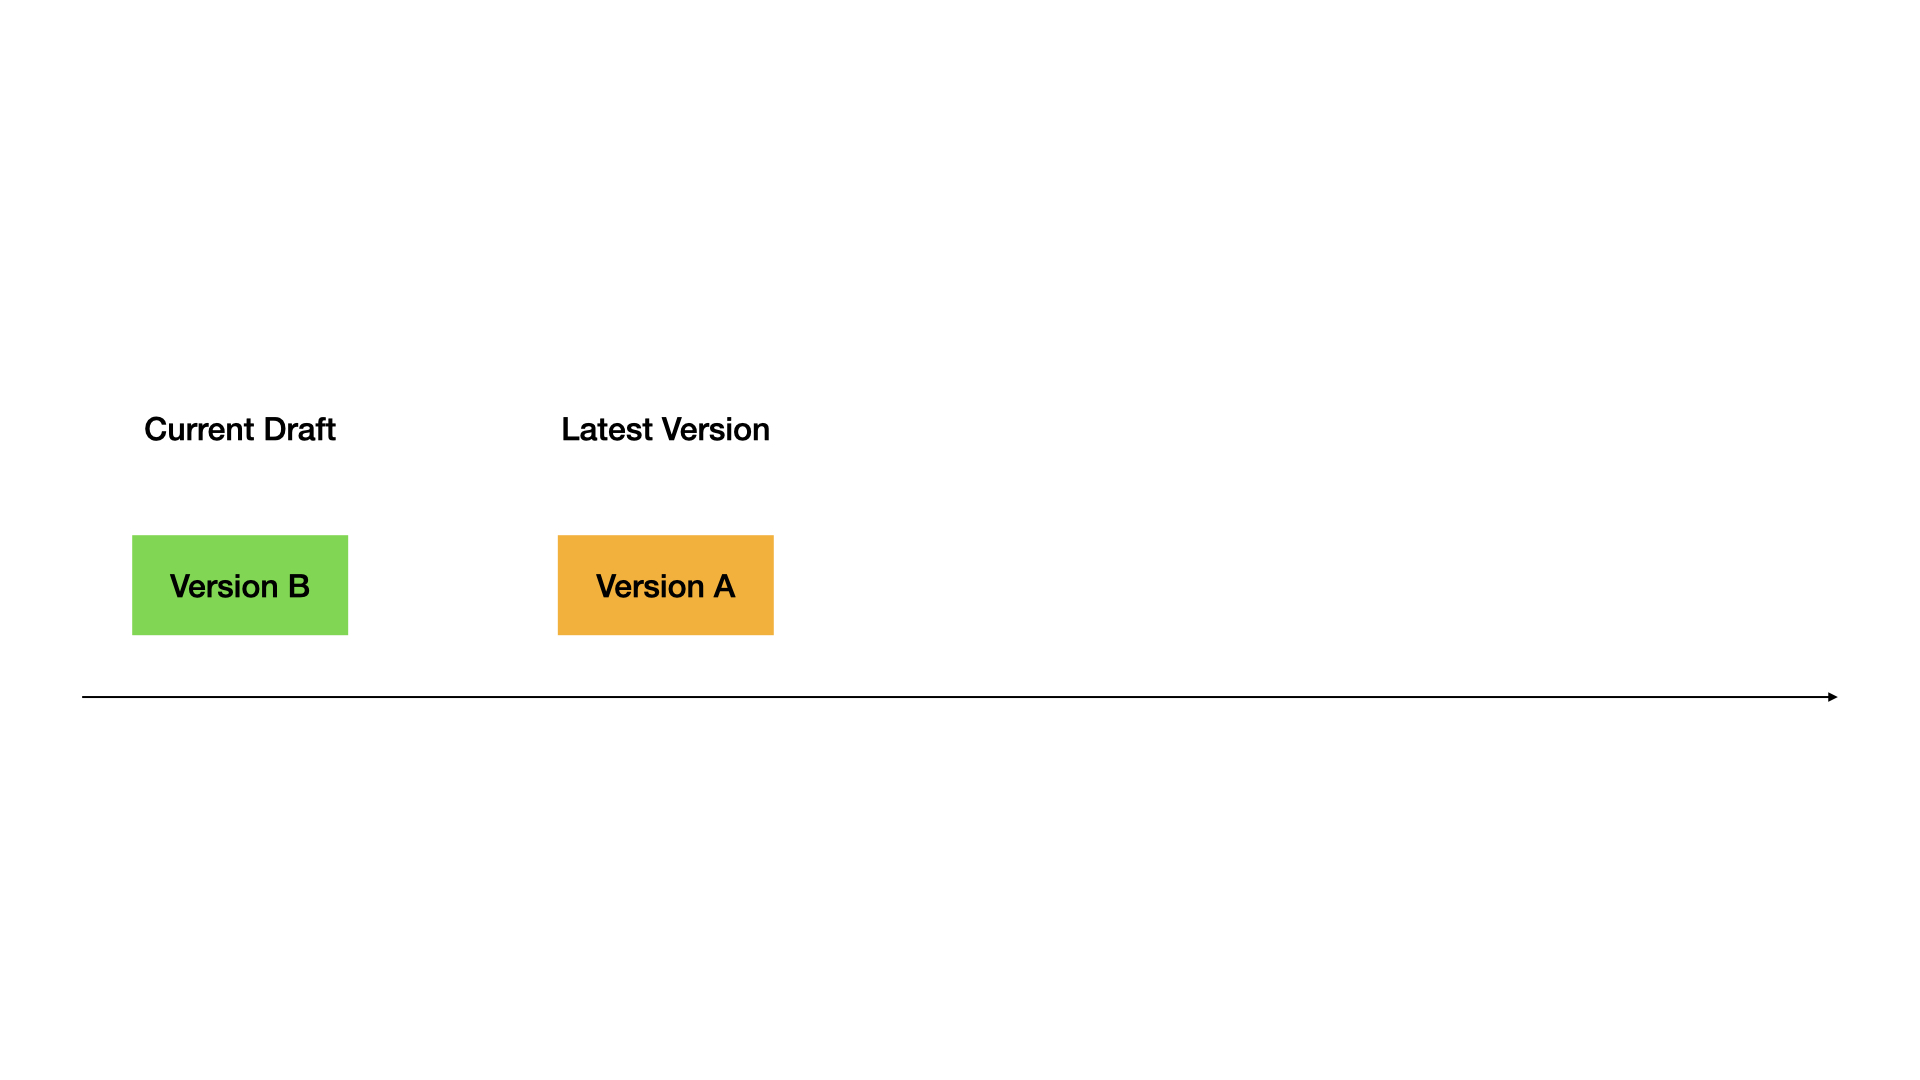
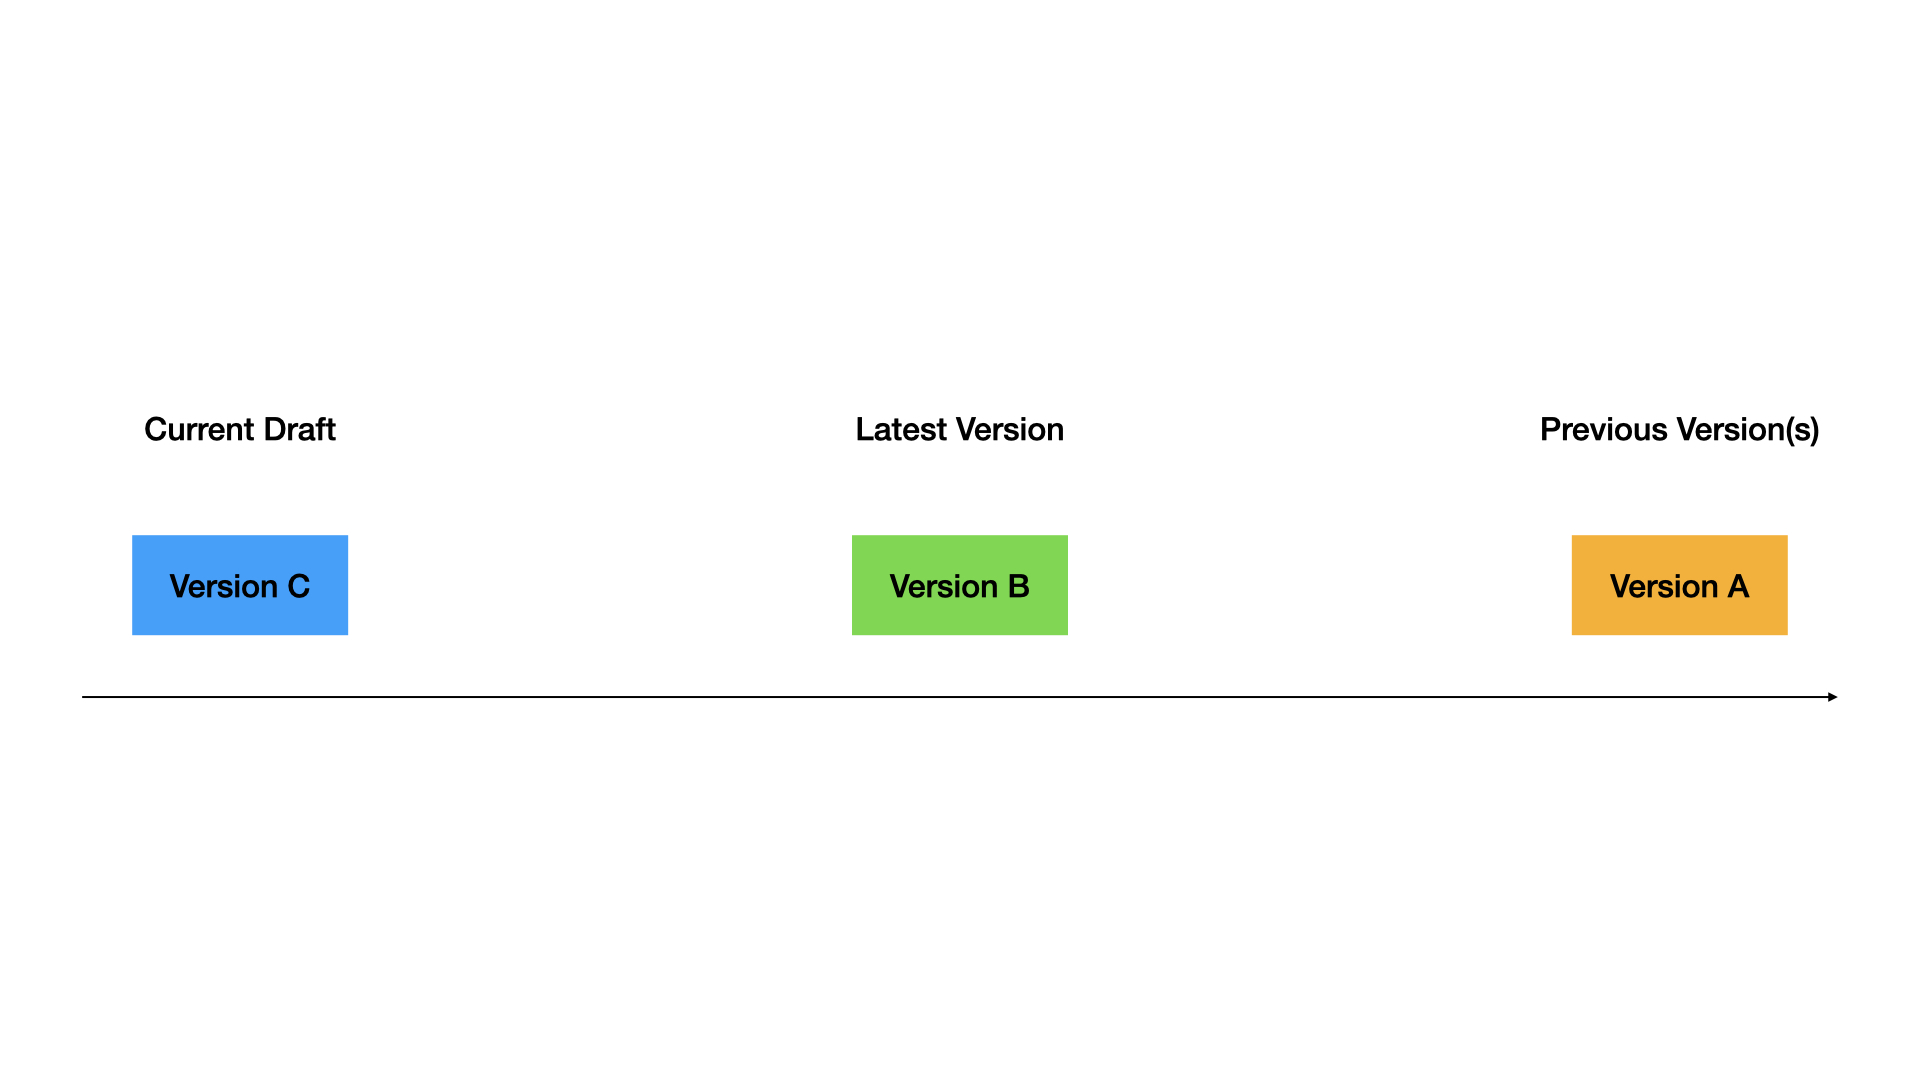
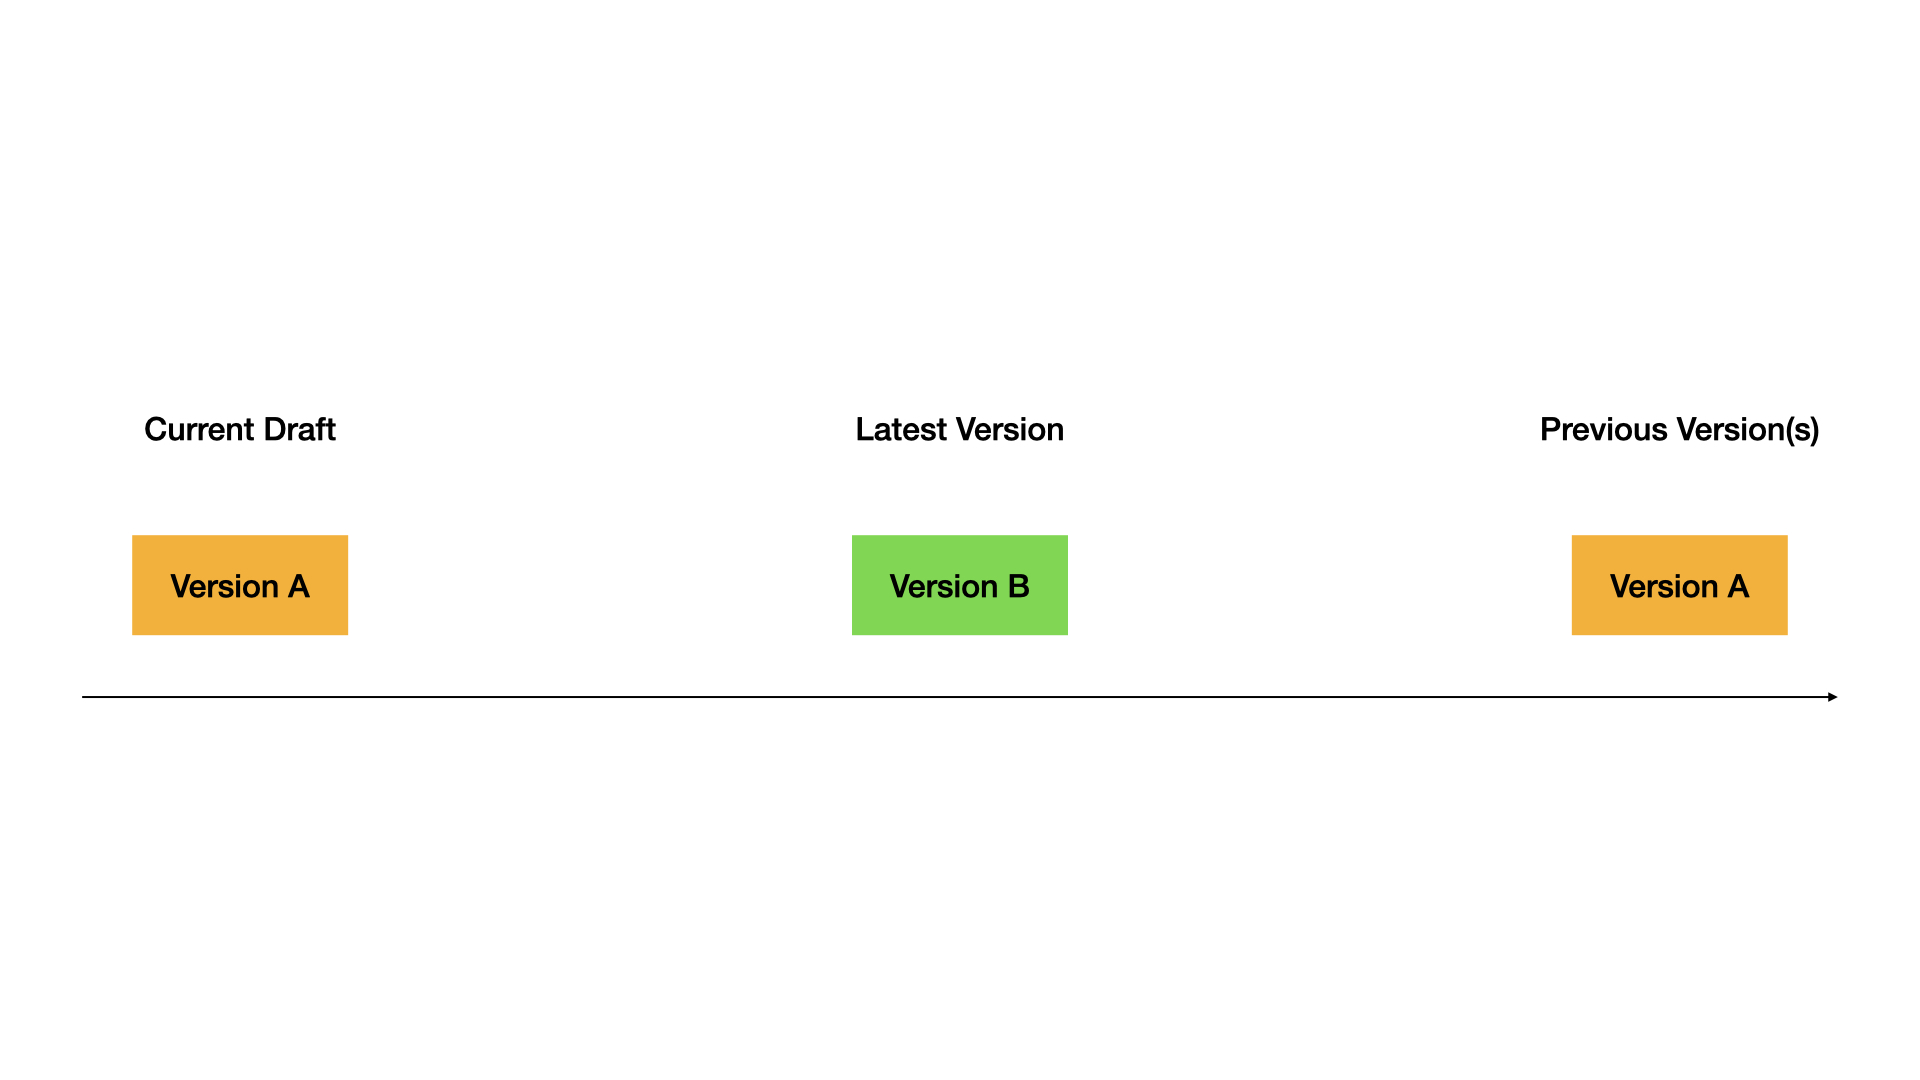
**Current Draft**: Your working version. This is where you make changes. Not live for users.

**Latest Version**: The live version users see.

**Previous Versions**: Older published versions.
## Publishing versions
Click **Publish** → **Publish Update** to make your draft live.
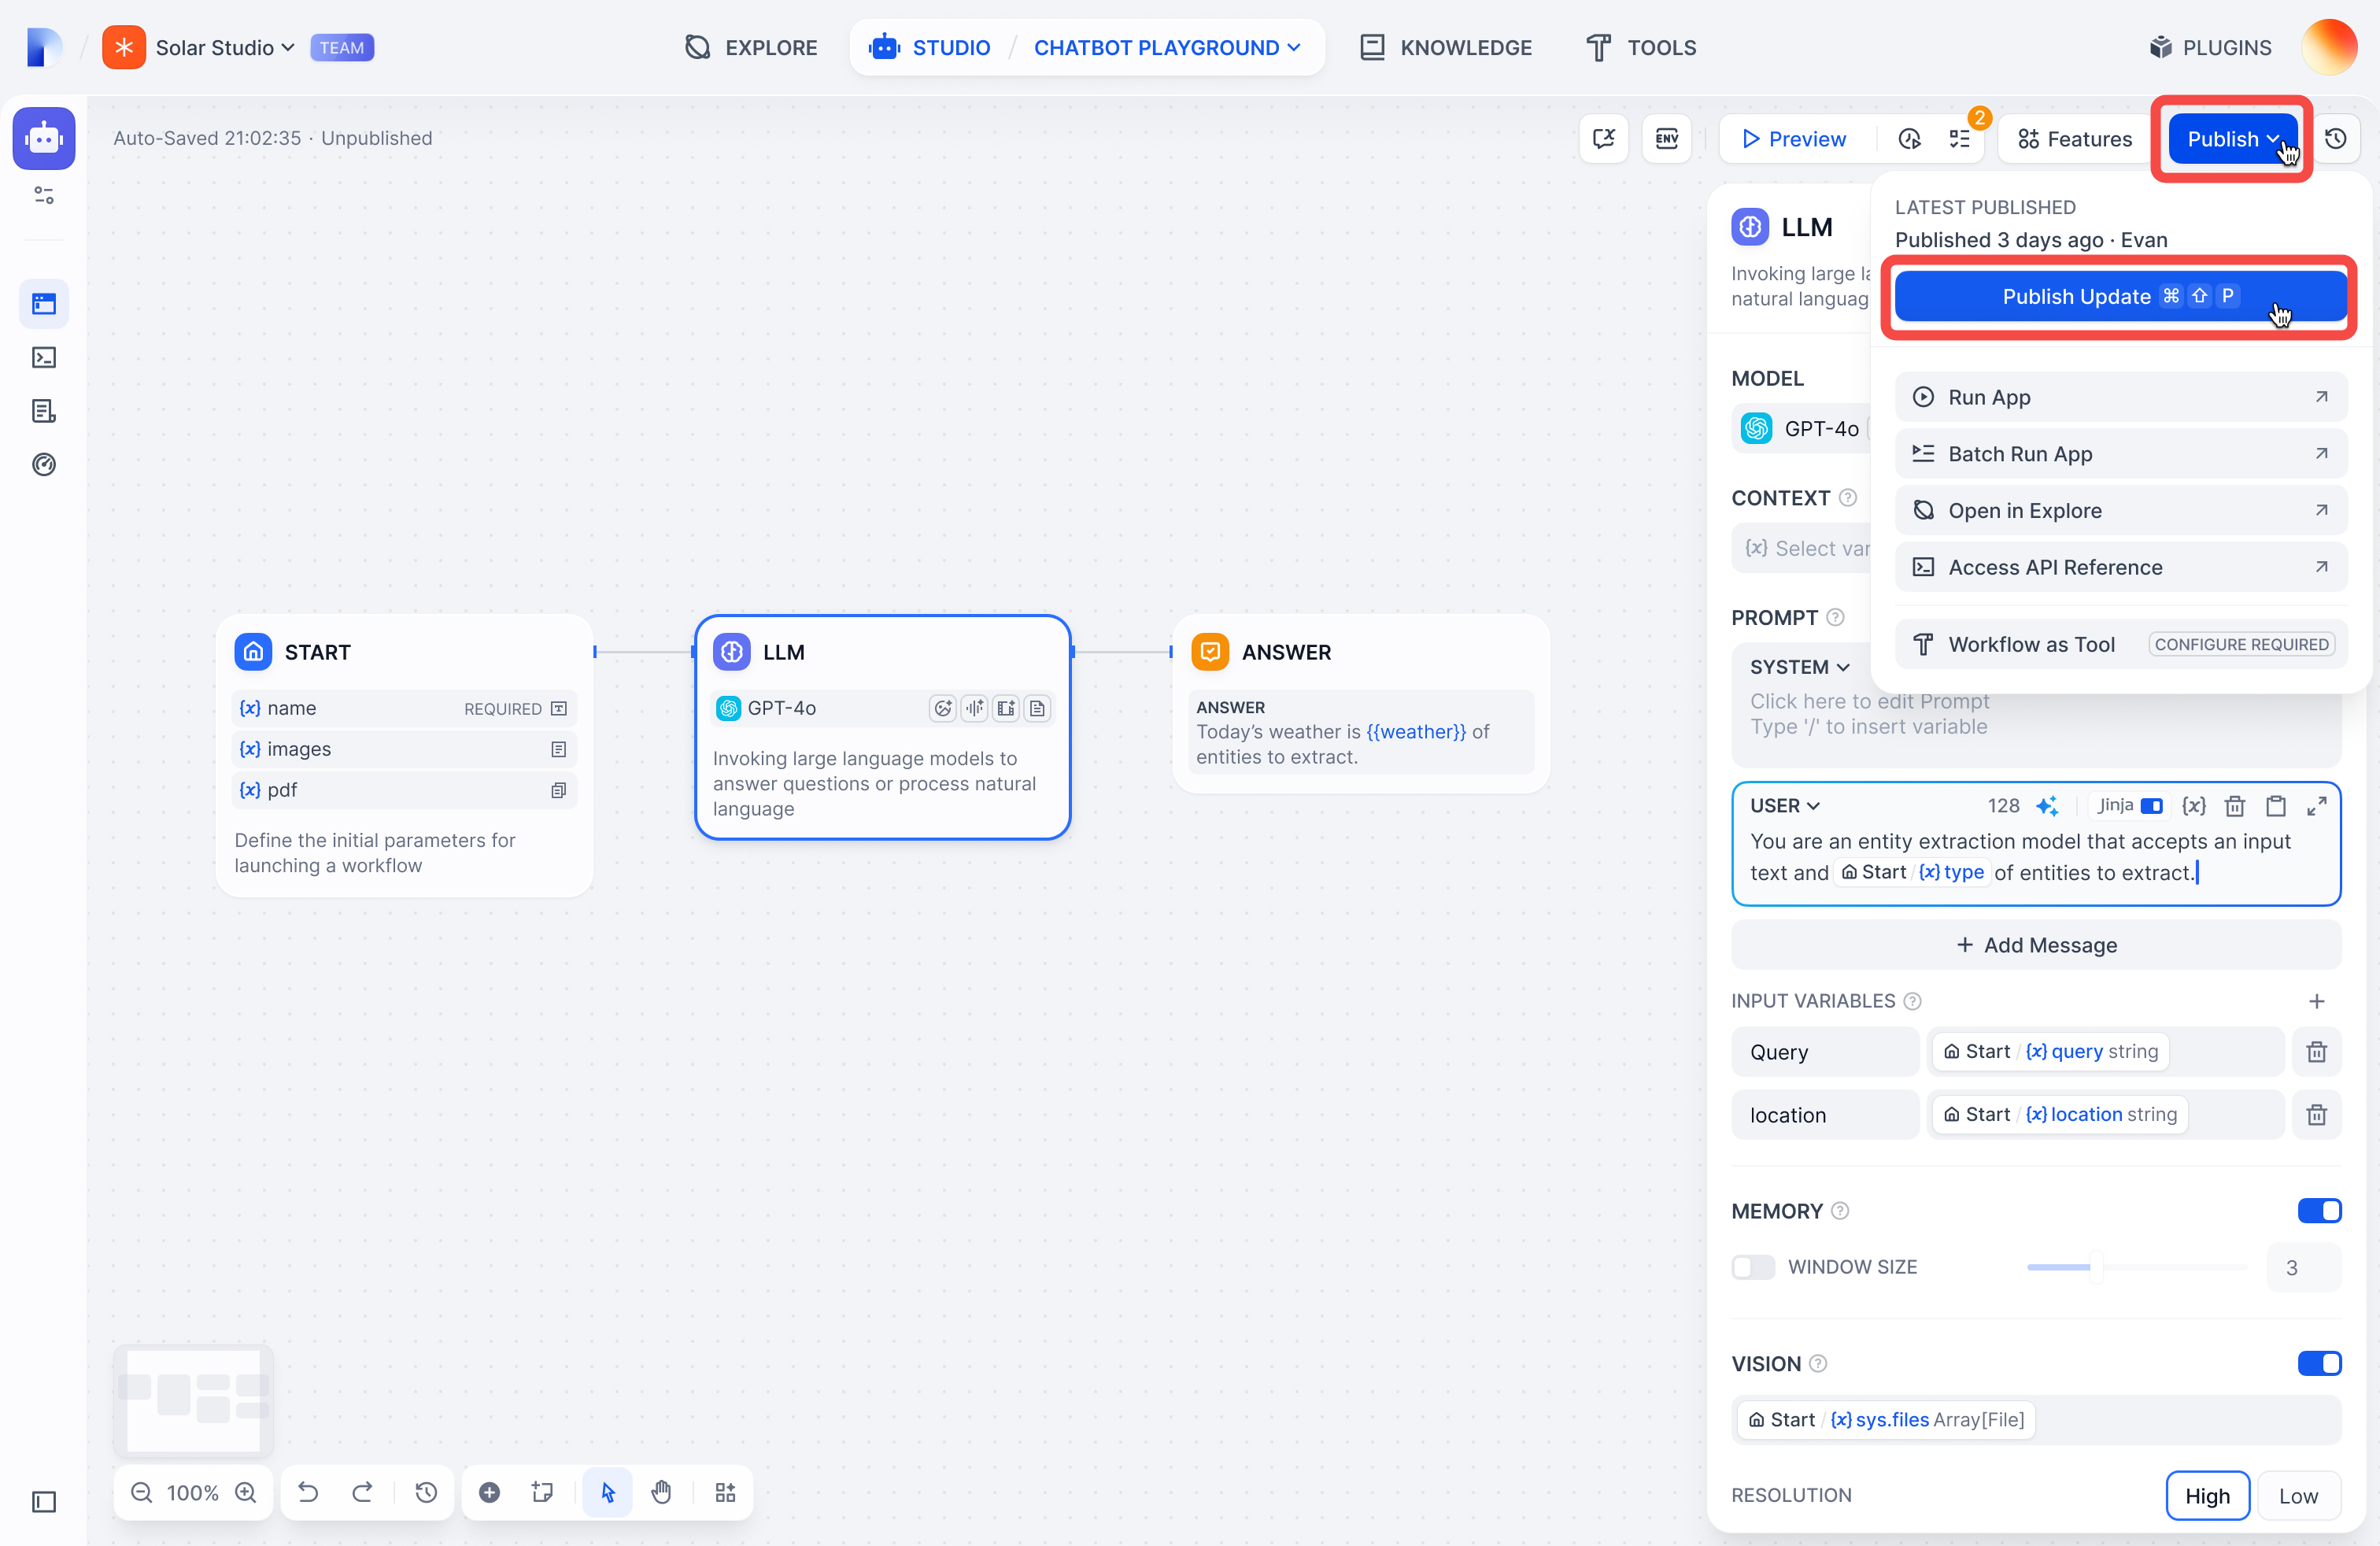
Your draft becomes the new Latest Version, and you get a fresh draft to work in.
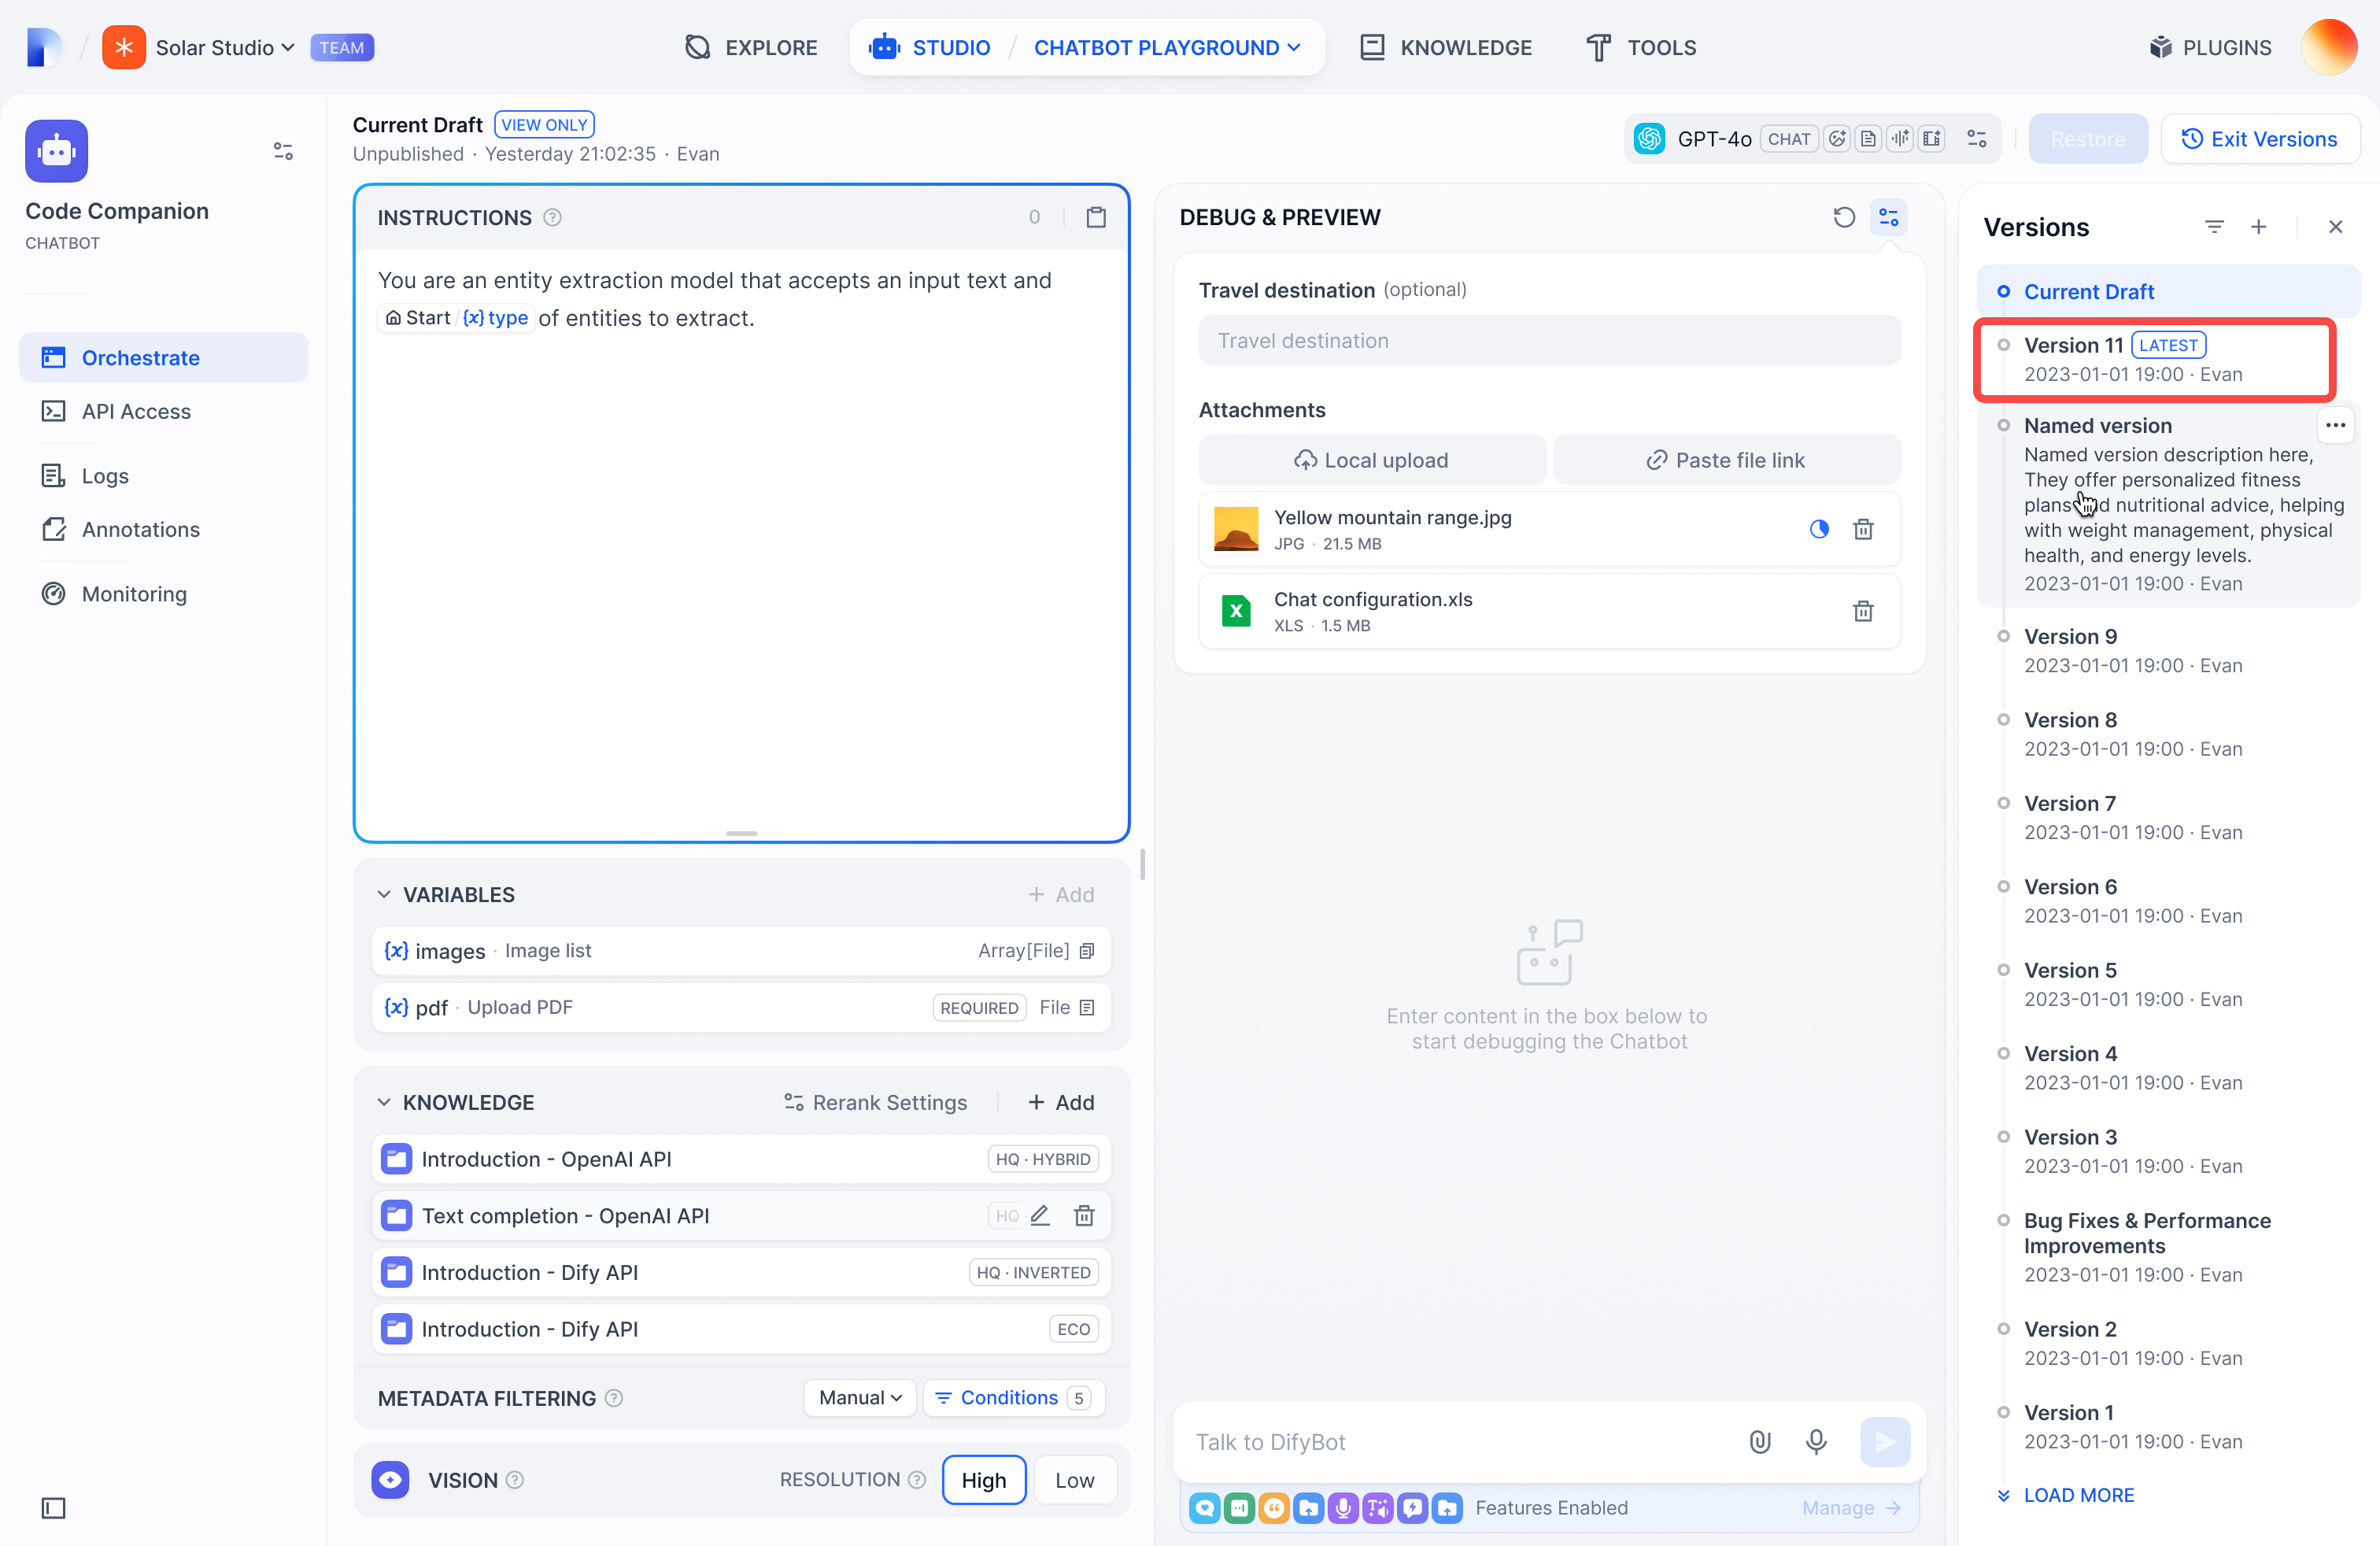
## Viewing versions
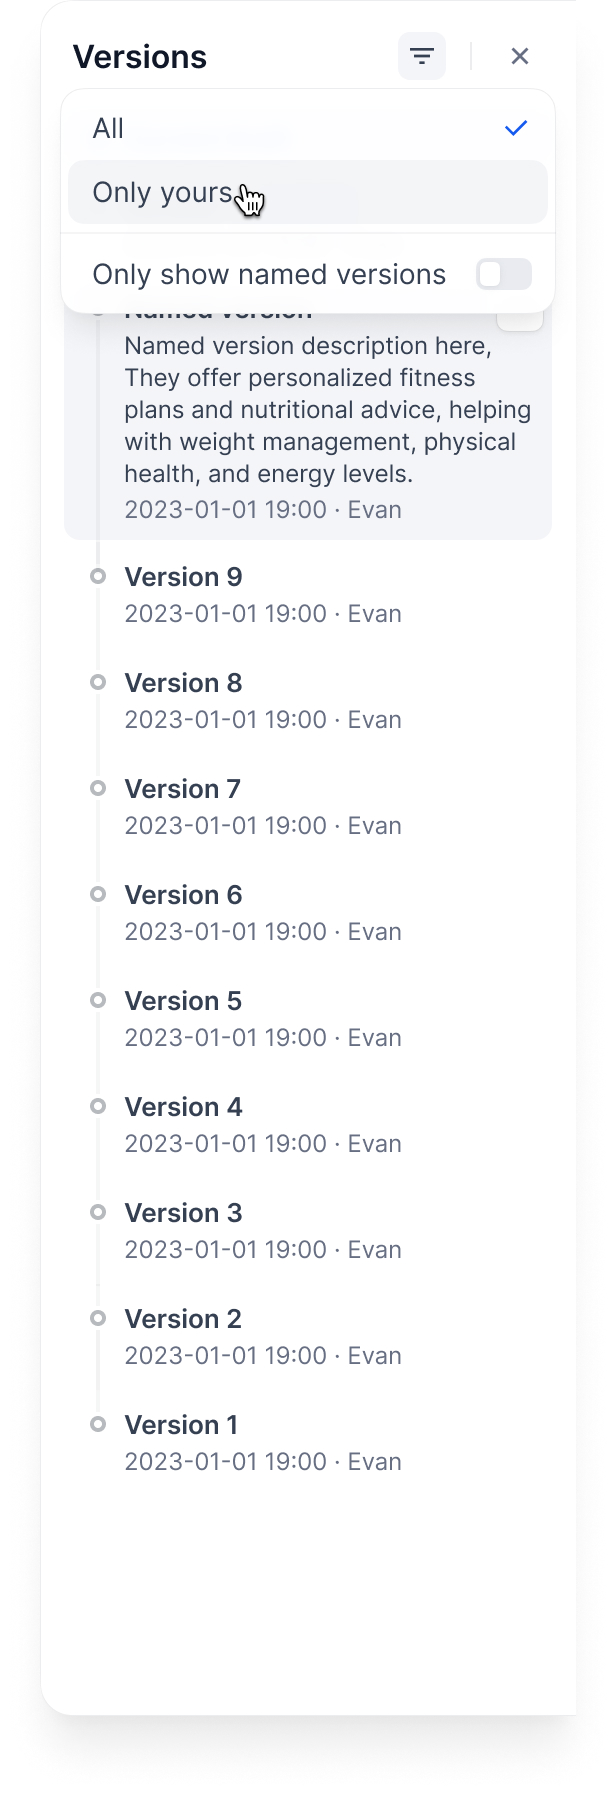
Click the history icon to see all versions:
Filter by:
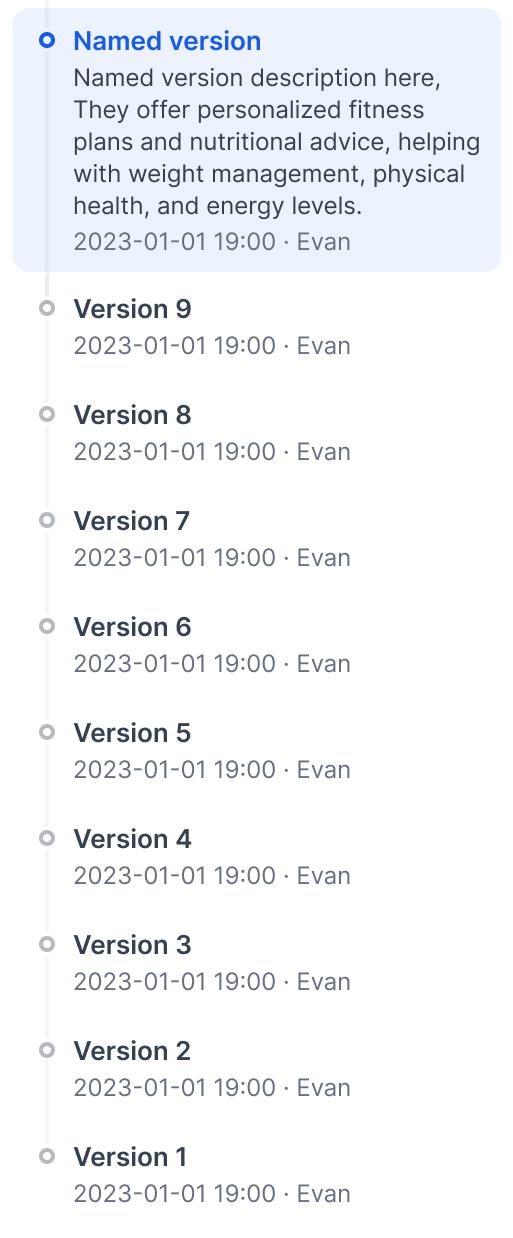
* **All versions** or **only yours**
* **Only named versions** (skip auto-generated names)
## Managing versions
**Name a version**: Give it a proper name instead of the auto-generated one
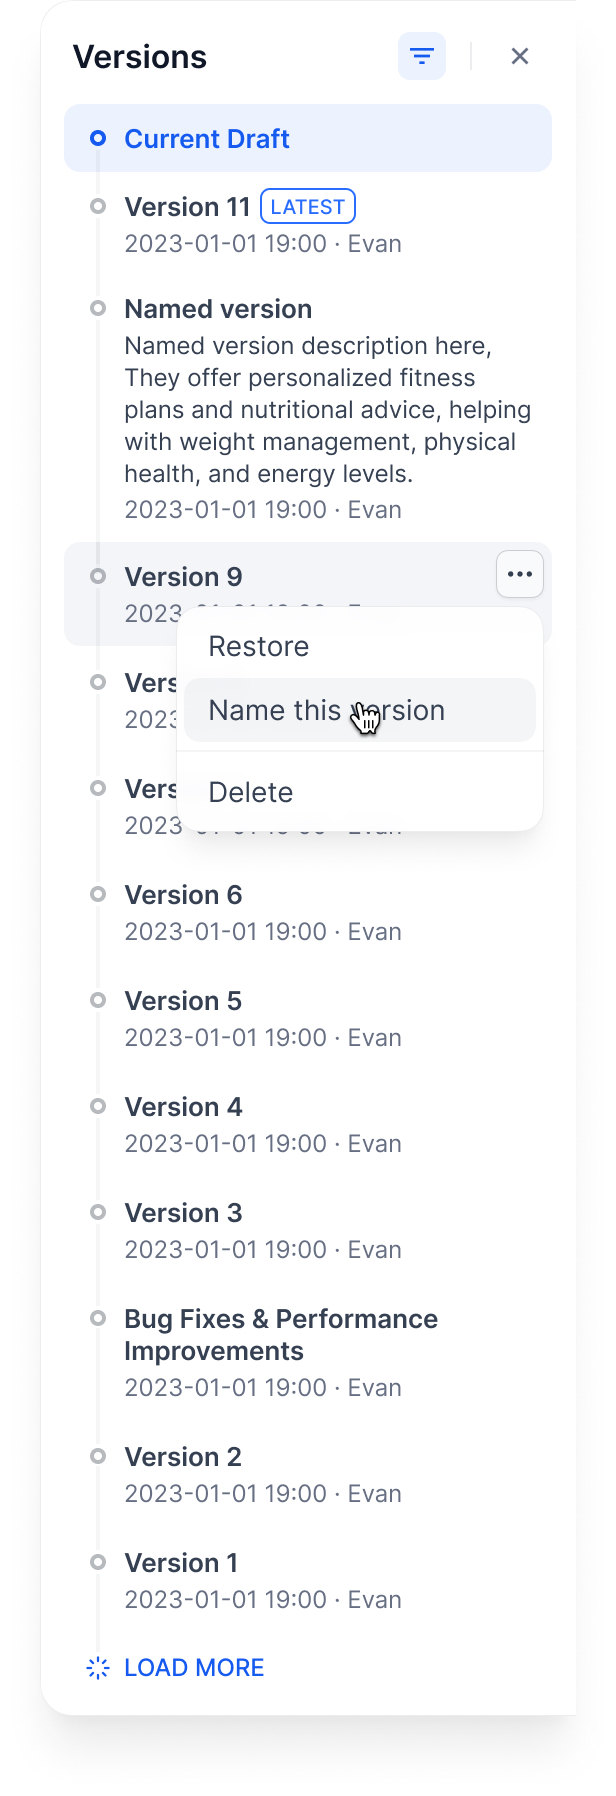
**Edit version info**: Change the name and add release notes

**Delete old versions**: Clean up versions you don't need
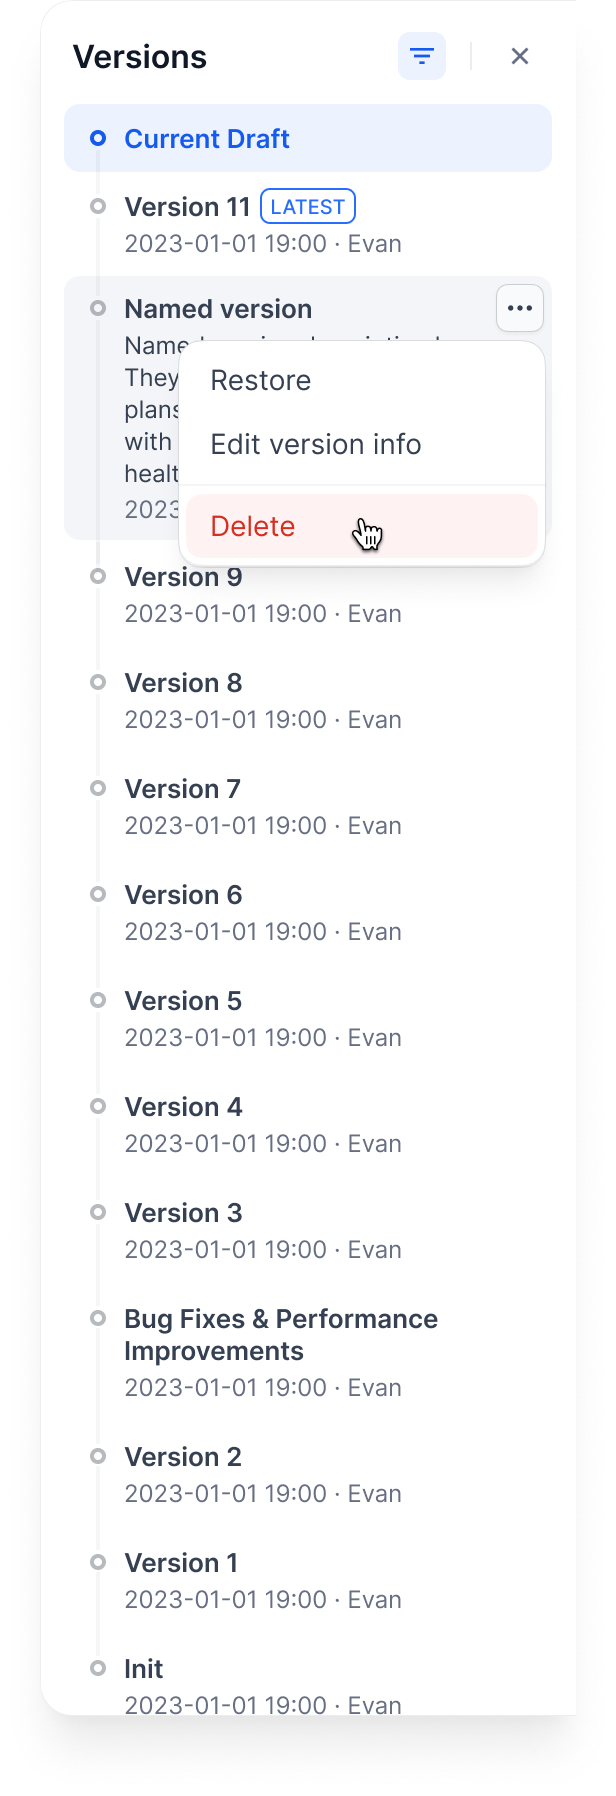
You can't delete the Current Draft or Latest Version.
**Restore a version**: Load an old version back into your draft
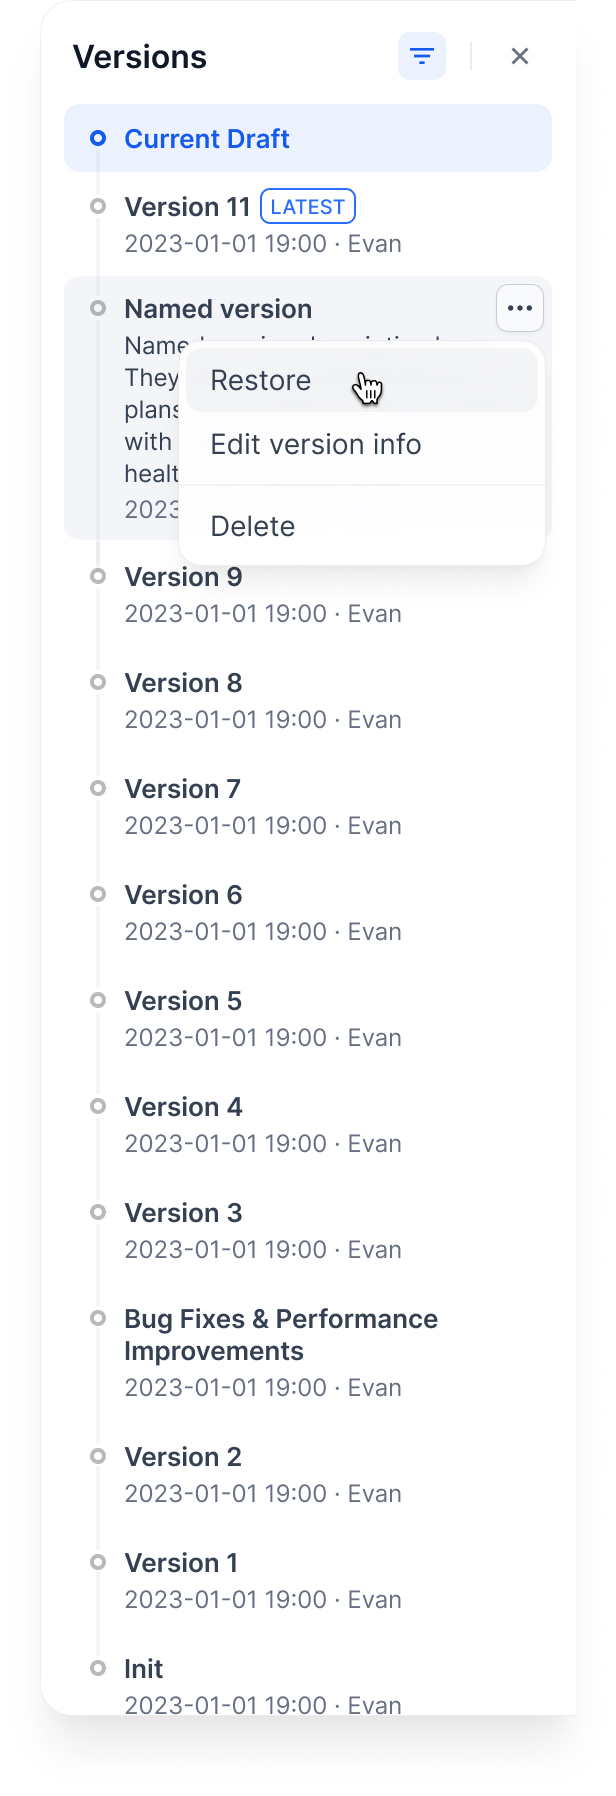
This replaces your current draft completely. Make sure you don't have unsaved work.
## Example workflow
Here's how versions work through a typical development cycle:
### 1. Start with a draft

### 2. Publish first version
### 3. Publish second version
### 4. Restore old version to draft
### 5. Publish the restored version
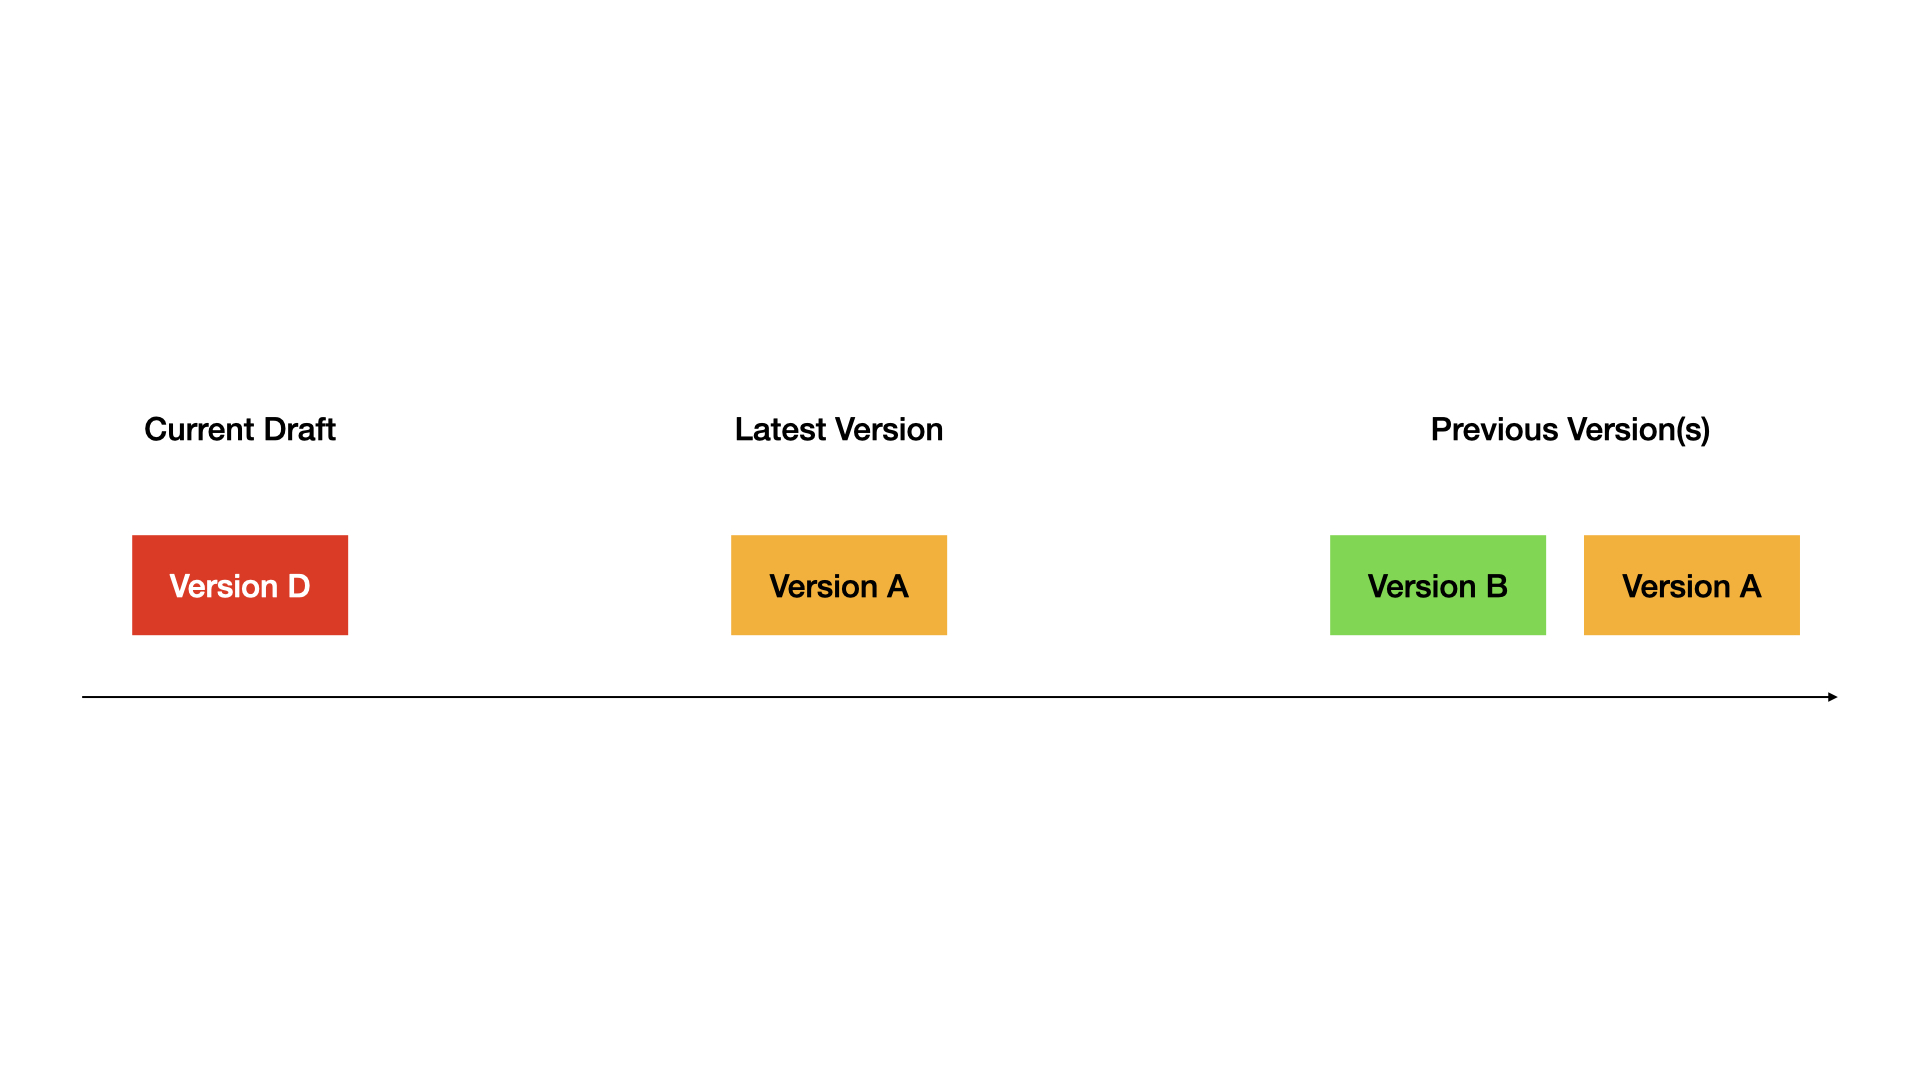
Complete demo:

## Tips
* Always test in draft before publishing
* Use descriptive version names for important releases
* Restore versions when you need to rollback quickly
* Keep old versions around for reference
# Workflow & Chatflow
Source: https://docs.dify.ai/en/use-dify/build/workflow-chatflow
Build agentic workflows that combine AI models, tools, and logic into reliable, repeatable processes
## Why Agentic Workflows
AI models are powerful, but on their own they can be unpredictable—they may hallucinate, miss steps, or produce inconsistent outputs. In production environments, especially for teams and enterprises where reliability matters, you need more control over how AI operates.
Agentic workflows solve this by embedding AI capabilities within a structured, repeatable process. Instead of relying on a single model to figure everything out, you design a flow that orchestrates models, tools, and logic step by step—with clear conditions, checkpoints, and fallback paths.
The AI is still doing the heavy lifting, but within boundaries you define.
## Workflow vs. Chatflow
Dify offers two app types for building agentic workflows: **Workflow** and **Chatflow**. Both are built on a shared visual canvas and node system.
To build a flow, connect nodes that each handle a specific step, such as calling a model, retrieving knowledge, running code, or branching on conditions. Most of the work is **drag, connect, and configure**—code is only needed when your logic calls for it.
Their core difference is how users interact with the app:
* A **Workflow** runs once from start to finish.
It takes an input, processes it through the flow, and returns a result. Use it for tasks like automated report generation, data processing pipelines, or batch processing.
* A **Chatflow** adds a conversation layer.
Users interact through a chat interface, and each message triggers the flow you designed before a response is generated. Use it for interactive assistants, guided Q\&A, or any conversational scenario that requires structured processing behind each reply.
Chatflows support optional features like content moderation, text to speech, and more. See [App Toolkit](/en/use-dify/build/additional-features) for details.
# Error Types
Source: https://docs.dify.ai/en/use-dify/debug/error-type
Each node type throws specific error classes that help you understand what went wrong and how to fix it.
## Node-specific errors
`CodeNodeError`
Your Python or JavaScript code threw an exception during execution
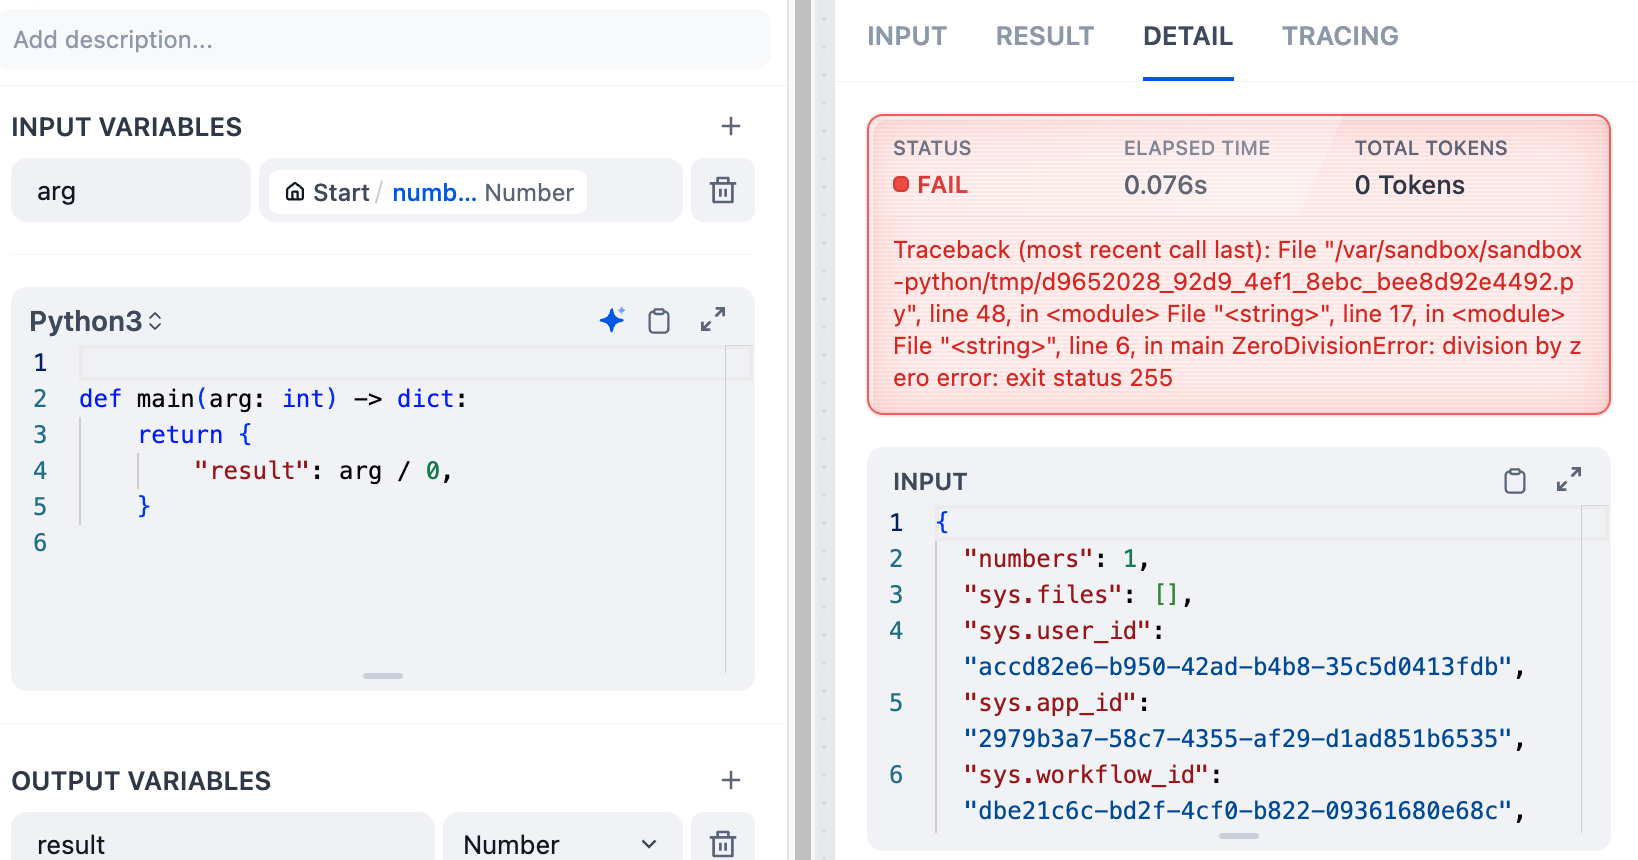
`OutputValidationError`
The data type your code returned doesn't match the output variable type you configured
`DepthLimitError`
Your code created nested data structures deeper than 5 levels
`CodeExecutionError`
The sandbox service couldn't execute your code - usually means the service is down
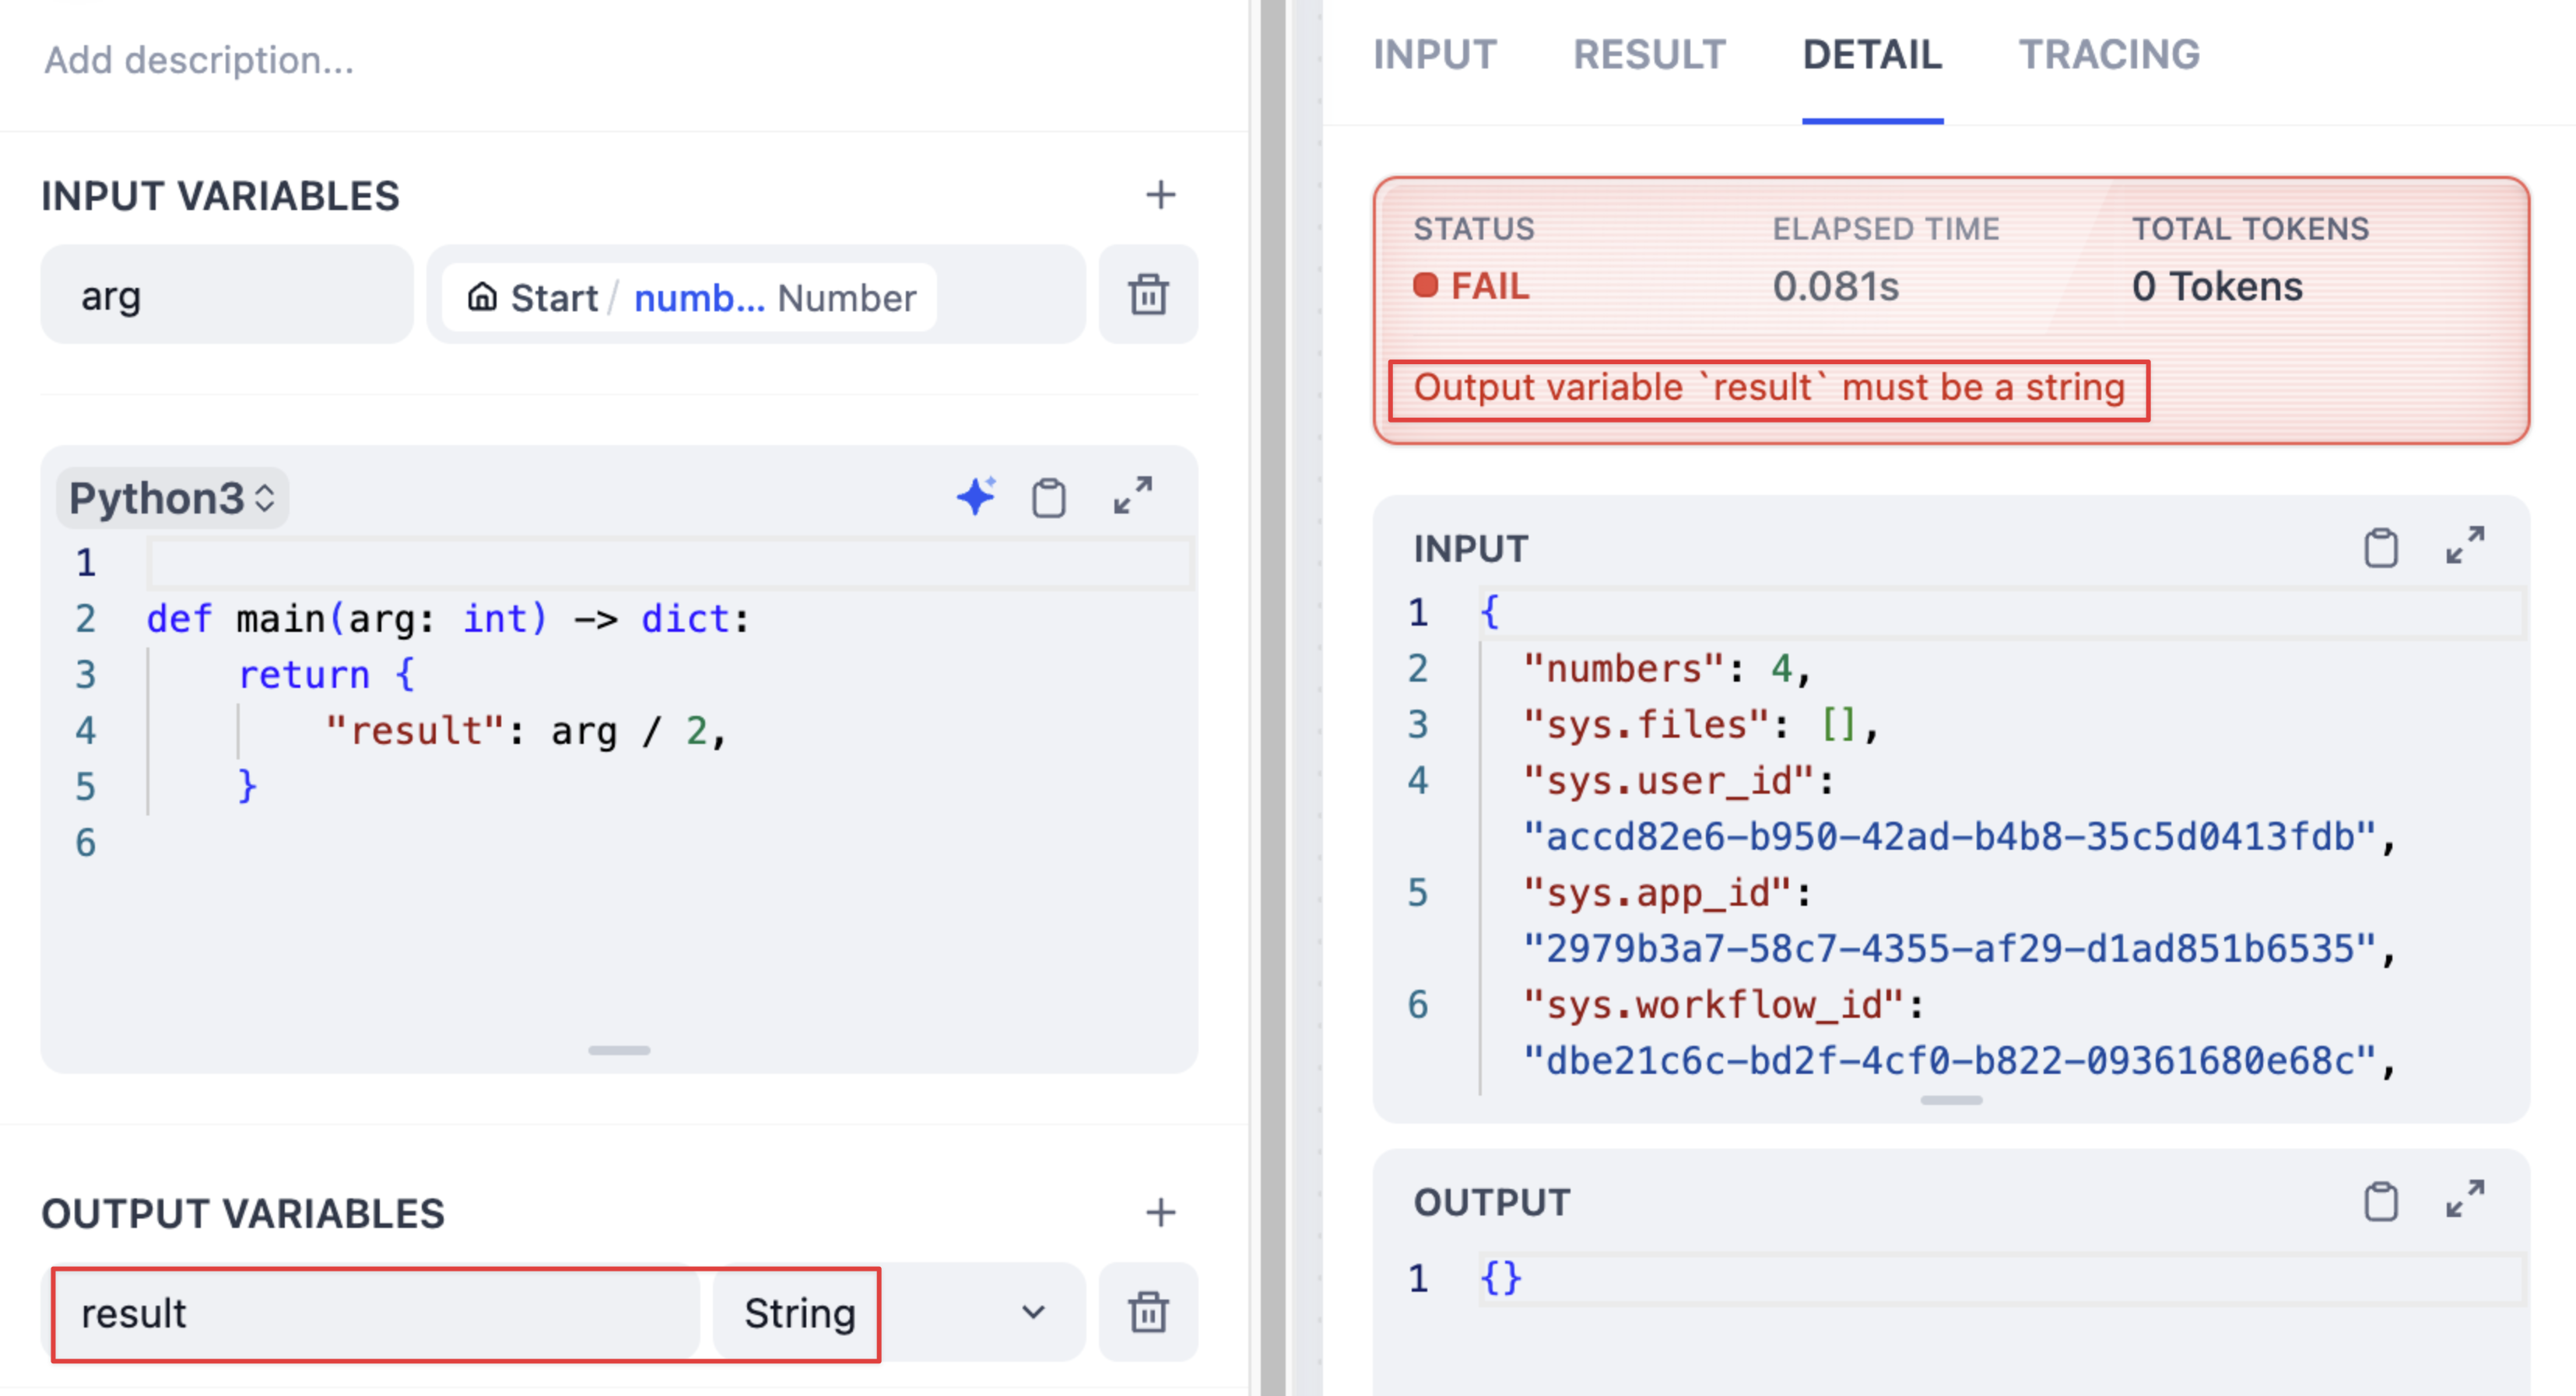
`VariableNotFoundError`
Your prompt template references a variable that doesn't exist in the workflow context
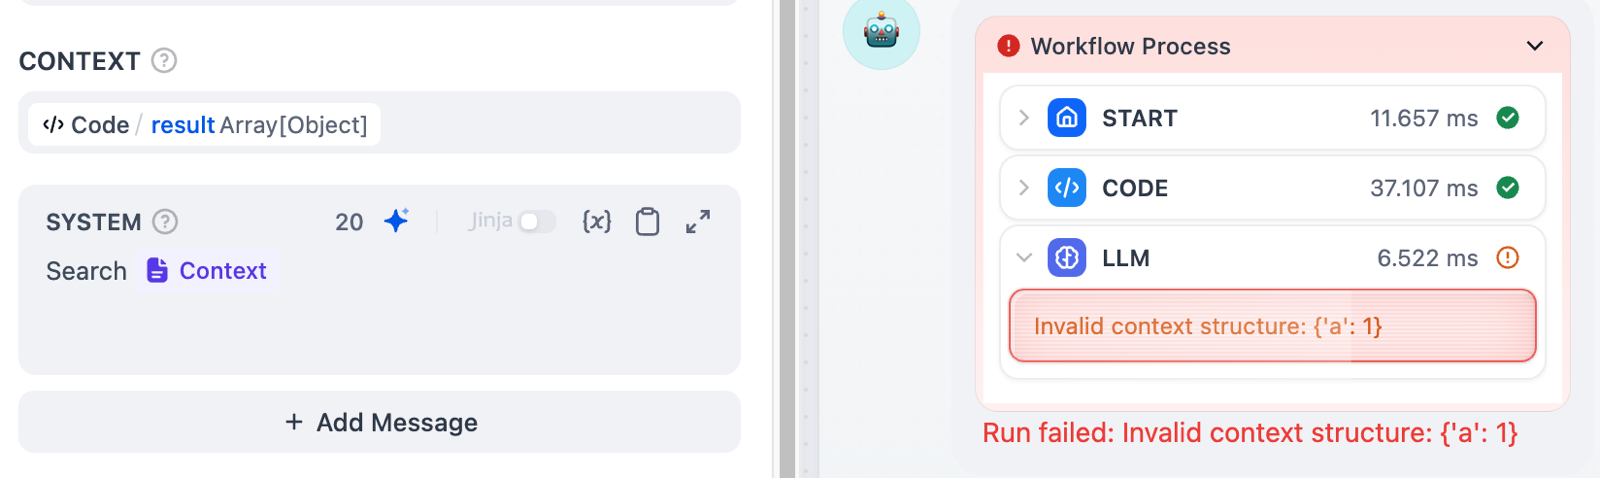
`InvalidContextStructureError`
You passed an array or object to the context field, which only accepts strings
`NoPromptFoundError`
The prompt field is completely empty
`ModelNotExistError`
No model is selected in the LLM node configuration
`LLMModeRequiredError`
The selected model doesn't have valid API credentials configured
`InvalidVariableTypeError`
Your prompt template isn't valid Jinja2 syntax or plain text format
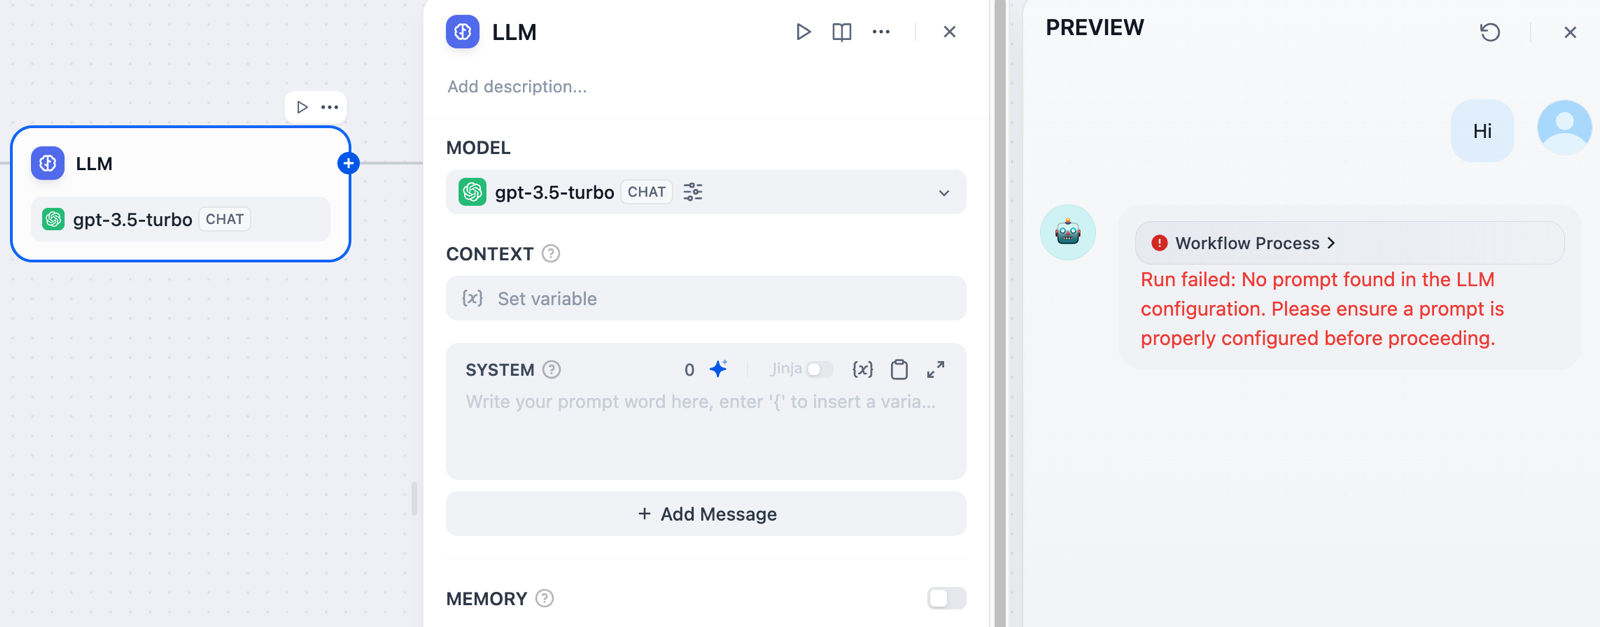
`AuthorizationConfigError`
Missing or invalid authentication configuration for the API endpoint
`InvalidHttpMethodError`
HTTP method must be GET, HEAD, POST, PUT, PATCH, or DELETE
`ResponseSizeError`
API response exceeded the 10MB size limit
`FileFetchError`
Couldn't retrieve a file variable referenced in the request
`InvalidURLError`
The URL format is malformed or unreachable
`ToolParameterError`
Parameters passed to the tool don't match its expected schema
`ToolFileError`
The tool couldn't access required files
`ToolInvokeError`
The external tool API returned an error during execution
# Version Control
Source: https://docs.dify.ai/en/use-dify/build/version-control
Track changes and manage versions in Chatflow and Workflow apps.
Only available for Chatflow and Workflow apps right now.
## How it works
**Current Draft**: Your working version. This is where you make changes. Not live for users.

**Latest Version**: The live version users see.

**Previous Versions**: Older published versions.

## Publishing versions
Click **Publish** → **Publish Update** to make your draft live.

Your draft becomes the new Latest Version, and you get a fresh draft to work in.

## Viewing versions
Click the history icon to see all versions:

Filter by:
* **All versions** or **only yours**
* **Only named versions** (skip auto-generated names)

## Managing versions
**Name a version**: Give it a proper name instead of the auto-generated one

**Edit version info**: Change the name and add release notes

**Delete old versions**: Clean up versions you don't need

You can't delete the Current Draft or Latest Version.
**Restore a version**: Load an old version back into your draft

This replaces your current draft completely. Make sure you don't have unsaved work.
## Example workflow
Here's how versions work through a typical development cycle:
### 1. Start with a draft

### 2. Publish first version

### 3. Publish second version

### 4. Restore old version to draft

### 5. Publish the restored version

Complete demo:

## Tips
* Always test in draft before publishing
* Use descriptive version names for important releases
* Restore versions when you need to rollback quickly
* Keep old versions around for reference
# Workflow & Chatflow
Source: https://docs.dify.ai/en/use-dify/build/workflow-chatflow
Build agentic workflows that combine AI models, tools, and logic into reliable, repeatable processes
## Why Agentic Workflows
AI models are powerful, but on their own they can be unpredictable—they may hallucinate, miss steps, or produce inconsistent outputs. In production environments, especially for teams and enterprises where reliability matters, you need more control over how AI operates.
Agentic workflows solve this by embedding AI capabilities within a structured, repeatable process. Instead of relying on a single model to figure everything out, you design a flow that orchestrates models, tools, and logic step by step—with clear conditions, checkpoints, and fallback paths.
The AI is still doing the heavy lifting, but within boundaries you define.
## Workflow vs. Chatflow
Dify offers two app types for building agentic workflows: **Workflow** and **Chatflow**. Both are built on a shared visual canvas and node system.
To build a flow, connect nodes that each handle a specific step, such as calling a model, retrieving knowledge, running code, or branching on conditions. Most of the work is **drag, connect, and configure**—code is only needed when your logic calls for it.
Their core difference is how users interact with the app:
* A **Workflow** runs once from start to finish.
It takes an input, processes it through the flow, and returns a result. Use it for tasks like automated report generation, data processing pipelines, or batch processing.
* A **Chatflow** adds a conversation layer.
Users interact through a chat interface, and each message triggers the flow you designed before a response is generated. Use it for interactive assistants, guided Q\&A, or any conversational scenario that requires structured processing behind each reply.
Chatflows support optional features like content moderation, text to speech, and more. See [App Toolkit](/en/use-dify/build/additional-features) for details.
# Error Types
Source: https://docs.dify.ai/en/use-dify/debug/error-type
Each node type throws specific error classes that help you understand what went wrong and how to fix it.
## Node-specific errors
`CodeNodeError`
Your Python or JavaScript code threw an exception during execution

`OutputValidationError`
The data type your code returned doesn't match the output variable type you configured
`DepthLimitError`
Your code created nested data structures deeper than 5 levels
`CodeExecutionError`
The sandbox service couldn't execute your code - usually means the service is down

`VariableNotFoundError`
Your prompt template references a variable that doesn't exist in the workflow context

`InvalidContextStructureError`
You passed an array or object to the context field, which only accepts strings
`NoPromptFoundError`
The prompt field is completely empty
`ModelNotExistError`
No model is selected in the LLM node configuration
`LLMModeRequiredError`
The selected model doesn't have valid API credentials configured
`InvalidVariableTypeError`
Your prompt template isn't valid Jinja2 syntax or plain text format

`AuthorizationConfigError`
Missing or invalid authentication configuration for the API endpoint
`InvalidHttpMethodError`
HTTP method must be GET, HEAD, POST, PUT, PATCH, or DELETE
`ResponseSizeError`
API response exceeded the 10MB size limit
`FileFetchError`
Couldn't retrieve a file variable referenced in the request
`InvalidURLError`
The URL format is malformed or unreachable
`ToolParameterError`
Parameters passed to the tool don't match its expected schema
`ToolFileError`
The tool couldn't access required files
`ToolInvokeError`
The external tool API returned an error during execution
`ToolProviderNotFoundError`
The tool provider isn't installed or configured properly
## System-level errors
`InvokeConnectionError`
Network connection failed to the external service
`InvokeServerUnavailableError`
External service returned a 503 status or is temporarily down
`InvokeRateLimitError`
You've hit rate limits on the API or model provider
`QuotaExceededError`
Your usage quota has been exceeded for this service
# Run History
Source: https://docs.dify.ai/en/use-dify/debug/history-and-logs
Dify records detailed Run History every time your workflow runs. You can see what happened at both the application level and for individual nodes.
For Run History from live users after publishing, see [Logs](/en/use-dify/monitor/logs).
## Application Run History
Each workflow run creates a complete log entry. Click any entry to see three sections:
### Result
Shows the final output that users see. If the workflow failed, you'll see error messages here.
Only available for Workflow applications.
### Detail
Shows the original input, final output, and system metadata from the execution.
### Tracing
Shows exactly how your workflow executed, including which nodes ran in what order, how long each took, and where data flowed between them. This is useful for finding bottlenecks and understanding complex workflows with branches or loops.
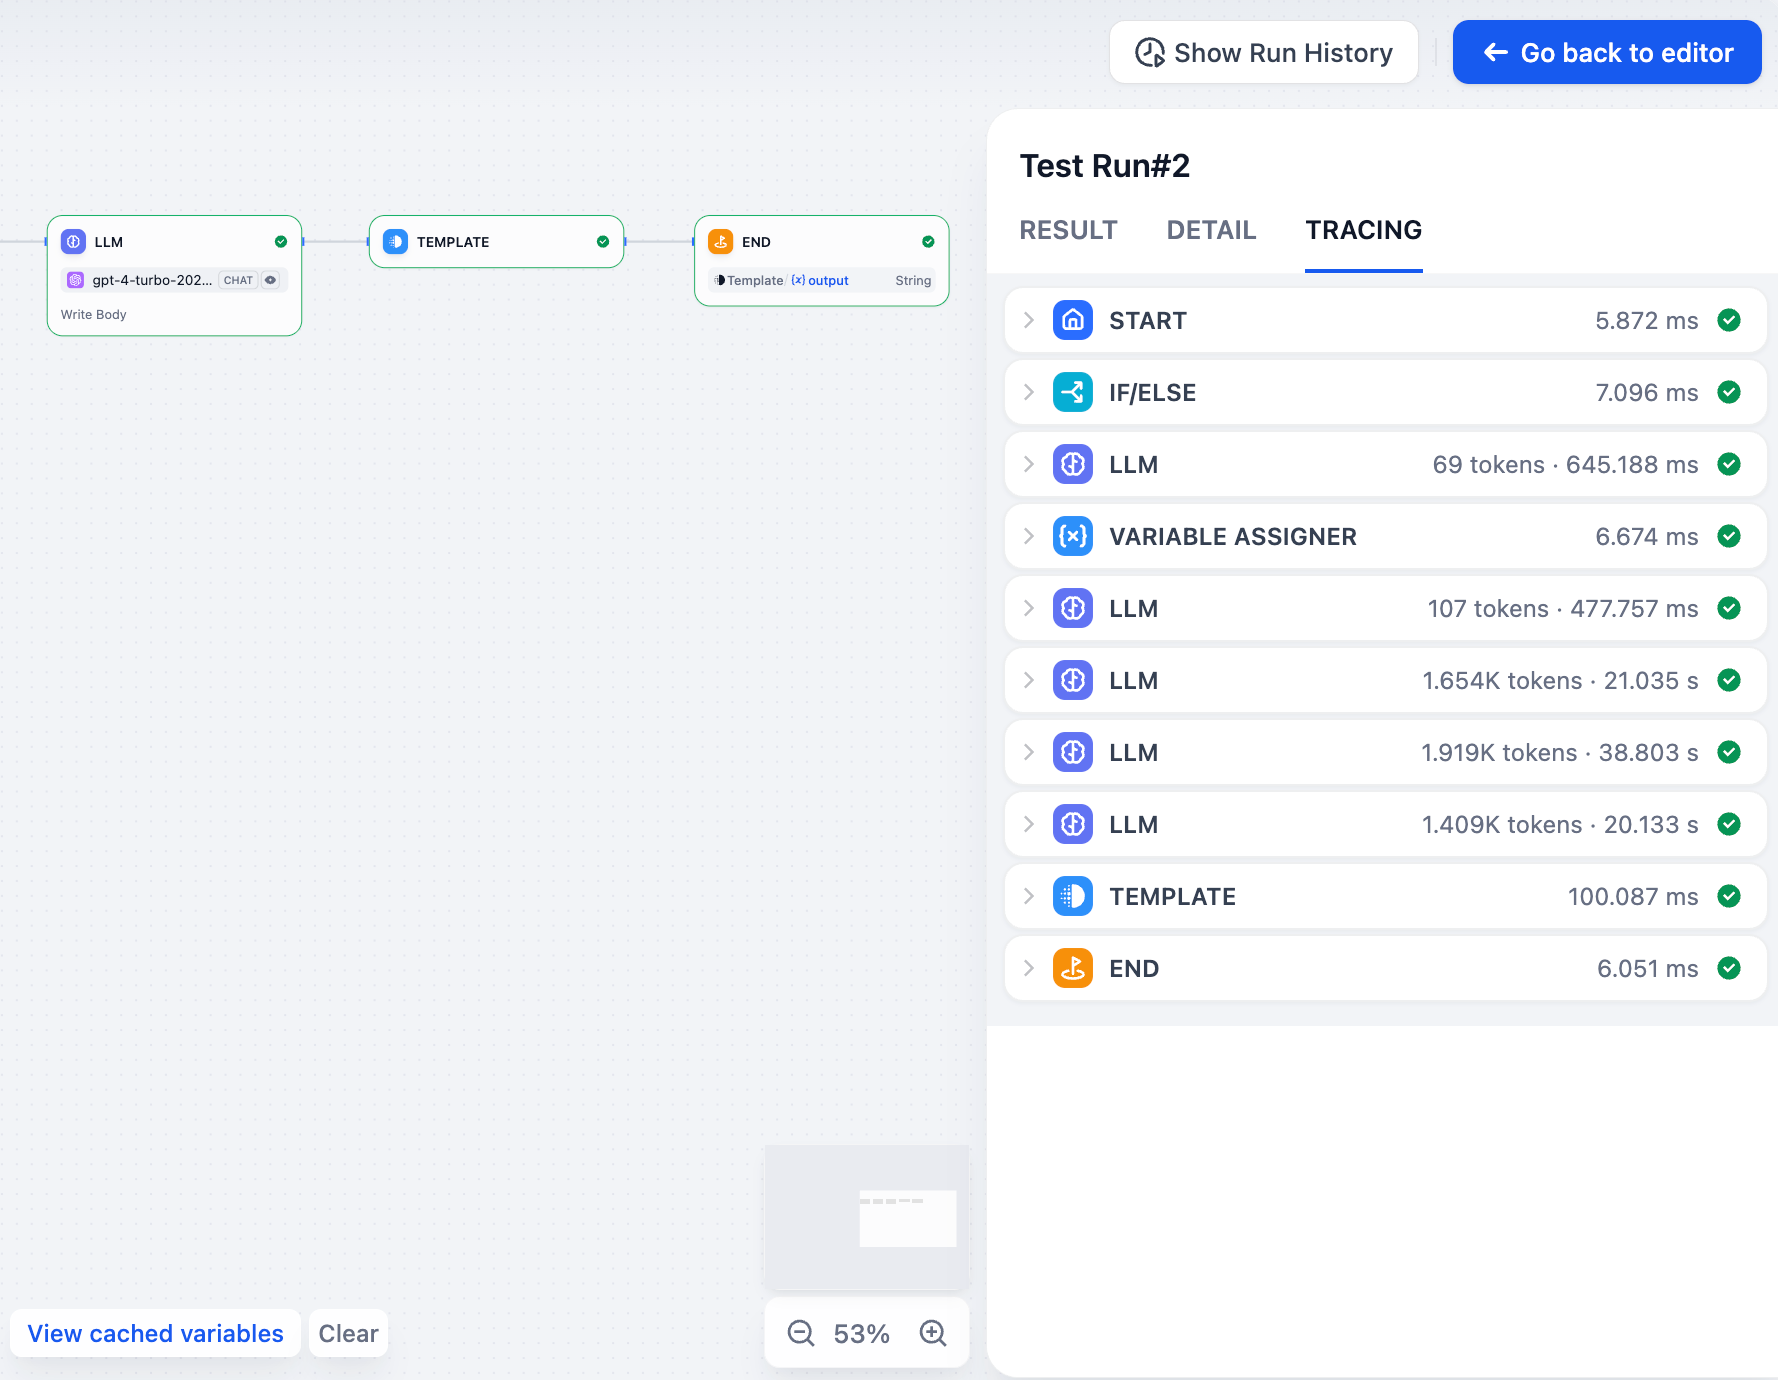
## Node Run History
You can also check the last execution of any individual node. Click "Last run" in the node's config panel to see its most recent input, output, and timing details.
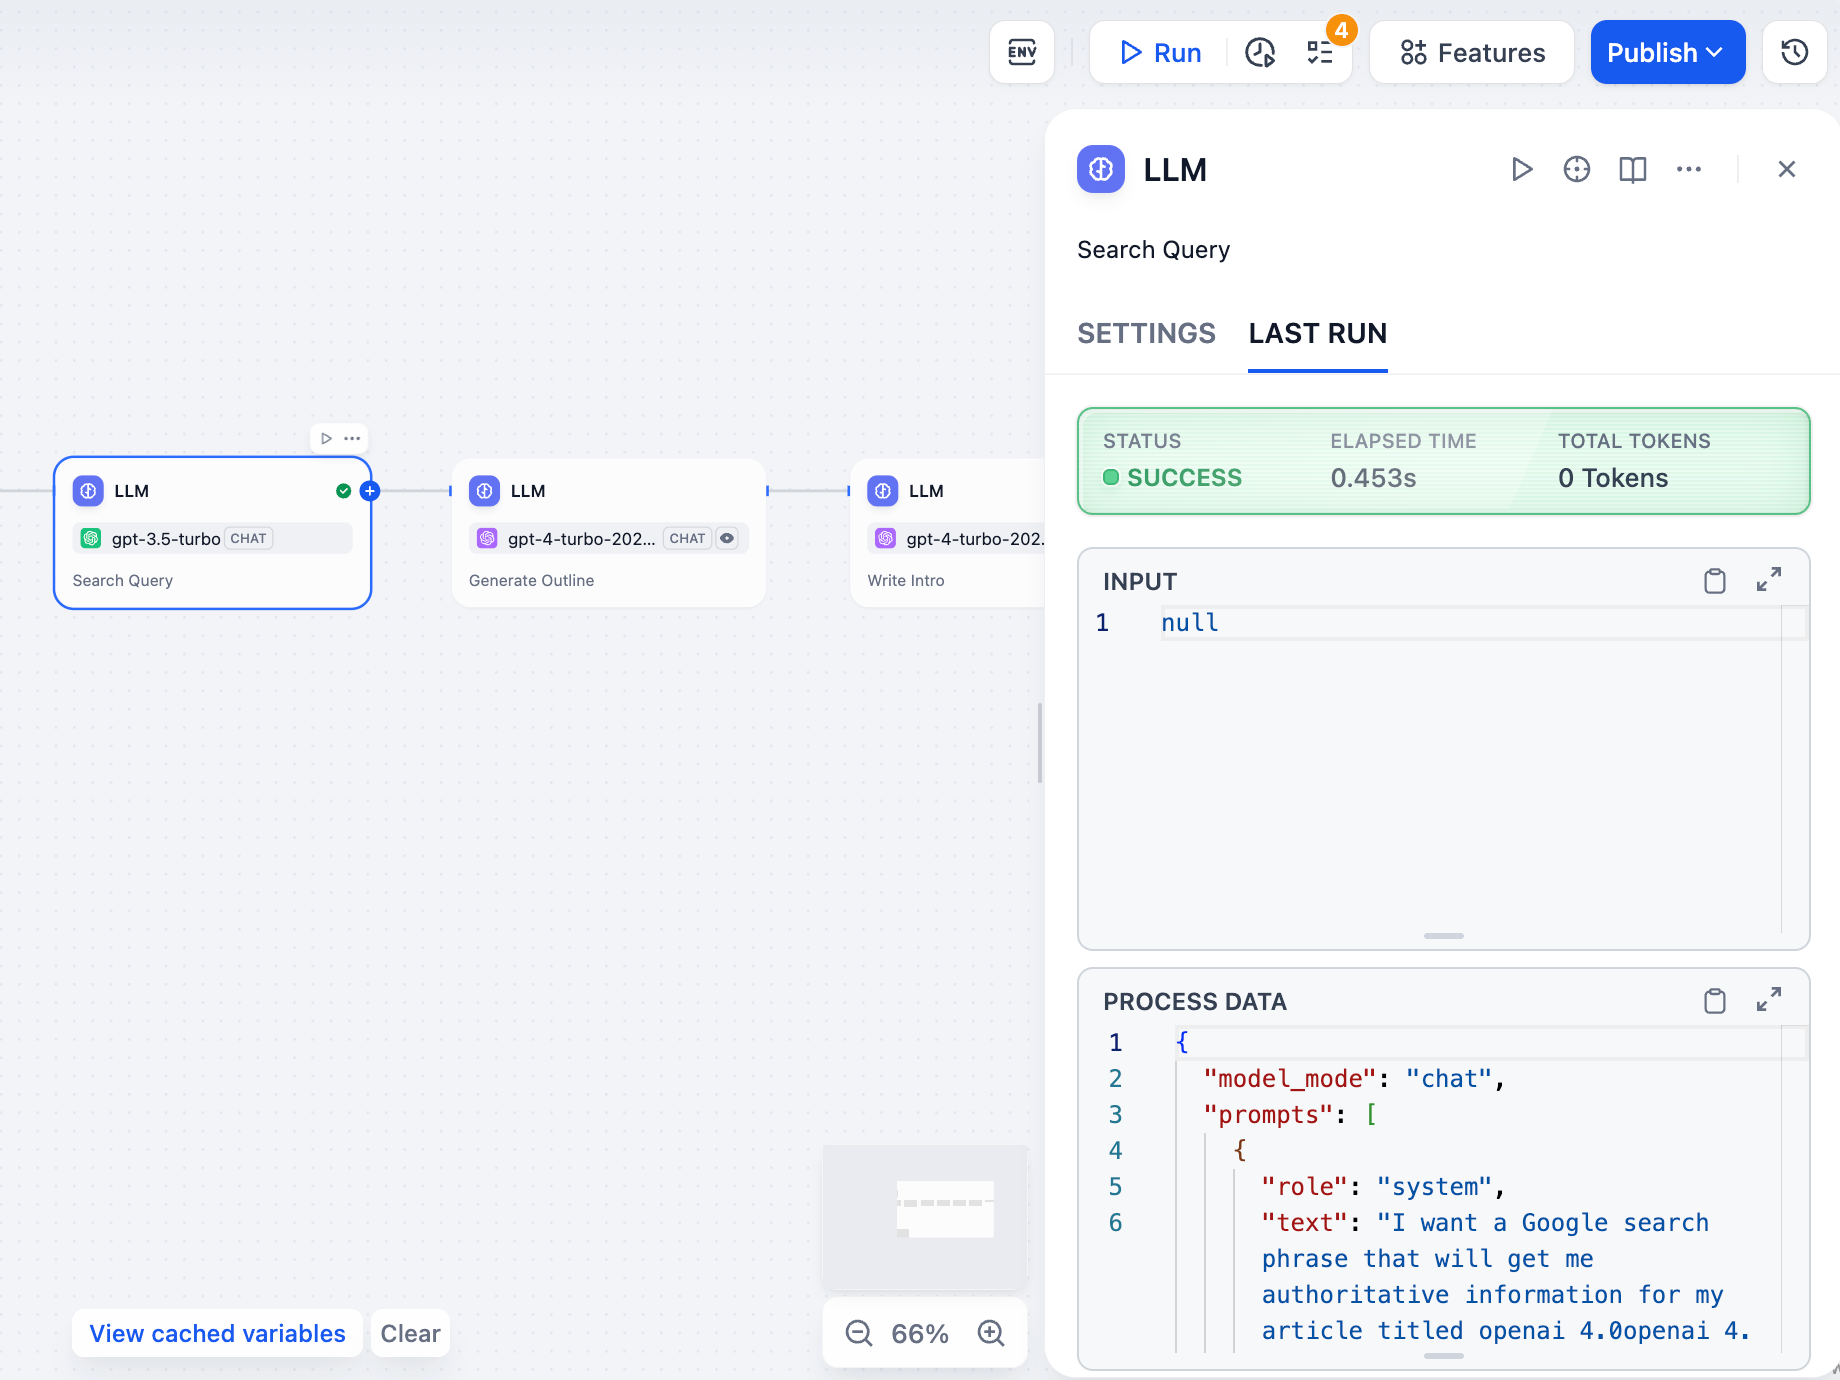
# Single Node
Source: https://docs.dify.ai/en/use-dify/debug/step-run
Test individual nodes or run through your workflow step-by-step to catch issues before publishing.
## Single node testing
You can test any node individually without running the entire workflow. Select the node, provide test input in its settings panel, and click Run to see the output.
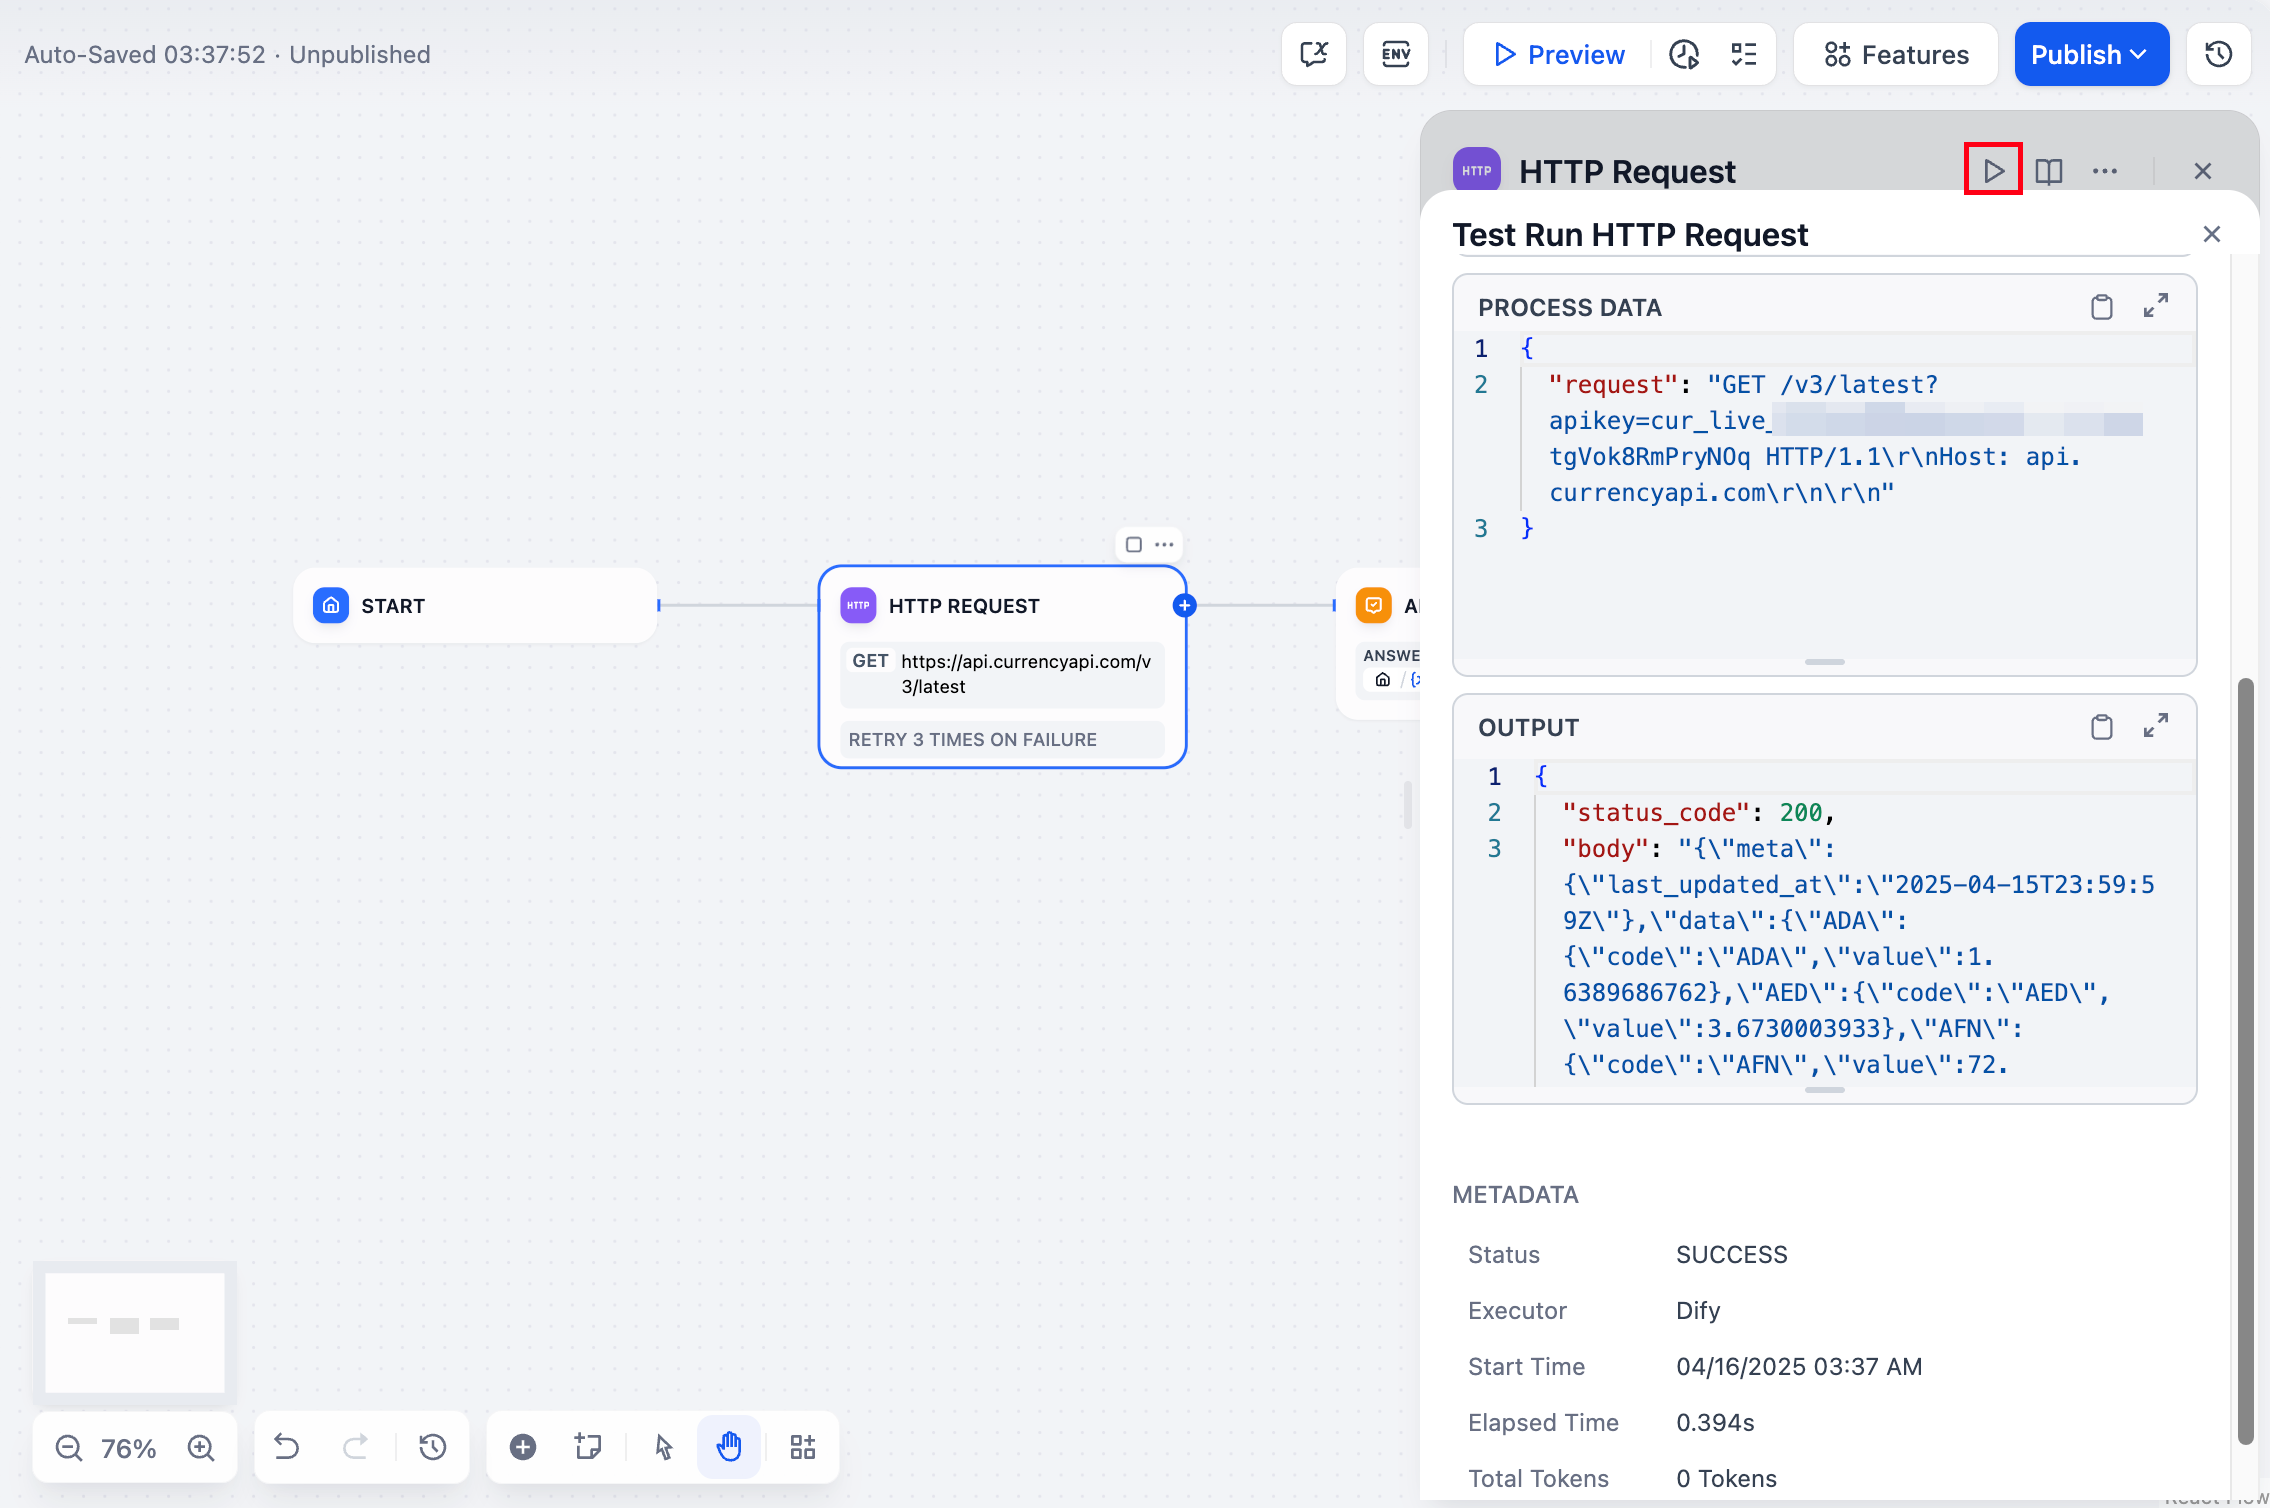
After testing, click "Last run" to see execution details including inputs, outputs, timing, and any error messages.
Answer and End nodes don't support single node testing.
## Step-by-step execution
When you run nodes one at a time, their outputs are cached in the Variable Inspector. You can edit these cached variables to test different scenarios without re-running upstream nodes.
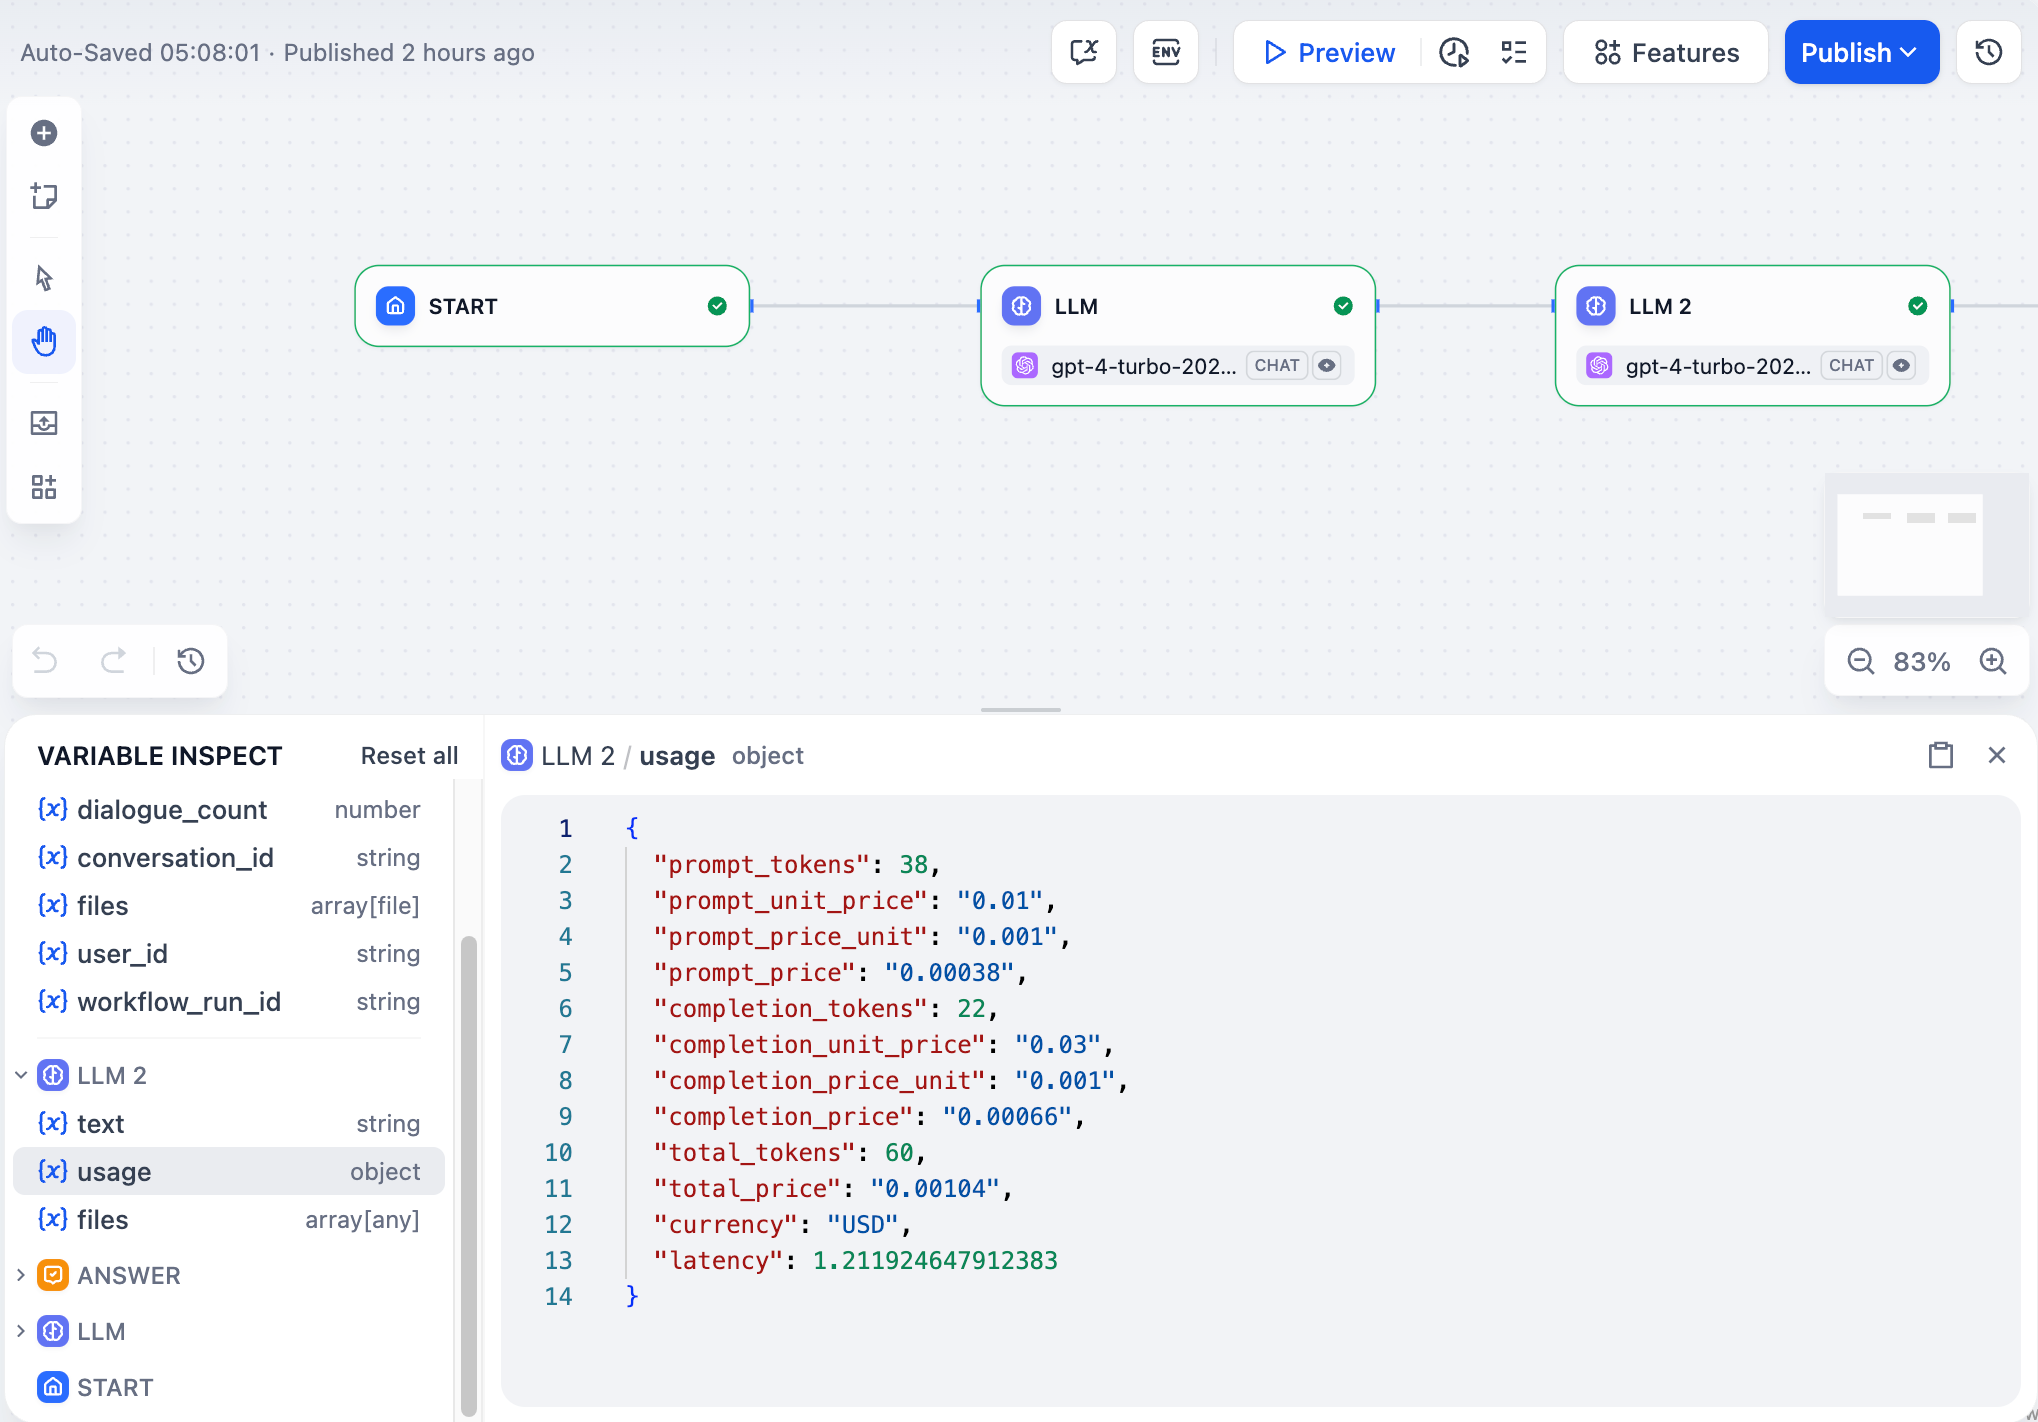
This is useful when you want to test how a node responds to different data without having to modify and re-run all the nodes before it. Just change the variable values in the inspector and run the node again.
## Viewing execution history
Every node execution creates a record. Click "Last run" on any node to see its most recent execution details including what data went in, what came out, and how long it took.
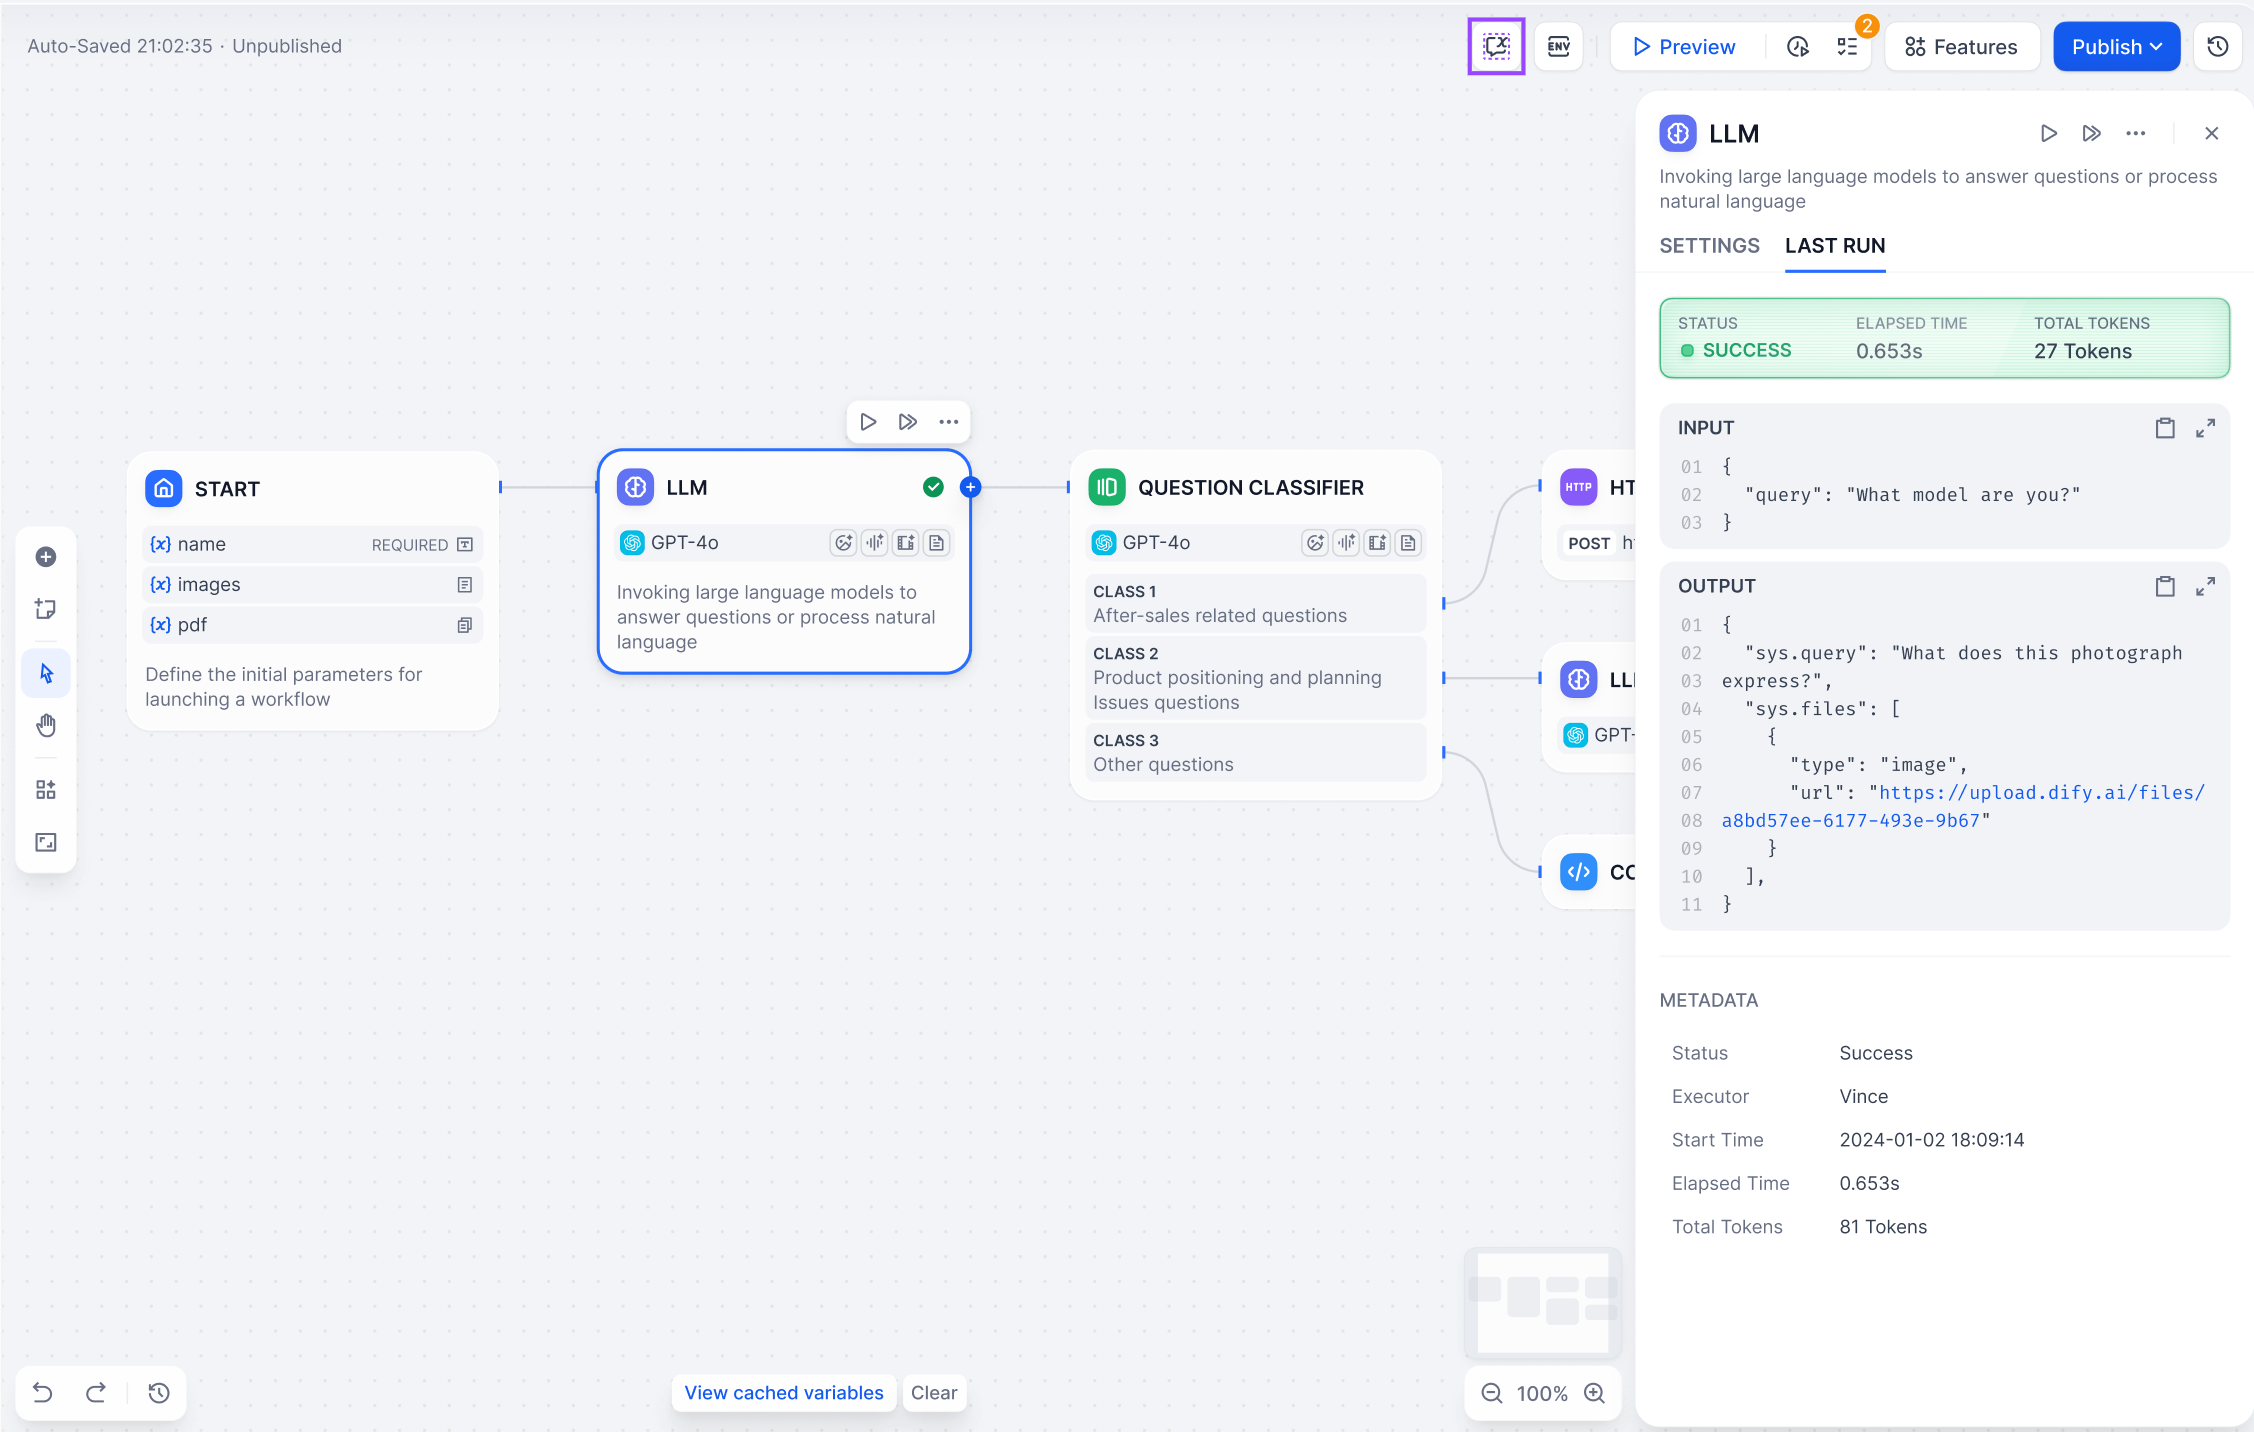
# Variable Inspector
Source: https://docs.dify.ai/en/use-dify/debug/variable-inspect
The Variable Inspector shows you all the data flowing through your workflow. It captures inputs and outputs from each node after they run, so you can see what's happening and test different scenarios.
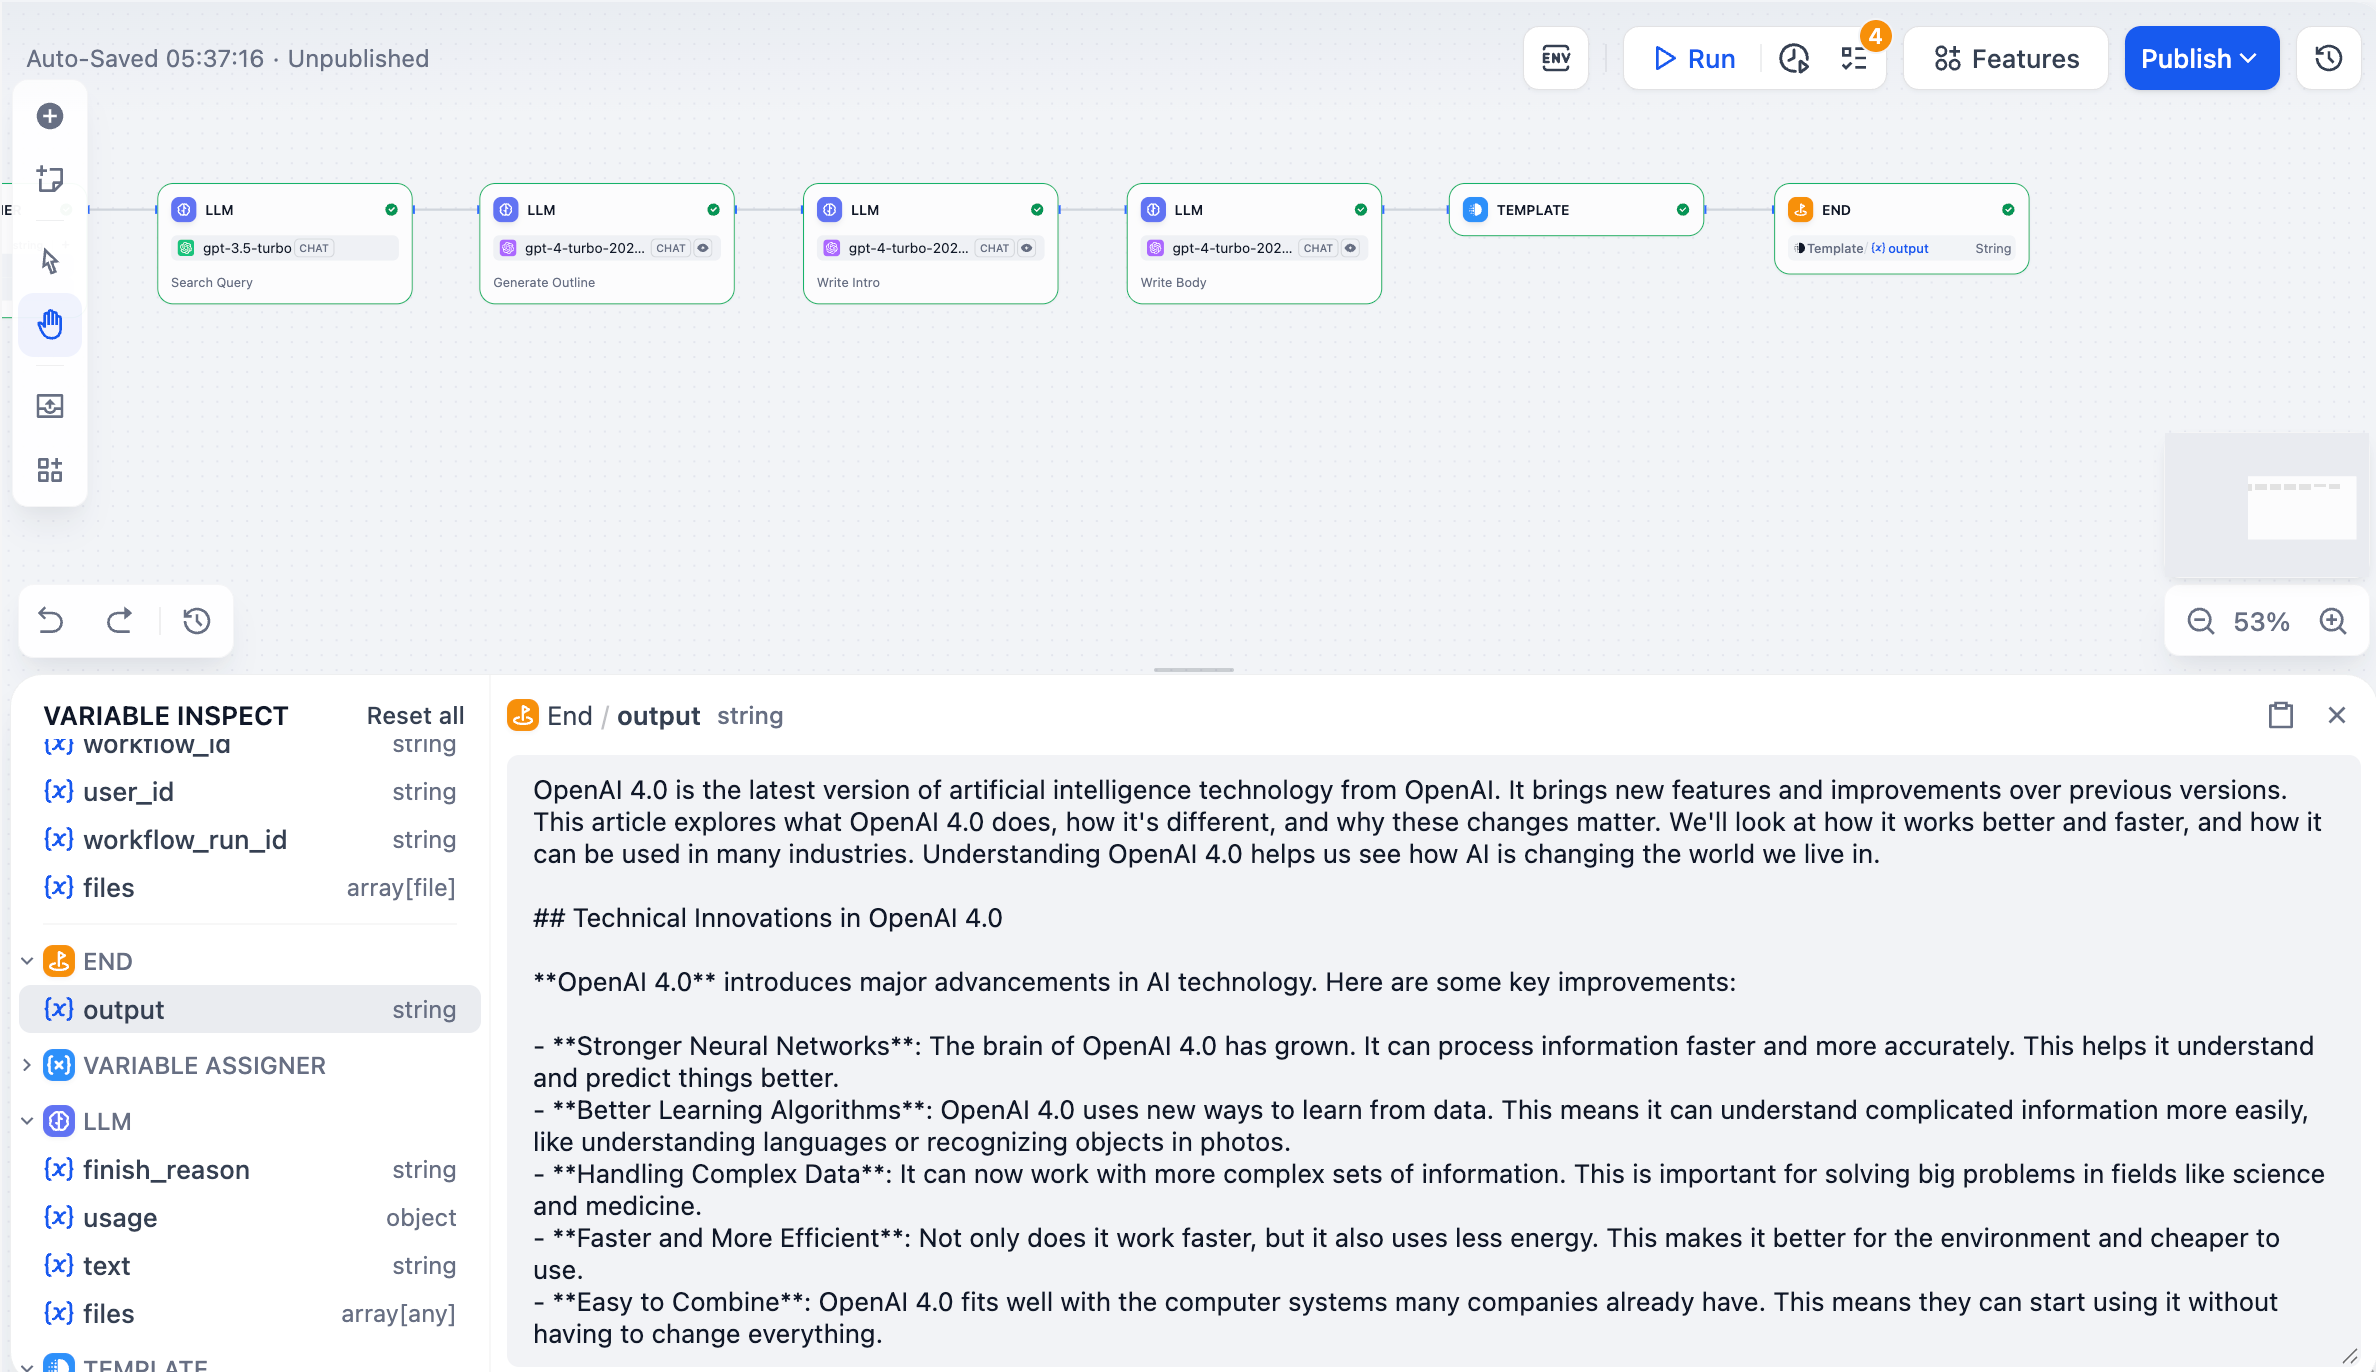
## Viewing variables
After any node runs, its output variables appear in the inspector panel at the bottom of the screen. Click any variable to see its full content.
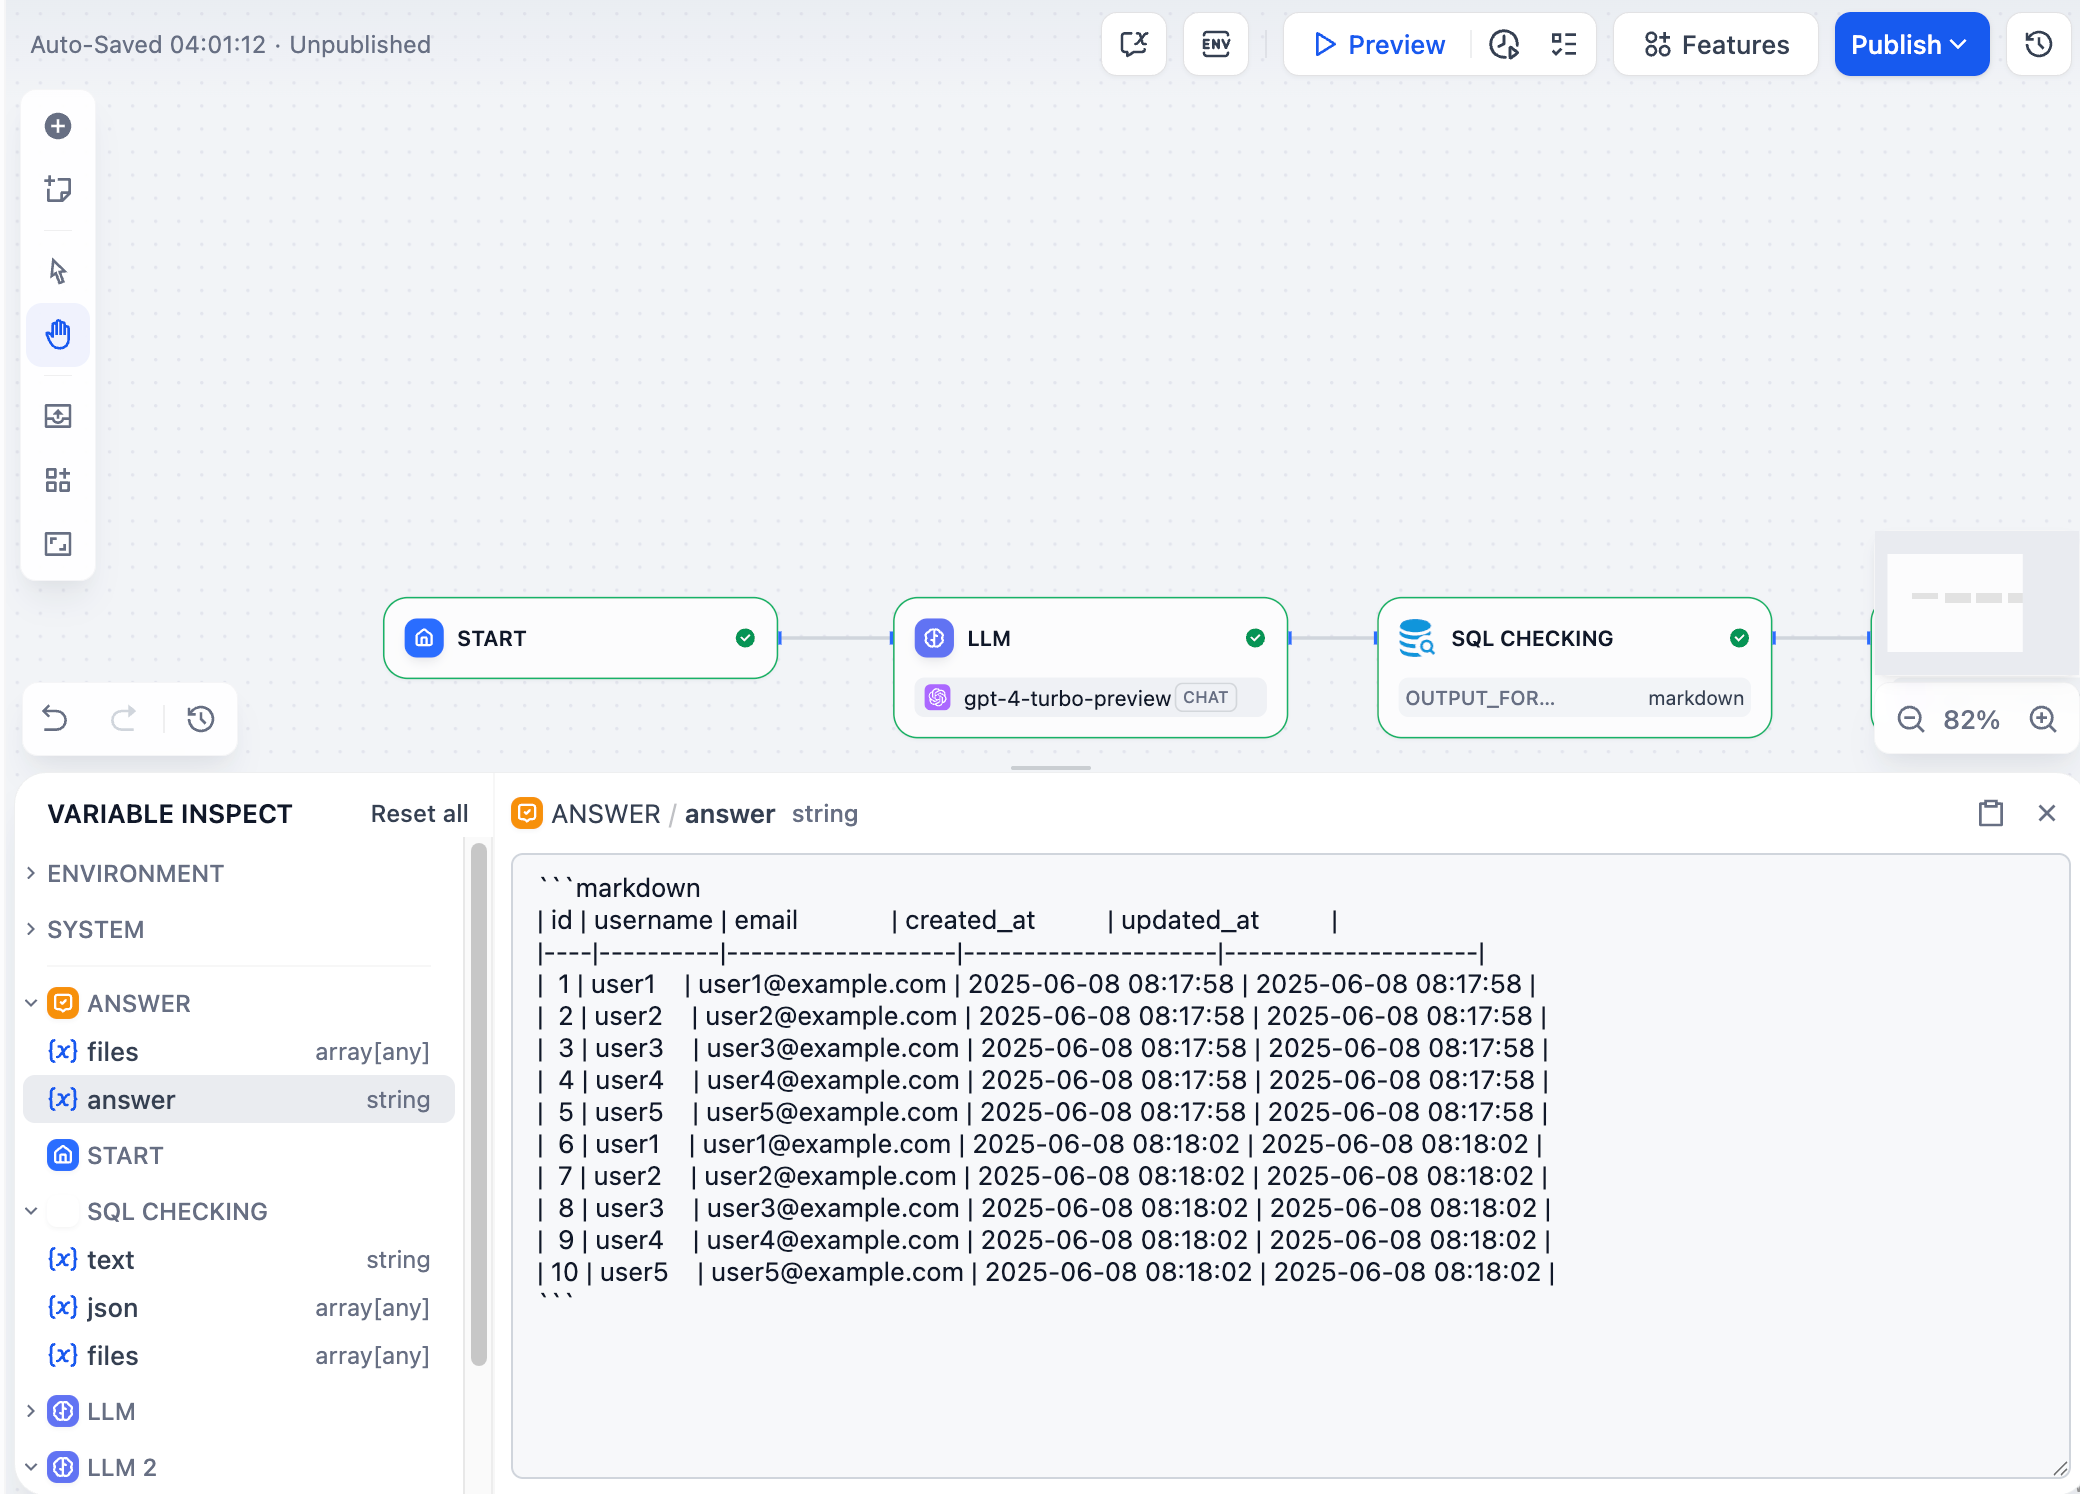
## Editing variables
You can edit most variable values by clicking on them. When you run downstream nodes, they'll use your edited values instead of the original ones. This lets you test different scenarios without re-running the entire workflow.
Editing variables here doesn't change the "Last run" record for the node that originally created them.
For example, if an LLM node generates SQL like `SELECT * FROM users`, you can edit it to `SELECT username FROM users` in the inspector and then re-run just the database node to see different results.
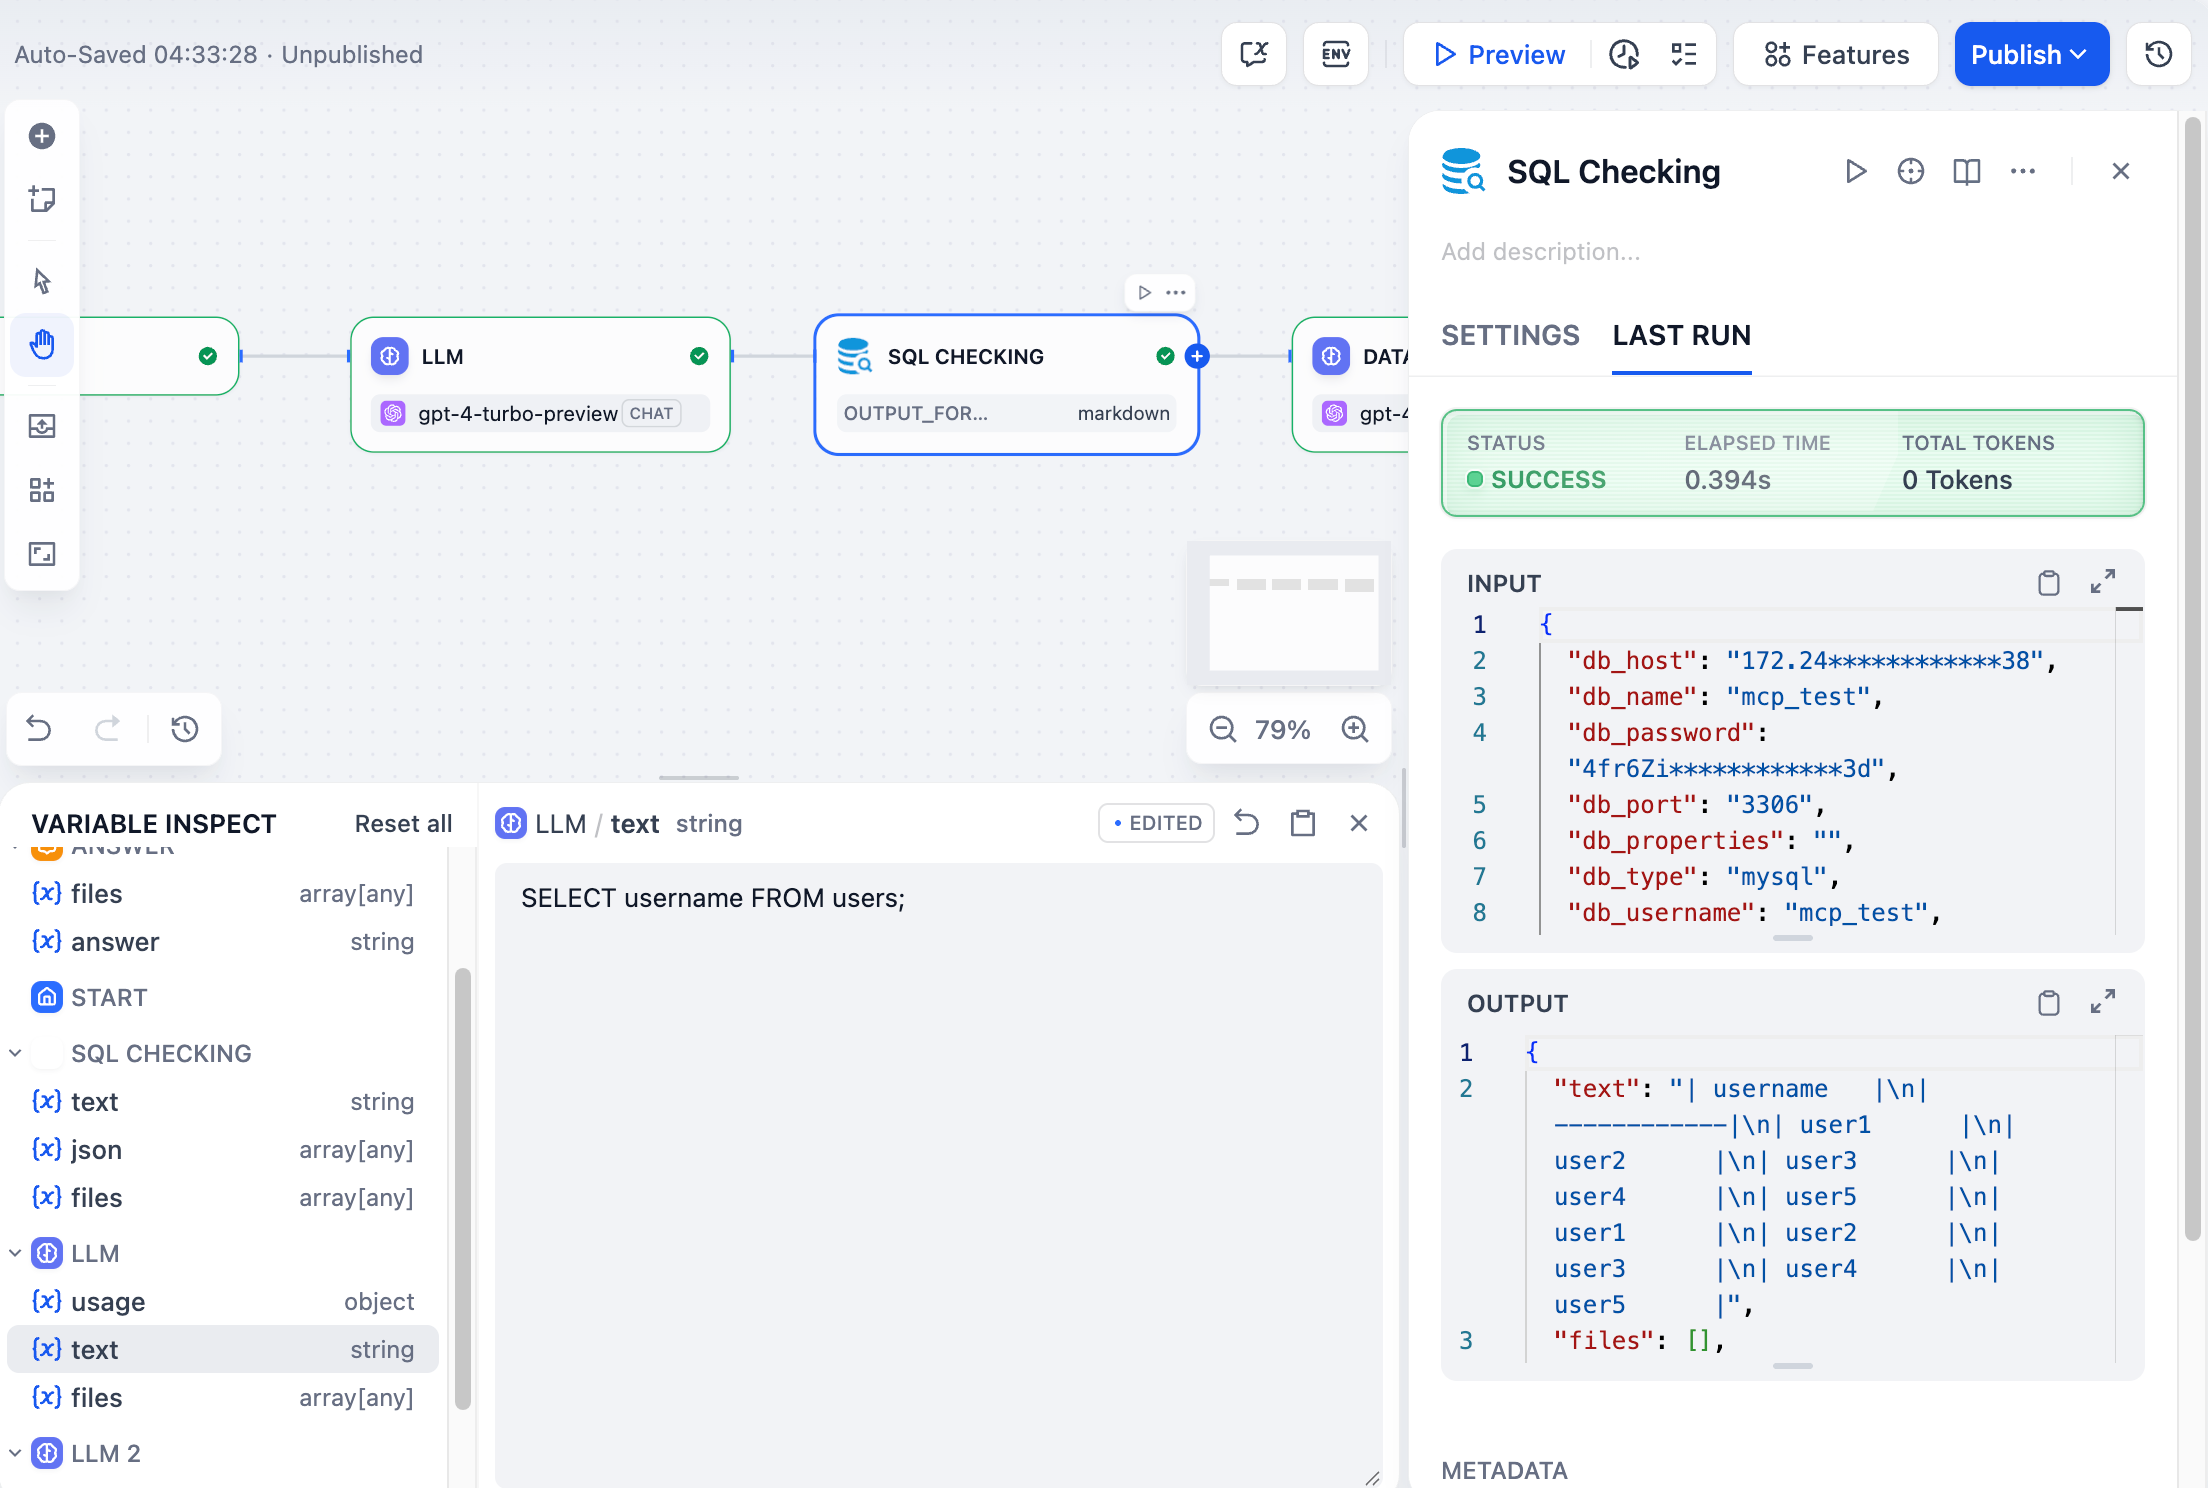
## Resetting variables
Click the revert icon next to any variable to restore its original value, or click "Reset all" to clear all cached variables at once.
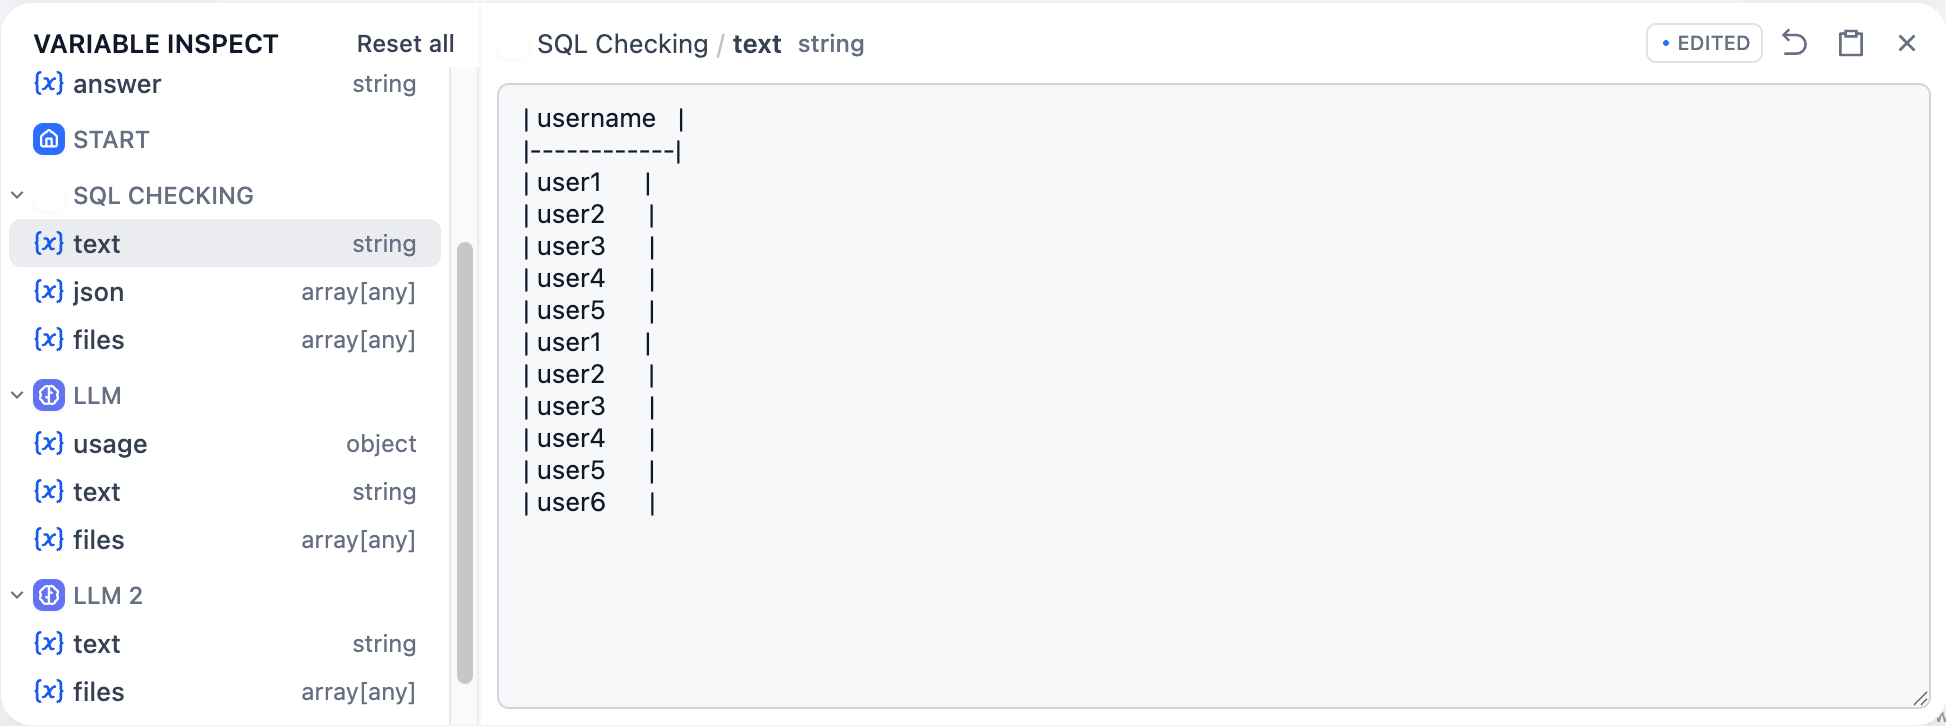
# Introduction
Source: https://docs.dify.ai/en/use-dify/getting-started/introduction
Dify is an open-source platform for building agentic workflows. It lets you define processes visually, connect your existing tools and data sources, and deploy AI applications that solve real problems.
![Dify Studio Overview]() Start shipping powerful apps in minutes
Core Dify building blocks explained
Deploy Dify on your own laptop / server
Trade notes with the community
What's changed over past releases
Example Dify use case walkthroughs
The name Dify comes from **D**o **I**t **F**or **Y**ou.
# Key Concepts
Source: https://docs.dify.ai/en/use-dify/getting-started/key-concepts
Quick overview of essential Dify concepts
### Dify App
Dify is made for agentic app building. In **Studio**, you can quickly build agentic workflows via a drag & drop interface and publish them as apps. You can access published apps via API, the web, or as an [MCP server](/en/use-dify/publish/publish-mcp). Dify offers two main app types: workflow and chatflow. You will need to choose an app type when creating a new app.
We recommend choosing Workflow or Chatflow your app type. But in addition to these, Dify also offers 3 more basic app types: Chatbot, Agent, and Text Generator.
Start shipping powerful apps in minutes
Core Dify building blocks explained
Deploy Dify on your own laptop / server
Trade notes with the community
What's changed over past releases
Example Dify use case walkthroughs
The name Dify comes from **D**o **I**t **F**or **Y**ou.
# Key Concepts
Source: https://docs.dify.ai/en/use-dify/getting-started/key-concepts
Quick overview of essential Dify concepts
### Dify App
Dify is made for agentic app building. In **Studio**, you can quickly build agentic workflows via a drag & drop interface and publish them as apps. You can access published apps via API, the web, or as an [MCP server](/en/use-dify/publish/publish-mcp). Dify offers two main app types: workflow and chatflow. You will need to choose an app type when creating a new app.
We recommend choosing Workflow or Chatflow your app type. But in addition to these, Dify also offers 3 more basic app types: Chatbot, Agent, and Text Generator.
![App Type Selector]() These app types run on the same workflow engine underneath, but comes with simpler legacy interfaces:
These app types run on the same workflow engine underneath, but comes with simpler legacy interfaces:
![Chatbot Interface]() ### Workflow
Build workflow apps to handle single-turn tasks. The webapp interface and API provides easy access to batch execute many tasks at once.
Underneath it all, workflow forms the basis for all other app types in Dify.
You can specify how and when to start your workflow. There are two types of Start nodes:
* **[User Input](/en/use-dify/nodes/user-input)**: Direct user interaction or API call invokes the app.
* **[Trigger](/en/use-dify/nodes/trigger/overview)**: The application runs automatically on a schedule or in response to a specific third-party event.
User Input and Trigger Start nodes are mutually exclusive—they cannot be used on the same canvas. To switch between them, right-click the current start node > **Change Node**. Alternatively, delete the current start node and add a new one.
Only workflows started by User Input can be published as standalone web apps or MCP servers, exposed through backend service APIs, or used as tools in other Dify applications.
### Chatflow
Chatflow is a special type of workflow app that gets triggered at every turn of a conversation. Other than workflow features, chatflow comes with the ability to store and update custom conversation-specific variables, enable memory in LLM nodes, and stream formatted text, images, and files at different points throughout the chatflow run.
Unlike workflow, chatflow can't use [Trigger](/en/use-dify/nodes/trigger/overview) to start.
### Dify DSL
All Dify apps can be exported into a YAML file in Dify's own DSL (Domain-Specific Language) and you may create Dify apps from these DSL files directly. This makes it easy to port apps to other Dify instances and share with others.
### Variables
A variable is a labeled container to store information, so you can find and use that information later by referencing its name. You'll come across different types of variables when building a Dify app:
**Inputs**: You can specify any number of input variables at the [User Input](/en/use-dify/nodes/user-input) node for your app's end users to fill in.
### Workflow
Build workflow apps to handle single-turn tasks. The webapp interface and API provides easy access to batch execute many tasks at once.
Underneath it all, workflow forms the basis for all other app types in Dify.
You can specify how and when to start your workflow. There are two types of Start nodes:
* **[User Input](/en/use-dify/nodes/user-input)**: Direct user interaction or API call invokes the app.
* **[Trigger](/en/use-dify/nodes/trigger/overview)**: The application runs automatically on a schedule or in response to a specific third-party event.
User Input and Trigger Start nodes are mutually exclusive—they cannot be used on the same canvas. To switch between them, right-click the current start node > **Change Node**. Alternatively, delete the current start node and add a new one.
Only workflows started by User Input can be published as standalone web apps or MCP servers, exposed through backend service APIs, or used as tools in other Dify applications.
### Chatflow
Chatflow is a special type of workflow app that gets triggered at every turn of a conversation. Other than workflow features, chatflow comes with the ability to store and update custom conversation-specific variables, enable memory in LLM nodes, and stream formatted text, images, and files at different points throughout the chatflow run.
Unlike workflow, chatflow can't use [Trigger](/en/use-dify/nodes/trigger/overview) to start.
### Dify DSL
All Dify apps can be exported into a YAML file in Dify's own DSL (Domain-Specific Language) and you may create Dify apps from these DSL files directly. This makes it easy to port apps to other Dify instances and share with others.
### Variables
A variable is a labeled container to store information, so you can find and use that information later by referencing its name. You'll come across different types of variables when building a Dify app:
**Inputs**: You can specify any number of input variables at the [User Input](/en/use-dify/nodes/user-input) node for your app's end users to fill in.
![User Input Node Variables]() Additionally, the User Input node comes with a set of input variables that you can reference later in the flow. Depending on the app type (workflow or chatflow), different variables are provided.
| Variable Name |
Additionally, the User Input node comes with a set of input variables that you can reference later in the flow. Depending on the app type (workflow or chatflow), different variables are provided.
| Variable Name | Data Type
| Description | Notes |
| :-------------------- | :------------------- | :--------------------------------------------------------------------------------------------------------------------------------------------------------------- | :--------------------------------------------------------------------------------------------------------------------------------------------- |
| `sys.user_id` | String | User ID: A unique identifier automatically assigned by the system to each user when they use a workflow application. It is used to distinguish different users. | |
| `sys.app_id` | String | App ID: A unique identifier automatically assigned by the system to each App. This parameter is used to record the basic information of the current application. | This parameter is used to differentiate and locate distinct Workflow applications for users with development capabilities. |
| `sys.workflow_id` | String | Workflow ID: This parameter records information about all nodes information in the current Workflow application. | This parameter can be used by users with development capabilities to track and record information about the nodes contained within a Workflow. |
| `sys.workflow_run_id` | String | Workflow Run ID: Used to record the runtime status and execution logs of a Workflow application. | This parameter can be used by users with development capabilities to track the application's historical execution records. |
| `sys.timestamp` | Number | The start time of each workflow execution. | |
| Variable Name | Data Type
| Description | Notes |
| :-------------------- | :------------------- | :-------------------------------------------------------------------------------------------------------------------------------------------------------------------------------------------------------------------------------------------------------------------------------------------------------------------------------------------------------------------- | :--------------------------------------------------------------------------------------------------------------------------------------------------------------------------------- |
| `sys.conversation_id` | String | A unique ID for the chatting box interaction session, grouping all related messages into the same conversation, ensuring that the LLM continues the chatting on the same topic and context. | |
| `sys.dialogue_count` | Number | The number of conversations turns during the user's interaction with a Chatflow application. The count automatically increases by one after each chat round and can be combined with if-else nodes to create rich branching logic.
For example, LLM will review the conversation history at the X conversation turn and automatically provide an analysis. | |
| `sys.user_id` | String | A unique ID is assigned for each application user to distinguish different conversation users. | The Service API does not share conversations created by the WebApp. This means users with the same ID will have separate conversation histories between API and WebApp interfaces. |
| `sys.app_id` | String | App ID: A unique identifier automatically assigned by the system to each App. This parameter is used to record the basic information of the current application. | This parameter is used to differentiate and locate distinct Workflow applications for users with development capabilities. |
| `sys.workflow_id` | String | Workflow ID: This parameter records information about all nodes information in the current Workflow application. | This parameter can be used by users with development capabilities to track and record information about the nodes contained within a Workflow. |
| `sys.workflow_run_id` | String | Workflow Run ID: Used to record the runtime status and execution logs of a Workflow application. | This parameter can be used by users with development capabilities to track the application's historical execution records. |
User inputs are set at the start of each workflow run and cannot be updated.
**Outputs**: Each node produces one or more outputs that can be referenced in subsequent nodes. For instance, the LLM node has outputs:
![LLM Node Output Variables]() Like inputs, node outputs cannot be updated either.
**Environment Variables**: Use environment variable to store sensitive information like API keys specific to your app. This allows a clean separation between secrets and the Dify app itself, so you don't have to risk exposing passwords and keys when sharing your app's DSL. Environment variables are also constants and cannot be updated.
**Conversation Variables (Chatflow only)**: These variables are conversation-specific -- meaning they persist over multi-turn chatflow runs in a single conversation so you can store and access dynamic information like to-do list and token cost. You can update the value of a conversation variable via the Variable Assigner node:
Like inputs, node outputs cannot be updated either.
**Environment Variables**: Use environment variable to store sensitive information like API keys specific to your app. This allows a clean separation between secrets and the Dify app itself, so you don't have to risk exposing passwords and keys when sharing your app's DSL. Environment variables are also constants and cannot be updated.
**Conversation Variables (Chatflow only)**: These variables are conversation-specific -- meaning they persist over multi-turn chatflow runs in a single conversation so you can store and access dynamic information like to-do list and token cost. You can update the value of a conversation variable via the Variable Assigner node:
![Conversation Variables Panel]() ### Variable Referencing
You can easily pass variables to any node when configuring its input field by selecting from a dropdown:
### Variable Referencing
You can easily pass variables to any node when configuring its input field by selecting from a dropdown:
![Variable Picker Dropdown]() You can also insert variable values into complex text inputs by typing `/` slash, and selecting the desired variable from the dropdown.
You can also insert variable values into complex text inputs by typing `/` slash, and selecting the desired variable from the dropdown.
![Variable Slash Insert]() # 30-Minute Quick Start
Source: https://docs.dify.ai/en/use-dify/getting-started/quick-start
Dive into Dify through an example app
This step-by-step tutorial will walk you through creating a multi-platform content generator from scratch.
Beyond basic LLM integration, you'll discover how to use powerful Dify nodes to orchestrate sophisticated AI applications faster with less effort.
By the end of this tutorial, you'll have a workflow that takes whatever content you throw at it (text, documents, or images), adds your preferred voice and tone, and spits out polished, platform-specific social media posts in your chosen language.
The complete workflow is shown below. Feel free to refer back to this as you build to stay on track and see how all the nodes work together.
# 30-Minute Quick Start
Source: https://docs.dify.ai/en/use-dify/getting-started/quick-start
Dive into Dify through an example app
This step-by-step tutorial will walk you through creating a multi-platform content generator from scratch.
Beyond basic LLM integration, you'll discover how to use powerful Dify nodes to orchestrate sophisticated AI applications faster with less effort.
By the end of this tutorial, you'll have a workflow that takes whatever content you throw at it (text, documents, or images), adds your preferred voice and tone, and spits out polished, platform-specific social media posts in your chosen language.
The complete workflow is shown below. Feel free to refer back to this as you build to stay on track and see how all the nodes work together.
![Workflow Overview]() ## Before You Start
Go to [Dify Cloud](https://cloud.dify.ai) and sign up for free.
New accounts on the Sandbox plan include 200 AI credits for calling models from providers like OpenAI, Anthropic, and Gemini.
AI credits are a one-time allocation and don't renew monthly.
Go to **Settings** > **Model Provider** and install the OpenAI plugin. This tutorial uses `gpt-5.2` for the examples.
If you're using Sandbox credits, no API key is required—the plugin is ready to use once installed. You can also configure your own API key and use it instead.
1. In the top-right corner of the **Model Provider** page, click **Default Model Settings**.
2. Set the **System Reasoning Model** to `gpt-5.2`. This becomes the default model in the workflow.
## Step 1: Create a New Workflow
1. Go to **Studio**, then select **Create from blank** > **Workflow**.
2. Name the workflow `Multi-platform content generator` and click **Create**. You'll automatically land on the workflow canvas to start building.
3. Select the User Input node to start our workflow.
## Step 2: Orchestrate & Configure
Keep any unmentioned settings at their default values.
Give nodes and variables clear, descriptive names to make them easier to identify and reference.
### 1. Collect User Inputs: User Input Node
First, we need to define what information to gather from users for running our content generator, such as the draft text, target platforms, desired tone, and any reference materials.
The User Input node is where we can easily set this up. Each input field we add here becomes a variable that all downstream nodes can reference and use.
Click the User Input node to open its configuration panel, then add the following input fields.
* Field type: `Paragraph`
* Variable Name: `draft`
* Label Name: `Draft`
* Max length: `2048`
* Required: `Yes`
* Field type: `File list`
* Variable Name: `user_file`
* Label Name: `Upload File (≤ 10)`
* Support File Types: `Document`, `Image`
* Upload File Types: `Both`
* Max number of uploads: `10`
* Required: `No`
* Field type: `Paragraph`
* Variable Name: `voice_and_tone`
* Label Name: `Voice & Tone`
* Max length: `2048`
* Required: `No`
* Field type: `Short Text`
* Variable Name: `platform`
* Label Name: `Target Platform (≤ 10)`
* Max length: `256`
* Required: `Yes`
* Field type: `Select`
* Variable Name: `language`
* Label Name: `Language`
* Options:
* `English`
* `日本語`
* `简体中文`
* Required: `Yes`
## Before You Start
Go to [Dify Cloud](https://cloud.dify.ai) and sign up for free.
New accounts on the Sandbox plan include 200 AI credits for calling models from providers like OpenAI, Anthropic, and Gemini.
AI credits are a one-time allocation and don't renew monthly.
Go to **Settings** > **Model Provider** and install the OpenAI plugin. This tutorial uses `gpt-5.2` for the examples.
If you're using Sandbox credits, no API key is required—the plugin is ready to use once installed. You can also configure your own API key and use it instead.
1. In the top-right corner of the **Model Provider** page, click **Default Model Settings**.
2. Set the **System Reasoning Model** to `gpt-5.2`. This becomes the default model in the workflow.
## Step 1: Create a New Workflow
1. Go to **Studio**, then select **Create from blank** > **Workflow**.
2. Name the workflow `Multi-platform content generator` and click **Create**. You'll automatically land on the workflow canvas to start building.
3. Select the User Input node to start our workflow.
## Step 2: Orchestrate & Configure
Keep any unmentioned settings at their default values.
Give nodes and variables clear, descriptive names to make them easier to identify and reference.
### 1. Collect User Inputs: User Input Node
First, we need to define what information to gather from users for running our content generator, such as the draft text, target platforms, desired tone, and any reference materials.
The User Input node is where we can easily set this up. Each input field we add here becomes a variable that all downstream nodes can reference and use.
Click the User Input node to open its configuration panel, then add the following input fields.
* Field type: `Paragraph`
* Variable Name: `draft`
* Label Name: `Draft`
* Max length: `2048`
* Required: `Yes`
* Field type: `File list`
* Variable Name: `user_file`
* Label Name: `Upload File (≤ 10)`
* Support File Types: `Document`, `Image`
* Upload File Types: `Both`
* Max number of uploads: `10`
* Required: `No`
* Field type: `Paragraph`
* Variable Name: `voice_and_tone`
* Label Name: `Voice & Tone`
* Max length: `2048`
* Required: `No`
* Field type: `Short Text`
* Variable Name: `platform`
* Label Name: `Target Platform (≤ 10)`
* Max length: `256`
* Required: `Yes`
* Field type: `Select`
* Variable Name: `language`
* Label Name: `Language`
* Options:
* `English`
* `日本語`
* `简体中文`
* Required: `Yes`
![User Input]() ### 2. Identify Target Platforms: Parameter Extractor Node
Since our platform field accepts free-form text input, users might type in various ways: `x and linkedIn`, `post on Twitter and LinkedIn`, or even `Twitter + LinkedIn please`.
However, we need a clean and structured list, like `["Twitter", "LinkedIn"]`, that downstream nodes can work with reliably.
This is the perfect job for the Parameter Extractor node. In our case, it uses the gpt-5.2 model to analyze users' natural language, recognize all these variations, and output a standardized array.
After the User Input node, add a Parameter Extractor node and configure it:
1. In the **Input Variable** field, select `User Input/platform`.
2. Add an extract parameter:
* Name: `platform`
* Type: `Array[String]`
* Description: `The platform(s) for which the user wants to create tailored content.`
* Required: `Yes`
3. In the **Instruction** field, paste the following to guide the LLM in parameter extraction:
```markdown INSTRUCTION theme={null}
# TASK DESCRIPTION
Parse platform names from input and output as a JSON array.
## PROCESSING RULES
- Support multiple delimiters: commas, semicolons, spaces, line breaks, "and", "&", "|", etc.
- Standardize common platform name variants (twitter/X→Twitter, insta→Instagram, etc.)
- Remove duplicates and invalid entries
- Preserve unknown but reasonable platform names
- Preserve the original language of platform names
## OUTPUT REQUIREMENTS
- Success: ["Platform1", "Platform2"]
- No platforms found: [No platforms identified. Please enter a valid platform name.]
## EXAMPLES
- Input: "twitter, linkedin" → ["Twitter", "LinkedIn"]
- Input: "x and insta" → ["Twitter", "Instagram"]
- Input: "invalid content" → [No platforms identified. Please enter a valid platform name.]
```
Note that we've instructed the LLM to output a specific error message for invalid inputs, which will serve as the end trigger for our workflow in the next step.
### 2. Identify Target Platforms: Parameter Extractor Node
Since our platform field accepts free-form text input, users might type in various ways: `x and linkedIn`, `post on Twitter and LinkedIn`, or even `Twitter + LinkedIn please`.
However, we need a clean and structured list, like `["Twitter", "LinkedIn"]`, that downstream nodes can work with reliably.
This is the perfect job for the Parameter Extractor node. In our case, it uses the gpt-5.2 model to analyze users' natural language, recognize all these variations, and output a standardized array.
After the User Input node, add a Parameter Extractor node and configure it:
1. In the **Input Variable** field, select `User Input/platform`.
2. Add an extract parameter:
* Name: `platform`
* Type: `Array[String]`
* Description: `The platform(s) for which the user wants to create tailored content.`
* Required: `Yes`
3. In the **Instruction** field, paste the following to guide the LLM in parameter extraction:
```markdown INSTRUCTION theme={null}
# TASK DESCRIPTION
Parse platform names from input and output as a JSON array.
## PROCESSING RULES
- Support multiple delimiters: commas, semicolons, spaces, line breaks, "and", "&", "|", etc.
- Standardize common platform name variants (twitter/X→Twitter, insta→Instagram, etc.)
- Remove duplicates and invalid entries
- Preserve unknown but reasonable platform names
- Preserve the original language of platform names
## OUTPUT REQUIREMENTS
- Success: ["Platform1", "Platform2"]
- No platforms found: [No platforms identified. Please enter a valid platform name.]
## EXAMPLES
- Input: "twitter, linkedin" → ["Twitter", "LinkedIn"]
- Input: "x and insta" → ["Twitter", "Instagram"]
- Input: "invalid content" → [No platforms identified. Please enter a valid platform name.]
```
Note that we've instructed the LLM to output a specific error message for invalid inputs, which will serve as the end trigger for our workflow in the next step.
![Parameter Extractor]() ### 3. Validate Platform Extraction Results: IF/ELSE Node
What if a user enters an invalid platform name, like `ohhhhhh` or `BookFace`? We don't want to waste time and tokens generating useless content.
In such cases, we can use an IF/ELSE node to create a branch that stops the workflow early. We'll set a condition that checks for the error message from the Parameter Extractor node; if that message is detected, the workflow will route directly to an Output node and end.
### 3. Validate Platform Extraction Results: IF/ELSE Node
What if a user enters an invalid platform name, like `ohhhhhh` or `BookFace`? We don't want to waste time and tokens generating useless content.
In such cases, we can use an IF/ELSE node to create a branch that stops the workflow early. We'll set a condition that checks for the error message from the Parameter Extractor node; if that message is detected, the workflow will route directly to an Output node and end.
![IF Branch]() 1. After the Parameter Extractor node, add an IF/ELSE node.
2. On the IF/ELSE node's panel, define the **IF** condition:
**IF** `Parameter Extractor/platform` **contains** `No platforms identified. Please enter a valid platform name.`
3. After the IF/ELSE node, add an Output node to the IF branch.
4. On the Output node's panel, set `Parameter Extractor/platform` as the output variable.
### 4. Separate Uploaded Files by Type: List Operator Node
Our users can upload both images and documents as reference materials, but these two types require different handling with `gpt-5.2`: images can be interpreted directly via its vision capability, while documents must first be converted to text before the model can process them.
To manage this, we'll use two List Operator nodes to filter and split the uploaded files into separate branches—one for images and one for documents.
1. After the Parameter Extractor node, add an IF/ELSE node.
2. On the IF/ELSE node's panel, define the **IF** condition:
**IF** `Parameter Extractor/platform` **contains** `No platforms identified. Please enter a valid platform name.`
3. After the IF/ELSE node, add an Output node to the IF branch.
4. On the Output node's panel, set `Parameter Extractor/platform` as the output variable.
### 4. Separate Uploaded Files by Type: List Operator Node
Our users can upload both images and documents as reference materials, but these two types require different handling with `gpt-5.2`: images can be interpreted directly via its vision capability, while documents must first be converted to text before the model can process them.
To manage this, we'll use two List Operator nodes to filter and split the uploaded files into separate branches—one for images and one for documents.
![List Operator]() 1. After the IF/ELSE node, add **two** parallel List Operator nodes to the ELSE branch.
2. Rename one node to `Image` and the other to `Document`.
3. Configure the Image node:
1. Set `User Input/user_file` as the input variable.
2. Enable **Filter Condition**: `{x}type` **in** `Image`.
4. Configure the Document node:
1. Set `User Input/user_file` as the input variable.
2. Enable **Filter Condition**: `{x}type` **in** `Doc`.
### 5. Extract Text from Documents: Doc Extractor Node
`gpt-5.2` cannot directly read uploaded documents like PDF or DOCX, so we must first convert them into plain text.
This is exactly what a Doc Extractor node does. It takes document files as input and outputs clean, usable text for the next steps.
1. After the IF/ELSE node, add **two** parallel List Operator nodes to the ELSE branch.
2. Rename one node to `Image` and the other to `Document`.
3. Configure the Image node:
1. Set `User Input/user_file` as the input variable.
2. Enable **Filter Condition**: `{x}type` **in** `Image`.
4. Configure the Document node:
1. Set `User Input/user_file` as the input variable.
2. Enable **Filter Condition**: `{x}type` **in** `Doc`.
### 5. Extract Text from Documents: Doc Extractor Node
`gpt-5.2` cannot directly read uploaded documents like PDF or DOCX, so we must first convert them into plain text.
This is exactly what a Doc Extractor node does. It takes document files as input and outputs clean, usable text for the next steps.
![Doc Extractor]() 1. After the Document node, add a Doc Extractor node.
2. On the Doc Extractor node's panel, set `Document/result` as the input variable.
### 6. Integrate All Reference Materials: LLM Node
When users provide multiple reference types—draft text, documents, and images—simultaneously, we need to consolidate them into a single, coherent summary.
An LLM node will handle this task by analyzing all the scattered pieces to create a comprehensive context that guides subsequent content generation.
1. After the Document node, add a Doc Extractor node.
2. On the Doc Extractor node's panel, set `Document/result` as the input variable.
### 6. Integrate All Reference Materials: LLM Node
When users provide multiple reference types—draft text, documents, and images—simultaneously, we need to consolidate them into a single, coherent summary.
An LLM node will handle this task by analyzing all the scattered pieces to create a comprehensive context that guides subsequent content generation.
![Integrate Information]() 1. After the Doc Extractor node, add an LLM node.
2. Connect the Image node to this LLM node as well.
3. Click the LLM node to configure it:
1. Rename it to `Integrate Info`.
2. Enable **VISION** and set `Image/result` as the vision variable.
3. In the system instruction field, paste the following:
```markdown wrap theme={null}
# ROLE & TASK
You are a content strategist. Analyze the provided draft and reference materials (if any), then create a comprehensive content foundation for multi-platform social media optimization.
# ANALYSIS PRINCIPLES
- Work exclusively with provided information—no external assumptions
- Focus on extraction, synthesis, and strategic interpretation
- Identify compelling and actionable elements
- Prepare insights adaptable across different platforms
# REQUIRED ANALYSIS
Deliver structured analysis with:
## 1. CORE MESSAGE
- Central theme, purpose, objective
- Key value or benefit being communicated
## 2. ESSENTIAL CONTENT ELEMENTS
- Primary topics, facts, statistics, data points
- Notable quotes, testimonials, key statements
- Features, benefits, characteristics mentioned
- Dates, locations, contextual details
## 3. STRATEGIC INSIGHTS
- What makes content compelling/unique
- Emotional/rational appeals present
- Credibility factors, proof points
- Competitive advantages highlighted
## 4. ENGAGEMENT OPPORTUNITIES
- Discussion points, questions emerging
- Calls-to-action, next steps suggested
- Interactive/participation opportunities
- Trending themes touched upon
## 5. PLATFORM OPTIMIZATION FOUNDATION
- High-impact: Quick, shareable formats
- Professional: Business-focused discussions
- Community: Interaction and sharing
- Visual: Enhanced with strong visuals
## 6. SUPPORTING DETAILS
- Metrics, numbers, quantifiable results
- Direct quotes, testimonials
- Technical details, specifications
- Background context available
```
4. Click **Add Message** to add a user message, then paste the following. Type `{` or `/` to replace `Doc Extractor/text` and `User Input/draft` with the corresponding variables from the list.
```markdown USER theme={null}
Draft: User Input/draft
Reference material: Doc Extractor/text
```
1. After the Doc Extractor node, add an LLM node.
2. Connect the Image node to this LLM node as well.
3. Click the LLM node to configure it:
1. Rename it to `Integrate Info`.
2. Enable **VISION** and set `Image/result` as the vision variable.
3. In the system instruction field, paste the following:
```markdown wrap theme={null}
# ROLE & TASK
You are a content strategist. Analyze the provided draft and reference materials (if any), then create a comprehensive content foundation for multi-platform social media optimization.
# ANALYSIS PRINCIPLES
- Work exclusively with provided information—no external assumptions
- Focus on extraction, synthesis, and strategic interpretation
- Identify compelling and actionable elements
- Prepare insights adaptable across different platforms
# REQUIRED ANALYSIS
Deliver structured analysis with:
## 1. CORE MESSAGE
- Central theme, purpose, objective
- Key value or benefit being communicated
## 2. ESSENTIAL CONTENT ELEMENTS
- Primary topics, facts, statistics, data points
- Notable quotes, testimonials, key statements
- Features, benefits, characteristics mentioned
- Dates, locations, contextual details
## 3. STRATEGIC INSIGHTS
- What makes content compelling/unique
- Emotional/rational appeals present
- Credibility factors, proof points
- Competitive advantages highlighted
## 4. ENGAGEMENT OPPORTUNITIES
- Discussion points, questions emerging
- Calls-to-action, next steps suggested
- Interactive/participation opportunities
- Trending themes touched upon
## 5. PLATFORM OPTIMIZATION FOUNDATION
- High-impact: Quick, shareable formats
- Professional: Business-focused discussions
- Community: Interaction and sharing
- Visual: Enhanced with strong visuals
## 6. SUPPORTING DETAILS
- Metrics, numbers, quantifiable results
- Direct quotes, testimonials
- Technical details, specifications
- Background context available
```
4. Click **Add Message** to add a user message, then paste the following. Type `{` or `/` to replace `Doc Extractor/text` and `User Input/draft` with the corresponding variables from the list.
```markdown USER theme={null}
Draft: User Input/draft
Reference material: Doc Extractor/text
```
![User Message]() ### 7. Create Customized Content for Each Platform: Iteration Node
Now that the integrated references and target platforms are ready, let's generate a tailored post for each platform using an Iteration node.
The node will loop through the list of platforms and run a sub-workflow for each: first analyze the specific platform's style guidelines and best practices, then generate optimized content based on all available information.
### 7. Create Customized Content for Each Platform: Iteration Node
Now that the integrated references and target platforms are ready, let's generate a tailored post for each platform using an Iteration node.
The node will loop through the list of platforms and run a sub-workflow for each: first analyze the specific platform's style guidelines and best practices, then generate optimized content based on all available information.
![Iteration Node]() 1. After the Integrate Info node, add an Iteration node.
2. Inside the Iteration node, add an LLM node and configure it:
1. Rename it to `Identify Style`.
2. In the system instruction field, paste the following:
```markdown wrap theme={null}
# ROLE & TASK
You are a social media expert. Analyze the platform and provide content creation guidelines.
# ANALYSIS REQUIRED
For the given platform, provide:
## 1. PLATFORM PROFILE
- Platform type and category
- Target audience characteristics
## 2. CONTENT GUIDELINES
- Optimal content length (characters/words)
- Recommended tone (professional/casual/conversational)
- Formatting best practices (line breaks, emojis, etc.)
## 3. ENGAGEMENT STRATEGY
- Hashtag recommendations (quantity and style)
- Call-to-action best practices
- Algorithm optimization tips
## 4. TECHNICAL SPECS
- Character/word limits
- Visual content requirements
- Special formatting needs
## 5. PLATFORM-SPECIFIC NOTES
- Unique features or recent changes
- Industry-specific considerations
- Community engagement approaches
# OUTPUT REQUIREMENTS
- For recognized platforms: Provide specific guidelines
- For unknown platforms: Base recommendations on similar platforms
- Focus on actionable, practical advice
- Be concise but comprehensive
```
3. Click **Add Message** to add a user message, then paste the following. Type `{` or `/` to replace `Current Iteration/item` with the corresponding variable from the list.
```markdown USER theme={null}
Platform: Current Iteration/item
```
3. After the Identify Style node, add another LLM node and configure it:
1. Rename it to `Create Content`.
2. In the system instruction field, paste the following:
```markdown wrap theme={null}
# ROLE & TASK
You are an expert social media content creator. Generate publication-ready content that matches platform guidelines, incorporates source information, and follows specified voice/tone and language requirements.
# LANGUAGE REQUIREMENT
- Generate ALL content exclusively in the target language specified in the user message. You MUST write the entire post in that language, regardless of the language of any source materials.
- No mixing of languages whatsoever
- Adapt platform terminology to the target language
# CONTENT REQUIREMENTS
- Follow platform guidelines exactly (format, length, tone, hashtags)
- Integrate source information effectively (key messages, data, value props)
- Apply voice & tone consistently (if provided)
- Optimize for platform-specific engagement
- Ensure cultural appropriateness for the specified language
# OUTPUT FORMAT
- Generate ONLY the final social media post content. No explanations or meta-commentary. Content must be immediately copy-paste ready.
- Maximum heading level: ## (H2) - never use # (H1)
- No horizontal dividers: avoid ---
# QUALITY CHECKLIST
✅ Platform guidelines followed
✅ Source information integrated
✅ Voice/tone consistent (when provided)
✅ Language consistency maintained
✅ Engagement optimized
✅ Publication ready
```
3. Click **Add Message** to add a user message, then paste the following. Type `{` or `/` to replace all inputs with the corresponding variable from the list.
```markdown USER theme={null}
Platform Name: Current Iteration/item
Target Language: User Input/language
Platform Guidelines: Identify Style/text
Source Information: Integrate Info/text
Voice & Tone: User Input/voice_and_tone
```
4. Enable structured output.
This allows us to extract specific pieces of information from the LLM's response in a more reliable way, which is crucial for the next step where we format the final output.
1. After the Integrate Info node, add an Iteration node.
2. Inside the Iteration node, add an LLM node and configure it:
1. Rename it to `Identify Style`.
2. In the system instruction field, paste the following:
```markdown wrap theme={null}
# ROLE & TASK
You are a social media expert. Analyze the platform and provide content creation guidelines.
# ANALYSIS REQUIRED
For the given platform, provide:
## 1. PLATFORM PROFILE
- Platform type and category
- Target audience characteristics
## 2. CONTENT GUIDELINES
- Optimal content length (characters/words)
- Recommended tone (professional/casual/conversational)
- Formatting best practices (line breaks, emojis, etc.)
## 3. ENGAGEMENT STRATEGY
- Hashtag recommendations (quantity and style)
- Call-to-action best practices
- Algorithm optimization tips
## 4. TECHNICAL SPECS
- Character/word limits
- Visual content requirements
- Special formatting needs
## 5. PLATFORM-SPECIFIC NOTES
- Unique features or recent changes
- Industry-specific considerations
- Community engagement approaches
# OUTPUT REQUIREMENTS
- For recognized platforms: Provide specific guidelines
- For unknown platforms: Base recommendations on similar platforms
- Focus on actionable, practical advice
- Be concise but comprehensive
```
3. Click **Add Message** to add a user message, then paste the following. Type `{` or `/` to replace `Current Iteration/item` with the corresponding variable from the list.
```markdown USER theme={null}
Platform: Current Iteration/item
```
3. After the Identify Style node, add another LLM node and configure it:
1. Rename it to `Create Content`.
2. In the system instruction field, paste the following:
```markdown wrap theme={null}
# ROLE & TASK
You are an expert social media content creator. Generate publication-ready content that matches platform guidelines, incorporates source information, and follows specified voice/tone and language requirements.
# LANGUAGE REQUIREMENT
- Generate ALL content exclusively in the target language specified in the user message. You MUST write the entire post in that language, regardless of the language of any source materials.
- No mixing of languages whatsoever
- Adapt platform terminology to the target language
# CONTENT REQUIREMENTS
- Follow platform guidelines exactly (format, length, tone, hashtags)
- Integrate source information effectively (key messages, data, value props)
- Apply voice & tone consistently (if provided)
- Optimize for platform-specific engagement
- Ensure cultural appropriateness for the specified language
# OUTPUT FORMAT
- Generate ONLY the final social media post content. No explanations or meta-commentary. Content must be immediately copy-paste ready.
- Maximum heading level: ## (H2) - never use # (H1)
- No horizontal dividers: avoid ---
# QUALITY CHECKLIST
✅ Platform guidelines followed
✅ Source information integrated
✅ Voice/tone consistent (when provided)
✅ Language consistency maintained
✅ Engagement optimized
✅ Publication ready
```
3. Click **Add Message** to add a user message, then paste the following. Type `{` or `/` to replace all inputs with the corresponding variable from the list.
```markdown USER theme={null}
Platform Name: Current Iteration/item
Target Language: User Input/language
Platform Guidelines: Identify Style/text
Source Information: Integrate Info/text
Voice & Tone: User Input/voice_and_tone
```
4. Enable structured output.
This allows us to extract specific pieces of information from the LLM's response in a more reliable way, which is crucial for the next step where we format the final output.
![Structured Output]() 1. Next to **Output Variables**, toggle **Structured** on. The `structured_output` variable will appear below. Click **Configure**.
2. In the pop-up schema editor, click **Import From JSON** in the top-right corner, and paste the following:
```json theme={null}
{
"platform_name": "string",
"post_content": "string"
}
```
1. Next to **Output Variables**, toggle **Structured** on. The `structured_output` variable will appear below. Click **Configure**.
2. In the pop-up schema editor, click **Import From JSON** in the top-right corner, and paste the following:
```json theme={null}
{
"platform_name": "string",
"post_content": "string"
}
```
![Import from JSON]() 4. Click the Iteration node to configure it:
1. Set `Parameter Extractor/platform` as the input variable.
2. Set `Create Content/structured_output` as the output variable.
3. Enable **Parallel Mode** and set the maximum parallelism to `10`.
This is why we included `(≤10)` in the label name for the target platform field back in the User Input node.
4. Click the Iteration node to configure it:
1. Set `Parameter Extractor/platform` as the input variable.
2. Set `Create Content/structured_output` as the output variable.
3. Enable **Parallel Mode** and set the maximum parallelism to `10`.
This is why we included `(≤10)` in the label name for the target platform field back in the User Input node.
![Iteration Configuration]() ### 8. Format the Final Output: Template Node
The Iteration node generates a post for each platform, but its output is a raw array of data (e.g., `[{"platform_name": "Twitter", "post_content": "..."}]`) that isn't very readable. We need to present the results in a clearer format.
That's where the Template node comes in—it allows us to format this raw data into well-organized text using [Jinja2](https://jinja.palletsprojects.com/en/stable/) templating, ensuring the final output is user-friendly and easy to read.
### 8. Format the Final Output: Template Node
The Iteration node generates a post for each platform, but its output is a raw array of data (e.g., `[{"platform_name": "Twitter", "post_content": "..."}]`) that isn't very readable. We need to present the results in a clearer format.
That's where the Template node comes in—it allows us to format this raw data into well-organized text using [Jinja2](https://jinja.palletsprojects.com/en/stable/) templating, ensuring the final output is user-friendly and easy to read.
![Template Node]() 1. After the Iteration node, add a Template node.
2. On the Template node's panel, set `Iteration/output` as the input variable and name it `output`.
3. Paste the following Jinja2 code:
```
{% for item in output %}
# 📱 {{ item.platform_name }}
{{ item.post_content }}
{% endfor %}
```
* `{% for item in output %}` / `{% endfor %}`: Loops through each platform-content pair in the input array.
* `{{ item.platform_name }}`: Displays the platform name as an H1 heading with a phone emoji.
* `{{ item.post_content }}`: Displays the generated content for that platform.
* The blank line between `{{ item.post_content }}` and `{% endfor %}` adds spacing between platforms in the final output.
While LLMs can handle output formatting as well, their outputs can be inconsistent and unpredictable. For rule-based formatting that requires no reasoning, the Template node gets things done in a more stable and reliable way at zero token cost.
LLMs are incredibly powerful, but knowing when to use the right tool is key to building more reliable and cost-effective AI applications.
### 9. Return the Results to Users: Output Node
1. After the Template node, add an Output node.
2. On the Output node's panel, set the `Template/output` as the output variable.
## Step 3: Test
Your workflow is now complete! Let's test it out.
1. Make sure your Checklist is clear.
1. After the Iteration node, add a Template node.
2. On the Template node's panel, set `Iteration/output` as the input variable and name it `output`.
3. Paste the following Jinja2 code:
```
{% for item in output %}
# 📱 {{ item.platform_name }}
{{ item.post_content }}
{% endfor %}
```
* `{% for item in output %}` / `{% endfor %}`: Loops through each platform-content pair in the input array.
* `{{ item.platform_name }}`: Displays the platform name as an H1 heading with a phone emoji.
* `{{ item.post_content }}`: Displays the generated content for that platform.
* The blank line between `{{ item.post_content }}` and `{% endfor %}` adds spacing between platforms in the final output.
While LLMs can handle output formatting as well, their outputs can be inconsistent and unpredictable. For rule-based formatting that requires no reasoning, the Template node gets things done in a more stable and reliable way at zero token cost.
LLMs are incredibly powerful, but knowing when to use the right tool is key to building more reliable and cost-effective AI applications.
### 9. Return the Results to Users: Output Node
1. After the Template node, add an Output node.
2. On the Output node's panel, set the `Template/output` as the output variable.
## Step 3: Test
Your workflow is now complete! Let's test it out.
1. Make sure your Checklist is clear.
![Check Checklist]() 2. Check your workflow against the reference diagram provided at the beginning to ensure all nodes and connections match.
3. Click **Test Run** in the top-right corner, fill in the input fields, then click **Start Run**.
If you're not sure what to enter, try these sample inputs:
* **Draft**: `We just launched a new AI writing assistant that helps teams create content 10x faster.`
* **Upload File**: Leave empty
* **Voice & Tone**: `Friendly and enthusiastic, but professional`
* **Target Platform**: `Twitter and LinkedIn`
* **Language**: `English`
A successful run produces a formatted output with a separate post for each platform, like this:
2. Check your workflow against the reference diagram provided at the beginning to ensure all nodes and connections match.
3. Click **Test Run** in the top-right corner, fill in the input fields, then click **Start Run**.
If you're not sure what to enter, try these sample inputs:
* **Draft**: `We just launched a new AI writing assistant that helps teams create content 10x faster.`
* **Upload File**: Leave empty
* **Voice & Tone**: `Friendly and enthusiastic, but professional`
* **Target Platform**: `Twitter and LinkedIn`
* **Language**: `English`
A successful run produces a formatted output with a separate post for each platform, like this:
![Test Output]() Your results may vary depending on the model you're using. Higher-capability models generally produce better output quality.
To test how a node reacts to different inputs from previous nodes, you don't need to re-run the entire workflow. Just click **View cached variables** at the bottom of the canvas, find the variable you want to change, and edit its value.
If you encounter any errors, check the **Last Run** logs of the corresponding node to identify the exact cause of the problem.
## Step 4: Publish & Share
Once the workflow runs as expected and you're happy with the results, click **Publish** > **Publish Update** to make it live and shareable.
If you make any changes later, always remember to publish again so the updates take effect.
# Connect to External Knowledge Base
Source: https://docs.dify.ai/en/use-dify/knowledge/connect-external-knowledge-base
Integrate external knowledge sources with Dify applications through API connections to leverage custom RAG systems or third-party knowledge services
If your team maintains its own RAG system or hosts content in a third-party knowledge service like [AWS Bedrock](https://aws.amazon.com/bedrock/), you can connect these external sources to Dify instead of migrating content into Dify's built-in knowledge base.
This lets your AI applications retrieve information directly from your existing infrastructure while you retain full control over the retrieval logic and content management.
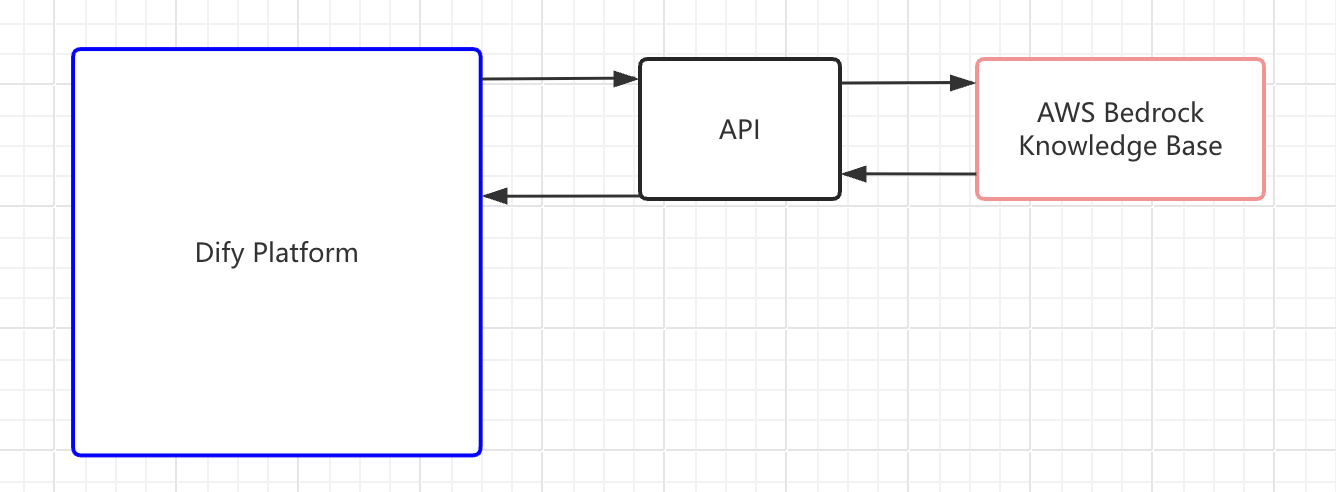
**Connecting an external knowledge base involves three steps**:
1. [Build an API service that Dify can query](#step-1-build-the-retrieval-api).
2. [Register the API endpoint in Dify](#step-2-register-an-external-knowledge-api).
3. [Connect a specific knowledge source through the registered API](#step-3-create-an-external-knowledge-base).
When your application runs, Dify sends retrieval requests to your endpoint and uses the returned chunks as context for LLM responses.
If you're connecting to LlamaCloud, install the [LlamaCloud plugin](https://marketplace.dify.ai/plugin/langgenius/llamacloud) instead of building a custom API. See the [video walkthrough](https://www.youtube.com/watch?v=FaOzKZRS-2E) for a complete setup demo.
If you're building a plugin for another knowledge service, the LlamaCloud plugin's [source code](https://github.com/langgenius/dify-official-plugins/tree/main/extensions/llamacloud) is available for reference.
Dify only has retrieval access to external knowledge bases—it cannot modify or manage your external content. You maintain the knowledge base and its retrieval logic independently.
## Step 1: Build the Retrieval API
Build an API service that implements the [External Knowledge API specification](/en/use-dify/knowledge/external-knowledge-api). Your service needs a single `POST` endpoint that accepts a search query and returns matching text chunks with similarity scores.
## Step 2: Register an External Knowledge API
An External Knowledge API stores your endpoint URL and authentication credentials. Multiple knowledge bases can share one API connection.
1. Go to **Knowledge**, click **External Knowledge API** in the upper-right corner, then click **Add an External Knowledge API**.
2. Fill in the following fields:
* **Name**: A label to distinguish this API connection from others.
* **API Endpoint**: The base URL of your external knowledge service. Dify appends `/retrieval` automatically when sending requests.
* **API Key**: The authentication credential for your service. Dify sends this as a Bearer token in the `Authorization` header.
Dify validates the connection by sending a test request to your endpoint when you save.
## Step 3: Create an External Knowledge Base
With the API registered, connect an external knowledge source to Dify. This creates a knowledge base in Dify that is linked to your external system.
1. Go to **Knowledge** and click **Connect to an External Knowledge Base**.
Your results may vary depending on the model you're using. Higher-capability models generally produce better output quality.
To test how a node reacts to different inputs from previous nodes, you don't need to re-run the entire workflow. Just click **View cached variables** at the bottom of the canvas, find the variable you want to change, and edit its value.
If you encounter any errors, check the **Last Run** logs of the corresponding node to identify the exact cause of the problem.
## Step 4: Publish & Share
Once the workflow runs as expected and you're happy with the results, click **Publish** > **Publish Update** to make it live and shareable.
If you make any changes later, always remember to publish again so the updates take effect.
# Connect to External Knowledge Base
Source: https://docs.dify.ai/en/use-dify/knowledge/connect-external-knowledge-base
Integrate external knowledge sources with Dify applications through API connections to leverage custom RAG systems or third-party knowledge services
If your team maintains its own RAG system or hosts content in a third-party knowledge service like [AWS Bedrock](https://aws.amazon.com/bedrock/), you can connect these external sources to Dify instead of migrating content into Dify's built-in knowledge base.
This lets your AI applications retrieve information directly from your existing infrastructure while you retain full control over the retrieval logic and content management.

**Connecting an external knowledge base involves three steps**:
1. [Build an API service that Dify can query](#step-1-build-the-retrieval-api).
2. [Register the API endpoint in Dify](#step-2-register-an-external-knowledge-api).
3. [Connect a specific knowledge source through the registered API](#step-3-create-an-external-knowledge-base).
When your application runs, Dify sends retrieval requests to your endpoint and uses the returned chunks as context for LLM responses.
If you're connecting to LlamaCloud, install the [LlamaCloud plugin](https://marketplace.dify.ai/plugin/langgenius/llamacloud) instead of building a custom API. See the [video walkthrough](https://www.youtube.com/watch?v=FaOzKZRS-2E) for a complete setup demo.
If you're building a plugin for another knowledge service, the LlamaCloud plugin's [source code](https://github.com/langgenius/dify-official-plugins/tree/main/extensions/llamacloud) is available for reference.
Dify only has retrieval access to external knowledge bases—it cannot modify or manage your external content. You maintain the knowledge base and its retrieval logic independently.
## Step 1: Build the Retrieval API
Build an API service that implements the [External Knowledge API specification](/en/use-dify/knowledge/external-knowledge-api). Your service needs a single `POST` endpoint that accepts a search query and returns matching text chunks with similarity scores.
## Step 2: Register an External Knowledge API
An External Knowledge API stores your endpoint URL and authentication credentials. Multiple knowledge bases can share one API connection.
1. Go to **Knowledge**, click **External Knowledge API** in the upper-right corner, then click **Add an External Knowledge API**.
2. Fill in the following fields:
* **Name**: A label to distinguish this API connection from others.
* **API Endpoint**: The base URL of your external knowledge service. Dify appends `/retrieval` automatically when sending requests.
* **API Key**: The authentication credential for your service. Dify sends this as a Bearer token in the `Authorization` header.
Dify validates the connection by sending a test request to your endpoint when you save.
## Step 3: Create an External Knowledge Base
With the API registered, connect an external knowledge source to Dify. This creates a knowledge base in Dify that is linked to your external system.
1. Go to **Knowledge** and click **Connect to an External Knowledge Base**.
![Connect to External Knowledge Base]() 2. Fill in the following fields:
* **External Knowledge Name** and **Knowledge Description** (optional).
* **External Knowledge API**: Select the API connection you registered.
* **External Knowledge ID**: The identifier of the specific knowledge source within your external system, passed to your API as the `knowledge_id` field.
This is whatever ID your external service uses to distinguish between different knowledge bases. For example, a Bedrock knowledge base ARN or an ID you defined in your own system.
The **External Knowledge API** and **External Knowledge ID** cannot be changed after creation. To use a different API or knowledge source, create a new external knowledge base.
* **Retrieval Settings**:
* **Top K**: Maximum number of chunks to retrieve per query. Higher values return more results but may include less relevant content.
* **Score Threshold**: Minimum similarity score for returned chunks. Enable this to filter out low-relevance results. Use higher value for stricter relevance or lower value to include broader matches.
When disabled, all results up to the Top K limit are returned regardless of score.
Once created, the external knowledge base is available for use in your applications just like any built-in knowledge base. See [Integrate Knowledge Within Application](/en/use-dify/knowledge/integrate-knowledge-within-application) for details.
## Troubleshoot
### Connection Refused or Timeout (Self-Hosted)
Dify routes outbound HTTP requests through a Squid-based SSRF proxy. If your external knowledge service runs on the same host as Dify or its domain is not allowlisted, the proxy blocks the request.
To allow connections, add your service's domain to the `allowed_domains` ACL in `docker/ssrf_proxy/squid.conf.template`:
```text theme={null}
acl allowed_domains dstdomain .marketplace.dify.ai .your-kb-service.com
```
Restart the SSRF proxy container after editing.
### API Response Format Issues
If retrieval fails or returns unexpected results, verify your API response against the [External Knowledge API specification](/en/use-dify/knowledge/external-knowledge-api#response).
Common issues:
* The `metadata` field in each record must be an object (`{}`), not `null`. A `null` value causes errors in the retrieval pipeline.
* The `content` and `score` fields must be present in every record.
# Configure the Chunk Settings
Source: https://docs.dify.ai/en/use-dify/knowledge/create-knowledge/chunking-and-cleaning-text
## What is Chunking?
Documents imported into knowledge bases are split into smaller segments called **chunks**. Think of chunking like organizing a large book into chapters and paragraphs—you can't quickly find specific information in one massive block of text, but well-organized sections make retrieval efficient.
When users ask questions, the system searches through these chunks for relevant information and provides it to the LLM as context. Without chunking, processing entire documents for every query would be slow and inefficient.
**Key Chunk Parameters**
* **Delimiter**: The character or sequence where text is split. For example, `\n\n` splits at paragraph breaks, `\n` at line breaks.
Delimiters are removed during chunking. For example, using `A` as the delimiter splits `CBACD` into `CB` and `CD`.
To avoid information loss, use non-content characters that don't naturally appear in your documents.
* **Maximum chunk length**: The maximum size of each chunk in characters. Text exceeding this limit is force-split regardless of delimiter settings.
## Choose a Chunk Mode
The chunk mode cannot be changed once the knowledge base is created. However, chunk settings like the delimiter and maximum chunk length can be adjusted at any time.
### Mode Overview
In General mode, all chunks share the same settings. Matched chunks are returned directly as retrieval results.
**Chunk Settings**
Beyond delimiter and maximum chunk length, you can also configure **Chunk overlap** to specify how many characters overlap between adjacent chunks. This helps preserve semantic connections and prevents important information from being split across chunk boundaries.
For example, with a 50-character overlap, the last 50 characters of one chunk will also appear as the first 50 characters of the next chunk.
In Parent-child mode, text is split into two tiers: smaller **child chunks** and larger **parent chunks**. When a query matches a child chunk, its entire parent chunk is returned as the retrieval result.
This solves a common retrieval dilemma: smaller chunks enable precise query matching but lack context, while larger chunks provide rich context but reduce retrieval accuracy.
Parent-child mode balances both—retrieving with precision and responding with context.
**Parent Chunk Settings**
Parent chunks can be created in **Paragraph** or **Full Doc** mode.
The document is split into multiple parent chunks based on the specified delimiter and maximum chunk length.
Suitable for lengthy documents with well-structured sections where each section provides meaningful context independently.
The entire document serves as a single parent chunk.
Suitable for small, cohesive documents where the full context is essential for understanding any specific detail.
In **Full Doc** mode:
* Only the first 10,000 tokens are processed. Content beyond this limit will be truncated.
* The parent chunk cannot be edited once created. To modify it, you must upload a new document.
**Child Chunk Settings**
Each parent chunk is further split into child chunks using their own delimiter and maximum chunk length settings.
### Quick Comparison
| Dimension | General Mode | Parent-child Mode |
| :------------------------------------------------------------------------------------------ | :----------------------------------------------------- | :------------------------------------------------------------------------------------------------ |
| Chunking Strategy | Single-tier: all chunks use the same settings | Two-tier: separate settings for parent and child chunks |
| Retrieval Workflow | Matched chunks are directly returned | Child chunks are used for matching queries; parent chunks are returned to provide broader context |
| Compatible [Index Method](/en/use-dify/knowledge/create-knowledge/setting-indexing-methods) | High Quality, Economical | High Quality only |
| Best For | Simple, self-contained content like glossaries or FAQs | Information-dense documents like technical manuals or research papers where context matters |
## Pre-process Text Before Chunking
Before splitting text into chunks, you can clean up irrelevant content to improve retrieval quality.
* **Replace consecutive spaces, newlines, and tabs**
* Three or more consecutive newlines → two newlines
* Multiple spaces → single space
* Tabs, form feeds, and special Unicode spaces → regular space
* **Remove all URLs and email addresses**
This setting is ignored in **Full Doc** mode.
## Enable Summary Auto-Gen
Available for self-hosted deployments only.
Automatically generate summaries for all chunks to enhance their retrievability.
Summaries are embedded and indexed for retrieval as well. When a summary matches a query, its corresponding chunk is also returned.
You can manually edit auto-generated summaries or regenerate them for specific documents later. See [Manage Knowledge Content](/en/use-dify/knowledge/manage-knowledge/maintain-knowledge-documents) for details.
If you select a vision-capable LLM, summaries will be generated based on both the chunk text and any attached images.
## Preview Chunks
Click **Preview** to see how your content will be chunked. A limited number of chunks will be displayed for a quick review.
If the results don't perfectly match your expectations, choose the closest configuration—you can manually fine-tune chunks later. See [Manage Knowledge Content](/en/use-dify/knowledge/manage-knowledge/maintain-knowledge-documents) for details.
For multiple documents, click the file name at the top of the preview panel to switch between them.
# Upload Local Files
Source: https://docs.dify.ai/en/use-dify/knowledge/create-knowledge/import-text-data/readme
Once a knowledge base is created, its data source cannot be changed later.
When quick-creating a knowledge base, you can upload local files as its data source:
1. Click **Knowledge** > **Create Knowledge**.
2. Select **Import from file** as the data source, then upload your files.
* Maximum number of files per upload: 5
On Dify Cloud, **batch uploading** (up to 50 files per upload) is only available on [paid plans](https://dify.ai/pricing).
* Maximum file size: 15 MB
For self-hosted deployments, you can adjust these two limits via the environment variables `UPLOAD_FILE_SIZE_LIMIT` and `UPLOAD_FILE_BATCH_LIMIT`.
***
**For Images in Uploaded Files**
JPG, JPEG, PNG, and GIF images under 2 MB are automatically extracted as attachments to their corresponding chunks. These images can be managed independently and are returned alongside their chunks during retrieval.
URLs of extracted images remain in the chunk text, but you can safely remove these URLs to keep the text clean—this won't affect the extracted images.
If you select a multimodal embedding model (marked with a **Vision** icon) in index settings, the extracted images will also be embedded and indexed for retrieval.
Each chunk supports up to 10 image attachments; images beyond this limit will not be extracted.
For self-hosted deployments, you can adjust the following limits via environment variables:
* Maximum image size: `ATTACHMENT_IMAGE_FILE_SIZE_LIMIT`
* Maximum number of attachments per chunk: `SINGLE_CHUNK_ATTACHMENT_LIMIT`
The above extraction rule applies to:
* Images embedded in DOCX files
Images embedded in other file types (e.g., PDF) can be extracted by using appropriate document extraction plugins in [knowledge pipelines](/en/use-dify/knowledge/knowledge-pipeline/readme).
* Images referenced via accessible URLs using the following Markdown syntax in any file type:
* ``
* ``
# Sync Data from Notion
Source: https://docs.dify.ai/en/use-dify/knowledge/create-knowledge/import-text-data/sync-from-notion
Dify datasets support importing from Notion and setting up **synchronization** so that data updates in Notion are automatically synced to Dify.
### Authorization Verification
1. When creating a dataset and selecting the data source, click **Sync from Notion Content -- Bind Now** and follow the prompts to complete the authorization verification.
2. Alternatively, you can go to **Settings -- Data Sources -- Add Data Source**, click on the Notion source **Bind**, and complete the authorization verification.
### Importing Notion Data
After completing the authorization verification, go to the create dataset page, click **Sync from Notion Content**, and select the authorized pages you need to import.
### Chunking and Cleaning
Next, choose a [chunking mode](/en/use-dify/knowledge/create-knowledge/chunking-and-cleaning-text) and [indexing method](/en/use-dify/knowledge/create-knowledge/setting-indexing-methods) for your knowledge base, then save it and wait for the automatically processing. Dify not only supports importing standard Notion pages but can also consolidate and save page attributes from database-type pages.
***Note: images and files cannot be imported, and data from tables will be converted to text.***
### Synchronizing Notion Data
If your Notion content has been updated, you can sync the changes by clicking the **Sync** button for the corresponding page in the document list of your knowledge base. Syncing involves an embedding process, which will consume tokens from your embedding model.
### Integration Configuration Method for Community Edition Notion
Notion offers two integration options: **internal integration** and **public integration**. For more details on the differences between these two methods, please refer to the [official Notion documentation](https://developers.notion.com/guides/get-started/authorization).
#### 1. Using Internal Integration
First, create an integration in the integration settings page [Create Integration](https://www.notion.so/my-integrations). By default, all integrations start as internal integrations; internal integrations will be associated with the workspace you choose, so you need to be the workspace owner to create an integration.
Specific steps:
Click the **New integration** button. The type is **Internal** by default (cannot be modified). Select the associated space, enter the integration name, upload a logo, and click **Submit** to create the integration successfully.
After creating the integration, you can update its settings as needed under the Capabilities tab and click the **Show** button under Secrets to copy the secrets.
After copying, go back to the Dify source code, and configure the relevant environment variables in the **.env** file. The environment variables are as follows:
```
NOTION_INTEGRATION_TYPE = internal or NOTION_INTEGRATION_TYPE = public
NOTION_INTERNAL_SECRET=you-internal-secret
```
#### **Using Public Integration**
**You need to upgrade the internal integration to a public integration.** Navigate to the Distribution page of the integration, and toggle the switch to make the integration public. When switching to the public setting, you need to fill in additional information in the Organization Information form below, including your company name, website, and redirect URL, then click the **Submit** button.

After successfully making the integration public on the integration settings page, you will be able to access the integration key in the Keys tab:
Go back to the Dify source code, and configure the relevant environment variables in the **.env** file. The environment variables are as follows:
```
NOTION_INTEGRATION_TYPE=public
NOTION_CLIENT_SECRET=your-client-secret
NOTION_CLIENT_ID=your-client-id
```
After configuration, you can operate the Notion data import and synchronization functions in the dataset.
# Import Data from Website
Source: https://docs.dify.ai/en/use-dify/knowledge/create-knowledge/import-text-data/sync-from-website
The knowledge base supports crawling content from public web pages using third-party tools such as [Jina Reader](https://jina.ai/reader/) and [Firecrawl](https://www.firecrawl.dev/), parsing it into Markdown content, and importing it into the knowledge base.
[Firecrawl](https://www.firecrawl.dev/) and [Jina Reader](https://jina.ai/reader/) are both open-source web parsing tools that can convert web pages into clean Markdown format text that is easy for LLMs to recognize, while providing easy-to-use API services.
The following sections will introduce the usage methods for Firecrawl and Jina Reader respectively.
## Firecrawl
### **1. Configure Firecrawl API credentials**
Click on the avatar in the upper right corner, then go to the **DataSource** page, and click the **Configure** button next to Firecrawl.
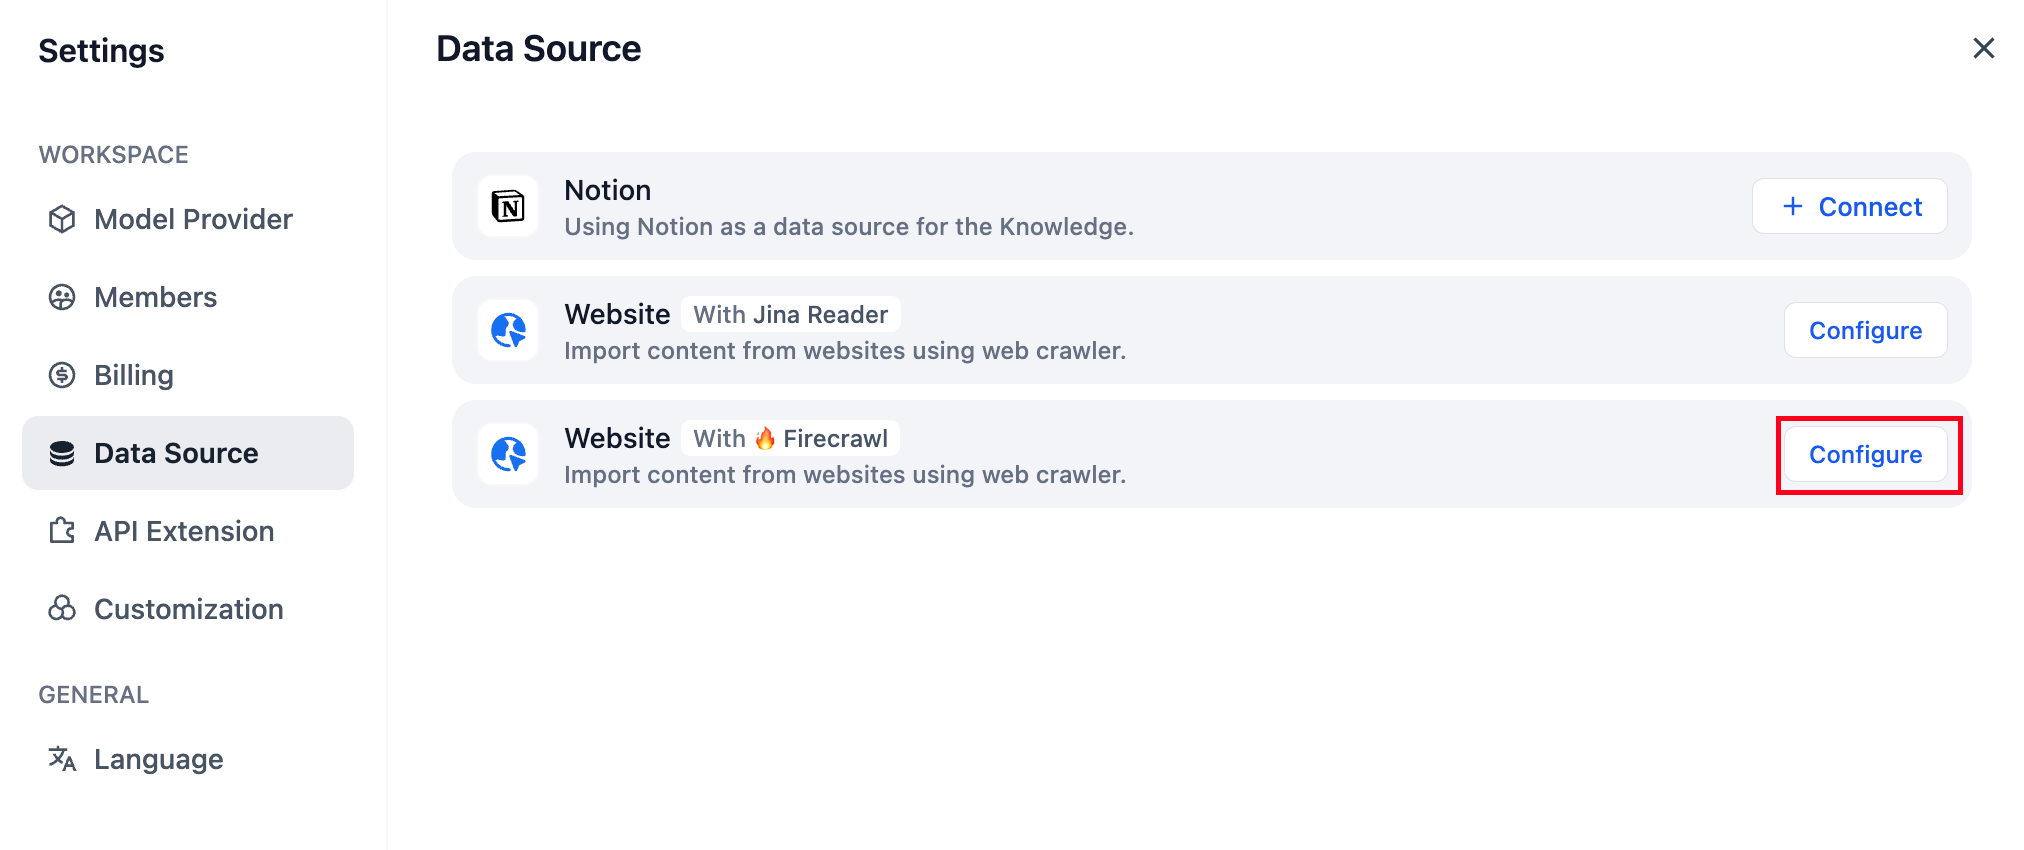
Log in to the [Firecrawl website](https://www.firecrawl.dev/) to complete registration, get your API Key, and then enter and save it in Dify.

### 2. Scrape target webpage
On the knowledge base creation page, select **Sync from website**, choose Firecrawl as the provider, and enter the target URL to be crawled.
The configuration options include: Whether to crawl sub-pages, Page crawling limit, Page scraping max depth, Excluded paths, Include only paths, and Content extraction scope. After completing the configuration, click **Run** to preview the parsed pages.
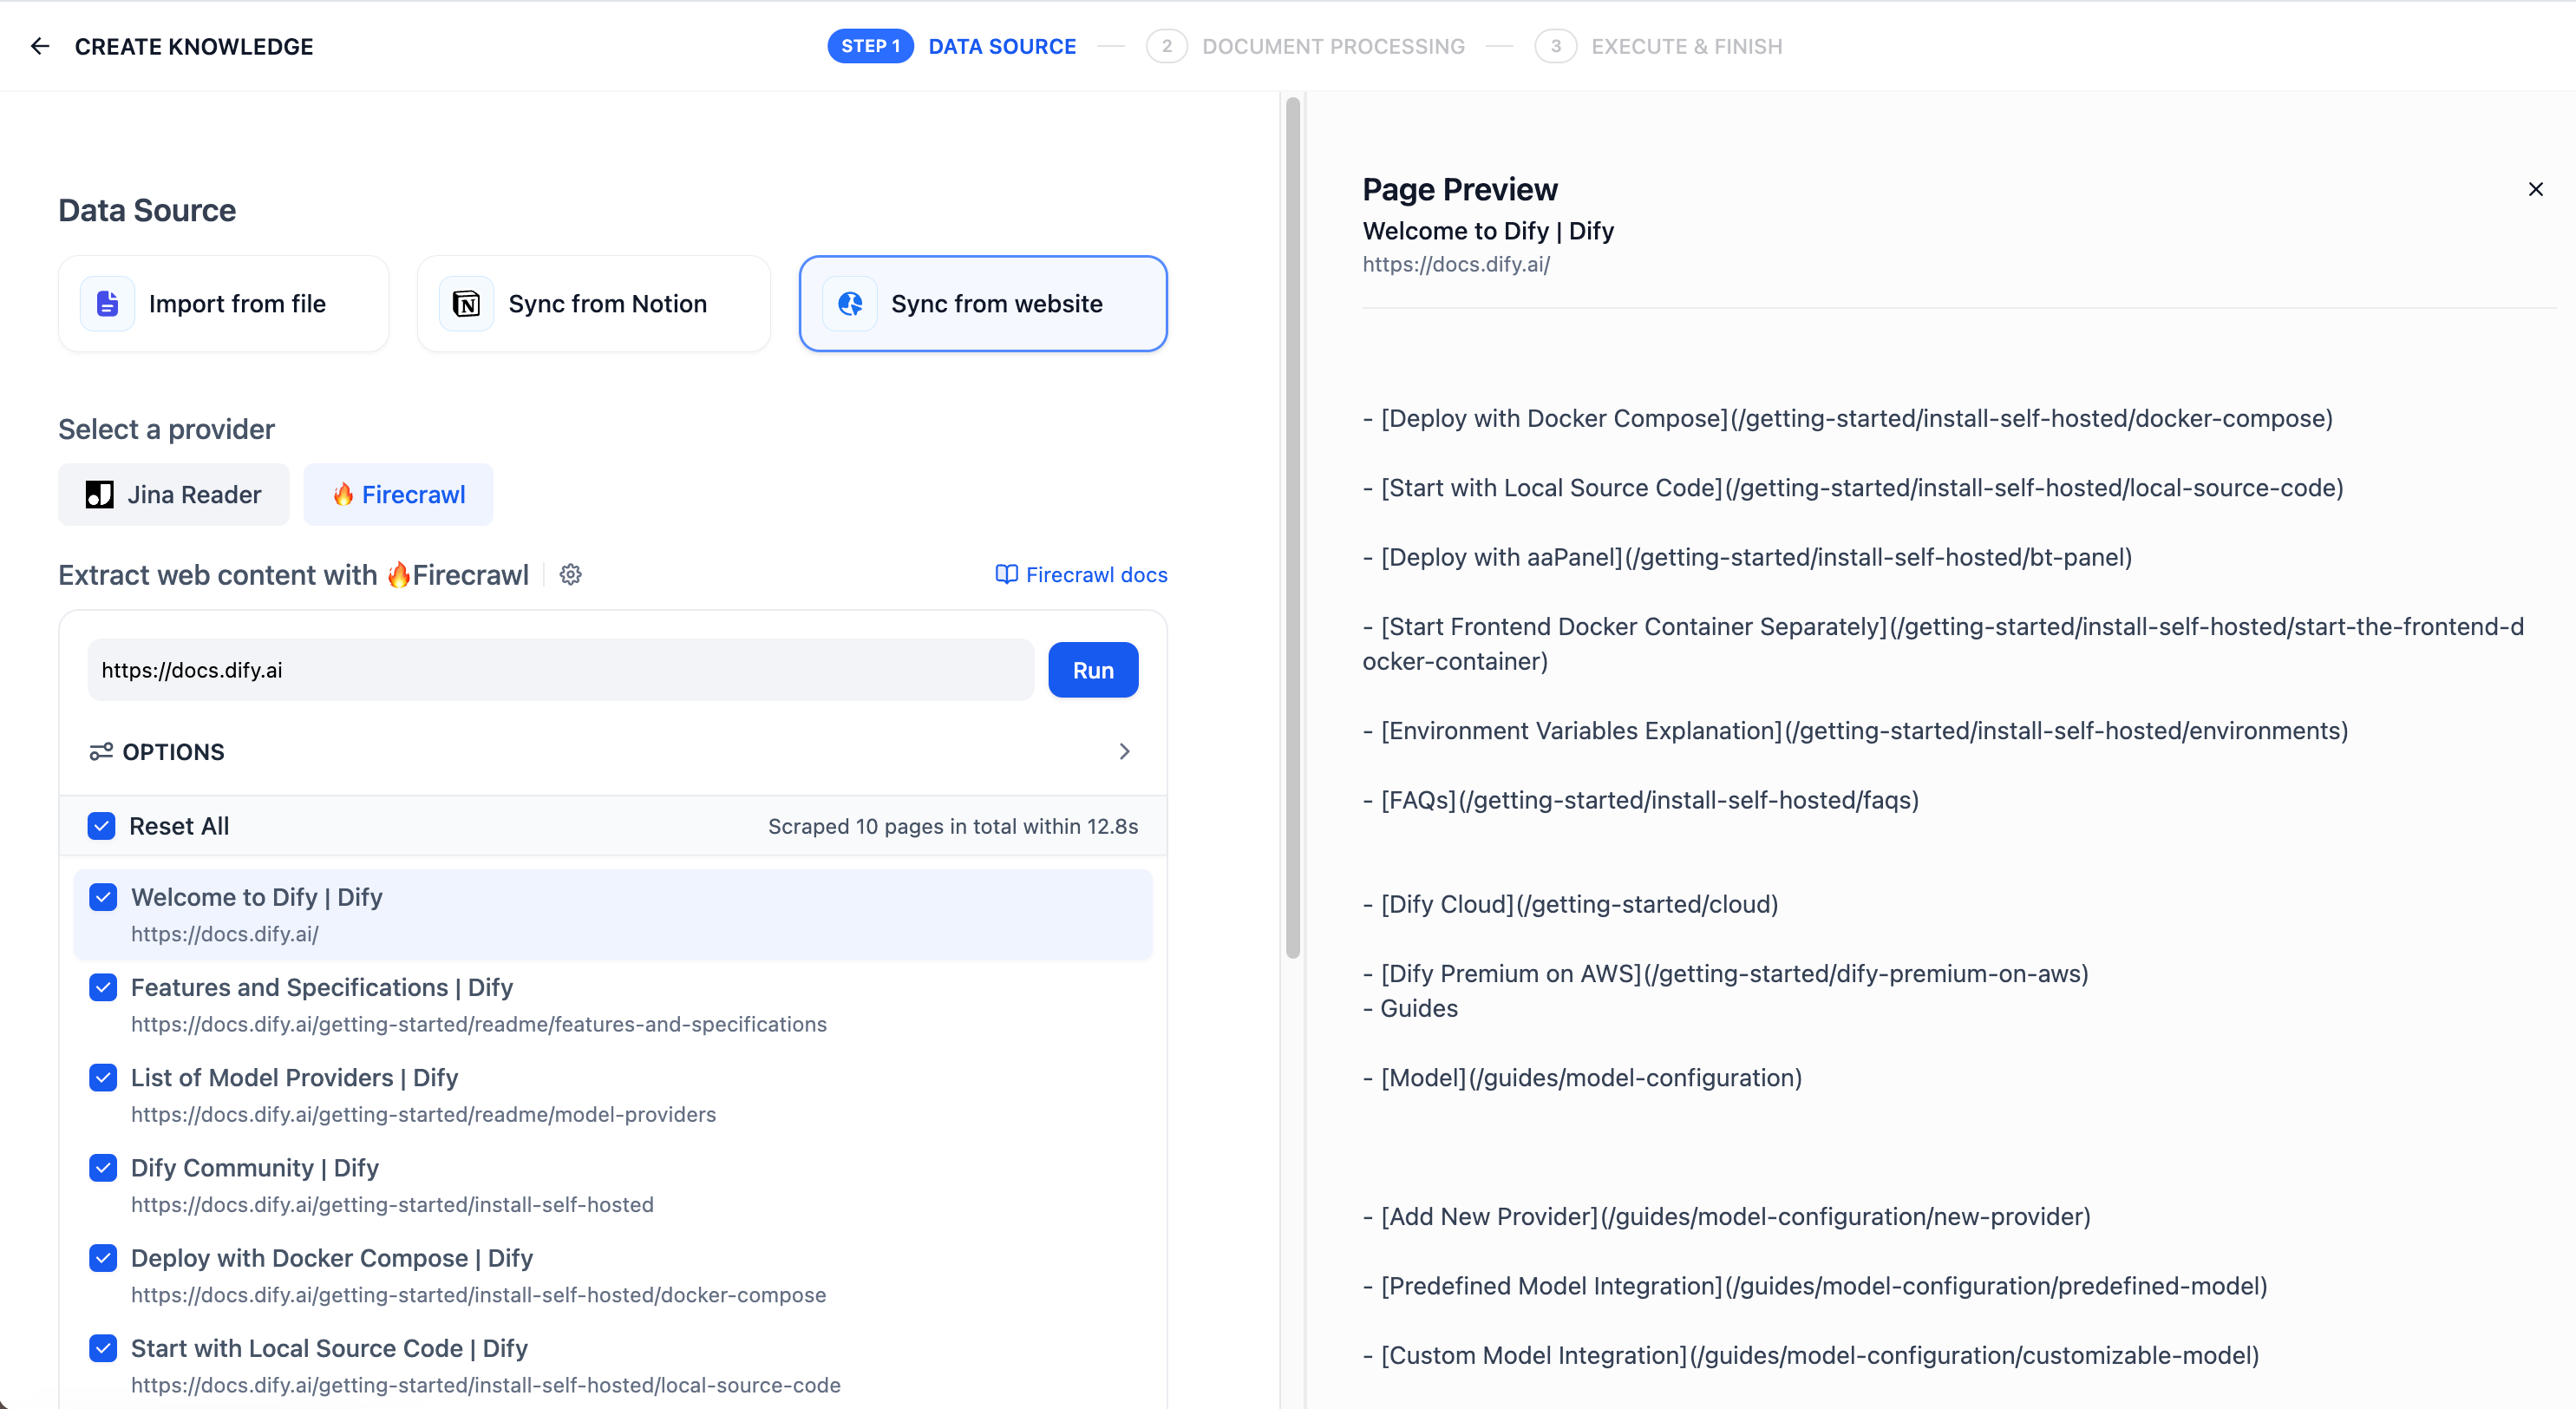
### 3. Review import results
After importing the parsed text from the webpage, it is stored in the knowledge base documents. View the import results and click **Add URL** to continue importing new web pages.
***
## Jina Reader
### 1. Configuring Jina Reader Credentials
Click on the avatar in the upper right corner, then go to the **DataSource** page, and click the **Configure** button next to Jina Reader.
Log in to the [Jina Reader website](https://jina.ai/reader/), complete registration, obtain the API Key, then fill it in and save.
### 2. Using Jina Reader to Crawl Web Content
On the knowledge base creation page, select **Sync from website**, choose Jina Reader as the provider, and enter the target URL to be crawled.
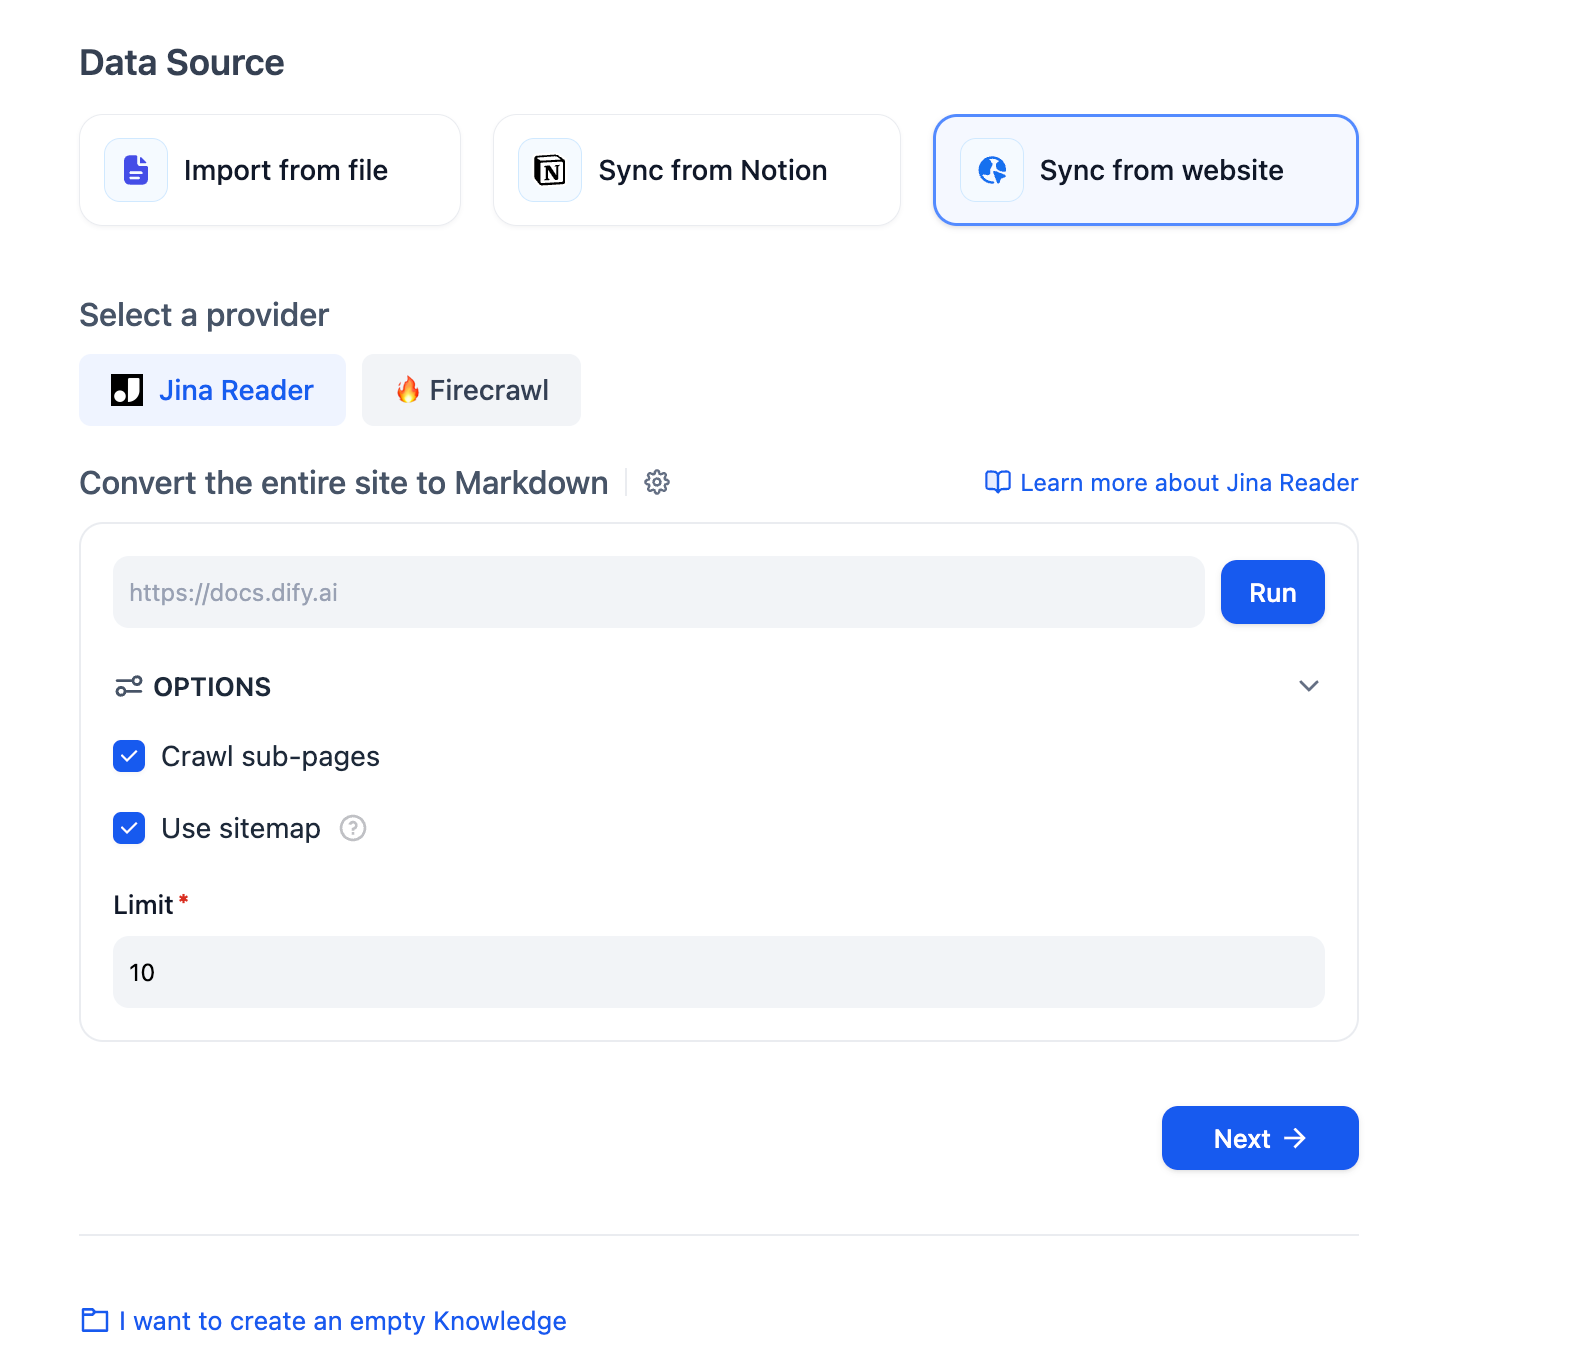
Configuration options include: whether to crawl subpages, maximum number of pages to crawl, and whether to use sitemap for crawling. After completing the configuration, click the **Run** button to preview the page links to be crawled.
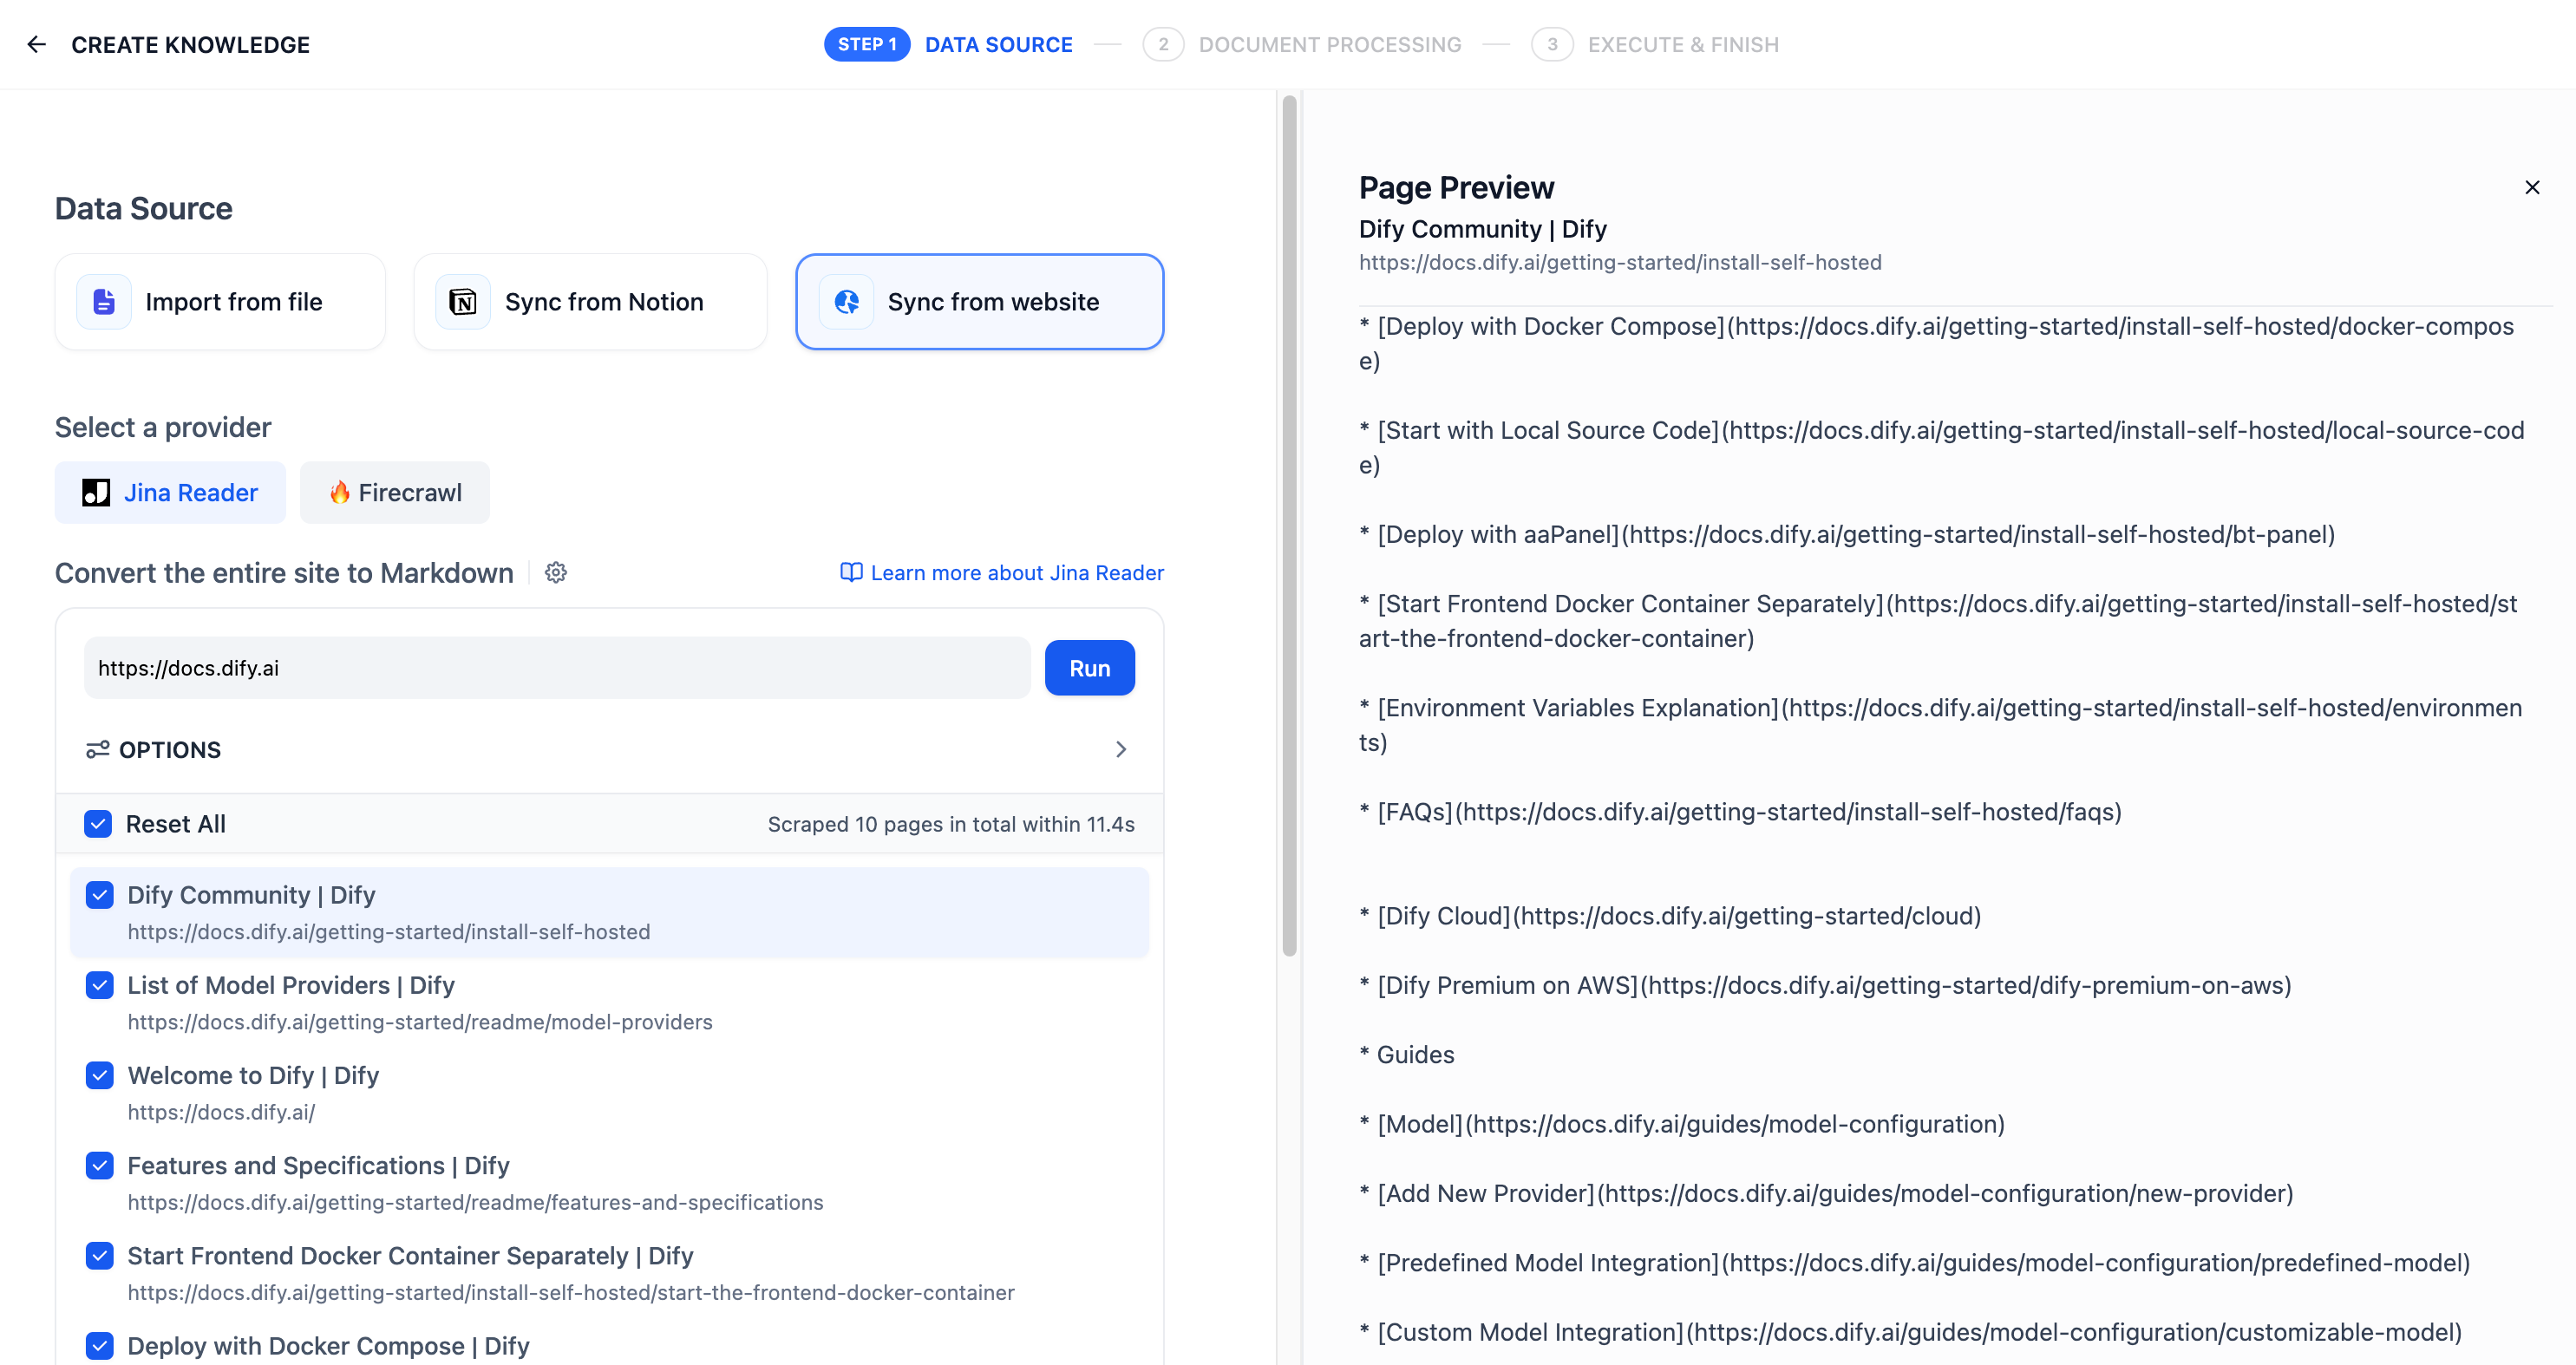
After importing the parsed text from web pages into the knowledge base, you can review the imported results in the documents section. To add more web pages, click the **Add URL** button on the right to continue importing new pages.
After crawling is complete, the content from the web pages will be incorporated into the knowledge base.
# Quick Create Knowledge
Source: https://docs.dify.ai/en/use-dify/knowledge/create-knowledge/introduction
To quick-create and configure a knowledge base:
1. Click **Knowledge** > **Create Knowledge**, then [upload local files](/en/use-dify/knowledge/create-knowledge/import-text-data/readme), [sync data from Notion](/en/use-dify/knowledge/create-knowledge/import-text-data/sync-from-notion), or [webpages](/en/use-dify/knowledge/create-knowledge/import-text-data/sync-from-website), or create an empty knowledge base.
2. [Configure the chunk settings](/en/use-dify/knowledge/create-knowledge/chunking-and-cleaning-text) and preview the chunking results. This stage involves content preprocessing and structuring, where long texts are divided into multiple smaller chunks.
3. [Specify the index method and retrieval settings](/en/use-dify/knowledge/create-knowledge/setting-indexing-methods). Once the knowledge base receives a user query, it searches existing documents according to preset retrieval methods and extracts highly relevant content chunks.
4. Wait for the data processing to complete.
# Specify the Index Method and Retrieval Settings
Source: https://docs.dify.ai/en/use-dify/knowledge/create-knowledge/setting-indexing-methods
After selecting the chunking mode, the next step is to define the index method for structured content.
## Select the Index Method
Similar to the search engines use efficient indexing algorithms to match search results most relevant to user queries, the selected index method directly impacts the retrieval efficiency of the LLM and the accuracy of its responses to knowledge base content.
The knowledge base offers two index methods: **High-Quality** and **Economical**, each with different retrieval setting options.
Once a knowledge base is created in the High Quality index method, it cannot switch to Economical later.
The High Quality index method uses an embedding model to convert content chunks into vector representations. This process is called embedding.
Think of these vectors as coordinates in a multi-dimensional space—the closer two points are, the more similar their meanings. This allows the system to find relevant information based on semantic similarity, not just exact keyword matches.
To enable cross-modal retrieval—retrieving both text and images based on semantic relevance—select a multimodal embedding model (marked with a **Vision** icon). Images extracted from documents will then be embedded and indexed for retrieval.
Knowledge bases using such embedding models are labeled **Multimodal** on their cards.
2. Fill in the following fields:
* **External Knowledge Name** and **Knowledge Description** (optional).
* **External Knowledge API**: Select the API connection you registered.
* **External Knowledge ID**: The identifier of the specific knowledge source within your external system, passed to your API as the `knowledge_id` field.
This is whatever ID your external service uses to distinguish between different knowledge bases. For example, a Bedrock knowledge base ARN or an ID you defined in your own system.
The **External Knowledge API** and **External Knowledge ID** cannot be changed after creation. To use a different API or knowledge source, create a new external knowledge base.
* **Retrieval Settings**:
* **Top K**: Maximum number of chunks to retrieve per query. Higher values return more results but may include less relevant content.
* **Score Threshold**: Minimum similarity score for returned chunks. Enable this to filter out low-relevance results. Use higher value for stricter relevance or lower value to include broader matches.
When disabled, all results up to the Top K limit are returned regardless of score.
Once created, the external knowledge base is available for use in your applications just like any built-in knowledge base. See [Integrate Knowledge Within Application](/en/use-dify/knowledge/integrate-knowledge-within-application) for details.
## Troubleshoot
### Connection Refused or Timeout (Self-Hosted)
Dify routes outbound HTTP requests through a Squid-based SSRF proxy. If your external knowledge service runs on the same host as Dify or its domain is not allowlisted, the proxy blocks the request.
To allow connections, add your service's domain to the `allowed_domains` ACL in `docker/ssrf_proxy/squid.conf.template`:
```text theme={null}
acl allowed_domains dstdomain .marketplace.dify.ai .your-kb-service.com
```
Restart the SSRF proxy container after editing.
### API Response Format Issues
If retrieval fails or returns unexpected results, verify your API response against the [External Knowledge API specification](/en/use-dify/knowledge/external-knowledge-api#response).
Common issues:
* The `metadata` field in each record must be an object (`{}`), not `null`. A `null` value causes errors in the retrieval pipeline.
* The `content` and `score` fields must be present in every record.
# Configure the Chunk Settings
Source: https://docs.dify.ai/en/use-dify/knowledge/create-knowledge/chunking-and-cleaning-text
## What is Chunking?
Documents imported into knowledge bases are split into smaller segments called **chunks**. Think of chunking like organizing a large book into chapters and paragraphs—you can't quickly find specific information in one massive block of text, but well-organized sections make retrieval efficient.
When users ask questions, the system searches through these chunks for relevant information and provides it to the LLM as context. Without chunking, processing entire documents for every query would be slow and inefficient.
**Key Chunk Parameters**
* **Delimiter**: The character or sequence where text is split. For example, `\n\n` splits at paragraph breaks, `\n` at line breaks.
Delimiters are removed during chunking. For example, using `A` as the delimiter splits `CBACD` into `CB` and `CD`.
To avoid information loss, use non-content characters that don't naturally appear in your documents.
* **Maximum chunk length**: The maximum size of each chunk in characters. Text exceeding this limit is force-split regardless of delimiter settings.
## Choose a Chunk Mode
The chunk mode cannot be changed once the knowledge base is created. However, chunk settings like the delimiter and maximum chunk length can be adjusted at any time.
### Mode Overview
In General mode, all chunks share the same settings. Matched chunks are returned directly as retrieval results.
**Chunk Settings**
Beyond delimiter and maximum chunk length, you can also configure **Chunk overlap** to specify how many characters overlap between adjacent chunks. This helps preserve semantic connections and prevents important information from being split across chunk boundaries.
For example, with a 50-character overlap, the last 50 characters of one chunk will also appear as the first 50 characters of the next chunk.
In Parent-child mode, text is split into two tiers: smaller **child chunks** and larger **parent chunks**. When a query matches a child chunk, its entire parent chunk is returned as the retrieval result.
This solves a common retrieval dilemma: smaller chunks enable precise query matching but lack context, while larger chunks provide rich context but reduce retrieval accuracy.
Parent-child mode balances both—retrieving with precision and responding with context.
**Parent Chunk Settings**
Parent chunks can be created in **Paragraph** or **Full Doc** mode.
The document is split into multiple parent chunks based on the specified delimiter and maximum chunk length.
Suitable for lengthy documents with well-structured sections where each section provides meaningful context independently.
The entire document serves as a single parent chunk.
Suitable for small, cohesive documents where the full context is essential for understanding any specific detail.
In **Full Doc** mode:
* Only the first 10,000 tokens are processed. Content beyond this limit will be truncated.
* The parent chunk cannot be edited once created. To modify it, you must upload a new document.
**Child Chunk Settings**
Each parent chunk is further split into child chunks using their own delimiter and maximum chunk length settings.
### Quick Comparison
| Dimension | General Mode | Parent-child Mode |
| :------------------------------------------------------------------------------------------ | :----------------------------------------------------- | :------------------------------------------------------------------------------------------------ |
| Chunking Strategy | Single-tier: all chunks use the same settings | Two-tier: separate settings for parent and child chunks |
| Retrieval Workflow | Matched chunks are directly returned | Child chunks are used for matching queries; parent chunks are returned to provide broader context |
| Compatible [Index Method](/en/use-dify/knowledge/create-knowledge/setting-indexing-methods) | High Quality, Economical | High Quality only |
| Best For | Simple, self-contained content like glossaries or FAQs | Information-dense documents like technical manuals or research papers where context matters |
## Pre-process Text Before Chunking
Before splitting text into chunks, you can clean up irrelevant content to improve retrieval quality.
* **Replace consecutive spaces, newlines, and tabs**
* Three or more consecutive newlines → two newlines
* Multiple spaces → single space
* Tabs, form feeds, and special Unicode spaces → regular space
* **Remove all URLs and email addresses**
This setting is ignored in **Full Doc** mode.
## Enable Summary Auto-Gen
Available for self-hosted deployments only.
Automatically generate summaries for all chunks to enhance their retrievability.
Summaries are embedded and indexed for retrieval as well. When a summary matches a query, its corresponding chunk is also returned.
You can manually edit auto-generated summaries or regenerate them for specific documents later. See [Manage Knowledge Content](/en/use-dify/knowledge/manage-knowledge/maintain-knowledge-documents) for details.
If you select a vision-capable LLM, summaries will be generated based on both the chunk text and any attached images.
## Preview Chunks
Click **Preview** to see how your content will be chunked. A limited number of chunks will be displayed for a quick review.
If the results don't perfectly match your expectations, choose the closest configuration—you can manually fine-tune chunks later. See [Manage Knowledge Content](/en/use-dify/knowledge/manage-knowledge/maintain-knowledge-documents) for details.
For multiple documents, click the file name at the top of the preview panel to switch between them.
# Upload Local Files
Source: https://docs.dify.ai/en/use-dify/knowledge/create-knowledge/import-text-data/readme
Once a knowledge base is created, its data source cannot be changed later.
When quick-creating a knowledge base, you can upload local files as its data source:
1. Click **Knowledge** > **Create Knowledge**.
2. Select **Import from file** as the data source, then upload your files.
* Maximum number of files per upload: 5
On Dify Cloud, **batch uploading** (up to 50 files per upload) is only available on [paid plans](https://dify.ai/pricing).
* Maximum file size: 15 MB
For self-hosted deployments, you can adjust these two limits via the environment variables `UPLOAD_FILE_SIZE_LIMIT` and `UPLOAD_FILE_BATCH_LIMIT`.
***
**For Images in Uploaded Files**
JPG, JPEG, PNG, and GIF images under 2 MB are automatically extracted as attachments to their corresponding chunks. These images can be managed independently and are returned alongside their chunks during retrieval.
URLs of extracted images remain in the chunk text, but you can safely remove these URLs to keep the text clean—this won't affect the extracted images.
If you select a multimodal embedding model (marked with a **Vision** icon) in index settings, the extracted images will also be embedded and indexed for retrieval.
Each chunk supports up to 10 image attachments; images beyond this limit will not be extracted.
For self-hosted deployments, you can adjust the following limits via environment variables:
* Maximum image size: `ATTACHMENT_IMAGE_FILE_SIZE_LIMIT`
* Maximum number of attachments per chunk: `SINGLE_CHUNK_ATTACHMENT_LIMIT`
The above extraction rule applies to:
* Images embedded in DOCX files
Images embedded in other file types (e.g., PDF) can be extracted by using appropriate document extraction plugins in [knowledge pipelines](/en/use-dify/knowledge/knowledge-pipeline/readme).
* Images referenced via accessible URLs using the following Markdown syntax in any file type:
* ``
* ``
# Sync Data from Notion
Source: https://docs.dify.ai/en/use-dify/knowledge/create-knowledge/import-text-data/sync-from-notion
Dify datasets support importing from Notion and setting up **synchronization** so that data updates in Notion are automatically synced to Dify.
### Authorization Verification
1. When creating a dataset and selecting the data source, click **Sync from Notion Content -- Bind Now** and follow the prompts to complete the authorization verification.
2. Alternatively, you can go to **Settings -- Data Sources -- Add Data Source**, click on the Notion source **Bind**, and complete the authorization verification.

### Importing Notion Data
After completing the authorization verification, go to the create dataset page, click **Sync from Notion Content**, and select the authorized pages you need to import.

### Chunking and Cleaning
Next, choose a [chunking mode](/en/use-dify/knowledge/create-knowledge/chunking-and-cleaning-text) and [indexing method](/en/use-dify/knowledge/create-knowledge/setting-indexing-methods) for your knowledge base, then save it and wait for the automatically processing. Dify not only supports importing standard Notion pages but can also consolidate and save page attributes from database-type pages.
***Note: images and files cannot be imported, and data from tables will be converted to text.***

### Synchronizing Notion Data
If your Notion content has been updated, you can sync the changes by clicking the **Sync** button for the corresponding page in the document list of your knowledge base. Syncing involves an embedding process, which will consume tokens from your embedding model.

### Integration Configuration Method for Community Edition Notion
Notion offers two integration options: **internal integration** and **public integration**. For more details on the differences between these two methods, please refer to the [official Notion documentation](https://developers.notion.com/guides/get-started/authorization).
#### 1. Using Internal Integration
First, create an integration in the integration settings page [Create Integration](https://www.notion.so/my-integrations). By default, all integrations start as internal integrations; internal integrations will be associated with the workspace you choose, so you need to be the workspace owner to create an integration.
Specific steps:
Click the **New integration** button. The type is **Internal** by default (cannot be modified). Select the associated space, enter the integration name, upload a logo, and click **Submit** to create the integration successfully.

After creating the integration, you can update its settings as needed under the Capabilities tab and click the **Show** button under Secrets to copy the secrets.

After copying, go back to the Dify source code, and configure the relevant environment variables in the **.env** file. The environment variables are as follows:
```
NOTION_INTEGRATION_TYPE = internal or NOTION_INTEGRATION_TYPE = public
NOTION_INTERNAL_SECRET=you-internal-secret
```
#### **Using Public Integration**
**You need to upgrade the internal integration to a public integration.** Navigate to the Distribution page of the integration, and toggle the switch to make the integration public. When switching to the public setting, you need to fill in additional information in the Organization Information form below, including your company name, website, and redirect URL, then click the **Submit** button.

After successfully making the integration public on the integration settings page, you will be able to access the integration key in the Keys tab:

Go back to the Dify source code, and configure the relevant environment variables in the **.env** file. The environment variables are as follows:
```
NOTION_INTEGRATION_TYPE=public
NOTION_CLIENT_SECRET=your-client-secret
NOTION_CLIENT_ID=your-client-id
```
After configuration, you can operate the Notion data import and synchronization functions in the dataset.
# Import Data from Website
Source: https://docs.dify.ai/en/use-dify/knowledge/create-knowledge/import-text-data/sync-from-website
The knowledge base supports crawling content from public web pages using third-party tools such as [Jina Reader](https://jina.ai/reader/) and [Firecrawl](https://www.firecrawl.dev/), parsing it into Markdown content, and importing it into the knowledge base.
[Firecrawl](https://www.firecrawl.dev/) and [Jina Reader](https://jina.ai/reader/) are both open-source web parsing tools that can convert web pages into clean Markdown format text that is easy for LLMs to recognize, while providing easy-to-use API services.
The following sections will introduce the usage methods for Firecrawl and Jina Reader respectively.
## Firecrawl
### **1. Configure Firecrawl API credentials**
Click on the avatar in the upper right corner, then go to the **DataSource** page, and click the **Configure** button next to Firecrawl.

Log in to the [Firecrawl website](https://www.firecrawl.dev/) to complete registration, get your API Key, and then enter and save it in Dify.

### 2. Scrape target webpage
On the knowledge base creation page, select **Sync from website**, choose Firecrawl as the provider, and enter the target URL to be crawled.
The configuration options include: Whether to crawl sub-pages, Page crawling limit, Page scraping max depth, Excluded paths, Include only paths, and Content extraction scope. After completing the configuration, click **Run** to preview the parsed pages.

### 3. Review import results
After importing the parsed text from the webpage, it is stored in the knowledge base documents. View the import results and click **Add URL** to continue importing new web pages.
***
## Jina Reader
### 1. Configuring Jina Reader Credentials
Click on the avatar in the upper right corner, then go to the **DataSource** page, and click the **Configure** button next to Jina Reader.

Log in to the [Jina Reader website](https://jina.ai/reader/), complete registration, obtain the API Key, then fill it in and save.
### 2. Using Jina Reader to Crawl Web Content
On the knowledge base creation page, select **Sync from website**, choose Jina Reader as the provider, and enter the target URL to be crawled.

Configuration options include: whether to crawl subpages, maximum number of pages to crawl, and whether to use sitemap for crawling. After completing the configuration, click the **Run** button to preview the page links to be crawled.

After importing the parsed text from web pages into the knowledge base, you can review the imported results in the documents section. To add more web pages, click the **Add URL** button on the right to continue importing new pages.

After crawling is complete, the content from the web pages will be incorporated into the knowledge base.
# Quick Create Knowledge
Source: https://docs.dify.ai/en/use-dify/knowledge/create-knowledge/introduction
To quick-create and configure a knowledge base:
1. Click **Knowledge** > **Create Knowledge**, then [upload local files](/en/use-dify/knowledge/create-knowledge/import-text-data/readme), [sync data from Notion](/en/use-dify/knowledge/create-knowledge/import-text-data/sync-from-notion), or [webpages](/en/use-dify/knowledge/create-knowledge/import-text-data/sync-from-website), or create an empty knowledge base.
2. [Configure the chunk settings](/en/use-dify/knowledge/create-knowledge/chunking-and-cleaning-text) and preview the chunking results. This stage involves content preprocessing and structuring, where long texts are divided into multiple smaller chunks.
3. [Specify the index method and retrieval settings](/en/use-dify/knowledge/create-knowledge/setting-indexing-methods). Once the knowledge base receives a user query, it searches existing documents according to preset retrieval methods and extracts highly relevant content chunks.
4. Wait for the data processing to complete.

# Specify the Index Method and Retrieval Settings
Source: https://docs.dify.ai/en/use-dify/knowledge/create-knowledge/setting-indexing-methods
After selecting the chunking mode, the next step is to define the index method for structured content.
## Select the Index Method
Similar to the search engines use efficient indexing algorithms to match search results most relevant to user queries, the selected index method directly impacts the retrieval efficiency of the LLM and the accuracy of its responses to knowledge base content.
The knowledge base offers two index methods: **High-Quality** and **Economical**, each with different retrieval setting options.
Once a knowledge base is created in the High Quality index method, it cannot switch to Economical later.
The High Quality index method uses an embedding model to convert content chunks into vector representations. This process is called embedding.
Think of these vectors as coordinates in a multi-dimensional space—the closer two points are, the more similar their meanings. This allows the system to find relevant information based on semantic similarity, not just exact keyword matches.
To enable cross-modal retrieval—retrieving both text and images based on semantic relevance—select a multimodal embedding model (marked with a **Vision** icon). Images extracted from documents will then be embedded and indexed for retrieval.
Knowledge bases using such embedding models are labeled **Multimodal** on their cards.
![Multimodal Knowledge Base]() The High-Quality index method supports three retrieval strategies: vector search, full-text search, or hybrid search. Learn more in [Configure the Retrieval Settings](#configure-the-retrieval-settings).
### Q\&A Mode
Q\&A mode is available for self-hosted deployments only.
When this mode is enabled, the system segments the uploaded text and automatically generates Q\&A pairs for each segment after summarizing its content.
Compared with the common **Q to P** strategy (user questions matched with text paragraphs), the Q\&A mode uses a **Q to Q** strategy (questions matched with questions).
This approach is particularly effective because the text in FAQ documents **is often written in natural language with complete grammatical structures**.
> The **Q to Q** strategy makes the matching between questions and answers clearer and better supports scenarios with high-frequency or highly similar questions.
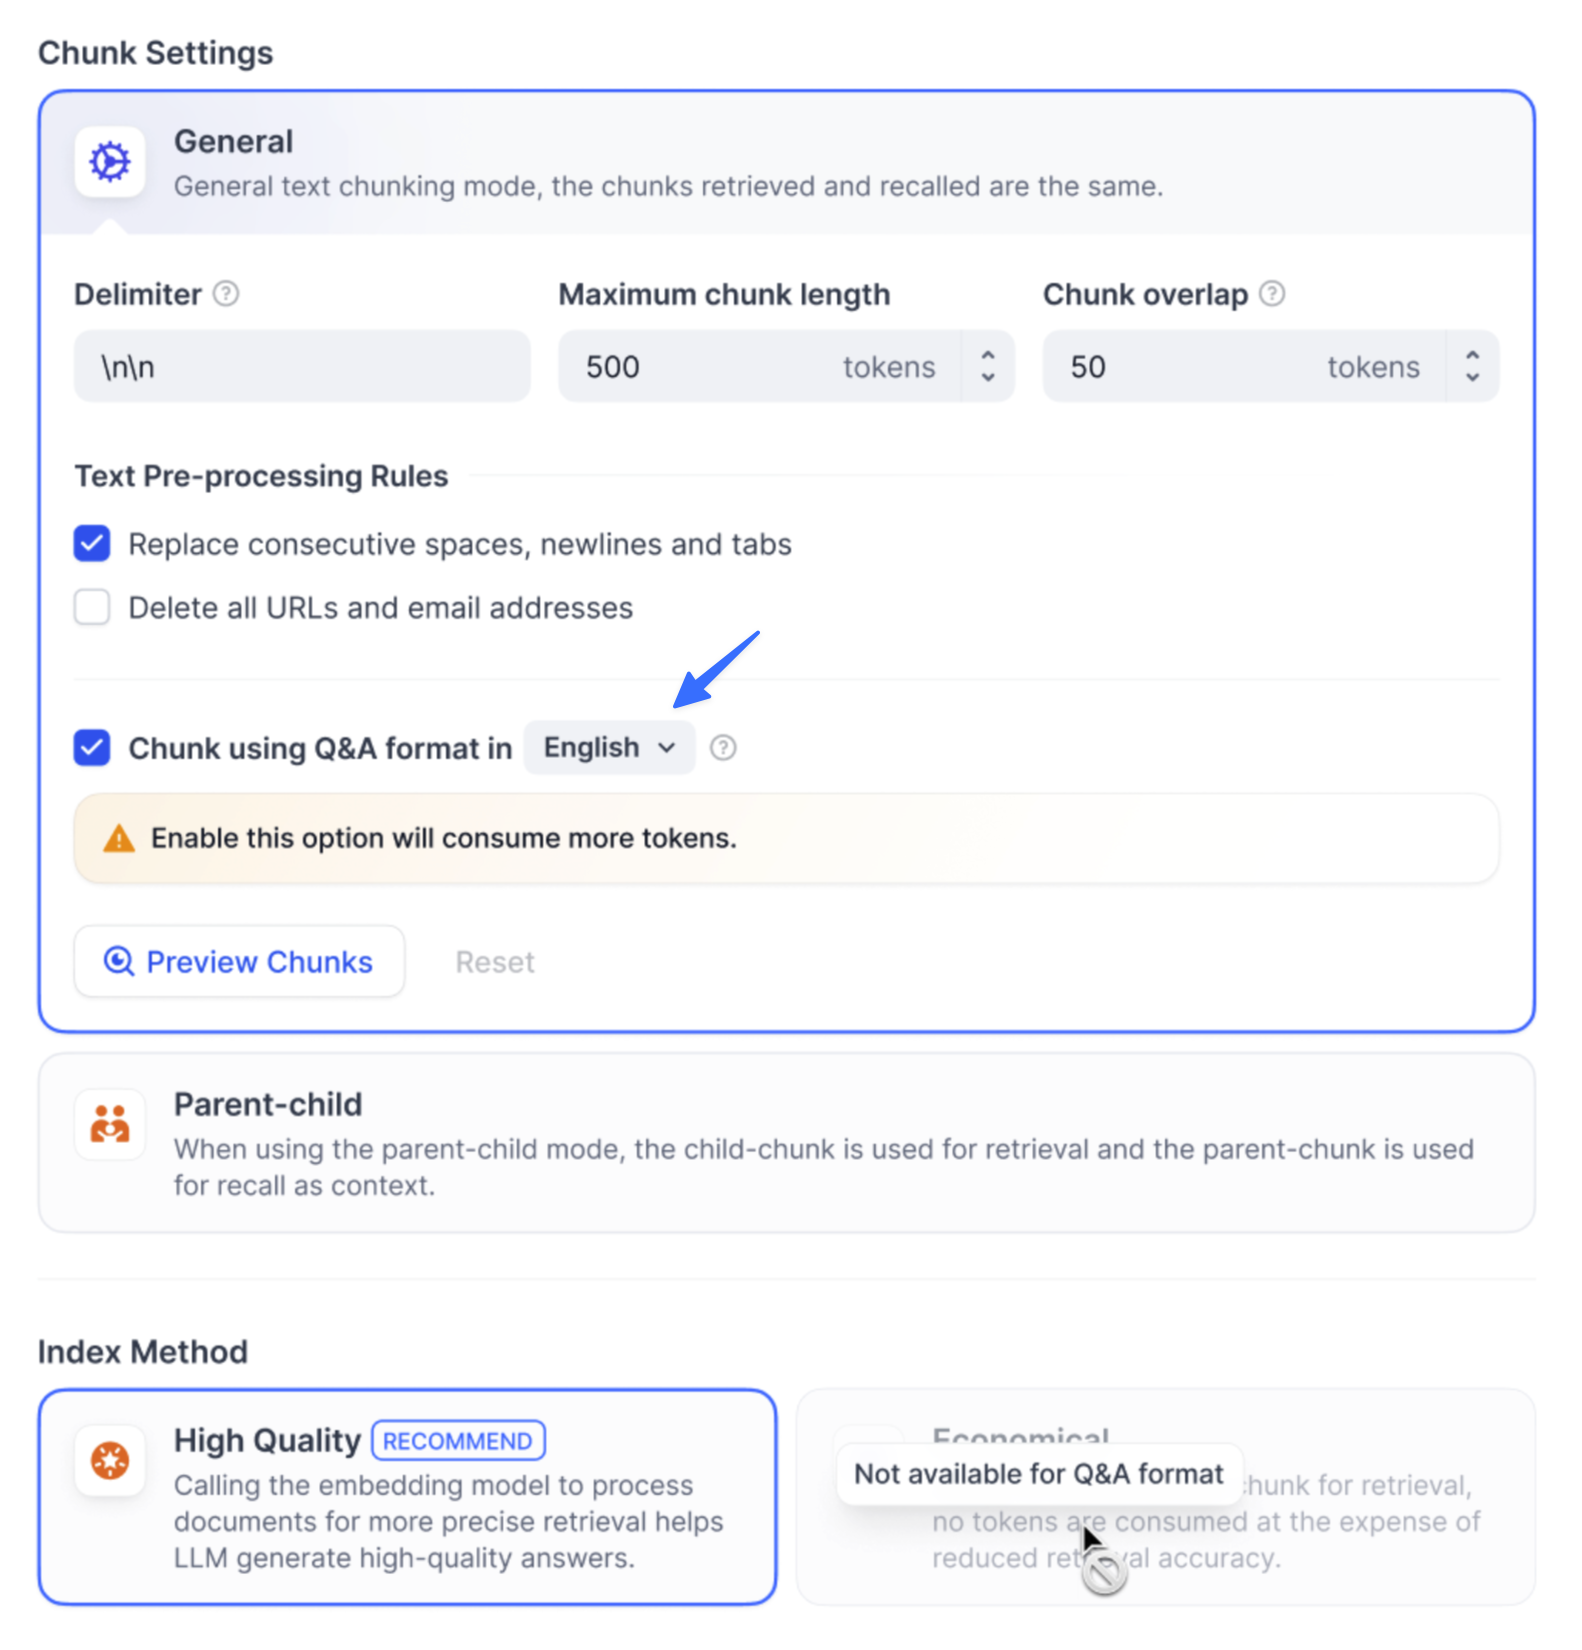
When a user asks a question, the system identifies the most similar question and returns the corresponding chunk as the answer. This approach is more precise, as it directly matches the user’s query, helping them retrieve the exact information they need.
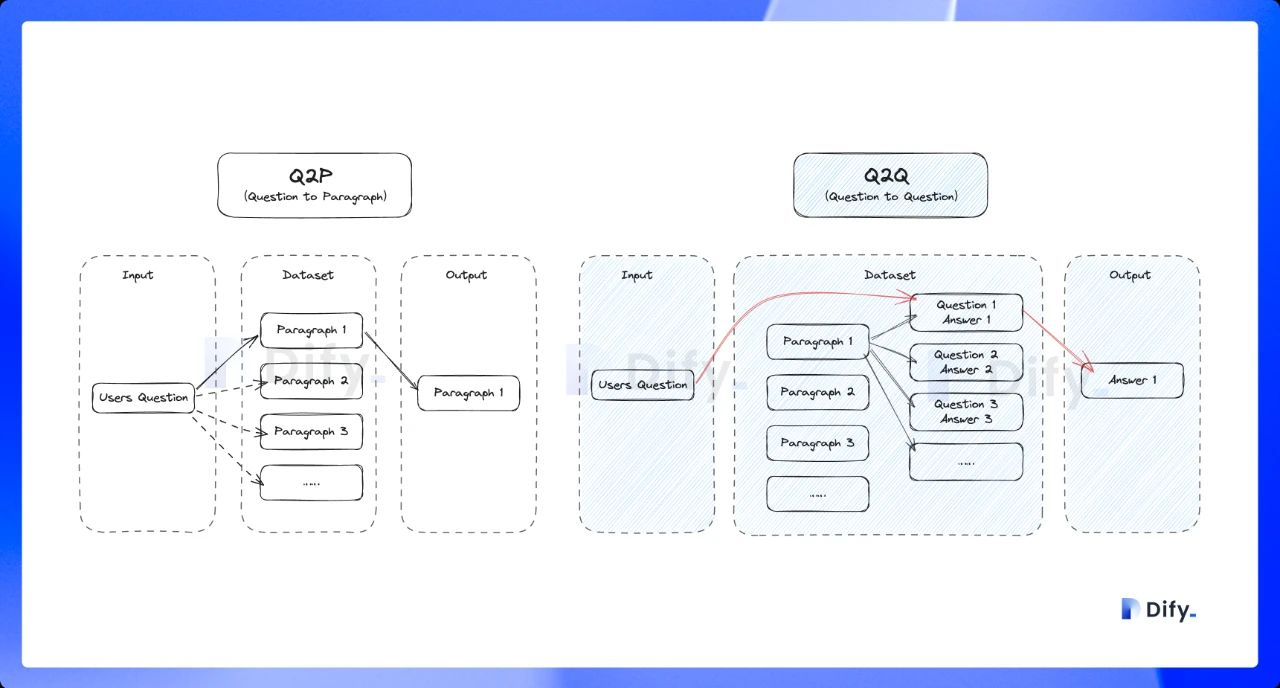
Using 10 keywords per chunk for retrieval, no tokens are consumed at the expense of reduced retrieval accuracy. For the retrieved blocks, only the inverted index method is provided to select the most relevant blocks.
If the performance of the economical indexing method does not meet your expectations, you can upgrade to the High-Quality indexing method in the Knowledge settings page.
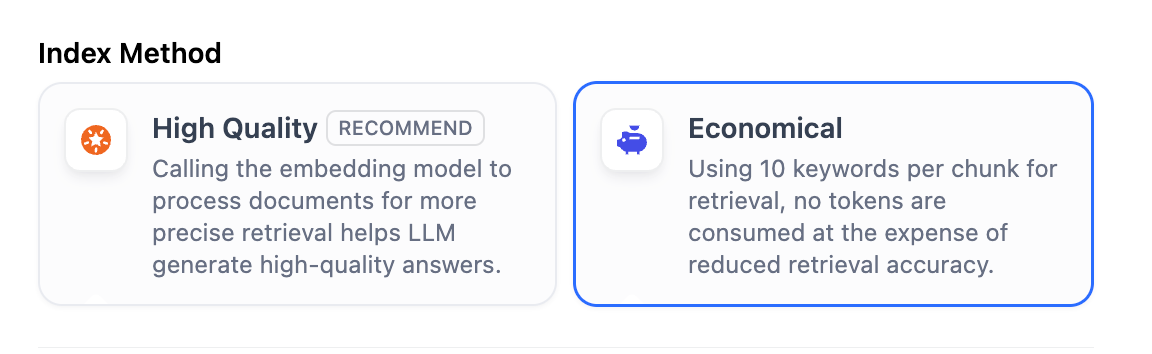
## Configure the Retrieval Settings
Once the knowledge base receives a user query, it searches existing documents according to preset retrieval methods and extracts highly relevant content chunks. These chunks provide essential context for the LLM, ultimately affecting the accuracy and credibility of its answers.
Common retrieval methods include:
1. Semantic Retrieval based on vector similarity—where text chunks and queries are converted into vectors and matched via similarity scoring.
2. Keyword Matching using an inverted index (a standard search engine technique). Both methods are supported in Dify’s knowledge base.
Both retrieval methods are supported in Dify’s knowledge base. The specific retrieval options available depend on the chosen indexing method.
**High Quality**
In the **High-Quality** Indexing Method, Dify offers three retrieval settings: **Vector Search, Full-Text Search, and Hybrid Search**.
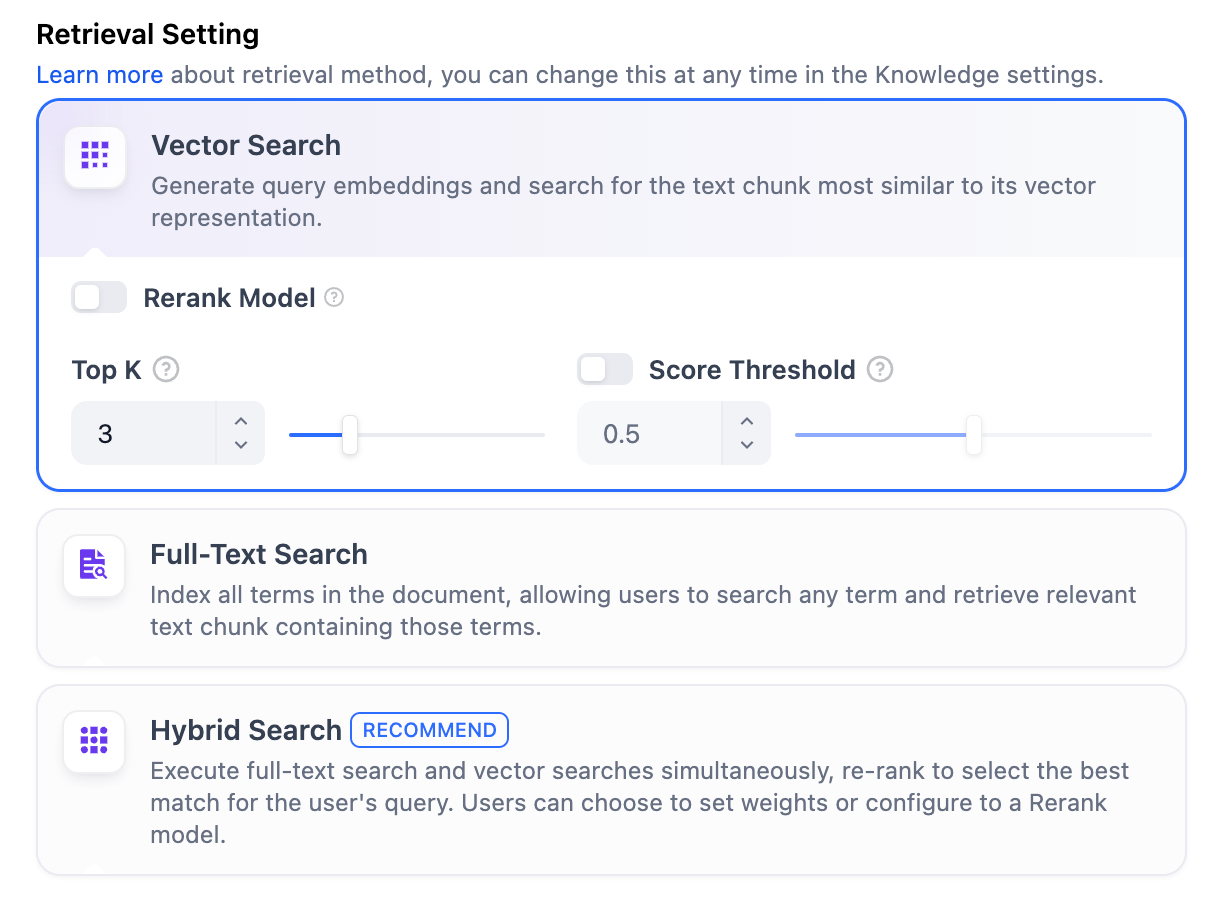
**Vector Search**
**Definition**: Vectorize the user’s question to generate a query vector, then compare it with the corresponding text vectors in the knowledge base to find the nearest chunks.
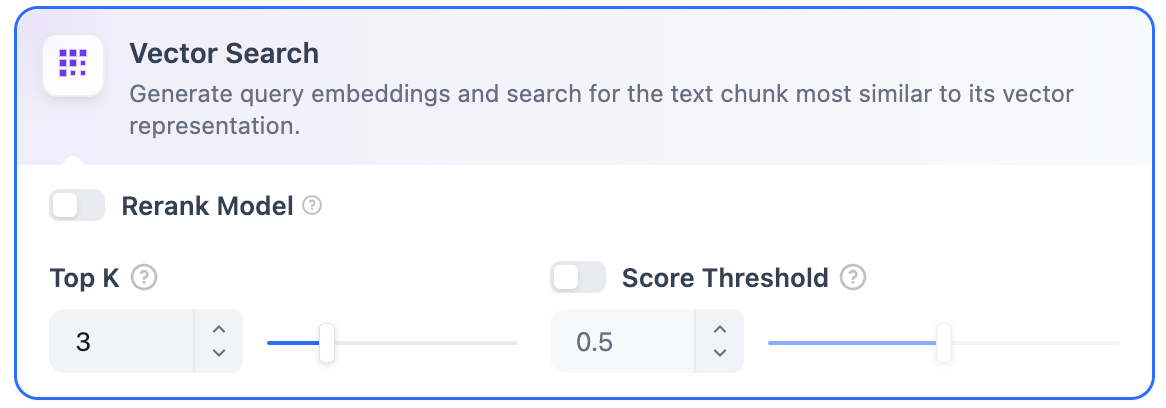
**Vector Search Settings:**
**Rerank Model**: Disabled by default. When enabled, a third-party Rerank model will sort the text chunks returned by Vector Search to optimize results. This helps the LLM access more precise information and improve output quality. Before enabling this option, go to **Settings** → **Model Providers** and configure the Rerank model’s API key.
If the selected embedding model is multimodal, select a multimodal rerank model (marked with a **Vision** icon) as well. Otherwise, retrieved images will be excluded from reranking and the retrieval results.
> Enabling this feature will consume tokens from the Rerank model. For more details, refer to the associated model’s pricing page.
**TopK**: Determines how many text chunks, deemed most similar to the user’s query, are retrieved. It also automatically adjusts the number of chunks based on the chosen model’s context window. The default value is **3**, and higher numbers will recall more text chunks.
**Score Threshold**: Sets the minimum similarity score required for a chunk to be retrieved. Only chunks exceeding this score are retrieved. The default value is **0.5**. Higher thresholds demand greater similarity and thus result in fewer chunks being retrieved.
> The TopK and Score configurations are only effective during the Rerank phase. Therefore, to apply either of these settings, it is necessary to add and enable a Rerank model.
***
**Full-Text Search**
**Definition:** Indexing all terms in the document, allowing users to query any terms and return text fragments containing those terms.
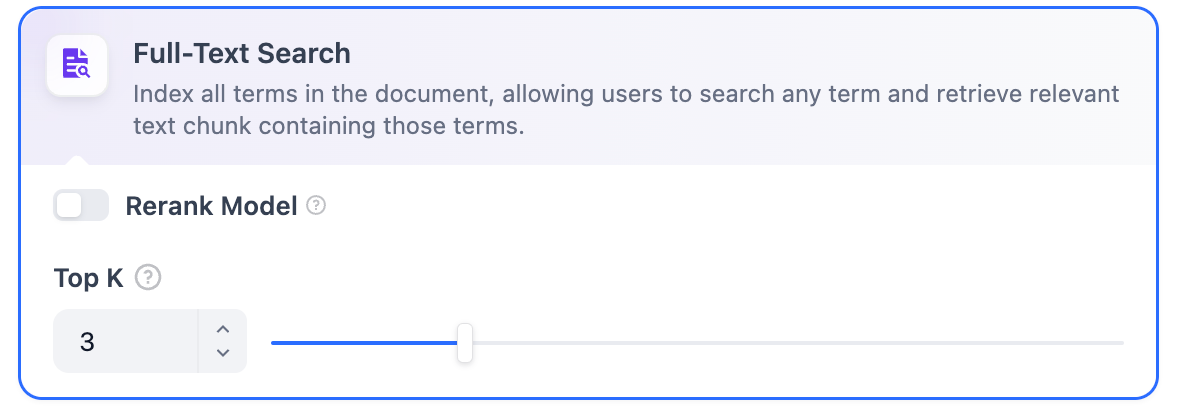
**Rerank Model**: Disabled by default. When enabled, a third-party Rerank model will sort the text chunks returned by Full-Text Search to optimize results. This helps the LLM access more precise information and improve output quality. Before enabling this option, go to **Settings** → **Model Providers** and configure the Rerank model’s API key.
If the selected embedding model is multimodal, select a multimodal rerank model (marked with a **Vision** icon) as well. Otherwise, retrieved images will be excluded from reranking and the retrieval results.
> Enabling this feature will consume tokens from the Rerank model. For more details, refer to the associated model’s pricing page.
**TopK**: Determines how many text chunks, deemed most similar to the user’s query, are retrieved. It also automatically adjusts the number of chunks based on the chosen model’s context window. The default value is **3**, and higher numbers will recall more text chunks.
**Score Threshold**: Sets the minimum similarity score required for a chunk to be retrieved. Only chunks exceeding this score are retrieved. The default value is **0.5**. Higher thresholds demand greater similarity and thus result in fewer chunks being retrieved.
> The TopK and Score configurations are only effective during the Rerank phase. Therefore, to apply either of these settings, it is necessary to add and enable a Rerank model.
***
**Hybrid Search**
**Definition**: This process combines full-text search and vector search, performing both simultaneously. It includes a reordering step to select the best-matching results from both search outcomes based on the user’s query.
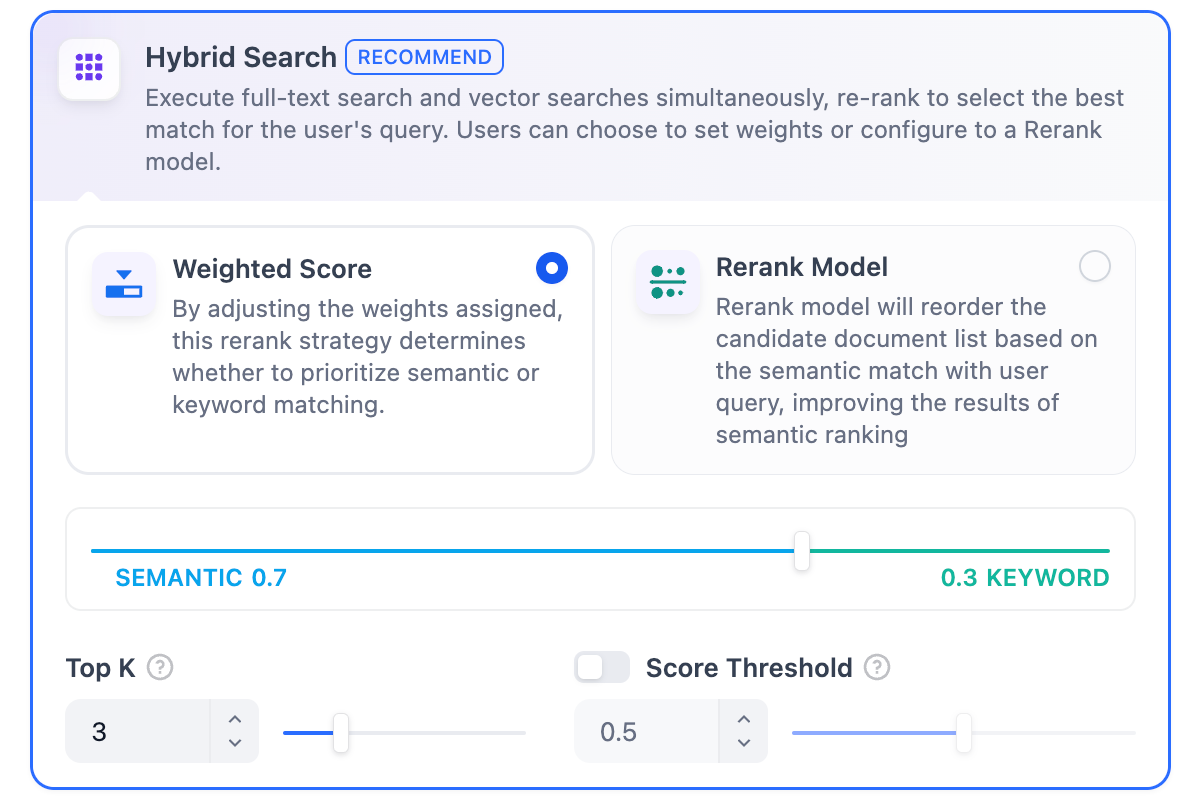
In this mode, you can specify **"Weight settings"** without needing to configure the Rerank model API, or enable **Rerank model** for retrieval.
* **Weight Settings**
This feature enables users to set custom weights for semantic priority and keyword priority. Keyword search refers to performing a full-text search within the knowledge base, while semantic search involves vector search within the knowledge base.
* **Semantic Value of 1**
This activates only the semantic search mode. Utilizing embedding models, even if the exact terms from the query do not appear in the knowledge base, the search can delve deeper by calculating vector distances, thus returning relevant content. Additionally, when dealing with multilingual content, semantic search can capture meaning across different languages, providing more accurate cross-language search results.
* **Keyword Value of 1**
This activates only the keyword search mode. It performs a full match against the input text in the knowledge base, suitable for scenarios where the user knows the exact information or terminology. This approach consumes fewer computational resources and is ideal for quick searches within a large document knowledge base.
* **Custom Keyword and Semantic Weights**
In addition to enabling only semantic search or keyword search, we provide flexible custom weight settings. You can continuously adjust the weights of the two methods to identify the optimal weight ratio that suits your business scenario.
***
**Rerank Model**
Disabled by default. When enabled, a third-party Rerank model will sort the text chunks returned by Hybrid Search to optimize results. This helps the LLM access more precise information and improve output quality. Before enabling this option, go to **Settings** → **Model Providers** and configure the Rerank model’s API key.
If the selected embedding model is multimodal, select a multimodal rerank model (marked with a **Vision** icon) as well. Otherwise, retrieved images will be excluded from reranking and the retrieval results.
> Enabling this feature will consume tokens from the Rerank model. For more details, refer to the associated model’s pricing page.
The **"Weight Settings"** and **"Rerank Model"** settings support the following options:
**TopK**: Determines how many text chunks, deemed most similar to the user’s query, are retrieved. It also automatically adjusts the number of chunks based on the chosen model’s context window. The default value is **3**, and higher numbers will recall more text chunks.
**Score Threshold**: Sets the minimum similarity score required for a chunk to be retrieved. Only chunks exceeding this score are retrieved. The default value is **0.5**. Higher thresholds demand greater similarity and thus result in fewer chunks being retrieved.
**Economical**
In **Economical Indexing** mode, only the inverted index approach is available. An inverted index is a data structure designed for fast keyword retrieval within documents, commonly used in online search engines. Inverted indexing supports only the **TopK** setting.
**TopK:** Determines how many text chunks, deemed most similar to the user’s query, are retrieved. It also automatically adjusts the number of chunks based on the chosen model’s context window. The default value is **3**, and higher numbers will recall more text chunks.
The High-Quality index method supports three retrieval strategies: vector search, full-text search, or hybrid search. Learn more in [Configure the Retrieval Settings](#configure-the-retrieval-settings).
### Q\&A Mode
Q\&A mode is available for self-hosted deployments only.
When this mode is enabled, the system segments the uploaded text and automatically generates Q\&A pairs for each segment after summarizing its content.
Compared with the common **Q to P** strategy (user questions matched with text paragraphs), the Q\&A mode uses a **Q to Q** strategy (questions matched with questions).
This approach is particularly effective because the text in FAQ documents **is often written in natural language with complete grammatical structures**.
> The **Q to Q** strategy makes the matching between questions and answers clearer and better supports scenarios with high-frequency or highly similar questions.

When a user asks a question, the system identifies the most similar question and returns the corresponding chunk as the answer. This approach is more precise, as it directly matches the user’s query, helping them retrieve the exact information they need.

Using 10 keywords per chunk for retrieval, no tokens are consumed at the expense of reduced retrieval accuracy. For the retrieved blocks, only the inverted index method is provided to select the most relevant blocks.
If the performance of the economical indexing method does not meet your expectations, you can upgrade to the High-Quality indexing method in the Knowledge settings page.

## Configure the Retrieval Settings
Once the knowledge base receives a user query, it searches existing documents according to preset retrieval methods and extracts highly relevant content chunks. These chunks provide essential context for the LLM, ultimately affecting the accuracy and credibility of its answers.
Common retrieval methods include:
1. Semantic Retrieval based on vector similarity—where text chunks and queries are converted into vectors and matched via similarity scoring.
2. Keyword Matching using an inverted index (a standard search engine technique). Both methods are supported in Dify’s knowledge base.
Both retrieval methods are supported in Dify’s knowledge base. The specific retrieval options available depend on the chosen indexing method.
**High Quality**
In the **High-Quality** Indexing Method, Dify offers three retrieval settings: **Vector Search, Full-Text Search, and Hybrid Search**.

**Vector Search**
**Definition**: Vectorize the user’s question to generate a query vector, then compare it with the corresponding text vectors in the knowledge base to find the nearest chunks.

**Vector Search Settings:**
**Rerank Model**: Disabled by default. When enabled, a third-party Rerank model will sort the text chunks returned by Vector Search to optimize results. This helps the LLM access more precise information and improve output quality. Before enabling this option, go to **Settings** → **Model Providers** and configure the Rerank model’s API key.
If the selected embedding model is multimodal, select a multimodal rerank model (marked with a **Vision** icon) as well. Otherwise, retrieved images will be excluded from reranking and the retrieval results.
> Enabling this feature will consume tokens from the Rerank model. For more details, refer to the associated model’s pricing page.
**TopK**: Determines how many text chunks, deemed most similar to the user’s query, are retrieved. It also automatically adjusts the number of chunks based on the chosen model’s context window. The default value is **3**, and higher numbers will recall more text chunks.
**Score Threshold**: Sets the minimum similarity score required for a chunk to be retrieved. Only chunks exceeding this score are retrieved. The default value is **0.5**. Higher thresholds demand greater similarity and thus result in fewer chunks being retrieved.
> The TopK and Score configurations are only effective during the Rerank phase. Therefore, to apply either of these settings, it is necessary to add and enable a Rerank model.
***
**Full-Text Search**
**Definition:** Indexing all terms in the document, allowing users to query any terms and return text fragments containing those terms.

**Rerank Model**: Disabled by default. When enabled, a third-party Rerank model will sort the text chunks returned by Full-Text Search to optimize results. This helps the LLM access more precise information and improve output quality. Before enabling this option, go to **Settings** → **Model Providers** and configure the Rerank model’s API key.
If the selected embedding model is multimodal, select a multimodal rerank model (marked with a **Vision** icon) as well. Otherwise, retrieved images will be excluded from reranking and the retrieval results.
> Enabling this feature will consume tokens from the Rerank model. For more details, refer to the associated model’s pricing page.
**TopK**: Determines how many text chunks, deemed most similar to the user’s query, are retrieved. It also automatically adjusts the number of chunks based on the chosen model’s context window. The default value is **3**, and higher numbers will recall more text chunks.
**Score Threshold**: Sets the minimum similarity score required for a chunk to be retrieved. Only chunks exceeding this score are retrieved. The default value is **0.5**. Higher thresholds demand greater similarity and thus result in fewer chunks being retrieved.
> The TopK and Score configurations are only effective during the Rerank phase. Therefore, to apply either of these settings, it is necessary to add and enable a Rerank model.
***
**Hybrid Search**
**Definition**: This process combines full-text search and vector search, performing both simultaneously. It includes a reordering step to select the best-matching results from both search outcomes based on the user’s query.

In this mode, you can specify **"Weight settings"** without needing to configure the Rerank model API, or enable **Rerank model** for retrieval.
* **Weight Settings**
This feature enables users to set custom weights for semantic priority and keyword priority. Keyword search refers to performing a full-text search within the knowledge base, while semantic search involves vector search within the knowledge base.
* **Semantic Value of 1**
This activates only the semantic search mode. Utilizing embedding models, even if the exact terms from the query do not appear in the knowledge base, the search can delve deeper by calculating vector distances, thus returning relevant content. Additionally, when dealing with multilingual content, semantic search can capture meaning across different languages, providing more accurate cross-language search results.
* **Keyword Value of 1**
This activates only the keyword search mode. It performs a full match against the input text in the knowledge base, suitable for scenarios where the user knows the exact information or terminology. This approach consumes fewer computational resources and is ideal for quick searches within a large document knowledge base.
* **Custom Keyword and Semantic Weights**
In addition to enabling only semantic search or keyword search, we provide flexible custom weight settings. You can continuously adjust the weights of the two methods to identify the optimal weight ratio that suits your business scenario.
***
**Rerank Model**
Disabled by default. When enabled, a third-party Rerank model will sort the text chunks returned by Hybrid Search to optimize results. This helps the LLM access more precise information and improve output quality. Before enabling this option, go to **Settings** → **Model Providers** and configure the Rerank model’s API key.
If the selected embedding model is multimodal, select a multimodal rerank model (marked with a **Vision** icon) as well. Otherwise, retrieved images will be excluded from reranking and the retrieval results.
> Enabling this feature will consume tokens from the Rerank model. For more details, refer to the associated model’s pricing page.
The **"Weight Settings"** and **"Rerank Model"** settings support the following options:
**TopK**: Determines how many text chunks, deemed most similar to the user’s query, are retrieved. It also automatically adjusts the number of chunks based on the chosen model’s context window. The default value is **3**, and higher numbers will recall more text chunks.
**Score Threshold**: Sets the minimum similarity score required for a chunk to be retrieved. Only chunks exceeding this score are retrieved. The default value is **0.5**. Higher thresholds demand greater similarity and thus result in fewer chunks being retrieved.
**Economical**
In **Economical Indexing** mode, only the inverted index approach is available. An inverted index is a data structure designed for fast keyword retrieval within documents, commonly used in online search engines. Inverted indexing supports only the **TopK** setting.
**TopK:** Determines how many text chunks, deemed most similar to the user’s query, are retrieved. It also automatically adjusts the number of chunks based on the chosen model’s context window. The default value is **3**, and higher numbers will recall more text chunks.
### Reference
After specifying the retrieval settings, you can refer to the following documentation to review how keywords match with content chunks in different scenarios.
Learn how to test and cite your knowledge base retrieval
# External Knowledge API
Source: https://docs.dify.ai/en/use-dify/knowledge/external-knowledge-api
API specification that your external knowledge service must implement to integrate with Dify
This page defines the API contract your external knowledge service must implement for Dify to retrieve content from it. Once your API is ready, see [Connect to External Knowledge Base](/en/use-dify/knowledge/connect-external-knowledge-base) to register it in Dify.
## Authentication
Dify sends the API Key you configured as a Bearer token in every request:
```text theme={null}
Authorization: Bearer {API_KEY}
```
You define the authentication logic on your side. Dify only passes the key—it does not validate it.
## Request
```text theme={null}
POST {your-endpoint}/retrieval
Content-Type: application/json
Authorization: Bearer {API_KEY}
```
Dify appends `/retrieval` to the endpoint URL you configured. If you registered `https://your-service.com`, Dify sends requests to `https://your-service.com/retrieval`.
### Body
| Property | Required | Type | Description |
| :------------------- | :------- | :----- | :------------------------------------------------------------------------------------------------------------------------------------------------------------------------------------------------------------- |
| `knowledge_id` | Yes | string | The identifier of the knowledge source in your external system. This is the value you entered in the **External Knowledge ID** field when connecting. Use it to route queries to the correct knowledge source. |
| `query` | Yes | string | The user's search query. |
| `retrieval_setting` | Yes | object | Retrieval parameters. See [below](#retrieval_setting). |
| `metadata_condition` | No | object | Metadata filtering conditions. See [below](#metadata_condition). |
#### `retrieval_setting`
| Property | Required | Type | Description |
| :---------------- | :------- | :---- | :--------------------------------------------------------------------------------------------- |
| `top_k` | Yes | int | Maximum number of results to return. |
| `score_threshold` | Yes | float | Minimum similarity score (0-1). When score threshold is disabled in Dify, this value is `0.0`. |
#### `metadata_condition`
Dify passes metadata conditions to your API but does not currently provide a UI for users to configure them. This parameter is available for programmatic use only.
| Property | Required | Type | Description |
| :----------------- | :------- | :------------- | :----------------------------- |
| `logical_operator` | No | string | `and` or `or`. Default: `and`. |
| `conditions` | Yes | array\[object] | List of filter conditions. |
Each object in `conditions`:
| Property | Required | Type | Description |
| :-------------------- | :------- | :-------------------------------- | :-------------------------------------------------------- |
| `name` | Yes | string | Metadata field name to filter on. |
| `comparison_operator` | Yes | string | Comparison operator. See supported values below. |
| `value` | No | string, number, or array\[string] | Comparison value. Omit when using `empty` or `not empty`. |
| Operator | Description |
| :------------- | :--------------------------------- |
| `contains` | Contains a value |
| `not contains` | Does not contain a value |
| `start with` | Starts with a value |
| `end with` | Ends with a value |
| `is` | Equals a value |
| `is not` | Does not equal a value |
| `in` | Matches any value in a list |
| `not in` | Does not match any value in a list |
| `empty` | Is empty |
| `not empty` | Is not empty |
| `=` | Equals (numeric) |
| `≠` | Not equal (numeric) |
| `>` | Greater than |
| `<` | Less than |
| `≥` | Greater than or equal to |
| `≤` | Less than or equal to |
| `before` | Before a date |
| `after` | After a date |
### Example Request
```json theme={null}
{
"knowledge_id": "your-knowledge-id",
"query": "What is Dify?",
"retrieval_setting": {
"top_k": 3,
"score_threshold": 0.5
}
}
```
## Response
Return HTTP 200 with a JSON body containing a `records` array. If no results match the query, return an empty array: `{"records": []}`.
### `records`
| Property | Type | Description |
| :--------- | :----- | :----------------------------------------------------------------------------- |
| `content` | string | The retrieved text chunk. Dify uses this as the context passed to the LLM. |
| `score` | float | Similarity score (0–1). Used for score threshold filtering and result ranking. |
| `title` | string | Source document title. |
| `metadata` | object | Arbitrary key-value pairs preserved by Dify. |
Dify does not reject records with missing fields, but omitting `content` or `score` will produce incomplete or unranked results.
If you include `metadata` in a record, it must be an object (`{}`), not `null`. A `null` metadata value causes errors in Dify's retrieval pipeline.
### Example Response
```json theme={null}
{
"records": [
{
"content": "This is the document for external knowledge.",
"score": 0.98,
"title": "knowledge.txt",
"metadata": {
"path": "s3://dify/knowledge.txt",
"description": "dify knowledge document"
}
},
{
"content": "The Innovation Engine for GenAI Applications",
"score": 0.66,
"title": "introduce.txt",
"metadata": {}
}
]
}
```
## Error Handling
Dify checks the HTTP status code of your response. A non-200 status raises an error that surfaces to the user.
You can optionally return structured error information in JSON:
| Property | Type | Description |
| :----------- | :----- | :------------------------------------------ |
| `error_code` | int | An application-level error code you define. |
| `error_msg` | string | A human-readable error description. |
The following are suggested error codes. These are conventions, not enforced by Dify:
| Code | Suggested Usage |
| :--- | :---------------------------------- |
| 1001 | Invalid Authorization header format |
| 1002 | Authorization failed |
| 2001 | Knowledge base not found |
### Example Error Response
```json theme={null}
{
"error_code": 1002,
"error_msg": "Authorization failed. Please check your API key."
}
```
# Integrate Knowledge within Apps
Source: https://docs.dify.ai/en/use-dify/knowledge/integrate-knowledge-within-application
### Creating an Application Integrated with Knowledge Base
A **"Knowledge Base"** can be used as an external information source to provide precise answers to user questions via LLM. You can associate an existing knowledge base with any [application type](/en/use-dify/getting-started/key-concepts#dify-app) in Dify.
Taking a chat assistant as an example, the process is as follows:
1. Go to **Knowledge -- Create Knowledge -- Upload file**
2. Go to **Studio -- Create Application -- Select Chatbot**
3. Enter **Context**, click **Add**, and select one of the knowledge base created
4. Use **Metadata Filtering** to refine document search in your knowledge base
5. In **Context Settings -- Retrieval Setting**, configure the **Retrieval Setting**
6. Enable **Citation and Attribution** in **Add Features**
7. In **Debug and Preview**, input user questions related to the knowledge base for debugging
8. After debugging, click **Publish** button to make an AI application based on your own knowledge!
***
### Connecting Knowledge and Setting Retrieval Mode
In applications that utilize multiple knowledge bases, it is essential to configure the retrieval mode to enhance the precision of retrieved content. To set the retrieval mode for the knowledge bases, navigate to **Context -- Retrieval Settings -- Rerank Setting**.
#### Retrieval Setting
The retriever scans all knowledge bases linked to the application for text content relevant to the user's question. The results are then consolidated. Below is the technical flowchart for the Multi-path Retrieval mode:
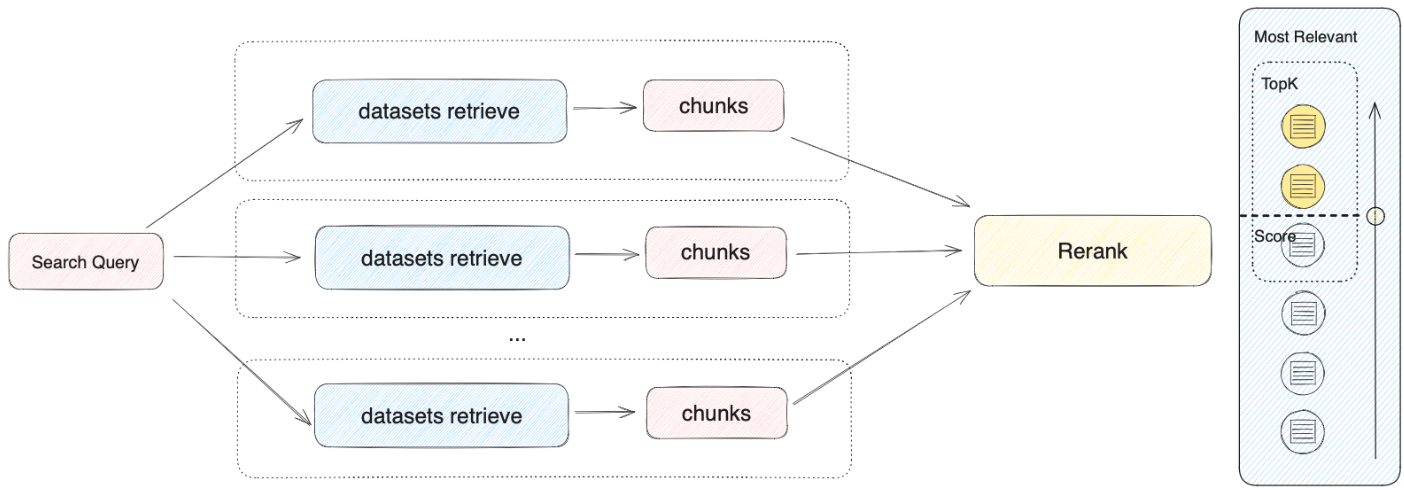
This method simultaneously queries all knowledge bases connected in **"Context"**, seeking relevant text chucks across multiple knowledge bases, collecting all content that aligns with the user's question, and ultimately applying the Rerank strategy to identify the most appropriate content to respond to the user. This retrieval approach offers more comprehensive and accurate results by leveraging multiple knowledge bases simultaneously.
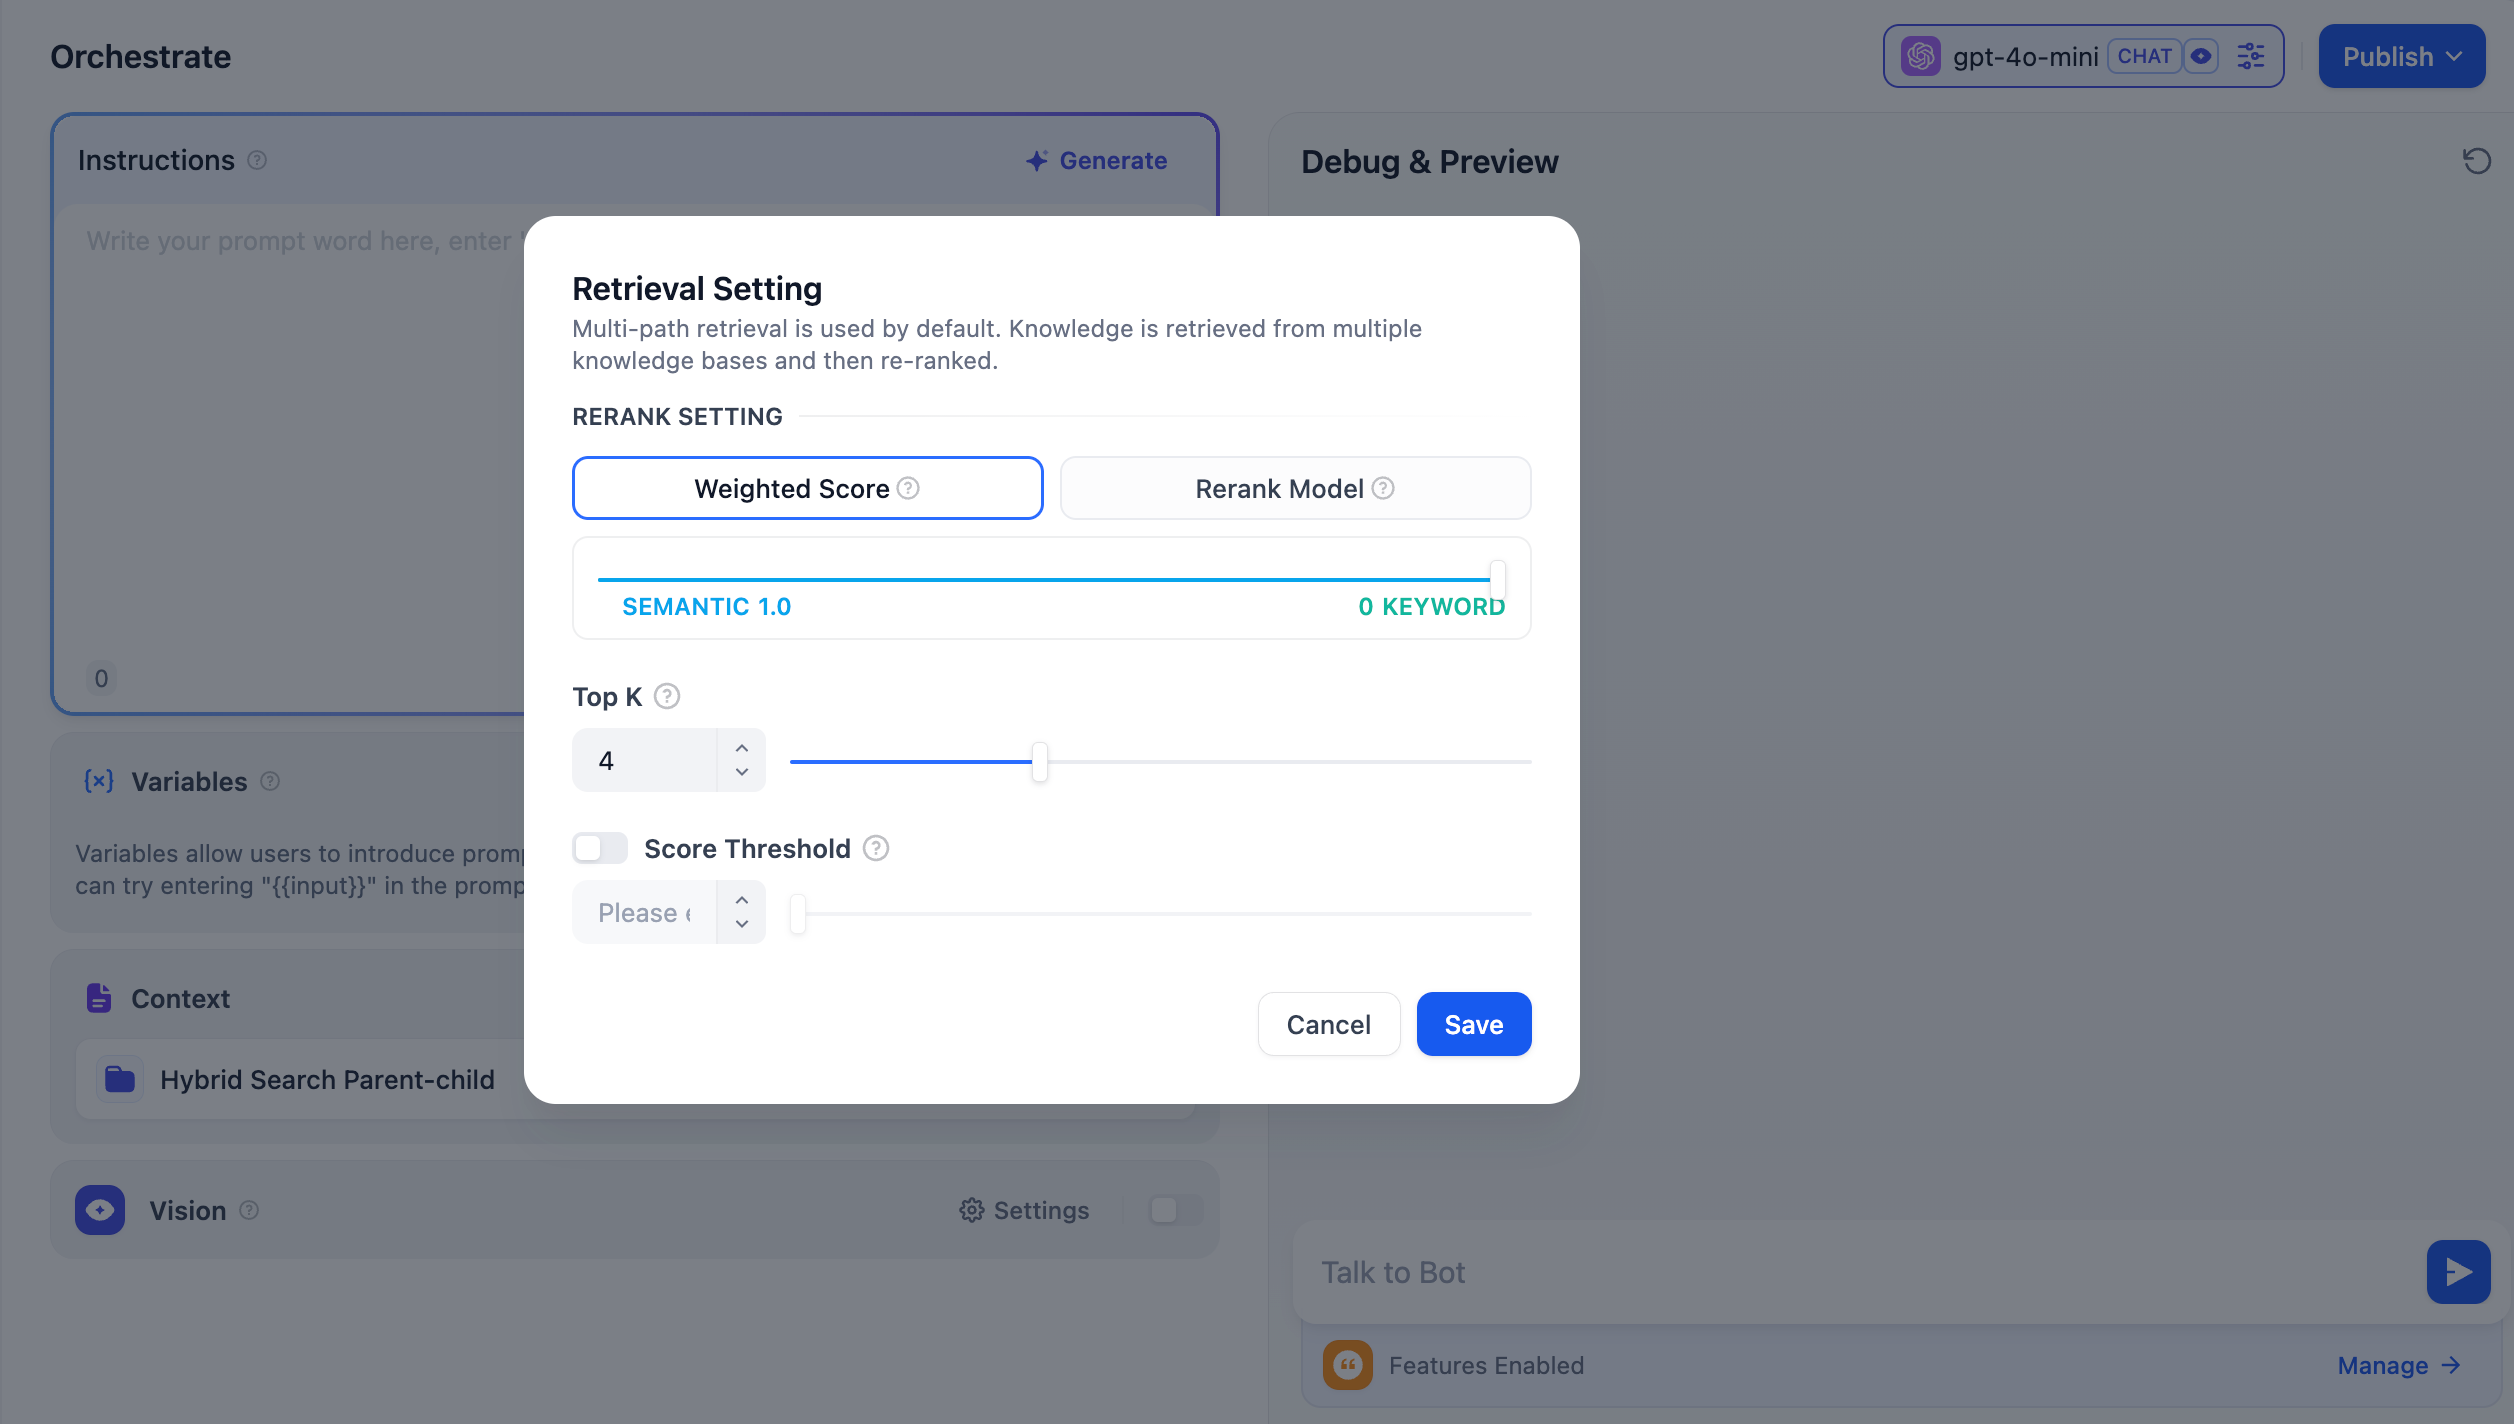
For instance, in application A, with three knowledge bases K1, K2, and K3. When a user send a question, multiple relevant pieces of content will be retrieved and combined from these knowledge bases. To ensure the most pertinent content is identified, the Rerank strategy is employed to find the content that best relates to the user's query, enhancing the precision and reliability of the results.
In practical Q\&A scenarios, the sources of content and retrieval methods for each knowledge base may differ. To manage the mixed content returned from retrieval, the Rerank strategy acts as a refined sorting mechanism. It ensures that the candidate content aligns well with the user's question, optimizing the ranking of results across multiple knowledge bases to identify the most suitable content, thereby improving answer quality and overall user experience.
Considering the costs associated with using Rerank and the needs of the business, the multi-path retrieval mode provides two Rerank settings:
**Weighted Score**
This setting uses internal scoring mechanisms and does not require an external Rerank model, thus **avoiding any additional processing costs**. You can select the most appropriate content matching strategy by adjusting the weight ratio sliders for semantics or keywords.
* **Semantic Value of 1**
This mode activates semantic retrieval only. By utilizing the Embedding model, the search depth can be enhanced even if the exact words from the query do not appear in the knowledge base, as it calculates vector distances to return the relevant content. Furthermore, when dealing with multilingual content, semantic retrieval can capture meanings across different languages, yielding more accurate cross-language search results.
* **Keyword Value of 1**
This mode activates keyword retrieval only. It matches the user's input text against the full text of the knowledge base, making it ideal for scenarios where the user knows the exact information or terminology. This method is resource-efficient, making it suitable for quickly retrieving information from large document repositories.
* **Custom Keyword and Semantic Weights**
In addition to enabling only semantic or keyword retrieval modes, we offer flexible custom Weight Score. You can determine the best weight ratio for your business scenario by continuously adjusting the weights of both.
**Rerank Model**
The Rerank model is an external scoring system that calculates the similarity score between the user's question and each candidate document provided, improving the results of semantic ranking and returning a list of documents sorted by similarity score from high to low.
While this method incurs some additional costs, it is more adept at handling complex knowledge base content, such as content that combines semantic queries and keyword matches, or cases involving multilingual returned content.
Dify currently supports multiple Rerank models. To use external Rerank models, you'll need to provide an API Key. Enter the API Key for the Rerank model (such as Cohere, Jina AI, etc.) on the "Model Provider" page.
**Adjustable Parameters**
* **TopK**: Determines how many text chunks, deemed most similar to the user’s query, are retrieved. It also automatically adjusts the number of chunks based on the chosen model’s context window. The default value is **3**, and higher numbers will recall more text chunks.
* **Score Threshold**: Sets the minimum similarity score required for a chunk to be retrieved. Only chunks exceeding this score are retrieved. The default value is **0.5**. Higher thresholds demand greater similarity and thus result in fewer chunks being retrieved.
### Metadata Filtering
#### Chatflow/Workflow
The **Knowledge Retrieval** node allows you to filter documents using metadata fields.
#### Steps
1. Select Filter Mode:
* **Disabled (Default):** No metadata filtering.
* **Automatic:** Filters auto-configure from query variables in the **Knowledge Retrieval** node.
> Note: Automatic Mode requires model selection for document retrieval.
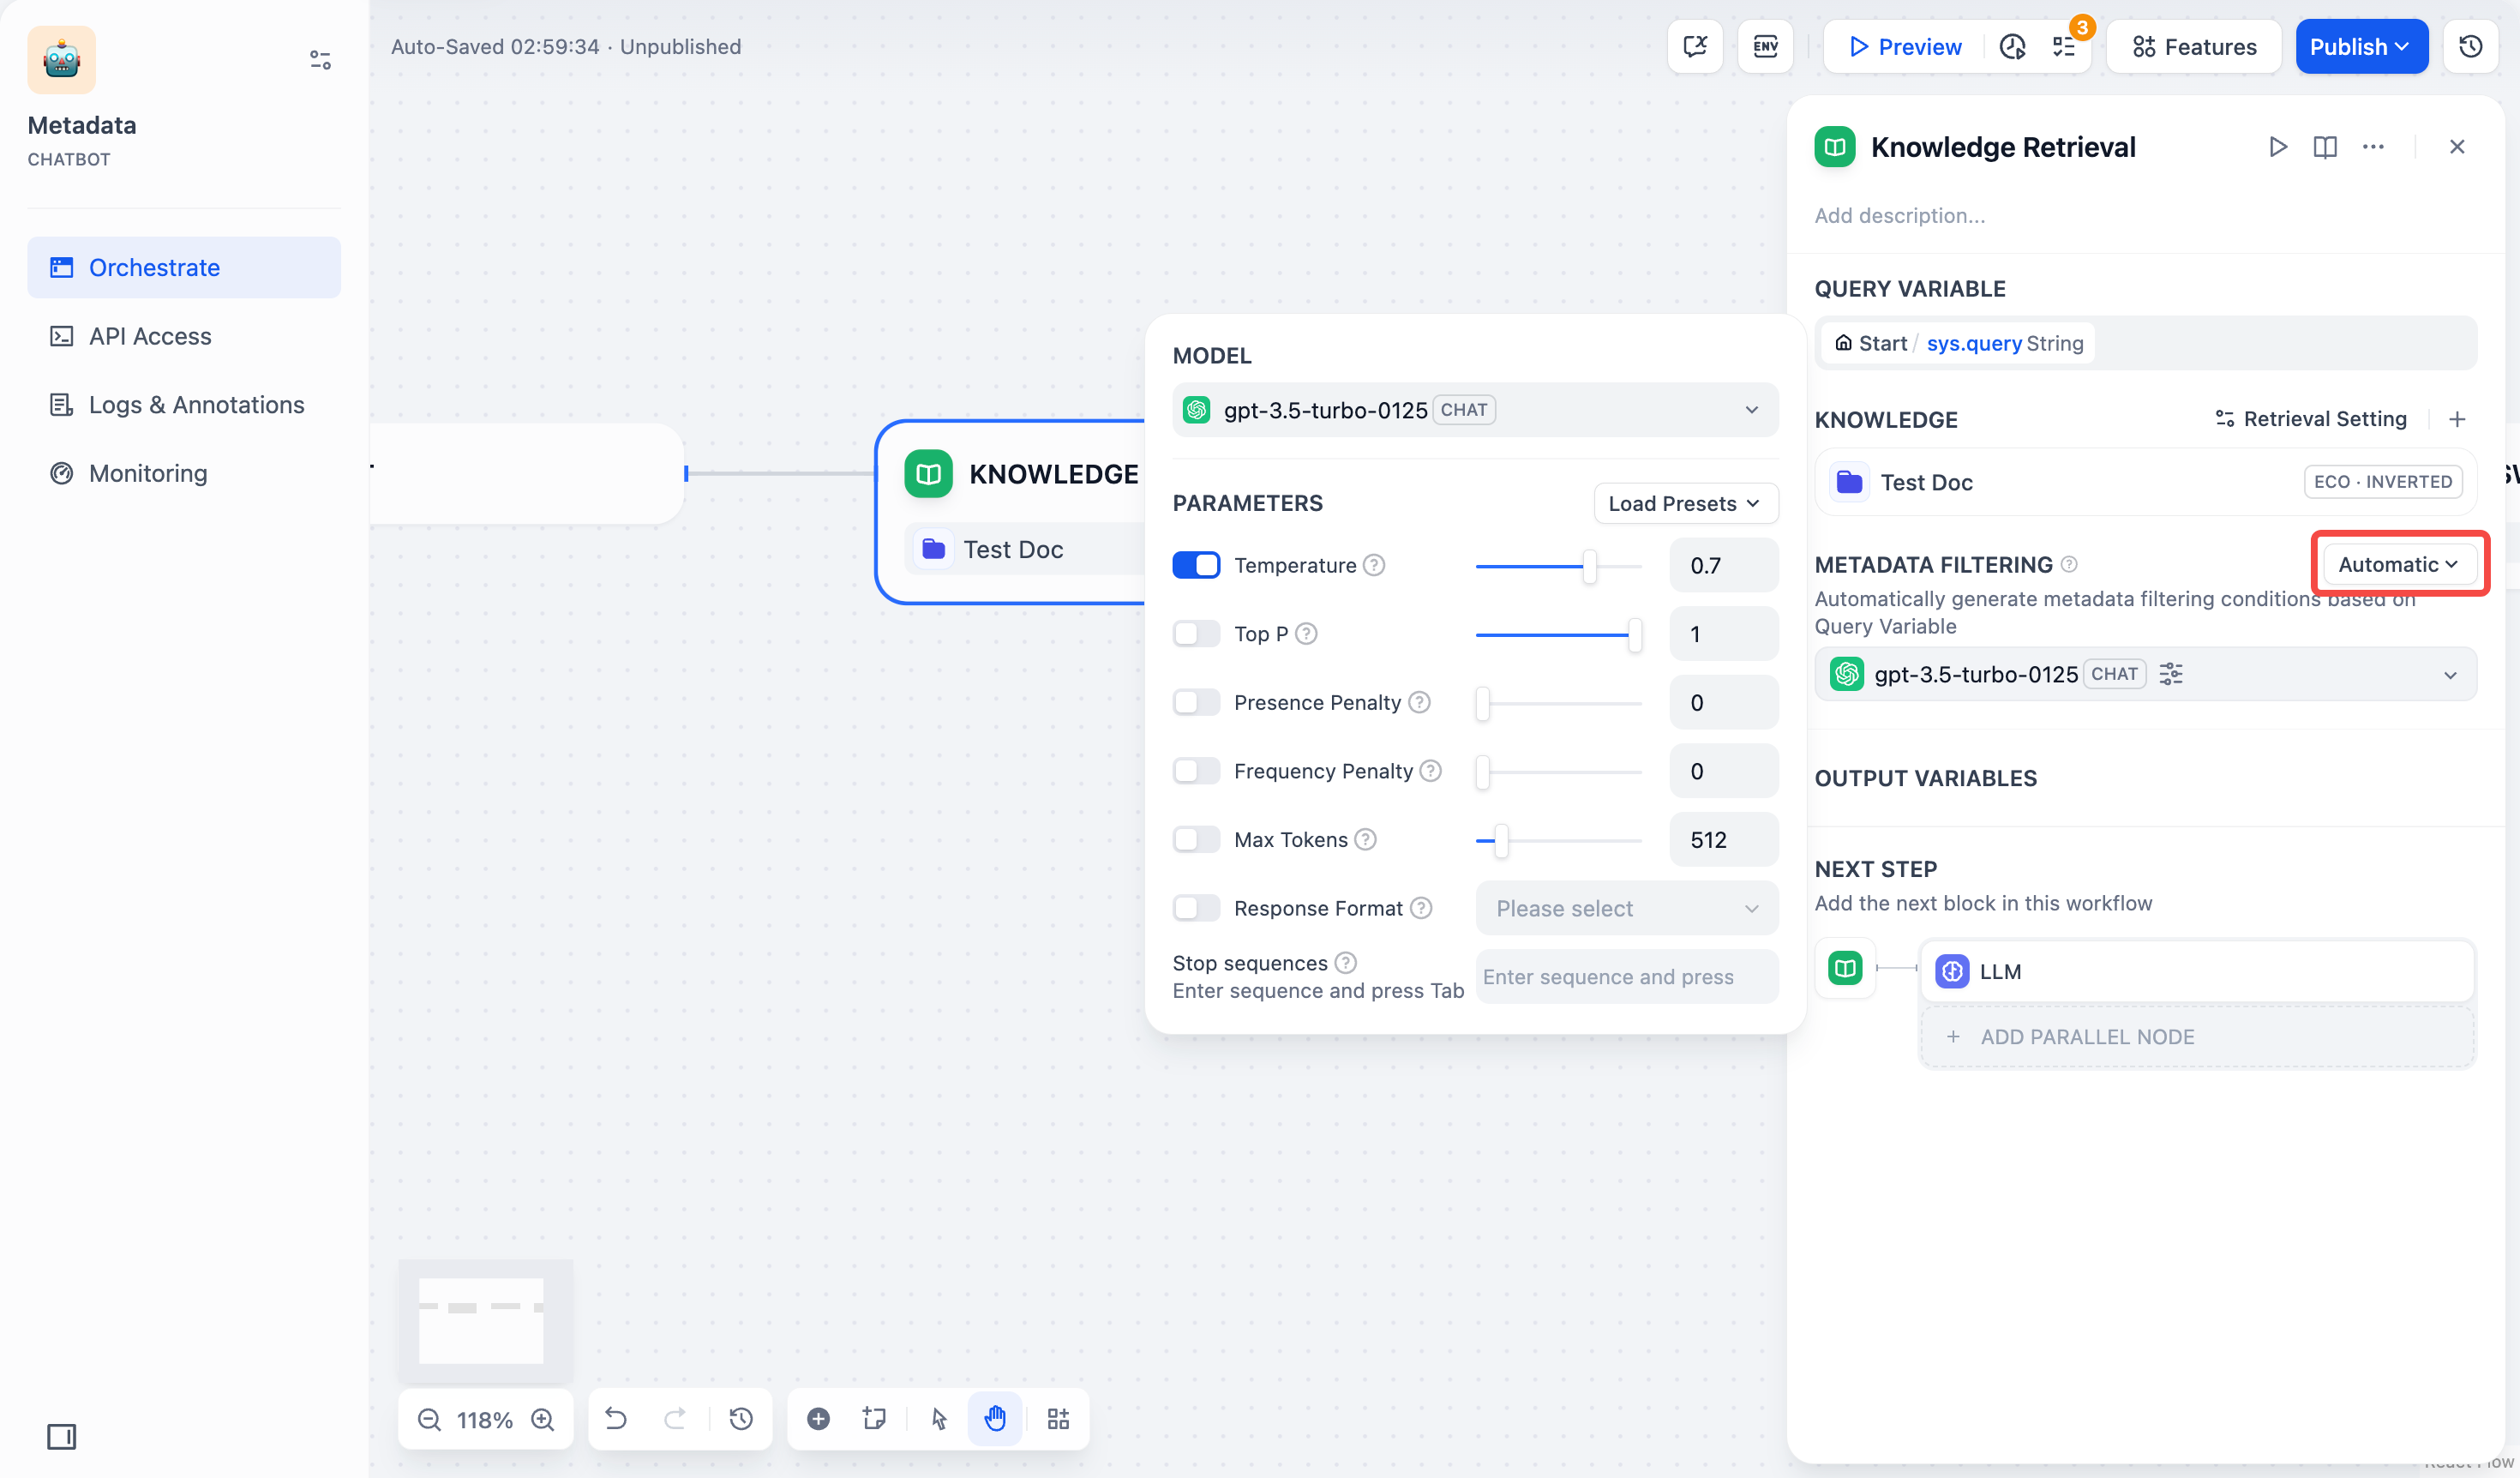
* **Manual:** Configure filters manually.
2. For Manual Mode, follow these steps:
1. Click **Conditions** to open the configuration panel.
2. Click **+Add Condition**:
* Select metadata fields within your chosen knowledge base from the dropdown list.
> Note: When multiple knowledge bases are selected, only common metadata fields are shown in the list.
* Use the search box to find specific fields.
3. Click **+Add Condition** to add more fields.
4. Configure filter conditions:
| Field Type | Operator | Description and Examples |
| ---------- | ------------ | ----------------------------------------------------------------------------------------------------------------------------- |
| String | is | Exact match required. Example: `is "Published"` returns only documents marked exactly as "Published". |
| | is not | Excludes exact matches. Example: `is not "Draft"` returns all documents except those marked as "Draft". |
| | is empty | Returns documents where the field has no value. |
| | is not empty | Returns documents where the field has any value. |
| | contains | Matches partial text. Example: `contains "Report"` returns "Monthly Report", "Annual Report", etc. |
| | not contains | Excludes documents containing specified text. Example: `not contains "Draft"` returns documents without "Draft" in the field. |
| | starts with | Matches text at beginning. Example: `starts with "Doc"` returns "Doc1", "Document", etc. |
| | ends with | Matches text at end. Example: `ends with "2024"` returns "Report 2024", "Summary 2024", etc. |
| Number | = | Exact number match. Example: `= 10` returns documents marked with exactly 10. |
| | ≠ | Excludes specific number. Example: `≠ 5` returns all documents except those marked with 5. |
| | > | Greater than. Example: `> 100` returns documents with values above 100. |
| | \< | Less than. Example: `< 50` returns documents with values below 50. |
| | ≥ | Greater than or equal to. Example: `≥ 20` returns documents with values 20 or higher. |
| | ≤ | Less than or equal to. Example: `≤ 200` returns documents with values 200 or lower. |
| | is empty | Field has no value assigned. For example, `is empty` returns all documents where this field has no number assigned. |
| | is not empty | Field has a value assigned. For example, `is not empty` returns all documents where this field has a number assigned. |
| Date | is | Exact date match. Example: `is "2024-01-01"` returns documents dated January 1, 2024. |
| | before | Prior to date. Example: `before "2024-01-01"` returns documents dated before January 1, 2024. |
| | after | After date. Example: `after "2024-01-01"` returns documents dated after January 1, 2024. |
| | is empty | Returns documents with no date value. |
| | is not empty | Returns documents with any date value. |
5. Add filter values:
* **Variable:** Select from existing **Chatflow/Workflow** variables.
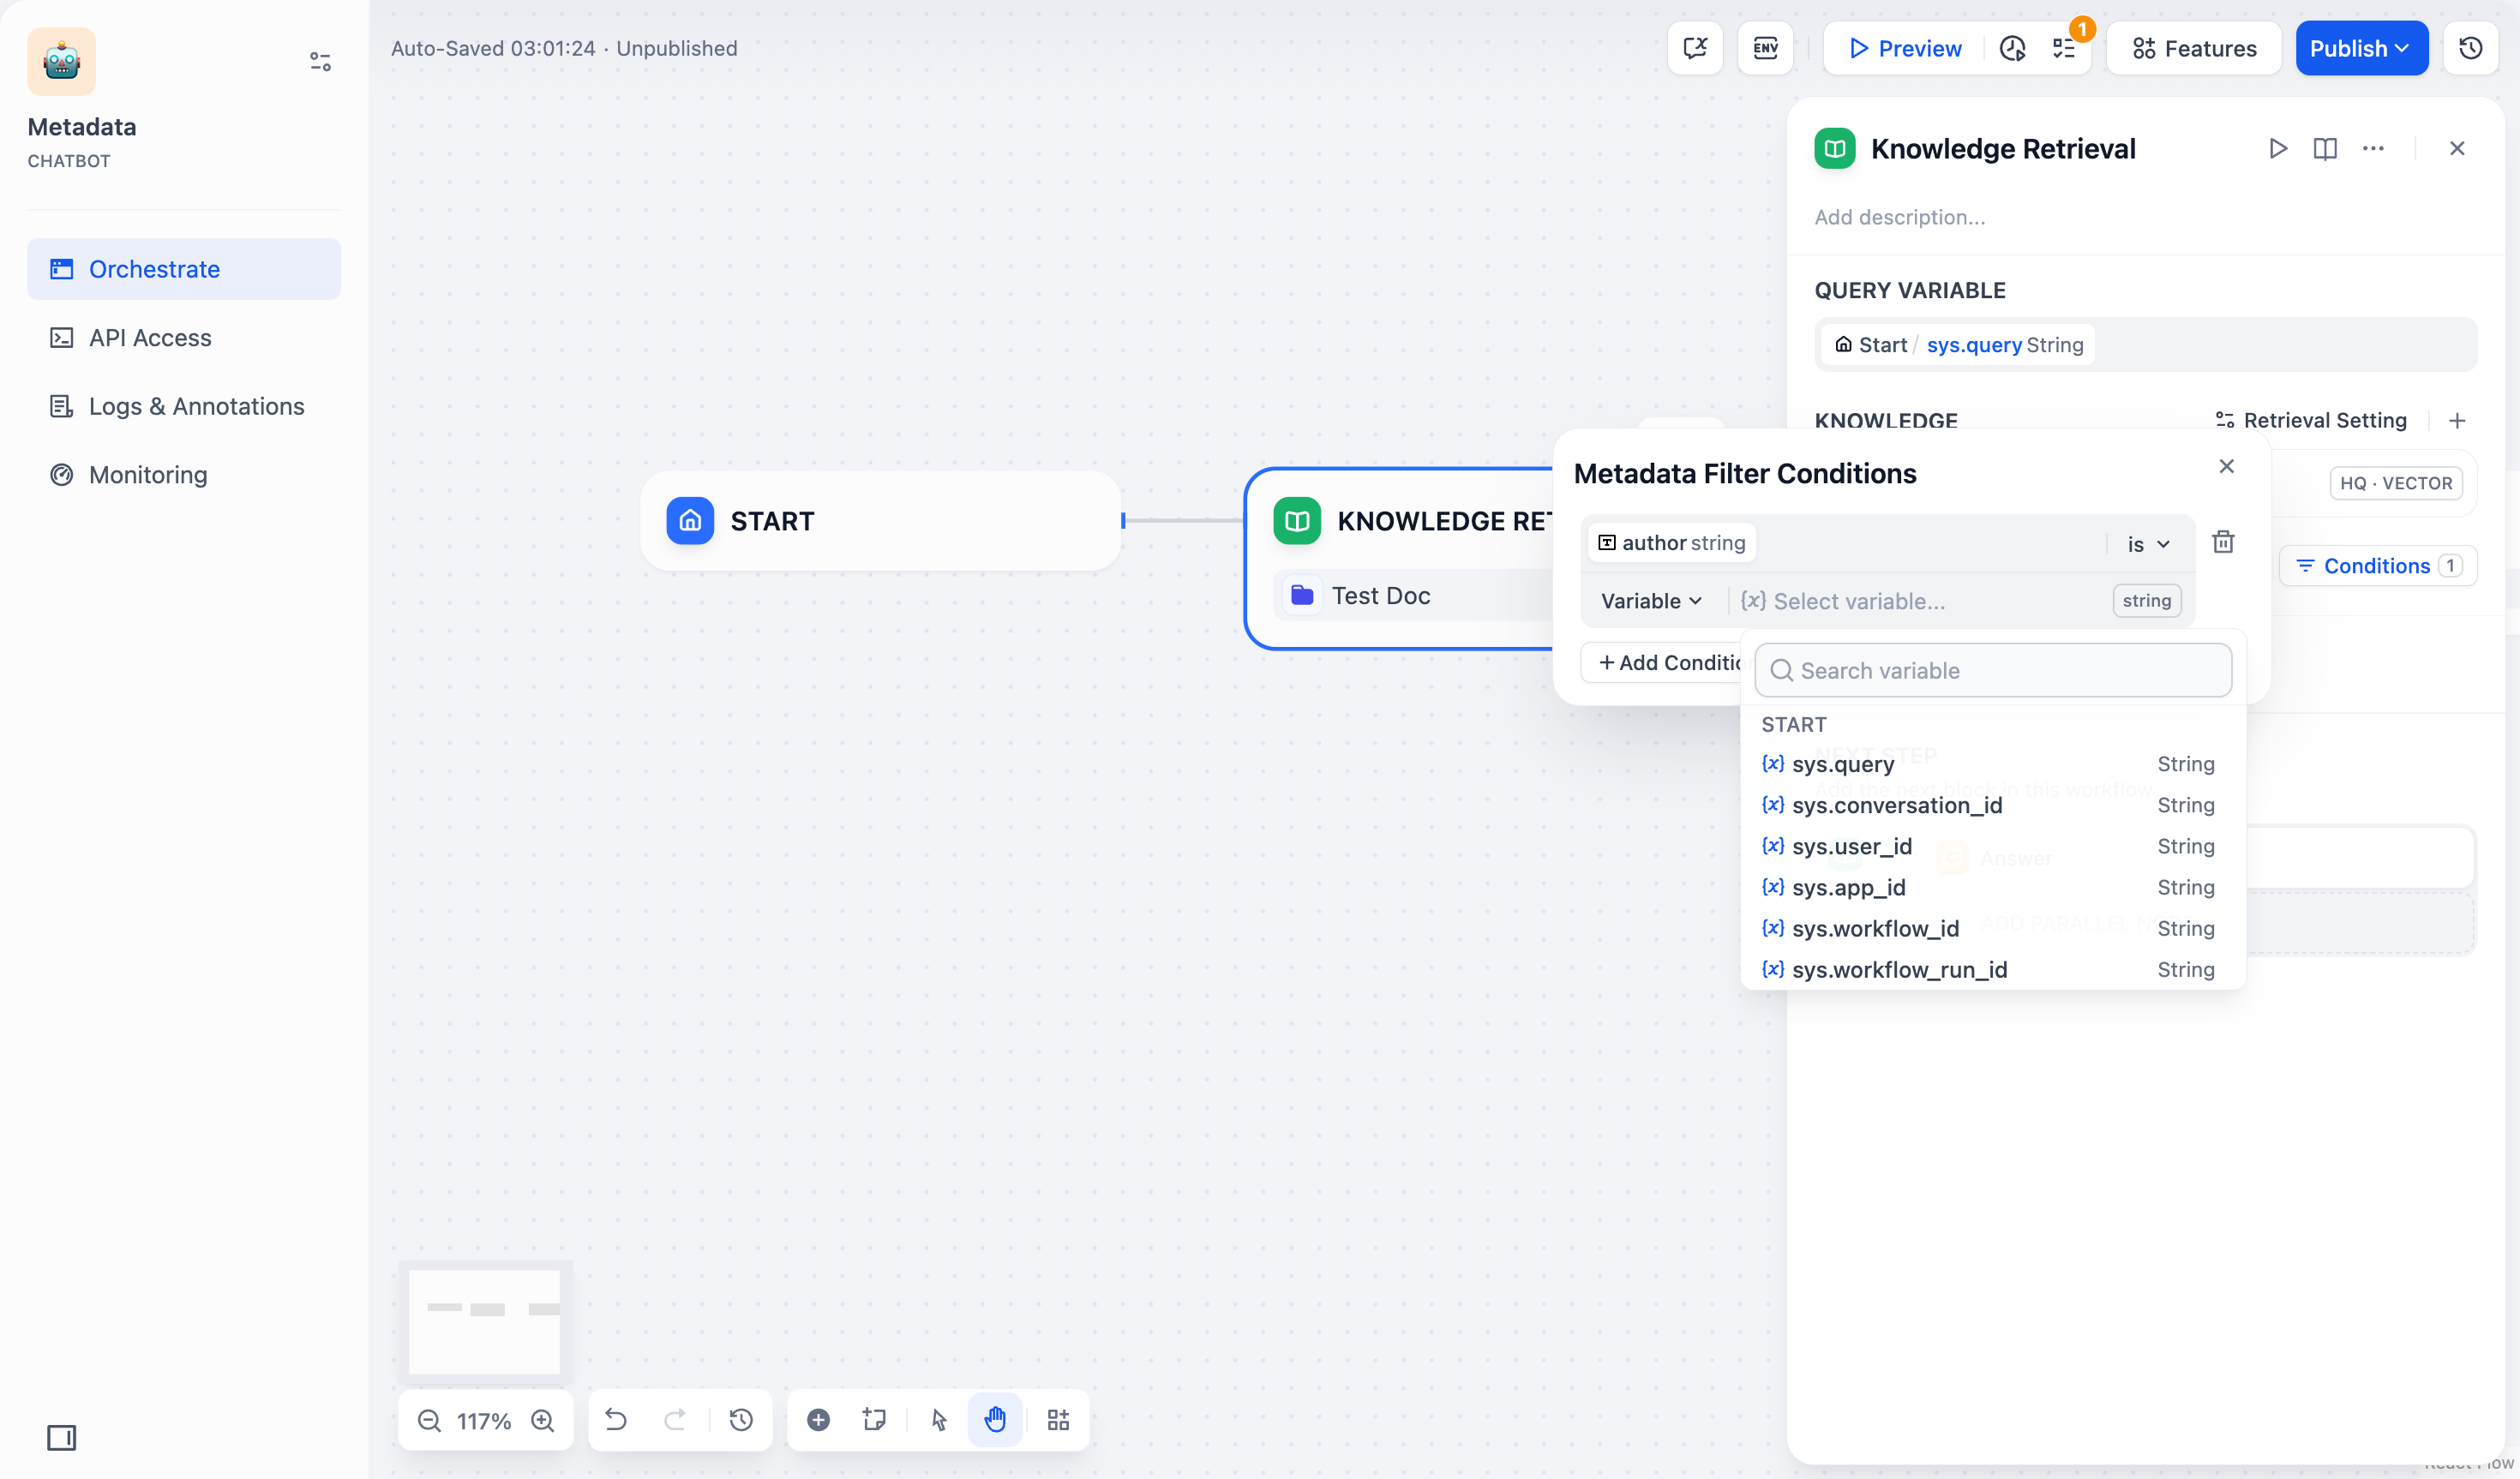
* **Constant:** Enter specific values.
> Time-type fields can only be filtered by constants The date picker is for time-type fields.
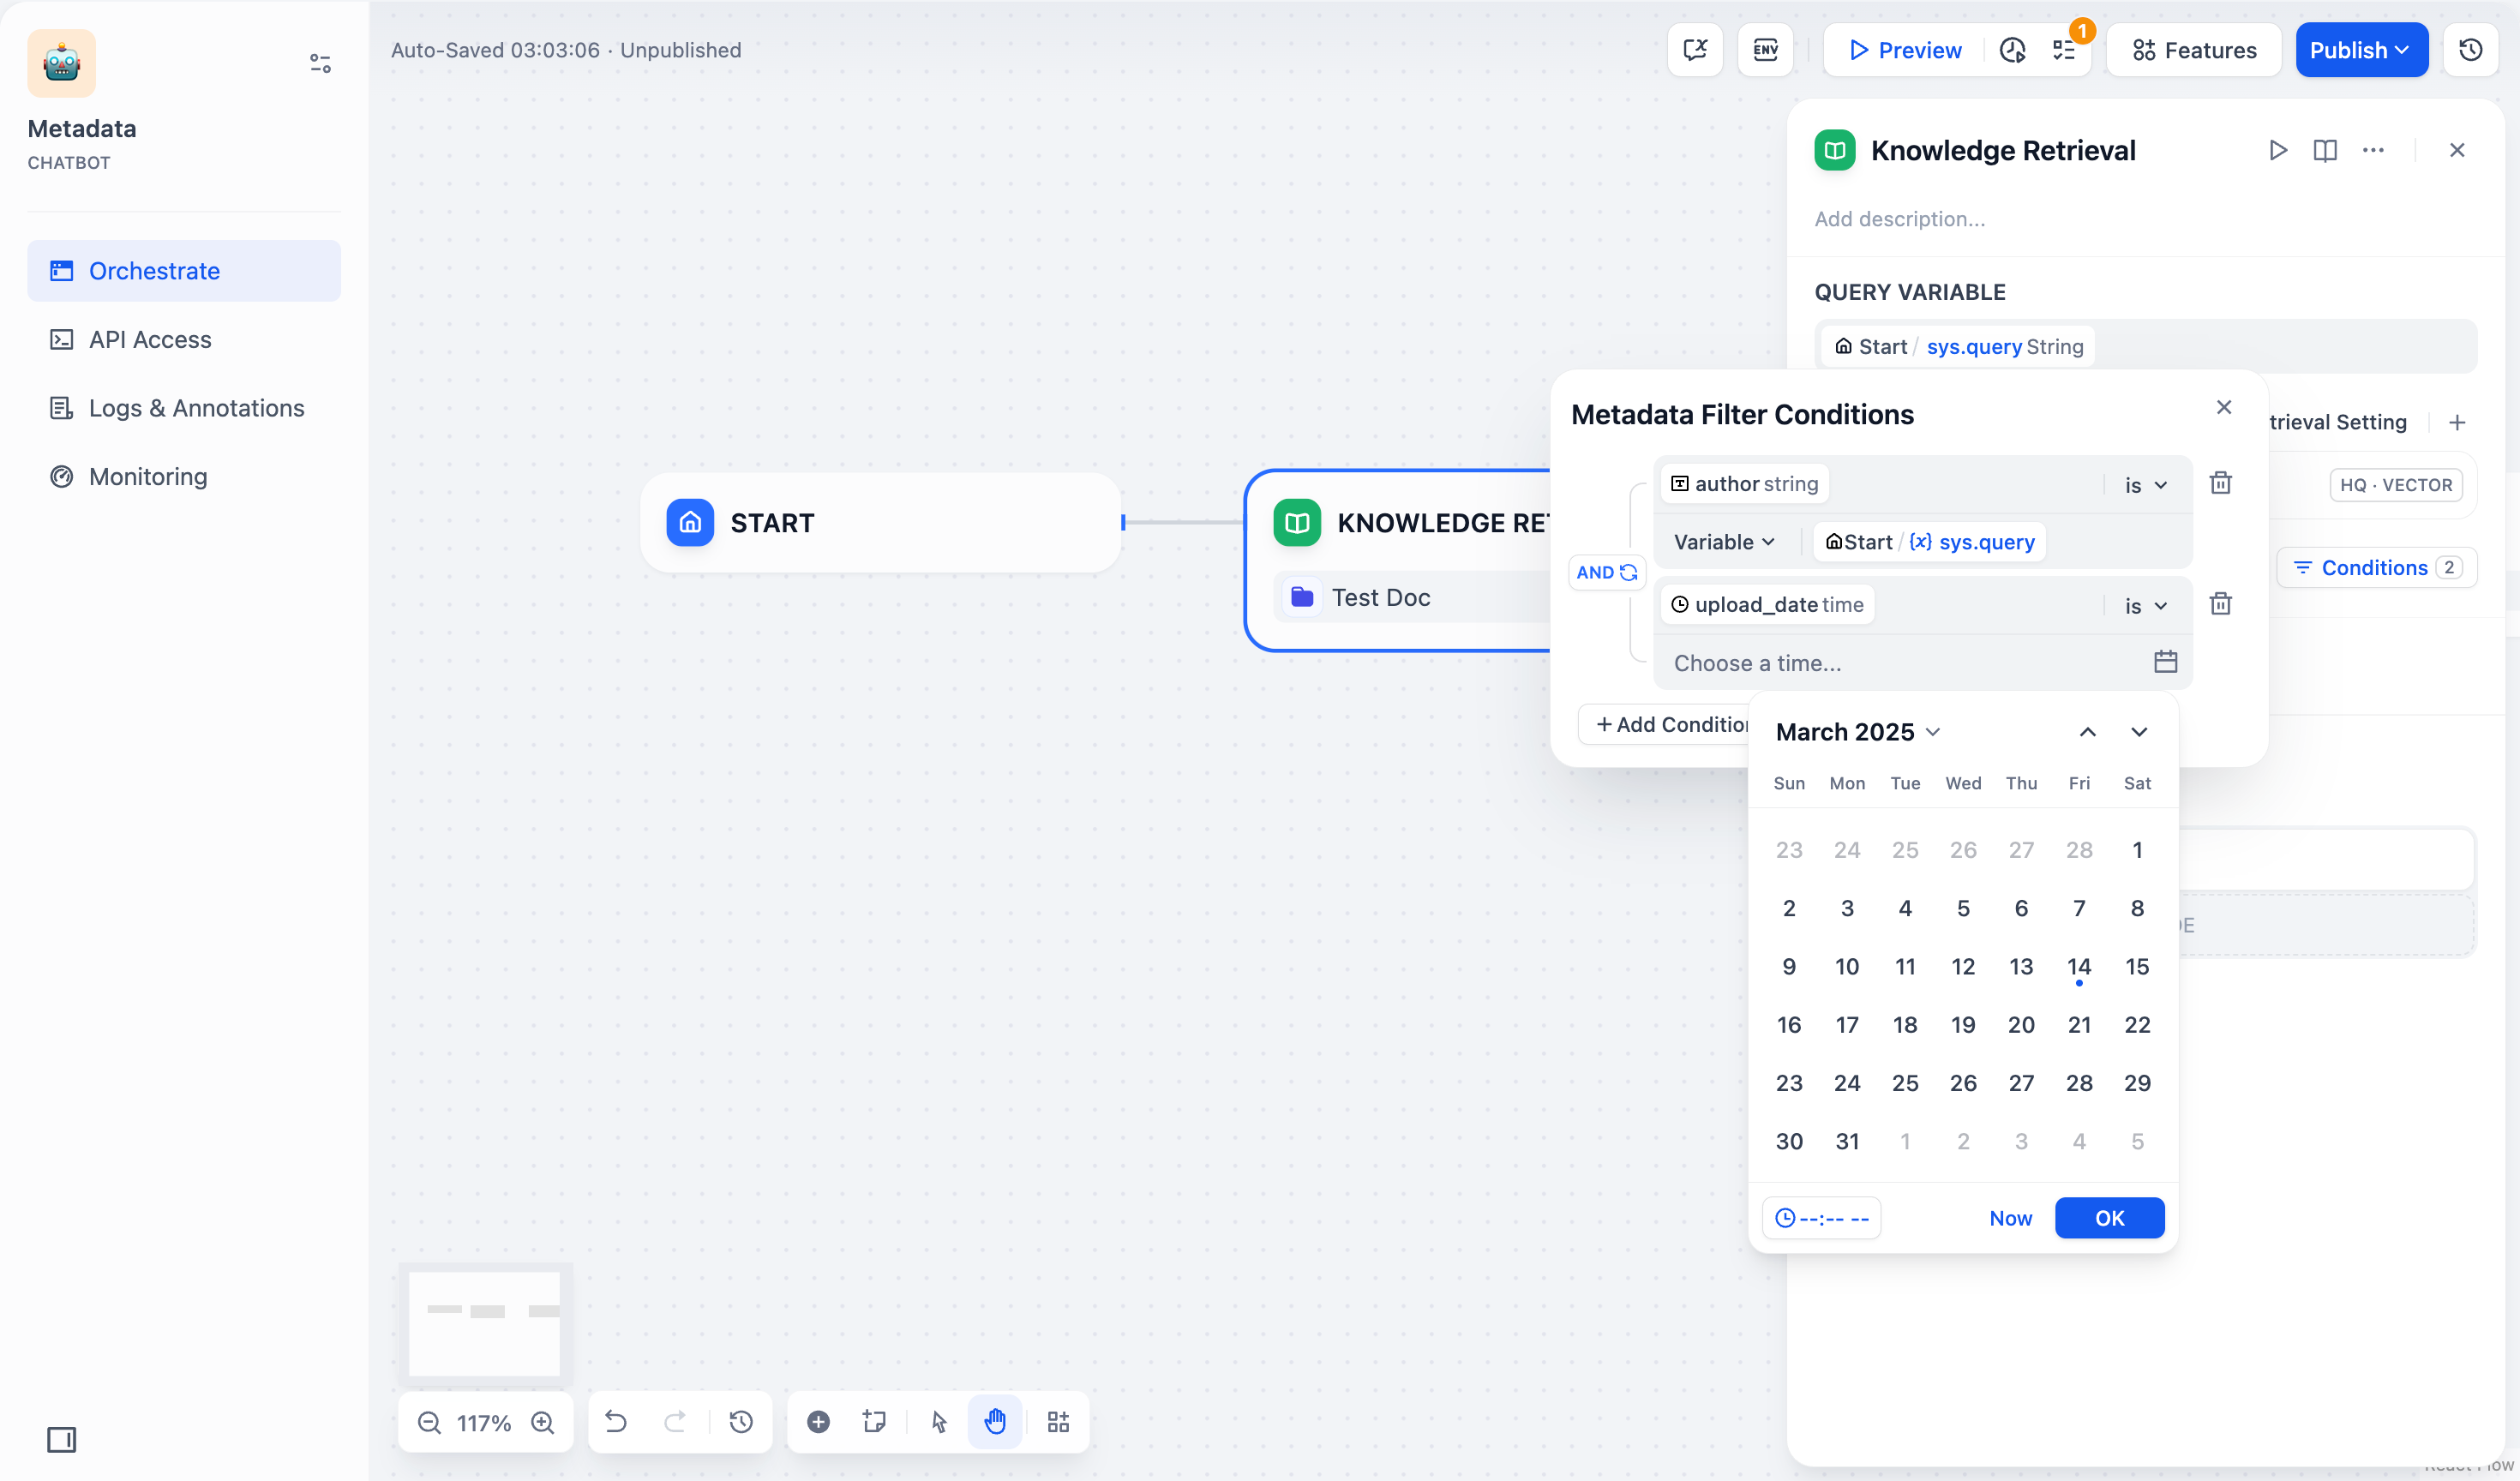
Filter values are case-sensitive and require exact matches. Example: a filter `starts with "App"` or `contains "App"` will match "Apple" but not "apple" or "APPLE".
6. Set logic operators:
* `AND`: Match all conditions
* `OR`: Match any condition
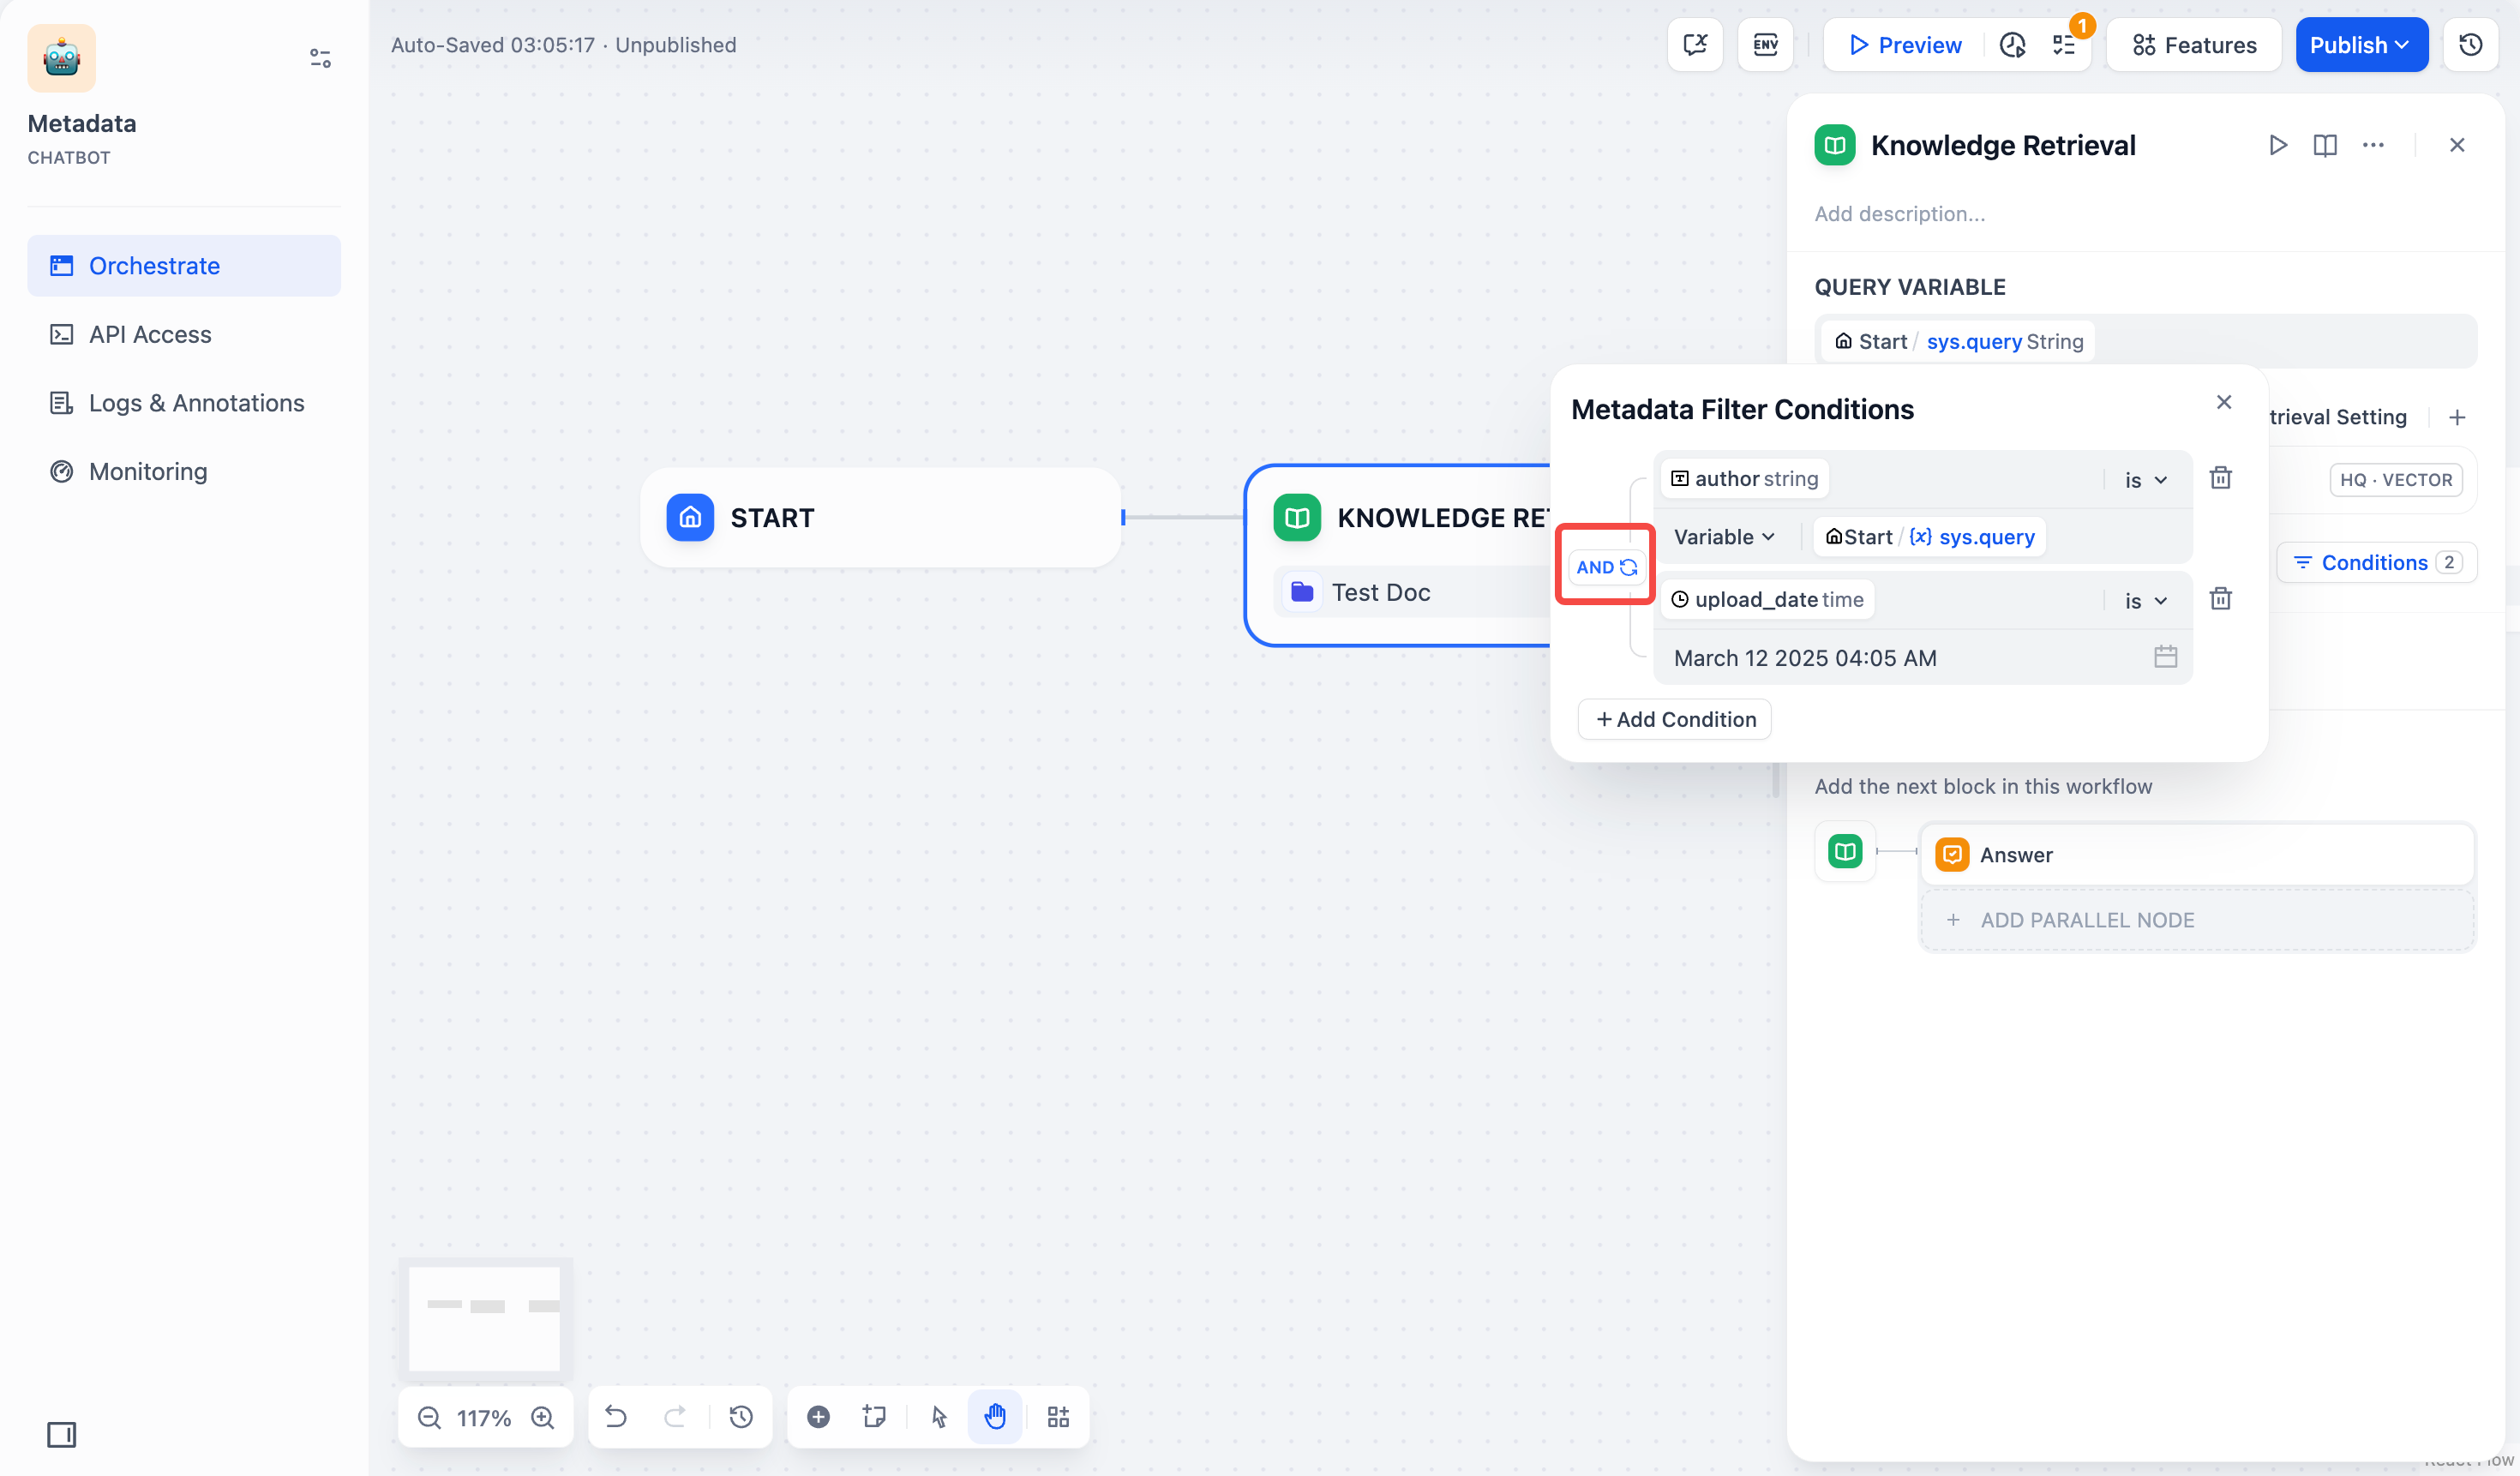
7. Click outside the panel to save your settings.
#### Chatbot
Access **Metadata Filtering** below **Knowledge** (bottom-left). Configuration steps are the same as in **Chatflow/Workflow**.
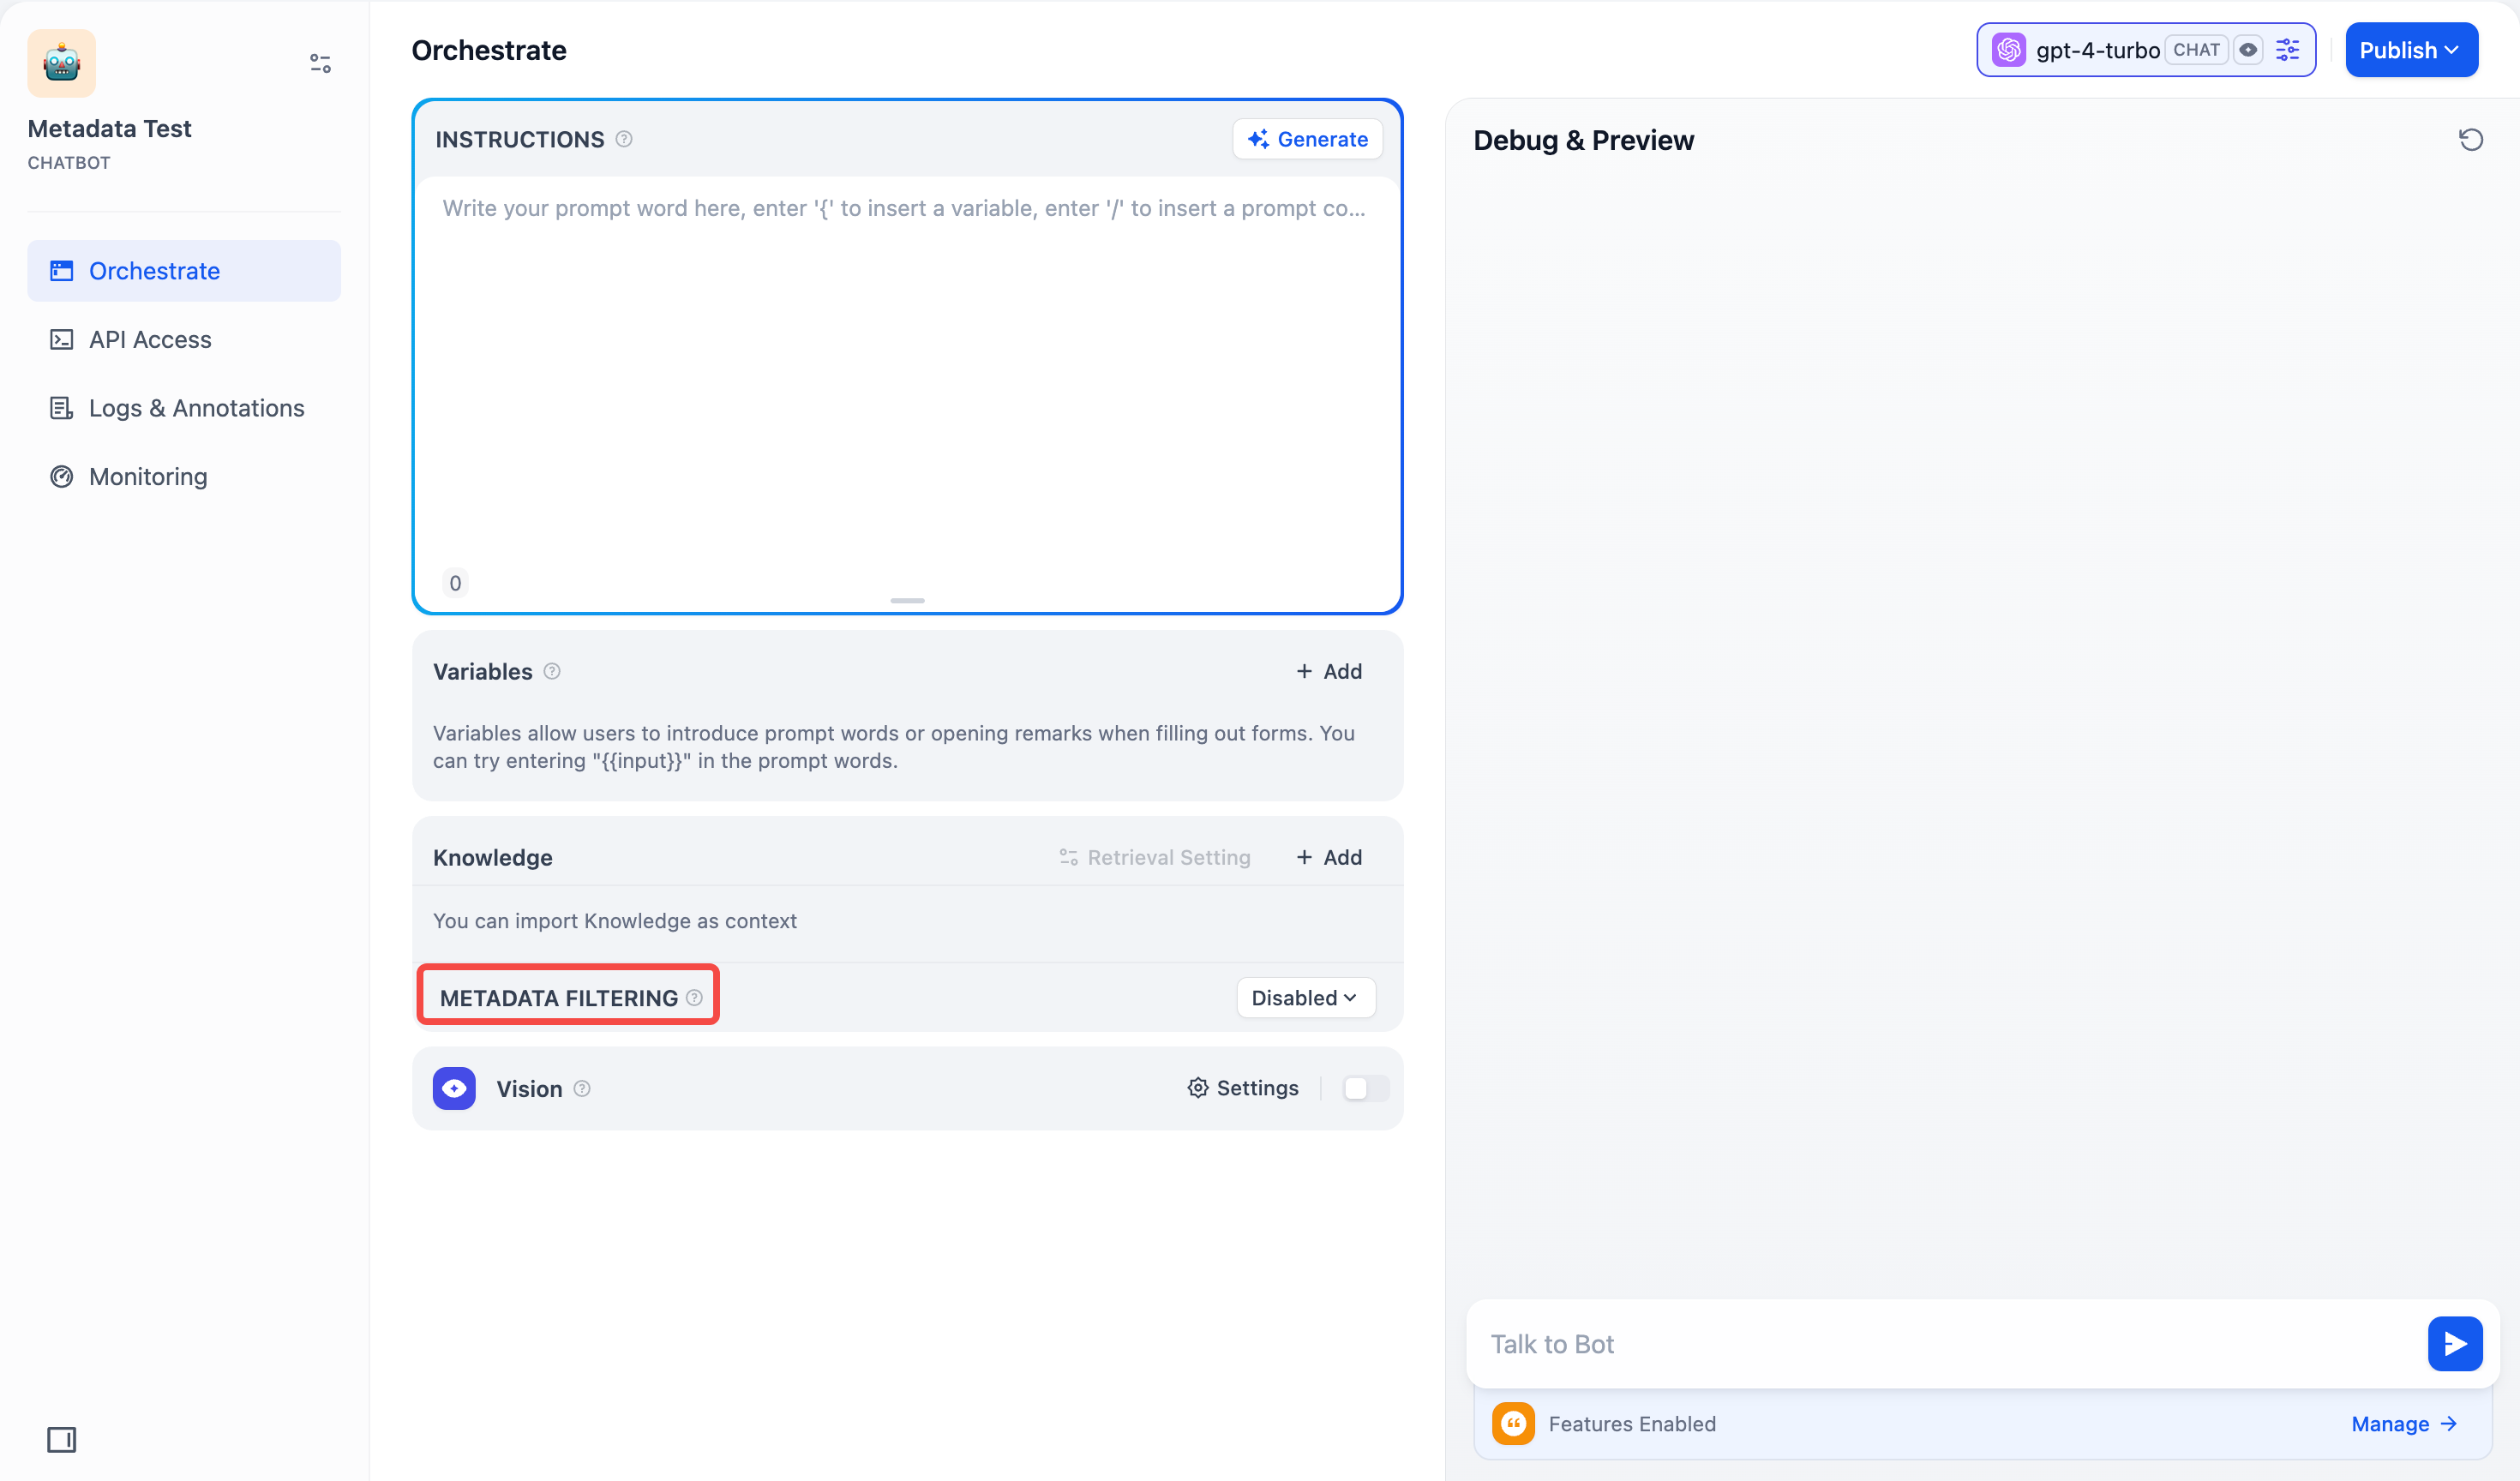
### View Linked Applications in the Knowledge Base
On the left side of the knowledge base, you can see all linked Apps. Hover over the circular icon to view the list of all linked apps. Click the jump button on the right to quickly browser them.
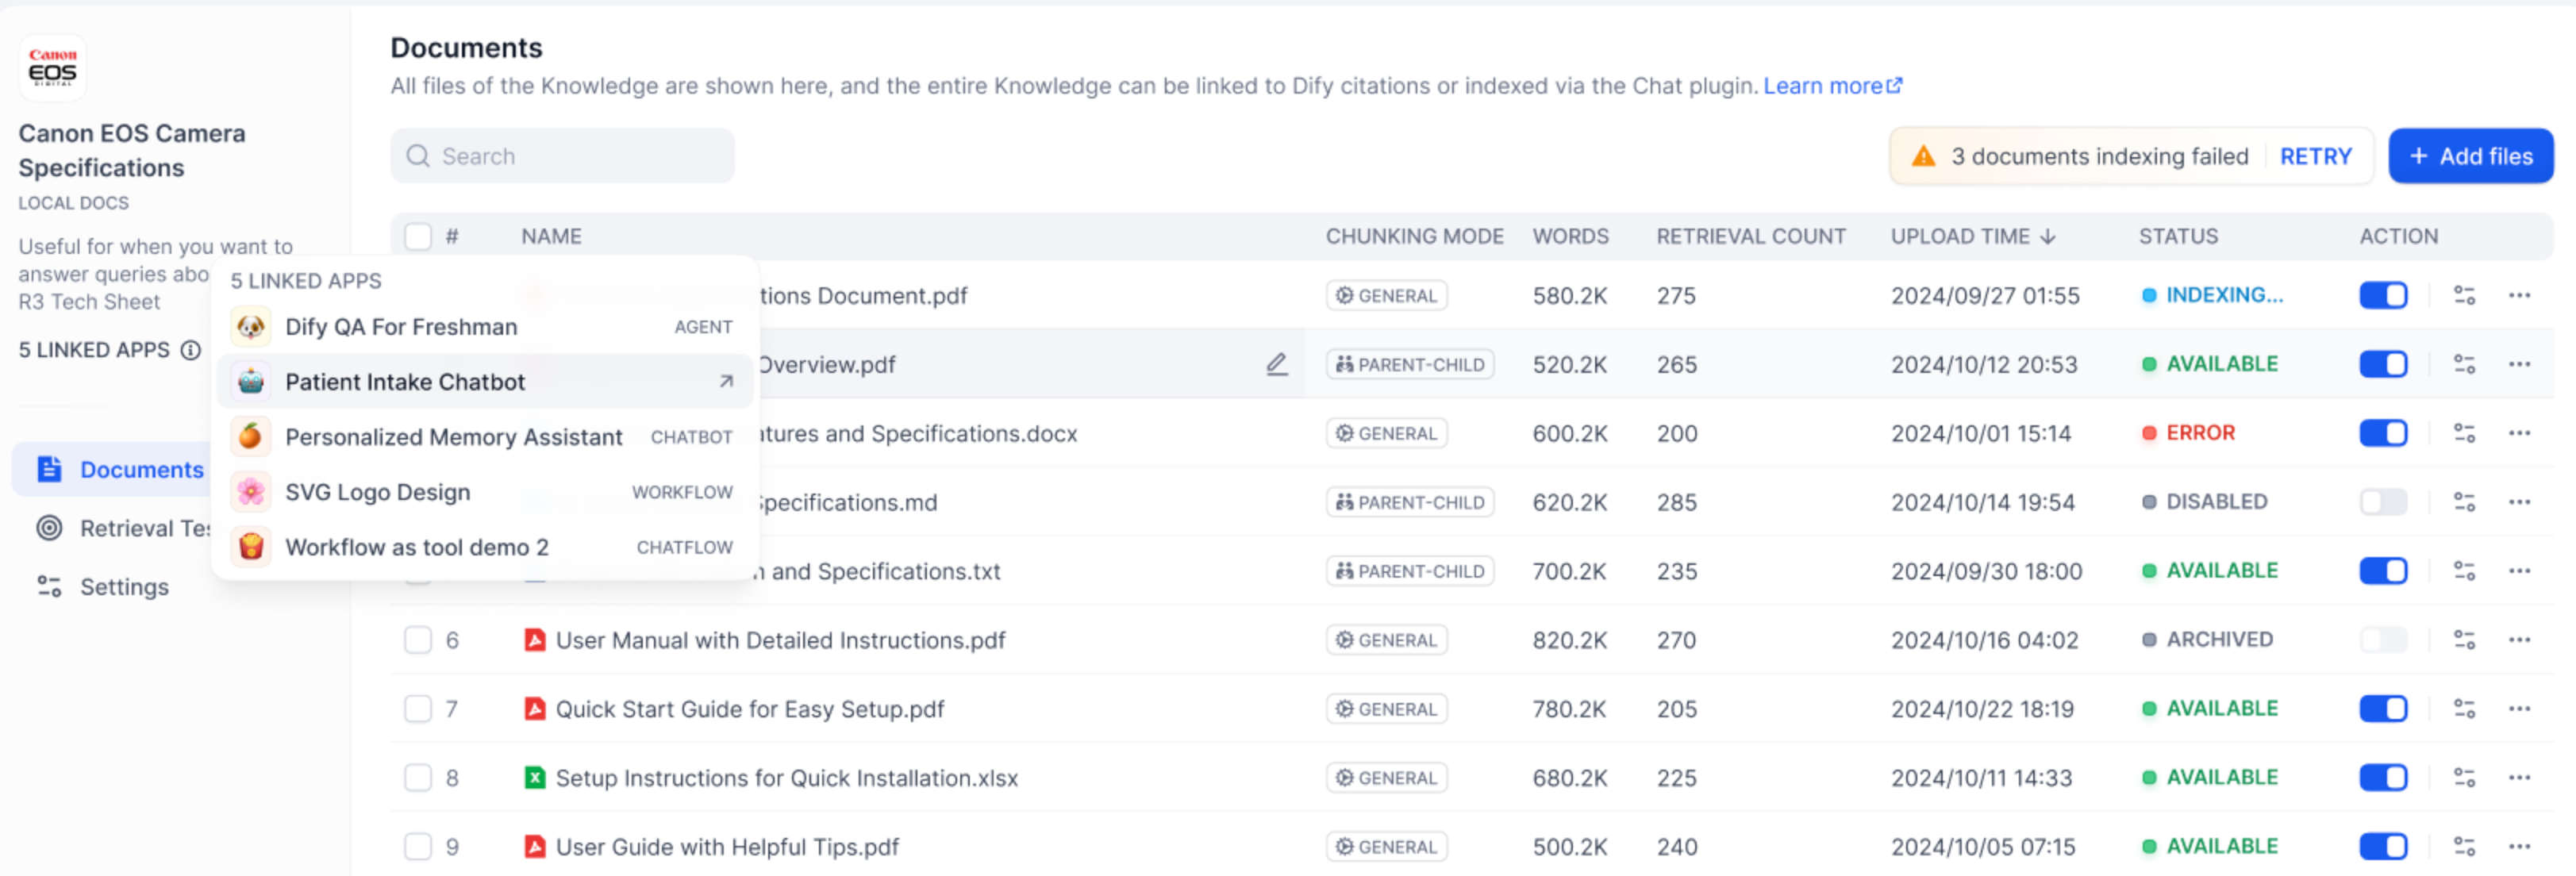
### Frequently Asked Questions
11. **How should I choose Rerank settings in multi-recall mode?**
If users know the exact information or terminology, you can use keyword search for precise matching. In that case, set **"Keywords" to 1** under Weight Settings.
If the knowledge base doesn't contain the exact terms or if a cross-lingual query is involved, we recommend setting **"Semantic" to 1** under Weight Settings.
If you are familiar with real user queries and want to adjust the ratio of semantics to keywords, they can manually tweak the ratio under **Weight Settings**.
If the knowledge base is complex, making simple semantic or keyword matches insufficient—and you need highly accurate answers and are willing to pay more—consider using a **Rerank Model** for content retrieval.
2. **What should I do if I encounter issues finding the "Weight Score" or the requirement to configure a Rerank model?**
Here's how the knowledge base retrieval method affects Multi-path Retrieval:
3. **What should I do if I cannot adjust the "Weight Score" when referencing multiple knowledge bases and an error message appears?**
This issue occurs because the embedding models used in the multiple referenced knowledge bases are inconsistent, prompting this notification to avoid conflicts in retrieval content. It is advisable to set and enable the Rerank model in the "Model Provider" or unify the retrieval settings of the knowledge bases.
4. **Why can't I find the "Weight Score" option in multi-recall mode, and only see the Rerank model?**
Please check whether your knowledge base is using the "Economical" index mode. If so, switch it to the "High Quality" index mode.
# Authorize Data Source
Source: https://docs.dify.ai/en/use-dify/knowledge/knowledge-pipeline/authorize-data-source
Dify supports connections to various external data sources. To ensure data security and access control, different data sources require appropriate authorization configurations. Dify provides two main authorization methods: **API Key** and **OAuth**.
## Accessing Data Source Authorization
In Dify, you can access data source authorization through the following two methods:
### I. Knowledge Pipeline Orchestration
When orchestrating a knowledge pipeline, select the data source node that requires authorization. Click **Connect** on the right panel.
![Knowledge Pipeline Authorization]() ### II. Settings
Click your avatar in the upper right corner and select **Settings**. Navigate to **Data Sources** and find the data source you wish to authorize.
### II. Settings
Click your avatar in the upper right corner and select **Settings**. Navigate to **Data Sources** and find the data source you wish to authorize.
![Settings Authorization]() ## Supported Data Source Authorization
| Data Source | API Key | OAuth |
| ------------ | ------- | ----- |
| Notion | ✅ | ✅ |
| Jina Reader | ✅ | |
| Firecrawl | ✅ | |
| Google Drive | | ✅ |
| Dropbox | | ✅ |
| OneDrive | | ✅ |
## Authorization Processes
### API Key Authorization
API Key authorization is a key-based authentication method suitable for enterprise-level services and developer tools. You need to generate API Keys from the corresponding service providers and configure them in Dify.
#### Process
1. On the **Data Source** page, navigate to the corresponding data source. Click **Configure** and then **Add API Key**.
## Supported Data Source Authorization
| Data Source | API Key | OAuth |
| ------------ | ------- | ----- |
| Notion | ✅ | ✅ |
| Jina Reader | ✅ | |
| Firecrawl | ✅ | |
| Google Drive | | ✅ |
| Dropbox | | ✅ |
| OneDrive | | ✅ |
## Authorization Processes
### API Key Authorization
API Key authorization is a key-based authentication method suitable for enterprise-level services and developer tools. You need to generate API Keys from the corresponding service providers and configure them in Dify.
#### Process
1. On the **Data Source** page, navigate to the corresponding data source. Click **Configure** and then **Add API Key**.
![Add API Key]() 2. In the pop-up window, fill in the **Authorization Name** and **API Key**. Click **Save** to complete the setup.
2. In the pop-up window, fill in the **Authorization Name** and **API Key**. Click **Save** to complete the setup.
![API Key Configuration]() The API key will be securely encrypted. Once completed, you can start using the data source (e.g., Jina Reader) for knowledge pipeline orchestration.
The API key will be securely encrypted. Once completed, you can start using the data source (e.g., Jina Reader) for knowledge pipeline orchestration.
![API Key Complete]() ### OAuth Authorization
OAuth is an open standard authorization protocol that allows users to authorize third-party applications to access their resources on specific service providers without exposing passwords.
#### Process
1. On the **Data Source** page, select an OAuth-supported data source. Click **Configure** and then **Add OAuth**.
### OAuth Authorization
OAuth is an open standard authorization protocol that allows users to authorize third-party applications to access their resources on specific service providers without exposing passwords.
#### Process
1. On the **Data Source** page, select an OAuth-supported data source. Click **Configure** and then **Add OAuth**.
![Add OAuth]() 2. Review the permission scope and click **Allow Access**.
#### OAuth Client Settings
Dify provides two OAuth client configuration methods: **Default** and **Custom**.
2. Review the permission scope and click **Allow Access**.
#### OAuth Client Settings
Dify provides two OAuth client configuration methods: **Default** and **Custom**.
![OAuth Client Settings]() The default client is primarily supported in the SaaS version, using OAuth client parameters that are pre-configured and maintained by Dify. Users can add OAuth credentials with one click without additional configuration.
Custom client is supported across all versions of Dify. Users need to register OAuth applications on third-party platforms and obtain client parameters themselves. This is mainly suitable for data sources that don't have default configuration in the SaaS version, or when enterprises have special security compliance requirements.
**Process for Custom OAuth**
1. On the **Data Source** page, select an OAuth-supported data source. Click **Configure** and then the **Setting icon** on the right side of **Add OAuth**.
The default client is primarily supported in the SaaS version, using OAuth client parameters that are pre-configured and maintained by Dify. Users can add OAuth credentials with one click without additional configuration.
Custom client is supported across all versions of Dify. Users need to register OAuth applications on third-party platforms and obtain client parameters themselves. This is mainly suitable for data sources that don't have default configuration in the SaaS version, or when enterprises have special security compliance requirements.
**Process for Custom OAuth**
1. On the **Data Source** page, select an OAuth-supported data source. Click **Configure** and then the **Setting icon** on the right side of **Add OAuth**.
![Custom OAuth Settings]() 2. Choose **Custom**, enter the **Client ID** and **Client Secret**. Click **Save and Authorize** to complete the authorization.
2. Choose **Custom**, enter the **Client ID** and **Client Secret**. Click **Save and Authorize** to complete the authorization.
![Custom OAuth Configuration]() # Step 1: Create Knowledge Pipeline
Source: https://docs.dify.ai/en/use-dify/knowledge/knowledge-pipeline/create-knowledge-pipeline
# Step 1: Create Knowledge Pipeline
Source: https://docs.dify.ai/en/use-dify/knowledge/knowledge-pipeline/create-knowledge-pipeline
![Create Knowledge Pipeline]() Navigate to Knowledge at the top, then click Create from Knowledge Pipeline on the left. There're three ways for you to get started.
### Build from Scratch
Navigate to Knowledge at the top, then click Create from Knowledge Pipeline on the left. There're three ways for you to get started.
### Build from Scratch
![Build from Scratch]() Click Blank Knowledge Pipeline to build a custom pipeline from scratch. Choose this option when you need custom processing strategies based on specific data source and business requirements.
### Templates
Dify offers two types of templates: **Built-in Pipeline** and **Customized**. Both template cards display name of knowledge base, description, and tags (including chunk structure).
Click Blank Knowledge Pipeline to build a custom pipeline from scratch. Choose this option when you need custom processing strategies based on specific data source and business requirements.
### Templates
Dify offers two types of templates: **Built-in Pipeline** and **Customized**. Both template cards display name of knowledge base, description, and tags (including chunk structure).
![Create Knowledge Pipeline 4 01]() #### Built-in Pipeline
Built-in pipelines are official knowledge base templates pre-configured by Dify. These templates are optimized for common document structures and use cases. Simply click **Choose** to get started.
#### Built-in Pipeline
Built-in pipelines are official knowledge base templates pre-configured by Dify. These templates are optimized for common document structures and use cases. Simply click **Choose** to get started.
![Built-in Templates]() **Types**
| Name | Chunk Structure | Index Method | Retrieval Setting | Description |
| ------------------- | ----------------- | ------------ | ------------------------------ | ---------------------------------------------------------------------------------------------------------------------------------------------------------------------------------------------------------------------------- |
| General Mode-ECO | General | Economical | Inverted Index | Divide document content into smaller paragraphs, directly used for matching user queries and retrieval. |
| Parent-child-HQ | Parent-Child | High Quality | Hybrid Search | Adopt advanced chunking strategy, dividing document text into larger parent chunks and smaller child chunks. The parent chunks contain child chunks which ensure both retrieval precision and maintain contextual integrity. |
| Simple Q\&A | Question & Answer | High Quality | Vector Search | Convert tabular data into question-answer format, using question matching to quickly hit corresponding answer information. |
| LLM Generated Q\&A | Question & Answer | High Quality | Vector Search | Generate structured question-answer pairs with large language models based on original text paragraphs. Find relevant answer by using question matching mechanism. |
| Convert to Markdown | Parent-child | High Quality | Hybrid Search - Weighted Score | Designed for Office native file formats such as DOCX, XLSX, and PPTX, converting them to Markdown format for better information processing. ⚠️ Note: PDF files are not recommended. |
To preview the selected built-in pipeline, click **Details** on any template card. Then, check information in the popup window, including: orchestration structure, pipeline description, and chunk structure. Click **Use this Knowledge Pipeline** for orchestration.
**Types**
| Name | Chunk Structure | Index Method | Retrieval Setting | Description |
| ------------------- | ----------------- | ------------ | ------------------------------ | ---------------------------------------------------------------------------------------------------------------------------------------------------------------------------------------------------------------------------- |
| General Mode-ECO | General | Economical | Inverted Index | Divide document content into smaller paragraphs, directly used for matching user queries and retrieval. |
| Parent-child-HQ | Parent-Child | High Quality | Hybrid Search | Adopt advanced chunking strategy, dividing document text into larger parent chunks and smaller child chunks. The parent chunks contain child chunks which ensure both retrieval precision and maintain contextual integrity. |
| Simple Q\&A | Question & Answer | High Quality | Vector Search | Convert tabular data into question-answer format, using question matching to quickly hit corresponding answer information. |
| LLM Generated Q\&A | Question & Answer | High Quality | Vector Search | Generate structured question-answer pairs with large language models based on original text paragraphs. Find relevant answer by using question matching mechanism. |
| Convert to Markdown | Parent-child | High Quality | Hybrid Search - Weighted Score | Designed for Office native file formats such as DOCX, XLSX, and PPTX, converting them to Markdown format for better information processing. ⚠️ Note: PDF files are not recommended. |
To preview the selected built-in pipeline, click **Details** on any template card. Then, check information in the popup window, including: orchestration structure, pipeline description, and chunk structure. Click **Use this Knowledge Pipeline** for orchestration.
![Template Details]() #### Customized
#### Customized
![Customized Templates]() Customized templates are user-created and published knowledge pipeline. You can choose a template to start, export the DSL, or view detailed information for any template.
Customized templates are user-created and published knowledge pipeline. You can choose a template to start, export the DSL, or view detailed information for any template.
![Template Actions]() To create a knowledge base from a template, click **Choose** on the template card. You can also create knowledge base by clicking **Use this Knowledge Pipeline** when previewing a template. Click **More** to edit pipeline information, export pipeline, or delete the template.
### Import Pipeline
To create a knowledge base from a template, click **Choose** on the template card. You can also create knowledge base by clicking **Use this Knowledge Pipeline** when previewing a template. Click **More** to edit pipeline information, export pipeline, or delete the template.
### Import Pipeline
![Import DSL]() Import a pipeline of a previously exported knowledge pipeline to quickly reuse existing configurations and modify them for different scenarios or requirements. Navigate to the bottom left of the page and click **Import from a DSL File**. Dify DSL is a YAML-based standard that defines AI application configurations, including model parameters, prompt design, and workflow orchestration. Similar to workflow DSL, knowledge pipeline uses the same YAML format standard to define processing workflows and configurations within a knowledge base.
What's in a knowledge pipeline DSL:
| Name | Description |
| ----------------------- | ------------------------------------------------------------------ |
| Data Sources | Local files, websites, online documents, online drive, web crawler |
| Data Processing | Document extraction, content chunking, cleaning strategies |
| Knowledge Configuration | Indexing methods, retrieval settings, storage parameters |
| Node Orchestration | Arrangement and sequence |
| User Input Form | Custom parameter fields (if configured) |
# Step 2: Orchestrate Knowledge Pipeline
Source: https://docs.dify.ai/en/use-dify/knowledge/knowledge-pipeline/knowledge-pipeline-orchestration
Imagine setting up a factory production line where each station (node) performs a specific task, and you connect them to assemble widgets into a final product. This is knowledge pipeline orchestration—a visual workflow builder that allows you to configure data processing sequences through a drag-and-drop interface. It provides control over document ingestion, processing, chunking, indexing, and retrieval strategies.
In this section, you'll learn about the knowledge pipeline process, understand different nodes, how to configure them, and customize your own data processing workflows to efficiently manage and optimize your knowledge base.
### Interface Status
When entering the knowledge pipeline orchestration canvas, you’ll see:
* **Tab Status**: Documents, Retrieval Test, and Settings tabs will be grayed out and unavailable at the moment
* **Essential Steps**: You must complete knowledge pipeline orchestration and publishing before uploading files
Your starting point depends on the template choice you made previously. If you chose **Blank Knowledge Pipeline**, you'll see a canvas that contains Knowledge Base node only. There'll be a note with guide next to the node that walks you through the general steps of pipeline creation.
Import a pipeline of a previously exported knowledge pipeline to quickly reuse existing configurations and modify them for different scenarios or requirements. Navigate to the bottom left of the page and click **Import from a DSL File**. Dify DSL is a YAML-based standard that defines AI application configurations, including model parameters, prompt design, and workflow orchestration. Similar to workflow DSL, knowledge pipeline uses the same YAML format standard to define processing workflows and configurations within a knowledge base.
What's in a knowledge pipeline DSL:
| Name | Description |
| ----------------------- | ------------------------------------------------------------------ |
| Data Sources | Local files, websites, online documents, online drive, web crawler |
| Data Processing | Document extraction, content chunking, cleaning strategies |
| Knowledge Configuration | Indexing methods, retrieval settings, storage parameters |
| Node Orchestration | Arrangement and sequence |
| User Input Form | Custom parameter fields (if configured) |
# Step 2: Orchestrate Knowledge Pipeline
Source: https://docs.dify.ai/en/use-dify/knowledge/knowledge-pipeline/knowledge-pipeline-orchestration
Imagine setting up a factory production line where each station (node) performs a specific task, and you connect them to assemble widgets into a final product. This is knowledge pipeline orchestration—a visual workflow builder that allows you to configure data processing sequences through a drag-and-drop interface. It provides control over document ingestion, processing, chunking, indexing, and retrieval strategies.
In this section, you'll learn about the knowledge pipeline process, understand different nodes, how to configure them, and customize your own data processing workflows to efficiently manage and optimize your knowledge base.
### Interface Status
When entering the knowledge pipeline orchestration canvas, you’ll see:
* **Tab Status**: Documents, Retrieval Test, and Settings tabs will be grayed out and unavailable at the moment
* **Essential Steps**: You must complete knowledge pipeline orchestration and publishing before uploading files
Your starting point depends on the template choice you made previously. If you chose **Blank Knowledge Pipeline**, you'll see a canvas that contains Knowledge Base node only. There'll be a note with guide next to the node that walks you through the general steps of pipeline creation.
![Blank Pipeline]() If you selected a specific pipeline template, there'll be a ready-to-use workflow that you can use or modify on the canvas right away.
If you selected a specific pipeline template, there'll be a ready-to-use workflow that you can use or modify on the canvas right away.
![Template Pipeline]() ## The Complete Knowledge Pipeline Process
Before we get started, let's break down the knowledge pipeline process to understand how your documents are transformed into a searchable knowledge base.
The knowledge pipeline includes these key steps:
Data Source → Data Processing (Extractor + Chunker) → Knowledge Base Node (Chunk Structure + Retrieval Setting) → User Input Field → Test & Publish
1. **Data Source**: Content from various data sources (local files, Notion, web pages, etc.)
2. **Data Processing**: Process and transform data content
* Extractor: Parse and structure document content
* Chunker: Split structured content into manageable segments
3. **Knowledge Base**: Set up chunk structure and retrieval settings
4. **User Input Field**: Define parameters that pipeline users need to input for data processing
5. **Test & Publish**: Validate and officially activate the knowledge base
***
## Step 1: Data Source
In a knowledge base, you can choose single or multiple data sources. Currently, Dify supports 4 types of data sources: **file upload, online drive, online documents, and web crawler**.
Visit the [Dify Marketplace](https://marketplace.dify.ai) for more data sources.
### File Upload
Upload local files through drag-and-drop or file selection.
## The Complete Knowledge Pipeline Process
Before we get started, let's break down the knowledge pipeline process to understand how your documents are transformed into a searchable knowledge base.
The knowledge pipeline includes these key steps:
Data Source → Data Processing (Extractor + Chunker) → Knowledge Base Node (Chunk Structure + Retrieval Setting) → User Input Field → Test & Publish
1. **Data Source**: Content from various data sources (local files, Notion, web pages, etc.)
2. **Data Processing**: Process and transform data content
* Extractor: Parse and structure document content
* Chunker: Split structured content into manageable segments
3. **Knowledge Base**: Set up chunk structure and retrieval settings
4. **User Input Field**: Define parameters that pipeline users need to input for data processing
5. **Test & Publish**: Validate and officially activate the knowledge base
***
## Step 1: Data Source
In a knowledge base, you can choose single or multiple data sources. Currently, Dify supports 4 types of data sources: **file upload, online drive, online documents, and web crawler**.
Visit the [Dify Marketplace](https://marketplace.dify.ai) for more data sources.
### File Upload
Upload local files through drag-and-drop or file selection.
**Configuration Options**
| Item | Description |
| ------------- | ------------------------------------------------------------------------------------------------- |
| File Format | Support PDF, XLSX, DOCX, etc. Users can customize their selection |
| Upload Method | Upload local files or folders through drag-and-drop or file selection. Batch upload is supported. |
**Limitations**
| Item | Description |
| ------------- | ------------------------------------------------------------------------------------------------- |
| File Quantity | Maximum 50 files per upload |
| File Size | Each file must not exceed 15MB |
| Storage | Limits on total document uploads and storage space may vary for different SaaS subscription plans |
**Output Variables**
| Output Variable | Format |
| --------------- | --------------- |
| `{x} Document` | Single document |
***
### Online Document
#### Notion
Integrate with your Notion workspace to seamlessly import pages and databases, always keeping your knowledge base automatically updated.
**Configuration Options**
| Item | Option | Output Variable | Description |
| --------- | -------- | --------------- | ------------------------------------ |
| Extractor | Enabled | `{x} Content` | Structured and processed information |
| | Disabled | `{x} Document` | Original text |
***
### Web Crawler
Transform web content into formats that can be easily read by large language models. The knowledge base supports Jina Reader and Firecrawl.
#### Jina Reader
An open-source web parsing tool providing simple and easy-to-use API services, suitable for fast crawling and processing web content.
**Parameter Configuration**
| Parameter | Type | Description |
| ---------------- | -------- | ------------------------------------ |
| URL | Required | Target webpage address |
| Crawl sub-page | Optional | Whether to crawl linked pages |
| Use sitemap | Optional | Crawl by using website sitemap |
| Limit | Required | Set maximum number of pages to crawl |
| Enable Extractor | Optional | Choose data extraction method |
#### Firecrawl
An open-source web parsing tool that provides more refined crawling control options and API services. It supports deep crawling of complex website structures, recommended for batch processing and precise control.
**Parameter Configuration**
| Parameter | Type | Description |
| ------------------------- | -------- | -------------------------------------------------------------------------- |
| URL | Required | Target webpage address |
| Limit | Required | Set maximum number of pages to crawl |
| Crawl sub-page | Optional | Whether to crawl linked pages |
| Max depth | Optional | How many levels deep the crawler will traverse from the starting URL |
| Exclude paths | Optional | Specify URL patterns that should not be crawled |
| Include only paths | Optional | Crawl specified paths only |
| Extractor | Optional | Choose data processing method |
| Extract Only Main Content | Optional | Isolate and retrieve the primary, meaningful text and media from a webpage |
***
### Online Drive
Connect your online cloud storage services (e.g., Google Drive, Dropbox, OneDrive) and let Dify automatically retrieve your files. Simply select and import the documents you need for processing, without manually downloading and re-uploading files.
Need help with authorization? Please check [Authorize Data Source](/en/use-dify/knowledge/knowledge-pipeline/authorize-data-source) for detailed guidance on authorizing different data sources.
***
## Step 2: Set Up Data Processing Tools
In this stage, these tools extract, chunk, and transform the content for optimal knowledge base storage and retrieval. Think of this step like meal preparation. We clean raw materials up, chop them into bite-sized pieces, and organize everything, so the dish can be cooked up quickly when someone orders it.
To develop a custom data processing plugin that extracts multimodal data for multimodal embedding and retrieval, see [Build Tool Plugins for Multimodal Data Processing in Knowledge Pipelines](/en/develop-plugin/dev-guides-and-walkthroughs/develop-multimodal-data-processing-tool).
### Doc Processor
Documents come in different formats - PDF, XLSX, DOCX. However, LLM can't read these files directly. That's where extractors come in. They support multiple formats and handle the conversion, so your content is ready for the next step of the LLMs.
You can choose Dify's Doc Extractor to process files, or select tools based on your needs from Marketplace which offers Dify Extractor and third-party tools such as Unstructured.
Images in documents can be extracted using appropriate document processors. Extracted images are attached to their corresponding chunks, can be managed independently, and are returned alongside those chunks during retrieval.
URLs of extracted images remain in the chunk text, but you can safely remove these URLs to keep the text clean—this won't affect the extracted images.
Each chunk supports up to 10 image attachments; images beyond this limit will not be extracted.
If no images are extracted by the selected processor, Dify will automatically extract JPG, JPEG, PNG, and GIF images under 2 MB that are referenced via accessible URLs using the following Markdown syntax:
* ``
* ``
For self-hosted deployments, you can adjust these limits via environment variables:
* Maximum image size: `ATTACHMENT_IMAGE_FILE_SIZE_LIMIT`
* Maximum number of attachments per chunk: `SINGLE_CHUNK_ATTACHMENT_LIMIT`
If you select a multimodal embedding model (marked with a **Vision** icon) in index settings, the extracted images will also be embedded and indexed for retrieval.
#### Doc Extractor
![Knowledge Pipeline Orchestration 4 01]() As an information processing center, document extractor node identifies and reads files from input variables, extracts information, and finally converts them into a format that works with the next node.
For more information, please refer to the [Document Extractor](/en/use-dify/nodes/doc-extractor).
#### Dify Extractor
Dify Extractor is a built-in document parser presented by Dify. It supports multiple common file formats and is specially optimized for Doc files. It can extract and store images from documents and return image URLs.
As an information processing center, document extractor node identifies and reads files from input variables, extracts information, and finally converts them into a format that works with the next node.
For more information, please refer to the [Document Extractor](/en/use-dify/nodes/doc-extractor).
#### Dify Extractor
Dify Extractor is a built-in document parser presented by Dify. It supports multiple common file formats and is specially optimized for Doc files. It can extract and store images from documents and return image URLs.
![Dify Extractor]() #### Unstructured
#### Unstructured
[Unstructured](https://marketplace.dify.ai/plugin/langgenius/unstructured) transforms documents into structured, machine-readable formats with highly customizable processing strategies. It offers multiple extraction strategies (auto, hi\_res, fast, OCR-only) and chunking methods (by\_title, by\_page, by\_similarity) to handle diverse document types, offering detailed element-level metadata including coordinates, confidence scores, and layout information. It's recommended for enterprise document workflows, processing of mixed file types, and cases that require precise control over document processing parameters.
Explore more tools in the [Dify Marketplace](https://marketplace.dify.ai).
***
### Chunker
Similar to human limited attention span, large language models cannot process huge amount of information simultaneously. Therefore, after information extraction, the chunker splits large document content into smaller and manageable segments (called "chunks").
Different documents require different chunking strategies. A product manual works best when split by product features, while research papers should be divided by logical sections. Dify offers 3 types of chunkers for various document types and use cases.
#### Overview of Different Chunkers
| Chunker Type | Highlights | Best for |
| -------------------- | ----------------------------------------------------- | ----------------------------------------------------- |
| General Chunker | Fixed-size chunks with customizable delimiters | Simple documents with basic structure |
| Parent-child Chunker | Dual-layer structure: precise matching + rich context | Complex documents requiring rich context preservation |
| Q\&A Processor | Processes question-answer pairs from spreadsheets | Structured Q\&A data from CSV/Excel files |
#### Common Text Pre-processing Rules
All chunkers support these text cleaning options:
| Preprocessing Option | Description |
| --------------------------------------------- | ---------------------------------------------------------------------------------- |
| Replace consecutive spaces, newlines and tabs | Clean up formatting by replacing multiple whitespace characters with single spaces |
| Remove all URLs and email addresses | Automatically detect and remove web links and email addresses from text |
#### General Chunker
Basic document chunking processing, suitable for documents with relatively simple structures. You can configure text chunking and text preprocessing rules according to the following configuration.
**Input and Output Variable**
| Type | Variable | Description |
| --------------- | ------------------ | --------------------------------------------------------------------------- |
| Input Variable | `{x} Content` | Complete document content that the chunker will split into smaller segments |
| Output Variable | `{x} Array[Chunk]` | Array of chunked content, each segment optimized for retrieval and analysis |
**Chunk Settings**
| Configuration Item | Description |
| -------------------- | -------------------------------------------------------------------------------------------------------------------------------------------------------------------------------------------------------- |
| Delimiter | Default value is `\n` (line breaks for paragraph segmentation). You can customize chunking rules following regex. The system will automatically execute segmentation when the delimiter appears in text. |
| Maximum Chunk Length | Specifies the maximum character limit within a segment. When this length is exceeded, forced segmentation will occur. |
| Chunk Overlap | When segmenting data, there is some overlap between segments. This overlap helps improve information retention and analysis accuracy, enhancing recall effectiveness. |
#### Parent-child Chunker
By using a dual-layer segmentation structure to resolve the contradiction between context and accuracy, parent-child clunker achieves the balance between precise matching and comprehensive contextual information in Retrieval Augmented Generation (RAG) systems.
**How Parent-child Chunker Works**
Child Chunks for query matching: Small, precise information segments (usually single sentences) to match user queries with high accuracy.
Parent Chunks provide rich context: Larger content blocks (paragraphs, sections, or entire documents) that contain the matching child chunks, giving the large language model (LLM) comprehensive background information.
| Type | Variable | Description |
| --------------- | ------------------------ | --------------------------------------------------------------------------- |
| Input Variable | `{x} Content` | Complete document content that the chunker will split into smaller segments |
| Output Variable | `{x} Array[ParentChunk]` | Array of parent chunks |
**Chunk Settings**
| Configuration Item | Description |
| --------------------------- | ----------------------------------------------------------------------------------------------------------------------------------- |
| Parent Delimiter | Set delimiter for parent chunk splitting |
| Parent Maximum Chunk Length | Set maximum character count for parent chunks |
| Child Delimiter | Set delimiter for child chunk splitting |
| Child Maximum Chunk Length | Set maximum character count for child chunks |
| Parent Mode | Choose between Paragraph (split text into paragraphs) or "Full Document" (use entire document as parent chunk) for direct retrieval |
#### Q\&A Processor
Combining extraction and chunking in one node, Q\&A Processor is specifically designed for structured Q\&A datasets from CSV and Excel files. Perfect for FAQ lists, shift schedules, and any spreadsheet data with clear question-answer pairs.
**Input and Output Variable**
| Type | Variable | Description |
| --------------- | -------------------- | ------------- |
| Input Variable | `{x} Document` | A single file |
| Output Variable | `{x} Array[QAChunk]` | QA chunk |
**Variable Configuration**
| Configuration Item | Description |
| -------------------------- | ------------------------------ |
| Column Number for Question | Set content column as question |
| Column Number for Answer | Set column answer as answer |
***
## Step 3: Configure Knowledge Base Node
Now that your documents are processed and chunked, it's time to set up how they'll be stored and retrieved. Here, you can select different indexing methods and retrieval strategies based on your specific needs.
Knowledge base node configuration includes: Input Variable, Chunk Structure, Index Method, and Retrieval Settings.
### Chunk Structure
![Chunk Structure]() Chunk structure determines how the knowledge base organizes and indexes your document content. Choose the structure mode that best fits your document type, use case, and cost.
The knowledge base supports three chunk modes: **General Mode, Parent-child Mode, and Q\&A Mode**. If you're creating a knowledge base for the first time, we recommend choosing Parent-child Mode.
**Important Reminder**: Chunk structure cannot be modified once saved and published. Please choose carefully.
#### General Mode
Suitable for most standard document processing scenarios. It provides flexible indexing options—you can choose appropriate indexing methods based on different quality and cost requirements.
General mode supports both high-quality and economical indexing methods, as well as various retrieval settings.
#### Parent-child Mode
It provides precise matching and corresponding contextual information during retrieval, suitable for professional documents that need to maintain complete context.
Parent-child mode supports HQ (High Quality) mode only, offering child chunks for query matching and parent chunks for contextual information during retrieval.
#### Q\&A Mode
Create documents that pair questions with answers when using structured question-answer data. These documents are indexed based on the question portion, enabling the system to retrieve relevant answers based on query similarity.
Q\&A Mode supports HQ (High Quality) mode only.
### Input Variable
Input variables receive processing results from data processing nodes as the data source for knowledge base. You need to connect the output from chunker to the knowledge base as input.
The node supports different types of standard inputs based on the selected chunk structure:
* **General Mode**: x Array\[Chunk] - General chunk array
* **Parent-child Mode**: x Array\[ParentChunk] - Parent chunk array
* **Q\&A Mode**: x Array\[QAChunk] - Q\&A chunk array
### Index Method & Retrieval Settings
The index method determines how your knowledge base builds content indexes, while retrieval settings provide corresponding retrieval strategies based on the selected index method.
Think of it in this way: the index method determines how to organize your documents, while retrieval settings tell users what methods they can use to find documents.
The knowledge base provides two index methods: **High Quality** and **Economical**, each offering different retrieval setting options.
The High Quality method uses embedding models to convert chunks into numerical vectors, helping to compress and store large amounts of information more effectively. This enables the system to find semantically relevant accurate answers even when the user's question wording doesn't exactly match the document.
To enable cross-modal retrieval—retrieving both text and images based on semantic relevance—select a multimodal embedding model (marked with a **Vision** icon). Images extracted from documents will then be embedded and indexed for retrieval.
Knowledge bases using such embedding models are labeled **Multimodal** on their cards.
Chunk structure determines how the knowledge base organizes and indexes your document content. Choose the structure mode that best fits your document type, use case, and cost.
The knowledge base supports three chunk modes: **General Mode, Parent-child Mode, and Q\&A Mode**. If you're creating a knowledge base for the first time, we recommend choosing Parent-child Mode.
**Important Reminder**: Chunk structure cannot be modified once saved and published. Please choose carefully.
#### General Mode
Suitable for most standard document processing scenarios. It provides flexible indexing options—you can choose appropriate indexing methods based on different quality and cost requirements.
General mode supports both high-quality and economical indexing methods, as well as various retrieval settings.
#### Parent-child Mode
It provides precise matching and corresponding contextual information during retrieval, suitable for professional documents that need to maintain complete context.
Parent-child mode supports HQ (High Quality) mode only, offering child chunks for query matching and parent chunks for contextual information during retrieval.
#### Q\&A Mode
Create documents that pair questions with answers when using structured question-answer data. These documents are indexed based on the question portion, enabling the system to retrieve relevant answers based on query similarity.
Q\&A Mode supports HQ (High Quality) mode only.
### Input Variable
Input variables receive processing results from data processing nodes as the data source for knowledge base. You need to connect the output from chunker to the knowledge base as input.
The node supports different types of standard inputs based on the selected chunk structure:
* **General Mode**: x Array\[Chunk] - General chunk array
* **Parent-child Mode**: x Array\[ParentChunk] - Parent chunk array
* **Q\&A Mode**: x Array\[QAChunk] - Q\&A chunk array
### Index Method & Retrieval Settings
The index method determines how your knowledge base builds content indexes, while retrieval settings provide corresponding retrieval strategies based on the selected index method.
Think of it in this way: the index method determines how to organize your documents, while retrieval settings tell users what methods they can use to find documents.
The knowledge base provides two index methods: **High Quality** and **Economical**, each offering different retrieval setting options.
The High Quality method uses embedding models to convert chunks into numerical vectors, helping to compress and store large amounts of information more effectively. This enables the system to find semantically relevant accurate answers even when the user's question wording doesn't exactly match the document.
To enable cross-modal retrieval—retrieving both text and images based on semantic relevance—select a multimodal embedding model (marked with a **Vision** icon). Images extracted from documents will then be embedded and indexed for retrieval.
Knowledge bases using such embedding models are labeled **Multimodal** on their cards.
![Multimodal Knowledge Base]() In the Economical method, each block uses 10 keywords for retrieval without calling embedding models, generating no costs.
For more details, see [Specify the Index Method and Retrieval Settings](/en/use-dify/knowledge/create-knowledge/setting-indexing-methods).
| Index Method | Available Retrieval Settings | Description |
| ------------ | ---------------------------- | ----------------------------------------------------------------------- |
| High Quality | Vector Retrieval | Understand deeper meaning of queries based on semantic similarity |
| | Full-text Retrieval | Keyword-based retrieval providing comprehensive search capabilities |
| | Hybrid Retrieval | Combine both semantic and keywords |
| Economical | Inverted Index | Common search engine retrieval method, matches queries with key content |
If the selected embedding model is multimodal, select a multimodal rerank model (marked with a **Vision** icon) as well. Otherwise, retrieved images will be excluded from reranking and the retrieval results.
You can also refer to the table below for information on configuring chunk structure, index methods, parameters, and retrieval settings.
| Chunk Structure | Index Methods | Parameters | Retrieval Settings |
| ----------------- | -------------------------------------------- | ------------------------------------------------------- | ----------------------------------------------------------------------------------------- |
| General mode | High Quality
In the Economical method, each block uses 10 keywords for retrieval without calling embedding models, generating no costs.
For more details, see [Specify the Index Method and Retrieval Settings](/en/use-dify/knowledge/create-knowledge/setting-indexing-methods).
| Index Method | Available Retrieval Settings | Description |
| ------------ | ---------------------------- | ----------------------------------------------------------------------- |
| High Quality | Vector Retrieval | Understand deeper meaning of queries based on semantic similarity |
| | Full-text Retrieval | Keyword-based retrieval providing comprehensive search capabilities |
| | Hybrid Retrieval | Combine both semantic and keywords |
| Economical | Inverted Index | Common search engine retrieval method, matches queries with key content |
If the selected embedding model is multimodal, select a multimodal rerank model (marked with a **Vision** icon) as well. Otherwise, retrieved images will be excluded from reranking and the retrieval results.
You can also refer to the table below for information on configuring chunk structure, index methods, parameters, and retrieval settings.
| Chunk Structure | Index Methods | Parameters | Retrieval Settings |
| ----------------- | -------------------------------------------- | ------------------------------------------------------- | ----------------------------------------------------------------------------------------- |
| General mode | High Quality
Economical | Embedding Model
Number of Keywords | Vector Retrieval
Full-text Retrieval
Hybrid Retrieval
Inverted Index |
| Parent-child Mode | High Quality Only | Embedding Model | Vector Retrieval
Full-text Retrieval
Hybrid Retrieval |
| Q\&A Mode | High Quality Only | Embedding Model | Vector Retrieval
Full-text Retrieval
Hybrid Retrieval |
### Summary Auto-Gen
Available for self-hosted deployments only.
Automatically generate summaries for all chunks to enhance their retrievability.
Summaries are embedded and indexed for retrieval as well. When a summary matches a query, its corresponding chunk is also returned.
You can manually edit auto-generated summaries or regenerate them for specific documents later. See [Manage Knowledge Content](/en/use-dify/knowledge/manage-knowledge/maintain-knowledge-documents) for details.
If you select a vision-capable LLM, summaries will be generated based on both the chunk text and any attached images.
***
## Step 4: Create User Input Form
User input forms are essential for collecting the initial information your pipeline needs to run effectively. Similar to [the User Input node](/en/use-dify/nodes/user-input) in workflow, this form gathers necessary details from users - such as files to upload, specific parameters for document processing - ensuring your pipeline has all the information it needs to deliver accurate results.
This way, you can create specialized input forms for different use scenarios, improving pipeline flexibility and usability for various data sources or document processing steps.
### Create User Input Form
There're two ways to create user input field:
1. **Pipeline Orchestration Interface**\
Click on the **Input field** to start creating and configuring input forms.\\
![]() 2. **Node Parameter Panel**\
Select a node. Then, in parameter input on the right-side panel, click + Create user input for new input items. New input items will also be collected in the Input Field. !\[Node Parameter Panel]\(/images/use-dify/knowledge/knowledge-pipeline-orchestration-10.png)
### Add User Input Fields
#### Unique Inputs for Each Entrance
2. **Node Parameter Panel**\
Select a node. Then, in parameter input on the right-side panel, click + Create user input for new input items. New input items will also be collected in the Input Field. !\[Node Parameter Panel]\(/images/use-dify/knowledge/knowledge-pipeline-orchestration-10.png)
### Add User Input Fields
#### Unique Inputs for Each Entrance
![Knowledge Pipeline Orchestration 11]() These inputs are specific to each data source and its downstream nodes. Users only need to fill out these fields when selecting the corresponding data source, such as different URLs for different data sources.
**How to create**: Click the `+` button on the right side of a data source to add fields for that specific data source. These fields can only be referenced by that data source and its subsequently connected nodes.
These inputs are specific to each data source and its downstream nodes. Users only need to fill out these fields when selecting the corresponding data source, such as different URLs for different data sources.
**How to create**: Click the `+` button on the right side of a data source to add fields for that specific data source. These fields can only be referenced by that data source and its subsequently connected nodes. ![These Inputs Are Specific to Each Data Source and Its Downstream Nodes]() #### Global Inputs for All Entrances
#### Global Inputs for All Entrances
![Knowledge Pipeline Orchestration 13]() Global shared inputs can be referenced by all nodes. These inputs are suitable for universal processing parameters, such as delimiters, maximum chunk length, document processing configurations, etc. Users need to fill out these fields regardless of which data source they choose.
**How to create**: Click the `+` button on the right side of Global Inputs to add fields that can be referenced by any node.
### Supported Input Field Types
The knowledge pipeline supports seven types of input variables:
Global shared inputs can be referenced by all nodes. These inputs are suitable for universal processing parameters, such as delimiters, maximum chunk length, document processing configurations, etc. Users need to fill out these fields regardless of which data source they choose.
**How to create**: Click the `+` button on the right side of Global Inputs to add fields that can be referenced by any node.
### Supported Input Field Types
The knowledge pipeline supports seven types of input variables:
| Field Type | Description |
| ---------- | --------------------------------------------------------------------------------------------------- |
| Text | Short text input by knowledge base users, maximum length 256 characters |
| Paragraph | Long text input for longer character strings |
| Select | Fixed options preset by the orchestrator for users to choose from, users cannot add custom content |
| Boolean | Only true/false values |
| Number | Only accepts numerical input |
| Single | Upload a single file, supports multiple file types (documents, images, audio, and other file types) |
| File List | Batch file upload, supports multiple file types (documents, images, audio, and other file types) |
For more information about supported field types, see [User Input](/en/use-dify/nodes/user-input).
### Field Configuration Options
All input field types include: required, optional, and additional settings. You can set whether fields are required by checking the appropriate option.
| Setting | Name | Description | Example |
| ------------------------- | ------------- | ----------------------------------------------------------------------- | -------------------------------------------------------- |
| Required Settings | Variable Name | Internal system identifier, usually named using English and underscores | `user_email` |
| | Display Name | Interface display name, usually concise and readable text | User Email |
| Type-specific Settings | | Special requirements for different field types | Text field max length 100 characters |
| Additional Settings | Default Value | Default value when user hasn't provided input | Number field defaults to 0, text field defaults to empty |
| | Placeholder | Hint text displayed when input box is empty | "Please enter your email" |
| | Tooltip | Explanatory text to guide user input, usually displayed on mouse hover | "Please enter a valid email address" |
| Special Optional Settings | | Additional setting options based on different field types | Validation of email format |
After completing configuration, click the preview button in the upper right corner to browse the form preview interface. You can drag and adjust field groupings. If an exclamation mark appears, it indicates that the reference is invalid after moving.
![Knowledge Pipeline Orchestration 15]() ***
## Step 5: Name the Knowledge Base
***
## Step 5: Name the Knowledge Base
![Name Knowledge Base]() By default, the knowledge base name will be "Untitled + number", permissions are set to "Only me", and the icon will be an orange book. If you import it from a DSL file, it will use the saved icon.
Edit knowledge base information by clicking **Settings** in the left panel and fill in the information below:
* **Name & Icon**\
Pick a name for your knowledge base.\
Choose an emoji, upload an image, or paste an image URL as the icon of this knowledge base.
* **Knowledge Description**\
Provide a brief description of your knowledge base. This helps the AI better understand and retrieve your data. If left empty, Dify will apply the default retrieval strategy.
* **Permissions**\
Select the appropriate access permissions from the dropdown menu.
***
## Step 6: Testing
You're almost there! This is the final step of the knowledge pipeline orchestration.
After completing the orchestration, you need to validate all the configuration first. Then, do some running tests and confirm all the settings. Finally, publish the knowledge pipeline.
### Configuration Completeness Check
Before testing, it's recommended to check the completeness of your configuration to avoid test failures due to missing configurations.
Click the checklist button in the upper right corner, and the system will display any missing parts.
By default, the knowledge base name will be "Untitled + number", permissions are set to "Only me", and the icon will be an orange book. If you import it from a DSL file, it will use the saved icon.
Edit knowledge base information by clicking **Settings** in the left panel and fill in the information below:
* **Name & Icon**\
Pick a name for your knowledge base.\
Choose an emoji, upload an image, or paste an image URL as the icon of this knowledge base.
* **Knowledge Description**\
Provide a brief description of your knowledge base. This helps the AI better understand and retrieve your data. If left empty, Dify will apply the default retrieval strategy.
* **Permissions**\
Select the appropriate access permissions from the dropdown menu.
***
## Step 6: Testing
You're almost there! This is the final step of the knowledge pipeline orchestration.
After completing the orchestration, you need to validate all the configuration first. Then, do some running tests and confirm all the settings. Finally, publish the knowledge pipeline.
### Configuration Completeness Check
Before testing, it's recommended to check the completeness of your configuration to avoid test failures due to missing configurations.
Click the checklist button in the upper right corner, and the system will display any missing parts.
![Knowledge Pipeline Orchestration 16]() After completing all configurations, you can preview the knowledge base pipeline's operation through test runs, confirm that all settings are accurate, and then proceed with publishing.
### Test Run
After completing all configurations, you can preview the knowledge base pipeline's operation through test runs, confirm that all settings are accurate, and then proceed with publishing.
### Test Run
![Knowledge Pipeline Orchestration 17]() 1. **Start Test**: Click the "Test Run" button in the upper right corner
2. **Import Test File**: Import files in the data source window that pops up on the right
**Important Note**: For better debugging and observation, only one file upload is allowed per test run.
3. **Fill Parameters**: After successful import, fill in corresponding parameters according to the user input form you configured earlier
4. **Start Test Run**: Click next step to start testing the entire pipeline
During testing, you can access [History Logs](/en/use-dify/monitor/logs) (track all run records with timestamps, execution status, and input/output summaries) and [Variable Inspector](/en/use-dify/debug/variable-inspect) (a dashboard at the bottom showing input/output data for each node to help identify issues and verify data flow) for efficient troubleshooting and error fixing.
1. **Start Test**: Click the "Test Run" button in the upper right corner
2. **Import Test File**: Import files in the data source window that pops up on the right
**Important Note**: For better debugging and observation, only one file upload is allowed per test run.
3. **Fill Parameters**: After successful import, fill in corresponding parameters according to the user input form you configured earlier
4. **Start Test Run**: Click next step to start testing the entire pipeline
During testing, you can access [History Logs](/en/use-dify/monitor/logs) (track all run records with timestamps, execution status, and input/output summaries) and [Variable Inspector](/en/use-dify/debug/variable-inspect) (a dashboard at the bottom showing input/output data for each node to help identify issues and verify data flow) for efficient troubleshooting and error fixing.
![Testing Tools]() # Step 5: Manage and Use Knowledge Base
Source: https://docs.dify.ai/en/use-dify/knowledge/knowledge-pipeline/manage-knowledge-base
After creating your knowledge base, continuous management and optimization will provide accurate contextual information for your applications. These are the options for follow-up maintenance.
### Knowledge Pipeline
View and modify your orchestrated pipeline nodes and configurations.
Find more information in [Manage Knowledge](/en/use-dify/knowledge/manage-knowledge/maintain-knowledge-documents).
# Step 5: Manage and Use Knowledge Base
Source: https://docs.dify.ai/en/use-dify/knowledge/knowledge-pipeline/manage-knowledge-base
After creating your knowledge base, continuous management and optimization will provide accurate contextual information for your applications. These are the options for follow-up maintenance.
### Knowledge Pipeline
View and modify your orchestrated pipeline nodes and configurations.
Find more information in [Manage Knowledge](/en/use-dify/knowledge/manage-knowledge/maintain-knowledge-documents).
![Knowledge Management]() # Step 3: Publish Knowledge Pipeline
Source: https://docs.dify.ai/en/use-dify/knowledge/knowledge-pipeline/publish-knowledge-pipeline
After completing pipeline orchestration and debugging, click **Publish** and **Confirm** in the pop-up window.
Important reminder: Once published, the chunk structure cannot be modified.
# Step 3: Publish Knowledge Pipeline
Source: https://docs.dify.ai/en/use-dify/knowledge/knowledge-pipeline/publish-knowledge-pipeline
After completing pipeline orchestration and debugging, click **Publish** and **Confirm** in the pop-up window.
Important reminder: Once published, the chunk structure cannot be modified.
Once it is published, you can:
**Add Documents (Go to add documents)**\
Click this option to jump to the knowledge base data source selection interface, where you can directly upload documents.
**Access API (Access API Reference)**\
Go to the API documentation page where you can get the knowledge base API calling methods and instructions.
**Publish as a Knowledge Pipeline**\
you can optionally use **Publish as a Knowledge Pipeline** to save it as a reusable template that will appear in the Customized section for future use.
Limitation: **Publish as a Knowledge Pipeline** is not available in Sandbox plan. To save and publish as a knowledge pipeline, please [upgrade](https://dify.ai/pricing) to professional or team plans.
# Create Knowledge from a Knowledge Pipeline
Source: https://docs.dify.ai/en/use-dify/knowledge/knowledge-pipeline/readme
A knowledge pipeline is a document processing workflow that transforms raw data into searchable knowledge bases. Think of orchestrating a workflow, now you can visually combine and configure different processing nodes and tools to optimize data processing for better accuracy and relevance.
Every knowledge pipeline normally follows a structured flow through four key steps:
**Data Sources → Data Extraction → Data Processing → Knowledge Storage**
Each step serves a specific purpose: gathering content from various sources, converting it to processable text, refining it for search, and storing it in a format that enables fast, accurate retrieval.
Dify provides built-in pipeline templates that is optimized for certain use cases, or you can also create knowledge pipelines from scratch. In this session, we will go through creating options, general process of building knowledge pipelines, and how to manage it.
Start from built-in templates, blank knowledge pipeline or import existing pipeline.
Get to know how the knowledge pipeline works, orchestrate different nodes and make sure it’s ready to use.
Let's make it ready for document processing.
Add documents and process them into the searchable knowledge base.
Maintain documents, test retrieval, modify settings, and more.
# Step 4: Upload Files
Source: https://docs.dify.ai/en/use-dify/knowledge/knowledge-pipeline/upload-files
After publishing knowledge pipeline, there're two ways to upload files as below:
A: Click **Go to Documents** in the success notification to add or manage documents. After entering Documents page, click **Add File** to upload.
B: Click **Go to Add Documents** to add documents.
### Upload Process
1. **Select Data Source**\
Choose from the data source types configured in your pipeline. Dify currently supports 4 types of data sources: File Upload (pdf, docx, etc.), Online Drive (Google Drive, OneDrive, etc.), Online Doc (Notion), and Web Crawler (Jina Reader, Firecrawl).
Please visit [Dify Marketplace](https://marketplace.dify.ai/) to install additional data sources.
2. **Fill in Processing Parameters and Preview**\
If you configured user input fields during pipeline orchestration, users will need to fill in the required parameters and variables at this step. After completing the form, click **Preview** to see chunking results. Click **Save & Process** to complete knowledge base creation and start data processing.
Important reminder: Chunk structure remains consistent with the pipeline configuration and won't change with user input parameters.
![Parameter Input]() 3. **Process Documents**\
Track the progress of document processing. After embedding is completed, click **Go to Document**.
3. **Process Documents**\
Track the progress of document processing. After embedding is completed, click **Go to Document**.
![Processing Progress]() 4. **Access Documents List**\
Click **Go to Documents** to view the Documents page, where you can browse all uploaded file, processing status, etc.
4. **Access Documents List**\
Click **Go to Documents** to view the Documents page, where you can browse all uploaded file, processing status, etc.
![Documents List]() # Knowledge Request Rate Limit
Source: https://docs.dify.ai/en/use-dify/knowledge/knowledge-request-rate-limit
## What is Knowledge Request Rate Limit?
On Dify Cloud, the knowledge request rate limit refers to the maximum number of actions that a workspace can perform in the knowledge base within one minute. These actions include creating datasets, managing documents, and running queries in apps or workflows.
## Limitations of Different Subscription Versions
Knowledge Request Rate Limit will vary by subscription level:
* **Sandbox**: 10/min
* **Professional**: 100/min
* **Team**: 1,000/min
For example, if a Sandbox user performs 10 hit tests within one minute, their workspace will be temporarily unable to perform the restricted actions during the following minute.
## Which Actions will be Limited by Knowledge Request Rate Limit when I Perform them?
When you perform the following actions, you will be limited by the frequency of Knowledge Base requests:
1. Creating empty datasets
2. Deleting datasets
3. Updating dataset settings
4. Uploading documents
5. Deleting documents
6. Updating documents
7. Disabling documents
8. Enabling documents
9. Archiving documents
10. Restoring archived documents
11. Pausing document processing
12. Resuming document processing
13. Adding segments
14. Deleting segments
15. Updating segments
16. Bulk importing segments
17. Performing hit tests
18. Querying the knowledge in apps or workflows (*Note: Multi-path recalls count as a single request.*)
# Manage Knowledge Settings
Source: https://docs.dify.ai/en/use-dify/knowledge/manage-knowledge/introduction
Only the workspace owner, administrators, and editors can modify the knowledge base settings.
In a knowledge base, click the **Settings** icon in the left sidebar to enter its settings page.
| Settings | Description |
| :----------------- | :--------------------------------------------------------------------------------------------------------------------------------------------------------------------------------------------------------------------------------------------------------- |
| Name & Icon | Identifies the knowledge base. |
| Description | Indicates the knowledge base's purpose and content. |
| Permissions | Defines which workspace members can access the knowledge base.Members granted access to a knowledge base have all the permissions listed in [Manage Knowledge Content](/en/use-dify/knowledge/manage-knowledge/maintain-knowledge-documents). |
| Index Method | Defines how document chunks are processed and organized for retrieval. For more details, see [Select the Index Method](/en/use-dify/knowledge/create-knowledge/setting-indexing-methods#select-the-index-method). |
| Embedding Model | Specifies the embedding model used to convert document chunks into vector representations.Changing the embedding model will re-embed all chunks. |
| Summary Auto-Gen | Automatically generate summaries for document chunks.Once enabled, this only applies to newly added documents and chunks. For existing chunks, select the document(s) in the document list and click **Generate summary**. |
| Retrieval Settings | Defines how the knowledge base retrieves relevant content. For more details, see [Configure the Retrieval Settings](/en/use-dify/knowledge/create-knowledge/setting-indexing-methods#configure-the-retrieval-settings). |
# Manage Knowledge via API
Source: https://docs.dify.ai/en/use-dify/knowledge/manage-knowledge/maintain-dataset-via-api
Manage your knowledge bases programmatically using the Dify Knowledge Base API
Dify provides a complete set of Knowledge Base APIs that let you manage knowledge bases, documents, and chunks programmatically. This is useful for automating data synchronization or integrating knowledge base operations into CI/CD pipelines.
API access is enabled by default when you create a knowledge base. To start making API calls, all you need is your API credentials: an endpoint and a key.
A single Knowledge Base API key has access to **all visible knowledge bases** under the same account. Handle your credentials carefully to avoid unintended data exposure.
## Get Your API Endpoint and Key
Navigate to **Knowledge** in Dify. In the top-right corner, click **Service API** to open the API configuration panel. From here you can:
* Get the Service API endpoint. This is the base URL for all Knowledge Base API requests.
* Click **API Key** to create new keys and manage existing ones.
Store your API key securely on the server side. Never expose it in client-side code or public repositories.
## Manage API Access for a Knowledge Base
Every knowledge base is accessible via the Service API by default.
If you want to restrict API access to a specific knowledge base, open it, then click **API Access** in the bottom-left corner and toggle it off.
## API Reference
See the [Knowledge Base API Reference](https://docs.dify.ai/api-reference/knowledge-bases/list-knowledge-bases) for the complete list of endpoints, request/response schemas, error codes, and interactive examples.
# Manage Knowledge Content
Source: https://docs.dify.ai/en/use-dify/knowledge/manage-knowledge/maintain-knowledge-documents
## Manage Documents
In a knowledge base, each imported item—whether a local file, a Notion page, or a web page—becomes a document.
From the document list, you can view and manage all these documents to keep your knowledge accurate, relevant, and up-to-date.
Click the knowledge base name at the top to quickly switch between knowledge bases.
# Knowledge Request Rate Limit
Source: https://docs.dify.ai/en/use-dify/knowledge/knowledge-request-rate-limit
## What is Knowledge Request Rate Limit?
On Dify Cloud, the knowledge request rate limit refers to the maximum number of actions that a workspace can perform in the knowledge base within one minute. These actions include creating datasets, managing documents, and running queries in apps or workflows.
## Limitations of Different Subscription Versions
Knowledge Request Rate Limit will vary by subscription level:
* **Sandbox**: 10/min
* **Professional**: 100/min
* **Team**: 1,000/min
For example, if a Sandbox user performs 10 hit tests within one minute, their workspace will be temporarily unable to perform the restricted actions during the following minute.
## Which Actions will be Limited by Knowledge Request Rate Limit when I Perform them?
When you perform the following actions, you will be limited by the frequency of Knowledge Base requests:
1. Creating empty datasets
2. Deleting datasets
3. Updating dataset settings
4. Uploading documents
5. Deleting documents
6. Updating documents
7. Disabling documents
8. Enabling documents
9. Archiving documents
10. Restoring archived documents
11. Pausing document processing
12. Resuming document processing
13. Adding segments
14. Deleting segments
15. Updating segments
16. Bulk importing segments
17. Performing hit tests
18. Querying the knowledge in apps or workflows (*Note: Multi-path recalls count as a single request.*)
# Manage Knowledge Settings
Source: https://docs.dify.ai/en/use-dify/knowledge/manage-knowledge/introduction
Only the workspace owner, administrators, and editors can modify the knowledge base settings.
In a knowledge base, click the **Settings** icon in the left sidebar to enter its settings page.
| Settings | Description |
| :----------------- | :--------------------------------------------------------------------------------------------------------------------------------------------------------------------------------------------------------------------------------------------------------- |
| Name & Icon | Identifies the knowledge base. |
| Description | Indicates the knowledge base's purpose and content. |
| Permissions | Defines which workspace members can access the knowledge base.Members granted access to a knowledge base have all the permissions listed in [Manage Knowledge Content](/en/use-dify/knowledge/manage-knowledge/maintain-knowledge-documents). |
| Index Method | Defines how document chunks are processed and organized for retrieval. For more details, see [Select the Index Method](/en/use-dify/knowledge/create-knowledge/setting-indexing-methods#select-the-index-method). |
| Embedding Model | Specifies the embedding model used to convert document chunks into vector representations.Changing the embedding model will re-embed all chunks. |
| Summary Auto-Gen | Automatically generate summaries for document chunks.Once enabled, this only applies to newly added documents and chunks. For existing chunks, select the document(s) in the document list and click **Generate summary**. |
| Retrieval Settings | Defines how the knowledge base retrieves relevant content. For more details, see [Configure the Retrieval Settings](/en/use-dify/knowledge/create-knowledge/setting-indexing-methods#configure-the-retrieval-settings). |
# Manage Knowledge via API
Source: https://docs.dify.ai/en/use-dify/knowledge/manage-knowledge/maintain-dataset-via-api
Manage your knowledge bases programmatically using the Dify Knowledge Base API
Dify provides a complete set of Knowledge Base APIs that let you manage knowledge bases, documents, and chunks programmatically. This is useful for automating data synchronization or integrating knowledge base operations into CI/CD pipelines.
API access is enabled by default when you create a knowledge base. To start making API calls, all you need is your API credentials: an endpoint and a key.
A single Knowledge Base API key has access to **all visible knowledge bases** under the same account. Handle your credentials carefully to avoid unintended data exposure.
## Get Your API Endpoint and Key
Navigate to **Knowledge** in Dify. In the top-right corner, click **Service API** to open the API configuration panel. From here you can:
* Get the Service API endpoint. This is the base URL for all Knowledge Base API requests.
* Click **API Key** to create new keys and manage existing ones.
Store your API key securely on the server side. Never expose it in client-side code or public repositories.
## Manage API Access for a Knowledge Base
Every knowledge base is accessible via the Service API by default.
If you want to restrict API access to a specific knowledge base, open it, then click **API Access** in the bottom-left corner and toggle it off.
## API Reference
See the [Knowledge Base API Reference](https://docs.dify.ai/api-reference/knowledge-bases/list-knowledge-bases) for the complete list of endpoints, request/response schemas, error codes, and interactive examples.
# Manage Knowledge Content
Source: https://docs.dify.ai/en/use-dify/knowledge/manage-knowledge/maintain-knowledge-documents
## Manage Documents
In a knowledge base, each imported item—whether a local file, a Notion page, or a web page—becomes a document.
From the document list, you can view and manage all these documents to keep your knowledge accurate, relevant, and up-to-date.
Click the knowledge base name at the top to quickly switch between knowledge bases.
![Manage Knowledge Documents]() | Action | Description |
| :-------------------- | :------------------------------------------------------------------------------------------------------------------------------------------------------------------------------------------------------------------------------------------------------------------------------------------------------------------------------------------------------------------------------------------------------------------------------------------ |
| Add | Import a new document. |
| Modify Chunk Settings | Modify a document's chunking settings (excluding the chunk structure).Each document can have its own chunking settings, while the chunk structure is shared across the knowledge base and cannot be changed once set. |
| Delete | Permanently remove a document. **Deletion cannot be undone**. |
| Enable / Disable | Temporarily include or exclude a document from retrieval. On Dify Cloud, documents that have not been updated or retrieved for a certain period are automatically disabled to optimize performance.
| Action | Description |
| :-------------------- | :------------------------------------------------------------------------------------------------------------------------------------------------------------------------------------------------------------------------------------------------------------------------------------------------------------------------------------------------------------------------------------------------------------------------------------------ |
| Add | Import a new document. |
| Modify Chunk Settings | Modify a document's chunking settings (excluding the chunk structure).Each document can have its own chunking settings, while the chunk structure is shared across the knowledge base and cannot be changed once set. |
| Delete | Permanently remove a document. **Deletion cannot be undone**. |
| Enable / Disable | Temporarily include or exclude a document from retrieval. On Dify Cloud, documents that have not been updated or retrieved for a certain period are automatically disabled to optimize performance.
The inactivity period varies by subscription plan:- Sandbox: 7 days
- Professional & Team: 30 days
For Professional and Team plans, these documents can be re-enabled **with one click**. |
| Generate Summary | Automatically generates summaries for all chunks in a document. Only available for self-hosted deployments when **Summary Auto-Gen** is enabled.Existing summaries will be overwritten. |
| Archive / Unarchive | Archive a document that you no longer need for retrieval but still want to keep. Archived documents are read-only and can be unarchived at any time. |
| Edit | Modify the content of a document by editing its chunks. See [Manage Chunks](#manage-chunks) for details. |
| Rename | Change the name of a document. |
## Manage Chunks
According to its chunk settings, every document is split into content chunks—the basic units for retrieval.
From the chunk list within a document, you can view and manage all its chunks to improve the retrieval efficiency and accuracy.
Click the document name in the upper-left corner to quickly switch between documents.
![Manage Knowledge Chunks]() | Action | Description |
| :----------------------------- | :------------------------------------------------------------------------------------------------------------------------------------------------------------------------------------------------------------------------------------------------------------------------------------------------------------------------------------------------------------------------------------------------------------------------------------------------------------------------------------------------------------------------------------------------------------------------------------------------------------------------------------------------------------------------------------------------------------------------ |
| Add | Add one or batch add multiple new chunks.
| Action | Description |
| :----------------------------- | :------------------------------------------------------------------------------------------------------------------------------------------------------------------------------------------------------------------------------------------------------------------------------------------------------------------------------------------------------------------------------------------------------------------------------------------------------------------------------------------------------------------------------------------------------------------------------------------------------------------------------------------------------------------------------------------------------------------------ |
| Add | Add one or batch add multiple new chunks.
For documents chunked with Parent-child mode, both new parent and child chunks can be added. *Add chunks* is a paid feature on Dify Cloud. [Upgrade to Professional or Team](https://dify.ai/pricing) to use it. |
| Delete | Permanently remove a chunk. **Deletion cannot be undone**. |
| Enable / Disable | Temporarily include or exclude a chunk from retrieval. Disabled chunks cannot be edited. |
| Edit | Modify the content of a chunk. Edited chunks are marked **Edited**.
For knowledge bases using the Parent-child chunk mode: - When editing a parent chunk, you can choose to regenerate its child chunks or keep them unchanged.
- Editing a child chunk does not update its parent chunk.
|
| Add / Edit / Delete Keywords | Add or modify keywords (up to 10) for a chunk to improve its retrievability. Only available for knowledge bases using the Economical index method. |
| Add / Delete Image Attachments | Remove images extracted from documents or upload new ones within their corresponding chunk.
URLs of extracted images remain in the chunk text, but you can safely remove these URLs to keep the text clean—this won't affect the extracted images. Each chunk can have up to 10 image attachments, which are returned alongside it during retrieval; images beyond this limit will not be extracted.
For self-hosted deployments, you can adjust this limit via the environment variable `SINGLE_CHUNK_ATTACHMENT_LIMIT`.If you select a multimodal embedding model (marked with a **Vision** icon), the extracted images will also be embedded and indexed for retrieval. |
| Add / Edit / Delete Summary | Add, modify, or remove a summary for a chunk.
Summaries are embedded and indexed for retrieval as well. When a summary matches a query, its corresponding chunk is also returned.Add identical summaries to multiple chunks to enable grouped retrieval, allowing related chunks to be returned together (subject to the Top K limit). |
## Best Practices
### Check Chunk Quality
After a document is chunked, carefully review each chunk to ensure it's semantically complete and appropriately sized for optimal retrieval accuracy and response relevance.
Common issues to watch for:
* Chunks are **too short**—may lack sufficient context, leading to semantic loss and inaccurate answers.
* Chunks are **too long**—may include irrelevant information, introducing semantic noise and lowering retrieval precision.
* Chunks are **semantically incomplete**—caused by forced chunking that cuts through sentences or paragraphs, resulting in missing or misleading content during retrieval.
### Use Child Chunks as Retrieval Hooks for Parent Chunks
For documents chunked with Parent-child mode, the system searches across child chunks but returns the parent chunks. Since editing a child chunk does not update its parent, you can treat child chunks as semantic tags or retrieval hints for their parent chunks.
To do this, rewrite child chunks into **keywords**, **summaries**, or **common user queries**. For example, if a parent chunk covers technical "LED Status Indicators", you could rephrase its child chunks as:
* *blinking light, won't turn on, red light, connection error, frozen* (keywords)
* *Guide to interpreting LED colors and troubleshooting hardware power or pairing issues* (summaries)
* *What does a solid red light mean?* (queries)
### Use Summaries to Bridge Query-Content Gaps
While high-quality indexing enables semantic search, raw chunks can still be hard to retrieve when they are too specific, noisy, or structurally complex to align well with user queries.
Summaries bridge this gap by providing a condensed semantic layer that makes the chunk's core intent explicit.
Use summaries when:
* **User queries differ from document language**: For technical documentation written formally, add summaries in the way users actually ask questions.
* **Concepts are implicit or buried in details**: Add high-level summaries that surface the core concepts and intent, so the chunk can be matched without relying on small details scattered across the text.
* **Raw text is non-textual**: When a chunk is primarily code, tables, logs, transcripts, or otherwise hard to match semantically, add descriptive summaries that clearly label what the chunk contains.
* **Related chunks should be retrieved together**: Apply identical summaries to a series of related chunks to enable grouped retrieval. This semantic glue allows multiple parts of a topic to be retrieved together, providing richer context.
The number of returned related chunks is subject to the Top K limit defined in the retrieval settings.
# Manage Document Metadata
Source: https://docs.dify.ai/en/use-dify/knowledge/metadata
## What is Metadata?
### Overview
Metadata is information that describes your data - essentially "data about data". Just as a book has a table of contents to help you understand its structure, metadata provides context about your data's content, origin, purpose, etc., making it easier for you to find and manage information in your knowledge base.
This guide aims to help you understand metadata and effectively manage your knowledge base.
### Core Concepts
* **Field:** The label of a metadata field (e.g., "author", "language").
* **Value:** The information stored in a metadata field (e.g., "Jack", "English").

* **Value Count:** The number of values contained in a metadata field,including duplicates. (e.g., "3").

* **Value Type:** The type of value a field can contain.
* Dify supports three value types:
* String: For text-based information
* Number: For numerical data
* Time: For dates/timestamps

## How to Manage My Metadata?
### Manage Metadata Fields in the Knowledge Base
You can create, modify, and delete metadata fields in the knowledge base.
> Any changes you make to metadata fields here affect your knowledge base globally.
#### Get Started with the Metadata Panel
**Access the Metadata Panel**
To access the Metadata Panel, go to **Knowledge Base** page and click **Metadata**.


**Built-in vs Custom Metadata**
|
Built-in Metadata |
Custom Metadata |
| Location |
Lower section of the Metadata panel |
Upper section of the Metadata panel |
| Activation |
Disabled by default; requires manual activation |
Add as needed |
| Generation |
System automatically extracts and generates field values |
User-defined and manually added |
| Editing |
Fields and values cannot be modified once generated |
Fields and values can be edited or deleted |
| Scope |
Applies to all existing and new documents when enabled |
Stored in metadata list; requires manual assignment to documents |
| Fields |
System-defined fields include:
- document\_name (string)
- uploader (string)
- upload\_date (time)
- last\_update\_date (time)
- source (string)
|
No default fields; all fields must be manually created |
| Value Types |
- String: For text values
- Number: For numerical values
- Time: For dates and timestamps
|
- String: For text values
- Number: For numerical values
- Time: For dates and timestamps
|
#### Create New Metadata Fields
To create a new metadata field:
1. Click **+Add Metadata** to open the **New Metadata** dialog.

2. Choose the value type.
3. Name the field.
> Naming rules: Use lowercase letters, numbers, and underscores only.

4. Click **Save** to apply changes.

#### Edit Metadata Fields
To edit a metadata field:
1. Click the edit icon next to a field to open the **Rename** dialog.

2. Enter the new name in the **Name** field.
> Note: You can only modify the field name, not the value type.

3. Click **Save** to apply changes.
> Note: Field changes update across all related documents in your knowledge base.

#### Delete Metadata Fields
To delete a metadata field, click the delete icon next to a field to delete it.
> Note: Deleting a field deletes it and all its values from all documents in your knowledge base.

### Edit Metadata
#### Bulk Edit Metadata in the Metadata Editor
You can edit metadata in bulk in the knowledge base.
**Access the Metadata Editor**
To access the Metadata Editor:
1. In the knowledge base, select documents using the checkboxes on the left.

2. Click **Metadata** in the bottom action bar to open the Metadata Editor.

**Bulk Add Metadata**
To add metadata in bulk:
1. Click **+Add Metadata** in the editor to:

* Add existing fields from the dropdown or from the search box.

* Create new fields via **+New Metadata**.
> New fields are automatically added to the knowledge base.

* Access the Metadata Panel to manage metadata fields via **Manage**.

2. *(Optional)* Enter values for new fields.

> The date picker is for time-type fields.

3. Click **Save** to apply changes.
**Bulk Update Metadata**
To update metadata in bulk:
1. In the editor:
* **Add Values:** Type directly in the field boxes.
* **Reset Values:** Click the blue dot that appears on hover.

* **Delete Values:** Clear the field or delete the **Multiple Value** card.

* **Delete fields:** Click the delete icon (fields appear struck through and grayed out).
> Note: This only deletes the field from this document, not from your knowledge base.

2. Click **Save** to apply changes.
**Set Update Scope**
Use **Apply to All Documents** to control changes:
* **Unchecked (Default)**: Updates only documents that already have the field.
* **Checked**: Adds or updates fields across all selected documents.

#### Edit Metadata on the Document Details Page
You can edit a single document's metadata on its details page.
**Access Metadata Edit Mode**
To edit a single document's metadata:
On the document details page, click **Start labeling** to begin editing.


**Add Metadata**
To add a single document's metadata fields and values:
1. Click **+Add Metadata** to:

* Create new fields via **+New Metadata**.
> New fields are automatically added to the knowledge base.

* Add existing fields from the dropdown or from the search box.

* Access the Metadata Panel via **Manage**.

2. *(Optional)* Enter values for new fields.

3. Click **Save** to apply changes.
**Edit Metadata**
To update a single document's metadata fields and values:
1. Click **Edit** in the top right to begin editing.

2. Edit metadata:
* **Update Values:** Type directly in value fields or delete it.
> Note: You can only modify the value, not the value name.
* **Delete Fields:** Click the delete icon.
> Note: This only deletes the field from this document, not from your knowledge base.

3. Click **Save** to apply changes.
## How to Filter Documents with Metadata?
See **Metadata Filtering** in *[Integrate Knowledge Base within Application](/en/use-dify/knowledge/integrate-knowledge-within-application)*.
## FAQ
* **What can I do with metadata?**
* Find information faster with smart filtering.
* Control access to sensitive content.
* Organize data more effectively.
* Automate workflows based on metadata rules.
* **Fields vs Values: What is the difference?**
| | Definition | Characteristics | Examples |
| ------------------------------------------ | -------------------------------------------------------------------- | --------------------------------------------------------------------- | ------------------------------------------------------------------------------------------------------- |
| Metadata Fields in the Metadata Panel | System-defined attributes that describe document properties | Global fields accessible across all documents in the knowledge base | Author, Type, Date, etc. |
| Metadata Value on a document's detail page | Custom metadata tagged according to individual document requirements | Unique metadata values assigned based on document content and context | The "Author" field in Document A is set to "Mary" value, while in Document B it is set to "John" value. |
* **How do different delete options work?**
| Action | Steps | Impact | Outcome |
| ---------------------------------------- | ------------------------------------------------------- | ------------------------------ | -------------------------------------------------------------------- |
| Delete field in the Metadata Panel | In the Metadata Panel, click delete icon next to field | Global - affects all documents | Field and all values permanently deleted from the knowledge base |
| Delete field in the Metadata Editor | In the Metadata Editor, click delete icon next to field | Selected documents only | Field deleted from selected documents; remains in the knowledge base |
| Delete field on the document detail page | In the Edit Mode, click delete icon next to field | Current document only | Field deleted from current document; remains in the knowledge base |
# Knowledge
Source: https://docs.dify.ai/en/use-dify/knowledge/readme
## Introduction
Knowledge in Dify is a collection of your own data that can be integrated into your AI apps. It allows you to provide LLMs with domain-specific information as context, ensuring their responses are more accurate, relevant, and less prone to hallucinations.
This is made possible through Retrieval-Augmented Generation (RAG). It means that instead of relying solely on its pre-trained public data, the LLM uses your custom knowledge as an additional source of truth:
1. (Retrieval) When a user asks a question, the system first **retrieves the most relevant** information from the incorporated knowledge.
2. (Augmented) This retrieved information is then combined with the user's original query and sent to the LLM as **augmented context**.
3. (Generation) The LLM uses this context to generate a **more precise** answer.
Knowledge is stored and managed in knowledge bases. You can create multiple knowledge bases, each tailored to different domains, use cases, or data sources, and selectively integrate them into your application as needed.
## Build with Knowledge
With Dify knowledge, you can build AI apps that are grounded in your own data and domain-specific expertise. Here are some common use cases:
* **Customer support chatbots**: Build smarter support bots that provide accurate answers from your up-to-date product documentation, FAQs, and troubleshooting guides.
* **Internal knowledge portals**: Build AI-powered search and Q\&A systems for employees to quickly access company policies and procedures.
* **Content generation tools**: Build intelligent writing tools that generate reports, articles, or emails based on specific background materials.
* **Research & analysis applications**: Build applications that assist in research by retrieving and summarizing information from specific knowledge repositories like academic papers, market reports, or legal documents.
## Create Knowledge
* **[Quick create](/en/use-dify/knowledge/create-knowledge/introduction)**: Import data, define processing rules, and let Dify handle the rest. Fast and beginner-friendly.
* **[Create from a knowledge pipeline](/en/use-dify/knowledge/knowledge-pipeline/readme)**: Orchestrate more complex, flexible data processing workflows with custom steps and various plugins.
* **[Connect to an external knowledge base](/en/use-dify/knowledge/connect-external-knowledge-base)**: Sync directly from external knowledge bases via APIs to leverage existing data without migration.
## Manage & Optimize Knowledge
* **[Manage content](/en/use-dify/knowledge/manage-knowledge/maintain-knowledge-documents)**: View, add, modify, or delete documents and chunks to keep your knowledge current, accurate, and retrieval-ready.
* **[Test and validate retrieval](/en/use-dify/knowledge/test-retrieval)**: Simulate user queries to test how well your knowledge base retrieves relevant information.
* **[Enhance retrieval with metadata](/en/use-dify/knowledge/metadata)**: Add metadata to documents to enable filter-based searches and further improve retrieval precision.
* **[Adjust knowledge base settings](/en/use-dify/knowledge/manage-knowledge/introduction)**: Modify the index method, embedding model, and retrieval strategy at any time.
## Use Knowledge
**[Integrate into applications](/en/use-dify/knowledge/integrate-knowledge-within-application)**: Ground your AI app in your own knowledge.
***
**Read More**:
* [Dify v1.1.0: Filtering Knowledge Retrieval with Customized Metadata](https://dify.ai/blog/dify-v1-1-0-filtering-knowledge-retrieval-with-customized-metadata)
* [Dify v0.15.0: Introducing Parent-child Retrieval for Enhanced Knowledge](https://dify.ai/blog/introducing-parent-child-retrieval-for-enhanced-knowledge)
* [Introducing Hybrid Search and Rerank to Improve the Retrieval Accuracy of the RAG System](https://dify.ai/blog/hybrid-search-rerank-rag-improvement)
* [Dify.AI's New Dataset Feature Enhancements: Citations and Attributions](https://dify.ai/blog/difyai-new-dataset-features)
* [Text Embedding: Basic Concepts and Implementation Principles](https://dify.ai/blog/text-embedding-basic-concepts-and-implementation-principles)
* [Enhance Dify RAG with InfraNodus: Expand Your LLM's Context](https://dify.ai/blog/enhance-dify-rag-with-infranodus-expand-your-llm-s-context)
* [Dify.AI x Jina AI: Dify now Integrates Jina Embedding Model](https://dify.ai/blog/integrating-jina-embeddings-v2-dify-enhancing-rag-applications)
# Test Knowledge Retrieval
Source: https://docs.dify.ai/en/use-dify/knowledge/test-retrieval
In a knowledge base, click the **Retrieval Testing** icon in the left sidebar to enter the testing page.
Here, you can simulate user queries to test how well the knowledge base retrieves relevant information and experiment with different retrieval settings for optimal performance.
Retrieval settings adjusted here are temporary and only apply to the current test session.
For more about retrieval settings, see [Configure the Retrieval Settings](/en/use-dify/knowledge/create-knowledge/setting-indexing-methods#configure-the-retrieval-settings).
The **Records** section logs all retrieval events associated with this knowledge base, including:
* Queries tested directly on the **Retrieval Testing** page
* Retrieval requests made by any linked app—whether during test runs or in production
Test retrievals and regular retrievals share the same API endpoint.
# Dashboard
Source: https://docs.dify.ai/en/use-dify/monitor/analysis
Monitor performance, costs, and user engagement through Dify's built-in analytics dashboard
The dashboard tracks four metrics over time to show how your application performs:
![Monitoring Dashboard]() **Total Messages:** Conversation volume\
**Active Users:** Users with meaningful interactions (more than one exchange)\
**Average User Interactions:** Engagement depth per session\
**Token Usage:** Resource consumption and costs
Use the time selector to view trends over different periods. Click **"Tracing app performance"** to connect external observability platforms like Langfuse or LangSmith for deeper analytics.
# Annotation System
Source: https://docs.dify.ai/en/use-dify/monitor/annotation-reply
Build a curated library of high-quality responses to improve consistency and bypass AI generation
Annotations let you create a curated library of perfect responses for specific questions. When users ask similar questions, Dify returns your pre-written answers instead of generating new responses, ensuring consistency and eliminating AI hallucinations for critical topics.
## When to Use Annotations
**Enterprise Standards**
Create definitive answers for policy questions, product information, or customer service scenarios where consistency is critical.
**Rapid Prototyping**
Quickly improve demo applications by curating high-quality responses without retraining models or complex prompt engineering.
**Quality Assurance**
Ensure certain sensitive or important questions always receive your approved responses rather than potentially variable AI-generated content.
## How Annotations Work
When annotation reply is enabled:
1. User asks a question
2. System searches existing annotations for semantic matches
3. If a match above the similarity threshold is found, returns the curated response
4. If no match, proceeds with normal AI generation
5. Track which annotations get used and how often
This creates a "fast path" for known good answers while maintaining AI flexibility for new questions.
## Setting Up Annotations
**Enable in App Configuration**
Navigate to **Orchestrate → Add Features** and enable annotation reply. Configure the similarity threshold and embedding model for matching.
**Similarity Threshold:** Higher values require closer matches. Start with moderate settings and adjust based on hit rates.
**Embedding Model:** Used to vectorize questions for semantic matching. Changing the model regenerates all embeddings.
## Creating Annotations
**From Conversations**
In debug mode or logs, click on AI responses and edit them into the perfect answer. Save as an annotation for future use.
**Bulk Import**
Download the template, create Q\&A pairs in the specified format, and upload for batch annotation creation.
**Manual Entry**
Add annotations directly in the Logs & Annotations interface with custom questions and responses.
## Managing Annotation Quality
**Hit Tracking**
Monitor which annotations are matched, how often they're used, and the similarity scores of matches. This shows which annotations provide value.
**Continuous Refinement**
Review hit history to improve annotation coverage and accuracy. Questions that consistently miss your annotations indicate gaps in coverage.
**A/B Testing**
Compare user satisfaction rates before and after annotation implementation to measure impact.
## Annotation Analytics
**Hit Rate Analysis**
Track which annotations are frequently matched and which are never used. Remove unused annotations and expand successful patterns.
**Question Patterns**
Identify common user question types that would benefit from annotation coverage.
**Match Quality**
Review similarity scores to ensure annotations are triggering for appropriate questions without false matches.
# Integrate with Alibaba Cloud Monitor
Source: https://docs.dify.ai/en/use-dify/monitor/integrations/integrate-aliyun
## What is Alibaba Cloud Monitor
Alibaba Cloud provides a fully managed, maintenance-free observability platform that enables one-click monitoring, tracing, and evaluation of Dify applications.
Alibaba Cloud Monitor natively supports Python/Golang/Java applications through [LoongSuite](https://github.com/alibaba/loongsuite-python-agent) agents and open-source OpenTelemetry agents. In addition to one-click monitoring of Dify LLM applications, it also supports end-to-end observability of Dify components and their upstream and downstream dependencies through non-invasive agents.
For more details, please refer to the [Cloud Monitor documentation](https://www.alibabacloud.com/help/en/cms/cloudmonitor-1-0/product-overview/what-is-cloudmonitor?spm=a3c0i.63551.2277339270.1.76c7112eeKEvSr).
***
## How to Configure Alibaba Cloud Monitor
### 1. Get Alibaba Cloud Endpoint and License Key
1. Log in to the [ARMS console](https://account.alibabacloud.com/login/login.htm?spm=5176.12901015-2.0.0.68d74b84XRatpU), and click **Integration Center** in the left navigation bar.
2. In the **Server-side Applications** area, click the **OpenTelemetry** card.
3. In the **OpenTelemetry** panel that appears, select **gRPC** as the export protocol, and select the connection method and region according to your actual deployment.
4. Save the **Public Endpoint** and **Authentication Token (License Key)**.
The Endpoint does not include a port number, for example `http://tracing-cn-heyuan.arms.aliyun.com`.
### 2. Configure Cloud Monitor in Dify
**Prerequisites**: Dify Cloud or Community Edition version must be ≥ v1.6.0
1. Log in to the Dify console and navigate to the application you want to monitor.
2. Open **Monitoring** in the left navigation bar.
3. Click **Tracing app performance**, then click **Configure** in the **Cloud Monitor** area.

4. In the dialog that appears, enter the **License Key** and **Endpoint** obtained in step 1, and customize the **App Name** (the application name displayed in the ARMS console), then click **Save & Enable**.
***
## View Monitoring Data in Alibaba Cloud Monitor
After configuration, debug or production data from applications in Dify can be monitored in Cloud Monitor.
### Method 1: Jump to ARMS Console from Dify Application
In the Dify console, select an application with tracing enabled, go to **Tracing Configuration**, and click **View** in the **Cloud Monitor** area.
### Method 2: View Directly in ARMS Console
Go to the corresponding Dify application in the **LLM Application Monitoring > Application List** page of the ARMS console.
***
## Access More Data
Cloud Monitor provides multi-language non-invasive agents that support accessing various components of the Dify cluster to achieve end-to-end tracing.
| Dify Component | Agent | Details |
| -------------- | ----------------------- | ----------------------------------------------------------------------------------------------------------------------------------------------------------------------------------------------------------------------------------------------------------------- |
| Nginx | OpenTelemetry Agent | [Use OpenTelemetry for Nginx Tracing](https://www.alibabacloud.com/help/en/opentelemetry/user-guide/use-opentelemetry-to-perform-tracing-analysis-on-nginx?spm=a2c63.l28256.help-menu-search-90275.d_1) |
| API | LoongSuite-Python Agent | [loongsuite-python-agent](https://github.com/alibaba/loongsuite-python-agent/blob/main/README.md) |
| Sandbox | LoongSuite-Go Agent | [loongsuite-go-agent](https://github.com/alibaba/loongsuite-go-agent/blob/main/README.md) |
| Worker | OpenTelemetry Agent | [Submit Python Application Data via OpenTelemetry](https://www.alibabacloud.com/help/en/opentelemetry/user-guide/use-managed-service-for-opentelemetry-to-submit-the-trace-data-of-python-applications?spm=a2c63.p38356.help-menu-90275.d_2_0_5_0.18ee53a4EGoGuS) |
| Plugin-Daemon | LoongSuite-Go Agent | [loongsuite-go-agent](https://github.com/alibaba/loongsuite-go-agent/blob/main/README.md) |
***
## Monitoring Data List
Cloud Monitor supports collecting data from Dify's Workflow/Chatflow/Chat/Agent applications, including execution details of workflows and workflow nodes, covering model calls, tool calls, knowledge retrieval, execution details of various process nodes, as well as metadata such as conversations and user information.
### Workflow/Chatflow Trace Information
**Total Messages:** Conversation volume\
**Active Users:** Users with meaningful interactions (more than one exchange)\
**Average User Interactions:** Engagement depth per session\
**Token Usage:** Resource consumption and costs
Use the time selector to view trends over different periods. Click **"Tracing app performance"** to connect external observability platforms like Langfuse or LangSmith for deeper analytics.
# Annotation System
Source: https://docs.dify.ai/en/use-dify/monitor/annotation-reply
Build a curated library of high-quality responses to improve consistency and bypass AI generation
Annotations let you create a curated library of perfect responses for specific questions. When users ask similar questions, Dify returns your pre-written answers instead of generating new responses, ensuring consistency and eliminating AI hallucinations for critical topics.
## When to Use Annotations
**Enterprise Standards**
Create definitive answers for policy questions, product information, or customer service scenarios where consistency is critical.
**Rapid Prototyping**
Quickly improve demo applications by curating high-quality responses without retraining models or complex prompt engineering.
**Quality Assurance**
Ensure certain sensitive or important questions always receive your approved responses rather than potentially variable AI-generated content.
## How Annotations Work
When annotation reply is enabled:
1. User asks a question
2. System searches existing annotations for semantic matches
3. If a match above the similarity threshold is found, returns the curated response
4. If no match, proceeds with normal AI generation
5. Track which annotations get used and how often
This creates a "fast path" for known good answers while maintaining AI flexibility for new questions.
## Setting Up Annotations
**Enable in App Configuration**
Navigate to **Orchestrate → Add Features** and enable annotation reply. Configure the similarity threshold and embedding model for matching.
**Similarity Threshold:** Higher values require closer matches. Start with moderate settings and adjust based on hit rates.
**Embedding Model:** Used to vectorize questions for semantic matching. Changing the model regenerates all embeddings.
## Creating Annotations
**From Conversations**
In debug mode or logs, click on AI responses and edit them into the perfect answer. Save as an annotation for future use.
**Bulk Import**
Download the template, create Q\&A pairs in the specified format, and upload for batch annotation creation.
**Manual Entry**
Add annotations directly in the Logs & Annotations interface with custom questions and responses.
## Managing Annotation Quality
**Hit Tracking**
Monitor which annotations are matched, how often they're used, and the similarity scores of matches. This shows which annotations provide value.
**Continuous Refinement**
Review hit history to improve annotation coverage and accuracy. Questions that consistently miss your annotations indicate gaps in coverage.
**A/B Testing**
Compare user satisfaction rates before and after annotation implementation to measure impact.
## Annotation Analytics
**Hit Rate Analysis**
Track which annotations are frequently matched and which are never used. Remove unused annotations and expand successful patterns.
**Question Patterns**
Identify common user question types that would benefit from annotation coverage.
**Match Quality**
Review similarity scores to ensure annotations are triggering for appropriate questions without false matches.
# Integrate with Alibaba Cloud Monitor
Source: https://docs.dify.ai/en/use-dify/monitor/integrations/integrate-aliyun
## What is Alibaba Cloud Monitor
Alibaba Cloud provides a fully managed, maintenance-free observability platform that enables one-click monitoring, tracing, and evaluation of Dify applications.
Alibaba Cloud Monitor natively supports Python/Golang/Java applications through [LoongSuite](https://github.com/alibaba/loongsuite-python-agent) agents and open-source OpenTelemetry agents. In addition to one-click monitoring of Dify LLM applications, it also supports end-to-end observability of Dify components and their upstream and downstream dependencies through non-invasive agents.
For more details, please refer to the [Cloud Monitor documentation](https://www.alibabacloud.com/help/en/cms/cloudmonitor-1-0/product-overview/what-is-cloudmonitor?spm=a3c0i.63551.2277339270.1.76c7112eeKEvSr).
***
## How to Configure Alibaba Cloud Monitor
### 1. Get Alibaba Cloud Endpoint and License Key
1. Log in to the [ARMS console](https://account.alibabacloud.com/login/login.htm?spm=5176.12901015-2.0.0.68d74b84XRatpU), and click **Integration Center** in the left navigation bar.
2. In the **Server-side Applications** area, click the **OpenTelemetry** card.
3. In the **OpenTelemetry** panel that appears, select **gRPC** as the export protocol, and select the connection method and region according to your actual deployment.

4. Save the **Public Endpoint** and **Authentication Token (License Key)**.
The Endpoint does not include a port number, for example `http://tracing-cn-heyuan.arms.aliyun.com`.
### 2. Configure Cloud Monitor in Dify
**Prerequisites**: Dify Cloud or Community Edition version must be ≥ v1.6.0
1. Log in to the Dify console and navigate to the application you want to monitor.
2. Open **Monitoring** in the left navigation bar.
3. Click **Tracing app performance**, then click **Configure** in the **Cloud Monitor** area.

4. In the dialog that appears, enter the **License Key** and **Endpoint** obtained in step 1, and customize the **App Name** (the application name displayed in the ARMS console), then click **Save & Enable**.
***
## View Monitoring Data in Alibaba Cloud Monitor
After configuration, debug or production data from applications in Dify can be monitored in Cloud Monitor.
### Method 1: Jump to ARMS Console from Dify Application
In the Dify console, select an application with tracing enabled, go to **Tracing Configuration**, and click **View** in the **Cloud Monitor** area.
### Method 2: View Directly in ARMS Console
Go to the corresponding Dify application in the **LLM Application Monitoring > Application List** page of the ARMS console.
***
## Access More Data
Cloud Monitor provides multi-language non-invasive agents that support accessing various components of the Dify cluster to achieve end-to-end tracing.
| Dify Component | Agent | Details |
| -------------- | ----------------------- | ----------------------------------------------------------------------------------------------------------------------------------------------------------------------------------------------------------------------------------------------------------------- |
| Nginx | OpenTelemetry Agent | [Use OpenTelemetry for Nginx Tracing](https://www.alibabacloud.com/help/en/opentelemetry/user-guide/use-opentelemetry-to-perform-tracing-analysis-on-nginx?spm=a2c63.l28256.help-menu-search-90275.d_1) |
| API | LoongSuite-Python Agent | [loongsuite-python-agent](https://github.com/alibaba/loongsuite-python-agent/blob/main/README.md) |
| Sandbox | LoongSuite-Go Agent | [loongsuite-go-agent](https://github.com/alibaba/loongsuite-go-agent/blob/main/README.md) |
| Worker | OpenTelemetry Agent | [Submit Python Application Data via OpenTelemetry](https://www.alibabacloud.com/help/en/opentelemetry/user-guide/use-managed-service-for-opentelemetry-to-submit-the-trace-data-of-python-applications?spm=a2c63.p38356.help-menu-90275.d_2_0_5_0.18ee53a4EGoGuS) |
| Plugin-Daemon | LoongSuite-Go Agent | [loongsuite-go-agent](https://github.com/alibaba/loongsuite-go-agent/blob/main/README.md) |
***
## Monitoring Data List
Cloud Monitor supports collecting data from Dify's Workflow/Chatflow/Chat/Agent applications, including execution details of workflows and workflow nodes, covering model calls, tool calls, knowledge retrieval, execution details of various process nodes, as well as metadata such as conversations and user information.
### Workflow/Chatflow Trace Information
| Workflow |
Alibaba Cloud Monitor Trace |
| workflow\_id |
Unique identifier of the Workflow |
| conversation\_id |
Conversation ID |
| workflow\_run\_id |
ID of this run |
| tenant\_id |
Tenant ID |
| elapsed\_time |
Duration of this run |
| status |
Run status |
| version |
Workflow version |
| total\_tokens |
Total tokens used in this run |
| file\_list |
List of processed files |
| triggered\_from |
Source that triggered this run |
| workflow\_run\_inputs |
Input data for this run |
| workflow\_run\_outputs |
Output data for this run |
| error |
Errors that occurred during this run |
| query |
Query used during runtime |
| workflow\_app\_log\_id |
Workflow application log ID |
| message\_id |
Associated message ID |
| start\_time |
Run start time |
| end\_time |
Run end time |
**Workflow Trace Metadata**
* workflow\_id - Unique identifier of the Workflow
* conversation\_id - Conversation ID
* workflow\_run\_id - ID of this run
* tenant\_id - Tenant ID
* elapsed\_time - Duration of this run
* status - Run status
* version - Workflow version
* total\_tokens - Total tokens used in this run
* file\_list - List of processed files
* triggered\_from - Trigger source
### Message Trace Information
| Message |
Alibaba Cloud Monitor Trace |
| message\_id |
Message ID |
| message\_data |
Message data |
| user\_session\_id |
User's session\_id |
| conversation\_model |
Conversation model |
| message\_tokens |
Number of tokens in the message |
| answer\_tokens |
Number of tokens in the answer |
| total\_tokens |
Total tokens in message and answer |
| error |
Error information |
| inputs |
Input data |
| outputs |
Output data |
| file\_list |
List of processed files |
| start\_time |
Start time |
| end\_time |
End time |
| message\_file\_data |
File data associated with the message |
| conversation\_mode |
Conversation mode |
**Message Trace Metadata**
* conversation\_id - ID of the conversation to which the message belongs
* ls\_provider - Model provider
* ls\_model\_name - Model ID
* status - Message status
* from\_end\_user\_id - ID of the sending user
* from\_account\_id - ID of the sending account
* agent\_based - Whether it is agent-based
* workflow\_run\_id - Workflow run ID
* from\_source - Message source
* message\_id - Message ID
### Dataset Retrieval Trace Information
| Dataset Retrieval |
Alibaba Cloud Monitor Trace |
| message\_id |
Message ID |
| inputs |
Input content |
| documents |
Document data |
| start\_time |
Start time |
| end\_time |
End time |
| message\_data |
Message data |
**Dataset Retrieval Trace Metadata**
* message\_id - Message ID
* ls\_provider - Model provider
* ls\_model\_name - Model ID
* status - Message status
* from\_end\_user\_id - ID of the sending user
* from\_account\_id - ID of the sending account
* agent\_based - Whether it is agent-based
* workflow\_run\_id - Workflow run ID
* from\_source - Message source
### Tool Trace Information
| Tool |
Alibaba Cloud Monitor Trace |
| message\_id |
Message ID |
| tool\_name |
Tool name |
| start\_time |
Start time |
| end\_time |
End time |
| tool\_inputs |
Tool inputs |
| tool\_outputs |
Tool outputs |
| message\_data |
Message data |
| error |
Error information (if any) |
| inputs |
Input content of the message |
| outputs |
Answer content of the message |
| tool\_config |
Tool configuration |
| time\_cost |
Time cost |
| tool\_parameters |
Tool parameters |
| file\_url |
URL of associated file |
**Tool Trace Metadata**
* message\_id - Message ID
* tool\_name - Tool name
* tool\_inputs - Tool inputs
* tool\_outputs - Tool outputs
* tool\_config - Tool configuration
* time\_cost - Time cost
* error - Error information
* tool\_parameters - Tool parameters
* message\_file\_id - Message file ID
* created\_by\_role - Creator role
* created\_user\_id - Creator user ID
# Integrate with Arize
Source: https://docs.dify.ai/en/use-dify/monitor/integrations/integrate-arize
### What is Arize
Enterprise-grade LLM observability, online & offline evaluation, monitoring, and experimentation—powered by OpenTelemetry. Purpose-built for LLM & agent-driven applications.
For more details, please refer to [Arize](https://arize.com).
***
### How to Configure Arize
#### 1. Register/Login to [Arize](https://app.arize.com/auth/join)
#### 2. Get your Arize API Key
Retrieve your Arize API Key from the user menu at the top-right. Click on **API Key**, then on the API Key to copy it:

#### 3. Integrating Arize with Dify
Configure Arize in the Dify application. Open the application you need to monitor, open **Monitoring** in the side menu, and select **Tracing app performance** on the page.

After clicking configure, paste the **API Key**, **Space ID** and **project name** created in Arize into the configuration and save.

Once successfully saved, you can view the monitoring status on the current page.

### Monitoring Data List
#### **Workflow/Chatflow Trace Information**
**Used to track workflows and chatflows**
| Workflow |
Arize Trace |
| workflow\_app\_log\_id/workflow\_run\_id |
id |
| user\_session\_id |
- placed in metadata |
| name |
| start\_time |
start\_time |
| end\_time |
end\_time |
| inputs |
inputs |
| outputs |
outputs |
| Model token consumption |
usage\_metadata |
| metadata |
metadata |
| error |
error |
| \[workflow] |
tags |
| "conversation\_id/none for workflow" |
conversation\_id in metadata |
**Workflow Trace Info**
* workflow\_id - Unique identifier of the workflow
* conversation\_id - Conversation ID
* workflow\_run\_id - ID of the current run
* tenant\_id - Tenant ID
* elapsed\_time - Time taken for the current run
* status - Run status
* version - Workflow version
* total\_tokens - Total tokens used in the current run
* file\_list - List of processed files
* triggered\_from - Source that triggered the current run
* workflow\_run\_inputs - Input data for the current run
* workflow\_run\_outputs - Output data for the current run
* error - Errors encountered during the current run
* query - Query used during the run
* workflow\_app\_log\_id - Workflow application log ID
* message\_id - Associated message ID
* start\_time - Start time of the run
* end\_time - End time of the run
* workflow node executions - Information about workflow node executions
* Metadata
* workflow\_id - Unique identifier of the workflow
* conversation\_id - Conversation ID
* workflow\_run\_id - ID of the current run
* tenant\_id - Tenant ID
* elapsed\_time - Time taken for the current run
* status - Run status
* version - Workflow version
* total\_tokens - Total tokens used in the current run
* file\_list - List of processed files
* triggered\_from - Source that triggered the current run
#### **Message Trace Information**
**Used to track LLM-related conversations**
| Chat |
Arize LLM |
| message\_id |
id |
| user\_session\_id |
- placed in metadata |
| "llm" |
name |
| start\_time |
start\_time |
| end\_time |
end\_time |
| inputs |
inputs |
| outputs |
outputs |
| Model token consumption |
usage\_metadata |
| metadata |
metadata |
| \["message", conversation\_mode] |
tags |
| conversation\_id |
conversation\_id in metadata |
**Message Trace Info**
* message\_id - Message ID
* message\_data - Message data
* user\_session\_id - User session ID
* conversation\_model - Conversation mode
* message\_tokens - Number of tokens in the message
* answer\_tokens - Number of tokens in the answer
* total\_tokens - Total number of tokens in the message and answer
* error - Error information
* inputs - Input data
* outputs - Output data
* file\_list - List of processed files
* start\_time - Start time
* end\_time - End time
* message\_file\_data - File data associated with the message
* conversation\_mode - Conversation mode
* Metadata
* conversation\_id - Conversation ID
* ls\_provider - Model provider
* ls\_model\_name - Model ID
* status - Message status
* from\_end\_user\_id - ID of the sending user
* from\_account\_id - ID of the sending account
* agent\_based - Whether the message is agent-based
* workflow\_run\_id - Workflow run ID
* from\_source - Message source
#### **Moderation Trace Information**
**Used to track conversation moderation**
| Moderation |
Arize Tool |
| user\_id |
- placed in metadata |
| “moderation" |
name |
| start\_time |
start\_time |
| end\_time |
end\_time |
| inputs |
inputs |
| outputs |
outputs |
| metadata |
metadata |
| \["moderation"] |
tags |
**Moderation Trace Info**
* message\_id - Message ID
* user\_id: User ID
* workflow\_app\_log\_id - Workflow application log ID
* inputs - Moderation input data
* message\_data - Message data
* flagged - Whether the content is flagged for attention
* action - Specific actions taken
* preset\_response - Preset response
* start\_time - Moderation start time
* end\_time - Moderation end time
* Metadata
* message\_id - Message ID
* action - Specific actions taken
* preset\_response - Preset response
#### **Suggested Question Trace Information**
**Used to track suggested questions**
| Suggested Question |
Arize LLM |
| user\_id |
- placed in metadata |
| "suggested\_question" |
name |
| start\_time |
start\_time |
| end\_time |
end\_time |
| inputs |
inputs |
| outputs |
outputs |
| metadata |
metadata |
| \["suggested\_question"] |
tags |
**Message Trace Info**
* message\_id - Message ID
* message\_data - Message data
* inputs - Input content
* outputs - Output content
* start\_time - Start time
* end\_time - End time
* total\_tokens - Number of tokens
* status - Message status
* error - Error information
* from\_account\_id - ID of the sending account
* agent\_based - Whether the message is agent-based
* from\_source - Message source
* model\_provider - Model provider
* model\_id - Model ID
* suggested\_question - Suggested question
* level - Status level
* status\_message - Status message
* Metadata
* message\_id - Message ID
* ls\_provider - Model provider
* ls\_model\_name - Model ID
* status - Message status
* from\_end\_user\_id - ID of the sending user
* from\_account\_id - ID of the sending account
* workflow\_run\_id - Workflow run ID
* from\_source - Message source
#### **Dataset Retrieval Trace Information**
**Used to track knowledge base retrieval**
| Dataset Retrieval |
Arize Retriever |
| user\_id |
- placed in metadata |
| "dataset\_retrieval" |
name |
| start\_time |
start\_time |
| end\_time |
end\_time |
| inputs |
inputs |
| outputs |
outputs |
| metadata |
metadata |
| \["dataset\_retrieval"] |
tags |
| message\_id |
parent\_run\_id |
**Dataset Retrieval Trace Info**
* message\_id - Message ID
* inputs - Input content
* documents - Document data
* start\_time - Start time
* end\_time - End time
* message\_data - Message data
* Metadata
* message\_id - Message ID
* ls\_provider - Model provider
* ls\_model\_name - Model ID
* status - Message status
* from\_end\_user\_id - ID of the sending user
* from\_account\_id - ID of the sending account
* agent\_based - Whether the message is agent-based
* workflow\_run\_id - Workflow run ID
* from\_source - Message source
#### **Tool Trace Information**
**Used to track tool invocation**
| Tool |
Arize Tool |
| user\_id |
- placed in metadata |
| tool\_name |
name |
| start\_time |
start\_time |
| end\_time |
end\_time |
| inputs |
inputs |
| outputs |
outputs |
| metadata |
metadata |
| \["tool", tool\_name] |
tags |
#### **Tool Trace Info**
* message\_id - Message ID
* tool\_name - Tool name
* start\_time - Start time
* end\_time - End time
* tool\_inputs - Tool inputs
* tool\_outputs - Tool outputs
* message\_data - Message data
* error - Error information, if any
* inputs - Inputs for the message
* outputs - Outputs of the message
* tool\_config - Tool configuration
* time\_cost - Time cost
* tool\_parameters - Tool parameters
* file\_url - URL of the associated file
* Metadata
* message\_id - Message ID
* tool\_name - Tool name
* tool\_inputs - Tool inputs
* tool\_outputs - Tool outputs
* tool\_config - Tool configuration
* time\_cost - Time cost
* error - Error information, if any
* tool\_parameters - Tool parameters
* message\_file\_id - Message file ID
* created\_by\_role - Role of the creator
* created\_user\_id - User ID of the creator
**Generate Name Trace Information**
**Used to track conversation title generation**
| Generate Name |
Arize Tool |
| user\_id |
- placed in metadata |
| "generate\_conversation\_name" |
name |
| start\_time |
start\_time |
| end\_time |
end\_time |
| inputs |
inputs |
| outputs |
outputs |
| metadata |
metadata |
| \["generate\_name"] |
tags |
**Generate Name Trace Info**
* conversation\_id - Conversation ID
* inputs - Input data
* outputs - Generated conversation name
* start\_time - Start time
* end\_time - End time
* tenant\_id - Tenant ID
* Metadata
* conversation\_id - Conversation ID
* tenant\_id - Tenant ID
# Integrate with Langfuse
Source: https://docs.dify.ai/en/use-dify/monitor/integrations/integrate-langfuse
### What is Langfuse
Langfuse is an open-source LLM engineering platform that helps teams collaborate on debugging, analyzing, and iterating their applications.
Introduction to Langfuse: [https://langfuse.com/](https://langfuse.com/)
***
### How to Configure Langfuse
1. Register and log in to Langfuse on the [official website](https://langfuse.com/)
2. Create a project in Langfuse. After logging in, click **New** on the homepage to create your own project. The **project** will be used to associate with **applications** in Dify for data monitoring.
Edit a name for the project.
3. Create project API credentials. In the left sidebar of the project, click **Settings** to open the settings.
In Settings, click **Create API Keys** to create project API credentials.

Copy and save the **Secret Key**, **Public Key**, and **Host**.
4. Configure Langfuse in Dify. Open the application you need to monitor, open **Monitoring** in the side menu, and select **Tracing app performance** on the page.
After clicking configure, paste the **Secret Key, Public Key, Host** created in Langfuse into the configuration and save.
Once successfully saved, you can view the status on the current page. If it shows as started, it is being monitored.
***
### Viewing Monitoring Data in Langfuse
After configuration, debugging or production data of the application in Dify can be viewed in Langfuse.

***
### List of monitoring data
#### Trace the information of Workflow and Chatflow
**Tracing workflow and chatflow**
| Workflow |
LangFuse Trace |
| workflow\_app\_log\_id/workflow\_run\_id |
id |
| user\_session\_id |
user\_id |
| name |
| start\_time |
start\_time |
| end\_time |
end\_time |
| inputs |
input |
| outputs |
output |
| Model token consumption |
usage |
| metadata |
metadata |
| error |
level |
| error |
status\_message |
| \[workflow] |
tags |
| \["message", conversation\_mode] |
session\_id |
| conversion\_id |
parent\_observation\_id |
**Workflow Trace Info**
* workflow\_id - Unique ID of Workflow
* conversation\_id - Conversation ID
* workflow\_run\_id - Workflow ID of this runtime
* tenant\_id - Tenant ID
* elapsed\_time - Elapsed time at this runtime
* status - Runtime status
* version - Workflow version
* total\_tokens - Total token used at this runtime
* file\_list - List of files processed
* triggered\_from - Source that triggered this runtime
* workflow\_run\_inputs - Input of this workflow
* workflow\_run\_outputs - Output of this workflow
* error - Error Message
* query - Queries used at runtime
* workflow\_app\_log\_id - Workflow Application Log ID
* message\_id - Relevant Message ID
* start\_time - Start time of this runtime
* end\_time - End time of this runtime
* workflow node executions - Workflow node runtime information
* Metadata
* workflow\_id - Unique ID of Workflow
* conversation\_id - Conversation ID
* workflow\_run\_id - Workflow ID of this runtime
* tenant\_id - Tenant ID
* elapsed\_time - Elapsed time at this runtime
* status - Operational state
* version - Workflow version
* total\_tokens - Total token used at this runtime
* file\_list - List of files processed
* triggered\_from - Source that triggered this runtime
#### Message Trace Info
**For trace llm conversation**
| Message |
LangFuse Generation/Trace |
| message\_id |
id |
| user\_session\_id |
user\_id |
| name |
| start\_time |
start\_time |
| end\_time |
end\_time |
| inputs |
input |
| outputs |
output |
| Model token consumption |
usage |
| metadata |
metadata |
| error |
level |
| error |
status\_message |
| \["message", conversation\_mode] |
tags |
| conversation\_id |
session\_id |
| conversion\_id |
parent\_observation\_id |
**Message Trace Info**
* message\_id - Message ID
* message\_data - Message data
* user\_session\_id - Session ID for user
* conversation\_model - Conversation model
* message\_tokens - Message tokens
* answer\_tokens - Answer Tokens
* total\_tokens - Total Tokens from Message and Answer
* error - Error Message
* inputs - Input data
* outputs - Output data
* file\_list - List of files processed
* start\_time - Start time
* end\_time - End time
* message\_file\_data - Message of relevant file data
* conversation\_mode - Conversation mode
* Metadata
* conversation\_id - Conversation ID
* ls\_provider - Model provider
* ls\_model\_name - Model ID
* status - Message status
* from\_end\_user\_id - Sending user's ID
* from\_account\_id - Sending account's ID
* agent\_based - Whether agent based
* workflow\_run\_id - Workflow ID of this runtime
* from\_source - Message source
* message\_id - Message ID
#### Moderation Trace Information
**Used to track conversation moderation**
| Moderation |
LangFuse Generation/Trace |
| user\_id |
user\_id |
| moderation |
name |
| start\_time |
start\_time |
| end\_time |
end\_time |
| inputs |
input |
| outputs |
output |
| metadata |
metadata |
| \[moderation] |
tags |
| message\_id |
parent\_observation\_id |
**Message Trace Info**
* message\_id - Message ID
* user\_id - user ID
* workflow\_app\_log\_id workflow\_app\_log\_id
* inputs - Input data for review
* message\_data - Message Data
* flagged - Whether it is flagged for attention
* action - Specific actions to implement
* preset\_response - Preset response
* start\_time - Start time of review
* end\_time - End time of review
* Metadata
* message\_id - Message ID
* action - Specific actions to implement
* preset\_response - Preset response
#### Suggested Question Trace Information
**Used to track suggested questions**
| Suggested Question |
LangFuse Generation/Trace |
| user\_id |
user\_id |
| suggested\_question |
name |
| start\_time |
start\_time |
| end\_time |
end\_time |
| inputs |
input |
| outputs |
output |
| metadata |
metadata |
| \[suggested\_question] |
tags |
| message\_id |
parent\_observation\_id |
**Message Trace Info**
* message\_id - Message ID
* message\_data - Message data
* inputs - Input data
* outputs - Output data
* start\_time - Start time
* end\_time - End time
* total\_tokens - Total tokens
* status - Message Status
* error - Error Message
* from\_account\_id - Sending account ID
* agent\_based - Whether agent based
* from\_source - Message source
* model\_provider - Model provider
* model\_id - Model ID
* suggested\_question - Suggested question
* level - Status level
* status\_message - Message status
* Metadata
* message\_id - Message ID
* ls\_provider - Model Provider
* ls\_model\_name - Model ID
* status - Message status
* from\_end\_user\_id - Sending user's ID
* from\_account\_id - Sending Account ID
* workflow\_run\_id - Workflow ID of this runtime
* from\_source - Message source
#### Dataset Retrieval Trace Information
**Used to track knowledge base retrieval**
| Dataset Retrieval |
LangFuse Generation/Trace |
| user\_id |
user\_id |
| dataset\_retrieval |
name |
| start\_time |
start\_time |
| end\_time |
end\_time |
| inputs |
input |
| outputs |
output |
| metadata |
metadata |
| \[dataset\_retrieval] |
tags |
| message\_id |
parent\_observation\_id |
**Dataset Retrieval Trace Info**
* message\_id - Message ID
* inputs - Input Message
* documents - Document data
* start\_time - Start time
* end\_time - End time
* message\_data - Message data
* Metadata
* message\_id - Message ID
* ls\_provider - Model Provider
* ls\_model\_name - Model ID
* status - Model status
* from\_end\_user\_id - Sending user's ID
* from\_account\_id - Sending account's ID
* agent\_based - Whether agent based
* workflow\_run\_id - Workflow ID of this runtime
* from\_source - Message Source
#### Tool Trace Information
**Used to track tool invocation**
| Tool |
LangFuse Generation/Trace |
| user\_id |
user\_id |
| tool\_name |
name |
| start\_time |
start\_time |
| end\_time |
end\_time |
| inputs |
input |
| outputs |
output |
| metadata |
metadata |
| \["tool", tool\_name] |
tags |
| message\_id |
parent\_observation\_id |
**Tool Trace Info**
* message\_id - Message ID
* tool\_name - Tool Name
* start\_time - Start time
* end\_time - End time
* tool\_inputs - Tool inputs
* tool\_outputs - Tool outputs
* message\_data - Message data
* error - Error Message,if exist
* inputs - Input of Message
* outputs - Output of Message
* tool\_config - Tool config
* time\_cost - Time cost
* tool\_parameters - Tool Parameters
* file\_url - URL of relevant files
* Metadata
* message\_id - Message ID
* tool\_name - Tool Name
* tool\_inputs - Tool inputs
* tool\_outputs - Tool outputs
* tool\_config - Tool config
* time\_cost - Time. cost
* error - Error Message
* tool\_parameters - Tool parameters
* message\_file\_id - Message file ID
* created\_by\_role - Created by role
* created\_user\_id - Created user ID
#### Generate Name Trace
**Used to track conversation title generation**
| Generate Name |
LangFuse Generation/Trace |
| user\_id |
user\_id |
| generate\_name |
name |
| start\_time |
start\_time |
| end\_time |
end\_time |
| inputs |
input |
| outputs |
output |
| metadata |
metadata |
| \[generate\_name] |
tags |
**Generate Name Trace Info**
* conversation\_id - Conversation ID
* inputs - Input data
* outputs - Generated session name
* start\_time - Start time
* end\_time - End time
* tenant\_id - Tenant ID
* Metadata
* conversation\_id - Conversation ID
* tenant\_id - Tenant ID
### Langfuse Prompt Management
The [Langfuse Prompt Management Plugin](https://github.com/gao-ai-com/dify-plugin-langfuse) (community maintained) lets you use prompts that are [managed and versioned in Langfuse](https://langfuse.com/docs/prompt-management/get-started) in your Dify applications, enhancing your LLM application development workflow. Key features include:
* **Get Prompt:** Fetch specific prompts managed in Langfuse.
* **Search Prompts:** Search for prompts in Langfuse using various filters.
* **Update Prompt:** Create new versions of prompts in Langfuse and set tags/labels.
This integration streamlines the process of managing and versioning your prompts, contributing to more efficient development and iteration cycles. You can find the plugin and installation instructions [here](https://github.com/gao-ai-com/dify-plugin-langfuse).
# Integrate with LangSmith
Source: https://docs.dify.ai/en/use-dify/monitor/integrations/integrate-langsmith
### What is LangSmith
LangSmith is a platform for building production-grade LLM applications. It is used for developing, collaborating, testing, deploying, and monitoring LLM applications.
For more details, please refer to [LangSmith](https://www.langchain.com/langsmith).
***
### How to Configure LangSmith
#### 1. Register/Login to [LangSmith](https://www.langchain.com/langsmith)
#### 2. Create a Project
Create a project in LangSmith. After logging in, click **New Project** on the homepage to create your own project. The **project** will be used to associate with **applications** in Dify for data monitoring.
Once created, you can view all created projects in the Projects section.
#### 3. Create Project Credentials
Find the project settings **Settings** in the left sidebar.
Click **Create API Key** to create project credentials.
Select **Personal Access Token** for subsequent API authentication.
Copy and save the created API key.
#### 4. Integrating LangSmith with Dify
Configure LangSmith in the Dify application. Open the application you need to monitor, open **Monitoring** in the side menu, and select **Tracing app performance** on the page.
After clicking configure, paste the **API Key** and **project name** created in LangSmith into the configuration and save.
The configured project name needs to match the project set in LangSmith. If the project names do not match, LangSmith will automatically create a new project during data synchronization.
Once successfully saved, you can view the monitoring status on the current page.
### Viewing Monitoring Data in LangSmith
Once configured, the debug or production data from applications within Dify can be monitored in LangSmith.

When you switch to LangSmith, you can view detailed operation logs of Dify applications in the dashboard.
Detailed LLM operation logs through LangSmith will help you optimize the performance of your Dify application.
### Monitoring Data List
#### **Workflow/Chatflow Trace Information**
**Used to track workflows and chatflows**
| Workflow |
LangSmith Chain |
| workflow\_app\_log\_id/workflow\_run\_id |
id |
| user\_session\_id |
- placed in metadata |
| name |
| start\_time |
start\_time |
| end\_time |
end\_time |
| inputs |
inputs |
| outputs |
outputs |
| Model token consumption |
usage\_metadata |
| metadata |
extra |
| error |
error |
| \[workflow] |
tags |
| "conversation\_id/none for workflow" |
conversation\_id in metadata |
| conversion\_id |
parent\_run\_id |
**Workflow Trace Info**
* workflow\_id - Unique identifier of the workflow
* conversation\_id - Conversation ID
* workflow\_run\_id - ID of the current run
* tenant\_id - Tenant ID
* elapsed\_time - Time taken for the current run
* status - Run status
* version - Workflow version
* total\_tokens - Total tokens used in the current run
* file\_list - List of processed files
* triggered\_from - Source that triggered the current run
* workflow\_run\_inputs - Input data for the current run
* workflow\_run\_outputs - Output data for the current run
* error - Errors encountered during the current run
* query - Query used during the run
* workflow\_app\_log\_id - Workflow application log ID
* message\_id - Associated message ID
* start\_time - Start time of the run
* end\_time - End time of the run
* workflow node executions - Information about workflow node executions
* Metadata
* workflow\_id - Unique identifier of the workflow
* conversation\_id - Conversation ID
* workflow\_run\_id - ID of the current run
* tenant\_id - Tenant ID
* elapsed\_time - Time taken for the current run
* status - Run status
* version - Workflow version
* total\_tokens - Total tokens used in the current run
* file\_list - List of processed files
* triggered\_from - Source that triggered the current run
#### **Message Trace Information**
**Used to track LLM-related conversations**
| Chat |
LangSmith LLM |
| message\_id |
id |
| user\_session\_id |
- placed in metadata |
| name |
| start\_time |
start\_time |
| end\_time |
end\_time |
| inputs |
inputs |
| outputs |
outputs |
| Model token consumption |
usage\_metadata |
| metadata |
extra |
| error |
error |
| \["message", conversation\_mode] |
tags |
| conversation\_id |
conversation\_id in metadata |
| conversion\_id |
parent\_run\_id |
**Message Trace Info**
* message\_id - Message ID
* message\_data - Message data
* user\_session\_id - User session ID
* conversation\_model - Conversation mode
* message\_tokens - Number of tokens in the message
* answer\_tokens - Number of tokens in the answer
* total\_tokens - Total number of tokens in the message and answer
* error - Error information
* inputs - Input data
* outputs - Output data
* file\_list - List of processed files
* start\_time - Start time
* end\_time - End time
* message\_file\_data - File data associated with the message
* conversation\_mode - Conversation mode
* Metadata
* conversation\_id - Conversation ID
* ls\_provider - Model provider
* ls\_model\_name - Model ID
* status - Message status
* from\_end\_user\_id - ID of the sending user
* from\_account\_id - ID of the sending account
* agent\_based - Whether the message is agent-based
* workflow\_run\_id - Workflow run ID
* from\_source - Message source
#### **Moderation Trace Information**
**Used to track conversation moderation**
| Moderation |
LangSmith Tool |
| user\_id |
- placed in metadata |
| “moderation" |
name |
| start\_time |
start\_time |
| end\_time |
end\_time |
| inputs |
inputs |
| outputs |
outputs |
| metadata |
extra |
| \[moderation] |
tags |
| message\_id |
parent\_run\_id |
**Moderation Trace Info**
* message\_id - Message ID
* user\_id: User ID
* workflow\_app\_log\_id - Workflow application log ID
* inputs - Moderation input data
* message\_data - Message data
* flagged - Whether the content is flagged for attention
* action - Specific actions taken
* preset\_response - Preset response
* start\_time - Moderation start time
* end\_time - Moderation end time
* Metadata
* message\_id - Message ID
* action - Specific actions taken
* preset\_response - Preset response
#### **Suggested Question Trace Information**
**Used to track suggested questions**
| Suggested Question |
LangSmith LLM |
| user\_id |
- placed in metadata |
| suggested\_question |
name |
| start\_time |
start\_time |
| end\_time |
end\_time |
| inputs |
inputs |
| outputs |
outputs |
| metadata |
extra |
| \[suggested\_question] |
tags |
| message\_id |
parent\_run\_id |
**Message Trace Info**
* message\_id - Message ID
* message\_data - Message data
* inputs - Input content
* outputs - Output content
* start\_time - Start time
* end\_time - End time
* total\_tokens - Number of tokens
* status - Message status
* error - Error information
* from\_account\_id - ID of the sending account
* agent\_based - Whether the message is agent-based
* from\_source - Message source
* model\_provider - Model provider
* model\_id - Model ID
* suggested\_question - Suggested question
* level - Status level
* status\_message - Status message
* Metadata
* message\_id - Message ID
* ls\_provider - Model provider
* ls\_model\_name - Model ID
* status - Message status
* from\_end\_user\_id - ID of the sending user
* from\_account\_id - ID of the sending account
* workflow\_run\_id - Workflow run ID
* from\_source - Message source
#### **Dataset Retrieval Trace Information**
**Used to track knowledge base retrieval**
| Dataset Retrieval |
LangSmith Retriever |
| user\_id |
- placed in metadata |
| dataset\_retrieval |
name |
| start\_time |
start\_time |
| end\_time |
end\_time |
| inputs |
inputs |
| outputs |
outputs |
| metadata |
extra |
| \[dataset\_retrieval] |
tags |
| message\_id |
parent\_run\_id |
**Dataset Retrieval Trace Info**
* message\_id - Message ID
* inputs - Input content
* documents - Document data
* start\_time - Start time
* end\_time - End time
* message\_data - Message data
* Metadata
* message\_id - Message ID
* ls\_provider - Model provider
* ls\_model\_name - Model ID
* status - Message status
* from\_end\_user\_id - ID of the sending user
* from\_account\_id - ID of the sending account
* agent\_based - Whether the message is agent-based
* workflow\_run\_id - Workflow run ID
* from\_source - Message source
#### **Tool Trace Information**
**Used to track tool invocation**
| Tool |
LangSmith Tool |
| user\_id |
- placed in metadata |
| tool\_name |
name |
| start\_time |
start\_time |
| end\_time |
end\_time |
| inputs |
inputs |
| outputs |
outputs |
| metadata |
extra |
| \["tool", tool\_name] |
tags |
| message\_id |
parent\_run\_id |
#### **Tool Trace Info**
* message\_id - Message ID
* tool\_name - Tool name
* start\_time - Start time
* end\_time - End time
* tool\_inputs - Tool inputs
* tool\_outputs - Tool outputs
* message\_data - Message data
* error - Error information, if any
* inputs - Inputs for the message
* outputs - Outputs of the message
* tool\_config - Tool configuration
* time\_cost - Time cost
* tool\_parameters - Tool parameters
* file\_url - URL of the associated file
* Metadata
* message\_id - Message ID
* tool\_name - Tool name
* tool\_inputs - Tool inputs
* tool\_outputs - Tool outputs
* tool\_config - Tool configuration
* time\_cost - Time cost
* error - Error information, if any
* tool\_parameters - Tool parameters
* message\_file\_id - Message file ID
* created\_by\_role - Role of the creator
* created\_user\_id - User ID of the creator
**Generate Name Trace Information**
**Used to track conversation title generation**
| Generate Name |
LangSmith Tool |
| user\_id |
- placed in metadata |
| generate\_name |
name |
| start\_time |
start\_time |
| end\_time |
end\_time |
| inputs |
inputs |
| outputs |
outputs |
| metadata |
extra |
| \[generate\_name] |
tags |
**Generate Name Trace Info**
* conversation\_id - Conversation ID
* inputs - Input data
* outputs - Generated conversation name
* start\_time - Start time
* end\_time - End time
* tenant\_id - Tenant ID
* Metadata
* conversation\_id - Conversation ID
* tenant\_id - Tenant ID
# Integrate with Opik
Source: https://docs.dify.ai/en/use-dify/monitor/integrations/integrate-opik
### What is Opik
Opik is an open-source platform designed for evaluating, testing, and monitoring large language model (LLM) applications. Developed by Comet, it aims to facilitate more intuitive collaboration, testing, and monitoring of LLM-based applications.
For more details, please refer to [Opik](https://www.comet.com/site/products/opik/).
***
### How to Configure Opik
#### 1. Register/Login to [Opik](https://www.comet.com/signup?from=llm)
#### 2. Get your Opik API Key
Retrieve your Opik API Key from the user menu at the top-right. Click on **API Key**, then on the API Key to copy it:
#### 3. Integrating Opik with Dify
Configure Opik in the Dify application. Open the application you need to monitor, open **Monitoring** in the side menu, and select **Tracing app performance** on the page.
After clicking configure, paste the **API Key** and **project name** created in Opik into the configuration and save.
Once successfully saved, you can view the monitoring status on the current page.
### Viewing Monitoring Data in Opik
Once configured, you can debug or use the Dify application as usual. All usage history can be monitored in Opik.

When you switch to Opik, you can view detailed operation logs of Dify applications in the dashboard.
Detailed LLM operation logs through Opik will help you optimize the performance of your Dify application.
### Monitoring Data List
#### **Workflow/Chatflow Trace Information**
**Used to track workflows and chatflows**
| Workflow |
Opik Trace |
| workflow\_app\_log\_id/workflow\_run\_id |
id |
| user\_session\_id |
- placed in metadata |
| name |
| start\_time |
start\_time |
| end\_time |
end\_time |
| inputs |
inputs |
| outputs |
outputs |
| Model token consumption |
usage\_metadata |
| metadata |
metadata |
| error |
error |
| \[workflow] |
tags |
| "conversation\_id/none for workflow" |
conversation\_id in metadata |
**Workflow Trace Info**
* workflow\_id - Unique identifier of the workflow
* conversation\_id - Conversation ID
* workflow\_run\_id - ID of the current run
* tenant\_id - Tenant ID
* elapsed\_time - Time taken for the current run
* status - Run status
* version - Workflow version
* total\_tokens - Total tokens used in the current run
* file\_list - List of processed files
* triggered\_from - Source that triggered the current run
* workflow\_run\_inputs - Input data for the current run
* workflow\_run\_outputs - Output data for the current run
* error - Errors encountered during the current run
* query - Query used during the run
* workflow\_app\_log\_id - Workflow application log ID
* message\_id - Associated message ID
* start\_time - Start time of the run
* end\_time - End time of the run
* workflow node executions - Information about workflow node executions
* Metadata
* workflow\_id - Unique identifier of the workflow
* conversation\_id - Conversation ID
* workflow\_run\_id - ID of the current run
* tenant\_id - Tenant ID
* elapsed\_time - Time taken for the current run
* status - Run status
* version - Workflow version
* total\_tokens - Total tokens used in the current run
* file\_list - List of processed files
* triggered\_from - Source that triggered the current run
#### **Message Trace Information**
**Used to track LLM-related conversations**
| Chat |
Opik LLM |
| message\_id |
id |
| user\_session\_id |
- placed in metadata |
| "llm" |
name |
| start\_time |
start\_time |
| end\_time |
end\_time |
| inputs |
inputs |
| outputs |
outputs |
| Model token consumption |
usage\_metadata |
| metadata |
metadata |
| \["message", conversation\_mode] |
tags |
| conversation\_id |
conversation\_id in metadata |
**Message Trace Info**
* message\_id - Message ID
* message\_data - Message data
* user\_session\_id - User session ID
* conversation\_model - Conversation mode
* message\_tokens - Number of tokens in the message
* answer\_tokens - Number of tokens in the answer
* total\_tokens - Total number of tokens in the message and answer
* error - Error information
* inputs - Input data
* outputs - Output data
* file\_list - List of processed files
* start\_time - Start time
* end\_time - End time
* message\_file\_data - File data associated with the message
* conversation\_mode - Conversation mode
* Metadata
* conversation\_id - Conversation ID
* ls\_provider - Model provider
* ls\_model\_name - Model ID
* status - Message status
* from\_end\_user\_id - ID of the sending user
* from\_account\_id - ID of the sending account
* agent\_based - Whether the message is agent-based
* workflow\_run\_id - Workflow run ID
* from\_source - Message source
#### **Moderation Trace Information**
**Used to track conversation moderation**
| Moderation |
Opik Tool |
| user\_id |
- placed in metadata |
| “moderation" |
name |
| start\_time |
start\_time |
| end\_time |
end\_time |
| inputs |
inputs |
| outputs |
outputs |
| metadata |
metadata |
| \["moderation"] |
tags |
**Moderation Trace Info**
* message\_id - Message ID
* user\_id: User ID
* workflow\_app\_log\_id - Workflow application log ID
* inputs - Moderation input data
* message\_data - Message data
* flagged - Whether the content is flagged for attention
* action - Specific actions taken
* preset\_response - Preset response
* start\_time - Moderation start time
* end\_time - Moderation end time
* Metadata
* message\_id - Message ID
* action - Specific actions taken
* preset\_response - Preset response
#### **Suggested Question Trace Information**
**Used to track suggested questions**
| Suggested Question |
Opik LLM |
| user\_id |
- placed in metadata |
| "suggested\_question" |
name |
| start\_time |
start\_time |
| end\_time |
end\_time |
| inputs |
inputs |
| outputs |
outputs |
| metadata |
metadata |
| \["suggested\_question"] |
tags |
**Message Trace Info**
* message\_id - Message ID
* message\_data - Message data
* inputs - Input content
* outputs - Output content
* start\_time - Start time
* end\_time - End time
* total\_tokens - Number of tokens
* status - Message status
* error - Error information
* from\_account\_id - ID of the sending account
* agent\_based - Whether the message is agent-based
* from\_source - Message source
* model\_provider - Model provider
* model\_id - Model ID
* suggested\_question - Suggested question
* level - Status level
* status\_message - Status message
* Metadata
* message\_id - Message ID
* ls\_provider - Model provider
* ls\_model\_name - Model ID
* status - Message status
* from\_end\_user\_id - ID of the sending user
* from\_account\_id - ID of the sending account
* workflow\_run\_id - Workflow run ID
* from\_source - Message source
#### **Dataset Retrieval Trace Information**
**Used to track knowledge base retrieval**
| Dataset Retrieval |
Opik Retriever |
| user\_id |
- placed in metadata |
| "dataset\_retrieval" |
name |
| start\_time |
start\_time |
| end\_time |
end\_time |
| inputs |
inputs |
| outputs |
outputs |
| metadata |
metadata |
| \["dataset\_retrieval"] |
tags |
| message\_id |
parent\_run\_id |
**Dataset Retrieval Trace Info**
* message\_id - Message ID
* inputs - Input content
* documents - Document data
* start\_time - Start time
* end\_time - End time
* message\_data - Message data
* Metadata
* message\_id - Message ID
* ls\_provider - Model provider
* ls\_model\_name - Model ID
* status - Message status
* from\_end\_user\_id - ID of the sending user
* from\_account\_id - ID of the sending account
* agent\_based - Whether the message is agent-based
* workflow\_run\_id - Workflow run ID
* from\_source - Message source
#### **Tool Trace Information**
**Used to track tool invocation**
| Tool |
Opik Tool |
| user\_id |
- placed in metadata |
| tool\_name |
name |
| start\_time |
start\_time |
| end\_time |
end\_time |
| inputs |
inputs |
| outputs |
outputs |
| metadata |
metadata |
| \["tool", tool\_name] |
tags |
#### **Tool Trace Info**
* message\_id - Message ID
* tool\_name - Tool name
* start\_time - Start time
* end\_time - End time
* tool\_inputs - Tool inputs
* tool\_outputs - Tool outputs
* message\_data - Message data
* error - Error information, if any
* inputs - Inputs for the message
* outputs - Outputs of the message
* tool\_config - Tool configuration
* time\_cost - Time cost
* tool\_parameters - Tool parameters
* file\_url - URL of the associated file
* Metadata
* message\_id - Message ID
* tool\_name - Tool name
* tool\_inputs - Tool inputs
* tool\_outputs - Tool outputs
* tool\_config - Tool configuration
* time\_cost - Time cost
* error - Error information, if any
* tool\_parameters - Tool parameters
* message\_file\_id - Message file ID
* created\_by\_role - Role of the creator
* created\_user\_id - User ID of the creator
**Generate Name Trace Information**
**Used to track conversation title generation**
| Generate Name |
Opik Tool |
| user\_id |
- placed in metadata |
| "generate\_conversation\_name" |
name |
| start\_time |
start\_time |
| end\_time |
end\_time |
| inputs |
inputs |
| outputs |
outputs |
| metadata |
metadata |
| \["generate\_name"] |
tags |
**Generate Name Trace Info**
* conversation\_id - Conversation ID
* inputs - Input data
* outputs - Generated conversation name
* start\_time - Start time
* end\_time - End time
* tenant\_id - Tenant ID
* Metadata
* conversation\_id - Conversation ID
* tenant\_id - Tenant ID
# Integrate with Phoenix
Source: https://docs.dify.ai/en/use-dify/monitor/integrations/integrate-phoenix
### What is Phoenix
Open-source & OpenTelemetry-based observability, evaluation, prompt engineering and experimentation platform for your LLM workflows and agents.
For more details, please refer to [Phoenix](https://phoenix.arize.com).
***
### How to Configure Phoenix
#### 1. Register/Login to [Phoenix](https://app.arize.com/auth/phoenix/signup)
#### 2. Get your Phoenix API Key
Retrieve your Phoenix API Key from the user menu at the top-right. Click on **API Key**, then on the API Key to copy it:

#### 3. Integrating Phoenix with Dify
Configure Phoenix in the Dify application. Open the application you need to monitor, open **Monitoring** in the side menu, and select **Tracing app performance** on the page.

After clicking configure, paste the **API Key** and **project name** created in Phoenix into the configuration and save.

Once successfully saved, you can view the monitoring status on the current page.

### How to Configure Phoenix Cloud
#### 1. Register/Login to [Phoenix Cloud](https://app.arize.com/auth/phoenix/signup)
#### 2. Create your Phoenix Space
You can create your Phoenix Space from the user menu at the top-right. Click on **Create Space**, then provide a unique URL identifier for your space:

Once successfully saved, you can view the space status on the overview page.

#### 3. Create your Phoenix API Key
After launching your space, you can create your Phoenix API Key from the **Settings** option in the user menu at the bottom-left. Click on **System Key**, then provide a name for your Phoenix API Key:

#### 4. Integrating Phoenix Cloud with Dify
Configure Phoenix in the Dify application. Open the application you need to monitor, open **Monitoring** in the side menu, and select **Tracing app performance** on the page.

After clicking configure, paste the **API Key** and **project name** along with **Space Hostname** created in Phoenix Cloud into the configuration and save.

Once successfully saved, you can view the monitoring status on the current page.

### Monitoring Data List
#### **Workflow/Chatflow Trace Information**
**Used to track workflows and chatflows**
| Workflow |
Phoenix Trace |
| workflow\_app\_log\_id/workflow\_run\_id |
id |
| user\_session\_id |
- placed in metadata |
| name |
| start\_time |
start\_time |
| end\_time |
end\_time |
| inputs |
inputs |
| outputs |
outputs |
| Model token consumption |
usage\_metadata |
| metadata |
metadata |
| error |
error |
| \[workflow] |
tags |
| "conversation\_id/none for workflow" |
conversation\_id in metadata |
**Workflow Trace Info**
* workflow\_id - Unique identifier of the workflow
* conversation\_id - Conversation ID
* workflow\_run\_id - ID of the current run
* tenant\_id - Tenant ID
* elapsed\_time - Time taken for the current run
* status - Run status
* version - Workflow version
* total\_tokens - Total tokens used in the current run
* file\_list - List of processed files
* triggered\_from - Source that triggered the current run
* workflow\_run\_inputs - Input data for the current run
* workflow\_run\_outputs - Output data for the current run
* error - Errors encountered during the current run
* query - Query used during the run
* workflow\_app\_log\_id - Workflow application log ID
* message\_id - Associated message ID
* start\_time - Start time of the run
* end\_time - End time of the run
* workflow node executions - Information about workflow node executions
* Metadata
* workflow\_id - Unique identifier of the workflow
* conversation\_id - Conversation ID
* workflow\_run\_id - ID of the current run
* tenant\_id - Tenant ID
* elapsed\_time - Time taken for the current run
* status - Run status
* version - Workflow version
* total\_tokens - Total tokens used in the current run
* file\_list - List of processed files
* triggered\_from - Source that triggered the current run
#### **Message Trace Information**
**Used to track LLM-related conversations**
| Chat |
Phoenix LLM |
| message\_id |
id |
| user\_session\_id |
- placed in metadata |
| "llm" |
name |
| start\_time |
start\_time |
| end\_time |
end\_time |
| inputs |
inputs |
| outputs |
outputs |
| Model token consumption |
usage\_metadata |
| metadata |
metadata |
| \["message", conversation\_mode] |
tags |
| conversation\_id |
conversation\_id in metadata |
**Message Trace Info**
* message\_id - Message ID
* message\_data - Message data
* user\_session\_id - User session ID
* conversation\_model - Conversation mode
* message\_tokens - Number of tokens in the message
* answer\_tokens - Number of tokens in the answer
* total\_tokens - Total number of tokens in the message and answer
* error - Error information
* inputs - Input data
* outputs - Output data
* file\_list - List of processed files
* start\_time - Start time
* end\_time - End time
* message\_file\_data - File data associated with the message
* conversation\_mode - Conversation mode
* Metadata
* conversation\_id - Conversation ID
* ls\_provider - Model provider
* ls\_model\_name - Model ID
* status - Message status
* from\_end\_user\_id - ID of the sending user
* from\_account\_id - ID of the sending account
* agent\_based - Whether the message is agent-based
* workflow\_run\_id - Workflow run ID
* from\_source - Message source
#### **Moderation Trace Information**
**Used to track conversation moderation**
| Moderation |
Phoenix Tool |
| user\_id |
- placed in metadata |
| “moderation" |
name |
| start\_time |
start\_time |
| end\_time |
end\_time |
| inputs |
inputs |
| outputs |
outputs |
| metadata |
metadata |
| \["moderation"] |
tags |
**Moderation Trace Info**
* message\_id - Message ID
* user\_id: User ID
* workflow\_app\_log\_id - Workflow application log ID
* inputs - Moderation input data
* message\_data - Message data
* flagged - Whether the content is flagged for attention
* action - Specific actions taken
* preset\_response - Preset response
* start\_time - Moderation start time
* end\_time - Moderation end time
* Metadata
* message\_id - Message ID
* action - Specific actions taken
* preset\_response - Preset response
#### **Suggested Question Trace Information**
**Used to track suggested questions**
| Suggested Question |
Phoenix LLM |
| user\_id |
- placed in metadata |
| "suggested\_question" |
name |
| start\_time |
start\_time |
| end\_time |
end\_time |
| inputs |
inputs |
| outputs |
outputs |
| metadata |
metadata |
| \["suggested\_question"] |
tags |
**Message Trace Info**
* message\_id - Message ID
* message\_data - Message data
* inputs - Input content
* outputs - Output content
* start\_time - Start time
* end\_time - End time
* total\_tokens - Number of tokens
* status - Message status
* error - Error information
* from\_account\_id - ID of the sending account
* agent\_based - Whether the message is agent-based
* from\_source - Message source
* model\_provider - Model provider
* model\_id - Model ID
* suggested\_question - Suggested question
* level - Status level
* status\_message - Status message
* Metadata
* message\_id - Message ID
* ls\_provider - Model provider
* ls\_model\_name - Model ID
* status - Message status
* from\_end\_user\_id - ID of the sending user
* from\_account\_id - ID of the sending account
* workflow\_run\_id - Workflow run ID
* from\_source - Message source
#### **Dataset Retrieval Trace Information**
**Used to track knowledge base retrieval**
| Dataset Retrieval |
Phoenix Retriever |
| user\_id |
- placed in metadata |
| "dataset\_retrieval" |
name |
| start\_time |
start\_time |
| end\_time |
end\_time |
| inputs |
inputs |
| outputs |
outputs |
| metadata |
metadata |
| \["dataset\_retrieval"] |
tags |
| message\_id |
parent\_run\_id |
**Dataset Retrieval Trace Info**
* message\_id - Message ID
* inputs - Input content
* documents - Document data
* start\_time - Start time
* end\_time - End time
* message\_data - Message data
* Metadata
* message\_id - Message ID
* ls\_provider - Model provider
* ls\_model\_name - Model ID
* status - Message status
* from\_end\_user\_id - ID of the sending user
* from\_account\_id - ID of the sending account
* agent\_based - Whether the message is agent-based
* workflow\_run\_id - Workflow run ID
* from\_source - Message source
#### **Tool Trace Information**
**Used to track tool invocation**
| Tool |
Phoenix Tool |
| user\_id |
- placed in metadata |
| tool\_name |
name |
| start\_time |
start\_time |
| end\_time |
end\_time |
| inputs |
inputs |
| outputs |
outputs |
| metadata |
metadata |
| \["tool", tool\_name] |
tags |
#### **Tool Trace Info**
* message\_id - Message ID
* tool\_name - Tool name
* start\_time - Start time
* end\_time - End time
* tool\_inputs - Tool inputs
* tool\_outputs - Tool outputs
* message\_data - Message data
* error - Error information, if any
* inputs - Inputs for the message
* outputs - Outputs of the message
* tool\_config - Tool configuration
* time\_cost - Time cost
* tool\_parameters - Tool parameters
* file\_url - URL of the associated file
* Metadata
* message\_id - Message ID
* tool\_name - Tool name
* tool\_inputs - Tool inputs
* tool\_outputs - Tool outputs
* tool\_config - Tool configuration
* time\_cost - Time cost
* error - Error information, if any
* tool\_parameters - Tool parameters
* message\_file\_id - Message file ID
* created\_by\_role - Role of the creator
* created\_user\_id - User ID of the creator
**Generate Name Trace Information**
**Used to track conversation title generation**
| Generate Name |
Phoenix Tool |
| user\_id |
- placed in metadata |
| "generate\_conversation\_name" |
name |
| start\_time |
start\_time |
| end\_time |
end\_time |
| inputs |
inputs |
| outputs |
outputs |
| metadata |
metadata |
| \["generate\_name"] |
tags |
**Generate Name Trace Info**
* conversation\_id - Conversation ID
* inputs - Input data
* outputs - Generated conversation name
* start\_time - Start time
* end\_time - End time
* tenant\_id - Tenant ID
* Metadata
* conversation\_id - Conversation ID
* tenant\_id - Tenant ID
# Integrate with W&B Weave
Source: https://docs.dify.ai/en/use-dify/monitor/integrations/integrate-weave
Dify Cloud | Community version ≥ v1.3.1
### What is W\&b Weave
Weights & Biases (W\&B) Weave is a framework for tracking, experimenting with, evaluating, deploying, and improving LLM-based applications. Designed for flexibility and scalability, Weave supports every stage of your LLM application development workflow.
For more details, please refer to [Weave](https://docs.wandb.ai/weave).
***
### How to Configure Weave
#### 1. Register/Login
Register/Login to [W\&B Weave](https://wandb.ai/signup) and get your API key. Then, copy your API key from [here](https://wandb.ai/authorize).
#### 2. Integrating W\&B Weave with Dify
Configure Weave in the Dify application. Open the application you need to monitor, open **Monitoring** in the side menu, and select **Tracing app performance** on the page.
After clicking configure, paste the **API Key** and **project name**, also specify the **W\&B entity**(optionally, default is your username) into the configuration and save.
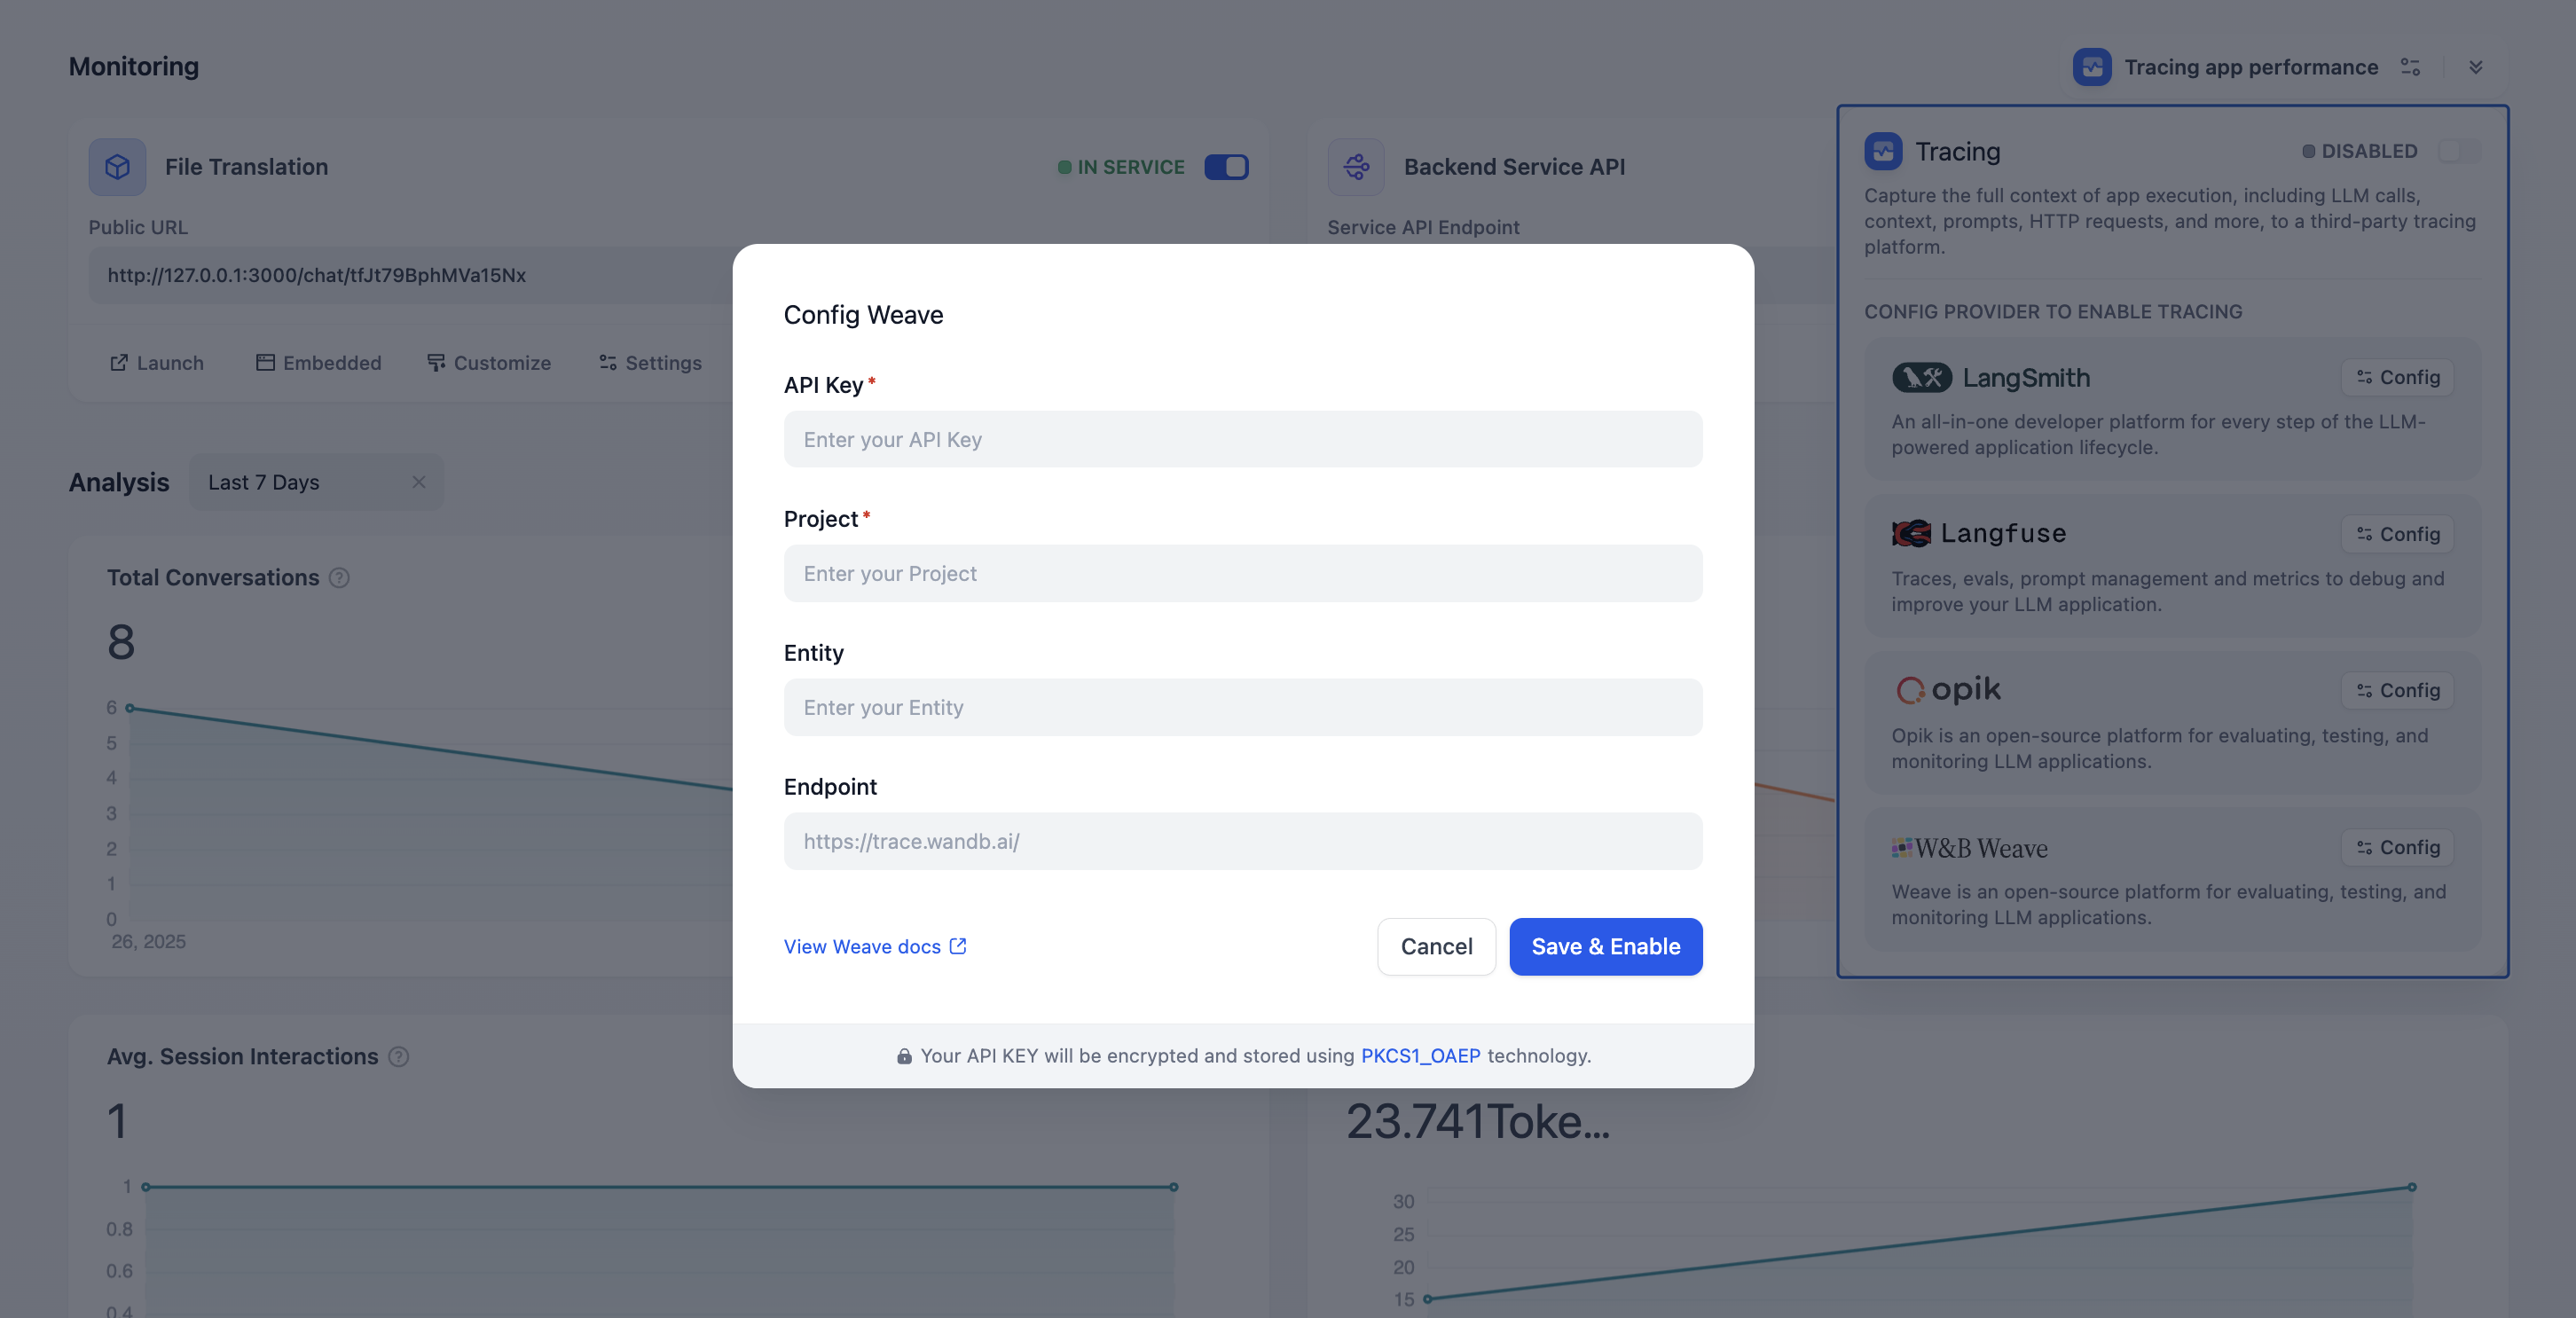
Once successfully saved, you can view the monitoring status on the current page.
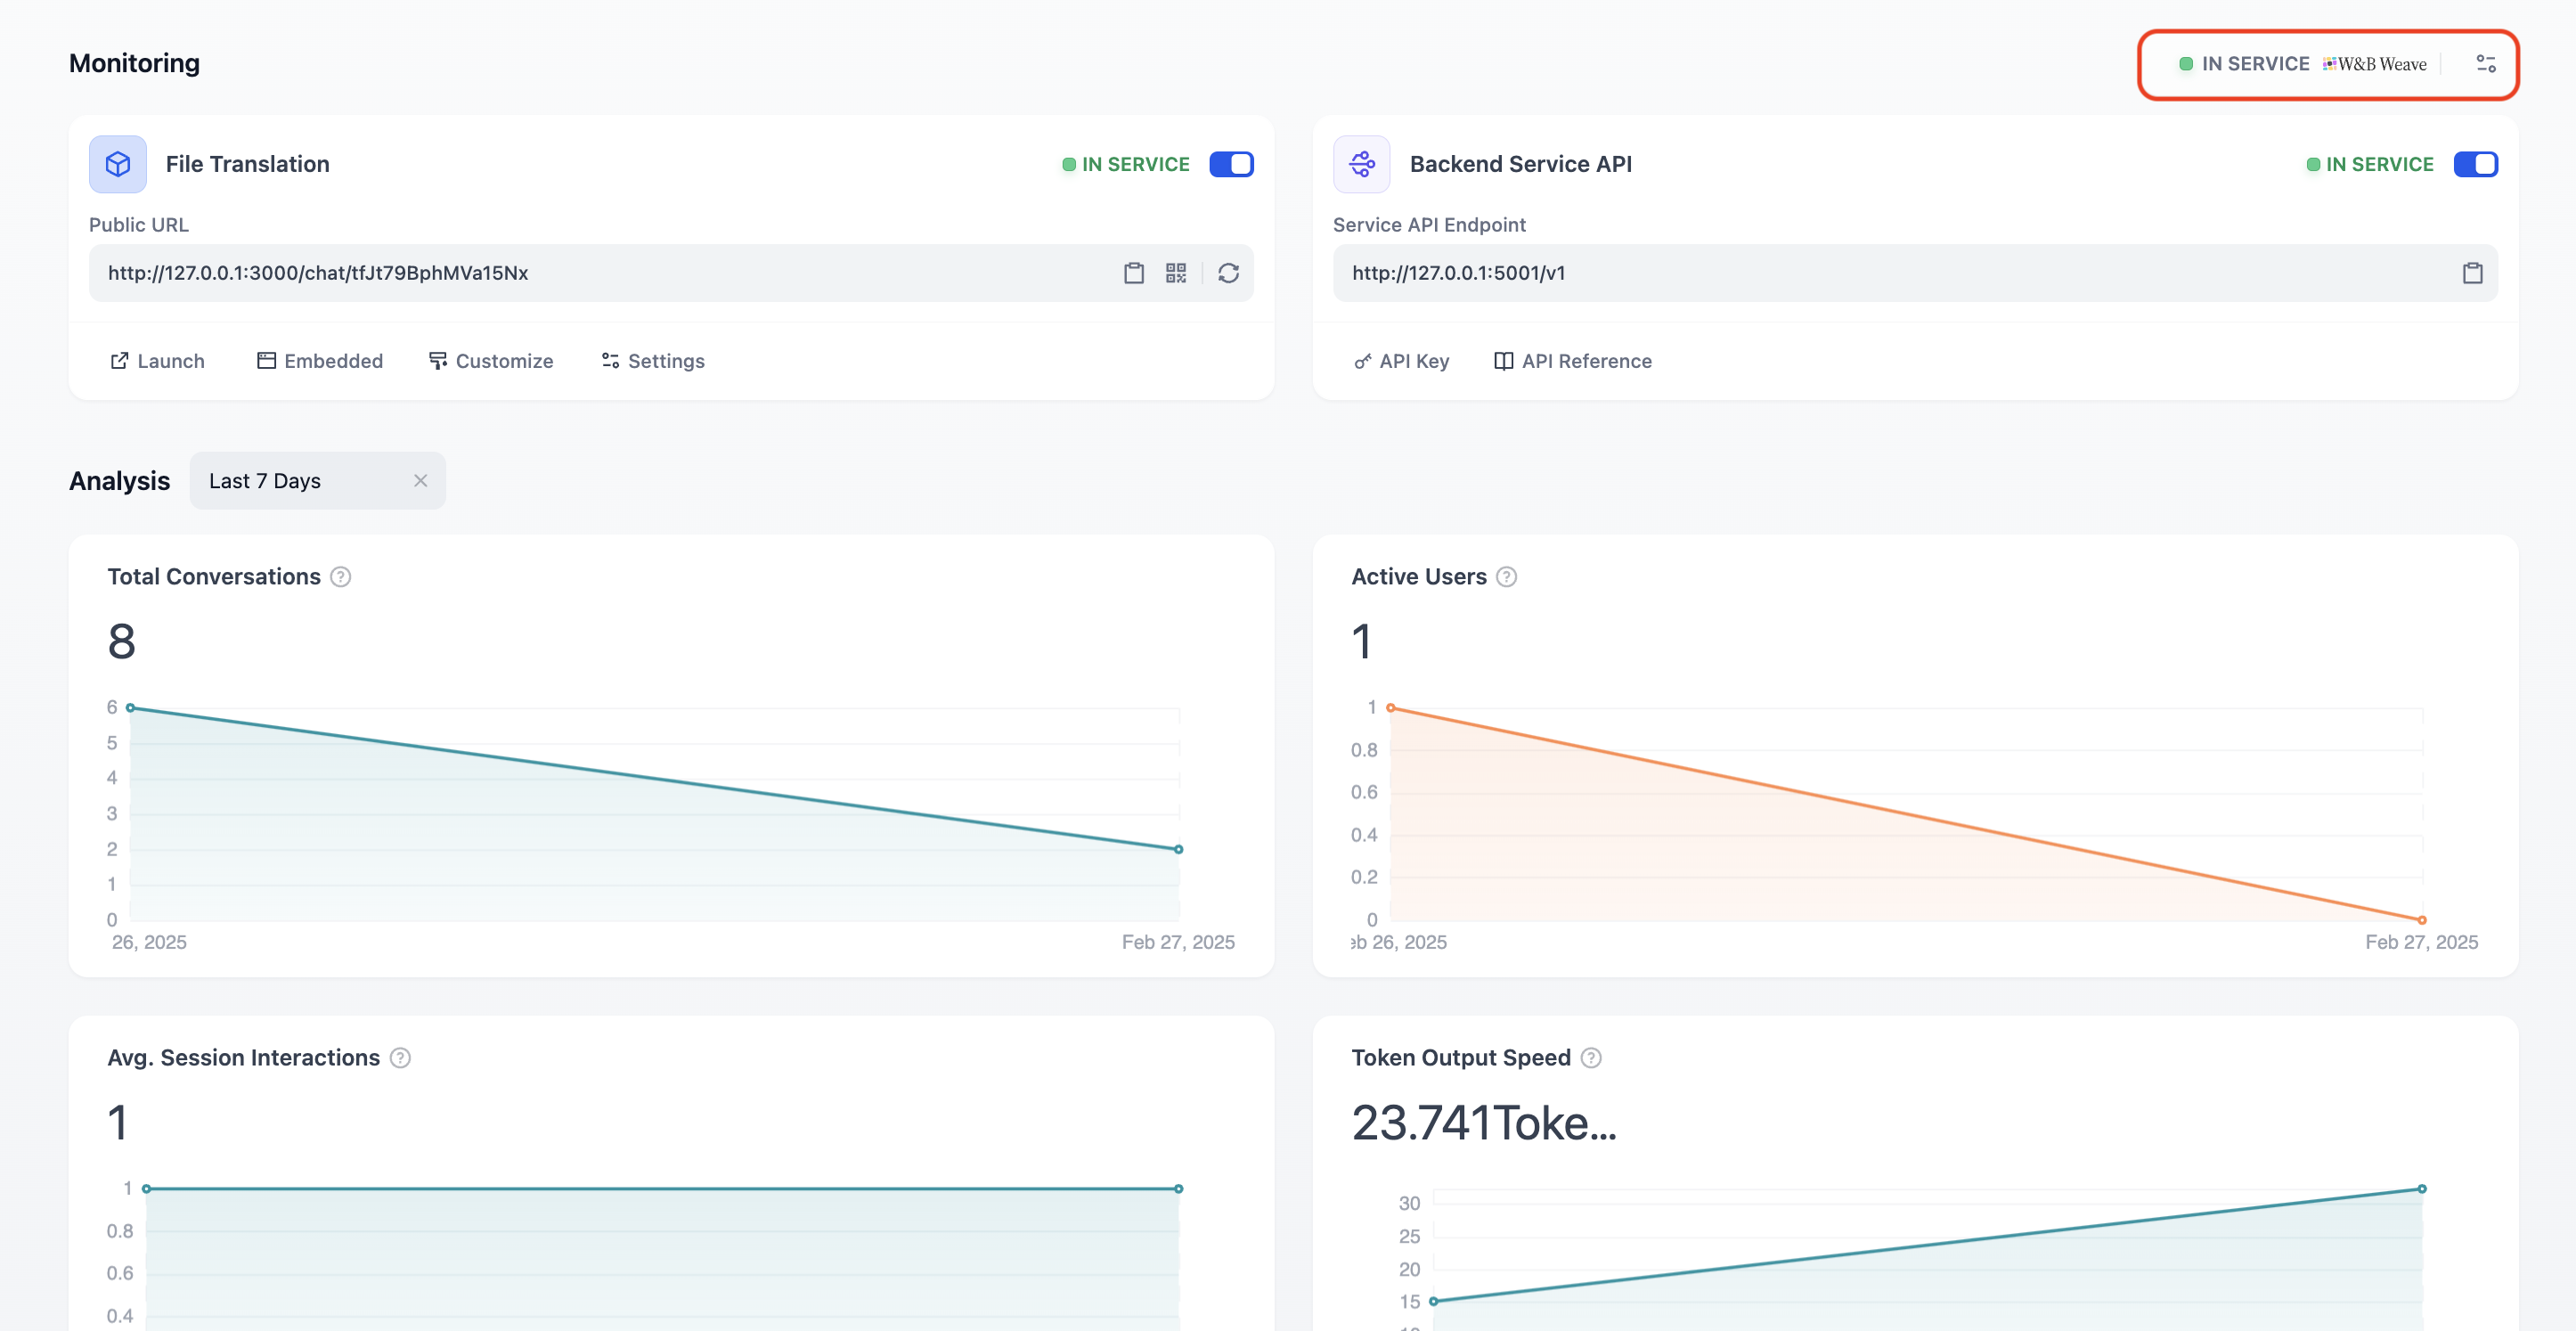
### Viewing Monitoring Data in Weave
Once configured, the debug or production data from applications within Dify can be monitored in Weave.

When you switch to Weave, you can view detailed operation logs of Dify applications in the dashboard.
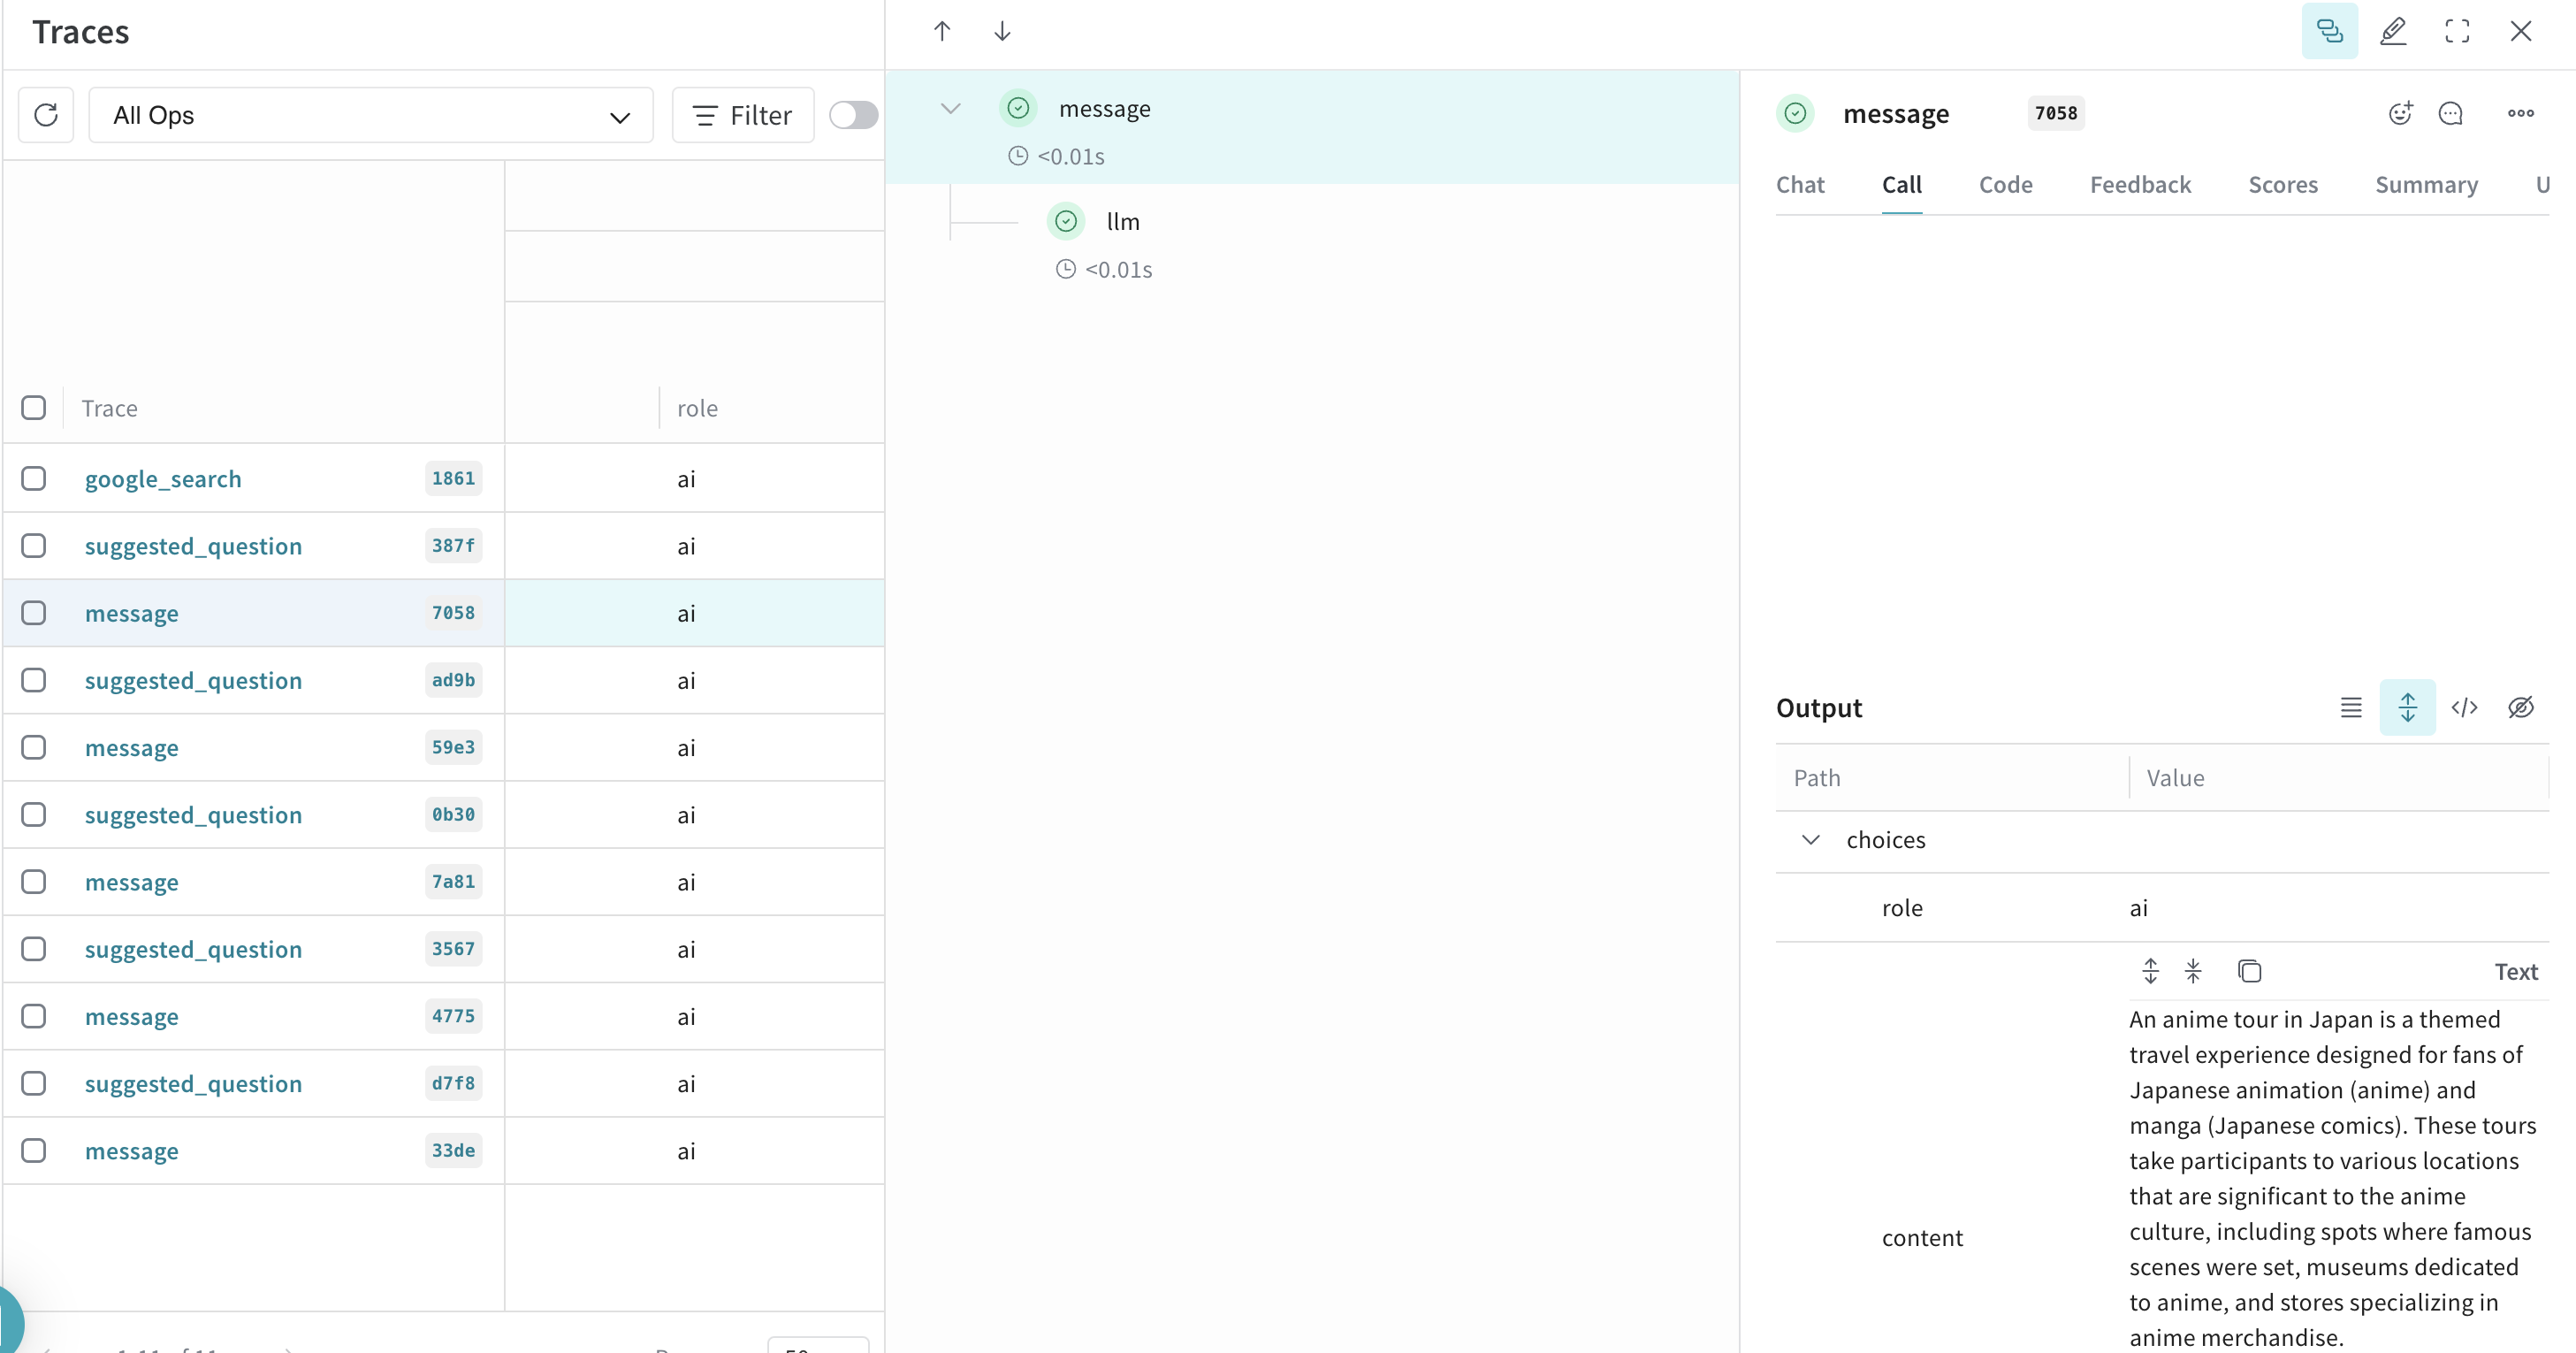
Detailed LLM operation logs through Weave will help you optimize the performance of your Dify application.
### Monitoring Data List
#### **Workflow/Chatflow Trace Information**
**Used to track workflows and chatflows**
| Workflow | Weave Trace |
| ---------------------------------------- | ---------------------------- |
| workflow\_app\_log\_id/workflow\_run\_id | id |
| user\_session\_id | placed in metadata |
| workflow\_\{id} | name |
| start\_time | start\_time |
| end\_time | end\_time |
| inputs | inputs |
| outputs | outputs |
| Model token consumption | usage\_metadata |
| metadata | extra |
| error | error |
| workflow | tags |
| "conversation\_id/none for workflow" | conversation\_id in metadata |
| conversion\_id | parent\_run\_id |
**Workflow Trace Info**
* workflow\_id - Unique identifier of the workflow
* conversation\_id - Conversation ID
* workflow\_run\_id - ID of the current run
* tenant\_id - Tenant ID
* elapsed\_time - Time taken for the current run
* status - Run status
* version - Workflow version
* total\_tokens - Total tokens used in the current run
* file\_list - List of processed files
* triggered\_from - Source that triggered the current run
* workflow\_run\_inputs - Input data for the current run
* workflow\_run\_outputs - Output data for the current run
* error - Errors encountered during the current run
* query - Query used during the run
* workflow\_app\_log\_id - Workflow application log ID
* message\_id - Associated message ID
* start\_time - Start time of the run
* end\_time - End time of the run
* workflow node executions - Information about workflow node executions
* Metadata
* workflow\_id - Unique identifier of the workflow
* conversation\_id - Conversation ID
* workflow\_run\_id - ID of the current run
* tenant\_id - Tenant ID
* elapsed\_time - Time taken for the current run
* status - Run status
* version - Workflow version
* total\_tokens - Total tokens used in the current run
* file\_list - List of processed files
* triggered\_from - Source that triggered the current run
#### **Message Trace Information**
**Used to track LLM-related conversations**
| Chat | Weave Trace |
| ----------------------------- | ---------------------------- |
| message\_id | id |
| user\_session\_id | placed in metadata |
| "message\_\{id}" | name |
| start\_time | start\_time |
| end\_time | end\_time |
| inputs | inputs |
| outputs | outputs |
| Model token consumption | usage\_metadata |
| metadata | extra |
| error | error |
| "message", conversation\_mode | tags |
| conversation\_id | conversation\_id in metadata |
| conversion\_id | parent\_run\_id |
**Message Trace Info**
* message\_id - Message ID
* message\_data - Message data
* user\_session\_id - User session ID
* conversation\_model - Conversation mode
* message\_tokens - Number of tokens in the message
* answer\_tokens - Number of tokens in the answer
* total\_tokens - Total number of tokens in the message and answer
* error - Error information
* inputs - Input data
* outputs - Output data
* file\_list - List of processed files
* start\_time - Start time
* end\_time - End time
* message\_file\_data - File data associated with the message
* conversation\_mode - Conversation mode
* Metadata
* conversation\_id - Conversation ID
* ls\_provider - Model provider
* ls\_model\_name - Model ID
* status - Message status
* from\_end\_user\_id - ID of the sending user
* from\_account\_id - ID of the sending account
* agent\_based - Whether the message is agent-based
* workflow\_run\_id - Workflow run ID
* from\_source - Message source
#### **Moderation Trace Information**
**Used to track conversation moderation**
| Moderation | Weave Trace |
| ------------ | ------------------ |
| user\_id | placed in metadata |
| “moderation" | name |
| start\_time | start\_time |
| end\_time | end\_time |
| inputs | inputs |
| outputs | outputs |
| metadata | extra |
| moderation | tags |
| message\_id | parent\_run\_id |
**Moderation Trace Info**
* message\_id - Message ID
* user\_id: User ID
* workflow\_app\_log\_id - Workflow application log ID
* inputs - Moderation input data
* message\_data - Message data
* flagged - Whether the content is flagged for attention
* action - Specific actions taken
* preset\_response - Preset response
* start\_time - Moderation start time
* end\_time - Moderation end time
* Metadata
* message\_id - Message ID
* action - Specific actions taken
* preset\_response - Preset response
#### **Suggested Question Trace Information**
**Used to track suggested questions**
| Suggested Question | Weave Trace |
| ------------------- | ------------------ |
| user\_id | placed in metadata |
| suggested\_question | name |
| start\_time | start\_time |
| end\_time | end\_time |
| inputs | inputs |
| outputs | outputs |
| metadata | extra |
| suggested\_question | tags |
| message\_id | parent\_run\_id |
**Message Trace Info**
* message\_id - Message ID
* message\_data - Message data
* inputs - Input content
* outputs - Output content
* start\_time - Start time
* end\_time - End time
* total\_tokens - Number of tokens
* status - Message status
* error - Error information
* from\_account\_id - ID of the sending account
* agent\_based - Whether the message is agent-based
* from\_source - Message source
* model\_provider - Model provider
* model\_id - Model ID
* suggested\_question - Suggested question
* level - Status level
* status\_message - Status message
* Metadata
* message\_id - Message ID
* ls\_provider - Model provider
* ls\_model\_name - Model ID
* status - Message status
* from\_end\_user\_id - ID of the sending user
* from\_account\_id - ID of the sending account
* workflow\_run\_id - Workflow run ID
* from\_source - Message source
#### **Dataset Retrieval Trace Information**
**Used to track knowledge base retrieval**
| Dataset Retrieval | Weave Trace |
| ------------------ | ------------------ |
| user\_id | placed in metadata |
| dataset\_retrieval | name |
| start\_time | start\_time |
| end\_time | end\_time |
| inputs | inputs |
| outputs | outputs |
| metadata | extra |
| dataset\_retrieval | tags |
| message\_id | parent\_run\_id |
**Dataset Retrieval Trace Info**
* message\_id - Message ID
* inputs - Input content
* documents - Document data
* start\_time - Start time
* end\_time - End time
* message\_data - Message data
* Metadata
* message\_id - Message ID
* ls\_provider - Model provider
* ls\_model\_name - Model ID
* status - Message status
* from\_end\_user\_id - ID of the sending user
* from\_account\_id - ID of the sending account
* agent\_based - Whether the message is agent-based
* workflow\_run\_id - Workflow run ID
* from\_source - Message source
#### **Tool Trace Information**
**Used to track tool invocation**
| Tool | Weave Trace |
| ------------------ | ------------------ |
| user\_id | placed in metadata |
| tool\_name | name |
| start\_time | start\_time |
| end\_time | end\_time |
| inputs | inputs |
| outputs | outputs |
| metadata | extra |
| "tool", tool\_name | tags |
| message\_id | parent\_run\_id |
#### **Tool Trace Info**
* message\_id - Message ID
* tool\_name - Tool name
* start\_time - Start time
* end\_time - End time
* tool\_inputs - Tool inputs
* tool\_outputs - Tool outputs
* message\_data - Message data
* error - Error information, if any
* inputs - Inputs for the message
* outputs - Outputs of the message
* tool\_config - Tool configuration
* time\_cost - Time cost
* tool\_parameters - Tool parameters
* file\_url - URL of the associated file
* Metadata
* message\_id - Message ID
* tool\_name - Tool name
* tool\_inputs - Tool inputs
* tool\_outputs - Tool outputs
* tool\_config - Tool configuration
* time\_cost - Time cost
* error - Error information, if any
* tool\_parameters - Tool parameters
* message\_file\_id - Message file ID
* created\_by\_role - Role of the creator
* created\_user\_id - User ID of the creator
**Generate Name Trace Information**
**Used to track conversation title generation**
| Generate Name | Weave Trace |
| -------------- | ------------------ |
| user\_id | placed in metadata |
| generate\_name | name |
| start\_time | start\_time |
| end\_time | end\_time |
| inputs | inputs |
| outputs | outputs |
| metadata | extra |
| generate\_name | tags |
**Generate Name Trace Info**
* conversation\_id - Conversation ID
* inputs - Input data
* outputs - Generated conversation name
* start\_time - Start time
* end\_time - End time
* tenant\_id - Tenant ID
* Metadata
* conversation\_id - Conversation ID
* tenant\_id - Tenant ID
# Logs
Source: https://docs.dify.ai/en/use-dify/monitor/logs
Monitor real-time conversations, debug issues, and collect user feedback
Conversation logs provide detailed visibility into every interaction with your AI application. Use them to debug specific issues, understand user behavior patterns, and collect feedback for continuous improvement.
## What Gets Logged
**All User Interactions**
Every conversation through your web app or API is logged with complete input/output history, timing data, and system metadata.
**User Feedback**
Thumbs up/down ratings and user comments are captured alongside the conversations they reference.
**System Context**
Model used, token consumption, response times, and any errors or warnings during processing.
**Exclusions:** Debugging sessions and prompt testing are not included in logs.
## Using the Logs Console
Access logs from your application's navigation menu. The interface shows:
* **Conversation Timeline:** Chronological list of user interactions
* **Message Details:** Full conversation context with AI responses
* **Performance Data:** Response times and token usage per interaction
* **User Feedback:** Ratings and comments from users and team members
## Debugging with Logs
**Failed Interactions**
Quickly identify conversations where the AI provided poor responses, failed to understand user intent, or encountered errors.
**Performance Issues**
Spot slow responses, high token usage, or system errors that affect user experience.
**User Journey Analysis**
Follow individual users through multiple conversations to understand usage patterns and pain points.
## Feedback Collection
**User Ratings**
Users can provide thumbs up/down feedback on AI responses. Track satisfaction trends over time.
**Team Annotations**
Team members can add internal notes and improved responses directly in the log interface.
**Feedback Analysis**
Identify common complaint patterns, successful interaction types, and areas needing improvement.
## Log Retention
Ensure your application complies with local data privacy regulations. Publish a privacy policy and obtain user consent where required.
* **Sandbox**: Logs are retained for 30 days.
* **Professional & Team**: Unlimited log retention during active subscription.
* **Self-hosted**: Unlimited by default; configurable via environment variables `WORKFLOW_LOG_CLEANUP_ENABLED`, `WORKFLOW_LOG_RETENTION_DAYS`, and `WORKFLOW_LOG_CLEANUP_BATCH_SIZE`.
## Improving Applications with Logs
**Pattern Recognition**
Look for recurring user questions that your application handles poorly. These indicate opportunities for prompt improvements or knowledge base updates.
**Response Quality**
Use feedback patterns to identify which types of responses work well and which need refinement.
**Performance Optimization**
Track response times and token usage to identify inefficient prompts or model configurations.
**Content Gaps**
Spot topics or question types where your application consistently struggles, indicating areas for knowledge base expansion.
## Privacy Considerations
Logs contain complete user conversations and may include sensitive information. Implement appropriate access controls and ensure compliance with applicable data protection regulations.
Consider configuring shorter retention periods for applications handling sensitive data or implement log anonymization where appropriate.
# Agent
Source: https://docs.dify.ai/en/use-dify/nodes/agent
Give LLMs autonomous control over tools for complex task execution
The Agent node gives your LLM autonomous control over tools, enabling it to iteratively decide which tools to use and when to use them. Instead of pre-planning every step, the Agent reasons through problems dynamically, calling tools as needed to complete complex tasks.

## Agent Strategies
Agent strategies define how your Agent thinks and acts. Choose the approach that best matches your model's capabilities and task requirements.
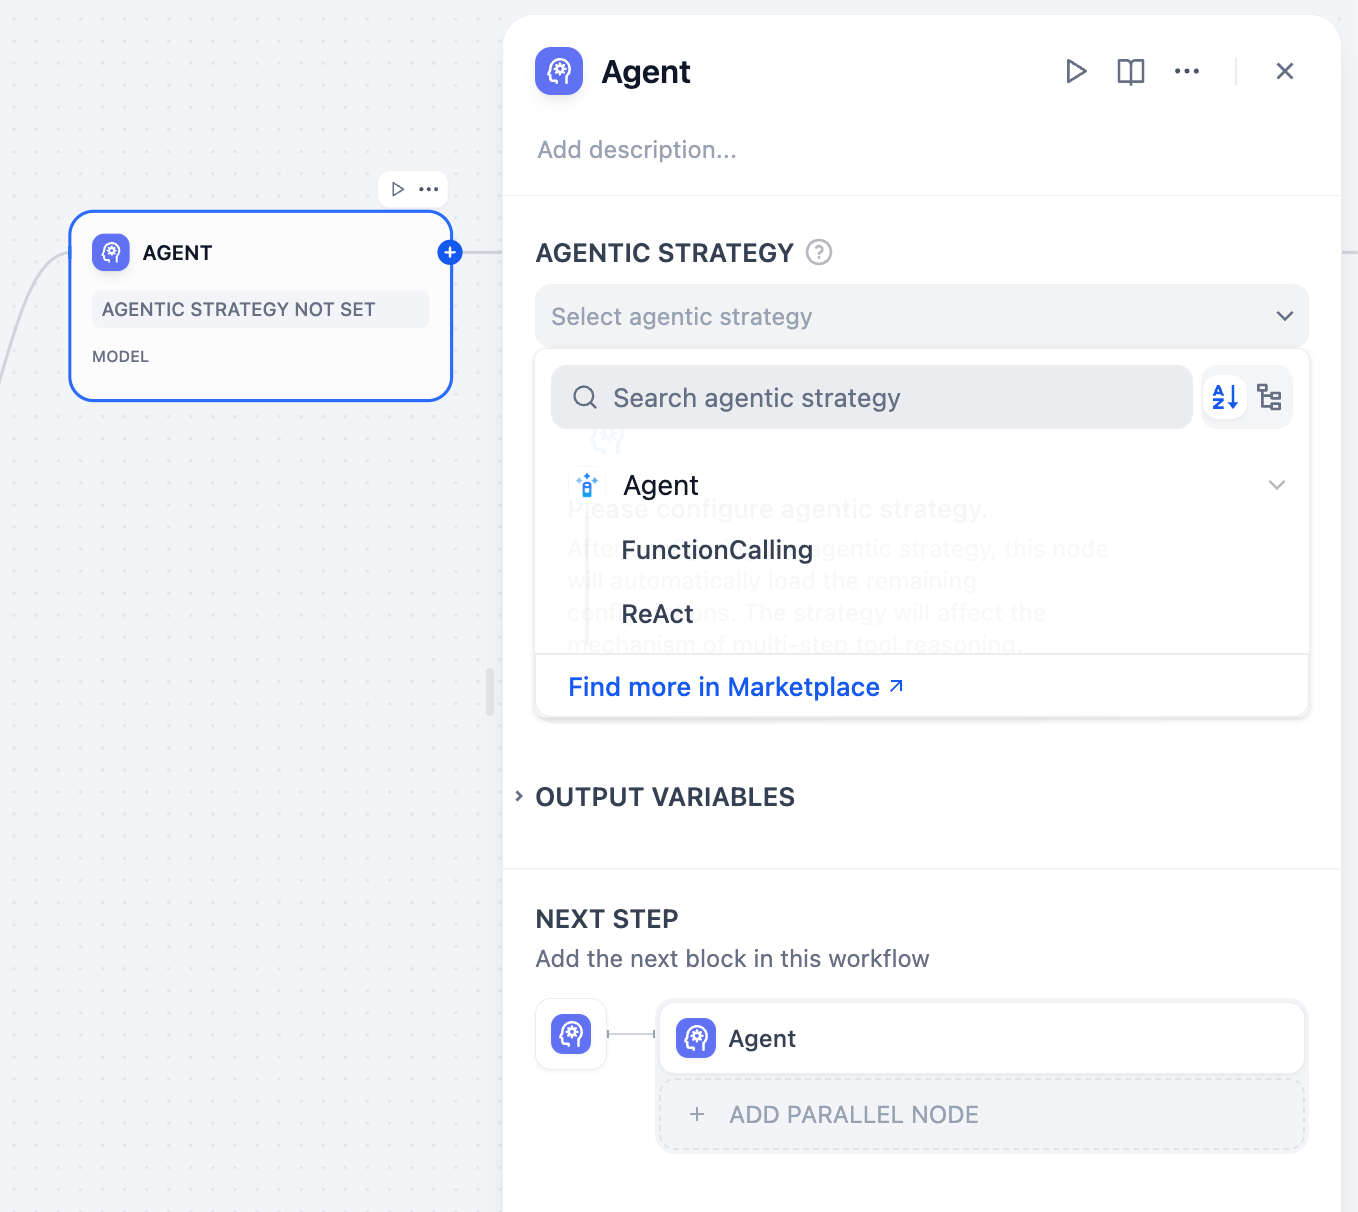
Uses the LLM's native function calling capabilities to directly pass tool definitions through the tools parameter. The LLM decides when and how to call tools using its built-in mechanism.
Best for models like GPT-4, Claude 3.5, and other models with robust function calling support.
Uses structured prompts that guide the LLM through explicit reasoning steps. Follows a **Thought → Action → Observation** cycle for transparent decision-making.
Works well with models that may not have native function calling or when you need explicit reasoning traces.
Install additional strategies from **Marketplace → Agent Strategies** or contribute custom strategies to the [community repository](https://github.com/langgenius/dify-plugins).
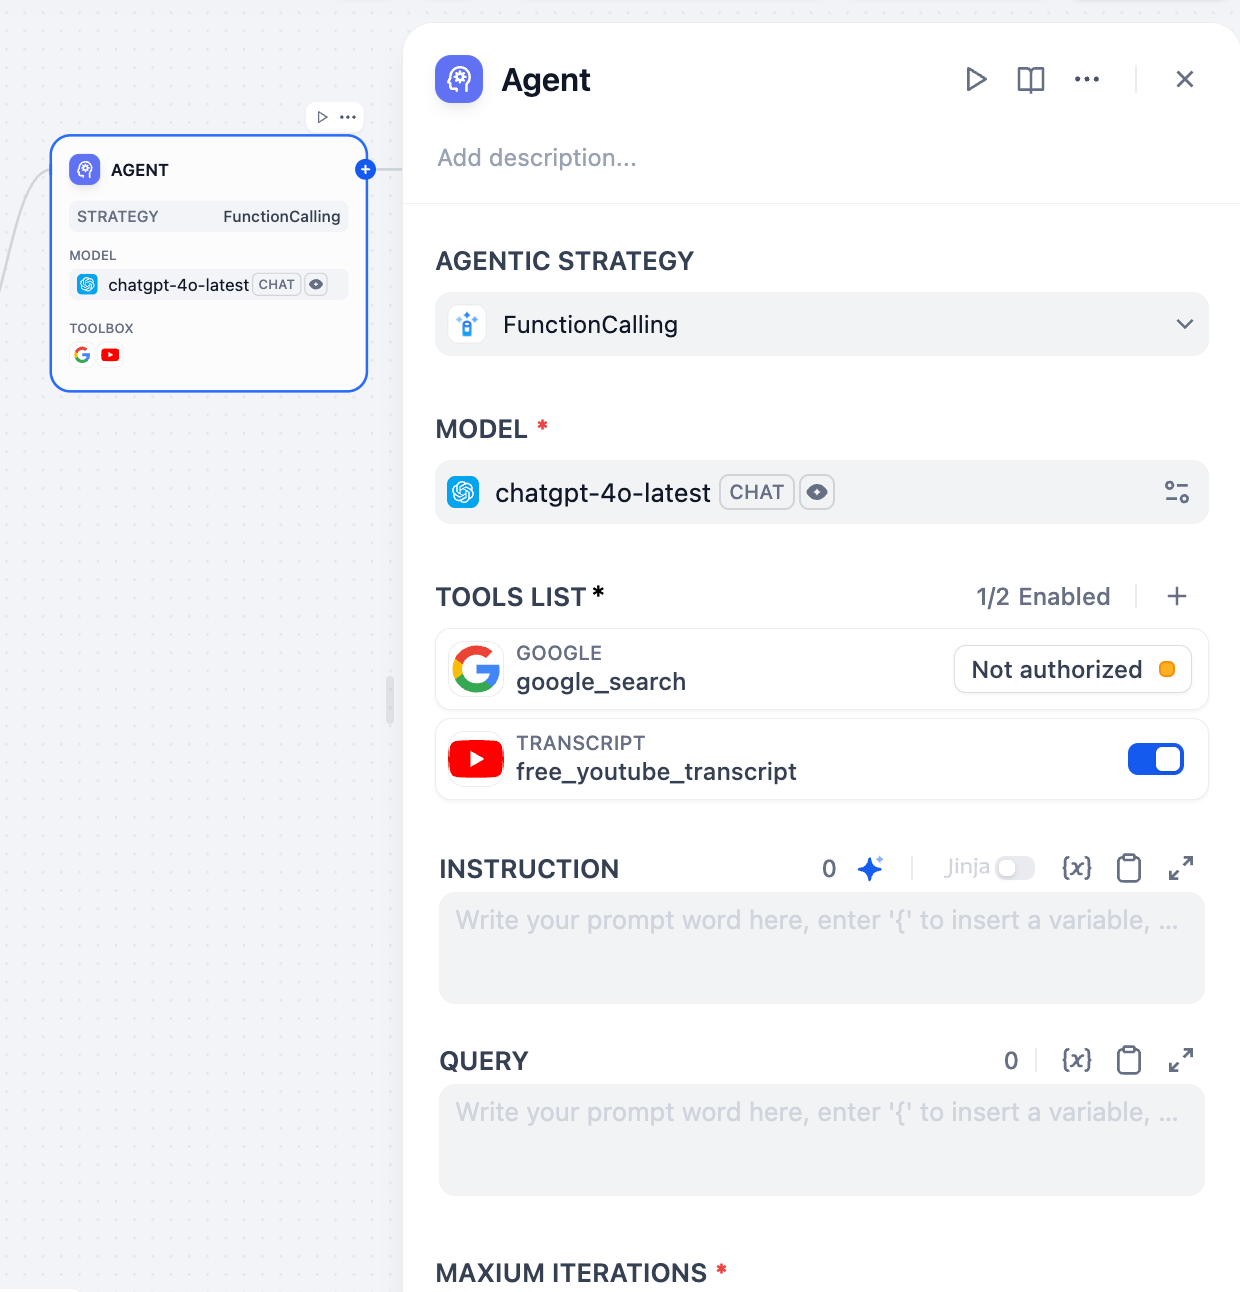
## Configuration
### Model Selection
Choose an LLM that supports your selected agent strategy. More capable models handle complex reasoning better but cost more per iteration. Ensure your model supports function calling if using that strategy.
### Tool Configuration
Configure the tools your Agent can access. Each tool requires:
**Authorization** - API keys and credentials for external services configured in your workspace
**Description** - Clear explanation of what the tool does and when to use it (this guides the Agent's decision-making)
**Parameters** - Required and optional inputs the tool accepts with proper validation
### Instructions and Context
Define the Agent's role, goals, and context using natural language instructions. Use Jinja2 syntax to reference variables from upstream workflow nodes.
**Query** specifies the user input or task the Agent should work on. This can be dynamic content from previous workflow nodes.
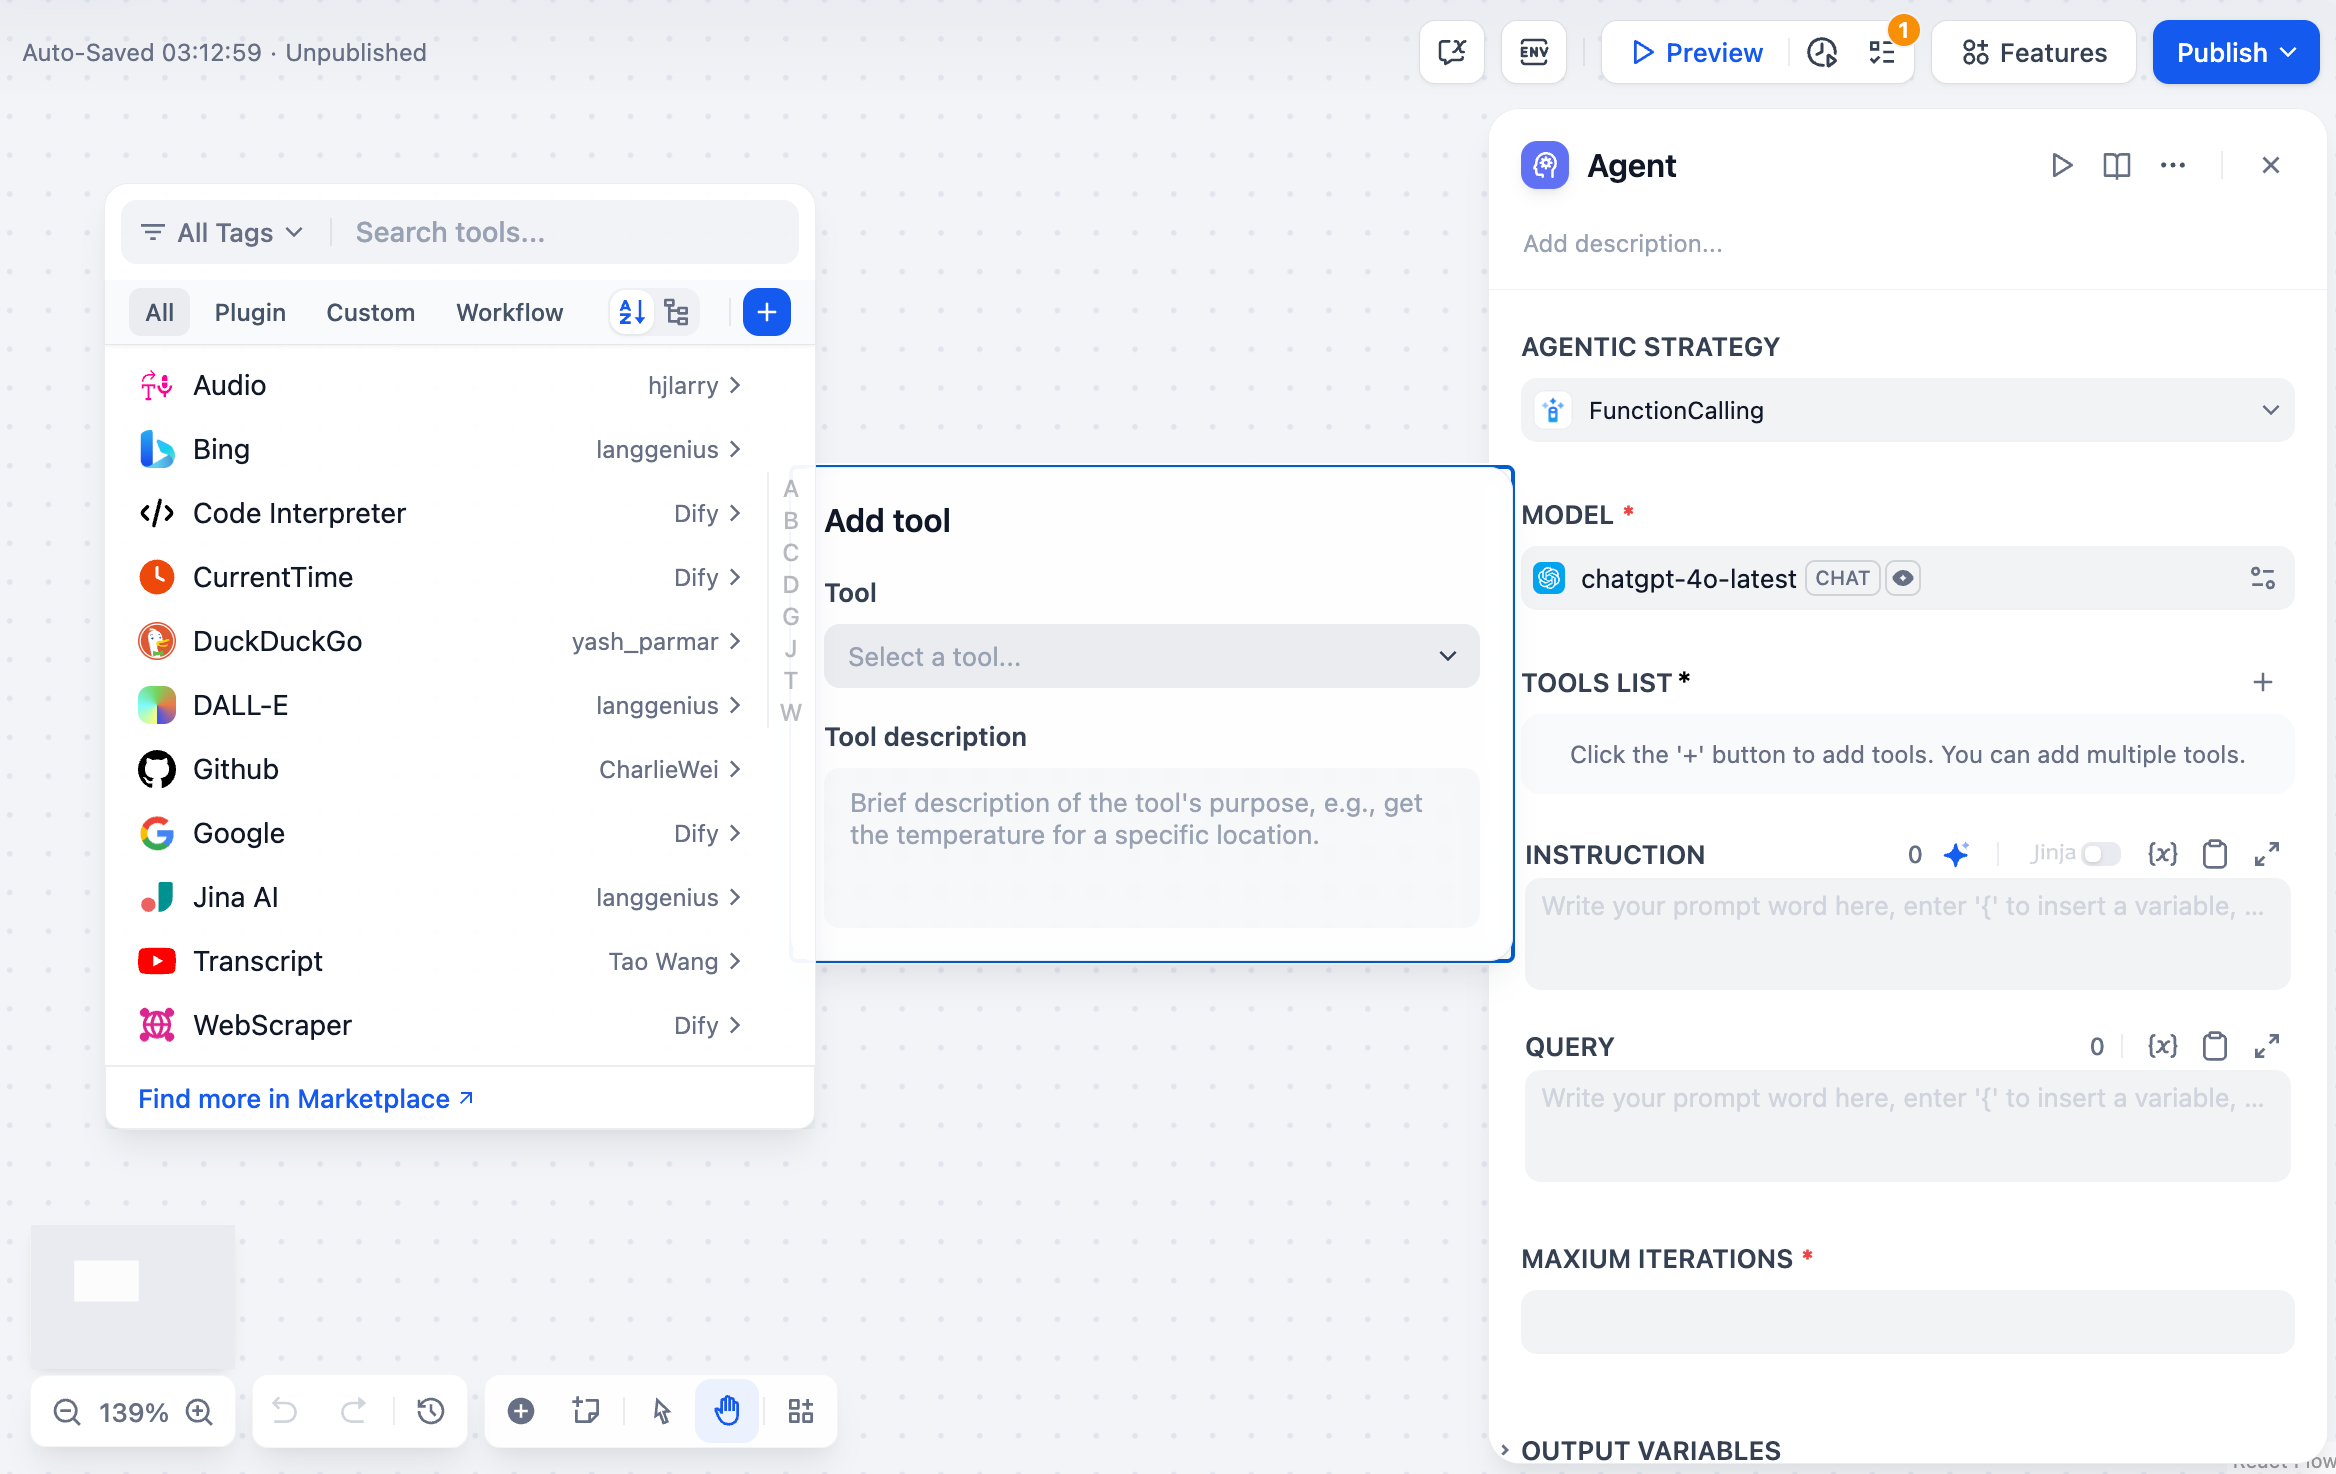
### Execution Controls
**Maximum Iterations** sets a safety limit to prevent infinite loops. Configure based on task complexity - simple tasks need 3-5 iterations, while complex research might require 10-15.
**Memory** controls how many previous messages the Agent remembers using TokenBufferMemory. Larger memory windows provide more context but increase token costs. This enables conversational continuity where users can reference previous actions.
### Tool Parameter Auto-Generation
Tools can have parameters configured as **auto-generated** or **manual input**. Auto-generated parameters (`auto: false`) are automatically populated by the Agent, while manual input parameters require explicit values that become part of the tool's permanent configuration.
## Output Variables
Agent nodes provide comprehensive output including:
**Final Answer** - The Agent's ultimate response to the query
**Tool Outputs** - Results from each tool invocation during execution
**Reasoning Trace** - Step-by-step decision process (especially detailed with ReAct strategy) available in the JSON output
**Iteration Count** - Number of reasoning cycles used
**Success Status** - Whether the Agent completed the task successfully
**Agent Logs** - Structured log events with metadata for debugging and monitoring tool invocations
## Use Cases
**Research and Analysis** - Agents can autonomously search multiple sources, synthesize information, and provide comprehensive answers.
**Troubleshooting** - Diagnostic tasks where the Agent needs to gather information, test hypotheses, and adapt its approach based on findings.
**Multi-step Data Processing** - Complex workflows where the next action depends on intermediate results.
**Dynamic API Integration** - Scenarios where the sequence of API calls depends on responses and conditions that can't be predetermined.
## Best Practices
**Clear Tool Descriptions** help the Agent understand when and how to use each tool effectively.
**Appropriate Iteration Limits** prevent runaway costs while allowing sufficient flexibility for complex tasks.
**Detailed Instructions** provide context about the Agent's role, goals, and any constraints or preferences.
**Memory Management** balance context retention with token efficiency based on your use case requirements.
# Answer
Source: https://docs.dify.ai/en/use-dify/nodes/answer
Define response content in chatflow applications
The Answer node defines what content gets delivered to users in chatflow applications. Use it to format responses, combine text with variables, and stream multimodal content including text, images, and files.
The Answer node is only available for Chatflow applications. Workflow applications use the End node instead.
## Content Configuration
The Answer node provides a flexible text editor where you can craft responses using fixed text, variables from previous nodes, or combinations of both.
Reference variables from any previous workflow node using the `{{variable_name}}` syntax. The editor supports rich content formatting and variable insertion to create dynamic, contextual responses.
## Multimodal Responses
Answer nodes support rich content delivery including text, images, and files in a single response stream.
**Text Content** can include variable substitution, markdown formatting, and dynamic content based on workflow processing results.
**Image Content** displays images generated by tools, uploaded by users, or processed by workflow nodes. Images stream alongside text for rich user experiences.
**File Content** delivers documents, spreadsheets, or other files generated or processed during the workflow execution.
## Streaming Behavior
Answer nodes stream content progressively based on variable availability. The node outputs all content up to the first unresolved variable, then waits for that variable to resolve before continuing.
**Variable Order Matters** - The sequence of variables in your Answer node determines streaming behavior, not the execution order of upstream nodes.
For example, with nodes executing as `Node A -> Node B -> Answer`:
* If the Answer contains `{{A}}` then `{{B}}`, it streams A's content immediately when available, then waits for B
* If the Answer contains `{{B}}` then `{{A}}`, it waits for B to complete before streaming any content
This streaming behavior enables responsive user experiences while maintaining content coherence.
## Multiple Answer Nodes
You can place multiple Answer nodes throughout your chatflow to deliver content at different stages of processing.
## Variable Integration
Answer nodes seamlessly integrate with outputs from all workflow node types. Common variable sources include:
**LLM Responses** - Display generated text, analysis results, or structured outputs from language models
**Knowledge Retrieval** - Show relevant information found in knowledge bases with automatic citation tracking
**Tool Results** - Present data from external APIs, calculations, or service integrations
**File Processing** - Display extracted text, analysis results, or processed document content
The variable system maintains type safety and automatically handles different content types for optimal display in the chat interface.
# Code
Source: https://docs.dify.ai/en/use-dify/nodes/code
Execute custom Python or JavaScript for data processing
The Code node executes custom Python or JavaScript to handle complex data transformations, calculations, and logic within your workflow. Use it when preset nodes aren't sufficient for your specific processing needs.
## Configuration
Define **Input Variables** to access data from other nodes in your workflow, then reference these variables in your code. Your function must return a dictionary containing the **Output Variables** you've declared.
```python theme={null}
def main(input_variable: str) -> dict:
# Process the input
result = input_variable.upper()
return {
'output_variable': result
}
```
## Language Support
Choose between **Python** and **JavaScript** based on your needs and familiarity. Both languages run in secure sandboxes with access to common libraries for data processing.
Python includes standard libraries like `json`, `math`, `datetime`, and `re`. Ideal for data analysis, mathematical operations, and text processing.
```python theme={null}
def main(data: list) -> dict:
import json
import math
average = sum(data) / len(data)
return {'result': math.ceil(average)}
```
JavaScript provides standard built-in objects and methods. Good for JSON manipulation and string operations.
```javascript theme={null}
function main(data) {
const processed = data.map(item => item.toUpperCase());
return { result: processed };
}
```
## Error Handling and Retries
Configure automatic retry behavior for failed code executions and define fallback strategies when code encounters errors.
**Retry Settings** allow up to 10 automatic retries with configurable intervals (maximum 5000ms). Enable this for handling temporary processing issues.
**Error Handling** lets you define fallback paths when code execution fails, allowing your workflow to continue running even when the code encounters problems.
## Output Validation and Limits
Code outputs are automatically validated with strict limits:
* **Strings**: Maximum length of 80,000 characters, null bytes are removed
* **Numbers**: Range from -999999999 to 999999999, floats limited to 10 decimal places
* **Objects/Arrays**: Maximum depth of 5 levels to prevent complex nested structures
These limits ensure performance and prevent memory issues in workflows.
## Security Considerations
Code executes in a strict sandbox that prevents file system access, network requests, and system commands. This maintains security while providing programming flexibility.
Some operations are automatically blocked for security reasons. Avoid attempting to access system files or execute potentially dangerous operations:
If your code isn't saving, check your browser's Network tab - security filters may be blocking potentially dangerous operations.
## Dependencies Support
Code nodes support external dependencies for both Python and JavaScript:
```python theme={null}
# Python: Import numpy, pandas, requests, etc.
import numpy as np
import pandas as pd
def main(data: list) -> dict:
df = pd.DataFrame(data)
return {'mean': float(np.mean(df['values']))}
```
```javascript theme={null}
// JavaScript: Import lodash, moment, etc.
const _ = require('lodash');
function main(data) {
return { unique: _.uniq(data) };
}
```
Dependencies are pre-installed in the sandbox environment. Check the available packages list in your Dify installation.
## Self-Hosted Setup
For self-hosted Dify installations, start the sandbox service for secure code execution:
```bash theme={null}
docker-compose -f docker-compose.middleware.yaml up -d
```
The sandbox service requires Docker and isolates code execution from your main system for security.
# Document Extractor
Source: https://docs.dify.ai/en/use-dify/nodes/doc-extractor
Extract text content from uploaded documents for AI processing
The Document Extractor node converts uploaded files into text that LLMs can process. Since language models can't directly read document formats like PDF or DOCX, this node serves as the essential bridge between file uploads and AI analysis.
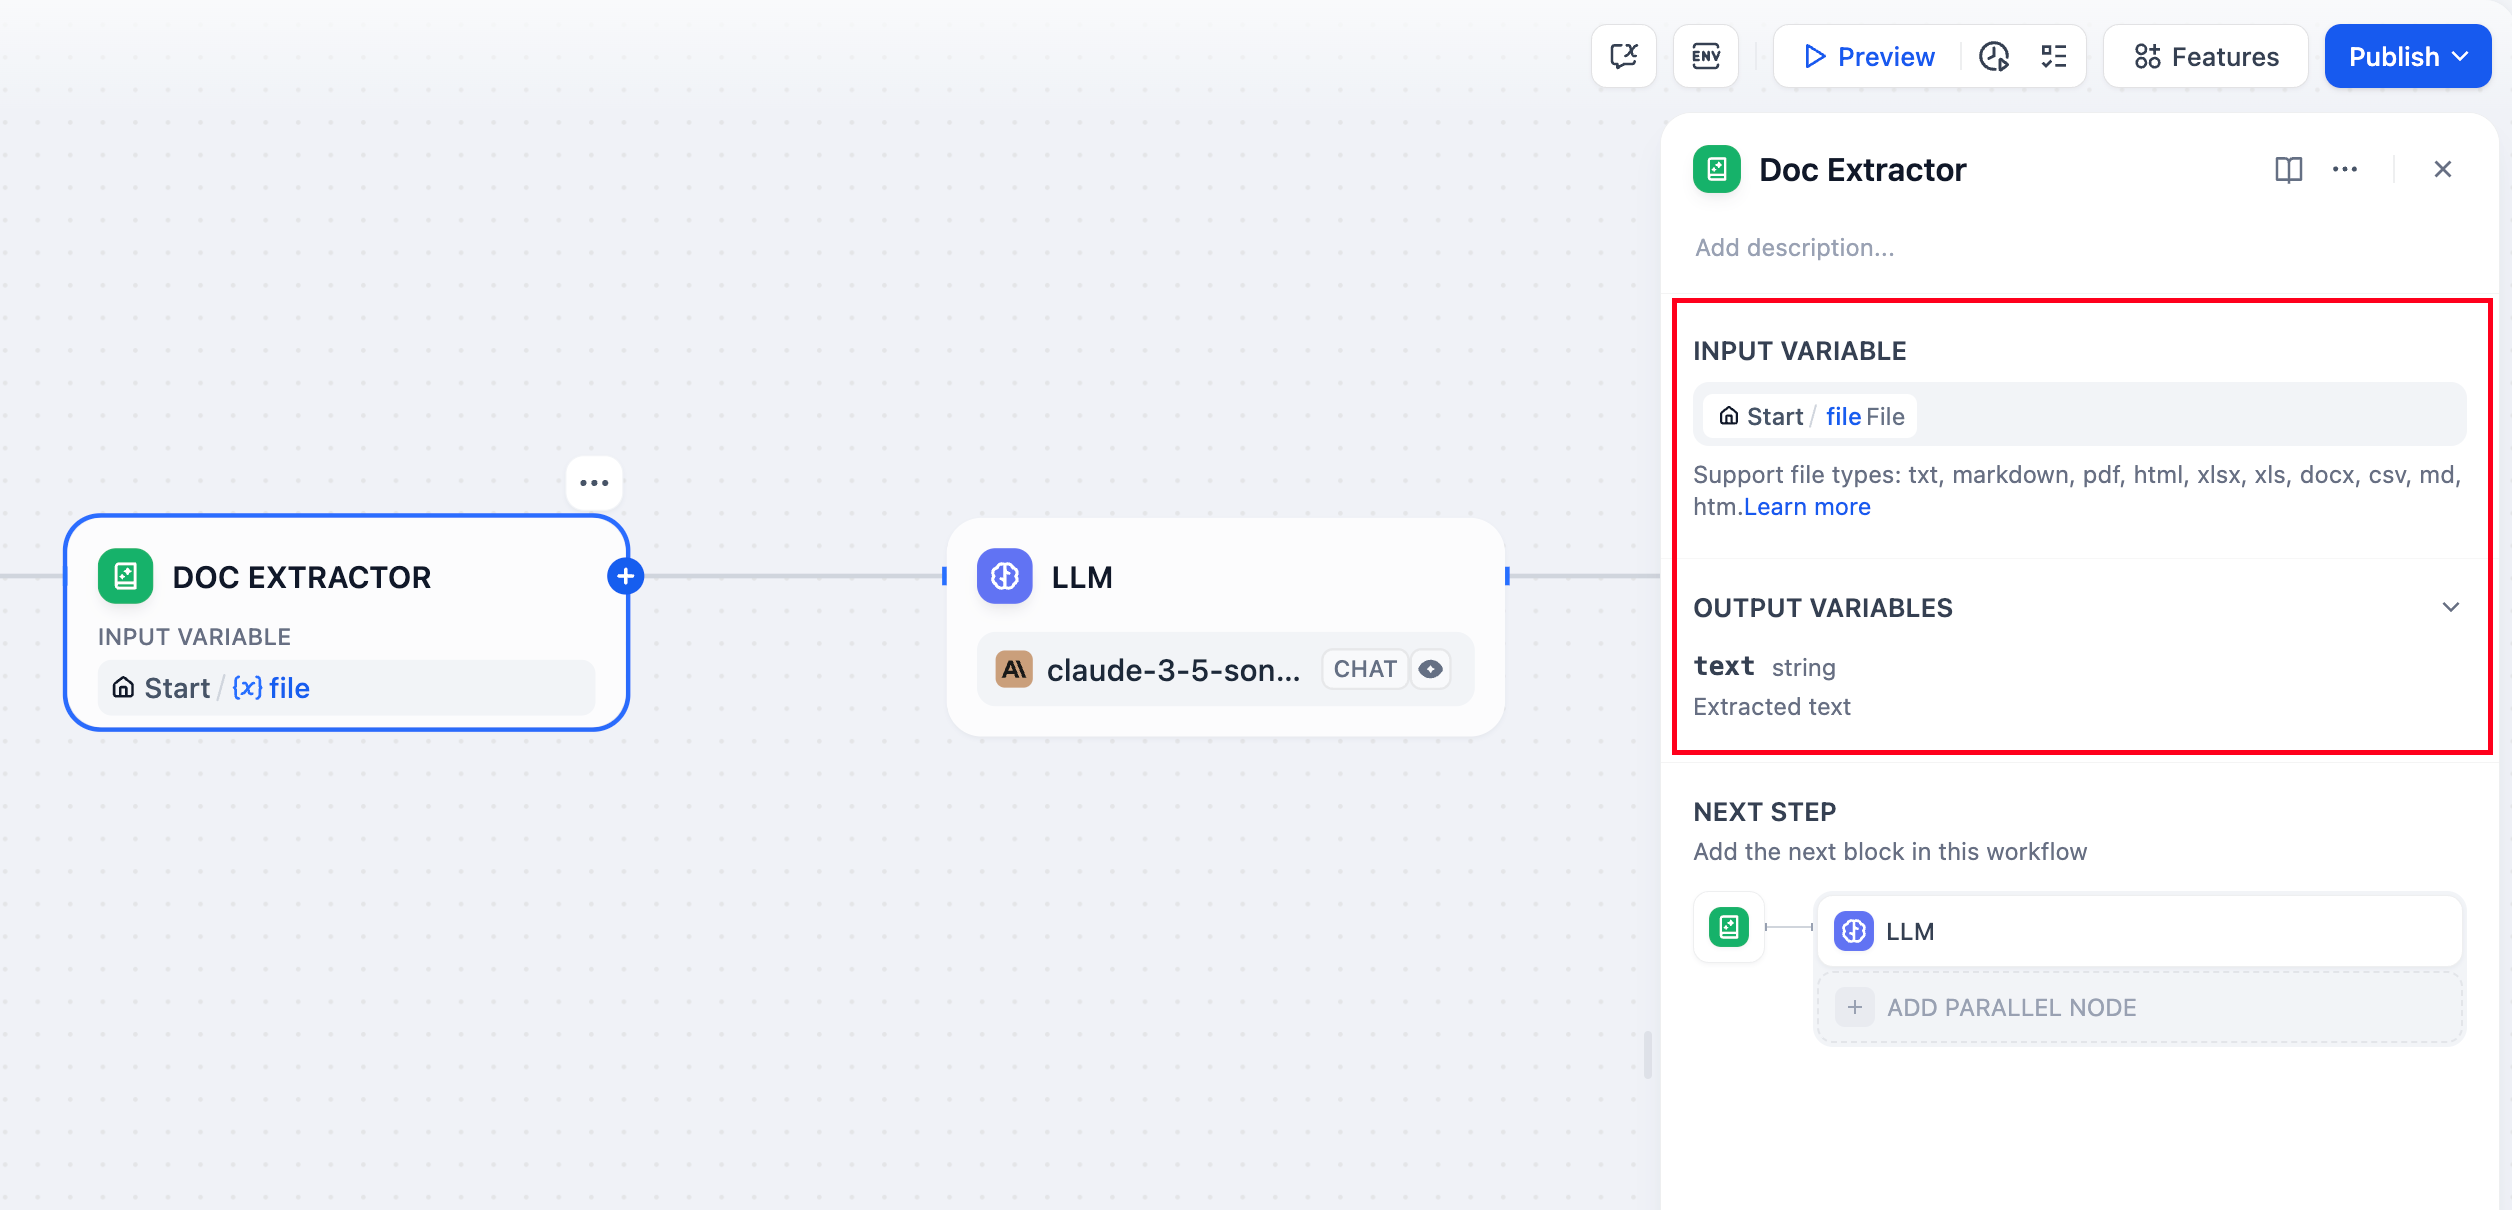
## Supported File Types
The node handles most text-based document formats:
**Text Documents** - TXT, Markdown, HTML files with direct text content
**Office Documents** - DOCX files from Microsoft Word and compatible applications
**PDF Documents** - Text-based PDFs using pypdfium2 for accurate text extraction
**Office Files** - DOC files require Unstructured API, DOCX files support direct parsing with table extraction converted to Markdown format
**Spreadsheets** - Excel (.xls/.xlsx) and CSV files converted to Markdown tables
**Presentations** - PowerPoint (.ppt/.pptx) files processed via Unstructured API
**Email Formats** - EML and MSG files for email content extraction
**Specialized Formats** - EPUB books, VTT subtitles, JSON/YAML data, and Properties files
Files containing primarily binary content like images, audio, or video require specialized processing tools or external services.
## Input and Output
### Input Configuration
Configure the node to accept either:
**Single File** input from a file variable (typically from the Start node)
**Multiple Files** as an array for batch document processing
### Output Structure
The node outputs extracted text content:
* Single file input produces a `string` containing the extracted text
* Multiple file input produces an `array[string]` with each file's content
The output variable is named `text` and contains the raw text content ready for downstream processing.
## Implementation Example
Here's a complete document Q\&A workflow using the Document Extractor:
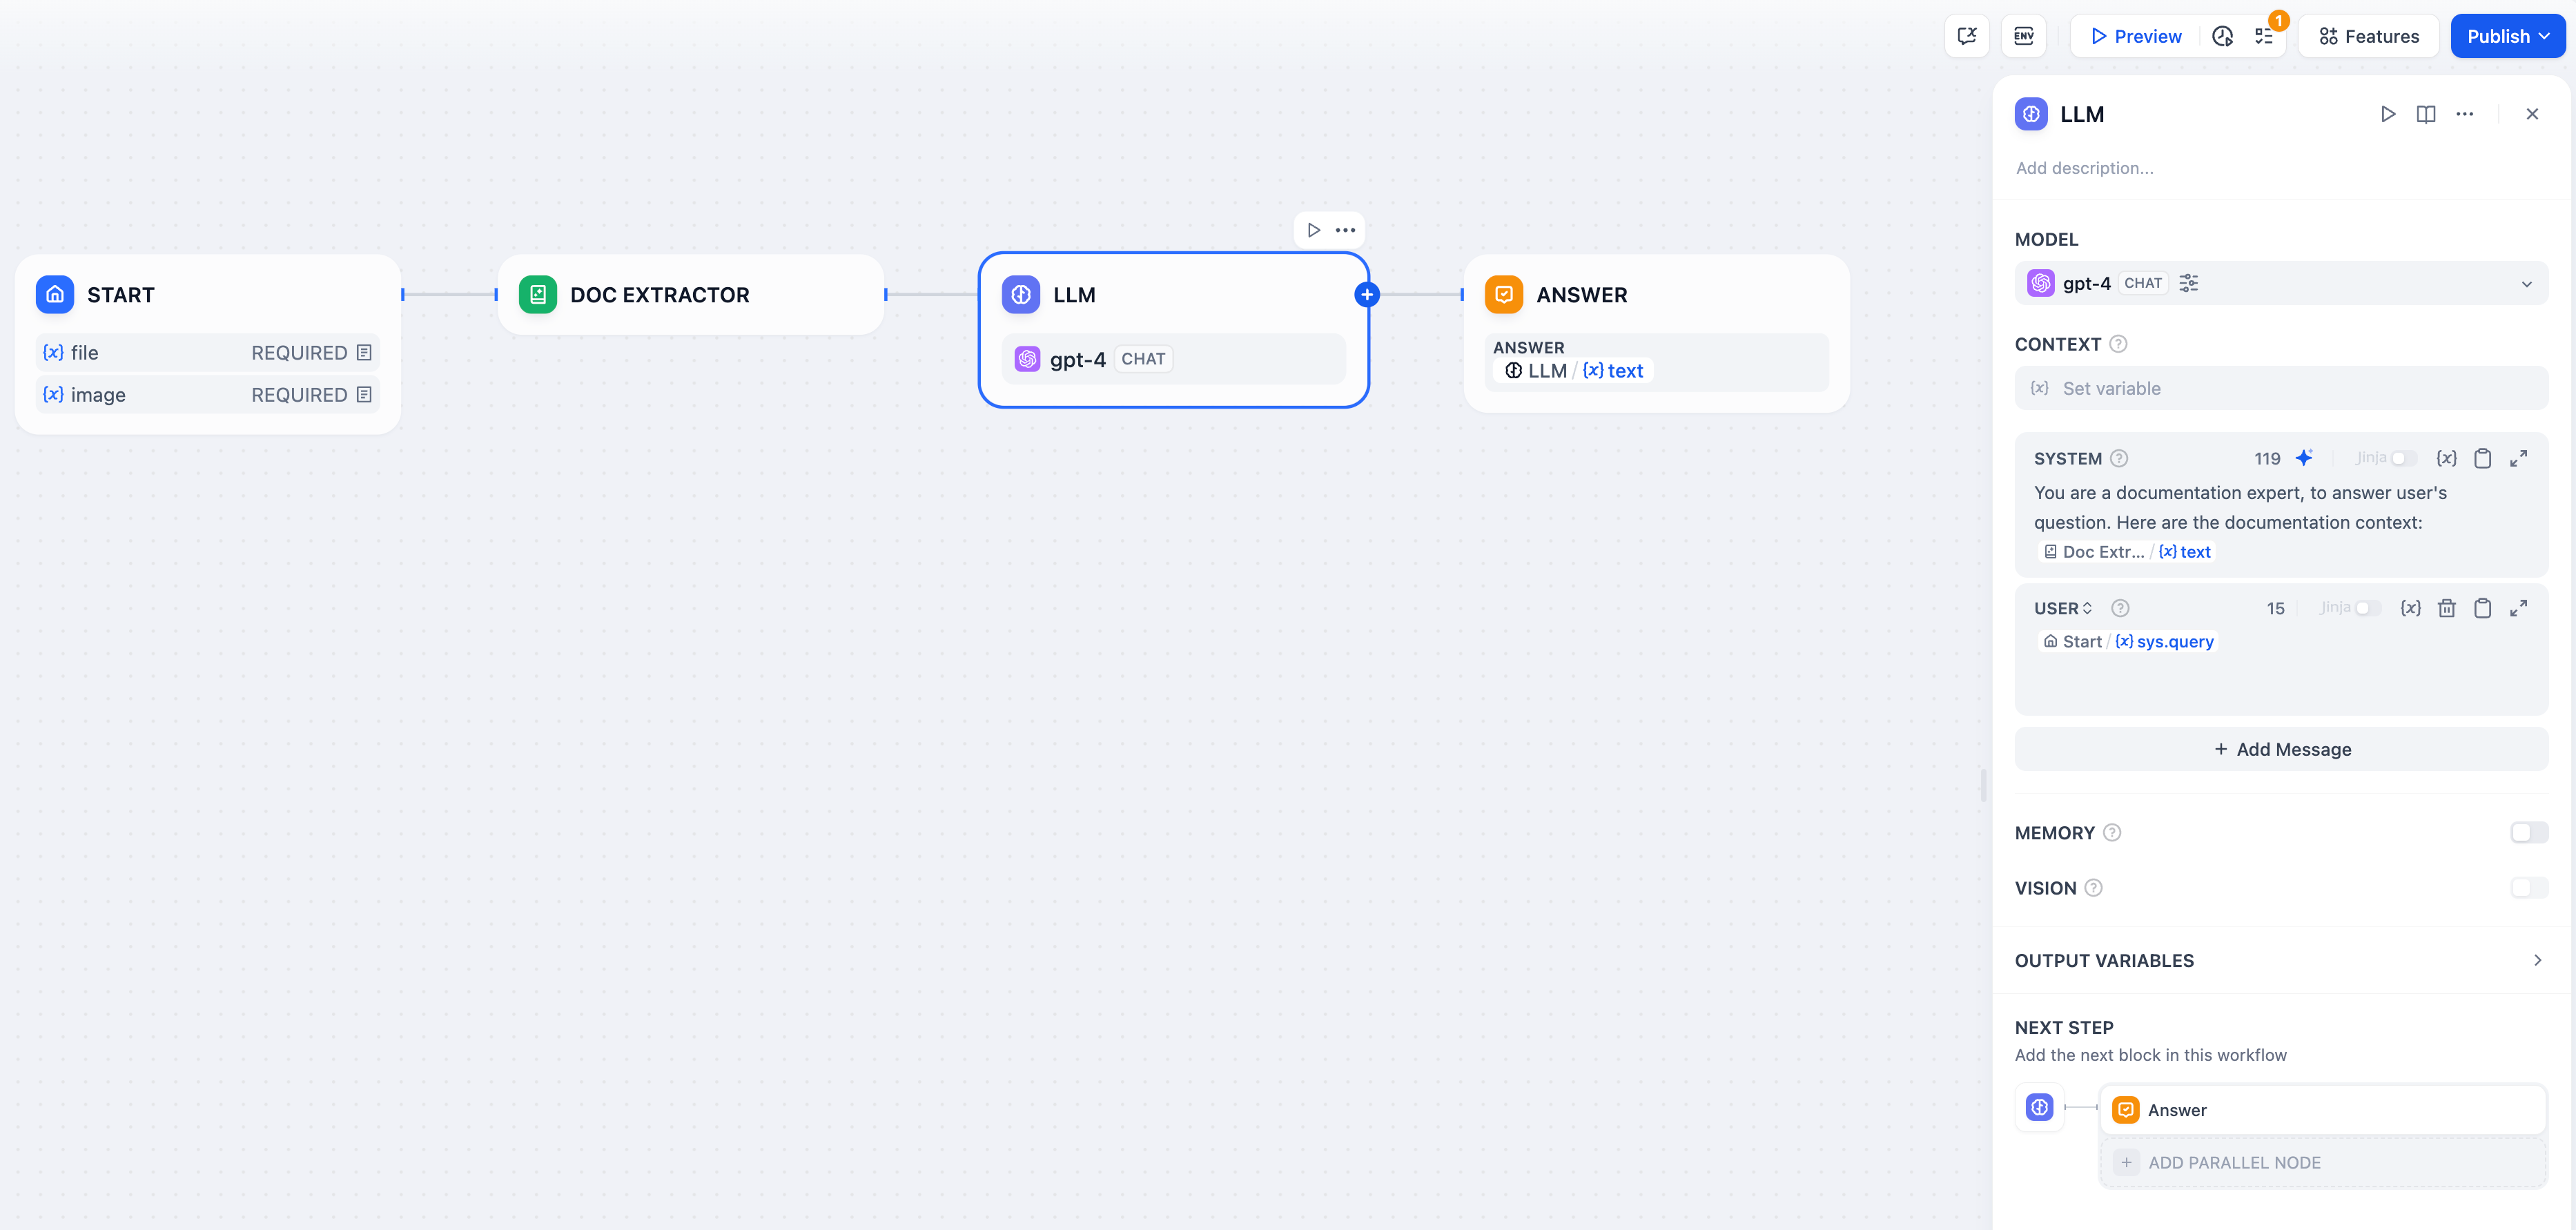
### Workflow Setup
**File Upload Configuration** - Enable file input in your Start node to accept document uploads from users.
**Text Extraction** - Connect the Document Extractor to process uploaded files and extract their text content.
**AI Processing** - Use the extracted text in LLM prompts for analysis, summarization, or question answering.
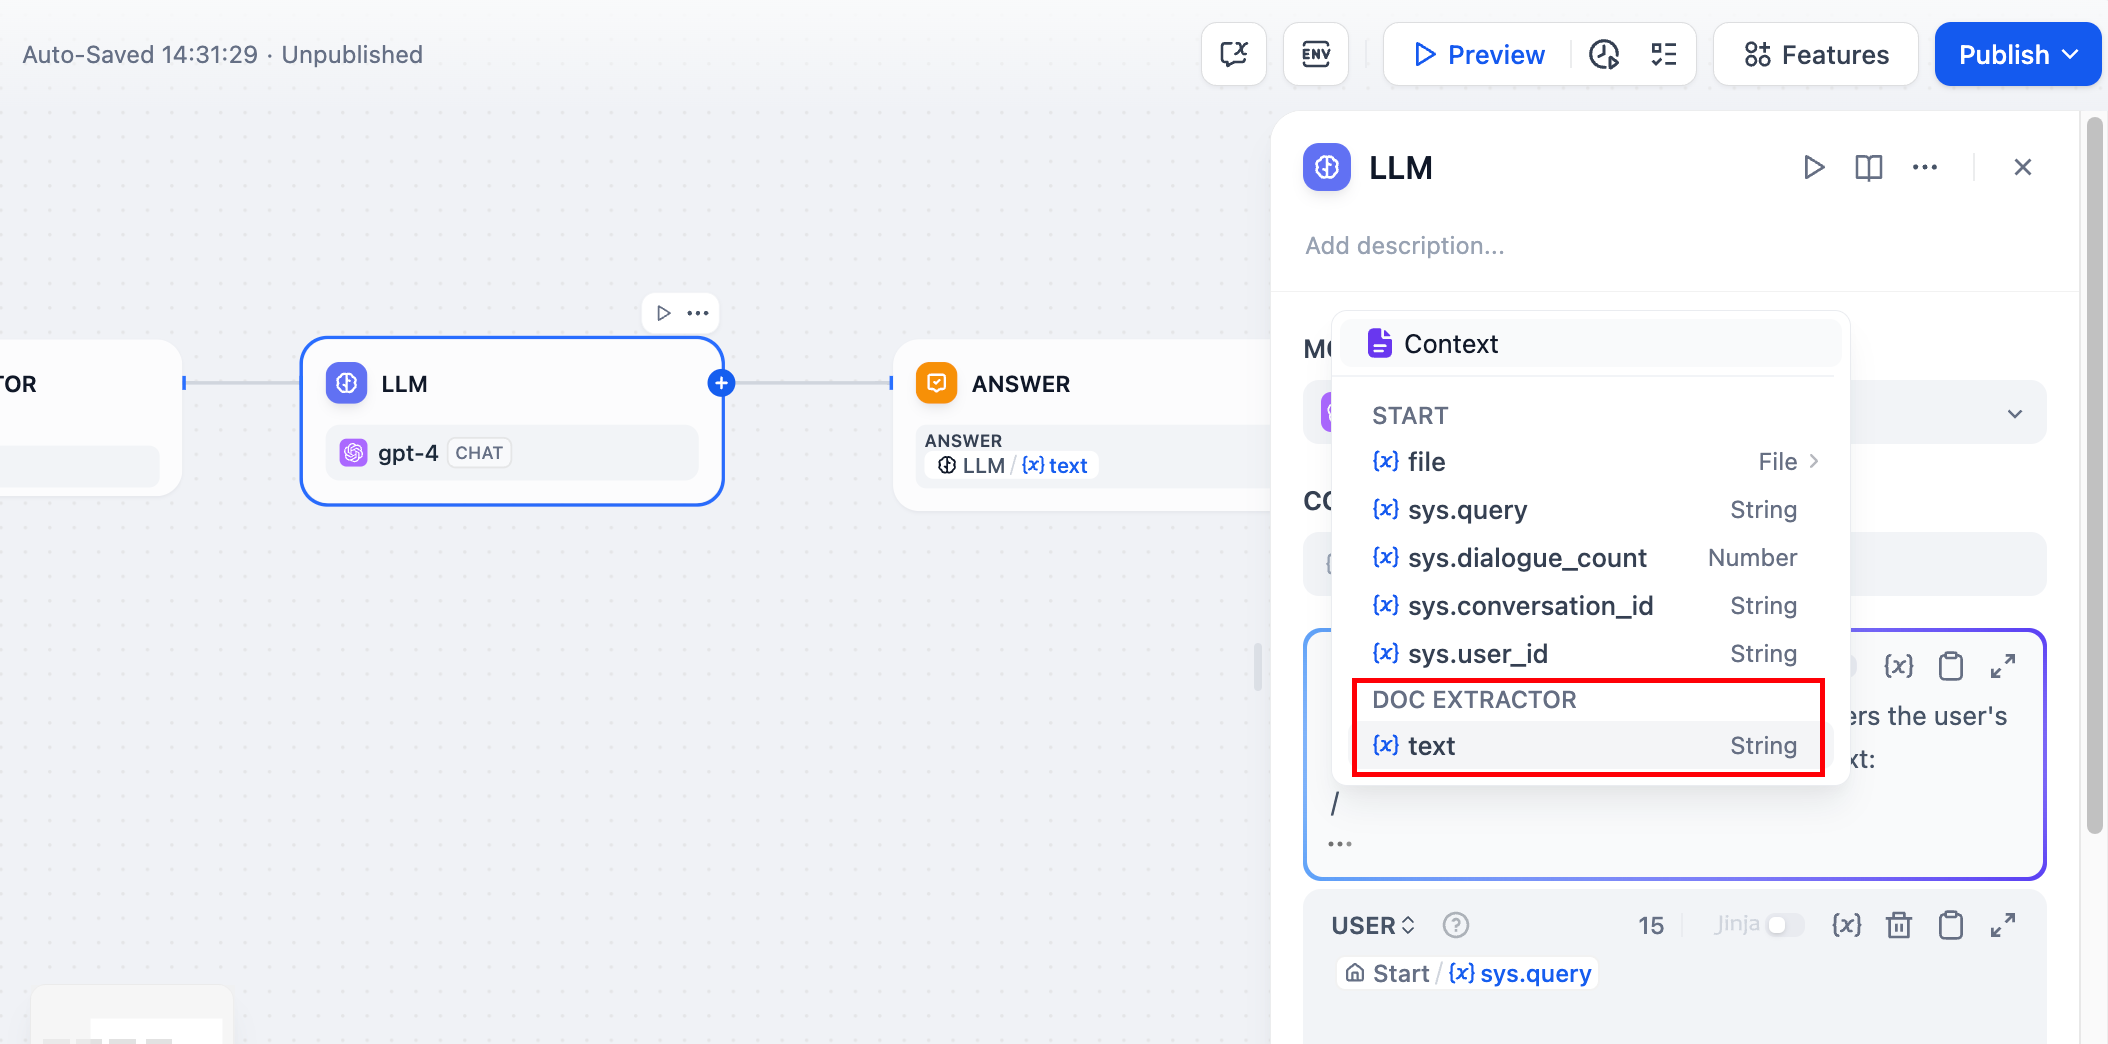
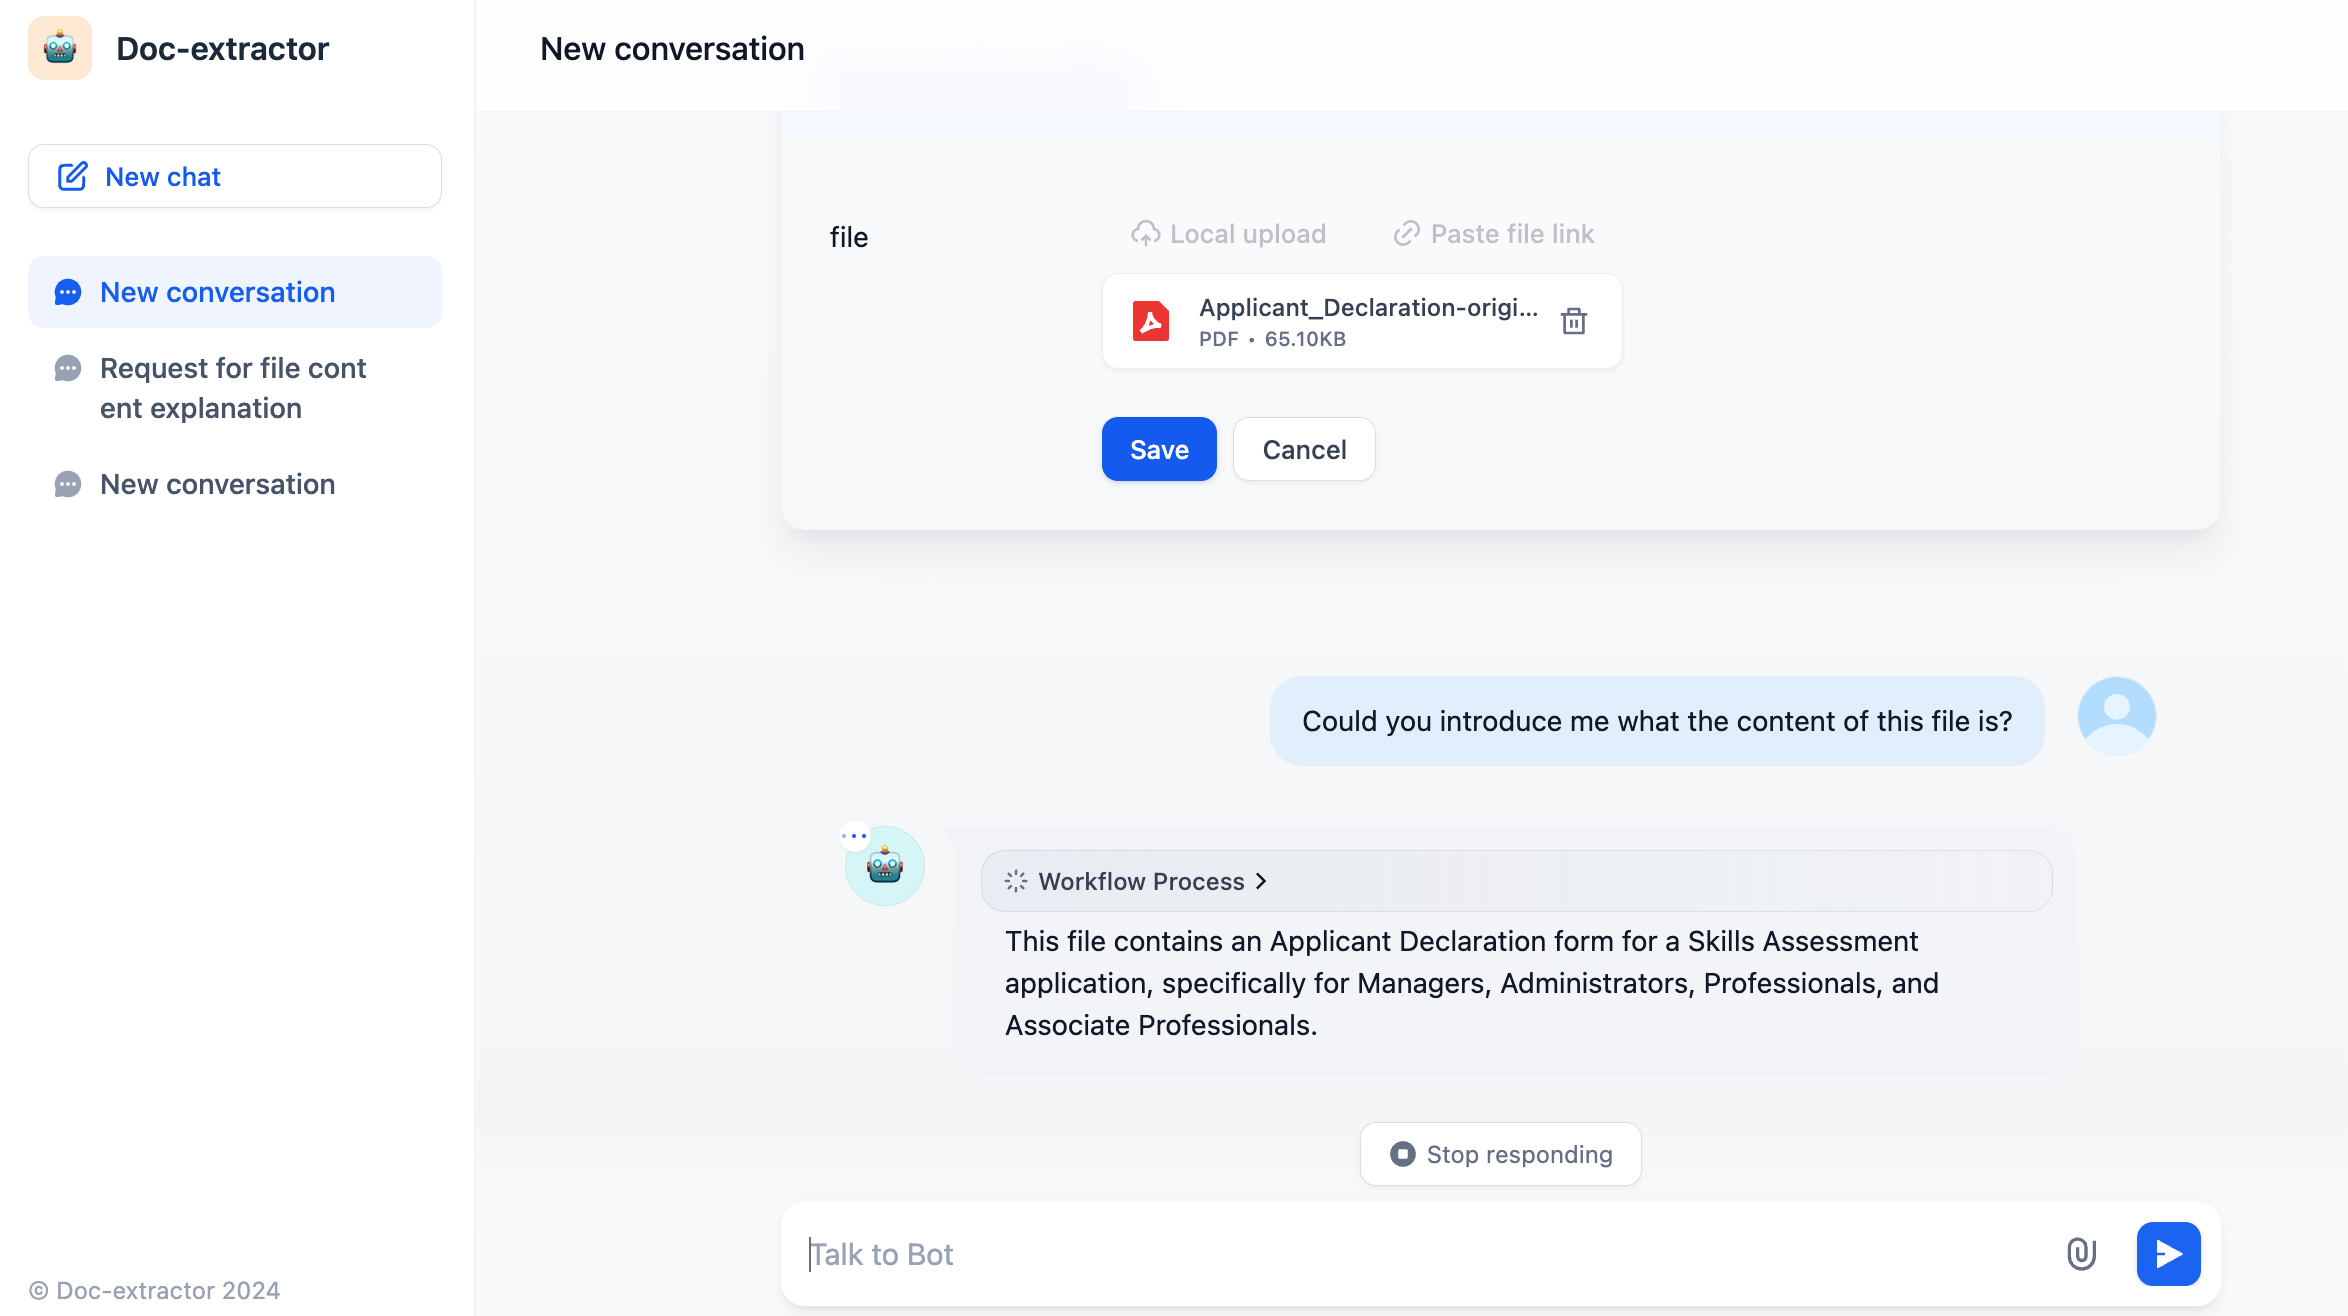
## Processing Considerations
The Document Extractor uses specialized parsing libraries optimized for different file formats. It preserves text structure and formatting where possible, making extracted content more useful for LLM processing.
### File Format Processing
**Encoding Detection** - Uses chardet library to automatically detect file encoding with UTF-8 fallback for text-based files
**Table Conversion** - Excel and CSV data becomes Markdown tables for better LLM comprehension
**Document Structure** - DOCX files maintain paragraph and table ordering with proper table-to-Markdown conversion
**Multi-line Content** - VTT subtitle files merge consecutive utterances by the same speaker
### External Dependencies
Some file formats require the **Unstructured API** service configured via `UNSTRUCTURED_API_URL` and `UNSTRUCTURED_API_KEY`:
* DOC files (legacy Word documents)
* PowerPoint presentations (if using API processing)
* EPUB books (if using API processing)
For very large documents, consider the LLM's context limits and implement chunking strategies if needed. The extracted text maintains the original document's logical structure to preserve meaning and context.
# HTTP Request
Source: https://docs.dify.ai/en/use-dify/nodes/http-request
Connect to external APIs and web services
The HTTP Request node connects your workflow to external APIs and web services. Use it to fetch data, send webhooks, upload files, or integrate with any service that accepts HTTP requests.
## HTTP Methods
The node supports all standard HTTP methods for different types of operations:
**GET** retrieves data from servers without modifying anything. Use for fetching user profiles, searching databases, or getting current status.
**HEAD** gets response headers without the full response body. Useful for checking if resources exist or getting metadata.
**POST** sends data to servers, typically for creating new resources. Use for form submissions, file uploads, or sending JSON payloads.
**PUT** creates or completely replaces resources. Use when you want to set the entire state of a resource.
**PATCH** makes partial updates to existing resources. Use when you only need to modify specific fields.
**DELETE** removes resources from servers. Use for deleting files, user accounts, or any resource that should be removed.
## Configuration
Configure every aspect of your HTTP request including URL, headers, query parameters, request body, and authentication. Variables from previous workflow nodes can be dynamically inserted anywhere in your request configuration.
### Variable Substitution
Reference workflow variables using double curly braces: `{{variable_name}}`. Dify supports deep object access, so you can extract nested values like `{{api_response.data.items[0].id}}` from previous HTTP responses.
### Timeout Configuration
HTTP requests have configurable timeouts to prevent hanging:
* **Connect timeout**: Maximum time to establish connection (default varies by deployment)
* **Read timeout**: Maximum time to read response data
* **Write timeout**: Maximum time to send request data
Timeouts are enforced to maintain workflow performance and prevent resource exhaustion.
### Authentication
The node supports multiple authentication types:
**No Auth** (`type: "no-auth"`) - No authentication headers added
**API Key** (`type: "api-key"`) with three subtypes:
* **Basic** (`type: "basic"`) - Adds Basic Auth header with base64 encoding
* **Bearer** (`type: "bearer"`) - Adds `Authorization: Bearer ` header
* **Custom** (`type: "custom"`) - Adds custom header with specified name and value
### Request Body
Choose the appropriate body type based on your API requirements:
* **JSON** for structured data
* **Form Data** for traditional web forms
* **Binary** for file uploads
* **Raw Text** for custom content types
## File Detection
The HTTP Request node automatically detects file responses using sophisticated logic:
1. **Content-Disposition analysis** - Checks for `attachment` disposition or filename parameters
2. **MIME type evaluation** - Analyzes content types to distinguish text from binary
3. **Content sampling** - For ambiguous types, samples first 1024 bytes to detect text patterns
Text-based responses (JSON, XML, HTML, etc.) are treated as regular data, while binary content becomes file variables.
## File Operations
The HTTP Request node handles file uploads and downloads seamlessly:
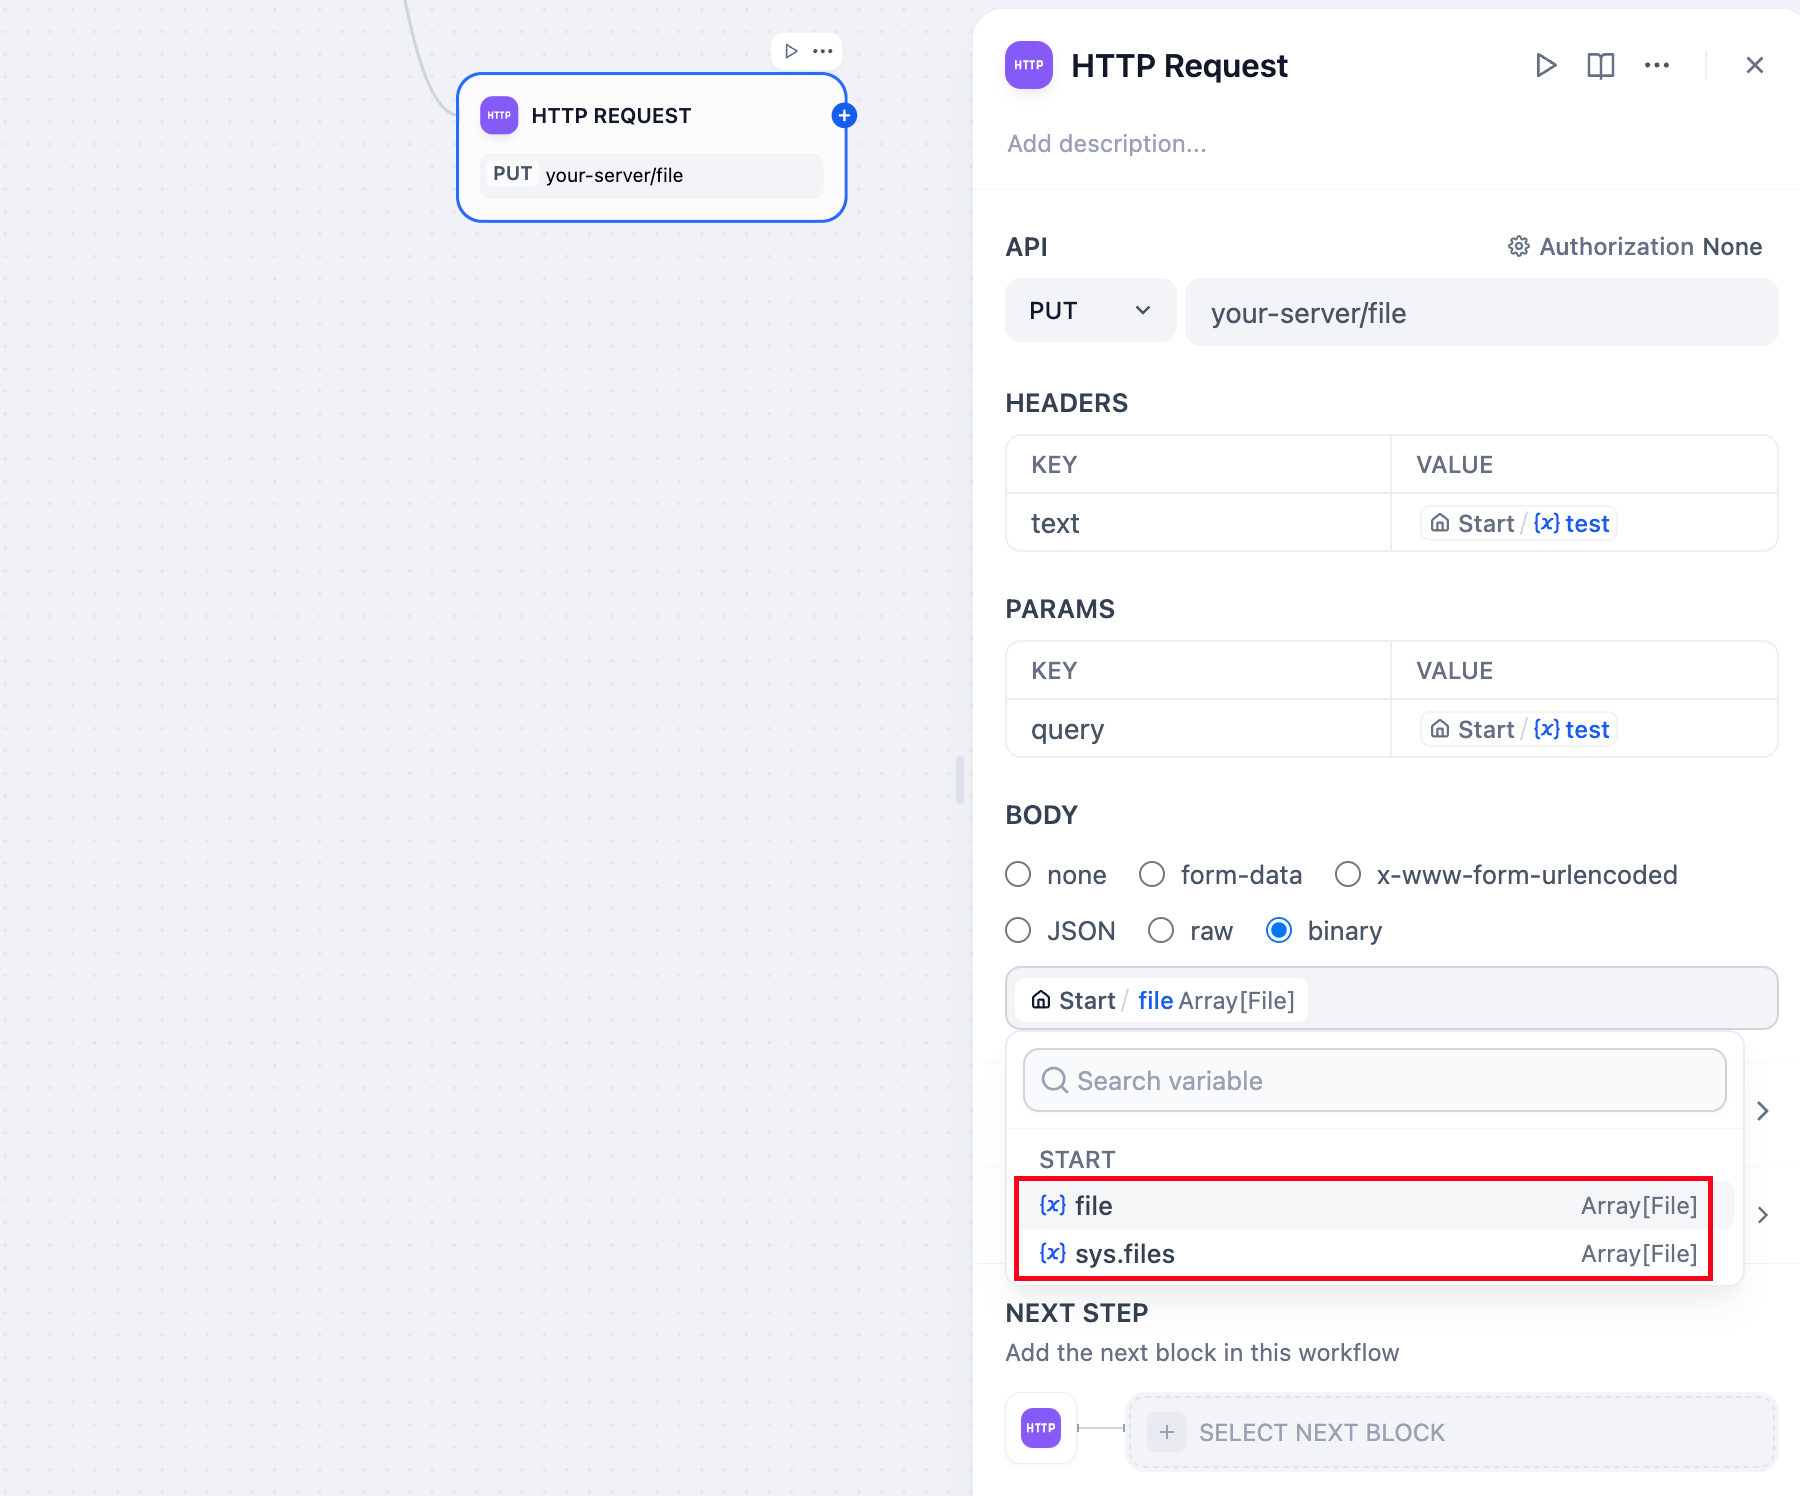
**File Uploads** use the binary request body option. Select file variables from previous nodes to send files to external services for document storage, media processing, or backup.
**File Downloads** are automatically handled when responses contain file content. Downloaded files become available as file variables for use in downstream nodes.
## Error Handling and Retries
Configure robust error handling for production workflows that depend on external services:
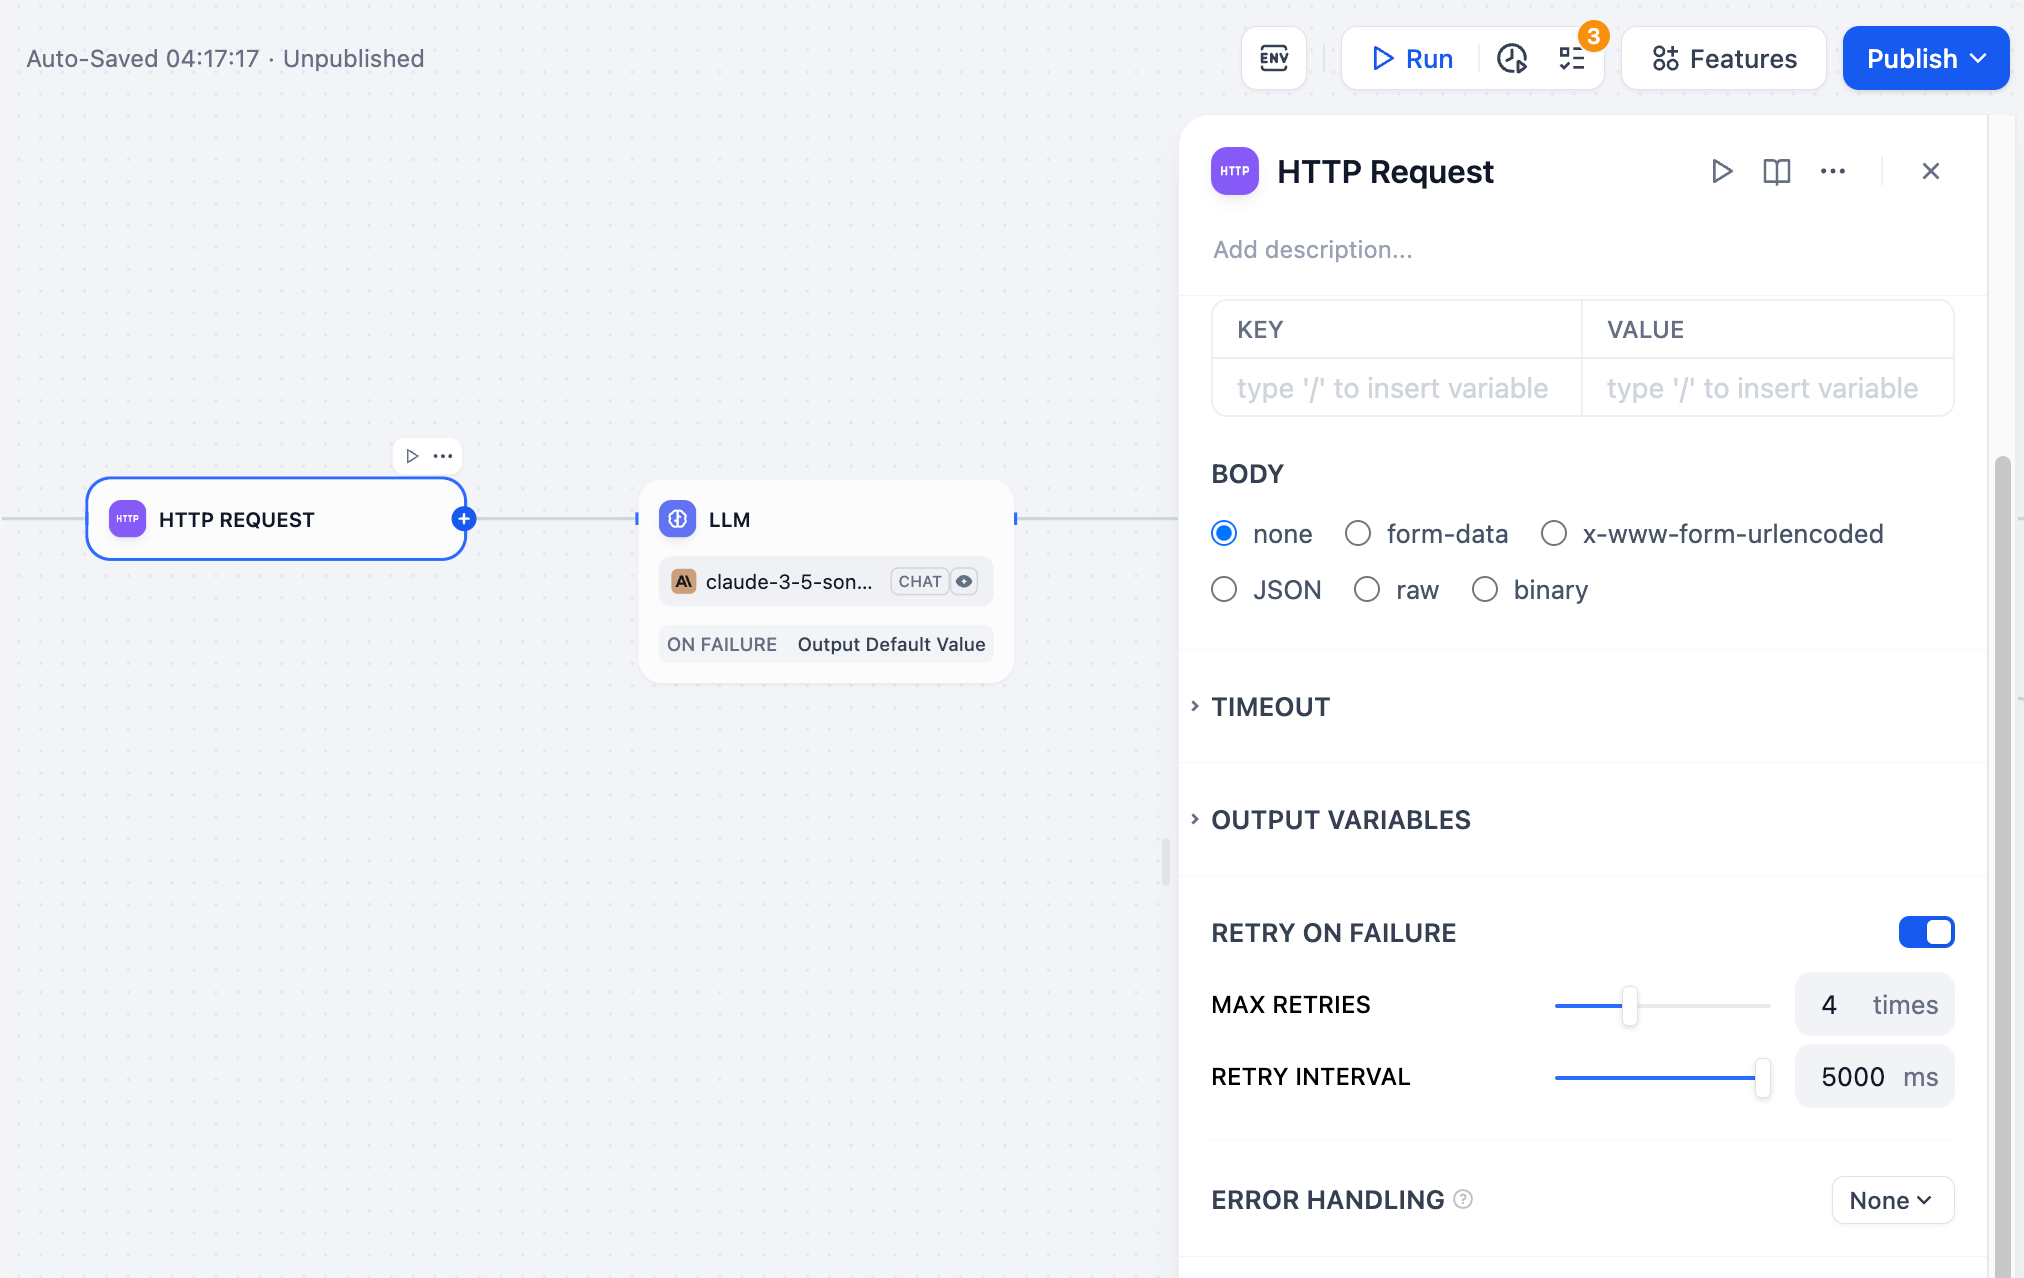
**Retry Settings** automatically retry failed requests up to 10 times with configurable intervals (maximum 5000ms). This handles temporary network issues or service unavailability.
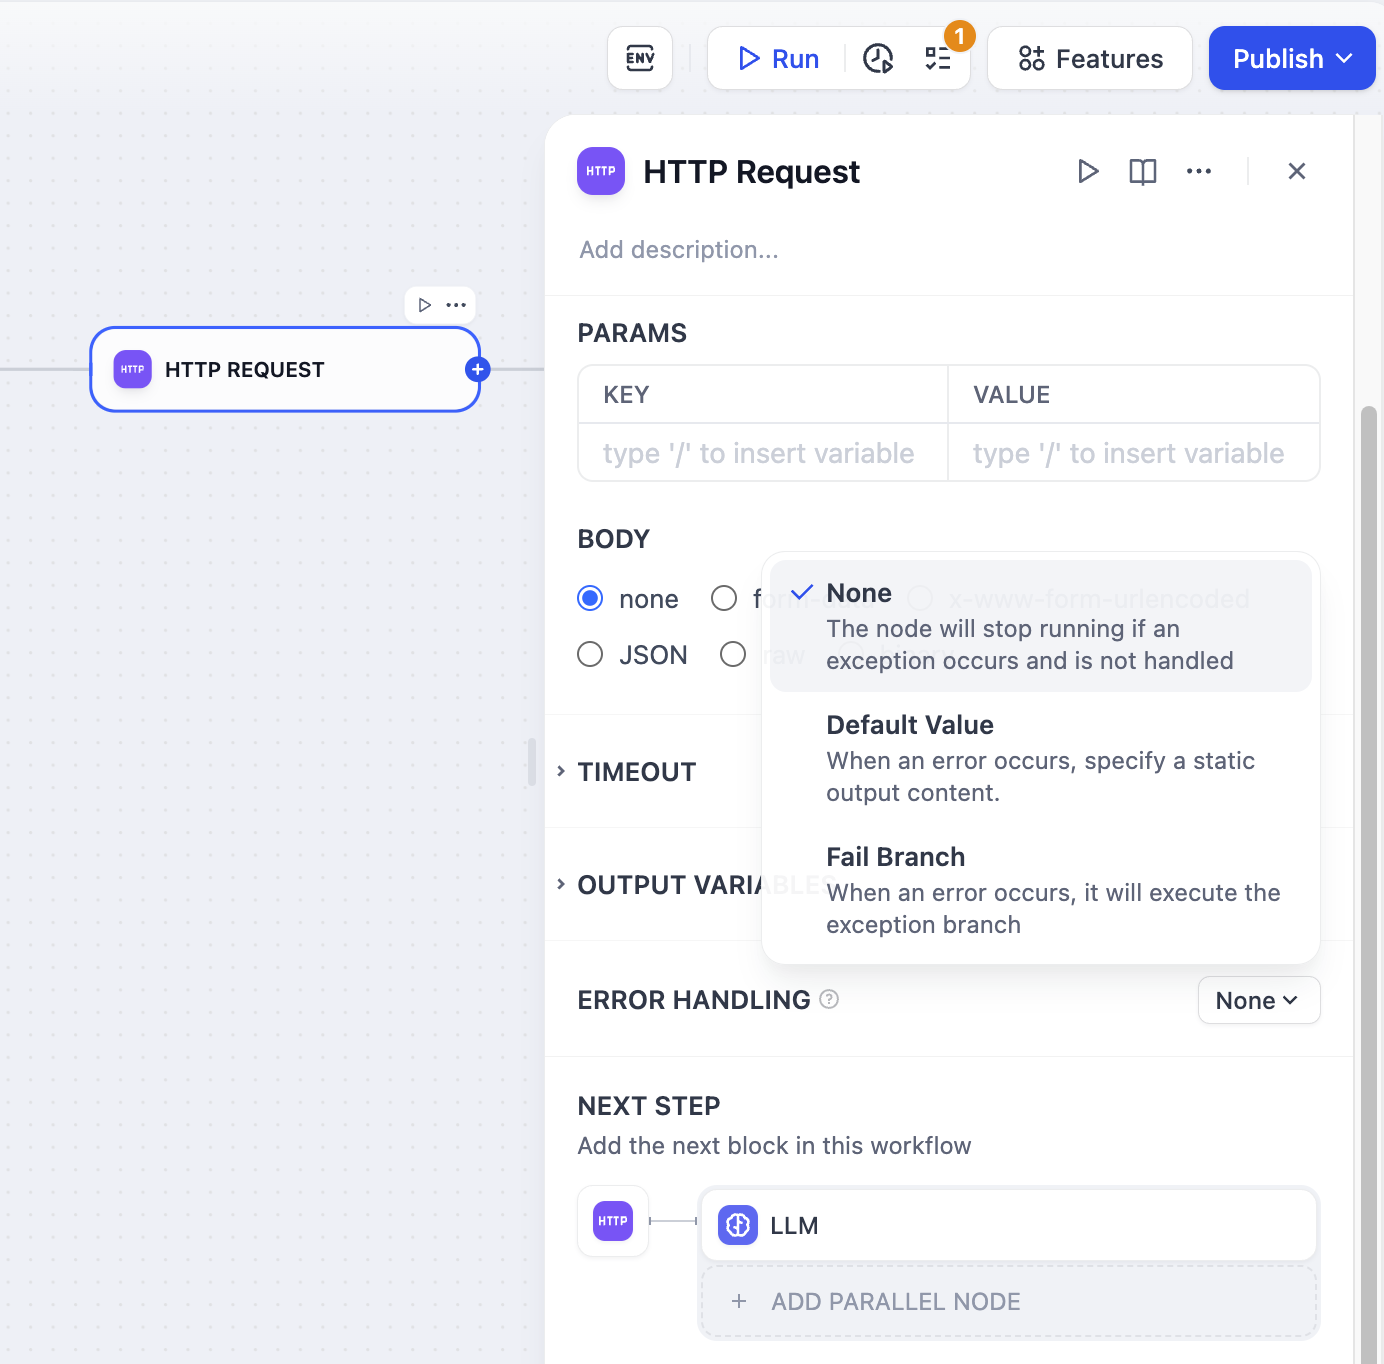
**Error Handling** defines alternative workflow paths when HTTP requests fail, ensuring your workflow continues executing even when external APIs are unavailable.
## Response Processing
HTTP responses become structured variables in subsequent nodes with separate access to:
* **Response Body** - The main content returned by the API
* **Status Code** - HTTP status for conditional logic
* **Headers** - Response metadata as key-value pairs
* **Files** - Any file content returned by the API
* **Size Information** - Content size in bytes with readable formatting (KB/MB)
### SSL Verification
SSL certificate verification is configurable per node (`ssl_verify` parameter). This allows connections to internal services with self-signed certificates while maintaining security for external APIs.
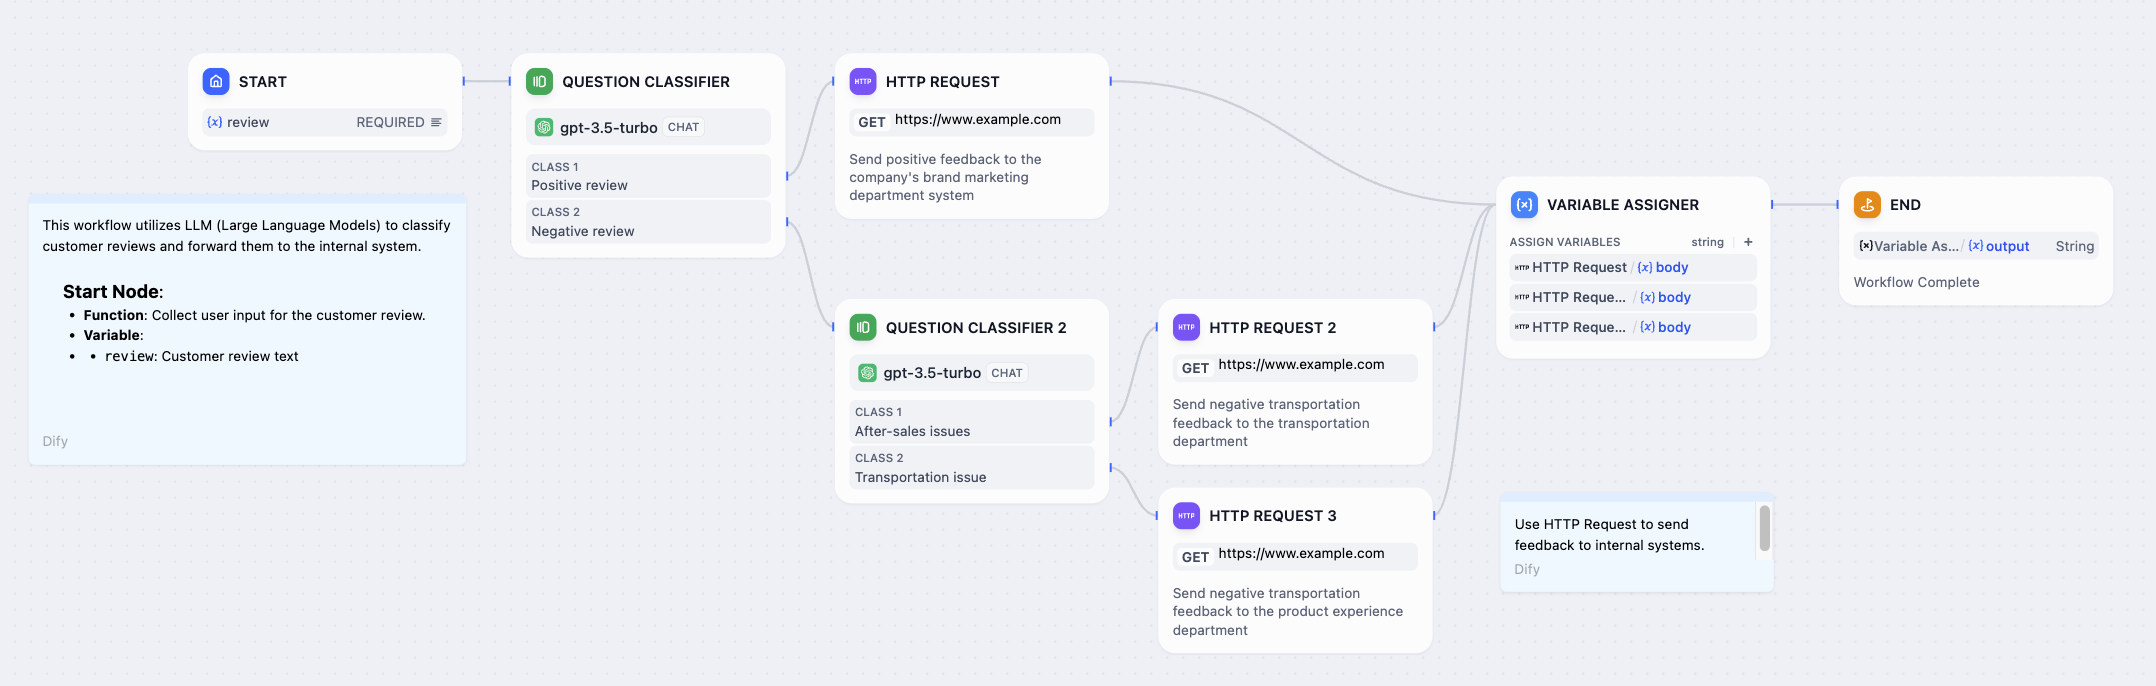
# Human Input
Source: https://docs.dify.ai/en/use-dify/nodes/human-input
Pause workflows to request human input, review, or decisions
The Human Input node pauses workflows at key points to request human input before execution continues.
When execution reaches this node, a customizable request form is delivered through specific channels. Recipients can provide input, review data, and choose from predefined decisions that determine how the workflow proceeds.
By embedding human judgement directly where it matters, you can **balance automated efficiency with human oversight**.
![Request Form Example]() ## Configuration
Configure the following to define how the node requests and processes human input:
* **Delivery method**: How the request form reaches recipients.
* **Form content**: What information recipients will see and what they can input.
* **User action**: What decisions recipients can make and how the workflow proceeds accordingly.
* **Timeout strategy**: How long to wait and what happens if no recipient responds.
### Delivery Method
Choose the channel through which the request is delivered. Currently available methods:
* **Web app**: Displays the request form directly in the web app interface for the current user to respond.
* **Email**: Sends an email containing the request link to one or more recipients.
The request closes after the first response regardless of delivery method.
### Form Content
Customize what appears in the request form:
* **Format and structure with Markdown**
Use headings, lists, bold text, links, and other Markdown elements to present information clearly.
* **Display dynamic data with variables**
Reference workflow variables to show dynamic content, such as AI-generated text for review or any needed contextual information from upstream nodes.
If you reference the `text` output variable from a reasoning model, the form will display the model's thinking process along with the final answer by default.
To show only the answer, toggle on **Enable Reasoning Tag Separation** for the corresponding LLM node.
* **Collect input with input fields**
Input fields can start empty or pre-filled with variables (e.g., LLM output to refine) or static text (e.g., example or default values) that recipients can edit.
Each input field becomes a variable for downstream use. For instance, pass edited content for further processing or send feedback to an LLM for regeneration.
### User Action
Define the decision buttons that recipients can click. Each button routes the workflow to a different execution path.
For example, a `Post` branch might lead to nodes that trigger content publishing, while a `Regenerate` branch might loop back to an LLM node to revise the content.
Use preset button styles to visually distinguish actions.
For example, use a prominent style for key actions like `Approve` and a subtler one for secondary options.
### Timeout Strategy
Configure how long to wait for a response before the request expires.
If no recipient responds within the set time, the workflow automatically ends unless you define a fallback branch to handle the timeout—for example, send a notification or retry the request.
# If-Else
Source: https://docs.dify.ai/en/use-dify/nodes/ifelse
Add conditional logic and branching to workflows
The If-Else node adds decision-making logic to your workflows by routing execution down different paths based on conditions you define. It evaluates variables and determines which branch your workflow should follow.

## Branching Logic
The node supports multiple branching paths to handle complex decision trees:
**IF Path** executes when the primary condition evaluates to true.
**ELIF Paths** provide additional conditions to check in sequence when the IF condition is false. You can add multiple ELIF branches for complex logic.
**ELSE Path** serves as the fallback when no conditions match, ensuring your workflow always has a path to follow.
## Condition Types
Configure conditions to test variables using various comparison operators:
**Contains** / **Not contains** - Check if the value includes specific words or phrases
**Starts with** / **Ends with** - Test text beginnings or endings for pattern matching
**Is** / **Is not** - Exact value matching
**Is empty** / **Is not empty** - Check for blank, null, or missing values
**Greater than** / **Less than** - Numerical comparisons for numbers and dates
**Equals** / **Not equals** - Exact matching for any data type
## Complex Conditions
Combine multiple conditions using logical operators for sophisticated decision-making:
**AND Logic** requires all conditions to be true. Use this when you need multiple criteria to be met simultaneously.
**OR Logic** requires any condition to be true. Use this when you want to trigger the same action for different scenarios.
## Variable References
Reference any variable from previous workflow nodes in your conditions. Variables can come from user input, LLM responses, API calls, or any other workflow node output.
Use the variable selector to choose from available variables, or type variable names directly using the `{{variable_name}}` syntax.
# Iteration
Source: https://docs.dify.ai/en/use-dify/nodes/iteration
Process arrays by applying workflows to each element
The Iteration node processes arrays by running the same workflow steps on each element sequentially or in parallel. Use it for batch processing tasks that would otherwise hit limits or be inefficient as single operations.
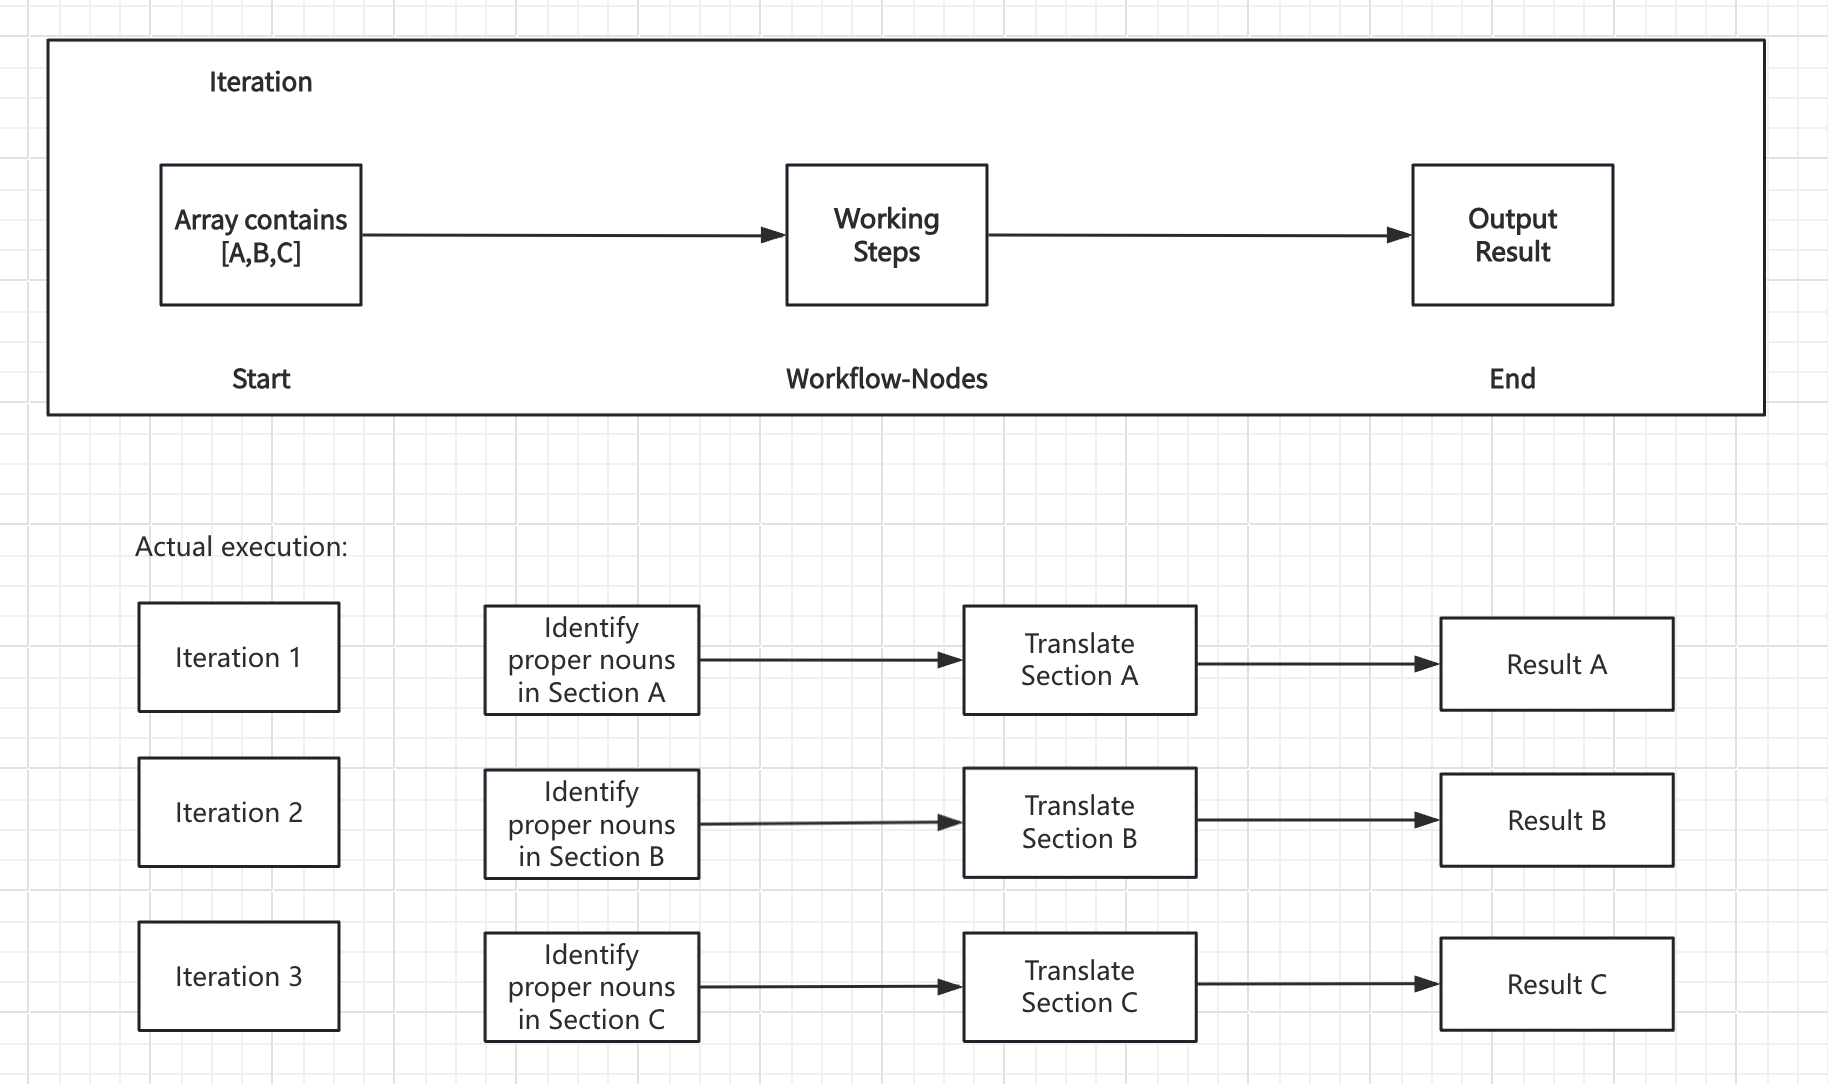
## How Iteration Works
The node takes an array input and creates a sub-workflow that runs once for each array element. During each iteration, the current item and its index are available as variables that internal nodes can reference.
**Core Components:**
* **Input Variables** - Array data from upstream nodes
* **Internal Workflow** - The processing steps to perform on each element
* **Output Variables** - Collected results from all iterations (also an array)
## Configuration
### Array Input
Connect an array variable from upstream nodes such as Parameter Extractor, Code nodes, Knowledge Retrieval, or HTTP Request responses.
### Built-in Variables
Each iteration provides access to:
* `items[object]` - The current array element being processed
* `index[number]` - The current iteration index (starting from 0)
### Processing Mode
**Sequential Processing** - Items processed one after another in order
**Streaming Support** - Results can be output progressively using Answer nodes
**Resource Management** - Lower memory usage, predictable execution order
**Best For** - When order matters or when using streaming output
**Concurrent Processing** - Up to 10 items processed simultaneously
**Improved Performance** - Faster execution for independent operations
**Batch Processing** - Handles large arrays efficiently
**Best For** - Independent operations where order doesn't matter
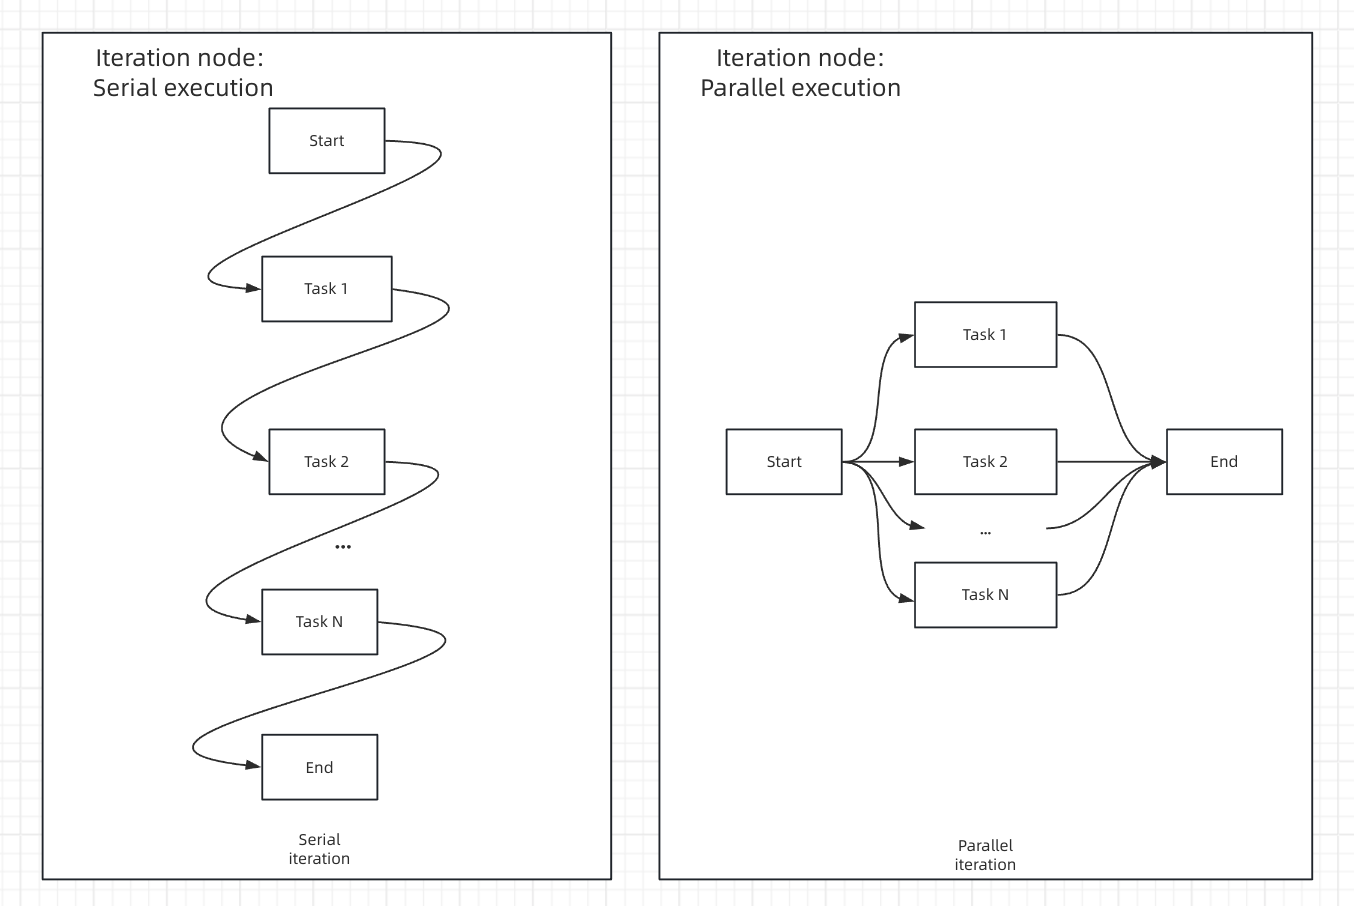
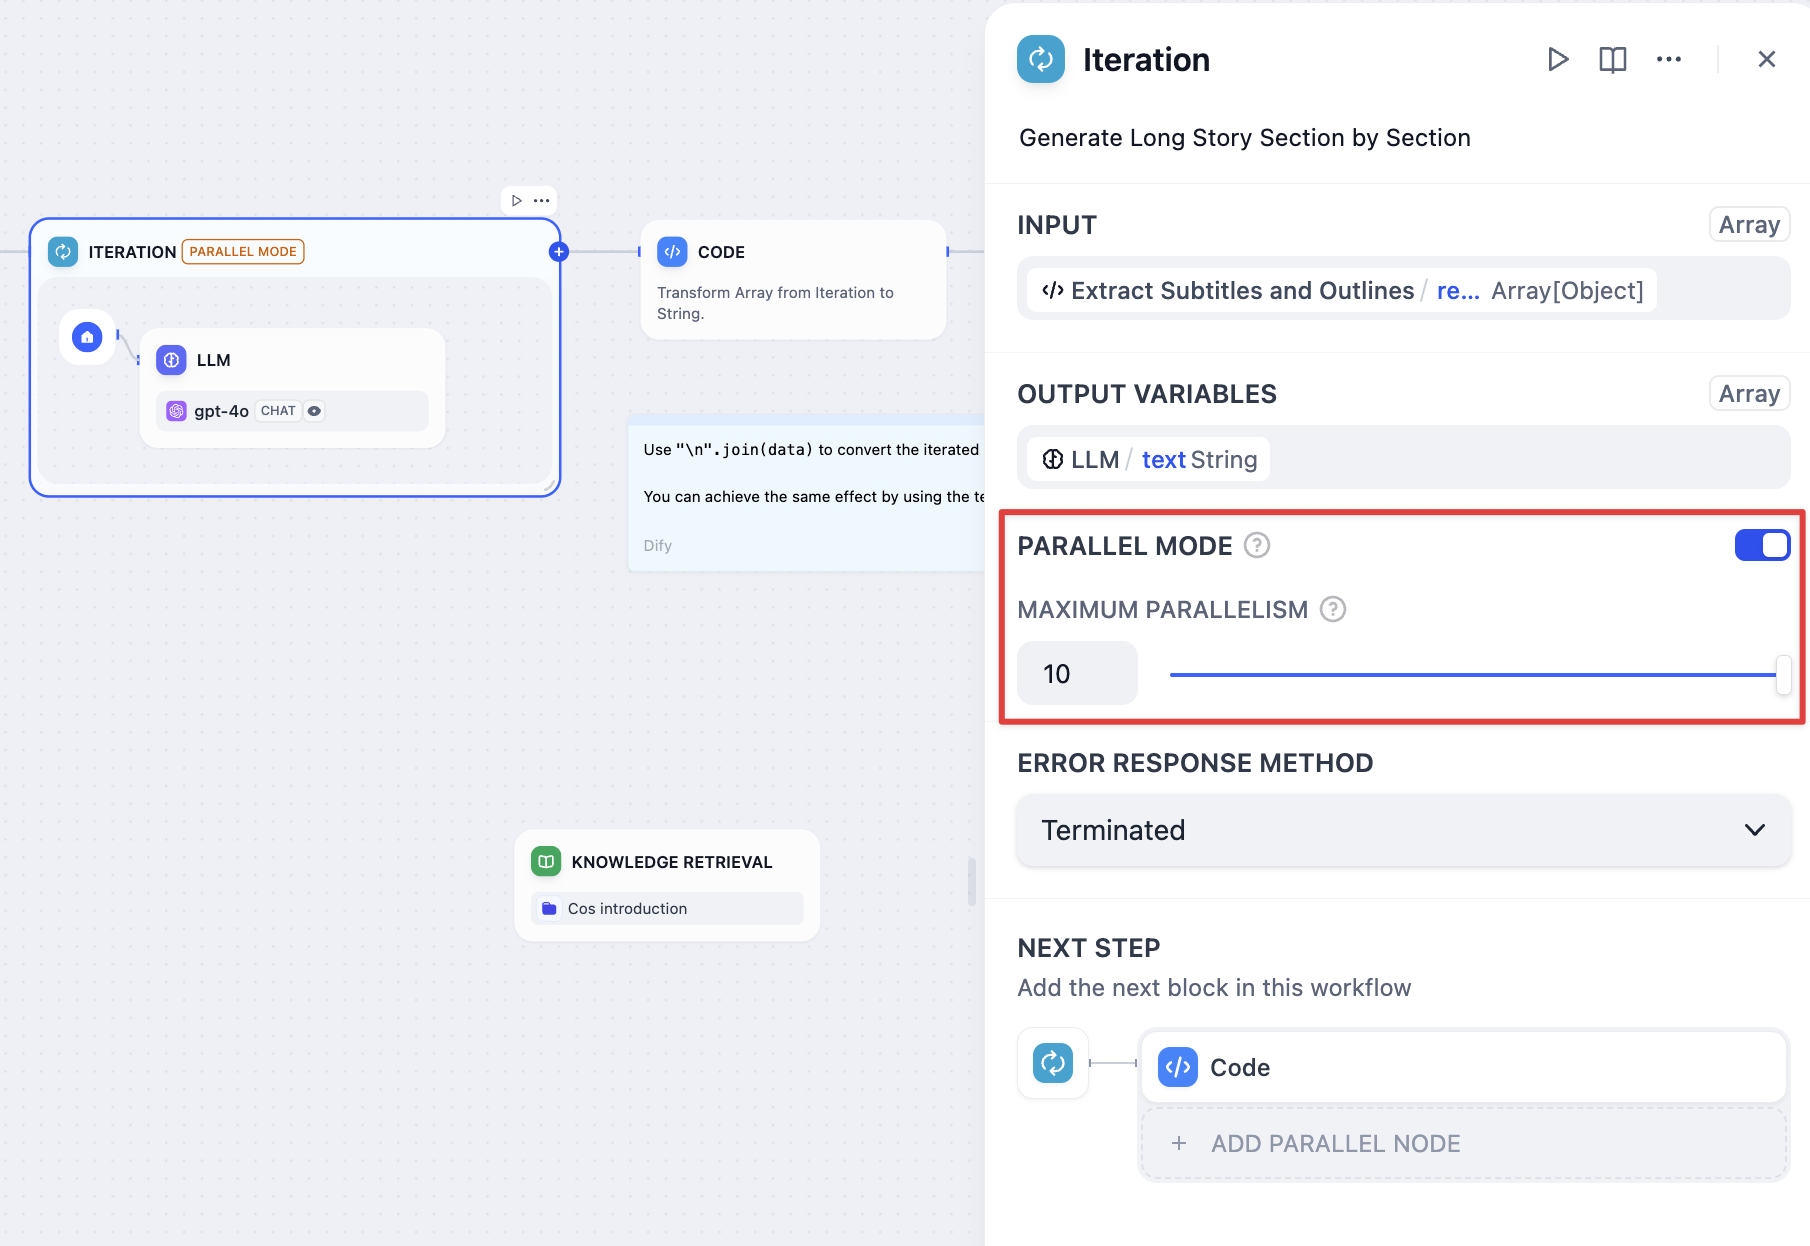
## Error Handling
Configure how to handle processing failures for individual array elements:
**Terminate** - Stop processing when any error occurs and return the error message
**Continue on Error** - Skip failed items and continue processing, outputting null for failed elements
**Remove Failed Results** - Skip failed items and return only successful results
Input-output correspondence examples:
* Input: `[1, 2, 3]`
* Output with Continue on Error: `[result-1, null, result-3]`
* Output with Remove Failed: `[result-1, result-3]`
## Long Article Generation Example
Generate lengthy content by processing chapter outlines individually:
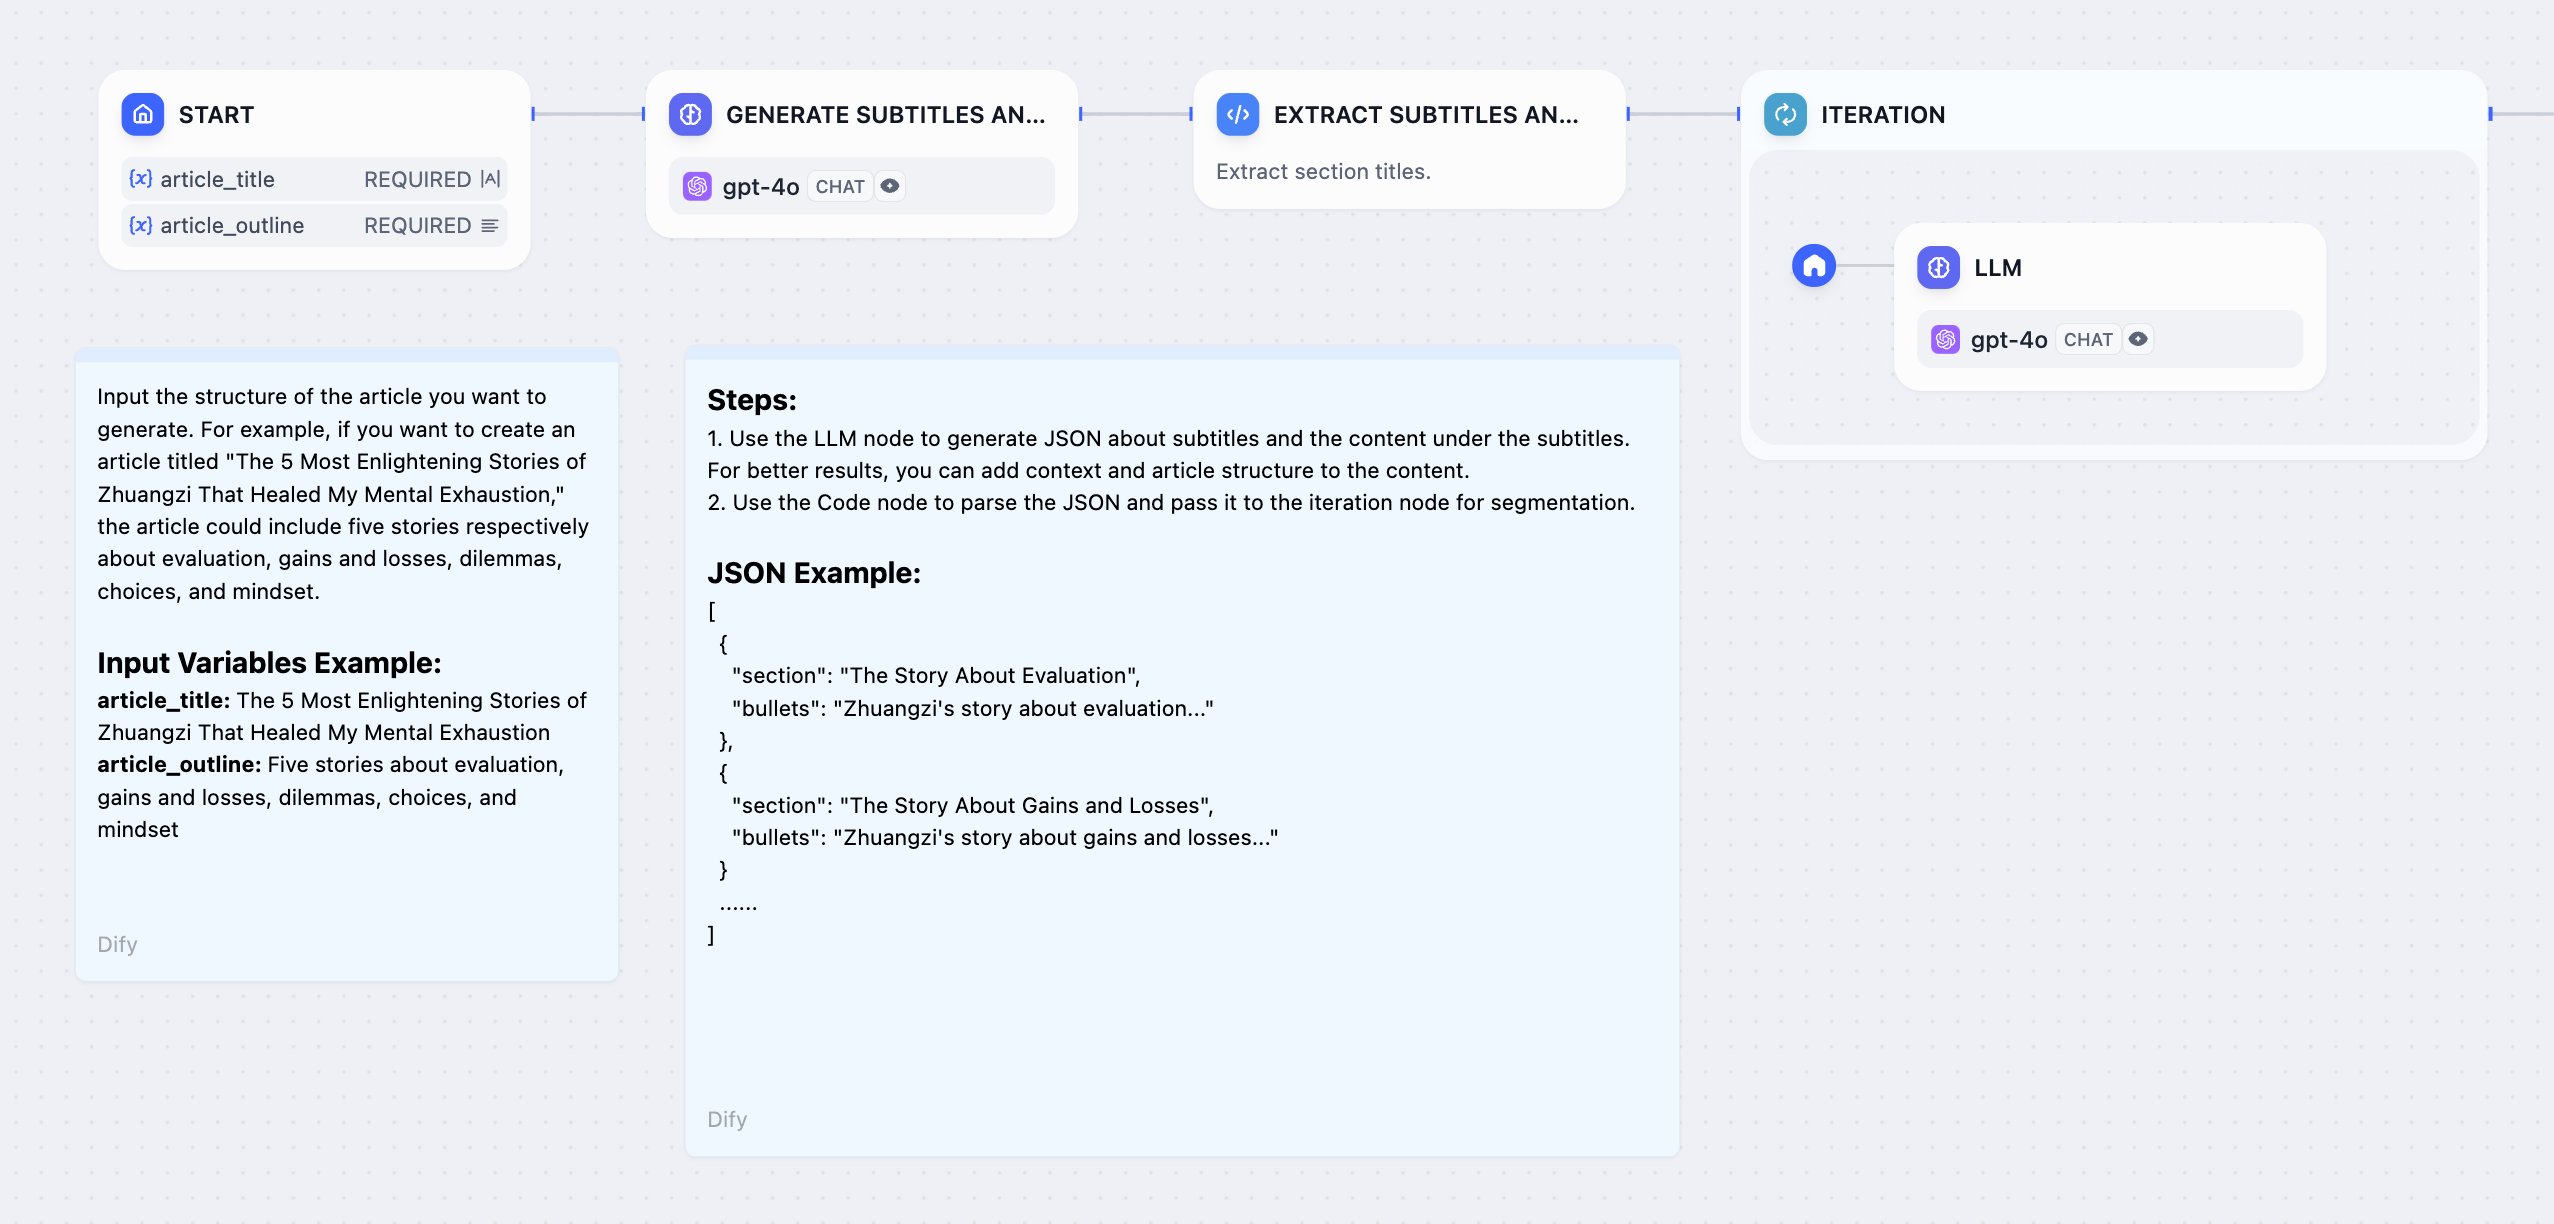
**Workflow Steps:**
1. **Start Node** - User provides story title and outline
2. **LLM Node** - Generate detailed chapter breakdown
3. **Parameter Extractor** - Convert chapter list to structured array
4. **Iteration Node** - Process each chapter with internal LLM
5. **Answer Node** - Stream chapter content as it's generated
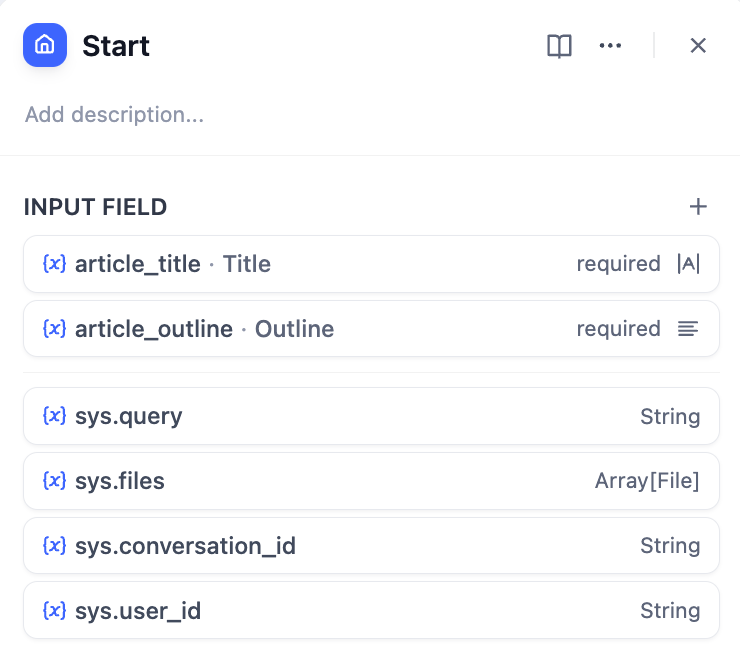
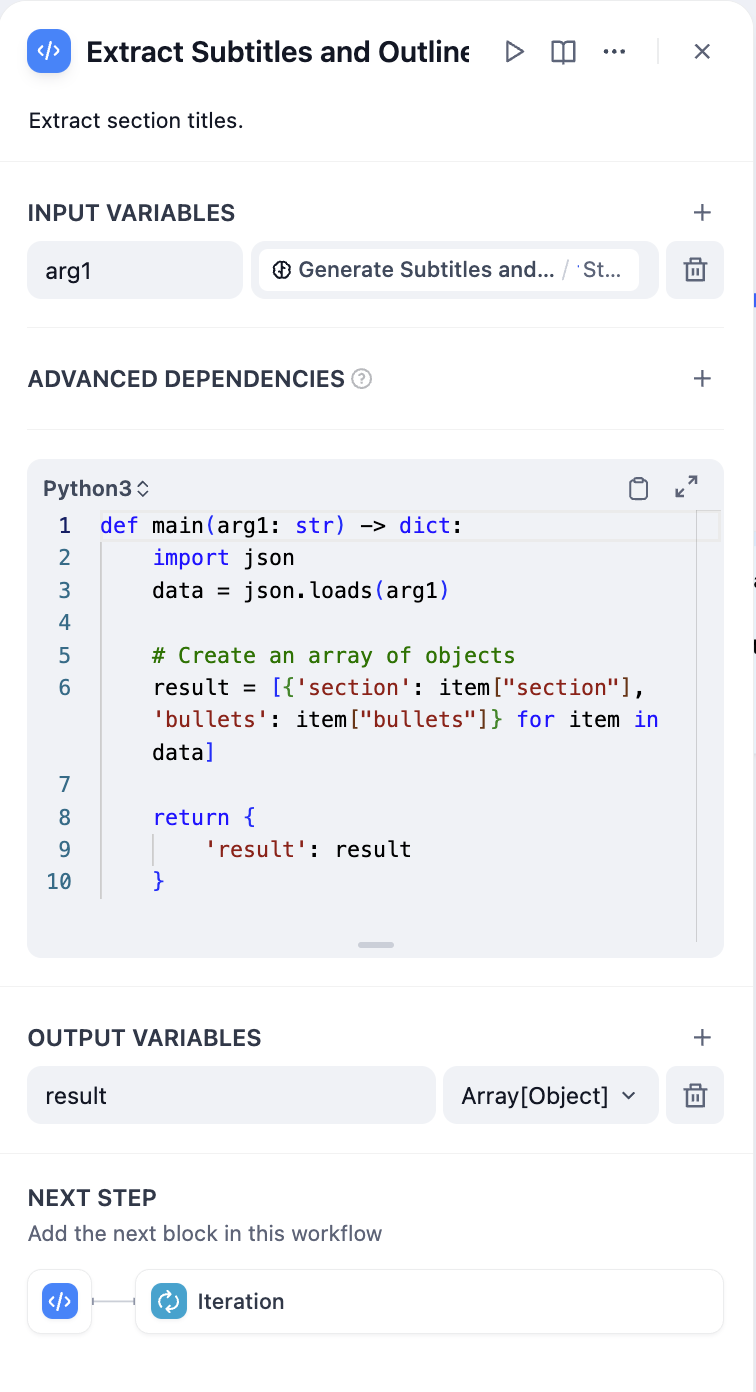
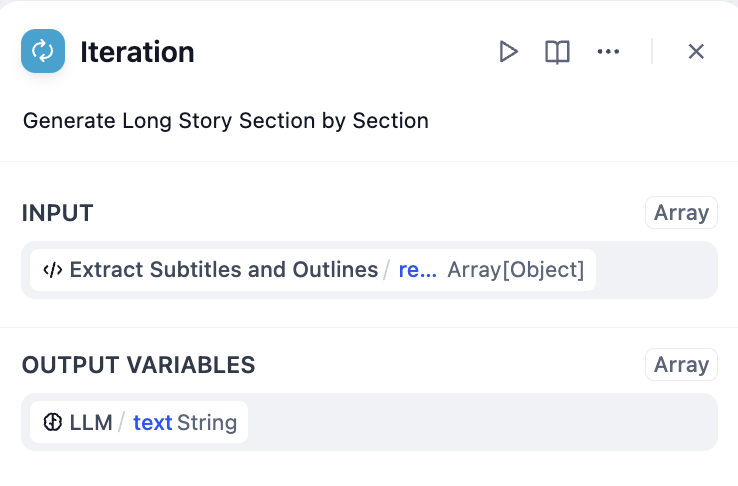
Parameter extraction effectiveness depends on model capabilities and instruction quality. Use stronger models and provide examples in instructions to improve results.
## Output Processing
Iteration nodes output arrays that often need conversion for final use:
### Convert Array to Text
```python theme={null}
def main(articleSections: list):
return {
"result": "\n".join(articleSections)
}
```
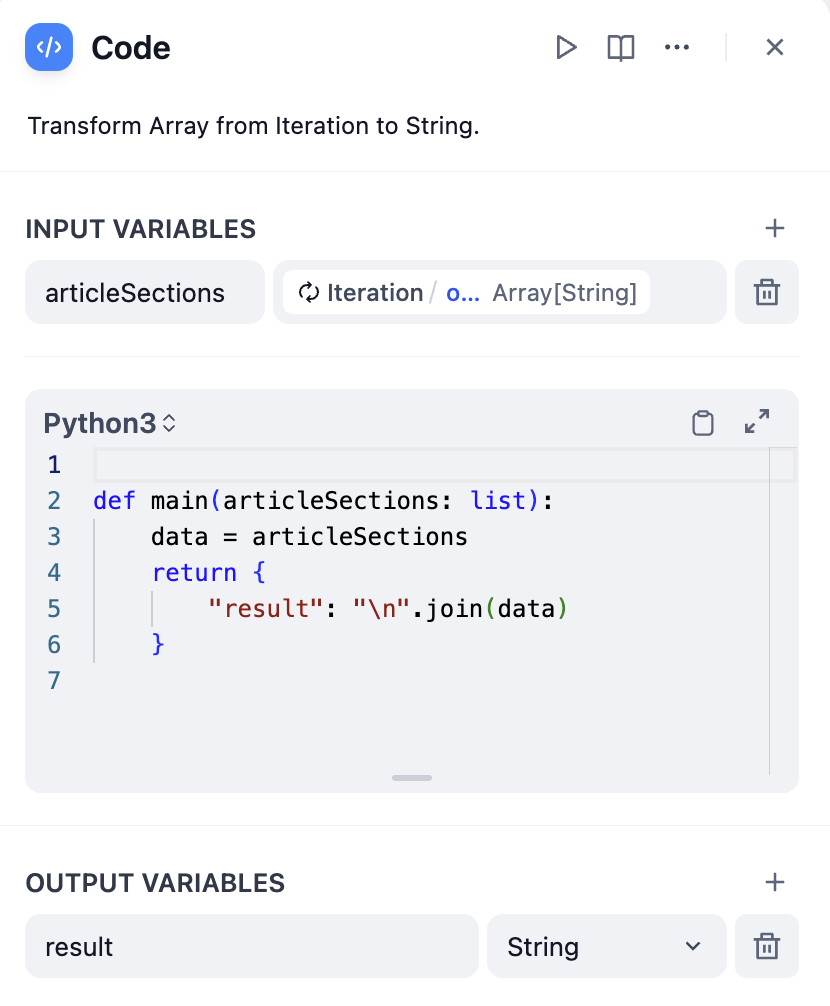
```jinja theme={null}
{{ articleSections | join("\n") }}
```
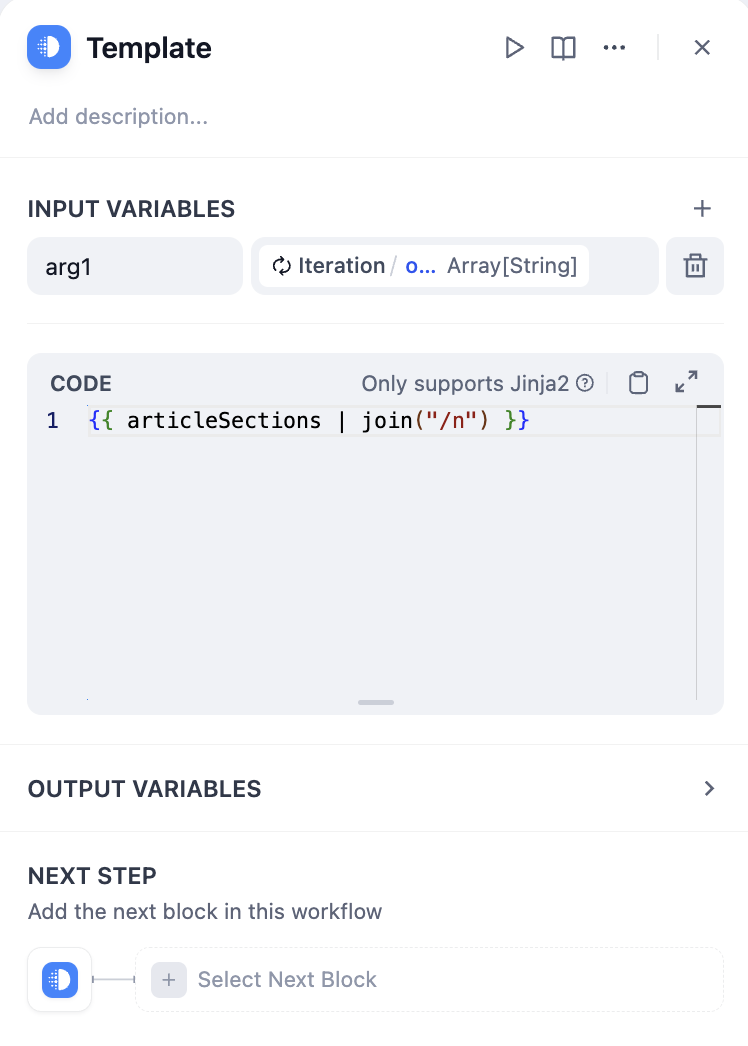
# Knowledge Retrieval
Source: https://docs.dify.ai/en/use-dify/nodes/knowledge-retrieval
Retrieve relevant content from knowledge bases and use it as context for downstream nodes
Use the Knowledge Retrieval node to integrate existing knowledge bases into your workflows. The node searches specific knowledge for information relevant to queries and outputs results as contextual content for use in downstream nodes (e.g., LLMs).
Below is an example of using the Knowledge Retrieval node in a Chatflow:
1. The **User Input** node collects the user query.
2. The **Knowledge Retrieval** node searches the selected knowledge base(s) for content related to the user query and outputs the retrieval results.
3. The **LLM** node generates a response based on both the user query and the retrieved knowledge.
4. The **Answer** node returns the LLM's response to the user.
## Configuration
Configure the following to define how the node requests and processes human input:
* **Delivery method**: How the request form reaches recipients.
* **Form content**: What information recipients will see and what they can input.
* **User action**: What decisions recipients can make and how the workflow proceeds accordingly.
* **Timeout strategy**: How long to wait and what happens if no recipient responds.
### Delivery Method
Choose the channel through which the request is delivered. Currently available methods:
* **Web app**: Displays the request form directly in the web app interface for the current user to respond.
* **Email**: Sends an email containing the request link to one or more recipients.
The request closes after the first response regardless of delivery method.
### Form Content
Customize what appears in the request form:
* **Format and structure with Markdown**
Use headings, lists, bold text, links, and other Markdown elements to present information clearly.
* **Display dynamic data with variables**
Reference workflow variables to show dynamic content, such as AI-generated text for review or any needed contextual information from upstream nodes.
If you reference the `text` output variable from a reasoning model, the form will display the model's thinking process along with the final answer by default.
To show only the answer, toggle on **Enable Reasoning Tag Separation** for the corresponding LLM node.
* **Collect input with input fields**
Input fields can start empty or pre-filled with variables (e.g., LLM output to refine) or static text (e.g., example or default values) that recipients can edit.
Each input field becomes a variable for downstream use. For instance, pass edited content for further processing or send feedback to an LLM for regeneration.
### User Action
Define the decision buttons that recipients can click. Each button routes the workflow to a different execution path.
For example, a `Post` branch might lead to nodes that trigger content publishing, while a `Regenerate` branch might loop back to an LLM node to revise the content.
Use preset button styles to visually distinguish actions.
For example, use a prominent style for key actions like `Approve` and a subtler one for secondary options.
### Timeout Strategy
Configure how long to wait for a response before the request expires.
If no recipient responds within the set time, the workflow automatically ends unless you define a fallback branch to handle the timeout—for example, send a notification or retry the request.
# If-Else
Source: https://docs.dify.ai/en/use-dify/nodes/ifelse
Add conditional logic and branching to workflows
The If-Else node adds decision-making logic to your workflows by routing execution down different paths based on conditions you define. It evaluates variables and determines which branch your workflow should follow.

## Branching Logic
The node supports multiple branching paths to handle complex decision trees:
**IF Path** executes when the primary condition evaluates to true.
**ELIF Paths** provide additional conditions to check in sequence when the IF condition is false. You can add multiple ELIF branches for complex logic.
**ELSE Path** serves as the fallback when no conditions match, ensuring your workflow always has a path to follow.
## Condition Types
Configure conditions to test variables using various comparison operators:
**Contains** / **Not contains** - Check if the value includes specific words or phrases
**Starts with** / **Ends with** - Test text beginnings or endings for pattern matching
**Is** / **Is not** - Exact value matching
**Is empty** / **Is not empty** - Check for blank, null, or missing values
**Greater than** / **Less than** - Numerical comparisons for numbers and dates
**Equals** / **Not equals** - Exact matching for any data type
## Complex Conditions
Combine multiple conditions using logical operators for sophisticated decision-making:

**AND Logic** requires all conditions to be true. Use this when you need multiple criteria to be met simultaneously.
**OR Logic** requires any condition to be true. Use this when you want to trigger the same action for different scenarios.
## Variable References
Reference any variable from previous workflow nodes in your conditions. Variables can come from user input, LLM responses, API calls, or any other workflow node output.
Use the variable selector to choose from available variables, or type variable names directly using the `{{variable_name}}` syntax.
# Iteration
Source: https://docs.dify.ai/en/use-dify/nodes/iteration
Process arrays by applying workflows to each element
The Iteration node processes arrays by running the same workflow steps on each element sequentially or in parallel. Use it for batch processing tasks that would otherwise hit limits or be inefficient as single operations.

## How Iteration Works
The node takes an array input and creates a sub-workflow that runs once for each array element. During each iteration, the current item and its index are available as variables that internal nodes can reference.
**Core Components:**
* **Input Variables** - Array data from upstream nodes
* **Internal Workflow** - The processing steps to perform on each element
* **Output Variables** - Collected results from all iterations (also an array)
## Configuration
### Array Input
Connect an array variable from upstream nodes such as Parameter Extractor, Code nodes, Knowledge Retrieval, or HTTP Request responses.
### Built-in Variables
Each iteration provides access to:
* `items[object]` - The current array element being processed
* `index[number]` - The current iteration index (starting from 0)
### Processing Mode
**Sequential Processing** - Items processed one after another in order
**Streaming Support** - Results can be output progressively using Answer nodes
**Resource Management** - Lower memory usage, predictable execution order
**Best For** - When order matters or when using streaming output
**Concurrent Processing** - Up to 10 items processed simultaneously
**Improved Performance** - Faster execution for independent operations
**Batch Processing** - Handles large arrays efficiently
**Best For** - Independent operations where order doesn't matter


## Error Handling
Configure how to handle processing failures for individual array elements:
**Terminate** - Stop processing when any error occurs and return the error message
**Continue on Error** - Skip failed items and continue processing, outputting null for failed elements
**Remove Failed Results** - Skip failed items and return only successful results
Input-output correspondence examples:
* Input: `[1, 2, 3]`
* Output with Continue on Error: `[result-1, null, result-3]`
* Output with Remove Failed: `[result-1, result-3]`
## Long Article Generation Example
Generate lengthy content by processing chapter outlines individually:

**Workflow Steps:**
1. **Start Node** - User provides story title and outline
2. **LLM Node** - Generate detailed chapter breakdown
3. **Parameter Extractor** - Convert chapter list to structured array
4. **Iteration Node** - Process each chapter with internal LLM
5. **Answer Node** - Stream chapter content as it's generated


Parameter extraction effectiveness depends on model capabilities and instruction quality. Use stronger models and provide examples in instructions to improve results.
## Output Processing
Iteration nodes output arrays that often need conversion for final use:
### Convert Array to Text
```python theme={null}
def main(articleSections: list):
return {
"result": "\n".join(articleSections)
}
```

```jinja theme={null}
{{ articleSections | join("\n") }}
```

# Knowledge Retrieval
Source: https://docs.dify.ai/en/use-dify/nodes/knowledge-retrieval
Retrieve relevant content from knowledge bases and use it as context for downstream nodes
Use the Knowledge Retrieval node to integrate existing knowledge bases into your workflows. The node searches specific knowledge for information relevant to queries and outputs results as contextual content for use in downstream nodes (e.g., LLMs).
Below is an example of using the Knowledge Retrieval node in a Chatflow:
1. The **User Input** node collects the user query.
2. The **Knowledge Retrieval** node searches the selected knowledge base(s) for content related to the user query and outputs the retrieval results.
3. The **LLM** node generates a response based on both the user query and the retrieved knowledge.
4. The **Answer** node returns the LLM's response to the user.
![Knowledge Retrieval Node Use Case]() Before using a Knowledge Retrieval node, ensure that you have at least one available knowledge base. To learn about creating knowledge bases, see [Knowledge](/en/use-dify/knowledge/readme#create-knowledge).
On Dify Cloud, knowledge retrieval operations are subject to rate limits based on the subscription plan. For more information, see [Knowledge Request Rate Limit](/en/use-dify/knowledge/knowledge-request-rate-limit).
## Configure the Node
To make the Knowledge Retrieval node work properly, you need to specify:
* *What* it should search for (the query)
* *Where* it should search (the knowledge base)
* *How* to process the retrieval results (the node-level retrieval settings)
You can also use document metadata to enable filter-based searches and further improve retrieval precision.
### Specify the Query
Provide the query content that the node should search for in the selected knowledge base(s).
* **Query Text**: Select a text variable. For example, use `userinput.query` to reference user input in Chatflows, or a custom text-type user input variable in Workflows.
* **Query Images**: Select an image variable, e.g., the image(s) uploaded by the user through a User Input node, to search by image. The image size limit is 2 MB.
For self-hosted deployments, you can adjust the image size limit via the environment variable `ATTACHMENT_IMAGE_FILE_SIZE_LIMIT`.
The **Query Images** option is available only when at least one multimodal knowledge base is added.
Such knowledge bases are marked with the **Vision** tag, indicating that they are using a multimodal embedding model.
### Select Knowledge to Search
Add one or more existing knowledge bases for the node to search for content relevant to the query.
When multiple knowledge bases are added, knowledge is first retrieved from all of them simultaneously, then combined and processed according to the [node-level retrieval settings](#configure-node-level-retrieval-settings).
Knowledge bases marked with the **Vision** tag support cross-modal retrieval—retrieving both text and images based on semantic relevance.
You can click the **Edit** icon next to any added knowledge base to modify its [settings](/en/use-dify/knowledge/manage-knowledge/introduction).
### Configure Node-Level Retrieval Settings
To fine-tune how the node processes retrieval results after they are fetched from the knowledge base(s), click **Retrieval Setting**.
There are two layers of retrieval settings—the knowledge base level and the knowledge retrieval node level.
Think of them as two consecutive filters: the knowledge base settings determine the initial pool of results, and the node settings further rerank the results or narrow down the pool.
* **Rerank Settings**
* **Weighted Score**
The relative weight between semantic similarity and keyword matching during reranking. Higher semantic weight favors meaning relevance, while higher keyword weight favors exact matches.
Weighted Score is available only when all added knowledge bases are indexed with **High Quality** mode.
* **Rerank Model**
The rerank model to re-score and reorder all the results based on their relevance to the query.
If any multimodal knowledge bases are added, select a multimodal rerank model (marked with a **Vision** tag) as well. Otherwise, retrieved images will be excluded from reranking and the final output.
* **Top K**
The maximum number of top results to return after reranking.
When a rerank model is selected, this value will be automatically adjusted based on the model's maximum input capacity (how much text the model can process at once).
* **Score Threshold**
The minimum similarity score for returned results. Results scoring below this threshold are excluded. Use higher thresholds for stricter relevance or lower thresholds to include broader matches.
### Enable Metadata Filtering
By default, retrieval searches across the entire knowledge base. To restrict retrieval to specific documents, enable manual or automatic metadata filtering.
This improves retrieval precision, especially when your knowledge base is large or contains content for different contexts.
For creating and managing document metadata, see [Metadata](/en/use-dify/knowledge/metadata).
## Output
The Knowledge Retrieval node outputs the retrieval results as a variable named `result`, which is an array of retrieved document chunks containing their content, metadata, title, and other attributes.
When the retrieval results contain image attachments, the `result` variable also includes a field named `files` containing image details.
## Use with LLM Nodes
To use the retrieval results as context in an LLM node:
1. In **Context**, select the Knowledge Retrieval node's `result` variable.
2. In the system instruction, reference the `Context` variable.
3. Optional: If the LLM is vision-capable, enable **Vision** so it can process image attachments in the retrieval results.
You don't need to specify the retrieval results as the vision input. Once **Vision** is enabled, the LLM will automatically access any retrieved images.
In chatflows, citations are shown alongside responses that reference knowledge by default. You can turn this off by disabling **[Citation and Attributions](/en/use-dify/build/additional-features#citations-and-attributions)** in **Features** at the top right corner of the canvas.
# List Operator
Source: https://docs.dify.ai/en/use-dify/nodes/list-operator
Filter, sort, and select elements from arrays
The List Operator node processes arrays by filtering, sorting, and selecting specific elements. Use it when you need to work with mixed file uploads, large datasets, or any array data that requires separation or organization before downstream processing.
Supported input data types include `array[string]`, `array[number]`, `array[file]`, and `array[boolean]`.
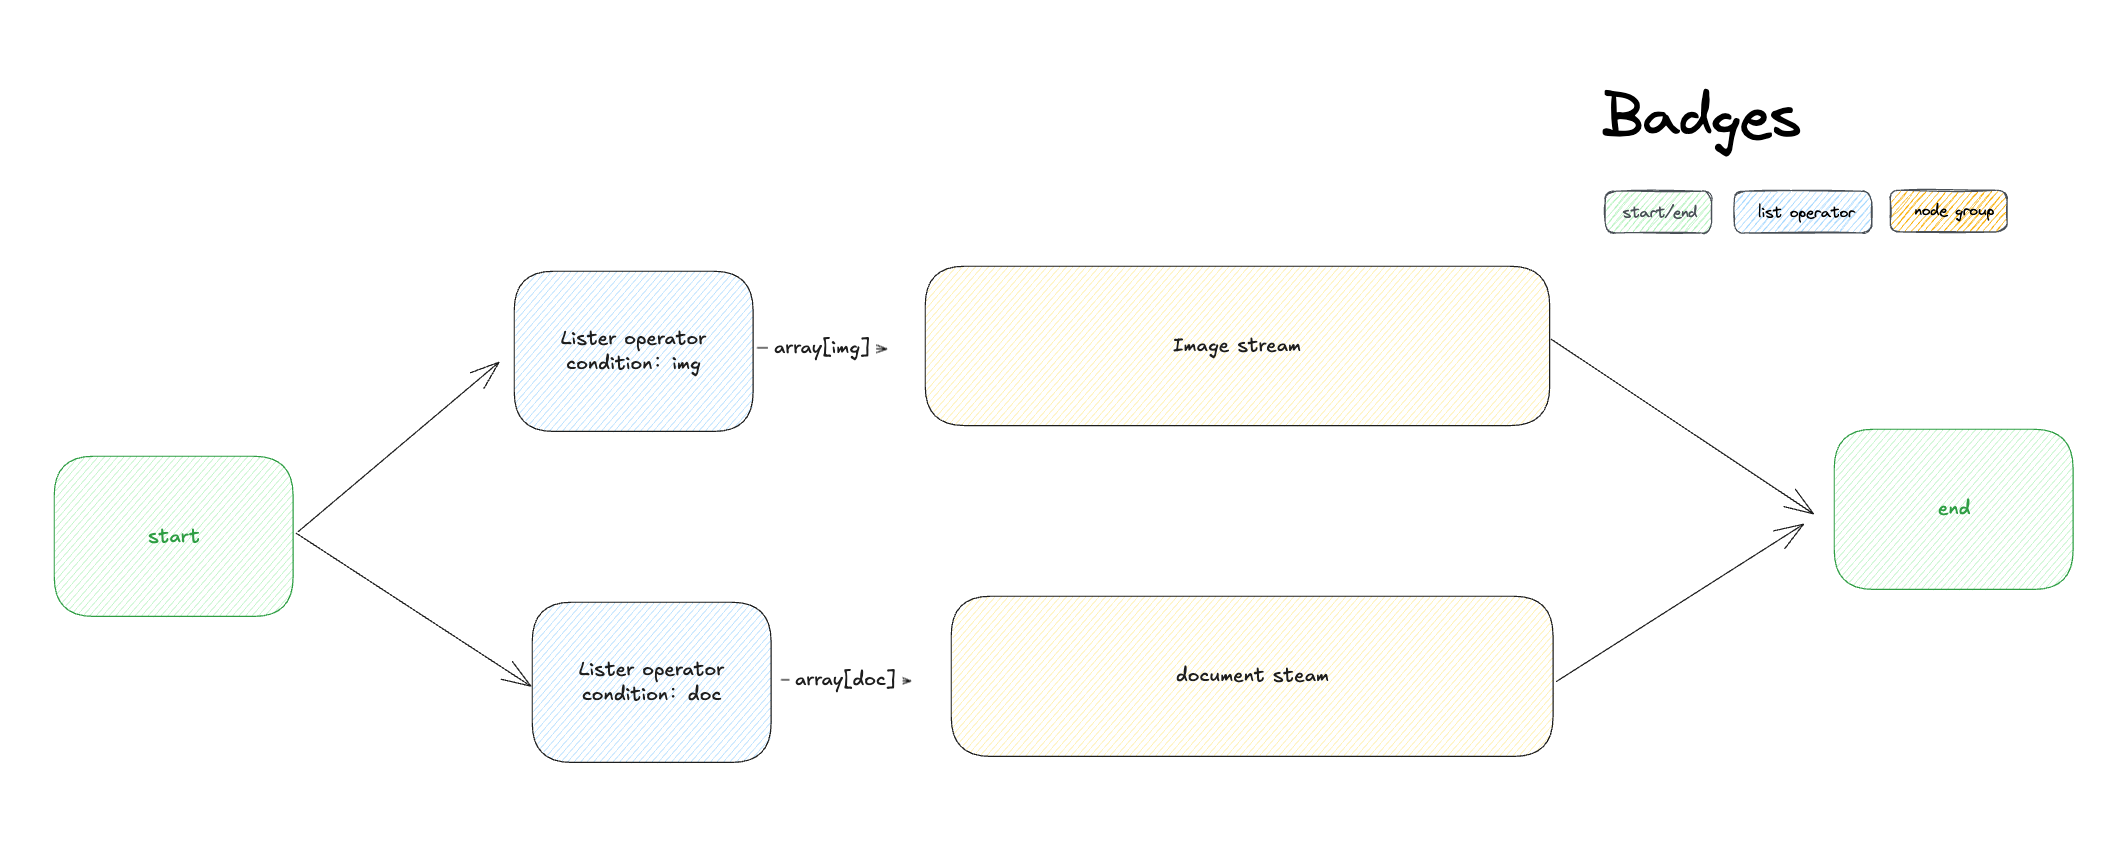
## The Array Processing Problem
Most workflow nodes expect single values, not arrays. When you have mixed content like `[image.png, document.pdf, audio.mp3]` in one variable, you need to separate this into focused streams that downstream nodes can process effectively.
The List Operator acts as an intelligent router, using filters to separate mixed arrays and prepare them for specialized processing.
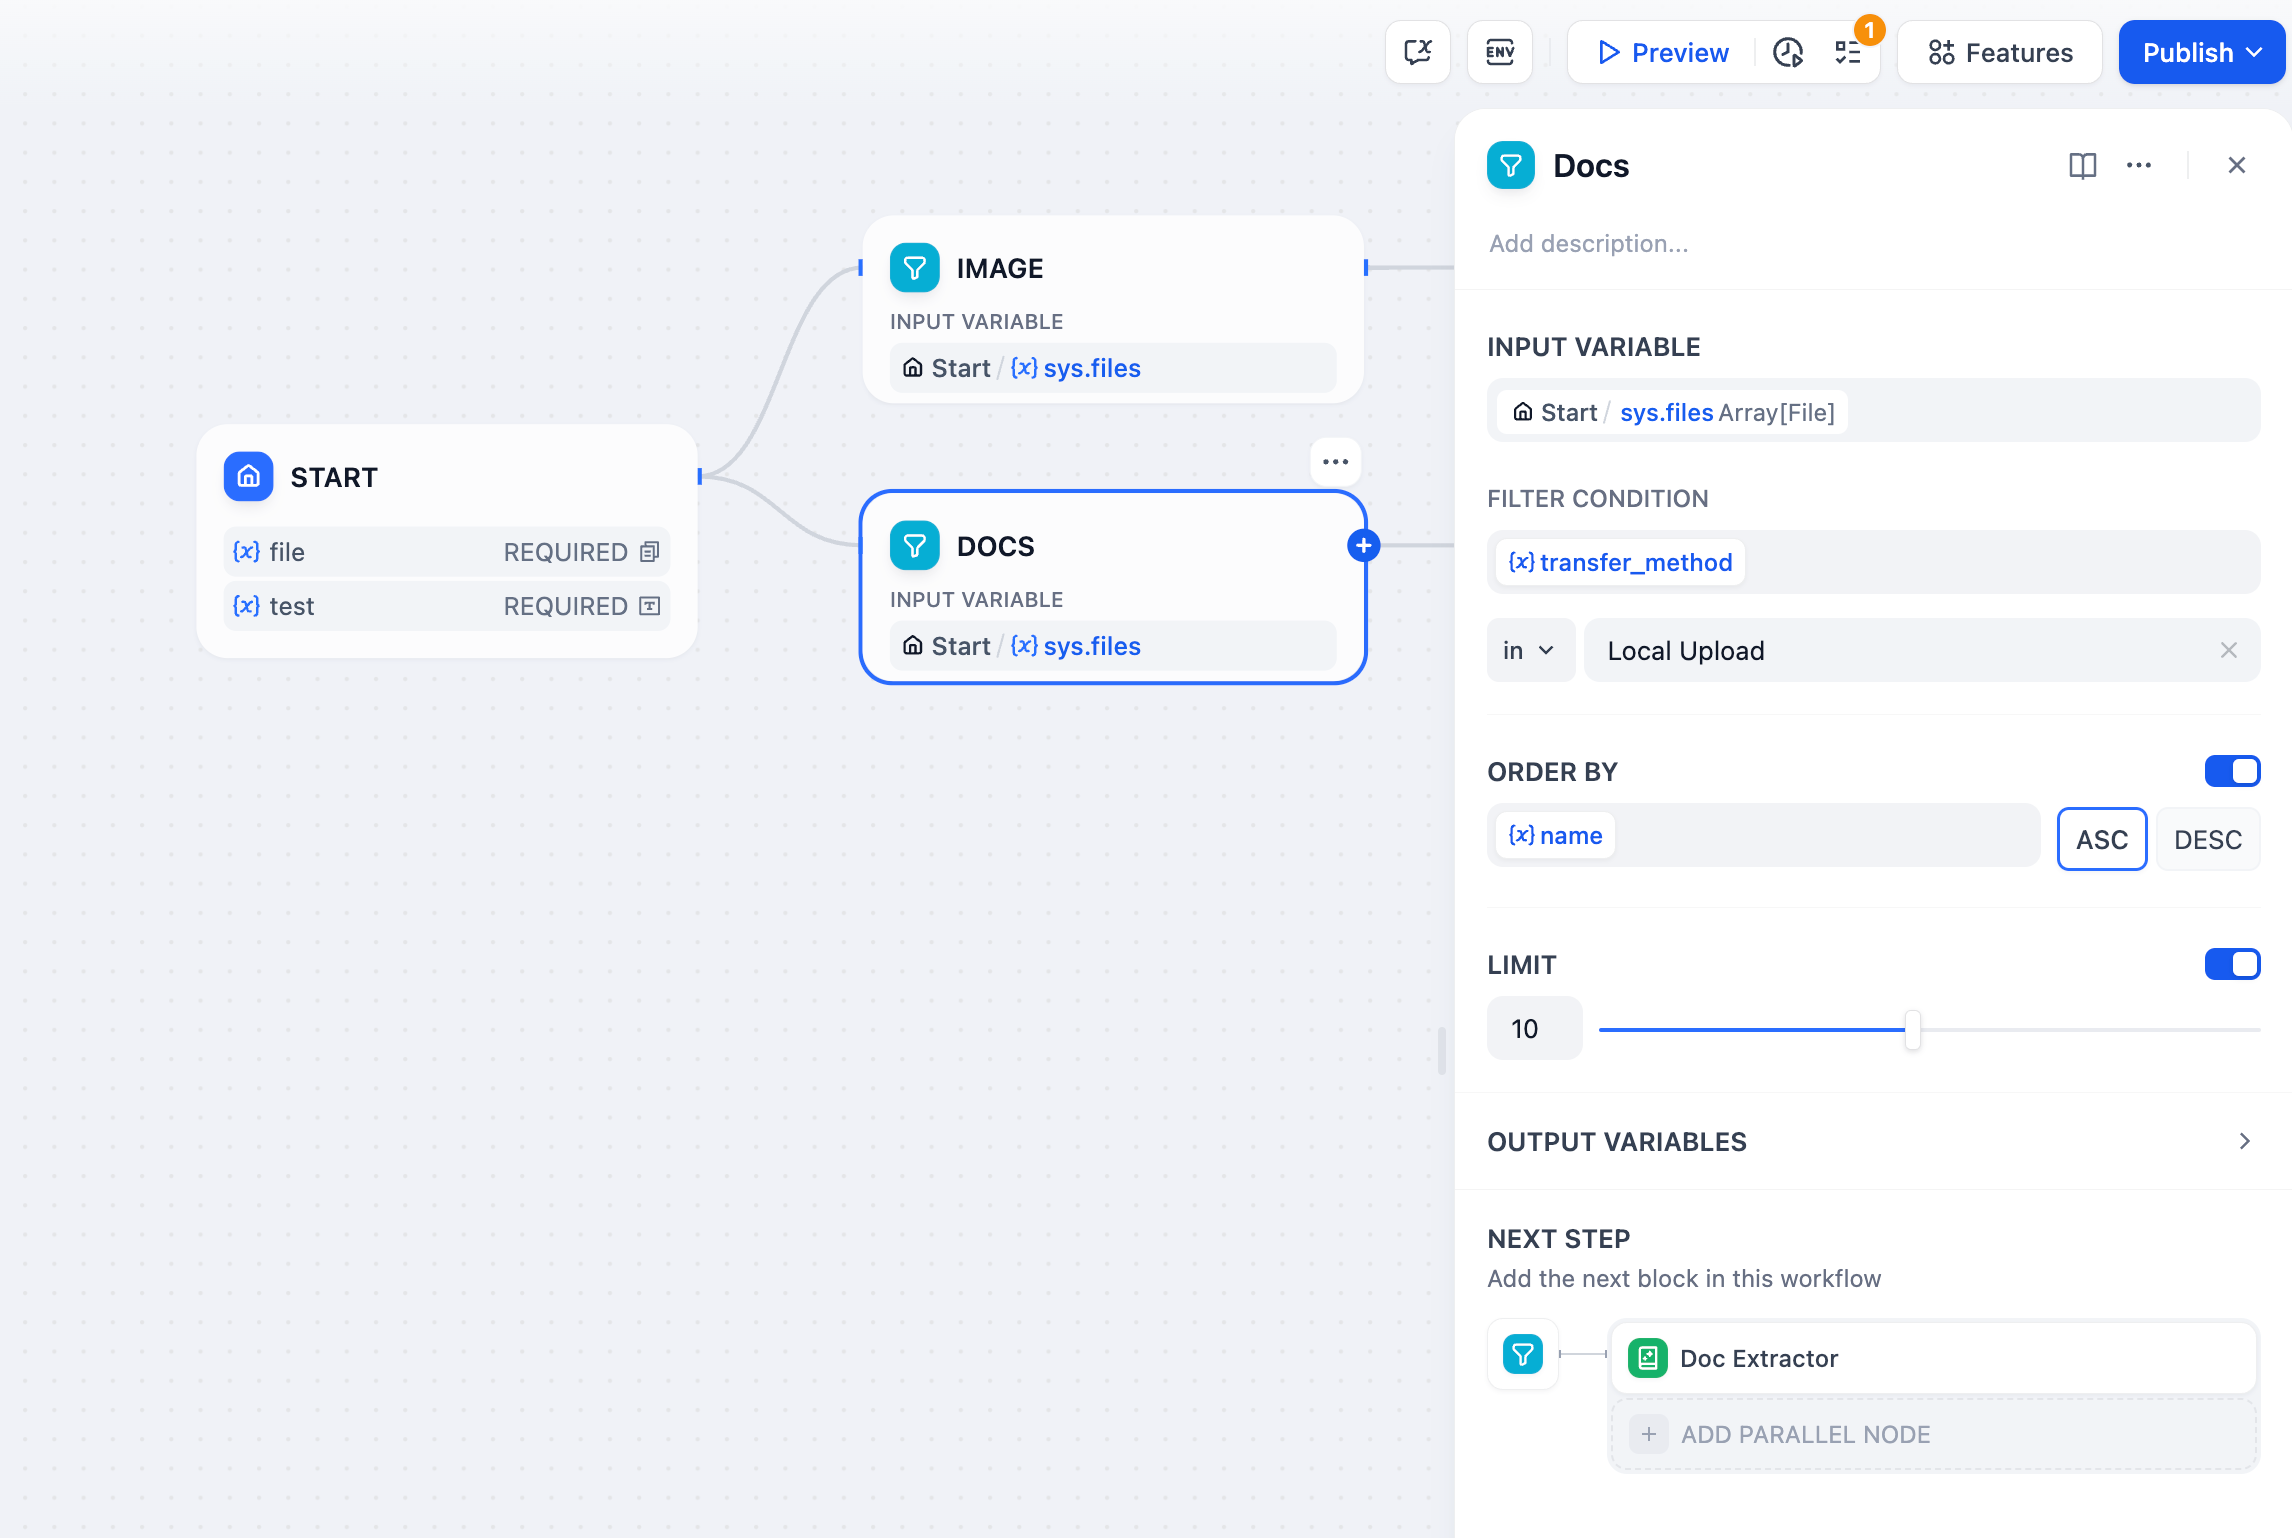
## Operations
### Filtering
Extract specific items based on their attributes. For file arrays, filter by:
**Type** - Filter by content category: image, document, audio, video
**MIME Type** - Precise content type identification (image/jpeg, application/pdf, etc.)
**Extension** - File extensions (.pdf, .jpg, .mp3, .docx, etc.)
**Size** - File size constraints for processing limits
**Name** - Filename patterns or specific names
**Transfer Method** - Distinguish between local uploads and URL-based files
### Sorting
Organize filtered results by any attribute:
**Ascending (ASC)** - Smallest to largest values, A-Z alphabetical order
**Descending (DESC)** - Largest to smallest values, Z-A reverse order
### Selection
Choose specific elements from the processed array:
**Take First N** - Select the first 1-20 items after filtering and sorting
**First Record** - Return only the first matching element as a single value
**Last Record** - Return only the last matching element as a single value
## Output Variables
**result** - Complete filtered and sorted array for bulk processing
**first\_record** - Single element from the beginning, perfect for "primary" or "latest" item selection
**last\_record** - Single element from the end, useful for "most recent" or "final" selection
## Mixed File Processing Example
Handle workflows where users upload both documents and images:

**Implementation Steps:**
1. **Configure Mixed Uploads** - Enable file upload features to accept multiple file types
2. **Split by Type** - Use separate List Operator nodes with different filters:
* Filter for `type = "image"` → route to LLM with vision capabilities
* Filter for `type = "document"` → route to Document Extractor
3. **Process Appropriately** - Images get analyzed directly, documents get text extraction
4. **Combine Results** - Merge processed outputs into unified responses
This pattern automatically routes different file types to appropriate processors, creating seamless multi-modal user experiences.
# LLM
Source: https://docs.dify.ai/en/use-dify/nodes/llm
Invoke language models for text generation and analysis
The LLM node invokes language models to process text, images, and documents. It sends prompts to your configured models and captures their responses, supporting structured outputs, context management, and multimodal inputs.
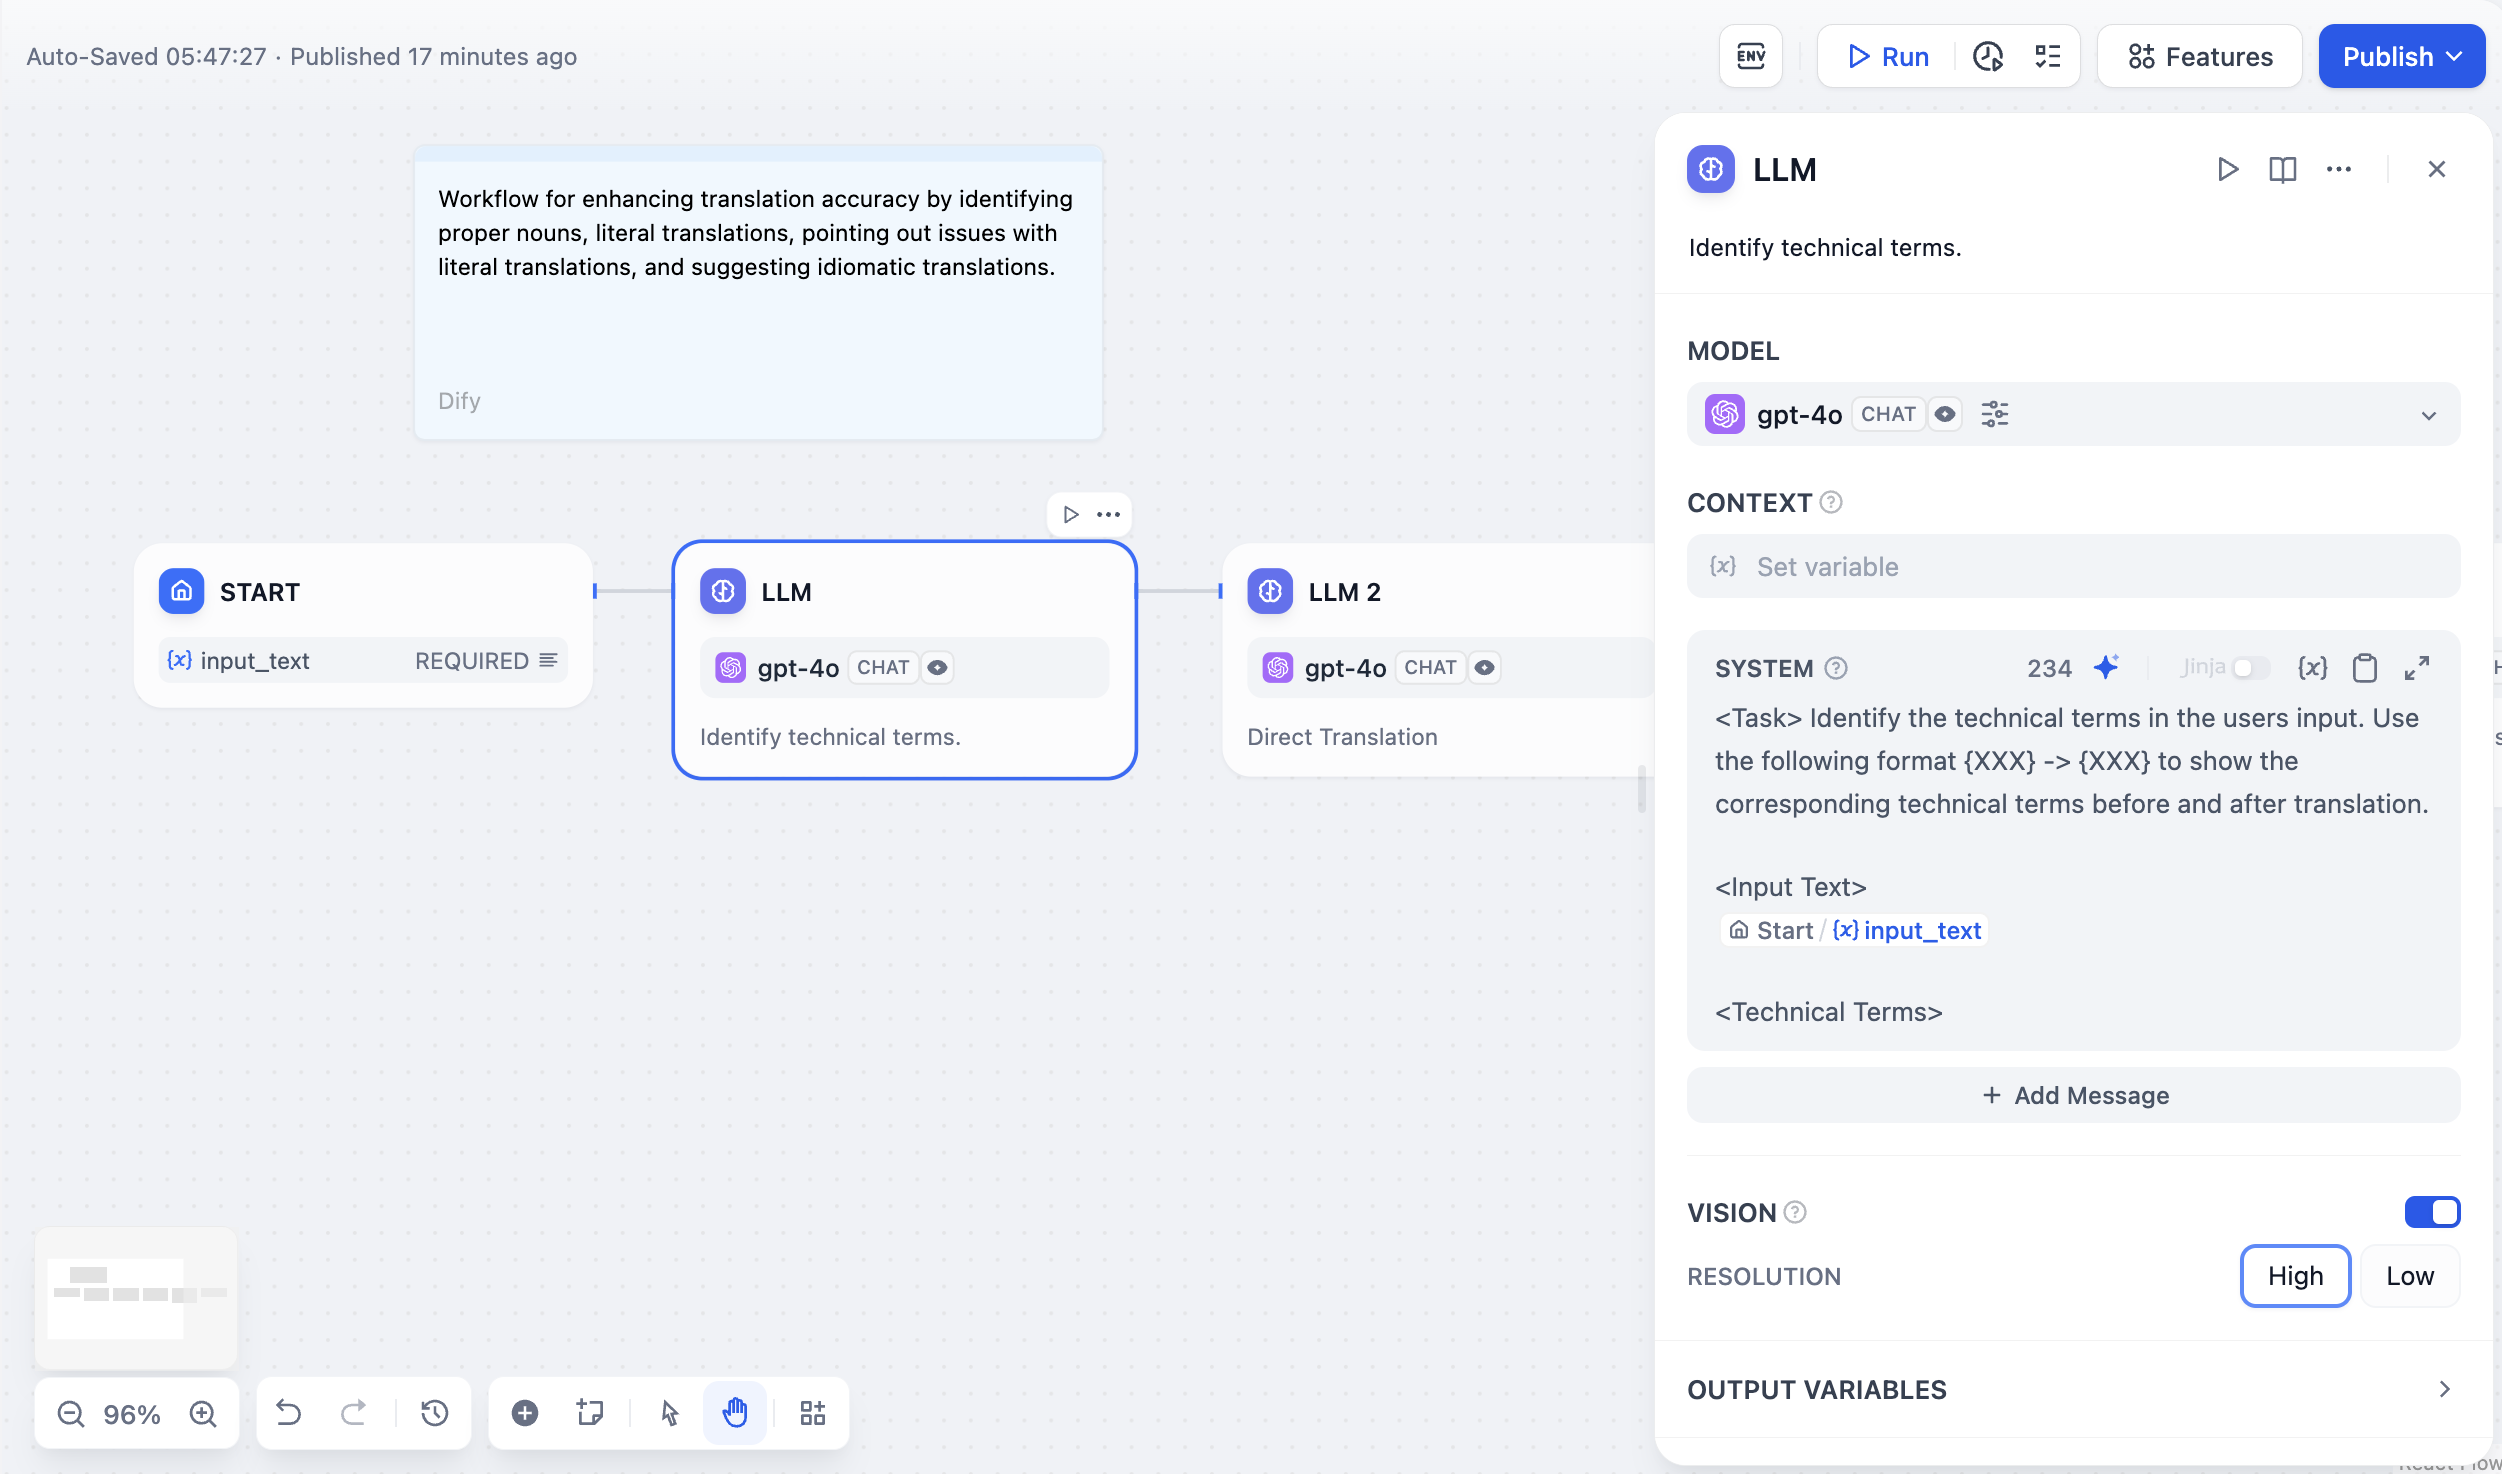
Configure at least one model provider in **System Settings → Model Providers** before using LLM nodes.
## Model Selection and Parameters
Choose from any model provider you've configured. Different models excel at different tasks - GPT-4 and Claude 3.5 handle complex reasoning well but cost more, while GPT-3.5 Turbo balances capability with affordability. For local deployment, use Ollama, LocalAI, or Xinference.
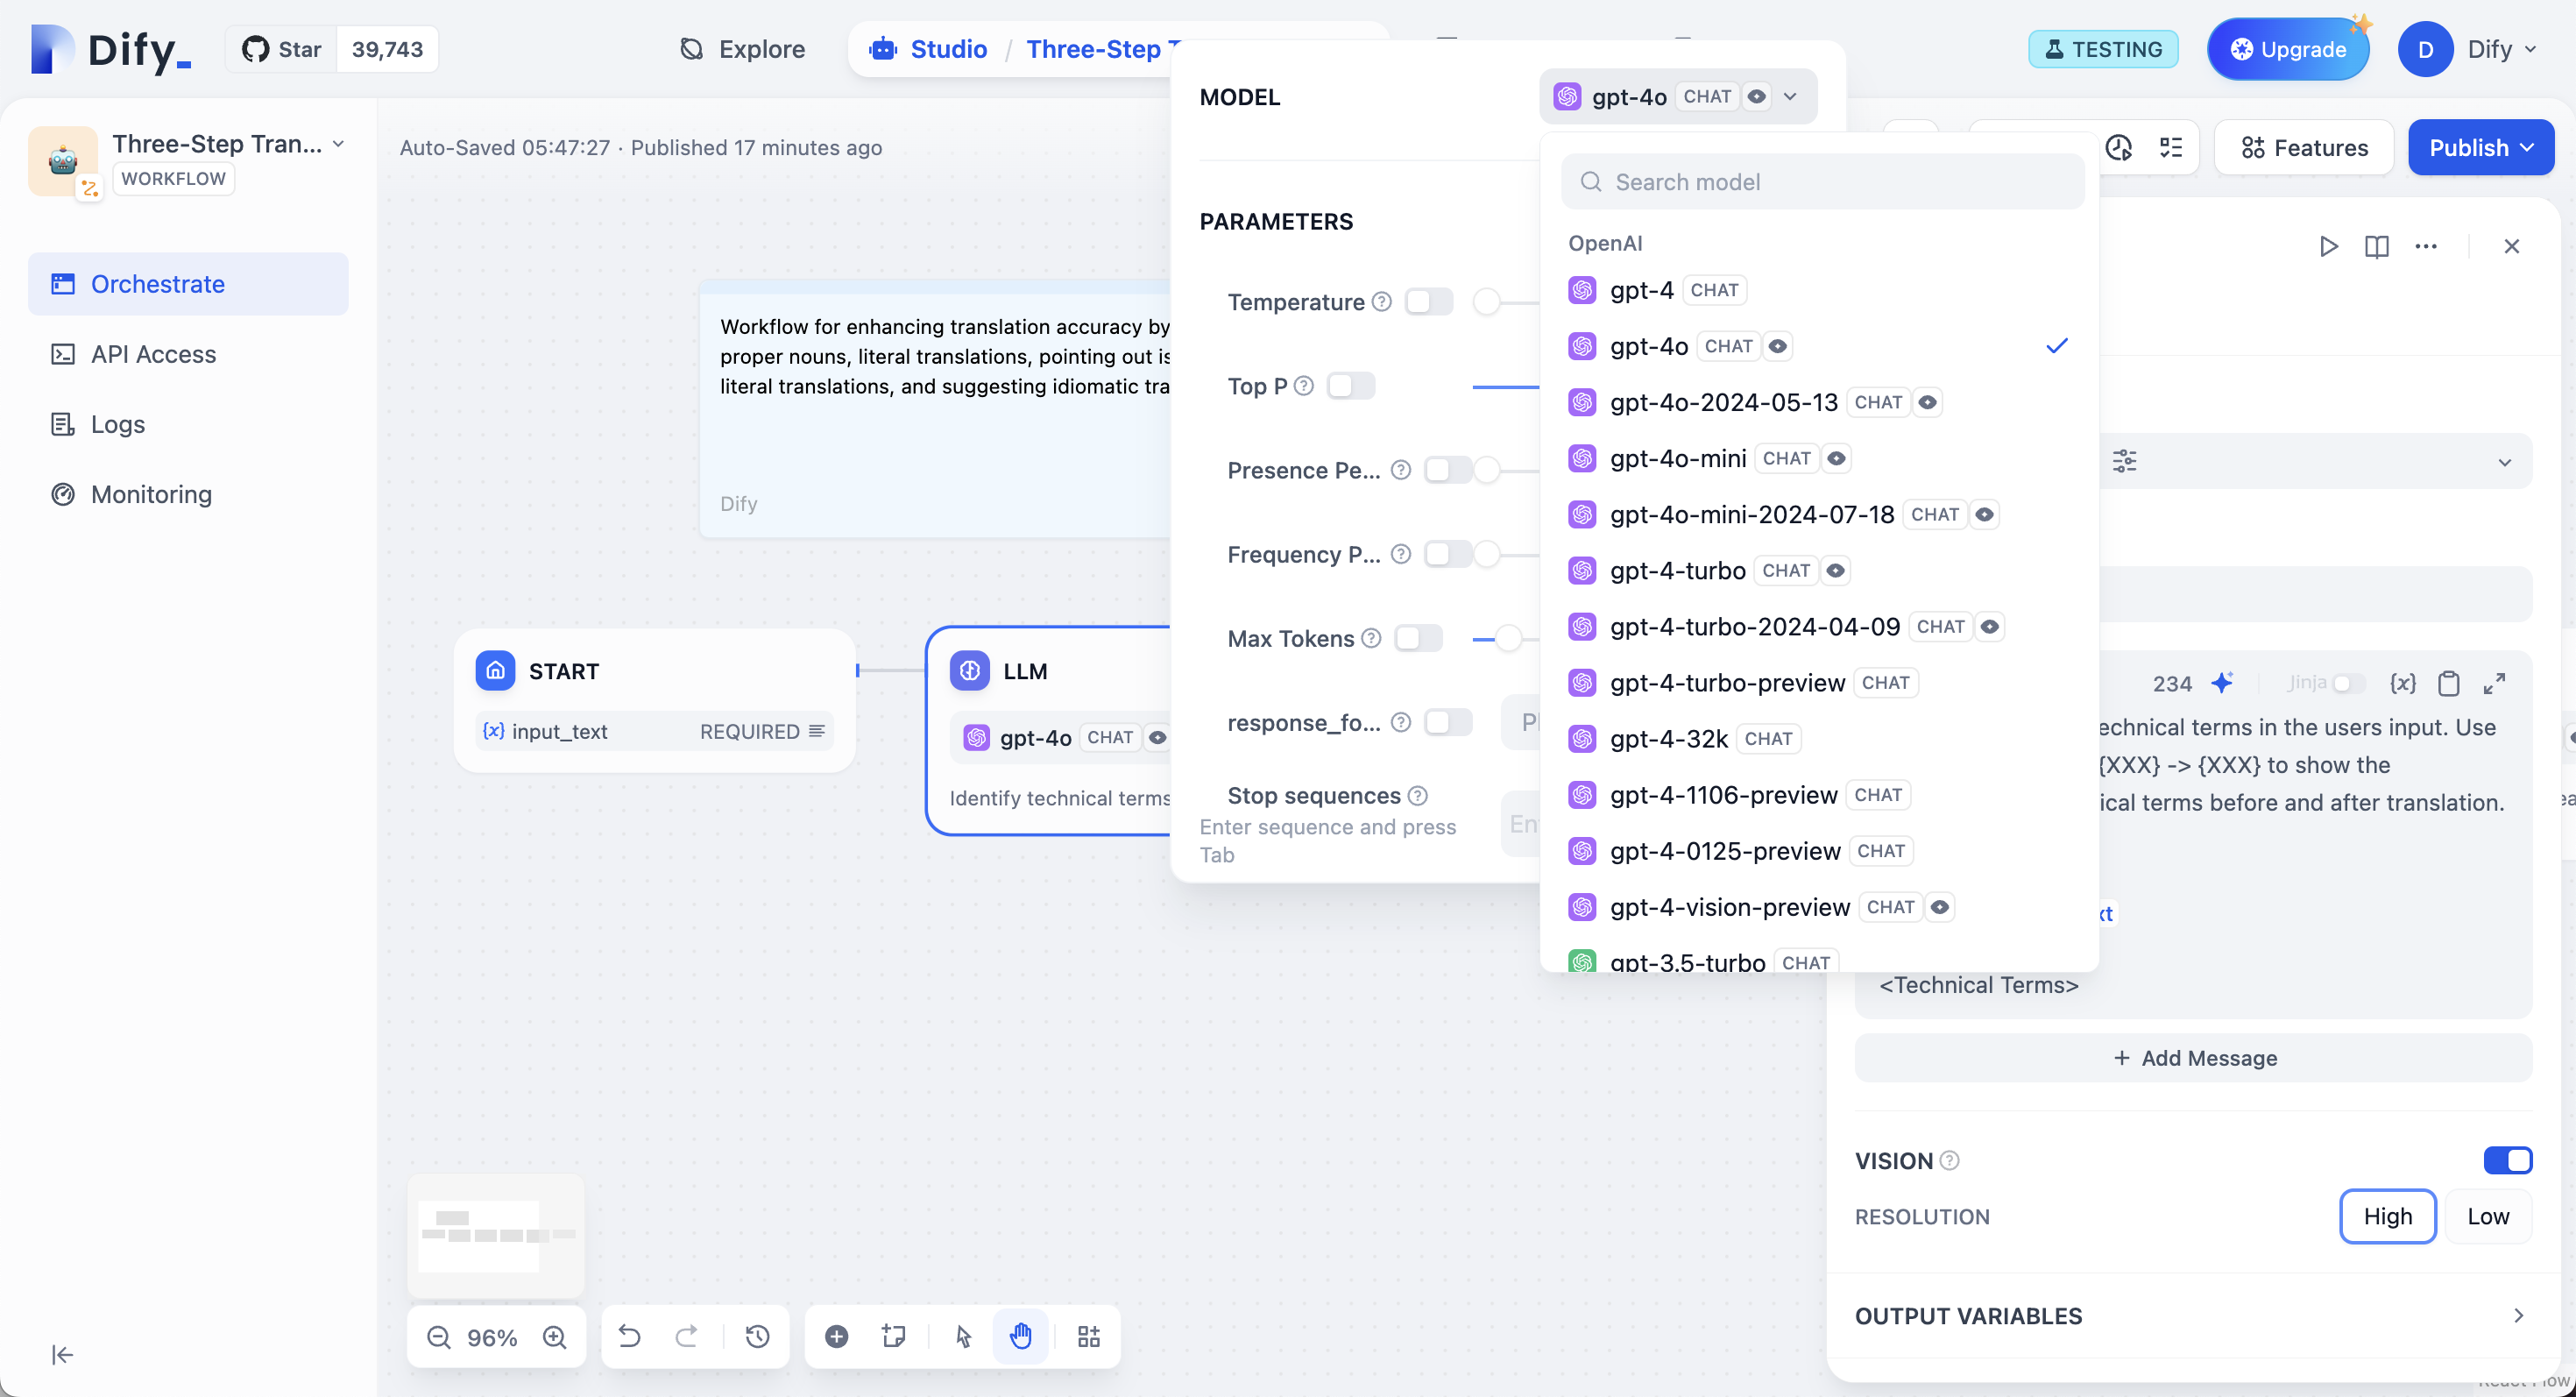
Model parameters control response generation. **Temperature** ranges from 0 (deterministic) to 1 (creative). **Top P** limits word choices by probability. **Frequency Penalty** reduces repetition. **Presence Penalty** encourages new topics. You can also use presets: **Precise**, **Balanced**, or **Creative**.
## Prompt Configuration
Your interface adapts based on model type. Chat models use message roles (**System** for behavior, **User** for input, **Assistant** for examples), while completion models use simple text continuation.
Reference workflow variables in prompts using double curly braces: `{{variable_name}}`. Variables are replaced with actual values before reaching the model.
```text theme={null}
System: You are a technical documentation expert.
User: {{user_input}}
```
## Context Variables
Context variables inject external knowledge while preserving source attribution. This enables RAG applications where LLMs answer questions using your specific documents.
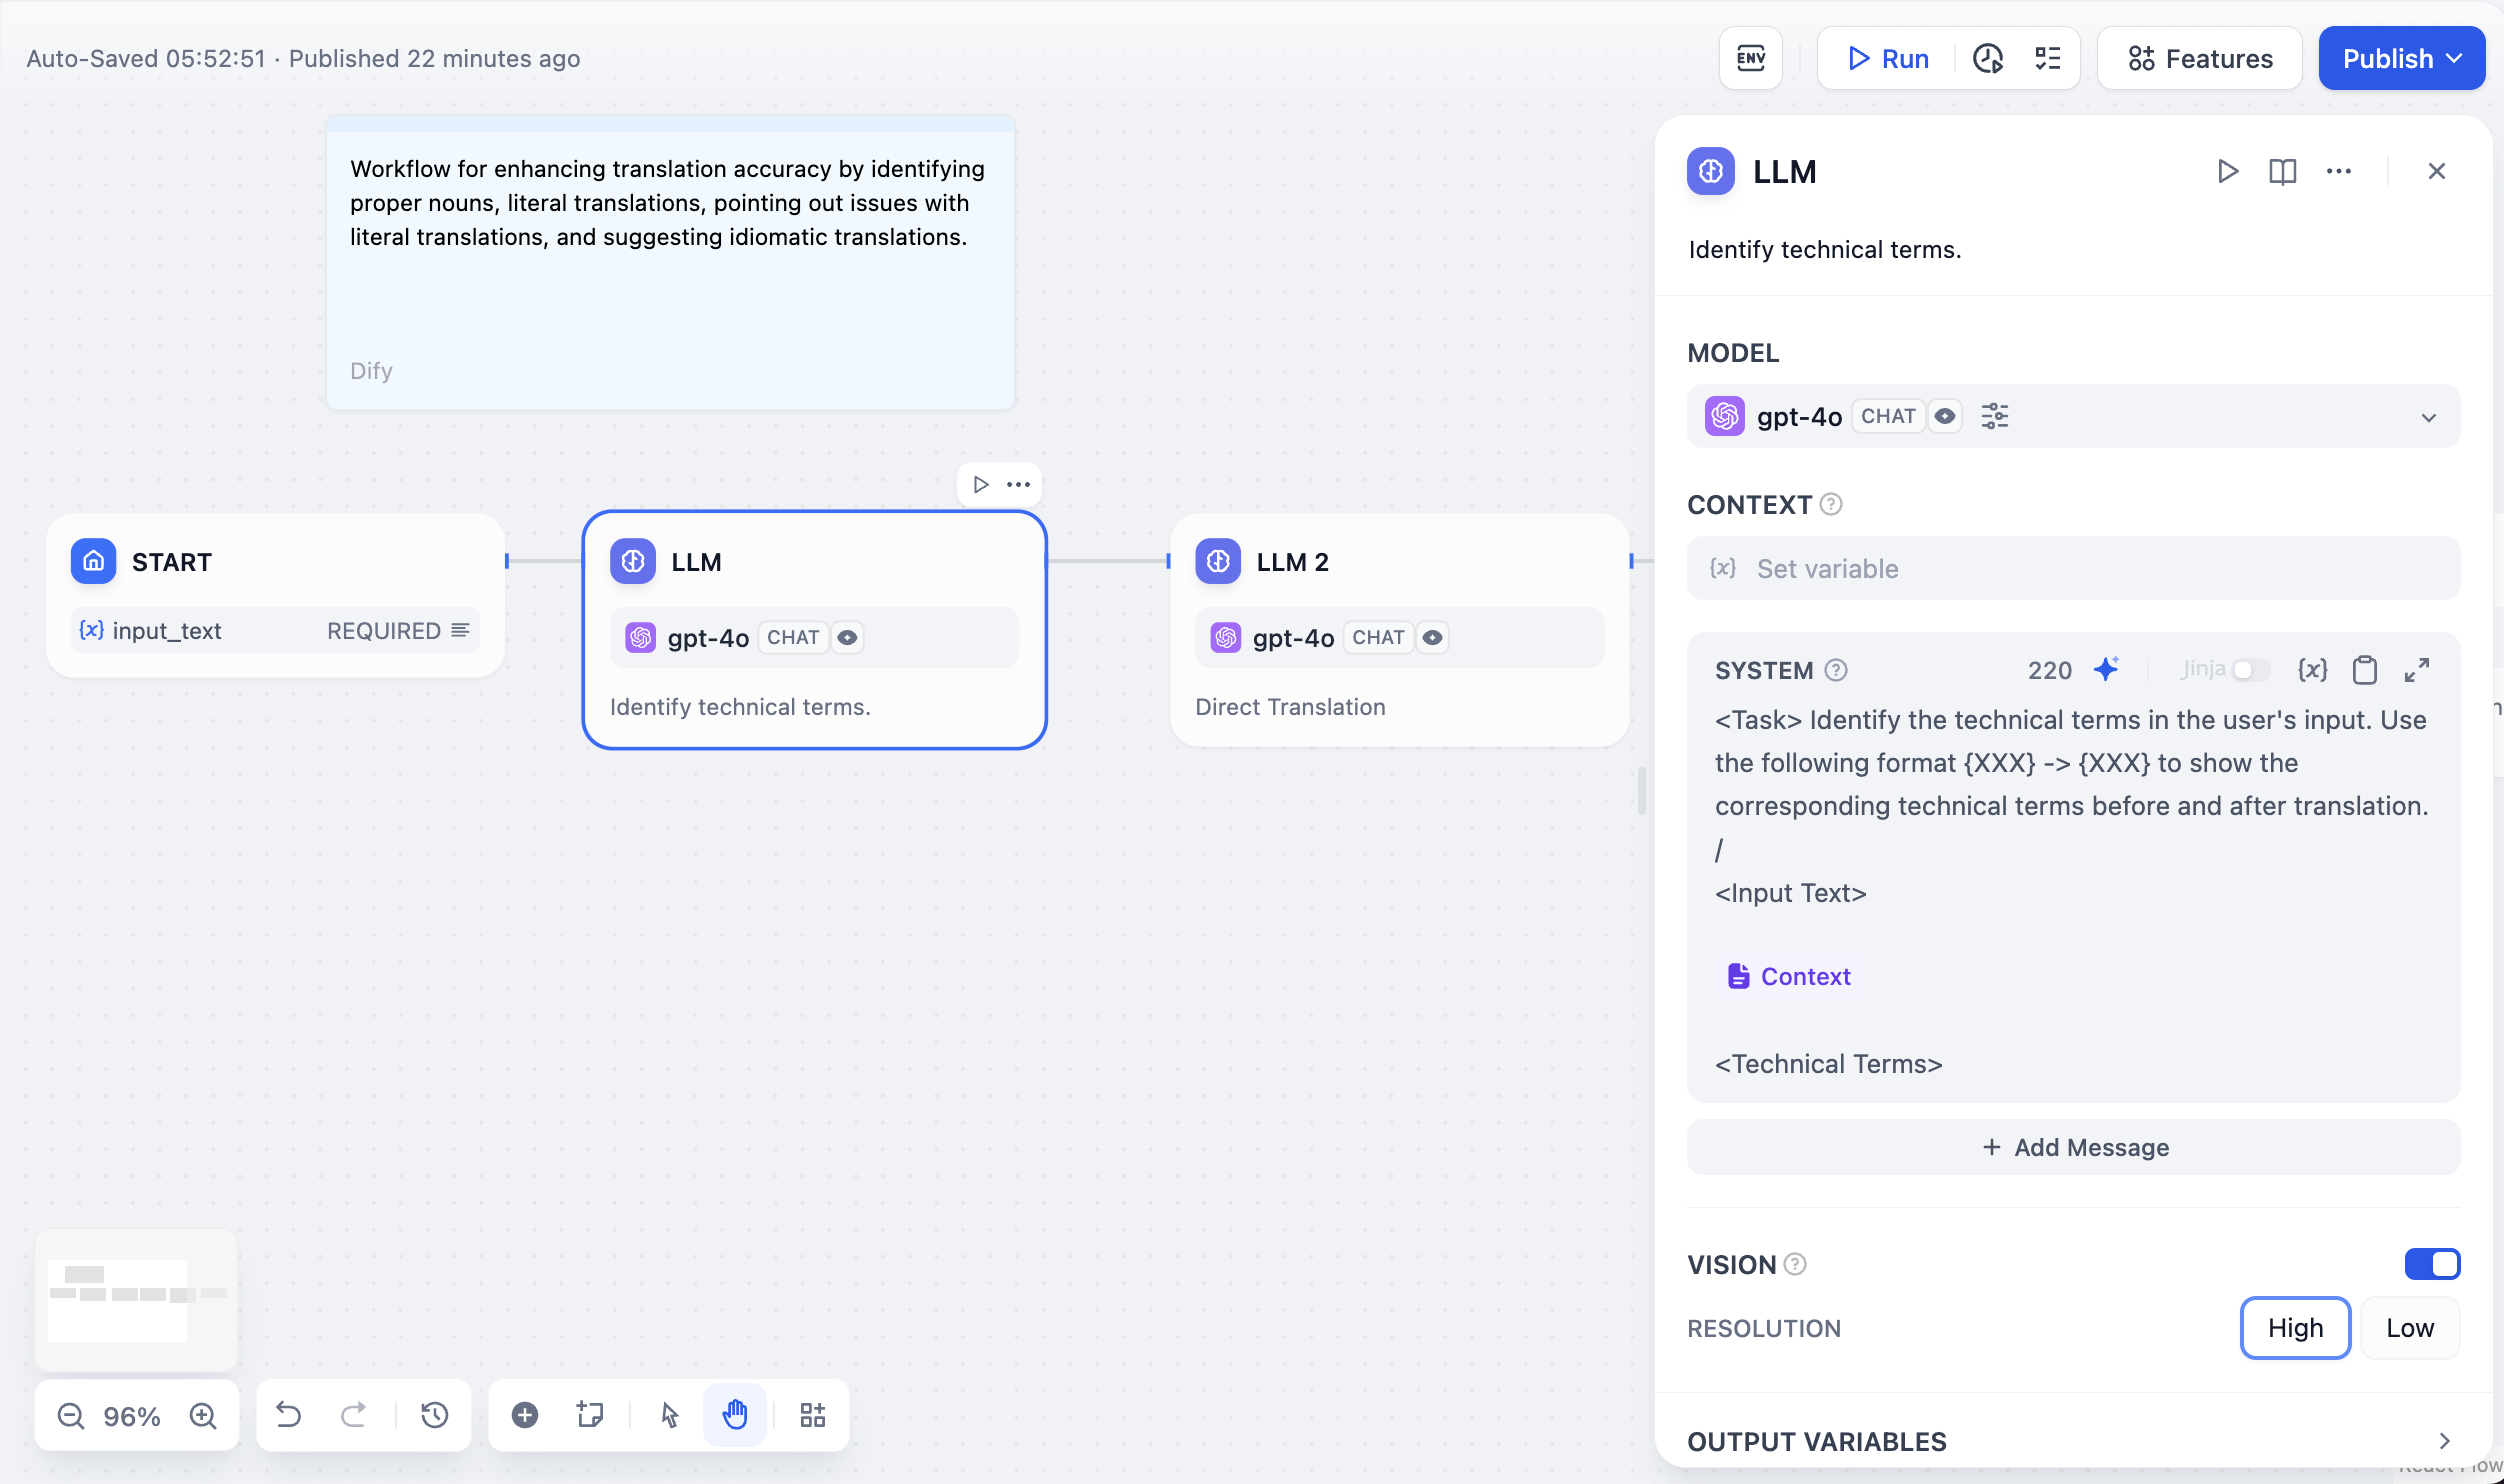
Connect a Knowledge Retrieval node's output to your LLM node's context input, then reference it:
```text theme={null}
Answer using only this context:
{{knowledge_retrieval.result}}
Question: {{user_question}}
```
When using context variables from knowledge retrieval, Dify automatically tracks citations so users see information sources.
## Structured Outputs
Force models to return specific data formats like JSON for programmatic use. Configure through three methods:
User-friendly interface for simple structures. Add fields with names and types, mark required fields, set descriptions. The editor generates JSON Schema automatically.
Write schemas directly for complex structures with nested objects, arrays, and validation rules.
```json theme={null}
{
"type": "object",
"properties": {
"sentiment": {
"type": "string",
"enum": ["positive", "negative", "neutral"]
}
},
"required": ["sentiment"]
}
```
Describe needs in plain language and let AI generate the schema.
Models with native JSON support handle structured outputs reliably. For others, Dify includes the schema in prompts, but results may vary.
## Memory and File Processing
Before using a Knowledge Retrieval node, ensure that you have at least one available knowledge base. To learn about creating knowledge bases, see [Knowledge](/en/use-dify/knowledge/readme#create-knowledge).
On Dify Cloud, knowledge retrieval operations are subject to rate limits based on the subscription plan. For more information, see [Knowledge Request Rate Limit](/en/use-dify/knowledge/knowledge-request-rate-limit).
## Configure the Node
To make the Knowledge Retrieval node work properly, you need to specify:
* *What* it should search for (the query)
* *Where* it should search (the knowledge base)
* *How* to process the retrieval results (the node-level retrieval settings)
You can also use document metadata to enable filter-based searches and further improve retrieval precision.
### Specify the Query
Provide the query content that the node should search for in the selected knowledge base(s).
* **Query Text**: Select a text variable. For example, use `userinput.query` to reference user input in Chatflows, or a custom text-type user input variable in Workflows.
* **Query Images**: Select an image variable, e.g., the image(s) uploaded by the user through a User Input node, to search by image. The image size limit is 2 MB.
For self-hosted deployments, you can adjust the image size limit via the environment variable `ATTACHMENT_IMAGE_FILE_SIZE_LIMIT`.
The **Query Images** option is available only when at least one multimodal knowledge base is added.
Such knowledge bases are marked with the **Vision** tag, indicating that they are using a multimodal embedding model.
### Select Knowledge to Search
Add one or more existing knowledge bases for the node to search for content relevant to the query.
When multiple knowledge bases are added, knowledge is first retrieved from all of them simultaneously, then combined and processed according to the [node-level retrieval settings](#configure-node-level-retrieval-settings).
Knowledge bases marked with the **Vision** tag support cross-modal retrieval—retrieving both text and images based on semantic relevance.
You can click the **Edit** icon next to any added knowledge base to modify its [settings](/en/use-dify/knowledge/manage-knowledge/introduction).
### Configure Node-Level Retrieval Settings
To fine-tune how the node processes retrieval results after they are fetched from the knowledge base(s), click **Retrieval Setting**.
There are two layers of retrieval settings—the knowledge base level and the knowledge retrieval node level.
Think of them as two consecutive filters: the knowledge base settings determine the initial pool of results, and the node settings further rerank the results or narrow down the pool.
* **Rerank Settings**
* **Weighted Score**
The relative weight between semantic similarity and keyword matching during reranking. Higher semantic weight favors meaning relevance, while higher keyword weight favors exact matches.
Weighted Score is available only when all added knowledge bases are indexed with **High Quality** mode.
* **Rerank Model**
The rerank model to re-score and reorder all the results based on their relevance to the query.
If any multimodal knowledge bases are added, select a multimodal rerank model (marked with a **Vision** tag) as well. Otherwise, retrieved images will be excluded from reranking and the final output.
* **Top K**
The maximum number of top results to return after reranking.
When a rerank model is selected, this value will be automatically adjusted based on the model's maximum input capacity (how much text the model can process at once).
* **Score Threshold**
The minimum similarity score for returned results. Results scoring below this threshold are excluded. Use higher thresholds for stricter relevance or lower thresholds to include broader matches.
### Enable Metadata Filtering
By default, retrieval searches across the entire knowledge base. To restrict retrieval to specific documents, enable manual or automatic metadata filtering.
This improves retrieval precision, especially when your knowledge base is large or contains content for different contexts.
For creating and managing document metadata, see [Metadata](/en/use-dify/knowledge/metadata).
## Output
The Knowledge Retrieval node outputs the retrieval results as a variable named `result`, which is an array of retrieved document chunks containing their content, metadata, title, and other attributes.
When the retrieval results contain image attachments, the `result` variable also includes a field named `files` containing image details.
## Use with LLM Nodes
To use the retrieval results as context in an LLM node:
1. In **Context**, select the Knowledge Retrieval node's `result` variable.
2. In the system instruction, reference the `Context` variable.
3. Optional: If the LLM is vision-capable, enable **Vision** so it can process image attachments in the retrieval results.
You don't need to specify the retrieval results as the vision input. Once **Vision** is enabled, the LLM will automatically access any retrieved images.
In chatflows, citations are shown alongside responses that reference knowledge by default. You can turn this off by disabling **[Citation and Attributions](/en/use-dify/build/additional-features#citations-and-attributions)** in **Features** at the top right corner of the canvas.
# List Operator
Source: https://docs.dify.ai/en/use-dify/nodes/list-operator
Filter, sort, and select elements from arrays
The List Operator node processes arrays by filtering, sorting, and selecting specific elements. Use it when you need to work with mixed file uploads, large datasets, or any array data that requires separation or organization before downstream processing.
Supported input data types include `array[string]`, `array[number]`, `array[file]`, and `array[boolean]`.

## The Array Processing Problem
Most workflow nodes expect single values, not arrays. When you have mixed content like `[image.png, document.pdf, audio.mp3]` in one variable, you need to separate this into focused streams that downstream nodes can process effectively.
The List Operator acts as an intelligent router, using filters to separate mixed arrays and prepare them for specialized processing.

## Operations
### Filtering
Extract specific items based on their attributes. For file arrays, filter by:
**Type** - Filter by content category: image, document, audio, video
**MIME Type** - Precise content type identification (image/jpeg, application/pdf, etc.)
**Extension** - File extensions (.pdf, .jpg, .mp3, .docx, etc.)
**Size** - File size constraints for processing limits
**Name** - Filename patterns or specific names
**Transfer Method** - Distinguish between local uploads and URL-based files
### Sorting
Organize filtered results by any attribute:
**Ascending (ASC)** - Smallest to largest values, A-Z alphabetical order
**Descending (DESC)** - Largest to smallest values, Z-A reverse order
### Selection
Choose specific elements from the processed array:
**Take First N** - Select the first 1-20 items after filtering and sorting
**First Record** - Return only the first matching element as a single value
**Last Record** - Return only the last matching element as a single value
## Output Variables
**result** - Complete filtered and sorted array for bulk processing
**first\_record** - Single element from the beginning, perfect for "primary" or "latest" item selection
**last\_record** - Single element from the end, useful for "most recent" or "final" selection
## Mixed File Processing Example
Handle workflows where users upload both documents and images:

**Implementation Steps:**
1. **Configure Mixed Uploads** - Enable file upload features to accept multiple file types
2. **Split by Type** - Use separate List Operator nodes with different filters:
* Filter for `type = "image"` → route to LLM with vision capabilities
* Filter for `type = "document"` → route to Document Extractor
3. **Process Appropriately** - Images get analyzed directly, documents get text extraction
4. **Combine Results** - Merge processed outputs into unified responses
This pattern automatically routes different file types to appropriate processors, creating seamless multi-modal user experiences.
# LLM
Source: https://docs.dify.ai/en/use-dify/nodes/llm
Invoke language models for text generation and analysis
The LLM node invokes language models to process text, images, and documents. It sends prompts to your configured models and captures their responses, supporting structured outputs, context management, and multimodal inputs.

Configure at least one model provider in **System Settings → Model Providers** before using LLM nodes.
## Model Selection and Parameters
Choose from any model provider you've configured. Different models excel at different tasks - GPT-4 and Claude 3.5 handle complex reasoning well but cost more, while GPT-3.5 Turbo balances capability with affordability. For local deployment, use Ollama, LocalAI, or Xinference.

Model parameters control response generation. **Temperature** ranges from 0 (deterministic) to 1 (creative). **Top P** limits word choices by probability. **Frequency Penalty** reduces repetition. **Presence Penalty** encourages new topics. You can also use presets: **Precise**, **Balanced**, or **Creative**.
## Prompt Configuration
Your interface adapts based on model type. Chat models use message roles (**System** for behavior, **User** for input, **Assistant** for examples), while completion models use simple text continuation.
Reference workflow variables in prompts using double curly braces: `{{variable_name}}`. Variables are replaced with actual values before reaching the model.
```text theme={null}
System: You are a technical documentation expert.
User: {{user_input}}
```
## Context Variables
Context variables inject external knowledge while preserving source attribution. This enables RAG applications where LLMs answer questions using your specific documents.

Connect a Knowledge Retrieval node's output to your LLM node's context input, then reference it:
```text theme={null}
Answer using only this context:
{{knowledge_retrieval.result}}
Question: {{user_question}}
```
When using context variables from knowledge retrieval, Dify automatically tracks citations so users see information sources.
## Structured Outputs
Force models to return specific data formats like JSON for programmatic use. Configure through three methods:
User-friendly interface for simple structures. Add fields with names and types, mark required fields, set descriptions. The editor generates JSON Schema automatically.
Write schemas directly for complex structures with nested objects, arrays, and validation rules.
```json theme={null}
{
"type": "object",
"properties": {
"sentiment": {
"type": "string",
"enum": ["positive", "negative", "neutral"]
}
},
"required": ["sentiment"]
}
```
Describe needs in plain language and let AI generate the schema.
Models with native JSON support handle structured outputs reliably. For others, Dify includes the schema in prompts, but results may vary.
## Memory and File Processing
![LLM Memory]() Enable Memory to maintain context across multiple LLM calls within a chatflow conversation. When enabled, previous interactions will be included in subsequent prompts as formatted user - assistant outputs. You can customize what goes into the user prompts by editing the `USER` template. Memory is node-specific and doesn't persist between different conversations.
For **File Processing**, add file variables to prompts for multimodal models. GPT-4V handles images, Claude processes PDFs directly, while other models might need preprocessing.
### Vision Configuration
When processing images, you can control the detail level:
* **High detail** - Better accuracy for complex images but uses more tokens
* **Low detail** - Faster processing with fewer tokens for simple images
The default variable selector for vision is `userinput.files` which automatically picks up files from the User Input node.
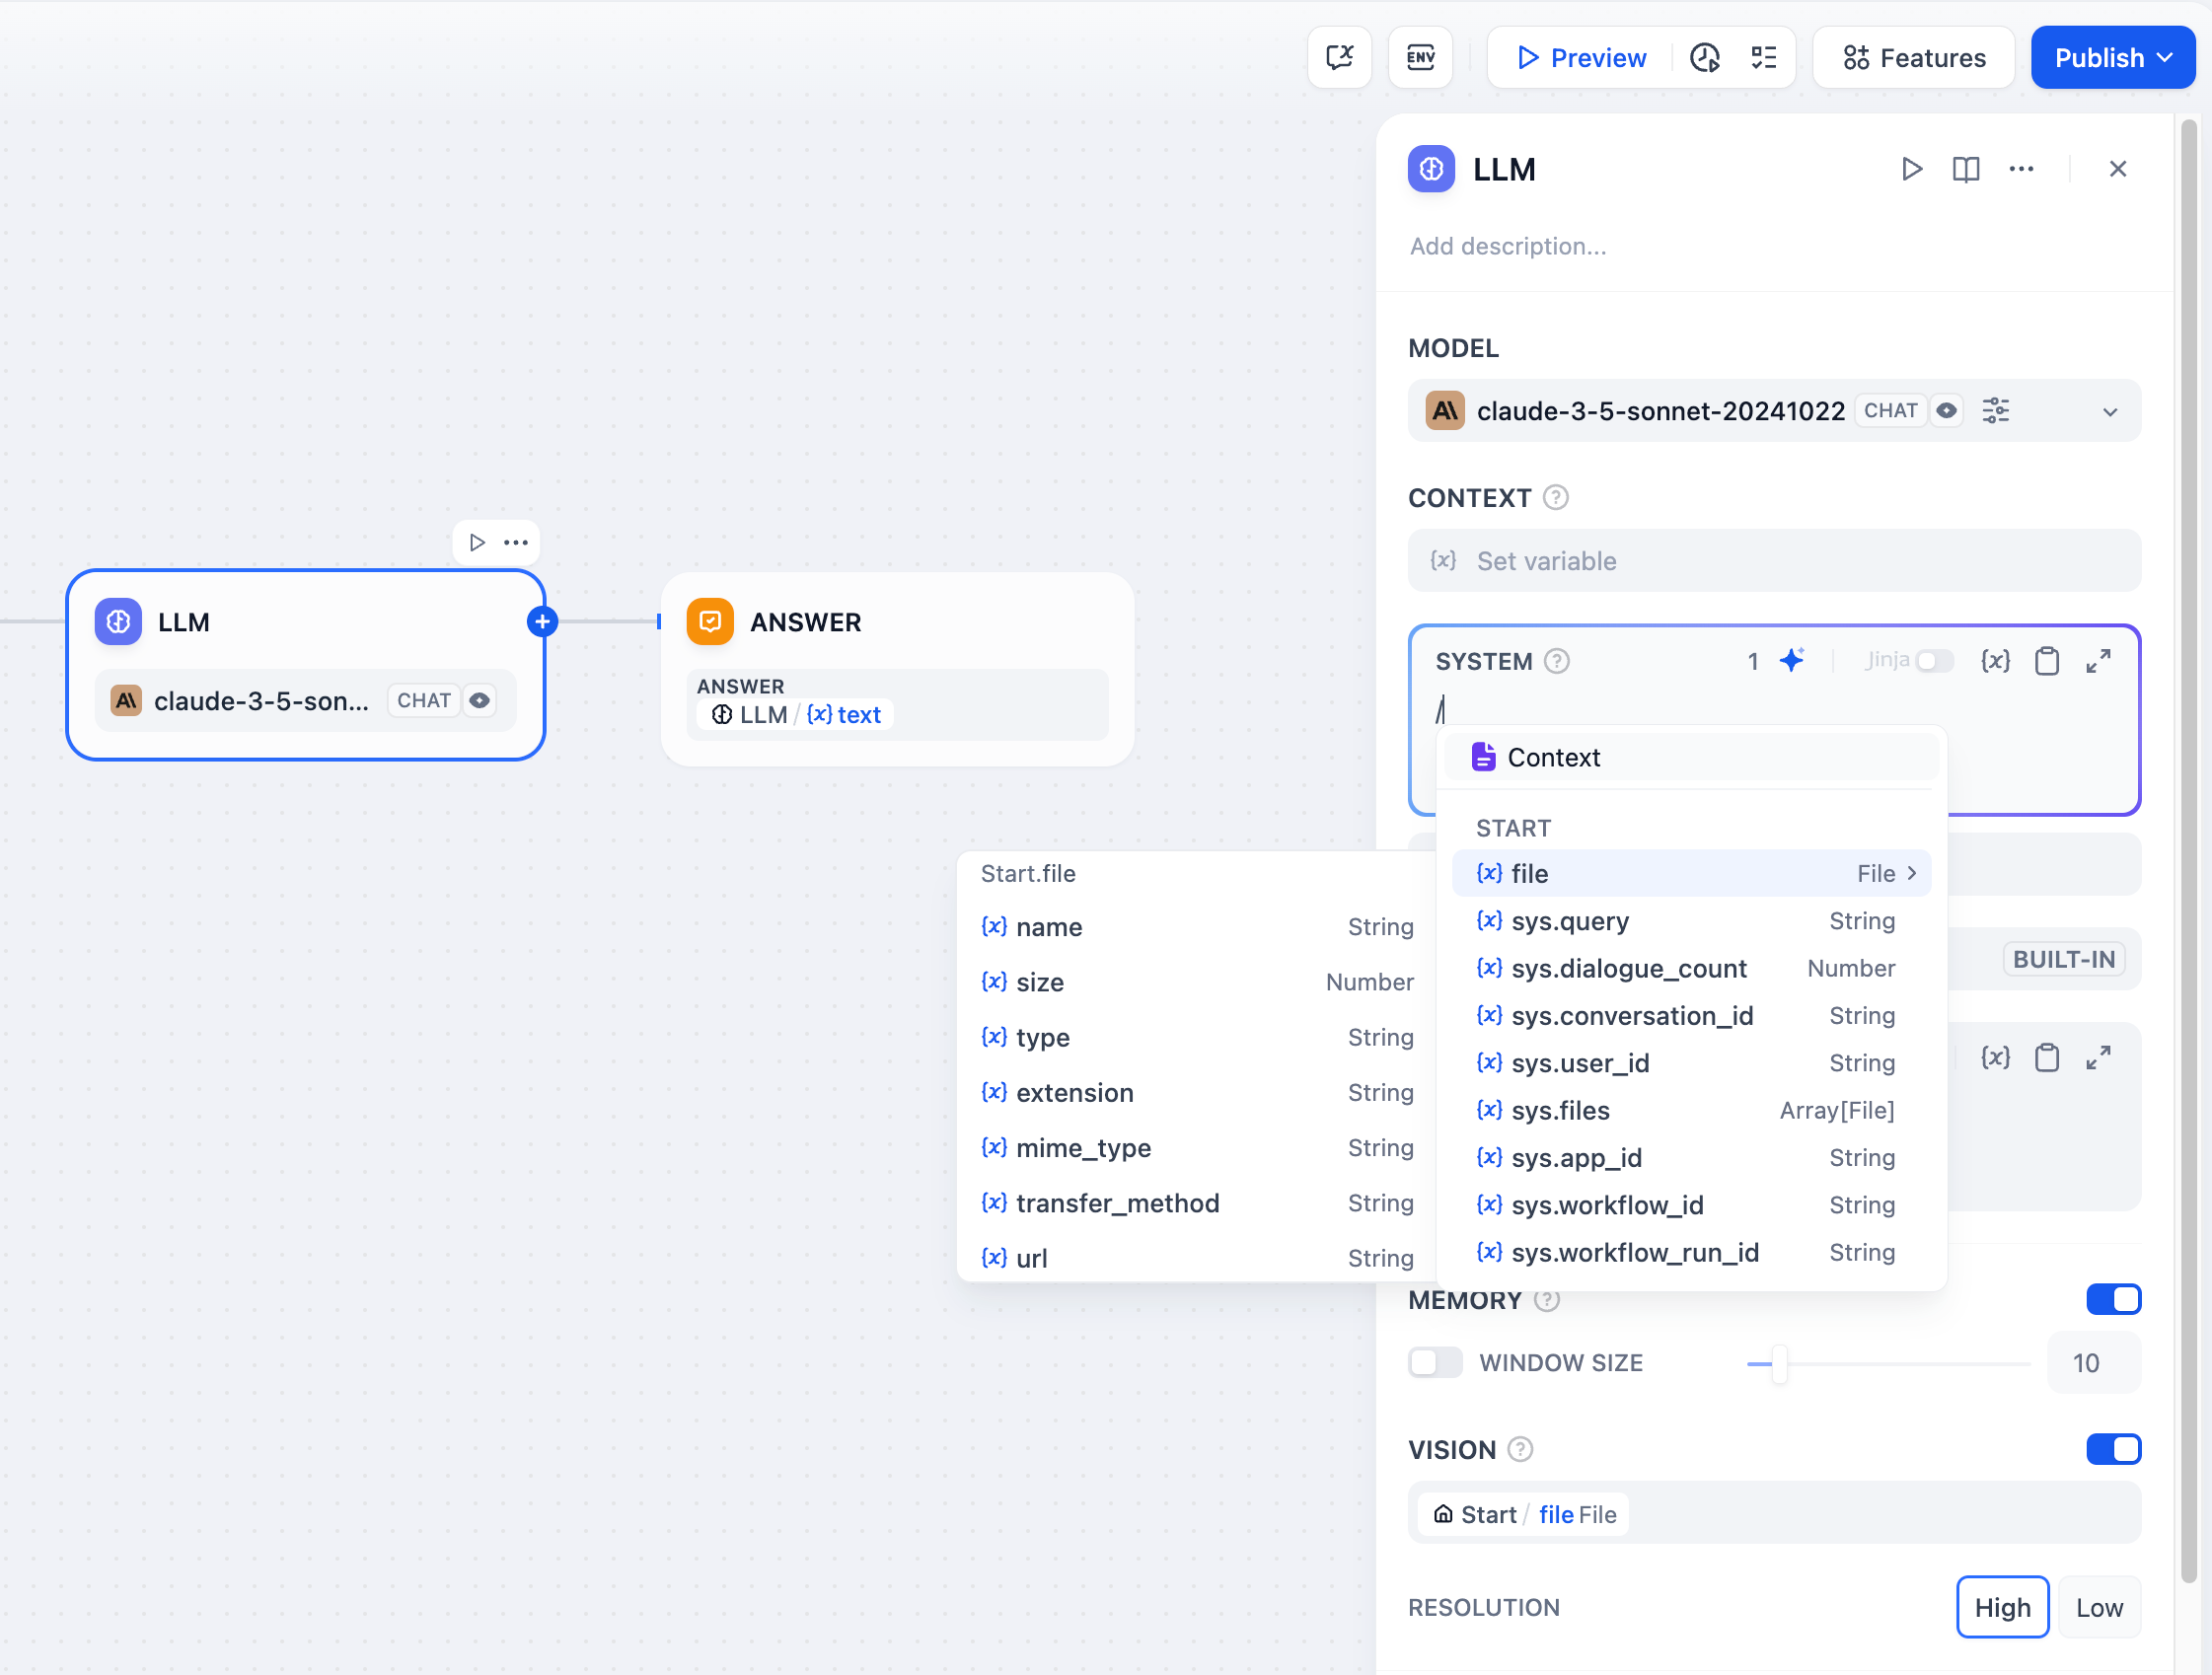
## Jinja2 Template Support
LLM prompts support Jinja2 templating for advanced variable handling. When you use Jinja2 mode (`edition_type: "jinja2"`), you can:
```jinja theme={null}
{% for item in search_results %}
{{ loop.index }}. {{ item.title }}: {{ item.content }}
{% endfor %}
```
Jinja2 variables are processed separately from regular variable substitution, allowing for loops, conditionals, and complex data transformations within prompts.
## Streaming Output
LLM nodes support streaming output by default. Each text chunk is yielded as a `RunStreamChunkEvent`, enabling real-time response display. File outputs (images, documents) are processed and saved automatically during streaming.
## Error Handling
Configure retry behavior for failed LLM calls. Set maximum retry attempts, intervals between retries, and backoff multipliers. Define fallback strategies like default values, error routing, or alternative models when retries aren't sufficient.
# Loop
Source: https://docs.dify.ai/en/use-dify/nodes/loop
Execute repetitive workflows with progressive refinement
The Loop node executes repetitive workflows where each cycle builds on the results of the previous one. Unlike iteration, which processes array elements independently, loops create progressive workflows that evolve with each repetition.
## Loop vs Iteration
Understanding when to use each repetition pattern:
**Sequential Processing** - Each cycle depends on previous results
**Progressive Refinement** - Outputs improve or evolve over iterations
**State Management** - Variables persist and accumulate across cycles
**Use Cases** - Content refinement, problem solving, quality assurance
**Independent Processing** - Each item processed separately
**Parallel Execution** - Items can be processed simultaneously
**Batch Operations** - Same operation applied to multiple data points
**Use Cases** - Data transformation, bulk processing, parallel analysis
## Configuration
### Loop Variables
Define variables that persist across loop iterations and remain accessible after the loop completes. These variables maintain state and enable progressive workflows.
### Termination Conditions
Configure when the loop should stop executing:
**Loop Termination Condition** - Expression that determines when to exit (e.g., `quality_score > 0.9`)
**Maximum Loop Count** - Safety limit to prevent infinite loops
**Exit Loop Node** - Immediate termination when this node is reached
The loop terminates when either the termination condition is met, the maximum count is reached, or an Exit Loop node executes. If no conditions are specified, the loop continues until the maximum count.
## Basic Loop Example
Generate random numbers until finding one less than 50:
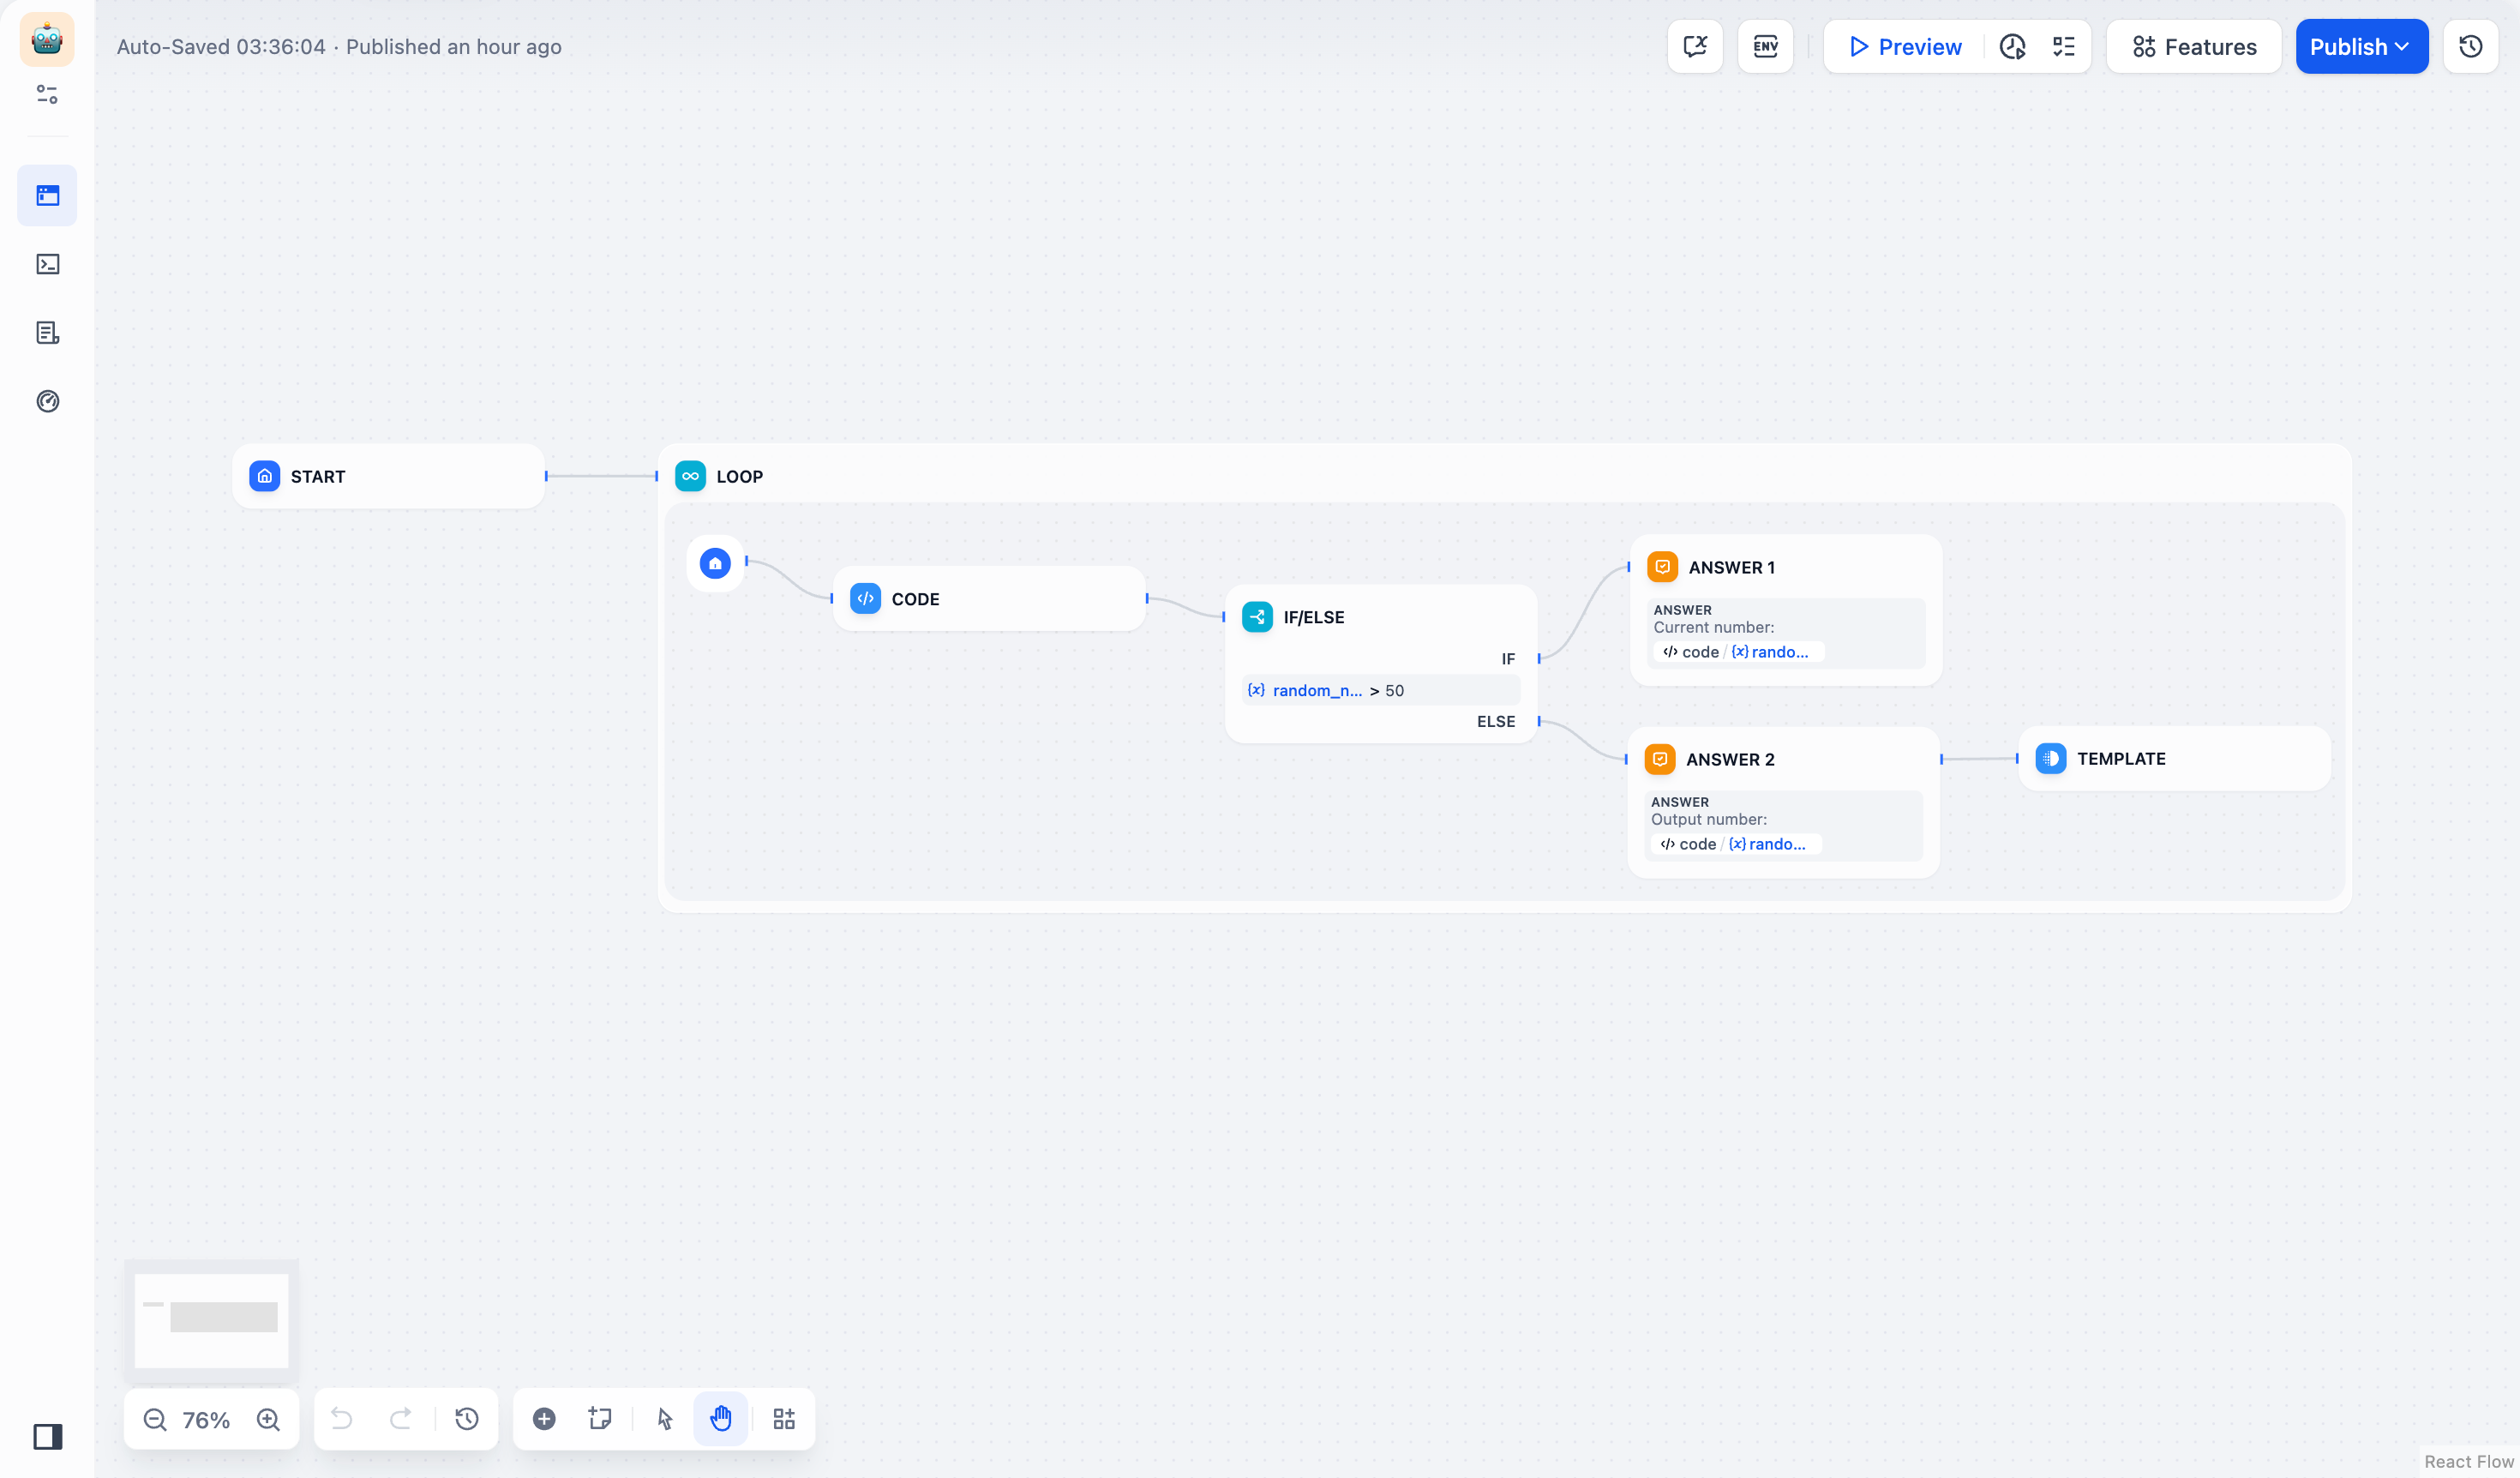
**Workflow Steps:**
1. **Code node** generates random integers between 1-100
2. **If-Else node** checks if number is less than 50
3. **Template node** returns "done" for numbers \< 50 to trigger loop termination
4. Loop continues until termination condition is met
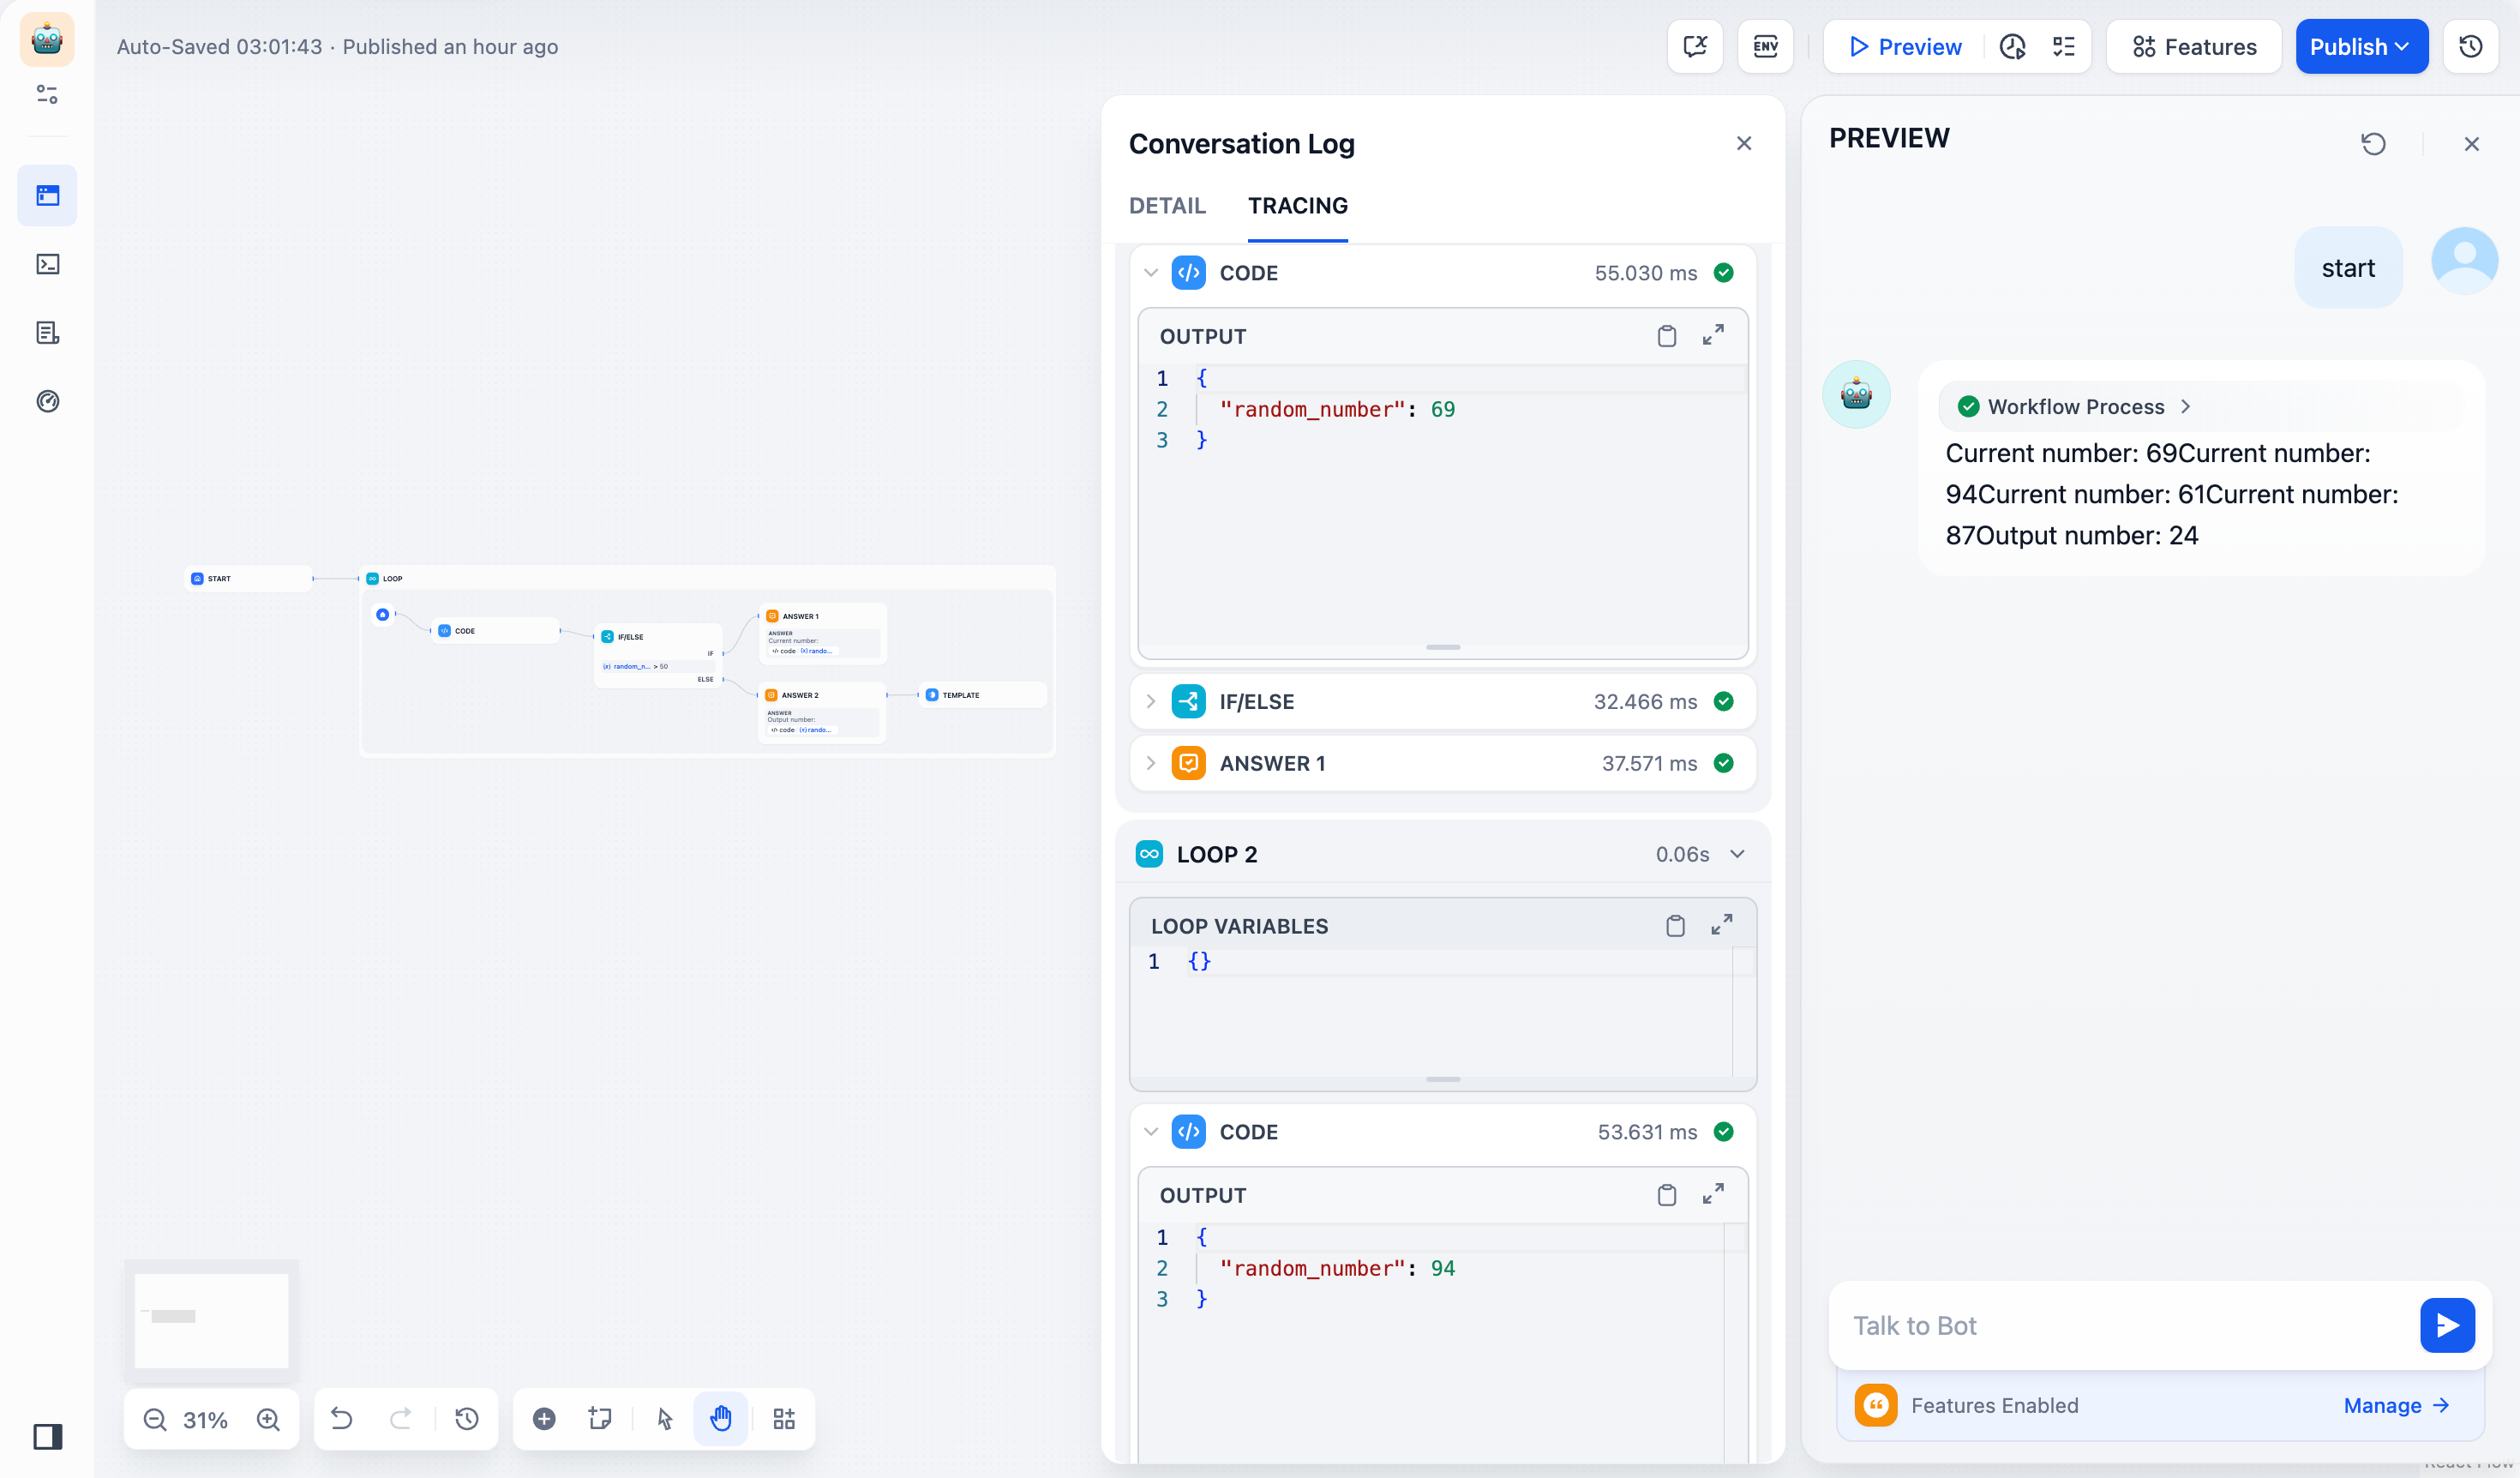
## Advanced Loop Example
Create a poem through iterative refinement, with each version building upon the previous one:
**Loop Variables:**
* `num` - Counter starting at 0, incrementing each iteration
* `verse` - Text variable holding the current poem version
**Workflow Logic:**
1. **If-Else node** checks if `num > 3` to determine when to exit
2. **LLM node** generates improved poem based on previous version
3. **Variable Assigner** updates both counter and poem content
4. **Exit Loop node** terminates after 4 refinement cycles
The LLM prompt references both the current verse and iteration context:
```text theme={null}
You are a European literary figure creating poetic verses.
Current verse: {{verse}}
Refine and improve this poem based on your previous work.
```
# Output
Source: https://docs.dify.ai/en/use-dify/nodes/output
Return workflow results to the end user or API caller
Use the Output node to deliver specific variable values from your workflow to the end user or API caller. Add it where you need to surface results.
The Output node was previously named *End* and was required in every workflow.
It is now optional—workflows run successfully without one, but any workflow or branch without an Output node returns no data to the caller.
Output nodes are only available in Workflows. Chatflows use the [Answer](/en/use-dify/nodes/answer) node instead.
## Configure Output Variables
Each Output node requires at least one output variable. To add a variable, assign a name and select the source from any upstream node's output.
The variable name you assign becomes the key in API responses.
You can add multiple output variables to a single Output node and reorder them by dragging.
## Supported Variable Types
Output variables support the following types:
`string`, `number`, `integer`, `boolean`, `object`, `file`, `array[string]`, `array[number]`, `array[object]`, `array[boolean]`, `array[file]`
## Multiple Output Nodes
A workflow can contain more than one Output node. The Output node does not stop workflow execution—other parallel branches (if any) continue running after it completes.
All output variables from every executed Output node are combined into one final result. Each Output node adds its variables to the result as the workflow reaches it:
* On the **same branch**, variables are added in the order the Output nodes are placed.
* On **parallel branches**, whichever Output node executes first adds its variables first.
Always use unique variable names across all Output nodes in a workflow.
When two Output nodes use the same output variable name, the later one overwrites the earlier value.
## API Response Structure
When you call a workflow through the API, output variables appear in the `outputs` object of the response.
All outputs return in a single response once the workflow completes:
```json theme={null}
{
"workflow_run_id": "...",
"status": "succeeded",
"outputs": {
"result_text": "The processed output...",
"score": 95
}
}
```
Outputs arrive in the final `workflow_finished` event:
```json theme={null}
{
"event": "workflow_finished",
"data": {
"outputs": {
"result_text": "The processed output...",
"score": 95
}
}
}
```
Each output variable name maps directly to a key in the `outputs` object.
## For Workflow Tools
When you [publish a workflow as a tool](/en/use-dify/workspace/tools#workflow-tool), the Output node defines the tool's return schema. Each output variable name becomes a key in the tool's result, accessible to the parent workflow that invokes the tool.
# Parameter Extractor
Source: https://docs.dify.ai/en/use-dify/nodes/parameter-extractor
Convert natural language to structured data using LLM intelligence
The Parameter Extractor node converts unstructured text into structured data using LLM intelligence. It bridges the gap between natural language input and the structured parameters that tools, APIs, and other workflow nodes require.
## Configuration
### Input and Model Selection
Select the **Input Variable** containing the text you want to extract parameters from. This typically comes from user input, LLM responses, or other workflow nodes.
Choose a **Model** with strong structured output capabilities. The Parameter Extractor relies on the LLM's ability to understand context and generate structured JSON responses.
### Parameter Definition
Define the parameters you want to extract by specifying:
* **Parameter Name** - The key that will appear in the output JSON
* **Data Type** - String, number, boolean, array, or object
* **Description** - Helps the LLM understand what to extract
* **Required Status** - Whether the parameter must be present
You can manually define parameters or **quickly import from existing tools** to match the parameter requirements of downstream nodes.
### Extraction Instructions
Write clear instructions describing what information to extract and how to format it. Providing examples in your instructions improves extraction accuracy and consistency for complex parameters.
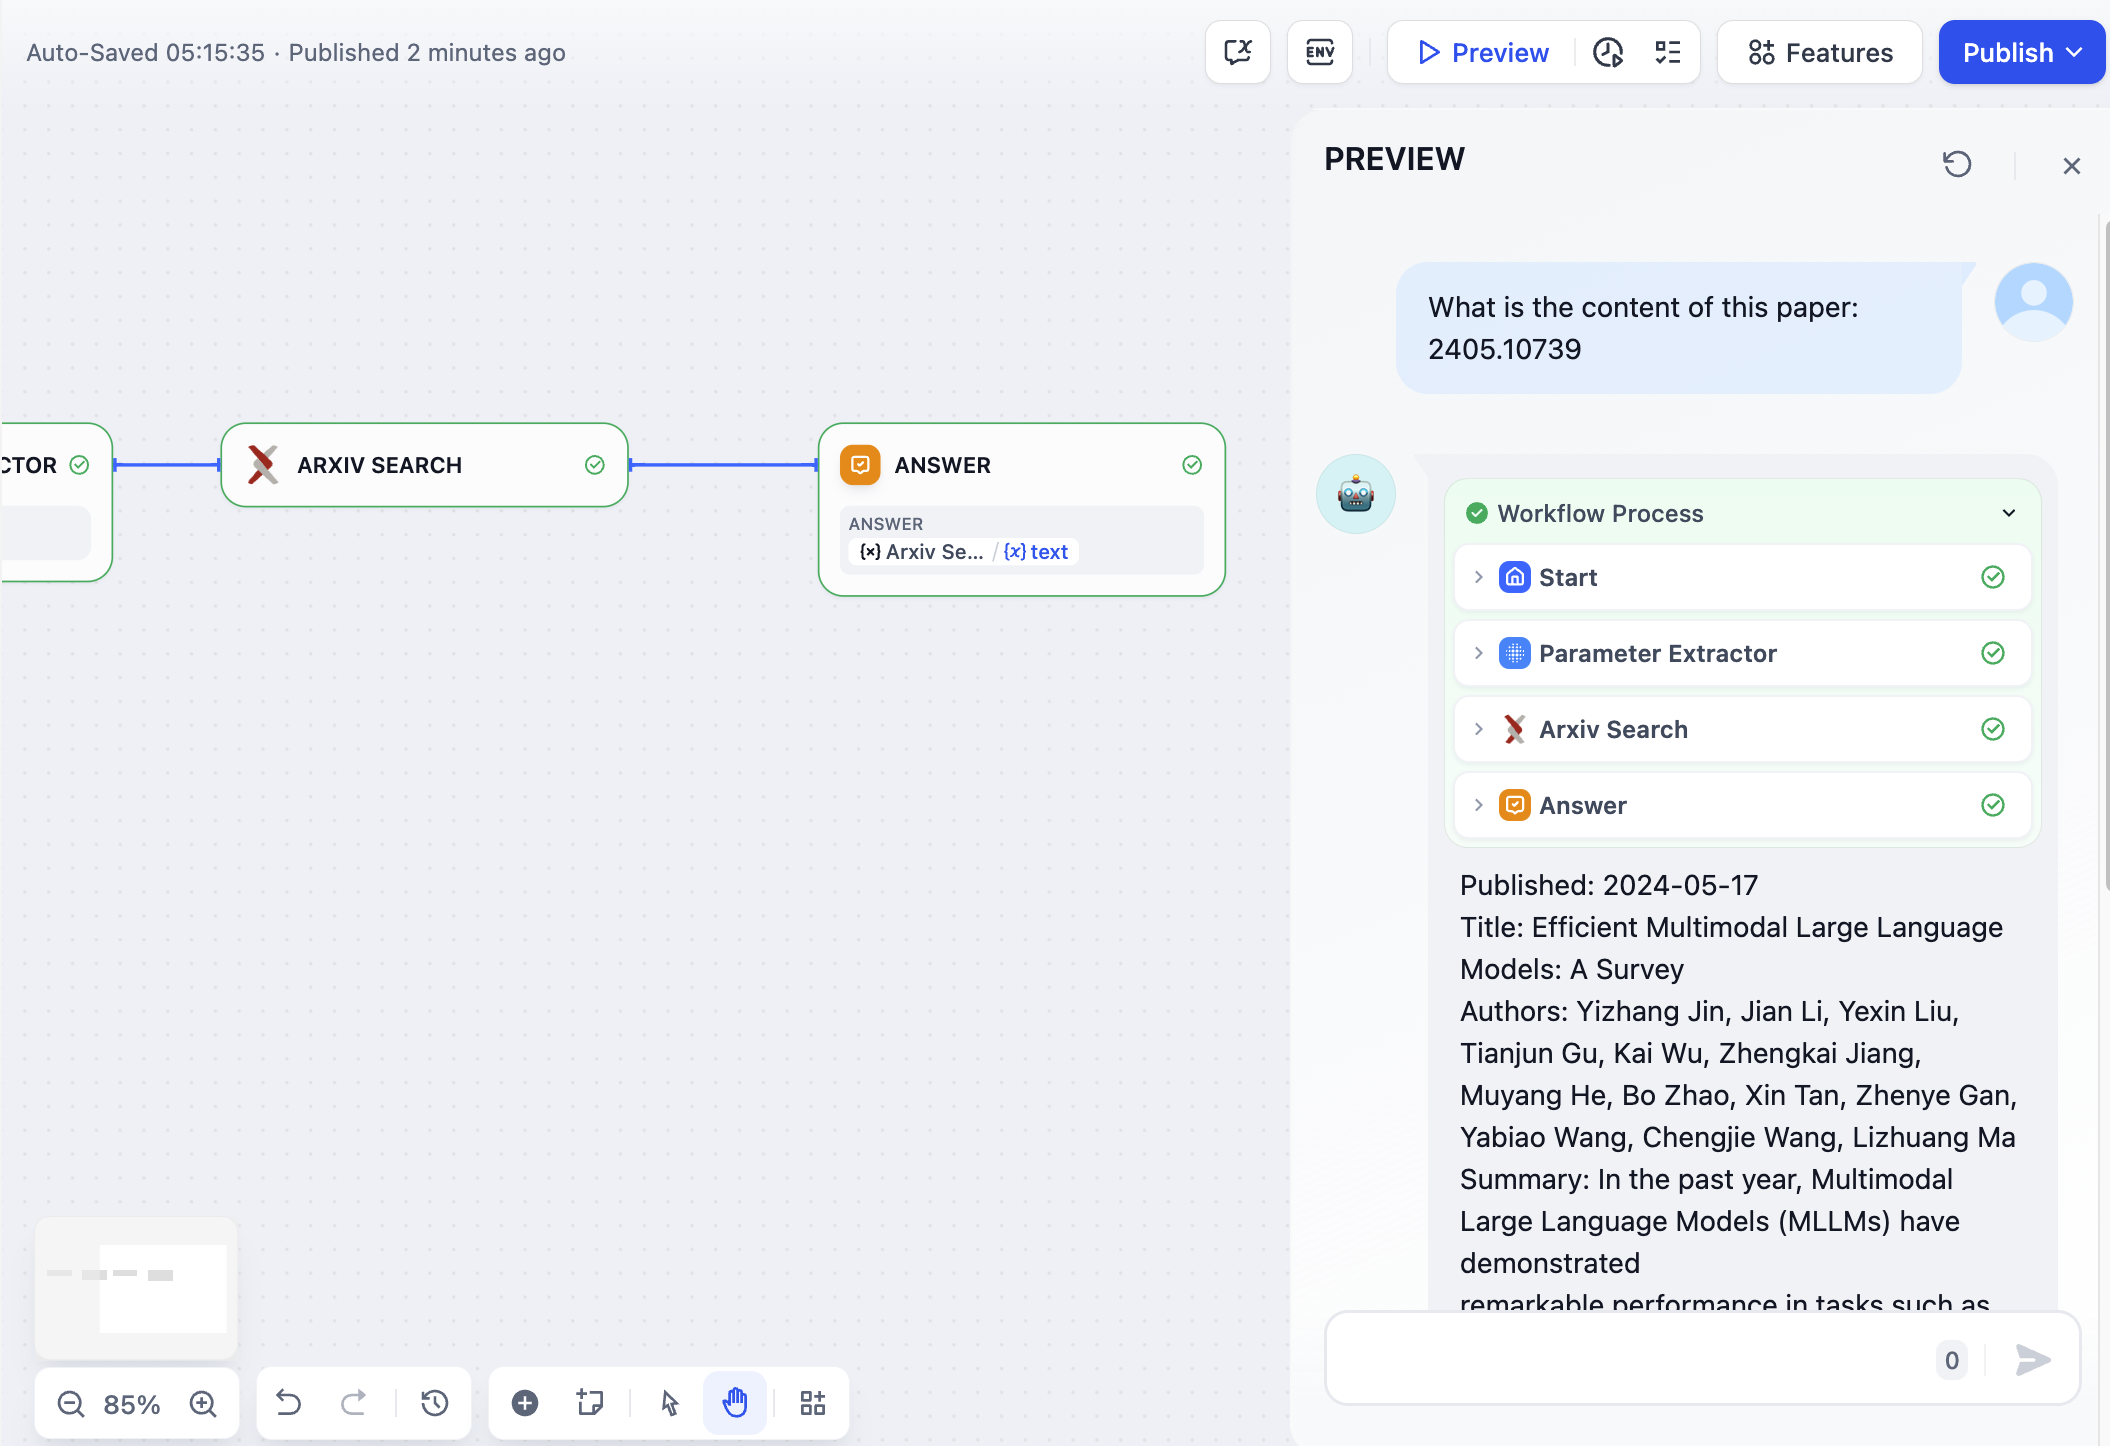
## Advanced Configuration
### Inference Mode
Choose between two extraction approaches based on your model's capabilities:
**Function Call/Tool Call** uses the model's structured output features for reliable parameter extraction with strong type compliance.
**Prompt-based** relies on pure prompting for models that may not support function calling or when prompt-based extraction performs better.
### Memory
Enable memory to include conversation history when extracting parameters. This helps the LLM understand context in interactive dialogues and improves extraction accuracy for conversational workflows.
## Output Variables
The node provides both extracted parameters and built-in status variables:
**Extracted Parameters** appear as individual variables matching your parameter definitions, ready for use in downstream nodes.
**Built-in Variables** include status information:
* `__is_success` - Extraction success status (1 for success, 0 for failure)
* `__reason` - Error description when extraction fails
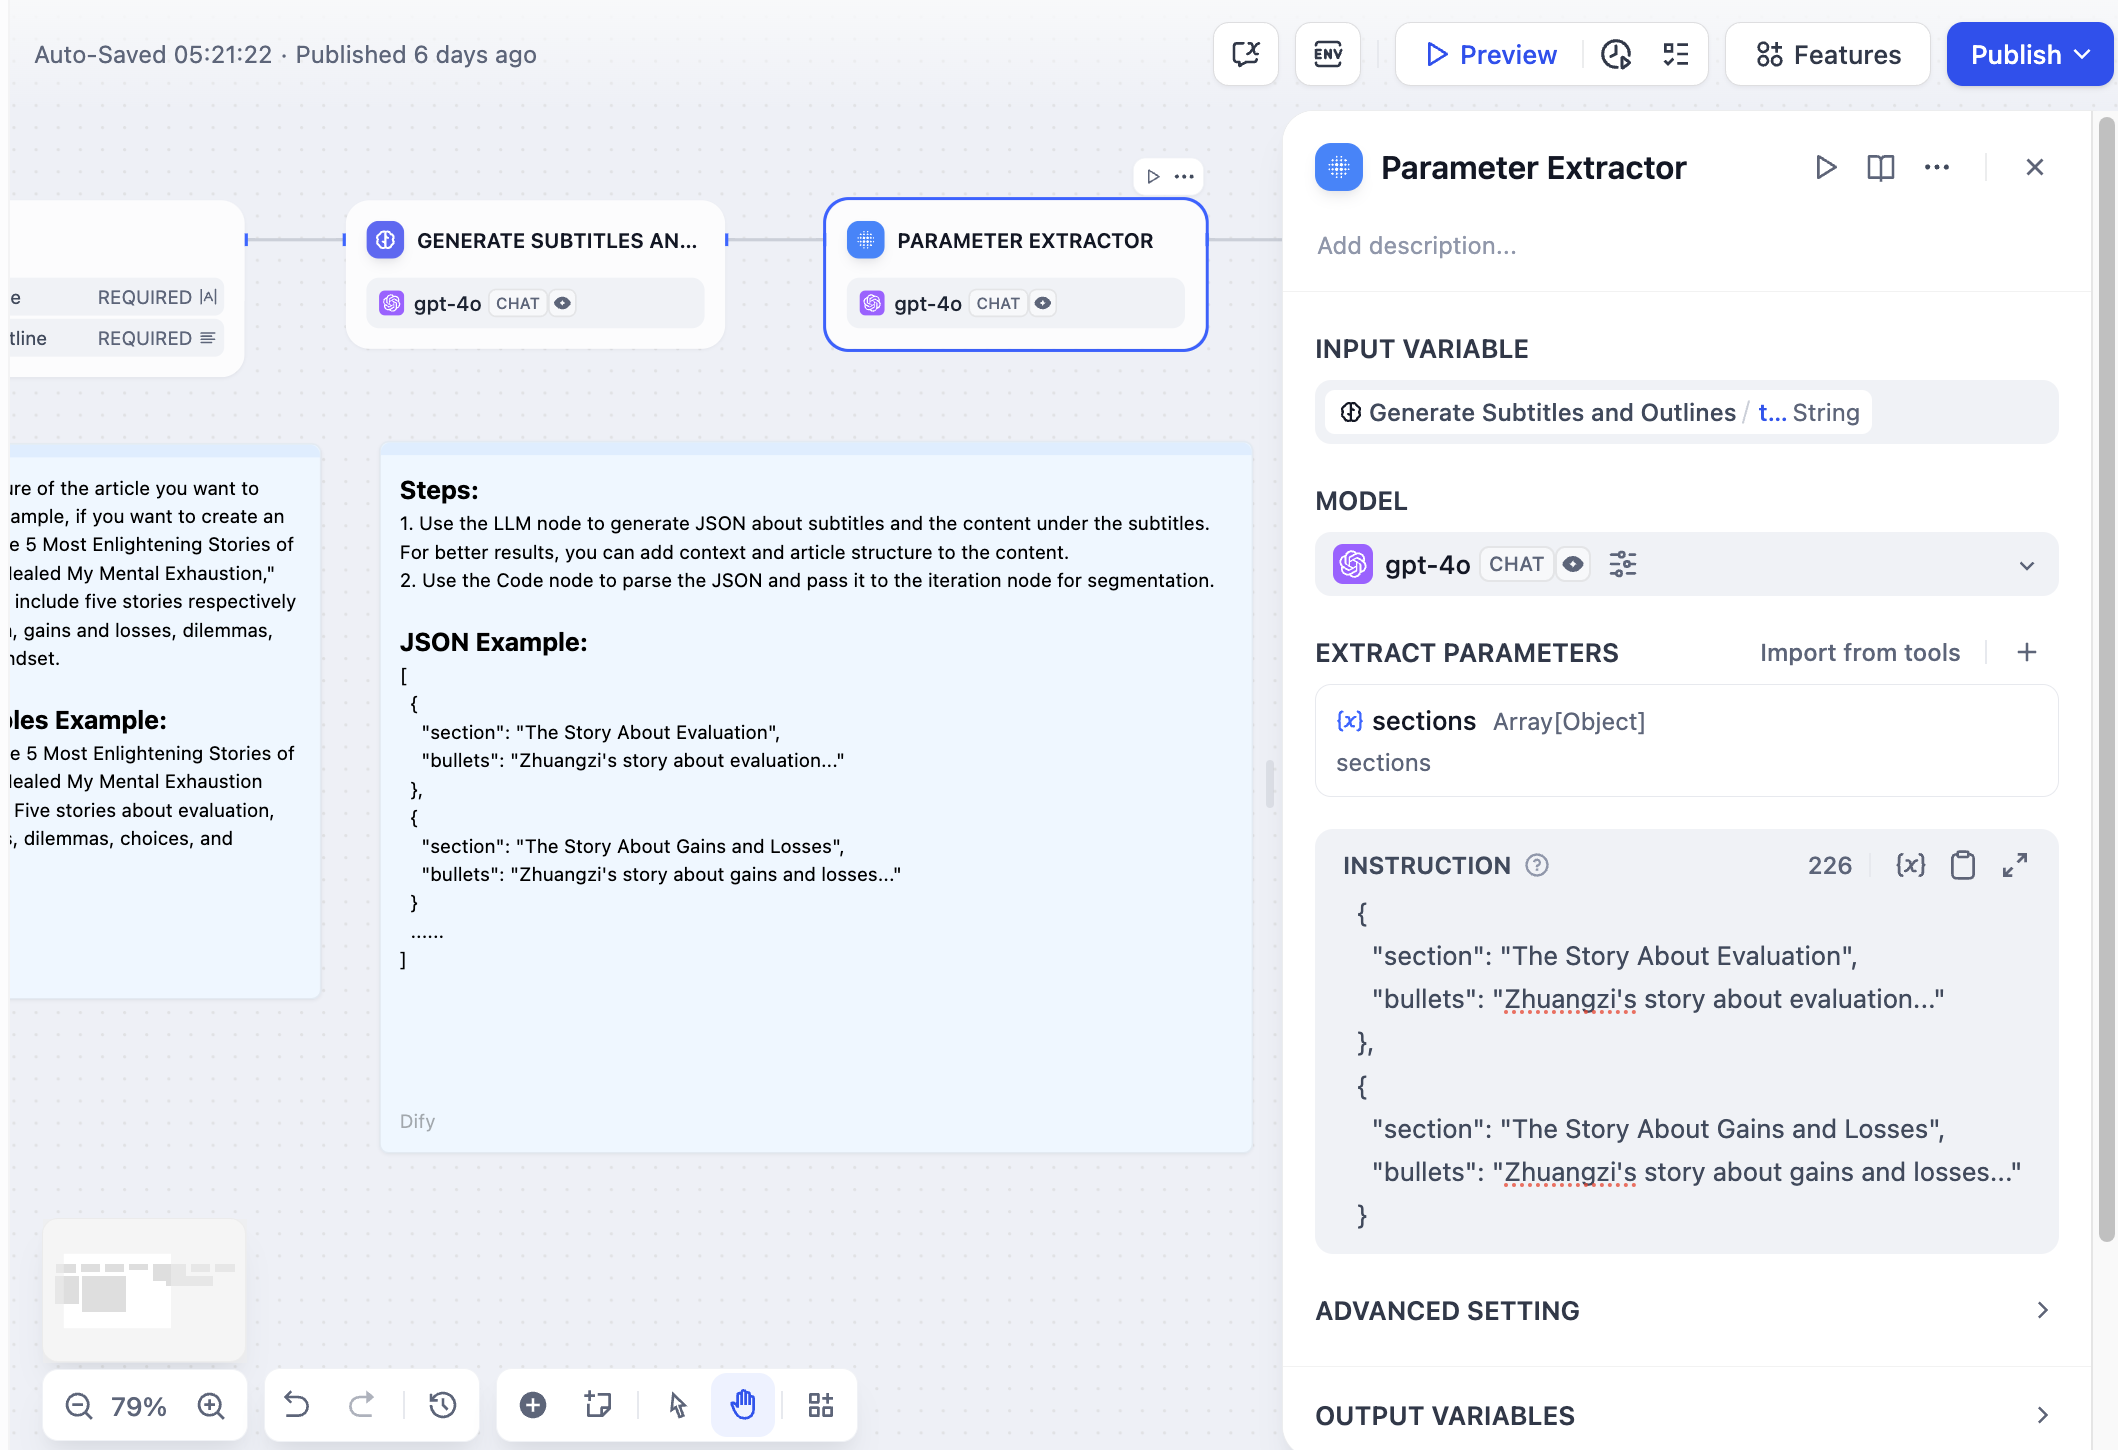
# Question Classifier
Source: https://docs.dify.ai/en/use-dify/nodes/question-classifier
Intelligently categorize user input to route workflow paths
The Question Classifier node intelligently categorizes user input to route conversations down different workflow paths. Instead of building complex conditional logic, you define categories and let the LLM determine which one fits best based on semantic understanding.
## Configuration
### Input and Model Setup
**Input Variable** - Select what to classify, typically `sys.query` for user questions, but can be any text variable from previous workflow nodes.
**Model Selection** - Choose an LLM for classification. Faster models work well for simple categories, while more powerful models handle nuanced distinctions better.
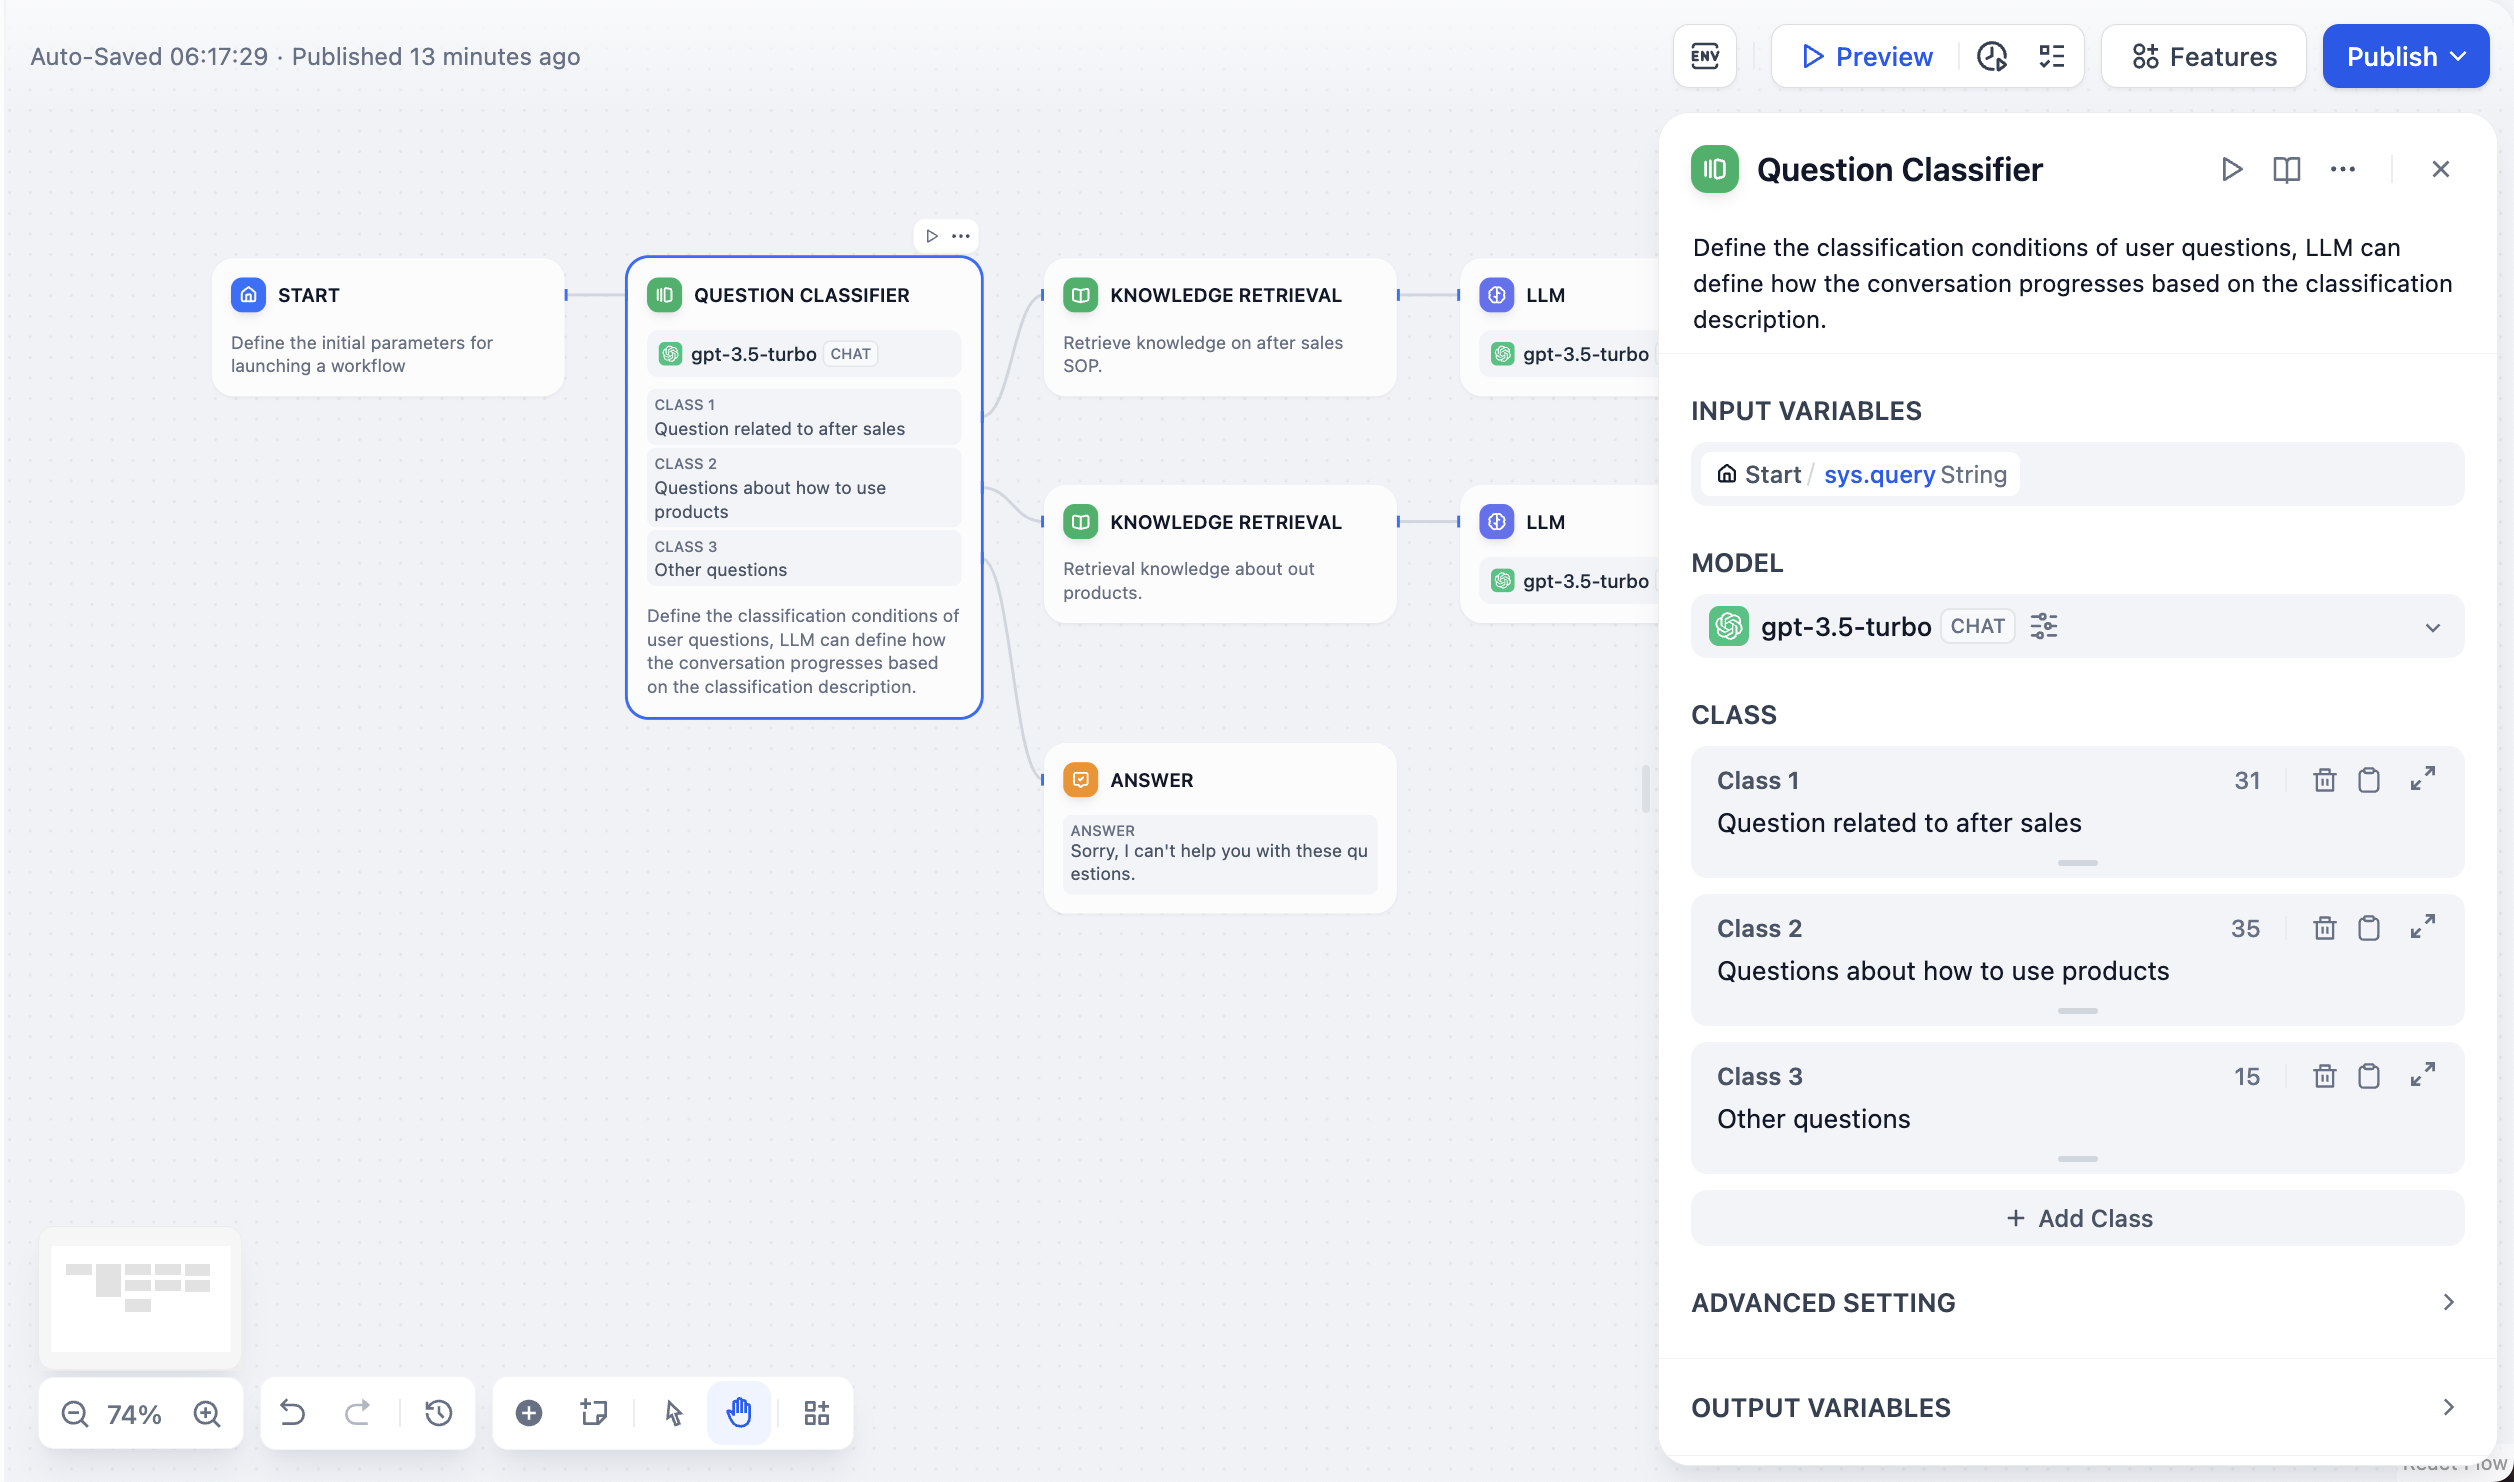
### Category Definition
Create clear, descriptive labels for each category with specific descriptions of what belongs in each. Be precise about boundaries between categories to help the LLM make accurate decisions.
Each category becomes a potential output path that you can connect to different downstream nodes like specialized knowledge bases, response templates, or processing workflows.
## Classification Example
Here's how the Question Classifier works in a customer service scenario:
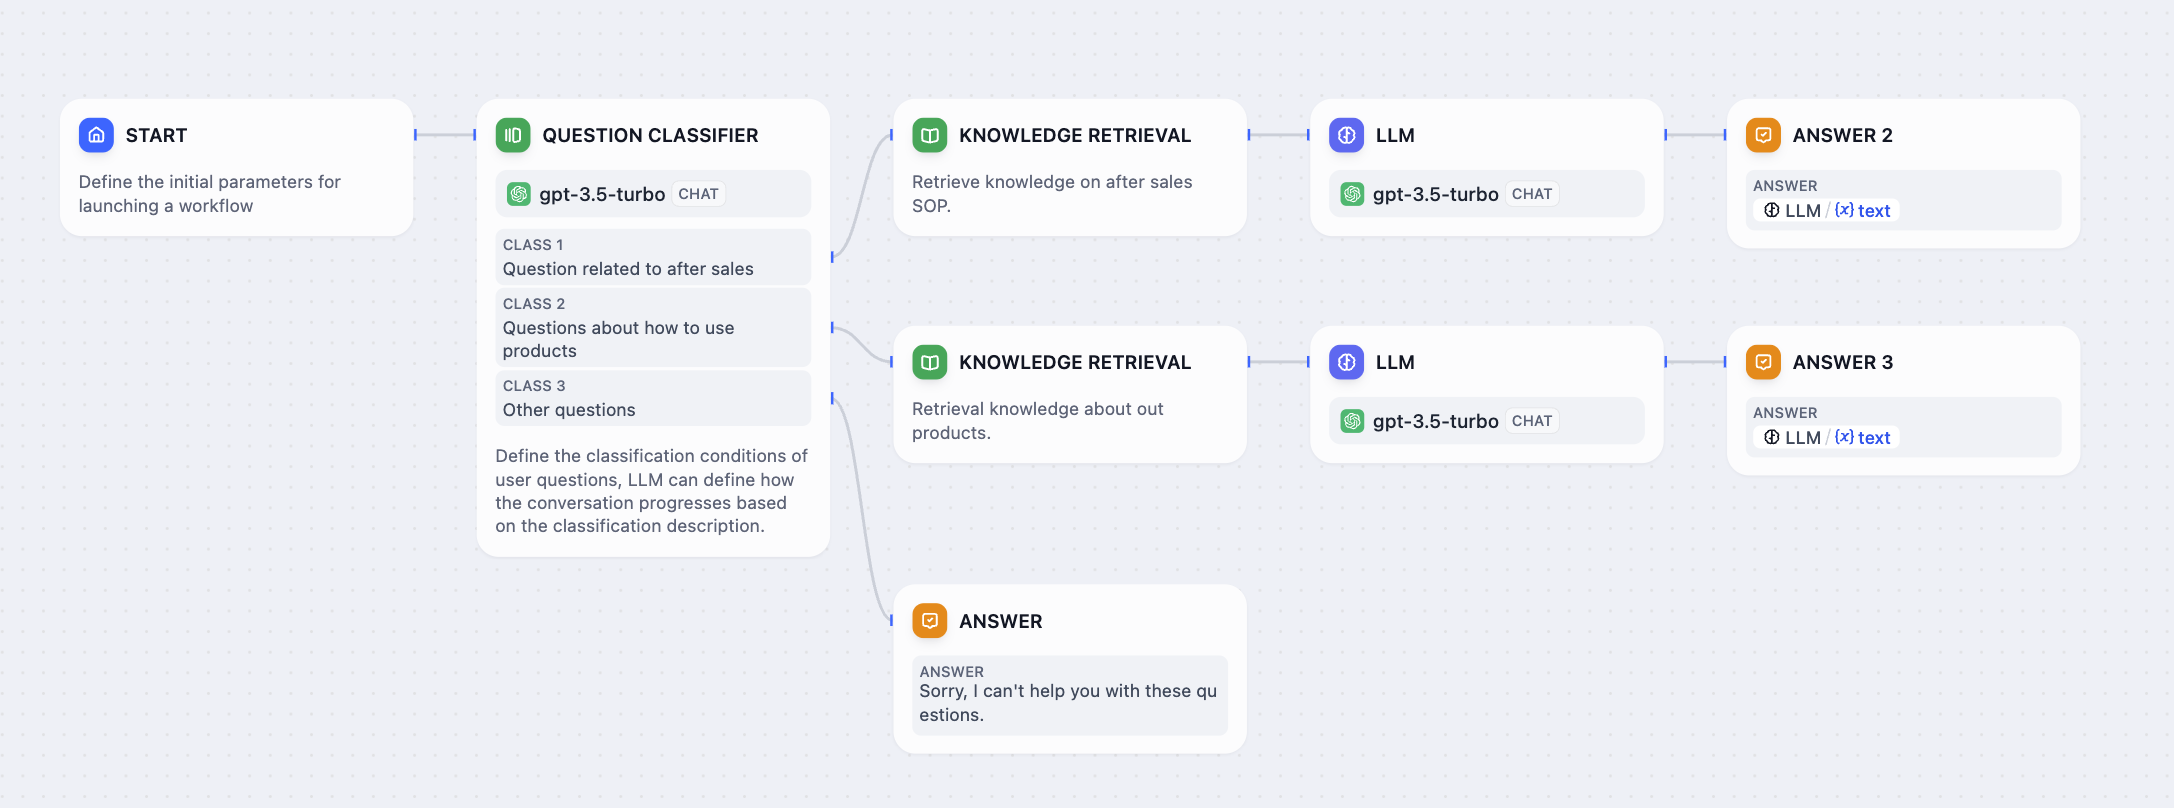
**Categories Defined:**
* **After-sales service** - Warranty claims, returns, repairs, and post-purchase support
* **Product usage** - Setup instructions, troubleshooting, feature explanations
* **Other questions** - General inquiries not covered by specific categories
**Classification Results:**
* "How to set up contacts on iPhone 14?" → **Product usage**
* "What is the warranty period for my purchase?" → **After-sales service**
* "What's the weather like today?" → **Other questions**
Each classification result routes to different knowledge bases and response strategies, ensuring users receive relevant, specialized assistance.
## Advanced Configuration
### Instructions and Guidelines
Add detailed classification guidelines in the **Instructions** field to handle edge cases, ambiguous scenarios, or specific business rules. This helps the LLM understand nuanced distinctions between categories.
# Template
Source: https://docs.dify.ai/en/use-dify/nodes/template
Transform and format data using Jinja2 templating
The Template node transforms and formats data from multiple sources into structured text using Jinja2 templating. Use it to combine variables, format outputs, and prepare data for downstream nodes or end users.

## Jinja2 Templating
Template nodes use Jinja2 templating syntax to create dynamic content that adapts based on workflow data. This provides programming-like capabilities including loops, conditionals, and filters for sophisticated text generation.
### Variable Substitution
Reference workflow variables using double curly braces: `{{ variable_name }}`. You can access nested object properties and array elements using dot notation and bracket syntax.
```jinja theme={null}
{{ user.name }}
{{ items[0].title }}
{{ data.metrics.score }}
```
### Conditional Logic
Show different content based on data values using if-else statements:
```jinja theme={null}
{% if user.subscription == 'premium' %}
Welcome back, Premium Member! You have access to all features.
{% else %}
Consider upgrading to Premium for additional capabilities.
{% endif %}
```
### Loops and Iteration
Process arrays and objects with for loops to generate repetitive content:
```jinja theme={null}
{% for item in search_results %}
### Result {{ loop.index }}
**Score**: {{ item.score | round(2) }}
{{ item.content }}
---
{% endfor %}
```

## Data Formatting
### Filters
Jinja2 filters transform data during template rendering:
```jinja theme={null}
{{ name | upper }}
{{ price | round(2) }}
{{ content | replace('\n', '
Enable Memory to maintain context across multiple LLM calls within a chatflow conversation. When enabled, previous interactions will be included in subsequent prompts as formatted user - assistant outputs. You can customize what goes into the user prompts by editing the `USER` template. Memory is node-specific and doesn't persist between different conversations.
For **File Processing**, add file variables to prompts for multimodal models. GPT-4V handles images, Claude processes PDFs directly, while other models might need preprocessing.
### Vision Configuration
When processing images, you can control the detail level:
* **High detail** - Better accuracy for complex images but uses more tokens
* **Low detail** - Faster processing with fewer tokens for simple images
The default variable selector for vision is `userinput.files` which automatically picks up files from the User Input node.

## Jinja2 Template Support
LLM prompts support Jinja2 templating for advanced variable handling. When you use Jinja2 mode (`edition_type: "jinja2"`), you can:
```jinja theme={null}
{% for item in search_results %}
{{ loop.index }}. {{ item.title }}: {{ item.content }}
{% endfor %}
```
Jinja2 variables are processed separately from regular variable substitution, allowing for loops, conditionals, and complex data transformations within prompts.
## Streaming Output
LLM nodes support streaming output by default. Each text chunk is yielded as a `RunStreamChunkEvent`, enabling real-time response display. File outputs (images, documents) are processed and saved automatically during streaming.
## Error Handling
Configure retry behavior for failed LLM calls. Set maximum retry attempts, intervals between retries, and backoff multipliers. Define fallback strategies like default values, error routing, or alternative models when retries aren't sufficient.
# Loop
Source: https://docs.dify.ai/en/use-dify/nodes/loop
Execute repetitive workflows with progressive refinement
The Loop node executes repetitive workflows where each cycle builds on the results of the previous one. Unlike iteration, which processes array elements independently, loops create progressive workflows that evolve with each repetition.
## Loop vs Iteration
Understanding when to use each repetition pattern:
**Sequential Processing** - Each cycle depends on previous results
**Progressive Refinement** - Outputs improve or evolve over iterations
**State Management** - Variables persist and accumulate across cycles
**Use Cases** - Content refinement, problem solving, quality assurance
**Independent Processing** - Each item processed separately
**Parallel Execution** - Items can be processed simultaneously
**Batch Operations** - Same operation applied to multiple data points
**Use Cases** - Data transformation, bulk processing, parallel analysis
## Configuration
### Loop Variables
Define variables that persist across loop iterations and remain accessible after the loop completes. These variables maintain state and enable progressive workflows.
### Termination Conditions
Configure when the loop should stop executing:
**Loop Termination Condition** - Expression that determines when to exit (e.g., `quality_score > 0.9`)
**Maximum Loop Count** - Safety limit to prevent infinite loops
**Exit Loop Node** - Immediate termination when this node is reached
The loop terminates when either the termination condition is met, the maximum count is reached, or an Exit Loop node executes. If no conditions are specified, the loop continues until the maximum count.
## Basic Loop Example
Generate random numbers until finding one less than 50:

**Workflow Steps:**
1. **Code node** generates random integers between 1-100
2. **If-Else node** checks if number is less than 50
3. **Template node** returns "done" for numbers \< 50 to trigger loop termination
4. Loop continues until termination condition is met

## Advanced Loop Example
Create a poem through iterative refinement, with each version building upon the previous one:
**Loop Variables:**
* `num` - Counter starting at 0, incrementing each iteration
* `verse` - Text variable holding the current poem version
**Workflow Logic:**
1. **If-Else node** checks if `num > 3` to determine when to exit
2. **LLM node** generates improved poem based on previous version
3. **Variable Assigner** updates both counter and poem content
4. **Exit Loop node** terminates after 4 refinement cycles
The LLM prompt references both the current verse and iteration context:
```text theme={null}
You are a European literary figure creating poetic verses.
Current verse: {{verse}}
Refine and improve this poem based on your previous work.
```
# Output
Source: https://docs.dify.ai/en/use-dify/nodes/output
Return workflow results to the end user or API caller
Use the Output node to deliver specific variable values from your workflow to the end user or API caller. Add it where you need to surface results.
The Output node was previously named *End* and was required in every workflow.
It is now optional—workflows run successfully without one, but any workflow or branch without an Output node returns no data to the caller.
Output nodes are only available in Workflows. Chatflows use the [Answer](/en/use-dify/nodes/answer) node instead.
## Configure Output Variables
Each Output node requires at least one output variable. To add a variable, assign a name and select the source from any upstream node's output.
The variable name you assign becomes the key in API responses.
You can add multiple output variables to a single Output node and reorder them by dragging.
## Supported Variable Types
Output variables support the following types:
`string`, `number`, `integer`, `boolean`, `object`, `file`, `array[string]`, `array[number]`, `array[object]`, `array[boolean]`, `array[file]`
## Multiple Output Nodes
A workflow can contain more than one Output node. The Output node does not stop workflow execution—other parallel branches (if any) continue running after it completes.
All output variables from every executed Output node are combined into one final result. Each Output node adds its variables to the result as the workflow reaches it:
* On the **same branch**, variables are added in the order the Output nodes are placed.
* On **parallel branches**, whichever Output node executes first adds its variables first.
Always use unique variable names across all Output nodes in a workflow.
When two Output nodes use the same output variable name, the later one overwrites the earlier value.
## API Response Structure
When you call a workflow through the API, output variables appear in the `outputs` object of the response.
All outputs return in a single response once the workflow completes:
```json theme={null}
{
"workflow_run_id": "...",
"status": "succeeded",
"outputs": {
"result_text": "The processed output...",
"score": 95
}
}
```
Outputs arrive in the final `workflow_finished` event:
```json theme={null}
{
"event": "workflow_finished",
"data": {
"outputs": {
"result_text": "The processed output...",
"score": 95
}
}
}
```
Each output variable name maps directly to a key in the `outputs` object.
## For Workflow Tools
When you [publish a workflow as a tool](/en/use-dify/workspace/tools#workflow-tool), the Output node defines the tool's return schema. Each output variable name becomes a key in the tool's result, accessible to the parent workflow that invokes the tool.
# Parameter Extractor
Source: https://docs.dify.ai/en/use-dify/nodes/parameter-extractor
Convert natural language to structured data using LLM intelligence
The Parameter Extractor node converts unstructured text into structured data using LLM intelligence. It bridges the gap between natural language input and the structured parameters that tools, APIs, and other workflow nodes require.
## Configuration
### Input and Model Selection
Select the **Input Variable** containing the text you want to extract parameters from. This typically comes from user input, LLM responses, or other workflow nodes.
Choose a **Model** with strong structured output capabilities. The Parameter Extractor relies on the LLM's ability to understand context and generate structured JSON responses.
### Parameter Definition
Define the parameters you want to extract by specifying:
* **Parameter Name** - The key that will appear in the output JSON
* **Data Type** - String, number, boolean, array, or object
* **Description** - Helps the LLM understand what to extract
* **Required Status** - Whether the parameter must be present
You can manually define parameters or **quickly import from existing tools** to match the parameter requirements of downstream nodes.
### Extraction Instructions
Write clear instructions describing what information to extract and how to format it. Providing examples in your instructions improves extraction accuracy and consistency for complex parameters.

## Advanced Configuration
### Inference Mode
Choose between two extraction approaches based on your model's capabilities:
**Function Call/Tool Call** uses the model's structured output features for reliable parameter extraction with strong type compliance.
**Prompt-based** relies on pure prompting for models that may not support function calling or when prompt-based extraction performs better.
### Memory
Enable memory to include conversation history when extracting parameters. This helps the LLM understand context in interactive dialogues and improves extraction accuracy for conversational workflows.
## Output Variables
The node provides both extracted parameters and built-in status variables:
**Extracted Parameters** appear as individual variables matching your parameter definitions, ready for use in downstream nodes.
**Built-in Variables** include status information:
* `__is_success` - Extraction success status (1 for success, 0 for failure)
* `__reason` - Error description when extraction fails

# Question Classifier
Source: https://docs.dify.ai/en/use-dify/nodes/question-classifier
Intelligently categorize user input to route workflow paths
The Question Classifier node intelligently categorizes user input to route conversations down different workflow paths. Instead of building complex conditional logic, you define categories and let the LLM determine which one fits best based on semantic understanding.
## Configuration
### Input and Model Setup
**Input Variable** - Select what to classify, typically `sys.query` for user questions, but can be any text variable from previous workflow nodes.
**Model Selection** - Choose an LLM for classification. Faster models work well for simple categories, while more powerful models handle nuanced distinctions better.

### Category Definition
Create clear, descriptive labels for each category with specific descriptions of what belongs in each. Be precise about boundaries between categories to help the LLM make accurate decisions.
Each category becomes a potential output path that you can connect to different downstream nodes like specialized knowledge bases, response templates, or processing workflows.
## Classification Example
Here's how the Question Classifier works in a customer service scenario:

**Categories Defined:**
* **After-sales service** - Warranty claims, returns, repairs, and post-purchase support
* **Product usage** - Setup instructions, troubleshooting, feature explanations
* **Other questions** - General inquiries not covered by specific categories
**Classification Results:**
* "How to set up contacts on iPhone 14?" → **Product usage**
* "What is the warranty period for my purchase?" → **After-sales service**
* "What's the weather like today?" → **Other questions**
Each classification result routes to different knowledge bases and response strategies, ensuring users receive relevant, specialized assistance.
## Advanced Configuration
### Instructions and Guidelines
Add detailed classification guidelines in the **Instructions** field to handle edge cases, ambiguous scenarios, or specific business rules. This helps the LLM understand nuanced distinctions between categories.
# Template
Source: https://docs.dify.ai/en/use-dify/nodes/template
Transform and format data using Jinja2 templating
The Template node transforms and formats data from multiple sources into structured text using Jinja2 templating. Use it to combine variables, format outputs, and prepare data for downstream nodes or end users.

## Jinja2 Templating
Template nodes use Jinja2 templating syntax to create dynamic content that adapts based on workflow data. This provides programming-like capabilities including loops, conditionals, and filters for sophisticated text generation.
### Variable Substitution
Reference workflow variables using double curly braces: `{{ variable_name }}`. You can access nested object properties and array elements using dot notation and bracket syntax.
```jinja theme={null}
{{ user.name }}
{{ items[0].title }}
{{ data.metrics.score }}
```
### Conditional Logic
Show different content based on data values using if-else statements:
```jinja theme={null}
{% if user.subscription == 'premium' %}
Welcome back, Premium Member! You have access to all features.
{% else %}
Consider upgrading to Premium for additional capabilities.
{% endif %}
```
### Loops and Iteration
Process arrays and objects with for loops to generate repetitive content:
```jinja theme={null}
{% for item in search_results %}
### Result {{ loop.index }}
**Score**: {{ item.score | round(2) }}
{{ item.content }}
---
{% endfor %}
```

## Data Formatting
### Filters
Jinja2 filters transform data during template rendering:
```jinja theme={null}
{{ name | upper }}
{{ price | round(2) }}
{{ content | replace('\n', '
') }}
{{ timestamp | strftime('%B %d, %Y') }}
{{ score | default('No score available') }}
```
### Error Handling
Handle missing or invalid data gracefully using default values and conditional checks:
```jinja theme={null}
{{ user.email | default('No email provided') }}
{{ metrics.accuracy | round(2) if metrics.accuracy else 'Not calculated' }}
```
## Interactive Forms
Templates can generate interactive HTML forms for structured data collection in chat interfaces:
```html theme={null}
```
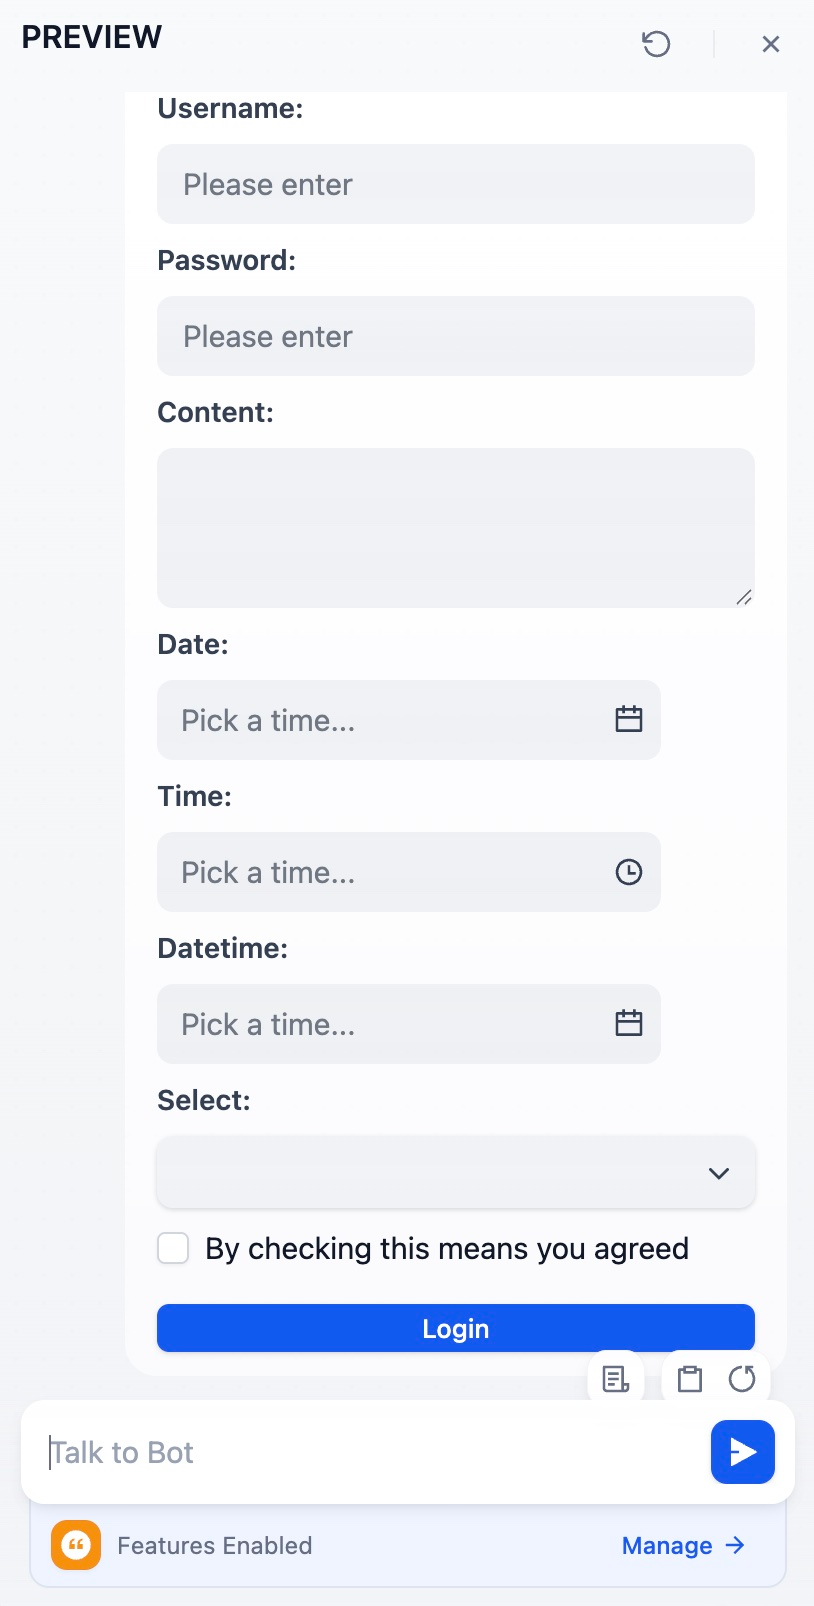
When users submit forms, responses become structured JSON data available for immediate processing in downstream workflow nodes.
## Output Limits
Template output is limited to **80,000 characters** (configurable via `TEMPLATE_TRANSFORM_MAX_LENGTH`). This prevents memory issues and ensures reasonable processing times for large template outputs.
# Tool Node
Source: https://docs.dify.ai/en/use-dify/nodes/tools
Connect to external services and APIs
Add [Dify tools](/en/use-dify/workspace/tools) to your workflows as standalone nodes.
This lets your workflows interact with external services and APIs to access real-time data and perform actions, like web searches, database queries, or content processing.
**To add and configure a tool node**:
1. On the canvas, click **Add Node** > **Tools**, then select an action from an available tool.
2. Optional: If a tool requires authentication, select an existing credential or create a new one.
To change the default credential, go to **Tools** or **Plugins**.
3. Complete any other required tool settings.
# Trigger
Source: https://docs.dify.ai/en/use-dify/nodes/trigger/overview
## Introduction
Triggers are available for workflow applications only.
A trigger is a type of Start node that enables your workflow to run automatically—on a schedule or in response to events from external systems (e.g., GitHub, Gmail, or your own internal systems)—rather than waiting for active initiation from a user or an API call.
Triggers are ideal for automating repetitive tasks or integrating your workflow with third-party applications to achieve automatic data synchronization and processing.
A workflow can have multiple triggers running in parallel. You can also build several independent workflows on the same canvas, each starting with its own triggers.
The Sandbox plan supports up to 2 triggers per workflow. [Upgrade](https://dify.ai/pricing) to add more.
The trigger source for each workflow execution is displayed in the **Logs** section.
On Dify Cloud, trigger events (workflow executions initiated by triggers) are subject to a quota that varies by plan. For details, see the [Plan Comparison](https://dify.ai/pricing).
The workspace owner and admins can check the remaining quota in **Settings** > **Billing**.
## Trigger Types
* [Schedule Trigger](/en/use-dify/nodes/trigger/schedule-trigger)
* Runs your workflow at specified times or intervals.
* Example: Automatically generate a daily sales report every morning at 9 AM and email it to your team.
Each workflow can have at most one schedule trigger.
* [Plugin Trigger](/en/use-dify/nodes/trigger/plugin-trigger)
* Runs your workflow when a specific event occurs in an external system, via an event subscription through a trigger plugin.
* Example: Automatically analyze and archive new messages in a specific Slack channel via a subscription to the `New Message in Channel` event through a Slack trigger plugin.
* [Webhook Trigger](/en/use-dify/nodes/trigger/webhook-trigger)
* Runs your workflow when a specific event occurs in an external system via a custom webhook.
* Example: Automatically process new orders in response to an HTTP request containing the order details from your e-commerce platform.
Both plugin triggers and webhook triggers make your workflow *event-driven*. Here's how to choose:
1. Use a **plugin trigger** when a trigger plugin is available for your target external system. You can simply subscribe to the supported events.
2. Use a **webhook trigger** when no corresponding plugin exists or when you need to capture events not supported by existing plugins. In such cases, you'll need to set up custom webhooks in the external system.
## Enable or Disable Triggers
In the **Quick Settings** side menu, you can enable or disable published triggers. Disabled triggers do not initiate workflow execution.
Only published triggers appear in **Quick Settings**. If you don't see an added trigger listed, ensure it has been published first.
![Enable or Disable Published Triggers]() ## Test Multiple Triggers
When a workflow has multiple triggers, you can click **Test Run** > **Run all triggers** to test them at once. The first trigger that activates will initiate the workflow, and the others will then be ignored.
After you click **Run all triggers**:
* Schedule triggers will run at the next scheduled execution time.
* Plugin triggers will listen for subscribed events.
* Webhook triggers will listen for external HTTP requests.
# Plugin Trigger
Source: https://docs.dify.ai/en/use-dify/nodes/trigger/plugin-trigger
## Introduction
Triggers are available for workflow applications only.
A plugin trigger automatically initiates your workflow when a specific event occurs in an external system. All you need to do is subscribe to these events through a trigger plugin and add the corresponding plugin trigger to your workflow.
For example, suppose you have installed a GitHub trigger plugin. It provides a list of GitHub events you can subscribe to, including `Pull Request`, `Push`, and `Issue`. If you subscribe to the `Pull Request` event and add the `Pull Request` plugin trigger to your workflow, it will automatically run whenever someone opens a pull request in the specified repository.
## Add and Configure a Plugin Trigger
1. On the workflow canvas, right-click and select **Add Node** > **Start**, then choose from the available plugin triggers or search for more in [Dify Marketplace](https://marketplace.dify.ai/?language=en-US\&category=trigger).
* If there's no suitable trigger plugin for your target external system, you can [request one from the community](https://github.com/langgenius/dify-plugins/issues/new?template=plugin_request.yaml), [develop one yourself](/en/develop-plugin/dev-guides-and-walkthroughs/trigger-plugin), or use a [webhook trigger](/en/use-dify/nodes/trigger/webhook-trigger) instead.
* A workflow can have multiple plugin triggers. If these trigger branches share identical downstream nodes, add a [Variable Aggregator](/en/use-dify/nodes/variable-aggregator) to converge them and avoid duplicating those nodes on each branch.
2. Select an existing subscription or [create a new one](#create-a-new-subscription).
View how many workflows are using a specific subscription from the plugin's details panel under **Plugins**.
3. Configure any other required settings.
The output variables of a plugin trigger are defined by its trigger plugin and cannot be modified.
## Create a New Subscription
A trigger plugin supports creating up to 10 subscriptions per workspace.
Each subscription is built on a webhook. When you create a subscription, you're essentially setting up a webhook that listens for events from an external system.
A webhook allows one system to automatically send real-time data to another. When a certain event occurs, the source system packages the event details into an HTTP request and sends it to a designated URL provided by the destination system.
Dify supports the following two methods for creating subscriptions (webhooks), but the options available in each plugin depend on how that plugin was designed.
* **Automatic Creation**: You select the events you want to subscribe to, and Dify automatically creates the corresponding webhook in the external system. This requires prior authorization via **OAuth** or **API keys** so Dify can handle the webhook setup on your behalf.
* **Manual Creation**: You create the webhook yourself using the webhook callback URL provided by Dify. No authorization is needed.
## Test Multiple Triggers
When a workflow has multiple triggers, you can click **Test Run** > **Run all triggers** to test them at once. The first trigger that activates will initiate the workflow, and the others will then be ignored.
After you click **Run all triggers**:
* Schedule triggers will run at the next scheduled execution time.
* Plugin triggers will listen for subscribed events.
* Webhook triggers will listen for external HTTP requests.
# Plugin Trigger
Source: https://docs.dify.ai/en/use-dify/nodes/trigger/plugin-trigger
## Introduction
Triggers are available for workflow applications only.
A plugin trigger automatically initiates your workflow when a specific event occurs in an external system. All you need to do is subscribe to these events through a trigger plugin and add the corresponding plugin trigger to your workflow.
For example, suppose you have installed a GitHub trigger plugin. It provides a list of GitHub events you can subscribe to, including `Pull Request`, `Push`, and `Issue`. If you subscribe to the `Pull Request` event and add the `Pull Request` plugin trigger to your workflow, it will automatically run whenever someone opens a pull request in the specified repository.
## Add and Configure a Plugin Trigger
1. On the workflow canvas, right-click and select **Add Node** > **Start**, then choose from the available plugin triggers or search for more in [Dify Marketplace](https://marketplace.dify.ai/?language=en-US\&category=trigger).
* If there's no suitable trigger plugin for your target external system, you can [request one from the community](https://github.com/langgenius/dify-plugins/issues/new?template=plugin_request.yaml), [develop one yourself](/en/develop-plugin/dev-guides-and-walkthroughs/trigger-plugin), or use a [webhook trigger](/en/use-dify/nodes/trigger/webhook-trigger) instead.
* A workflow can have multiple plugin triggers. If these trigger branches share identical downstream nodes, add a [Variable Aggregator](/en/use-dify/nodes/variable-aggregator) to converge them and avoid duplicating those nodes on each branch.
2. Select an existing subscription or [create a new one](#create-a-new-subscription).
View how many workflows are using a specific subscription from the plugin's details panel under **Plugins**.
3. Configure any other required settings.
The output variables of a plugin trigger are defined by its trigger plugin and cannot be modified.
## Create a New Subscription
A trigger plugin supports creating up to 10 subscriptions per workspace.
Each subscription is built on a webhook. When you create a subscription, you're essentially setting up a webhook that listens for events from an external system.
A webhook allows one system to automatically send real-time data to another. When a certain event occurs, the source system packages the event details into an HTTP request and sends it to a designated URL provided by the destination system.
Dify supports the following two methods for creating subscriptions (webhooks), but the options available in each plugin depend on how that plugin was designed.
* **Automatic Creation**: You select the events you want to subscribe to, and Dify automatically creates the corresponding webhook in the external system. This requires prior authorization via **OAuth** or **API keys** so Dify can handle the webhook setup on your behalf.
* **Manual Creation**: You create the webhook yourself using the webhook callback URL provided by Dify. No authorization is needed.
![Ways to Create Subscriptions]() It's recommended to select all available events when creating a subscription.
A plugin trigger works only when its corresponding event is included in the linked subscription. Selecting all available events ensures that any plugin trigger you add to the workflow later can use the same subscription—no need to update or create new ones.
On Dify Cloud, many popular trigger plugins are pre-configured with default OAuth clients so you can authorize Dify with a single click.
For self-hosted deployments, only the custom OAuth client option is available, meaning that you need to create the OAuth application yourself in the external system.
1. Select **Create with OAuth** > **Default** > **Save and Authorize**.
**Save** means the selected option is set as the default OAuth method for future subscriptions.
To switch methods later, click the **OAuth Client Settings** icon.
It's recommended to select all available events when creating a subscription.
A plugin trigger works only when its corresponding event is included in the linked subscription. Selecting all available events ensures that any plugin trigger you add to the workflow later can use the same subscription—no need to update or create new ones.
On Dify Cloud, many popular trigger plugins are pre-configured with default OAuth clients so you can authorize Dify with a single click.
For self-hosted deployments, only the custom OAuth client option is available, meaning that you need to create the OAuth application yourself in the external system.
1. Select **Create with OAuth** > **Default** > **Save and Authorize**.
**Save** means the selected option is set as the default OAuth method for future subscriptions.
To switch methods later, click the **OAuth Client Settings** icon.
![OAuth Client Settings Icon]() 2. On the external system's authorization page that pops up, click **Next** to grant Dify access.
3. Specify the subscription name, select the events you want to subscribe to, and configure any other required settings.
We recommend selecting all available events, but you can always change your selection later from the plugin's details panel under **Plugins**.
4. Click **Create**.
1. Select **Create with OAuth** > **Custom**.
2. In the external system, create an OAuth application using the callback URL provided by Dify.
3. Back in Dify, enter the client ID and client secret of the newly created OAuth application, then click **Save and Authorize**.
Once saved, the same client credentials can be reused for future subscriptions.
4. Specify the subscription name, select the events you want to subscribe to, and configure any other required settings.
We recommend selecting all available events, but you can always change your selection later from the plugin's details panel under **Plugins**.
5. Click **Create**.
The displayed **Callback URL** is used internally by Dify to create the webhook in the external system on your behalf, so you don't need to take any action with this URL.
For self-hosted deployments, you can change the URL's base prefix via the `TRIGGER_URL` environment variable. Ensure it points to a public domain or IP address accessible to external systems.
1. Select **Create with API Key**.
2. Enter the required authentication information, then click **Verify**.
3. Specify the subscription name, select the events you want to subscribe to, and configure any other required settings.
We recommend selecting all available events, but you can always change your selection later from the plugin's details panel under **Plugins**.
4. Click **Create**.
The displayed **Callback URL** is used internally by Dify to create the webhook in the external system on your behalf, so you don't need to take any action with this URL.
For self-hosted deployments, you can change the URL's base prefix via the `TRIGGER_URL` environment variable. Ensure it points to a public domain or IP address accessible to external systems.
1. Select **Paste URL to create a new subscription**.
2. Specify the subscription name and use the provided callback URL to manually create a webhook in the external system.
For self-hosted deployments, you can change the callback URL's base prefix via the `TRIGGER_URL` environment variable.
Ensure the prefix points to a public domain or IP address accessible to external systems.
3. (Optional) Test the created webhook.
Most external systems automatically test a new webhook by sending a ping request to Dify upon creation.
1. Trigger a subscribed event so the external system sends an HTTP request to the callback URL.
2. Return to the **Manual Setup** page and check the **Request Logs** section at the bottom. If the webhook works properly, you'll see the received request and Dify's response.
2. On the external system's authorization page that pops up, click **Next** to grant Dify access.
3. Specify the subscription name, select the events you want to subscribe to, and configure any other required settings.
We recommend selecting all available events, but you can always change your selection later from the plugin's details panel under **Plugins**.
4. Click **Create**.
1. Select **Create with OAuth** > **Custom**.
2. In the external system, create an OAuth application using the callback URL provided by Dify.
3. Back in Dify, enter the client ID and client secret of the newly created OAuth application, then click **Save and Authorize**.
Once saved, the same client credentials can be reused for future subscriptions.
4. Specify the subscription name, select the events you want to subscribe to, and configure any other required settings.
We recommend selecting all available events, but you can always change your selection later from the plugin's details panel under **Plugins**.
5. Click **Create**.
The displayed **Callback URL** is used internally by Dify to create the webhook in the external system on your behalf, so you don't need to take any action with this URL.
For self-hosted deployments, you can change the URL's base prefix via the `TRIGGER_URL` environment variable. Ensure it points to a public domain or IP address accessible to external systems.
1. Select **Create with API Key**.
2. Enter the required authentication information, then click **Verify**.
3. Specify the subscription name, select the events you want to subscribe to, and configure any other required settings.
We recommend selecting all available events, but you can always change your selection later from the plugin's details panel under **Plugins**.
4. Click **Create**.
The displayed **Callback URL** is used internally by Dify to create the webhook in the external system on your behalf, so you don't need to take any action with this URL.
For self-hosted deployments, you can change the URL's base prefix via the `TRIGGER_URL` environment variable. Ensure it points to a public domain or IP address accessible to external systems.
1. Select **Paste URL to create a new subscription**.
2. Specify the subscription name and use the provided callback URL to manually create a webhook in the external system.
For self-hosted deployments, you can change the callback URL's base prefix via the `TRIGGER_URL` environment variable.
Ensure the prefix points to a public domain or IP address accessible to external systems.
3. (Optional) Test the created webhook.
Most external systems automatically test a new webhook by sending a ping request to Dify upon creation.
1. Trigger a subscribed event so the external system sends an HTTP request to the callback URL.
2. Return to the **Manual Setup** page and check the **Request Logs** section at the bottom. If the webhook works properly, you'll see the received request and Dify's response.
![Request Logs]() 4. Click **Create**.
## Test a Plugin Trigger
To test an unpublished plugin trigger, you must first click **Run this step** or test-run the entire workflow. This puts the trigger into a listening state so that it can monitor external events. Otherwise, the trigger will not capture subscribed events even when they occur.
# Schedule Trigger
Source: https://docs.dify.ai/en/use-dify/nodes/trigger/schedule-trigger
## Introduction
* Triggers are available for workflow applications only.
* Each workflow can have at most one schedule trigger.
Schedule triggers enable your workflow to run at specified times or intervals. They are ideal for recurring tasks like generating daily reports or sending scheduled notifications.
## Add a Schedule Trigger
On the workflow canvas, right-click and select **Add Node** > **Start** > **Schedule Trigger**.
## Configure a Schedule Trigger
You can configure the schedule using either the default visual picker or a cron expression.
After configuration, you can see the next 5 scheduled execution times.
Schedule triggers do not produce output variables, but they update the system variable `sys.timestamp` (the start time of each workflow execution) each time they initiate the workflow.
### With the Visual Picker
Use this for simple hourly, daily, weekly, or monthly schedules. For weekly and monthly frequencies, you can select multiple days or dates.
### With a Cron Expression
Use this for more complex and precise timing patterns, such as every 15 minutes from 9 AM to 5 PM on weekdays.
You can use LLMs to generate cron expressions.
#### Standard Format
A cron expression is a string that defines the schedule for executing your workflow. It consists of five fields separated by spaces, each representing a different time unit.
Ensure that there is a single space between each field.
```
* * * * *
| | | | |
| | | | |── Day of week (0-7 or SUN-SAT, where both 0 and 7 = Sunday)
| | | |──── Month (1-12 or JAN-DEC)
| | |────── Day of month (1-31)
| |──────── Hour (0-23)
|────────── Minute (0-59)
```
When both the **day-of-month** and **day-of-week** fields are specified, the trigger activates on dates that match *either* field.
For example, `1 2 3 4 4` will trigger your workflow on the 3rd of April *and* every Thursday in April, not just on Thursdays that fall on the 3rd.
#### Special Characters
| Character | Description | Example |
| :-------- | :----------------------------------------------------------------------------------------------------------------------------------------------------------------------------------------------------------------------------------------------------------------------------------------------------------- | :------------------------------------------------------------------------------------------------------------------------------------------------------------------------------------------------------------------------------------- |
| `*` | Means "every". | `*` in the **hour** field means "every hour". |
| `,` | Separates multiple values. | `1,3,5` in the **day-of-week** field means "Monday, Wednesday, and Friday". |
| `-` | Defines a range of values. | `9-17` in the **hour** field means "from 9 AM to 5 PM". |
| `/` | Specifies step values. | `*/15` in the **minute** field means "every 15 minutes". |
| `L` | Means "the last".
4. Click **Create**.
## Test a Plugin Trigger
To test an unpublished plugin trigger, you must first click **Run this step** or test-run the entire workflow. This puts the trigger into a listening state so that it can monitor external events. Otherwise, the trigger will not capture subscribed events even when they occur.
# Schedule Trigger
Source: https://docs.dify.ai/en/use-dify/nodes/trigger/schedule-trigger
## Introduction
* Triggers are available for workflow applications only.
* Each workflow can have at most one schedule trigger.
Schedule triggers enable your workflow to run at specified times or intervals. They are ideal for recurring tasks like generating daily reports or sending scheduled notifications.
## Add a Schedule Trigger
On the workflow canvas, right-click and select **Add Node** > **Start** > **Schedule Trigger**.
## Configure a Schedule Trigger
You can configure the schedule using either the default visual picker or a cron expression.
After configuration, you can see the next 5 scheduled execution times.
Schedule triggers do not produce output variables, but they update the system variable `sys.timestamp` (the start time of each workflow execution) each time they initiate the workflow.
### With the Visual Picker
Use this for simple hourly, daily, weekly, or monthly schedules. For weekly and monthly frequencies, you can select multiple days or dates.
### With a Cron Expression
Use this for more complex and precise timing patterns, such as every 15 minutes from 9 AM to 5 PM on weekdays.
You can use LLMs to generate cron expressions.
#### Standard Format
A cron expression is a string that defines the schedule for executing your workflow. It consists of five fields separated by spaces, each representing a different time unit.
Ensure that there is a single space between each field.
```
* * * * *
| | | | |
| | | | |── Day of week (0-7 or SUN-SAT, where both 0 and 7 = Sunday)
| | | |──── Month (1-12 or JAN-DEC)
| | |────── Day of month (1-31)
| |──────── Hour (0-23)
|────────── Minute (0-59)
```
When both the **day-of-month** and **day-of-week** fields are specified, the trigger activates on dates that match *either* field.
For example, `1 2 3 4 4` will trigger your workflow on the 3rd of April *and* every Thursday in April, not just on Thursdays that fall on the 3rd.
#### Special Characters
| Character | Description | Example |
| :-------- | :----------------------------------------------------------------------------------------------------------------------------------------------------------------------------------------------------------------------------------------------------------------------------------------------------------- | :------------------------------------------------------------------------------------------------------------------------------------------------------------------------------------------------------------------------------------- |
| `*` | Means "every". | `*` in the **hour** field means "every hour". |
| `,` | Separates multiple values. | `1,3,5` in the **day-of-week** field means "Monday, Wednesday, and Friday". |
| `-` | Defines a range of values. | `9-17` in the **hour** field means "from 9 AM to 5 PM". |
| `/` | Specifies step values. | `*/15` in the **minute** field means "every 15 minutes". |
| `L` | Means "the last".
In the **day-of-month** field, means "the last day of the month".
In the **day-of-week** field:- When used alone, means "the last day of the week".
- When combined with a number, means "the last occurrence of that weekday in the month".
| `L` in the **day-of-month** field means "Jan 31, April 30, or Feb 28 in a non-leap year".
`L` in the **day-of-week** field means Sunday.
`5L` in the **day-of-week** field means "the last Friday of the month". |
| `?` | Means "any" or "no specific value".
If you specify a value for the **day-of-week** field, you can use `?` for the **day-of-month** field to ignore it, and vice versa.
Not required, because `*` works as well. | To run a task every Monday, it's more precise to set the **day-of-month** field to `?` instead of `*`. |
#### Predefined Expressions
* `@yearly`: Run once a year at 12 AM on January 1.
* `@monthly`: Run once a month at 12 AM on the first day of the month.
* `@weekly`: Run once a week at 12 AM on Sunday.
* `@daily`: Run once a day at 12 AM.
* `@hourly`: Run at the beginning of every hour.
#### Examples
| Schedule | Cron Expression |
| :-------------------------------------- | :--------------------------------- |
| Weekdays at 9 AM | `0 9 * * MON-FRI` or `0 9 * * 1-5` |
| Every Wednesday at 2:30 PM | `30 14 * * WED` |
| Every Sunday at 12 AM | `0 0 * * 0` |
| Every 2 hours on Tuesday | `0 */2 * * 2` |
| The first day of every month at 12 AM | `0 0 1 * *` |
| At 12 PM on January 1 and June 1 | `0 12 1 JAN,JUN *` |
| The last day of every month at 5 PM | `0 17 L * *` |
| The last Friday of every month at 10 PM | `0 22 * * 5L` |
## Test a Schedule Trigger
* **Run this step**: The schedule trigger runs immediately, ignoring the configured schedule.
* **Test Run**: The schedule trigger waits for its next scheduled execution time.
# Webhook Trigger
Source: https://docs.dify.ai/en/use-dify/nodes/trigger/webhook-trigger
## Introduction
Triggers are available for workflow applications only.
A webhook allows one system to automatically send real-time data to another. When a certain event occurs, the source system packages the event details into an HTTP request and sends it to a designated URL provided by the destination system.
Following the same mechanism, webhook triggers enable your workflow to run in response to third-party events. Here's how you work with it:
1. When you add a webhook trigger to your workflow, a unique webhook URL is generated—a dedicated endpoint that listens for external HTTP requests.
For self-hosted deployments, you can change the base prefix of this URL via the `TRIGGER_URL` environment variable.
Ensure it points to a public domain or IP address accessible to external systems.
2. You use this URL to create a webhook subscribing to the events you want to monitor in an external system. Then you configure the webhook trigger to define how it processes incoming requests and extracts request data.
For testing purposes, always use the test webhook URL to keep test data separate from production data.
![Test Webhook URL]() 3. When a subscribed event occurs, the external system sends an HTTP request with the event data to that provided webhook URL. Once the request is received and processed successfully, your workflow is triggered, and the specified event data is extracted into variables that can be referenced by downstream nodes.
If there's a ready-made trigger plugin for your target external system, we recommend using the [plugin trigger](/en/use-dify/nodes/trigger/plugin-trigger) instead.
## Add a Webhook Trigger
On the workflow canvas, right-click and select **Add Node** > **Start** > **Webhook Trigger**.
A workflow can have multiple webhook triggers. If these trigger branches share identical downstream nodes, add a [Variable Aggregator](/en/use-dify/nodes/variable-aggregator) to converge them and avoid duplicating those nodes on each branch.
## Configure a Webhook Trigger
You can define how a webhook trigger handles incoming HTTP requests, including:
* The expected HTTP method for the webhook URL
* The request's content-type
* The data you wish to extract from the request
* The response sent back to the external system when your workflow is successfully triggered
To test an unpublished webhook trigger, make sure to click **Run this step** or test-run the entire workflow first. This puts the trigger into a listening state so that it can receive external requests. Otherwise, no request will be captured.
### HTTP Method
To ensure the incoming request can be received successfully, you need to specify which HTTP method the webhook URL accepts.
The method you select here must match the one used by the external system to send requests; otherwise, the requests will be rejected.
You can typically find this information in the external system's webhook documentation or setup interface.
### Content-Type
To ensure the request body can be properly parsed and the data you need extracted, you need to specify the expected content type of the incoming request.
The content-type you select here must match the content type of the request sent from the external system; otherwise, the request will be rejected.
### Query Parameters, Header Parameters, and Request Body Parameters
You can extract specific data from the query parameters, headers, and body of the incoming request. **Each extracted parameter becomes an output variable that can be used in your workflow.**
Some external systems provide a delivery log for each request, where you can view all the data included in the request and decide which parameters to extract.
Alternatively, you can send a test request to the webhook trigger and check the received request data in its last run logs:
1. Create a webhook in the external system using the provided test webhook URL.
2. Set the correct HTTP method and content-type in the trigger.
3. Click the **Run this step** icon. The trigger will start listening for external requests.
4. Trigger the subscribed event in the external system so it sends an HTTP request to the provided webhook URL.
5. Go to the trigger's **Last Run** tab and check the received request data in **Input**.
The variable name you define in the trigger must match the key name of the corresponding parameter in the request.
* Parameters in key-value pairs added to the webhook URL (after `?`) by external systems when sending requests, each pair separated by `&`.
* Typically simple, non-sensitive identifiers or filter data about the event.
* Example: From the URL `{webhook url}?userID=u-456&source=email`, you can extract the `userID` (`u-456`) or the `source` (`email`).
* Request metadata included in the request headers.
* Technical information needed for processing the request, such as an authentication token or the request body's data format.
* Example: From headers like `Authorization: Bearer sk-abc... `and `Content-Type: application/json`, you can extract the authorization information (`Bearer sk-abc...`) or the content-type (`application/json`).
* The main payload where the core event data is sent, such as a customer profile, order details, or the content of a Slack message.
* Example: From the following request body, you can extract the `customerName` (`Alex`), the list of items, or the `isPriority` status (`true`).
```json theme={null}
"customerName": "Alex",
"items":
[
{ "sku": "A42", "quantity": 2 },
{ "sku": "B12", "quantity": 1 }
],
"isPriority": true
```
The content-type determines which data types can be extracted from the request body.
| Content-Type | `String` | `Number` | `Boolean` | `Object` | `File` | `Array[String]` | `Array[Number]` | `Array[Boolean]` | `Array[Object]` | `Array[File]` |
| :-------------------------------- | :------: | :------: | :-------: | :------: | :----: | :-------------: | :-------------: | :--------------: | :-------------: | :-----------: |
| application/json | ✅ | ✅ | ✅ | ✅ | ❌ | ✅ | ✅ | ✅ | ✅ | ❌ |
| application/x-www-form-urlencoded | ✅ | ✅ | ✅ | ❌ | ❌ | ✅ | ✅ | ✅ | ❌ | ❌ |
| multipart/form-data | ✅ | ✅ | ✅ | ❌ | ✅ | ✅ | ✅ | ✅ | ❌ | ✅ |
| text/plain | ✅ | ✅ | ✅ | ❌ | ❌ | ❌ | ❌ | ❌ | ❌ | ❌ |
**Parameter Settings**
For each parameter to be extracted, you can specify the following:
* **Variable Name**: The key name of the parameter in the incoming request (e.g., `userID` in `userID=u-456`).
For header parameters, any hyphen (`-`) in the variable name will be automatically converted to an underscore (`_`) in the output variable.
* **Data Type**: The expected data format. Available for query and request body parameters only, as header parameters are always treated as strings.
* **Required**: Whether the parameter is required for your workflow to execute properly. If any required parameter is missing from an incoming request, your workflow will not be triggered.
### Response
When your workflow is successfully triggered by an external HTTP request, a default `200 OK` response is sent back to the external system.
If the external system requires a specific success response format, you can customize the status code and response body. The default one will be overridden.
* **Status Code**: Supports any status code in the range \[200, 399].
* **Response Body**: Supports JSON or plain text.
In the returned response body, non-JSON content will be automatically converted to JSON.
For example, `OK` will be wrapped as `"message": "OK"`.
The following error responses are system-defined and cannot be customized. Error details can be found in the response body.
* 400 Bad Request
* 404 Not Found
* 413 Payload Too Large
* 500 Internal Server Error
## Test a Webhook Trigger
To test an unpublished webhook trigger, you must first click **Run this step** or test-run the entire workflow. This puts the trigger into a listening state so that it can receive external requests. Otherwise, incoming requests will not be captured.
# User Input
Source: https://docs.dify.ai/en/use-dify/nodes/user-input
Collects user inputs to start workflow and chatflow applications
## Introduction
The User Input node allows you to define what to collect from end users as inputs for your applications.
Applications that start with this node run *on demand* and can be initiated by direct user interaction or API calls.
You can also publish these applications as standalone web apps or MCP servers, expose them through backend service APIs, or use them as tools in other Dify applications.
Each application canvas can contain only one User Input node.
## Input Variable
### Preset
Preset input variables are system-defined and available by default.
* `userinput.files`: Files uploaded by end users when they run the application.
For workflow applications, this preset variable has been considered *legacy* and kept only for backward compatibility.
We recommend using a [custom file input field](#file-input) instead to collect user files.
* `userinput.query` (for chatflows only): The text message automatically captured from the user's latest chat turn.
### Custom
You can configure custom input fields in a User Input node to collect different kinds of user input. Each field becomes a variable that can be referenced by downstream nodes.
**Label Name** is displayed to your end users.
In a chatflow application, you can **Hide** any user input field to make it invisible to end users while keeping it available for reference within the chatflow.
Note that a **Required** field cannot be hidden.
#### Text Input
Accepts up to 256 characters. Use it for names, email addresses, titles, or any brief text input that fits on a single line.
Allows long-form text without length restrictions. It gives users a multi-line text area for detailed responses or descriptions.
#### Structured Input
Displays a dropdown menu with predefined options. Users can choose only from listed options, ensuring data consistency and preventing invalid inputs.
Restricts input to numerical values only—ideal for quantities, ratings, IDs, or any data requiring mathematical processing.
Provides a simple yes/no option. When a user checks the box, the output is `true`; otherwise, it's `false`. Use it for confirmations or any case that requires a binary choice.
Accepts data in JSON object format, ideal for passing complex, nested data structures into your application.
You can optionally define a JSON schema to validate the input and guide end users on the expected structure and validation requirements. This also allows you to reference individual properties of the object in other nodes.
#### File Input
Allows users to upload one file of any supported type, either from their device or via a file URL. The uploaded file is available as a variable containing file metadata (name, size, type, etc.).
Supports multiple file uploads at once. It's useful for handling batches of documents, images, or other files together.
Use a List Operator node to filter, sort, or extract specific files from the uploaded file list for further processing.
**File Processing**
Since the User Input node only collects files—it does not read or parse their content—uploaded files must be processed appropriately by subsequent nodes. For example:
* Document files can be routed to a Doc Extractor node for text extraction so that LLMs can understand their content.
* Images can be sent to LLM nodes with vision capabilities or specialized image processing tool nodes.
* Structured data files such as CSV or JSON can be processed with Code nodes to parse and transform the data.
When users upload multiple files with mixed types (e.g., images and documents), you can use a List Operator node to separate them by file type before routing them to different processing branches.
## What's Next
After setting up a User Input node, you can connect it to other nodes to process the collected data. Common patterns include:
* Send the input to an LLM node for processing.
* Use a Knowledge Retrieval node to find information relevant to the input.
* Create conditional branches based on the input with an If/Else node.
# Variable Aggregator
Source: https://docs.dify.ai/en/use-dify/nodes/variable-aggregator
Converge exclusive workflow branches into a single output
Use the Variable Aggregator node to converge **exclusive** workflow branches into a single output, so you only need to define downstream processing once.
Nodes like If/Else and Question Classifier create exclusive branches—only one path executes per run. When these branches produce the same type of output, you would normally duplicate downstream nodes on every branch.
The Variable Aggregator eliminates this duplication. It provides a single output variable for downstream nodes to reference, regardless of which branch ran.
3. When a subscribed event occurs, the external system sends an HTTP request with the event data to that provided webhook URL. Once the request is received and processed successfully, your workflow is triggered, and the specified event data is extracted into variables that can be referenced by downstream nodes.
If there's a ready-made trigger plugin for your target external system, we recommend using the [plugin trigger](/en/use-dify/nodes/trigger/plugin-trigger) instead.
## Add a Webhook Trigger
On the workflow canvas, right-click and select **Add Node** > **Start** > **Webhook Trigger**.
A workflow can have multiple webhook triggers. If these trigger branches share identical downstream nodes, add a [Variable Aggregator](/en/use-dify/nodes/variable-aggregator) to converge them and avoid duplicating those nodes on each branch.
## Configure a Webhook Trigger
You can define how a webhook trigger handles incoming HTTP requests, including:
* The expected HTTP method for the webhook URL
* The request's content-type
* The data you wish to extract from the request
* The response sent back to the external system when your workflow is successfully triggered
To test an unpublished webhook trigger, make sure to click **Run this step** or test-run the entire workflow first. This puts the trigger into a listening state so that it can receive external requests. Otherwise, no request will be captured.
### HTTP Method
To ensure the incoming request can be received successfully, you need to specify which HTTP method the webhook URL accepts.
The method you select here must match the one used by the external system to send requests; otherwise, the requests will be rejected.
You can typically find this information in the external system's webhook documentation or setup interface.
### Content-Type
To ensure the request body can be properly parsed and the data you need extracted, you need to specify the expected content type of the incoming request.
The content-type you select here must match the content type of the request sent from the external system; otherwise, the request will be rejected.
### Query Parameters, Header Parameters, and Request Body Parameters
You can extract specific data from the query parameters, headers, and body of the incoming request. **Each extracted parameter becomes an output variable that can be used in your workflow.**
Some external systems provide a delivery log for each request, where you can view all the data included in the request and decide which parameters to extract.
Alternatively, you can send a test request to the webhook trigger and check the received request data in its last run logs:
1. Create a webhook in the external system using the provided test webhook URL.
2. Set the correct HTTP method and content-type in the trigger.
3. Click the **Run this step** icon. The trigger will start listening for external requests.
4. Trigger the subscribed event in the external system so it sends an HTTP request to the provided webhook URL.
5. Go to the trigger's **Last Run** tab and check the received request data in **Input**.
The variable name you define in the trigger must match the key name of the corresponding parameter in the request.
* Parameters in key-value pairs added to the webhook URL (after `?`) by external systems when sending requests, each pair separated by `&`.
* Typically simple, non-sensitive identifiers or filter data about the event.
* Example: From the URL `{webhook url}?userID=u-456&source=email`, you can extract the `userID` (`u-456`) or the `source` (`email`).
* Request metadata included in the request headers.
* Technical information needed for processing the request, such as an authentication token or the request body's data format.
* Example: From headers like `Authorization: Bearer sk-abc... `and `Content-Type: application/json`, you can extract the authorization information (`Bearer sk-abc...`) or the content-type (`application/json`).
* The main payload where the core event data is sent, such as a customer profile, order details, or the content of a Slack message.
* Example: From the following request body, you can extract the `customerName` (`Alex`), the list of items, or the `isPriority` status (`true`).
```json theme={null}
"customerName": "Alex",
"items":
[
{ "sku": "A42", "quantity": 2 },
{ "sku": "B12", "quantity": 1 }
],
"isPriority": true
```
The content-type determines which data types can be extracted from the request body.
| Content-Type | `String` | `Number` | `Boolean` | `Object` | `File` | `Array[String]` | `Array[Number]` | `Array[Boolean]` | `Array[Object]` | `Array[File]` |
| :-------------------------------- | :------: | :------: | :-------: | :------: | :----: | :-------------: | :-------------: | :--------------: | :-------------: | :-----------: |
| application/json | ✅ | ✅ | ✅ | ✅ | ❌ | ✅ | ✅ | ✅ | ✅ | ❌ |
| application/x-www-form-urlencoded | ✅ | ✅ | ✅ | ❌ | ❌ | ✅ | ✅ | ✅ | ❌ | ❌ |
| multipart/form-data | ✅ | ✅ | ✅ | ❌ | ✅ | ✅ | ✅ | ✅ | ❌ | ✅ |
| text/plain | ✅ | ✅ | ✅ | ❌ | ❌ | ❌ | ❌ | ❌ | ❌ | ❌ |
**Parameter Settings**
For each parameter to be extracted, you can specify the following:
* **Variable Name**: The key name of the parameter in the incoming request (e.g., `userID` in `userID=u-456`).
For header parameters, any hyphen (`-`) in the variable name will be automatically converted to an underscore (`_`) in the output variable.
* **Data Type**: The expected data format. Available for query and request body parameters only, as header parameters are always treated as strings.
* **Required**: Whether the parameter is required for your workflow to execute properly. If any required parameter is missing from an incoming request, your workflow will not be triggered.
### Response
When your workflow is successfully triggered by an external HTTP request, a default `200 OK` response is sent back to the external system.
If the external system requires a specific success response format, you can customize the status code and response body. The default one will be overridden.
* **Status Code**: Supports any status code in the range \[200, 399].
* **Response Body**: Supports JSON or plain text.
In the returned response body, non-JSON content will be automatically converted to JSON.
For example, `OK` will be wrapped as `"message": "OK"`.
The following error responses are system-defined and cannot be customized. Error details can be found in the response body.
* 400 Bad Request
* 404 Not Found
* 413 Payload Too Large
* 500 Internal Server Error
## Test a Webhook Trigger
To test an unpublished webhook trigger, you must first click **Run this step** or test-run the entire workflow. This puts the trigger into a listening state so that it can receive external requests. Otherwise, incoming requests will not be captured.
# User Input
Source: https://docs.dify.ai/en/use-dify/nodes/user-input
Collects user inputs to start workflow and chatflow applications
## Introduction
The User Input node allows you to define what to collect from end users as inputs for your applications.
Applications that start with this node run *on demand* and can be initiated by direct user interaction or API calls.
You can also publish these applications as standalone web apps or MCP servers, expose them through backend service APIs, or use them as tools in other Dify applications.
Each application canvas can contain only one User Input node.
## Input Variable
### Preset
Preset input variables are system-defined and available by default.
* `userinput.files`: Files uploaded by end users when they run the application.
For workflow applications, this preset variable has been considered *legacy* and kept only for backward compatibility.
We recommend using a [custom file input field](#file-input) instead to collect user files.
* `userinput.query` (for chatflows only): The text message automatically captured from the user's latest chat turn.
### Custom
You can configure custom input fields in a User Input node to collect different kinds of user input. Each field becomes a variable that can be referenced by downstream nodes.
**Label Name** is displayed to your end users.
In a chatflow application, you can **Hide** any user input field to make it invisible to end users while keeping it available for reference within the chatflow.
Note that a **Required** field cannot be hidden.
#### Text Input
Accepts up to 256 characters. Use it for names, email addresses, titles, or any brief text input that fits on a single line.
Allows long-form text without length restrictions. It gives users a multi-line text area for detailed responses or descriptions.
#### Structured Input
Displays a dropdown menu with predefined options. Users can choose only from listed options, ensuring data consistency and preventing invalid inputs.
Restricts input to numerical values only—ideal for quantities, ratings, IDs, or any data requiring mathematical processing.
Provides a simple yes/no option. When a user checks the box, the output is `true`; otherwise, it's `false`. Use it for confirmations or any case that requires a binary choice.
Accepts data in JSON object format, ideal for passing complex, nested data structures into your application.
You can optionally define a JSON schema to validate the input and guide end users on the expected structure and validation requirements. This also allows you to reference individual properties of the object in other nodes.
#### File Input
Allows users to upload one file of any supported type, either from their device or via a file URL. The uploaded file is available as a variable containing file metadata (name, size, type, etc.).
Supports multiple file uploads at once. It's useful for handling batches of documents, images, or other files together.
Use a List Operator node to filter, sort, or extract specific files from the uploaded file list for further processing.
**File Processing**
Since the User Input node only collects files—it does not read or parse their content—uploaded files must be processed appropriately by subsequent nodes. For example:
* Document files can be routed to a Doc Extractor node for text extraction so that LLMs can understand their content.
* Images can be sent to LLM nodes with vision capabilities or specialized image processing tool nodes.
* Structured data files such as CSV or JSON can be processed with Code nodes to parse and transform the data.
When users upload multiple files with mixed types (e.g., images and documents), you can use a List Operator node to separate them by file type before routing them to different processing branches.
## What's Next
After setting up a User Input node, you can connect it to other nodes to process the collected data. Common patterns include:
* Send the input to an LLM node for processing.
* Use a Knowledge Retrieval node to find information relevant to the input.
* Create conditional branches based on the input with an If/Else node.
# Variable Aggregator
Source: https://docs.dify.ai/en/use-dify/nodes/variable-aggregator
Converge exclusive workflow branches into a single output
Use the Variable Aggregator node to converge **exclusive** workflow branches into a single output, so you only need to define downstream processing once.
Nodes like If/Else and Question Classifier create exclusive branches—only one path executes per run. When these branches produce the same type of output, you would normally duplicate downstream nodes on every branch.
The Variable Aggregator eliminates this duplication. It provides a single output variable for downstream nodes to reference, regardless of which branch ran.
![Without Variable Aggregator]()
![With Variable Aggregator]() The Variable Aggregator is designed for exclusive branches where **only one path runs at a time**. It does not combine outputs from multiple branches that execute in parallel.
To merge results from parallel branches, use a [Code](/en/use-dify/nodes/code) or [Template](/en/use-dify/nodes/template) node.
## Select the Variables to Converge
From each branch, add variables that need the same downstream processing. All variables must share the same data type.
Supported types: `string`, `number`, `object`, `boolean`, `array`, `file`.
The node outputs whichever variable has a value at runtime. Since only one branch executes, only one variable will have a value, and that value becomes the node's output.
## Converge Multiple Sets of Variables
When you have multiple sets of variables that each need to be converged separately, enable **Aggregation Group** to create groups within a single Variable Aggregator.
Each group converges its own set of variables and produces a separate output.
# Variable Assigner
Source: https://docs.dify.ai/en/use-dify/nodes/variable-assigner
Manage persistent conversation variables in chatflow applications
The Variable Assigner node manages persistent data in chatflow applications by writing to conversation variables (Understand the different types of variables [here](/en/use-dify/getting-started/key-concepts#variables)). Unlike regular workflow variables that reset with each execution, conversation variables persist throughout an entire chat session.
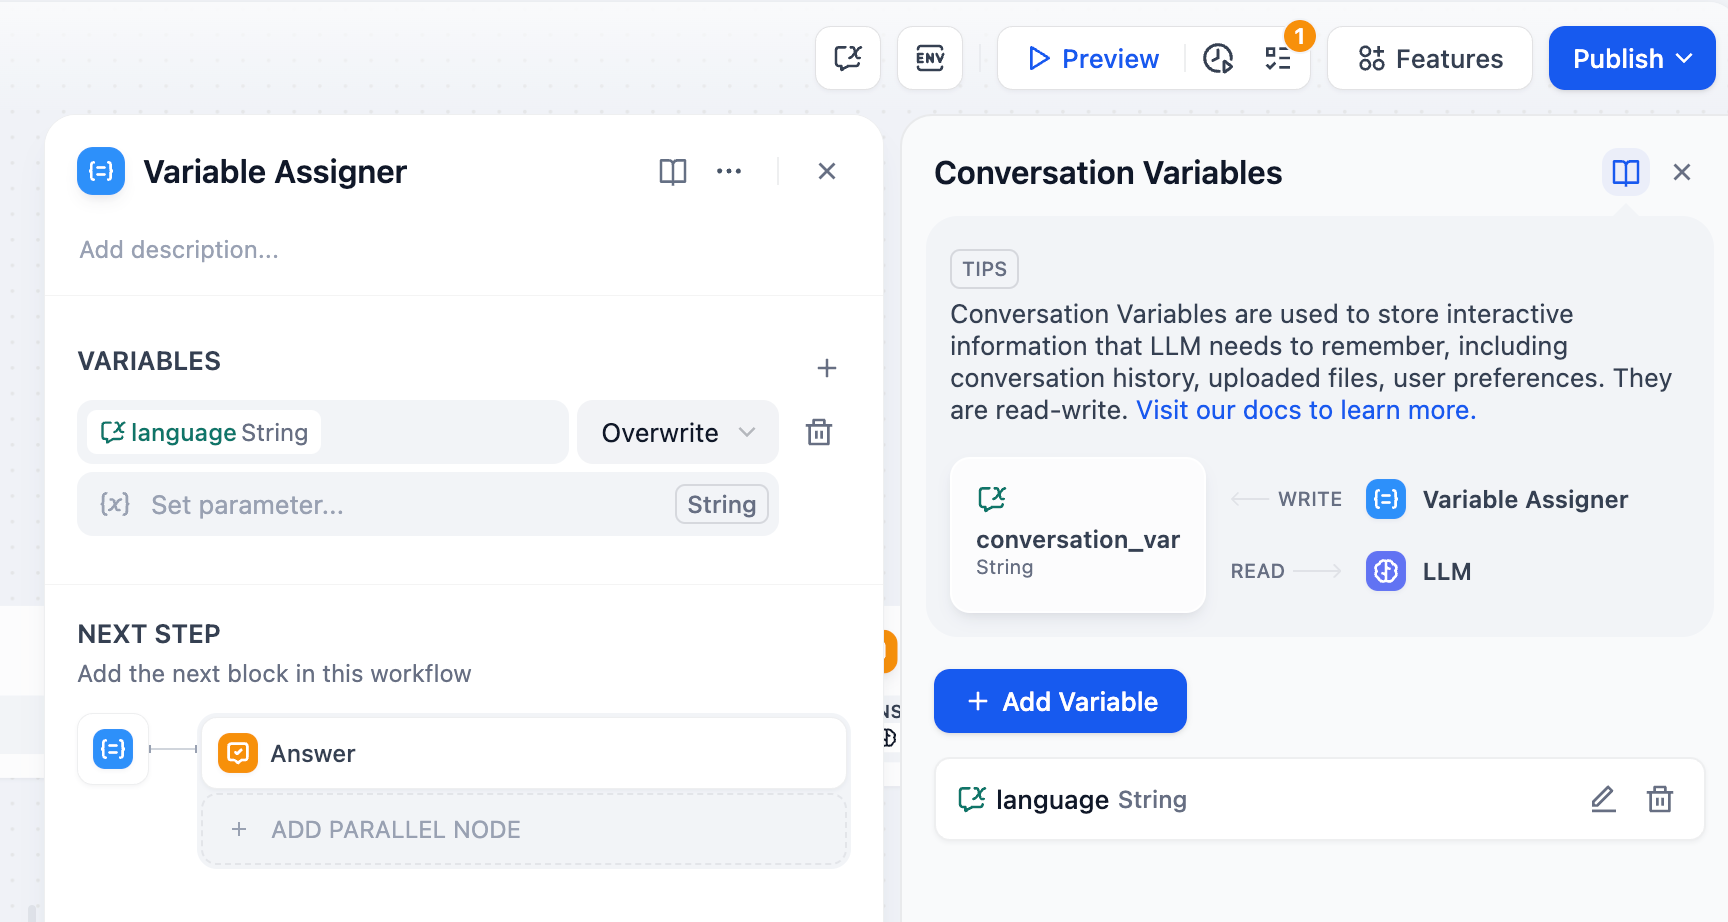
## Conversation Variables vs Workflow Variables
**Workflow Variables** exist only during a single workflow execution and reset when the workflow completes.
**Conversation Variables** persist across multiple conversation turns within the same chat session, enabling stateful interactions and contextual memory.
This persistence enables contextual conversations, user personalization, stateful workflows, and progress tracking across multiple user interactions.
## Configuration
Configure which conversation variables to update and specify their source data. You can assign multiple variables in a single node.
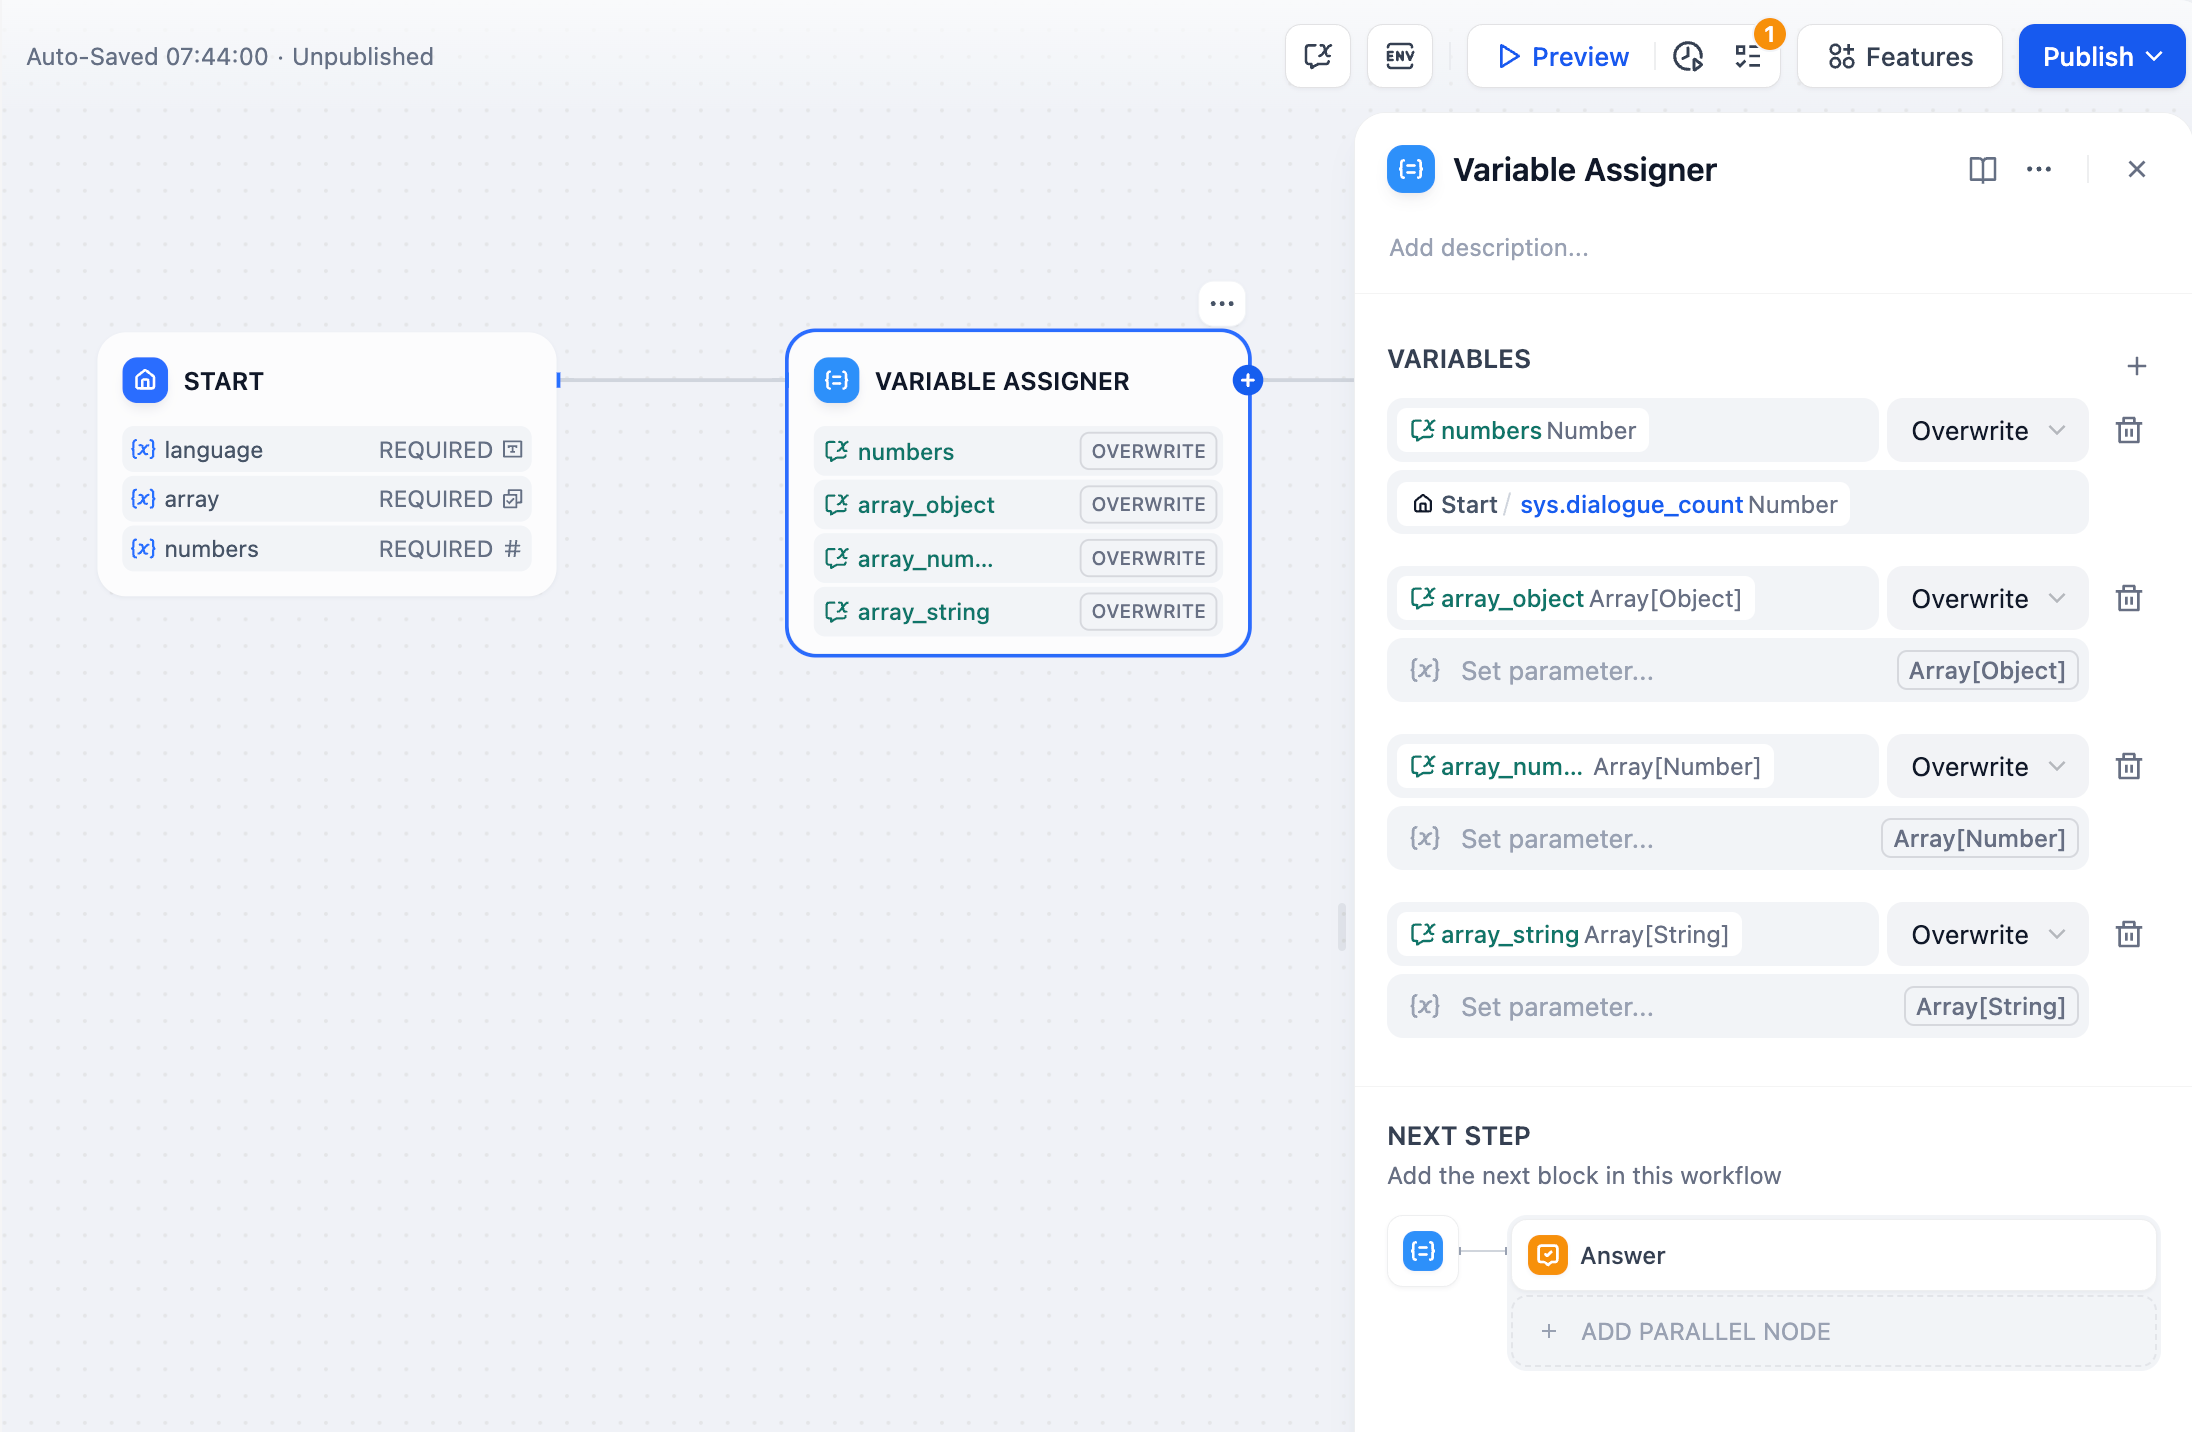
**Variable** - Select the conversation variable to write to
**Set Variable** - Choose the source data from upstream workflow nodes
**Operation Mode** - Determine how to update the variable (overwrite, append, clear, etc.)
## Operation Modes
Different variable types support different operations based on their data structure:
* **Overwrite** - Replace with another string variable
* **Clear** - Remove the current value
* **Set** - Manually assign a fixed value
* **Overwrite** - Replace with another number variable
* **Clear** - Remove the current value
* **Set** - Manually assign a fixed value
* **Arithmetic** - Add, subtract, multiply, or divide the current value by another number
* **Overwrite** - Replace with another boolean variable
* **Clear** - Remove the current value
* **Set** - Manually assign a fixed value
* **Overwrite** - Replace with another object variable
* **Clear** - Remove the current value
* **Set** - Manually define the object structure and values
* **Overwrite** - Replace with another array variable of the same type
* **Clear** - Remove all elements from the array
* **Append** - Add a single element to the end of the array
* **Extend** - Add all elements from another array of the same type
* **Remove First/Last** - Remove the first or last element from the array
Array operations are particularly powerful for building memory systems, checklists, and conversation histories that grow over time.
## Common Implementation Patterns
### Smart Memory System
Build chatbots that automatically detect and store important information from conversations:
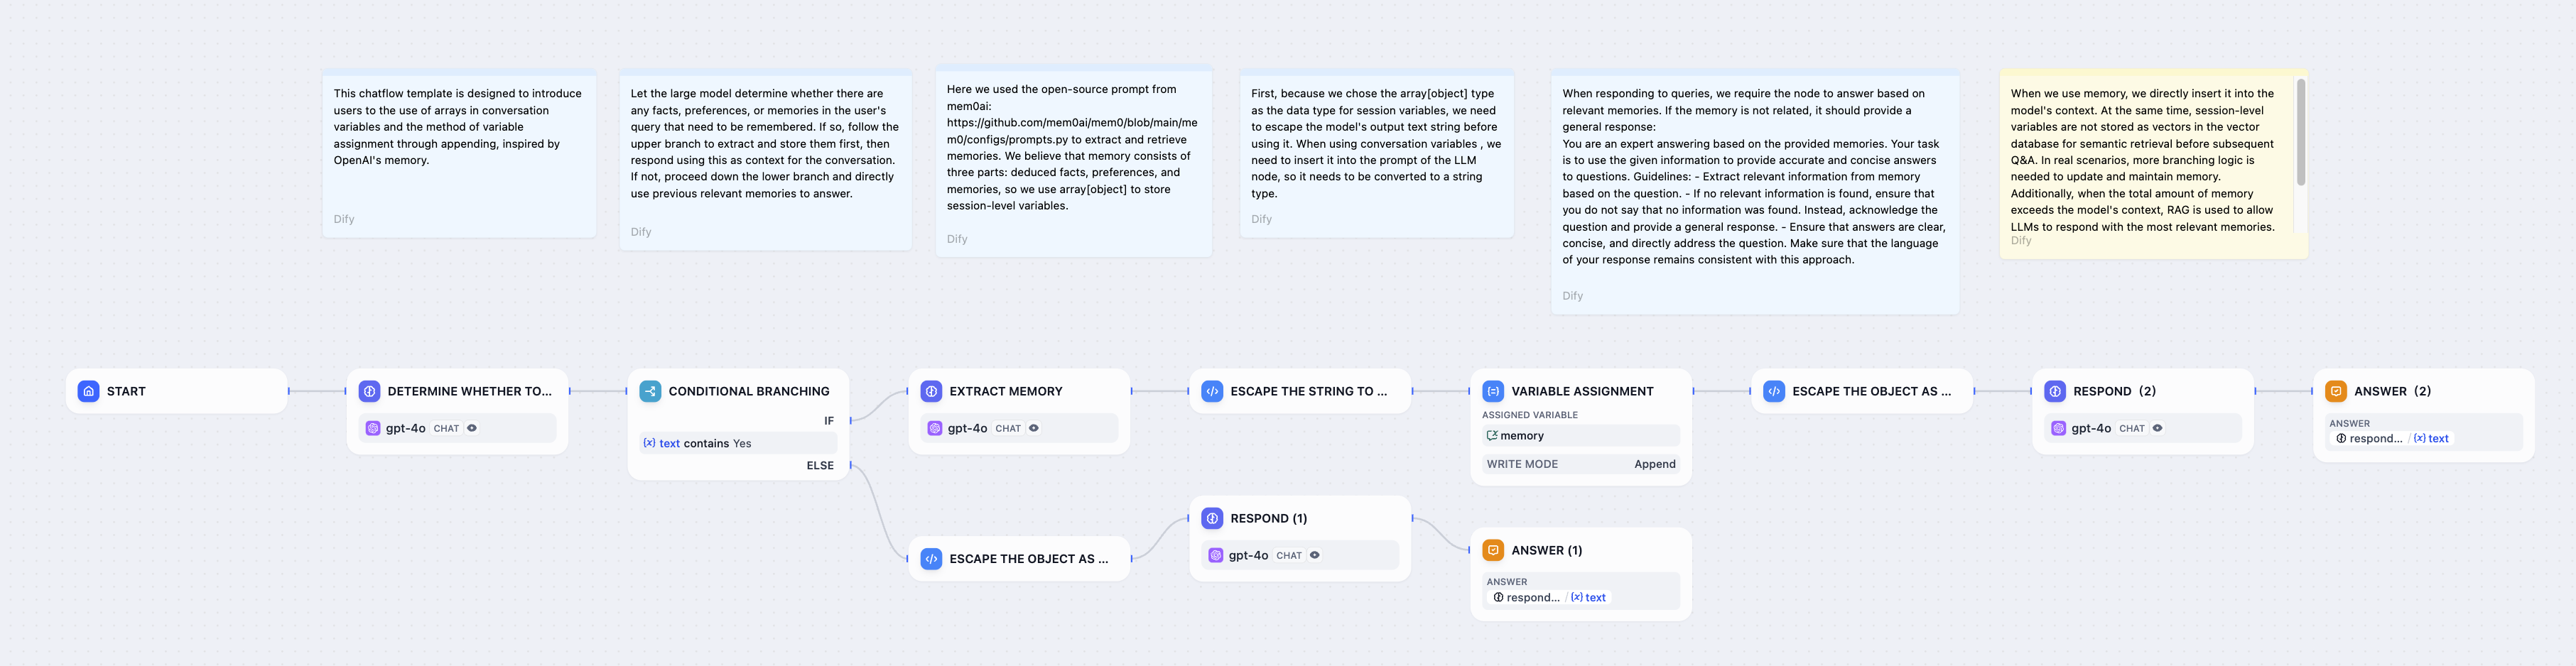
The system analyzes user input for memorable facts, extracts structured information, and appends it to a persistent memories array for future reference in conversations.
### User Preferences Storage
Store user preferences like language settings, notification preferences, or display options:

Use **Overwrite** mode to capture initial preferences from user input, then reference them in all subsequent LLM responses for personalized interactions.
### Progressive Checklists
Build guided workflows that track completion status across multiple conversation turns:

Use array conversation variables to track completed items. The Variable Assigner updates the checklist each turn, while the LLM references it to guide users through remaining tasks.
# Overview
Source: https://docs.dify.ai/en/use-dify/publish/README
Get your Dify applications into users' hands with web apps, APIs, embeds, and integrations
The Variable Aggregator is designed for exclusive branches where **only one path runs at a time**. It does not combine outputs from multiple branches that execute in parallel.
To merge results from parallel branches, use a [Code](/en/use-dify/nodes/code) or [Template](/en/use-dify/nodes/template) node.
## Select the Variables to Converge
From each branch, add variables that need the same downstream processing. All variables must share the same data type.
Supported types: `string`, `number`, `object`, `boolean`, `array`, `file`.
The node outputs whichever variable has a value at runtime. Since only one branch executes, only one variable will have a value, and that value becomes the node's output.
## Converge Multiple Sets of Variables
When you have multiple sets of variables that each need to be converged separately, enable **Aggregation Group** to create groups within a single Variable Aggregator.
Each group converges its own set of variables and produces a separate output.
# Variable Assigner
Source: https://docs.dify.ai/en/use-dify/nodes/variable-assigner
Manage persistent conversation variables in chatflow applications
The Variable Assigner node manages persistent data in chatflow applications by writing to conversation variables (Understand the different types of variables [here](/en/use-dify/getting-started/key-concepts#variables)). Unlike regular workflow variables that reset with each execution, conversation variables persist throughout an entire chat session.

## Conversation Variables vs Workflow Variables
**Workflow Variables** exist only during a single workflow execution and reset when the workflow completes.
**Conversation Variables** persist across multiple conversation turns within the same chat session, enabling stateful interactions and contextual memory.
This persistence enables contextual conversations, user personalization, stateful workflows, and progress tracking across multiple user interactions.
## Configuration
Configure which conversation variables to update and specify their source data. You can assign multiple variables in a single node.

**Variable** - Select the conversation variable to write to
**Set Variable** - Choose the source data from upstream workflow nodes
**Operation Mode** - Determine how to update the variable (overwrite, append, clear, etc.)
## Operation Modes
Different variable types support different operations based on their data structure:
* **Overwrite** - Replace with another string variable
* **Clear** - Remove the current value
* **Set** - Manually assign a fixed value
* **Overwrite** - Replace with another number variable
* **Clear** - Remove the current value
* **Set** - Manually assign a fixed value
* **Arithmetic** - Add, subtract, multiply, or divide the current value by another number
* **Overwrite** - Replace with another boolean variable
* **Clear** - Remove the current value
* **Set** - Manually assign a fixed value
* **Overwrite** - Replace with another object variable
* **Clear** - Remove the current value
* **Set** - Manually define the object structure and values
* **Overwrite** - Replace with another array variable of the same type
* **Clear** - Remove all elements from the array
* **Append** - Add a single element to the end of the array
* **Extend** - Add all elements from another array of the same type
* **Remove First/Last** - Remove the first or last element from the array
Array operations are particularly powerful for building memory systems, checklists, and conversation histories that grow over time.
## Common Implementation Patterns
### Smart Memory System
Build chatbots that automatically detect and store important information from conversations:

The system analyzes user input for memorable facts, extracts structured information, and appends it to a persistent memories array for future reference in conversations.
### User Preferences Storage
Store user preferences like language settings, notification preferences, or display options:

Use **Overwrite** mode to capture initial preferences from user input, then reference them in all subsequent LLM responses for personalized interactions.
### Progressive Checklists
Build guided workflows that track completion status across multiple conversation turns:

Use array conversation variables to track completed items. The Variable Assigner updates the checklist each turn, while the LLM references it to guide users through remaining tasks.
# Overview
Source: https://docs.dify.ai/en/use-dify/publish/README
Get your Dify applications into users' hands with web apps, APIs, embeds, and integrations
![Publish Methods]() You've built something great in Dify. Now let's get it to your users. Every Dify application becomes available in multiple ways automatically—choose what works best for your situation.
## Start with Web Apps
Your fastest path to sharing is through web apps. These are generated automatically when you create any application and work immediately without setup.
Click "Publish" in your app to activate the latest version.
Find your web app link in the publish section.
Send the link to users—they can start using your app right away.
Web apps work on any device and automatically adapt to screen sizes. No app store approvals or installation required.
## Publishing Options
Instant, shareable applications. Perfect for testing ideas or serving end users directly.
Build AI into your existing products. Full control over user experience and data flow.
Deploy your web app as chat widgets or inline frames on any website.
Connect to AI tools like Claude Desktop and Cursor. Great for development workflows.
## How Publishing Works
When you publish an app, Dify creates a web app and API endpoint with your latest configuration:
* **Web apps** update immediately with new features and responses
* **API endpoints** serve the latest model and workflow configurations
* **Website embeds** (which display your web app) automatically reflect all changes
* **MCP servers** provide access to current app capabilities
Publishing replaces your live app with the current configuration. Users will immediately see changes in their next interaction.
## Choose Your Approach
Use **Web Apps**. Share a link and start collecting feedback within minutes. Perfect for validating ideas or serving non-technical users.
Use **API Integration**. You control the interface, user authentication, and data handling. Your app becomes part of your product ecosystem.
Use **Embed on Websites**. Display your web app as a chat widget or inline frame on your current site. Works with any website technology.
Use **MCP Server**. Make your app available to Claude Desktop, Cursor, and other AI development environments as a native tool.
## Publishing Best Practices
Before you share your app, ensure you've configured these settings:
* **App description** - Helps users understand what your app does
* **Icon and branding** - Makes your app recognizable and professional
* **Access controls** - Decide if your app should be public or require authentication
* **Rate limits** - Protect your app from overuse (especially important for API access)
All publishing methods use the same app configuration. Set it once, publish everywhere.
# API
Source: https://docs.dify.ai/en/use-dify/publish/developing-with-apis
Integrate your Dify workflows anywhere
You can use your Dify app as a backend API service out-of-box.
## How API Integration Works
1. **Build your app** in Dify Studio with the AI capabilities you need
2. **Generate API credentials** to securely access your app's functionality
3. **Call the API** from your application to get AI-powered responses
4. **Users interact** with your custom interface while Dify handles the AI processing
## Getting Started
In your app, navigate to **API Access** in the left sidebar.
Generate new credentials for your integration. You can create multiple keys for different environments or users.
Dify generates complete API documentation specific to your app's configuration.
Use the provided examples to integrate API calls into your application.
Never expose API keys in frontend code or client-side requests. Always call Dify APIs from your backend to prevent abuse and maintain security.
### Text-generation application
These applications are used to generate high-quality text, such as articles, summaries, translations, etc., by calling the completion-messages API and sending user input to obtain generated text results. The model parameters and prompt templates used for generating text depend on the developer's settings in the Dify Prompt Arrangement page.
You can find the API documentation and example requests for this application in **Applications -> Access API**.
For example, here is a sample call an API for text generation:
```
curl --location --request POST 'https://api.dify.ai/v1/completion-messages' \
--header 'Authorization: Bearer ENTER-YOUR-SECRET-KEY' \
--header 'Content-Type: application/json' \
--data-raw '{
"inputs": {},
"response_mode": "streaming",
"user": "abc-123"
}'
```
```python theme={null}
import requests
import json
url = "https://api.dify.ai/v1/completion-messages"
headers = {
'Authorization': 'Bearer ENTER-YOUR-SECRET-KEY',
'Content-Type': 'application/json',
}
data = {
"inputs": {"text": 'Hello, how are you?'},
"response_mode": "streaming",
"user": "abc-123"
}
response = requests.post(url, headers=headers, data=json.dumps(data))
print(response.text)
```
### Conversational Applications
Conversational applications facilitate ongoing dialogue with users through a question-and-answer format. To initiate a conversation, you will call the `chat-messages` API. A `conversation_id` is generated for each session and must be included in subsequent API calls to maintain the conversation flow.
> **Important Note**: The Service API does not share conversations created by the WebApp. Conversations created through the API are isolated from those created in the WebApp interface.
#### Key Considerations for `conversation_id`:
* **Generating the `conversation_id`:** When starting a new conversation, leave the `conversation_id` field empty. The system will generate and return a new `conversation_id`, which you will use in future interactions to continue the dialogue.
* **Handling `conversation_id` in Existing Sessions:** Once a `conversation_id` is generated, future calls to the API should include this `conversation_id` to ensure the conversation continuity with the Dify bot. When a previous `conversation_id` is passed, any new `inputs` will be ignored. Only the `query` is processed for the ongoing conversation.
* **Managing Dynamic Variables:** If there is a need to modify logic or variables during the session, you can use conversation variables (session-specific variables) to adjust the bot's behavior or responses.
You can access the API documentation and example requests for this application in **Applications -> Access API**.
Here is an example of calling the `chat-messages` API:
```
curl --location --request POST 'https://api.dify.ai/v1/chat-messages' \
--header 'Authorization: Bearer ENTER-YOUR-SECRET-KEY' \
--header 'Content-Type: application/json' \
--data-raw '{
"inputs": {},
"query": "eh",
"response_mode": "streaming",
"conversation_id": "1c7e55fb-1ba2-4e10-81b5-30addcea2276",
"user": "abc-123"
}'
```
```python theme={null}
import requests
import json
url = 'https://api.dify.ai/v1/chat-messages'
headers = {
'Authorization': 'Bearer ENTER-YOUR-SECRET-KEY',
'Content-Type': 'application/json',
}
data = {
"inputs": {},
"query": "eh",
"response_mode": "streaming",
"conversation_id": "1c7e55fb-1ba2-4e10-81b5-30addcea2276",
"user": "abc-123"
}
response = requests.post(url, headers=headers, data=json.dumps(data))
print(response.text())
```
# MCP Server
Source: https://docs.dify.ai/en/use-dify/publish/publish-mcp
Expose your Dify applications as MCP servers for integration with Claude Desktop, Cursor, and other AI development tools
Dify now supports exposing your applications as [MCP](https://modelcontextprotocol.io/docs/getting-started/intro) (Model Context Protocol) servers, enabling seamless integration with AI assistants like Claude Desktop and development environments like Cursor. This allows these tools to directly interact with your Dify apps as if they were native extensions.
If you're looking to use MCP tools within Dify workflows & agents, see [here](/en/use-dify/build/mcp).
## Configuring Your Dify App as an MCP Server
Navigate to your application's configuration interface in Dify, you'll find an MCP Server configuration module. The feature is disabled by default. When you toggle it on, Dify generates an unique MCP Server address for your application. This address serves as the connection point for external tools.
Your MCP Server URL contains authentication credentials, so treat it like an API key. If you suspect it's been compromised, use the regenerate button to create a new URL. The old one will immediately stop working.
You've built something great in Dify. Now let's get it to your users. Every Dify application becomes available in multiple ways automatically—choose what works best for your situation.
## Start with Web Apps
Your fastest path to sharing is through web apps. These are generated automatically when you create any application and work immediately without setup.
Click "Publish" in your app to activate the latest version.
Find your web app link in the publish section.
Send the link to users—they can start using your app right away.
Web apps work on any device and automatically adapt to screen sizes. No app store approvals or installation required.
## Publishing Options
Instant, shareable applications. Perfect for testing ideas or serving end users directly.
Build AI into your existing products. Full control over user experience and data flow.
Deploy your web app as chat widgets or inline frames on any website.
Connect to AI tools like Claude Desktop and Cursor. Great for development workflows.
## How Publishing Works
When you publish an app, Dify creates a web app and API endpoint with your latest configuration:
* **Web apps** update immediately with new features and responses
* **API endpoints** serve the latest model and workflow configurations
* **Website embeds** (which display your web app) automatically reflect all changes
* **MCP servers** provide access to current app capabilities
Publishing replaces your live app with the current configuration. Users will immediately see changes in their next interaction.
## Choose Your Approach
Use **Web Apps**. Share a link and start collecting feedback within minutes. Perfect for validating ideas or serving non-technical users.
Use **API Integration**. You control the interface, user authentication, and data handling. Your app becomes part of your product ecosystem.
Use **Embed on Websites**. Display your web app as a chat widget or inline frame on your current site. Works with any website technology.
Use **MCP Server**. Make your app available to Claude Desktop, Cursor, and other AI development environments as a native tool.
## Publishing Best Practices
Before you share your app, ensure you've configured these settings:
* **App description** - Helps users understand what your app does
* **Icon and branding** - Makes your app recognizable and professional
* **Access controls** - Decide if your app should be public or require authentication
* **Rate limits** - Protect your app from overuse (especially important for API access)
All publishing methods use the same app configuration. Set it once, publish everywhere.
# API
Source: https://docs.dify.ai/en/use-dify/publish/developing-with-apis
Integrate your Dify workflows anywhere
You can use your Dify app as a backend API service out-of-box.
## How API Integration Works
1. **Build your app** in Dify Studio with the AI capabilities you need
2. **Generate API credentials** to securely access your app's functionality
3. **Call the API** from your application to get AI-powered responses
4. **Users interact** with your custom interface while Dify handles the AI processing
## Getting Started
In your app, navigate to **API Access** in the left sidebar.
Generate new credentials for your integration. You can create multiple keys for different environments or users.
Dify generates complete API documentation specific to your app's configuration.
Use the provided examples to integrate API calls into your application.
Never expose API keys in frontend code or client-side requests. Always call Dify APIs from your backend to prevent abuse and maintain security.
### Text-generation application
These applications are used to generate high-quality text, such as articles, summaries, translations, etc., by calling the completion-messages API and sending user input to obtain generated text results. The model parameters and prompt templates used for generating text depend on the developer's settings in the Dify Prompt Arrangement page.
You can find the API documentation and example requests for this application in **Applications -> Access API**.
For example, here is a sample call an API for text generation:
```
curl --location --request POST 'https://api.dify.ai/v1/completion-messages' \
--header 'Authorization: Bearer ENTER-YOUR-SECRET-KEY' \
--header 'Content-Type: application/json' \
--data-raw '{
"inputs": {},
"response_mode": "streaming",
"user": "abc-123"
}'
```
```python theme={null}
import requests
import json
url = "https://api.dify.ai/v1/completion-messages"
headers = {
'Authorization': 'Bearer ENTER-YOUR-SECRET-KEY',
'Content-Type': 'application/json',
}
data = {
"inputs": {"text": 'Hello, how are you?'},
"response_mode": "streaming",
"user": "abc-123"
}
response = requests.post(url, headers=headers, data=json.dumps(data))
print(response.text)
```
### Conversational Applications
Conversational applications facilitate ongoing dialogue with users through a question-and-answer format. To initiate a conversation, you will call the `chat-messages` API. A `conversation_id` is generated for each session and must be included in subsequent API calls to maintain the conversation flow.
> **Important Note**: The Service API does not share conversations created by the WebApp. Conversations created through the API are isolated from those created in the WebApp interface.
#### Key Considerations for `conversation_id`:
* **Generating the `conversation_id`:** When starting a new conversation, leave the `conversation_id` field empty. The system will generate and return a new `conversation_id`, which you will use in future interactions to continue the dialogue.
* **Handling `conversation_id` in Existing Sessions:** Once a `conversation_id` is generated, future calls to the API should include this `conversation_id` to ensure the conversation continuity with the Dify bot. When a previous `conversation_id` is passed, any new `inputs` will be ignored. Only the `query` is processed for the ongoing conversation.
* **Managing Dynamic Variables:** If there is a need to modify logic or variables during the session, you can use conversation variables (session-specific variables) to adjust the bot's behavior or responses.
You can access the API documentation and example requests for this application in **Applications -> Access API**.
Here is an example of calling the `chat-messages` API:
```
curl --location --request POST 'https://api.dify.ai/v1/chat-messages' \
--header 'Authorization: Bearer ENTER-YOUR-SECRET-KEY' \
--header 'Content-Type: application/json' \
--data-raw '{
"inputs": {},
"query": "eh",
"response_mode": "streaming",
"conversation_id": "1c7e55fb-1ba2-4e10-81b5-30addcea2276",
"user": "abc-123"
}'
```
```python theme={null}
import requests
import json
url = 'https://api.dify.ai/v1/chat-messages'
headers = {
'Authorization': 'Bearer ENTER-YOUR-SECRET-KEY',
'Content-Type': 'application/json',
}
data = {
"inputs": {},
"query": "eh",
"response_mode": "streaming",
"conversation_id": "1c7e55fb-1ba2-4e10-81b5-30addcea2276",
"user": "abc-123"
}
response = requests.post(url, headers=headers, data=json.dumps(data))
print(response.text())
```
# MCP Server
Source: https://docs.dify.ai/en/use-dify/publish/publish-mcp
Expose your Dify applications as MCP servers for integration with Claude Desktop, Cursor, and other AI development tools
Dify now supports exposing your applications as [MCP](https://modelcontextprotocol.io/docs/getting-started/intro) (Model Context Protocol) servers, enabling seamless integration with AI assistants like Claude Desktop and development environments like Cursor. This allows these tools to directly interact with your Dify apps as if they were native extensions.
If you're looking to use MCP tools within Dify workflows & agents, see [here](/en/use-dify/build/mcp).
## Configuring Your Dify App as an MCP Server
Navigate to your application's configuration interface in Dify, you'll find an MCP Server configuration module. The feature is disabled by default. When you toggle it on, Dify generates an unique MCP Server address for your application. This address serves as the connection point for external tools.
Your MCP Server URL contains authentication credentials, so treat it like an API key. If you suspect it's been compromised, use the regenerate button to create a new URL. The old one will immediately stop working.
![App Publish MCP Panel]() ## Integration with Claude Desktop
To connect your Dify app to Claude Desktop, you'll need to add a Claude integration. Go to your Claude Profile > Settings > Integrations > Add integration. Replace the Integration URL with your Dify app's Server URL.
## Integration with Cursor
For Cursor, create or edit the `.cursor/mcp.json` file in your project root:
```json theme={null}
{
"mcpServers": {
"your-server-name": {
"url": "your-server-url"
}
}
}
```
Simply replace the URL with your Dify app's MCP Server address. Cursor will automatically detect this configuration and make your Dify app available as a tool. You can add multiple Dify apps by including additional entries in the `mcpServers` object.
## Practical Considerations
* Descriptiveness
When designing descriptions for your tool and its input parameters, think about how an AI would interpret them. Clear, specific descriptions lead to better invocations. Instead of "input data," specify "JSON object containing user profile with required fields: name, email, preferences."
* Latency
The MCP protocol handles the communication layer, but your Dify app's performance still matters. If your app typically takes 30 seconds to process, that latency will be felt in the client application. Consider adding progress indicators or breaking complex workflows into smaller, faster operations.
# Publish Apps to Marketplace
Source: https://docs.dify.ai/en/use-dify/publish/publish-to-marketplace
Publish your apps to Dify Marketplace and share them with the world
Publish your apps as templates to Dify Marketplace, where other Dify users can discover and use them.
## Submit Templates
To publish a template, submit it through the [Creator Center](https://creators.dify.ai) for review. Once approved, it will be listed on Marketplace.
While your template is pending review, you can withdraw it anytime to make changes and resubmit.
Before submission:
* Make sure all plugins used in the app are **installed directly from Marketplace**.
* Run the app at least once in Dify Cloud or the latest Community Edition to confirm it works as expected.
### Submit as Individual or Organization
You can submit templates under your personal account or an organization.
* **Individual**: For independent creators. When you first log in to the Creator Center, you're signed in with your personal account by default.
* **Organization**: For teams that want to build and manage templates together. To get started, click your avatar in the top-left corner and click **Create an organization**, then invite members to collaborate.
You can switch between your personal account and organizations anytime.
### Submission Methods
Available in [beta](https://github.com/langgenius/dify/releases/tag/1.14.0-rc1) environment only.
In your app, click **Publish** > **Publish to Marketplace**.
This takes you to the Creator Center with your app file automatically uploaded — just fill in the template details and submit for review.
Export your app, then go to the Creator Center and upload the export file. Fill in the template details and submit for review.
## Template Writing Guidelines
### Language Requirements
Keep the template library consistent and searchable.
**The following fields must be written in English**:
* Template name
* Overview
* Setup steps
**Inside the app, you can use any language (e.g. Chinese) for**:
* Node names
* Prompts / system messages
* Messages shown to end-users
If your template mainly targets non-English users, you can add a tag in the title. For example,
`Stock Investment Analysis Copilot [ZH]`.
### Template Name & Icon
From the name alone, users should know where it runs and what it does.
* Use a short English phrase, typically 3-7 words.
* Recommended pattern: \[Channel / target] + \[core task], for example:
* WeChat Customer Support Bot
* CSV Data Analyzer with Natural Language
* Internal Docs Q\&A Assistant
* GitHub Issue Triage Agent
* Include keywords users might search for: channel names (Slack, WeChat, Email, Notion) and task names (Summarizer, Assistant, Generator, Bot).
* Use an icon that clearly reflects the template's theme and purpose, rather than the default avatar.
### Categories
Help users discover your template when browsing or filtering by category.
* Select only **1-3** categories that best describe your template.
* Do not check every category just for exposure.
### Language
Help users discover your template via language filters.
* Select the language(s) your template is designed for in real usage.
* This refers to the language of the template's use case, input, or output — **not** the title or overview (which must be in English).
### Overview
In 2-4 English sentences, explain what it does and who it is for.
You don't need to list prerequisites, inputs, or outputs here.
**Recommended structure**
1. Sentence 1: **What it does**
A one-sentence summary of the main function.
2. Sentence 2-3: **Who and when**
Typical user roles or scenarios (support team, marketers, founders, individual knowledge workers, etc.).
This template creates a stock investment analysis copilot that uses Yahoo Finance tools to fetch news, analytics, and ticker data for any listed company.
It helps investors and analysts quickly generate structured research summaries, compare companies, and prepare reports without manually switching between multiple finance websites.
### Setup Steps
Write Setup steps as a numbered Markdown list (1., 2., 3.), with one short sentence per step, starting with a verb.
A new user should be able to get the template running in a few minutes just by following these steps.
**Writing principles**
1. Follow the real setup order, usually:
1. Use/import the template
2. Connect accounts / add API keys
3. Connect data sources (docs, databases, sheets, etc.)
4. Optional customization (assistant name, tone, filters)
5. Activate the workflow and run a test
2. Each step should answer:
* Where to click in the UI
* What to configure or fill in
3. Aim for 3-8 steps. Too few feels incomplete; too many feels overwhelming.
1) Click **Use template** to copy the "Investment Analysis Copilot (Yahoo Finance)" agent into your workspace.
2) Go to **Settings → Model provider** and add your LLM API key. For example, OpenAI, Anthropic, or another supported provider.
3) Open the agent's **Orchestrate** page and make sure the Yahoo Finance tools are enabled in the **Tools** section:
* `yahoo Analytics`
* `yahoo News`
* `yahoo Ticker`
4. (Optional) Customize the analysis style:
* In the **INSTRUCTIONS** area, adjust the system prompt to match your target users. For example, tone, report length, preferred language, or risk preference.
* Update the suggested questions in the **Debug & Preview** panel if you want different example queries.
5. Click **Publish** to make the agent available, then use the preview panel to test it:
* Enter a company name or ticker (e.g., `Nvidia`, `AAPL`, `TSLA`).
* Confirm that the copilot calls the Yahoo Finance tools and returns a structured investment analysis report.
### Quick Checklist Before You Submit
* The name is a short English phrase that clearly shows where it runs and what it does.
* The overview uses 2-4 English sentences to explain the value and typical use cases.
* Only 1-3 relevant categories are selected.
* Setup steps are a clear numbered list.
* Internal workflow texts and prompts are written in appropriate languages for your target users.
# Chat Web Apps
Source: https://docs.dify.ai/en/use-dify/publish/webapp/chatflow-webapp
Turn your chatflow into a fully-featured conversation interface with persistent history and interactive features
Chat web apps transform your chatflow into a complete conversation experience. Users get persistent chat sessions, smart interactions, and all the features you've configured—without installing anything.
## How Chat Apps Work
Your chatflow automatically becomes a web app when you publish it. The system creates a responsive interface that:
* **Maintains conversation context** across user sessions
* **Inherits all orchestration settings** from your chatflow configuration
* **Adapts to any screen size** from mobile to desktop
* **Handles user authentication** if you've enabled access controls
Unlike single-use text generators, chat apps maintain conversation memory and let users build on previous exchanges.
## Interactive Features
Your web app automatically includes these capabilities based on your chatflow settings:
Collect context before chatting starts—better than asking mid-conversation
Eliminate the blank page problem with helpful opening messages
System generates 3 contextual next questions after each response
Speech-to-text lets users talk instead of type
References show exactly where information comes from
Users can rate responses to help improve your app
## Pre-conversation Setup
When your chatflow uses variables, users complete a form before chatting starts. This front-loads context gathering instead of interrupting the conversation flow.
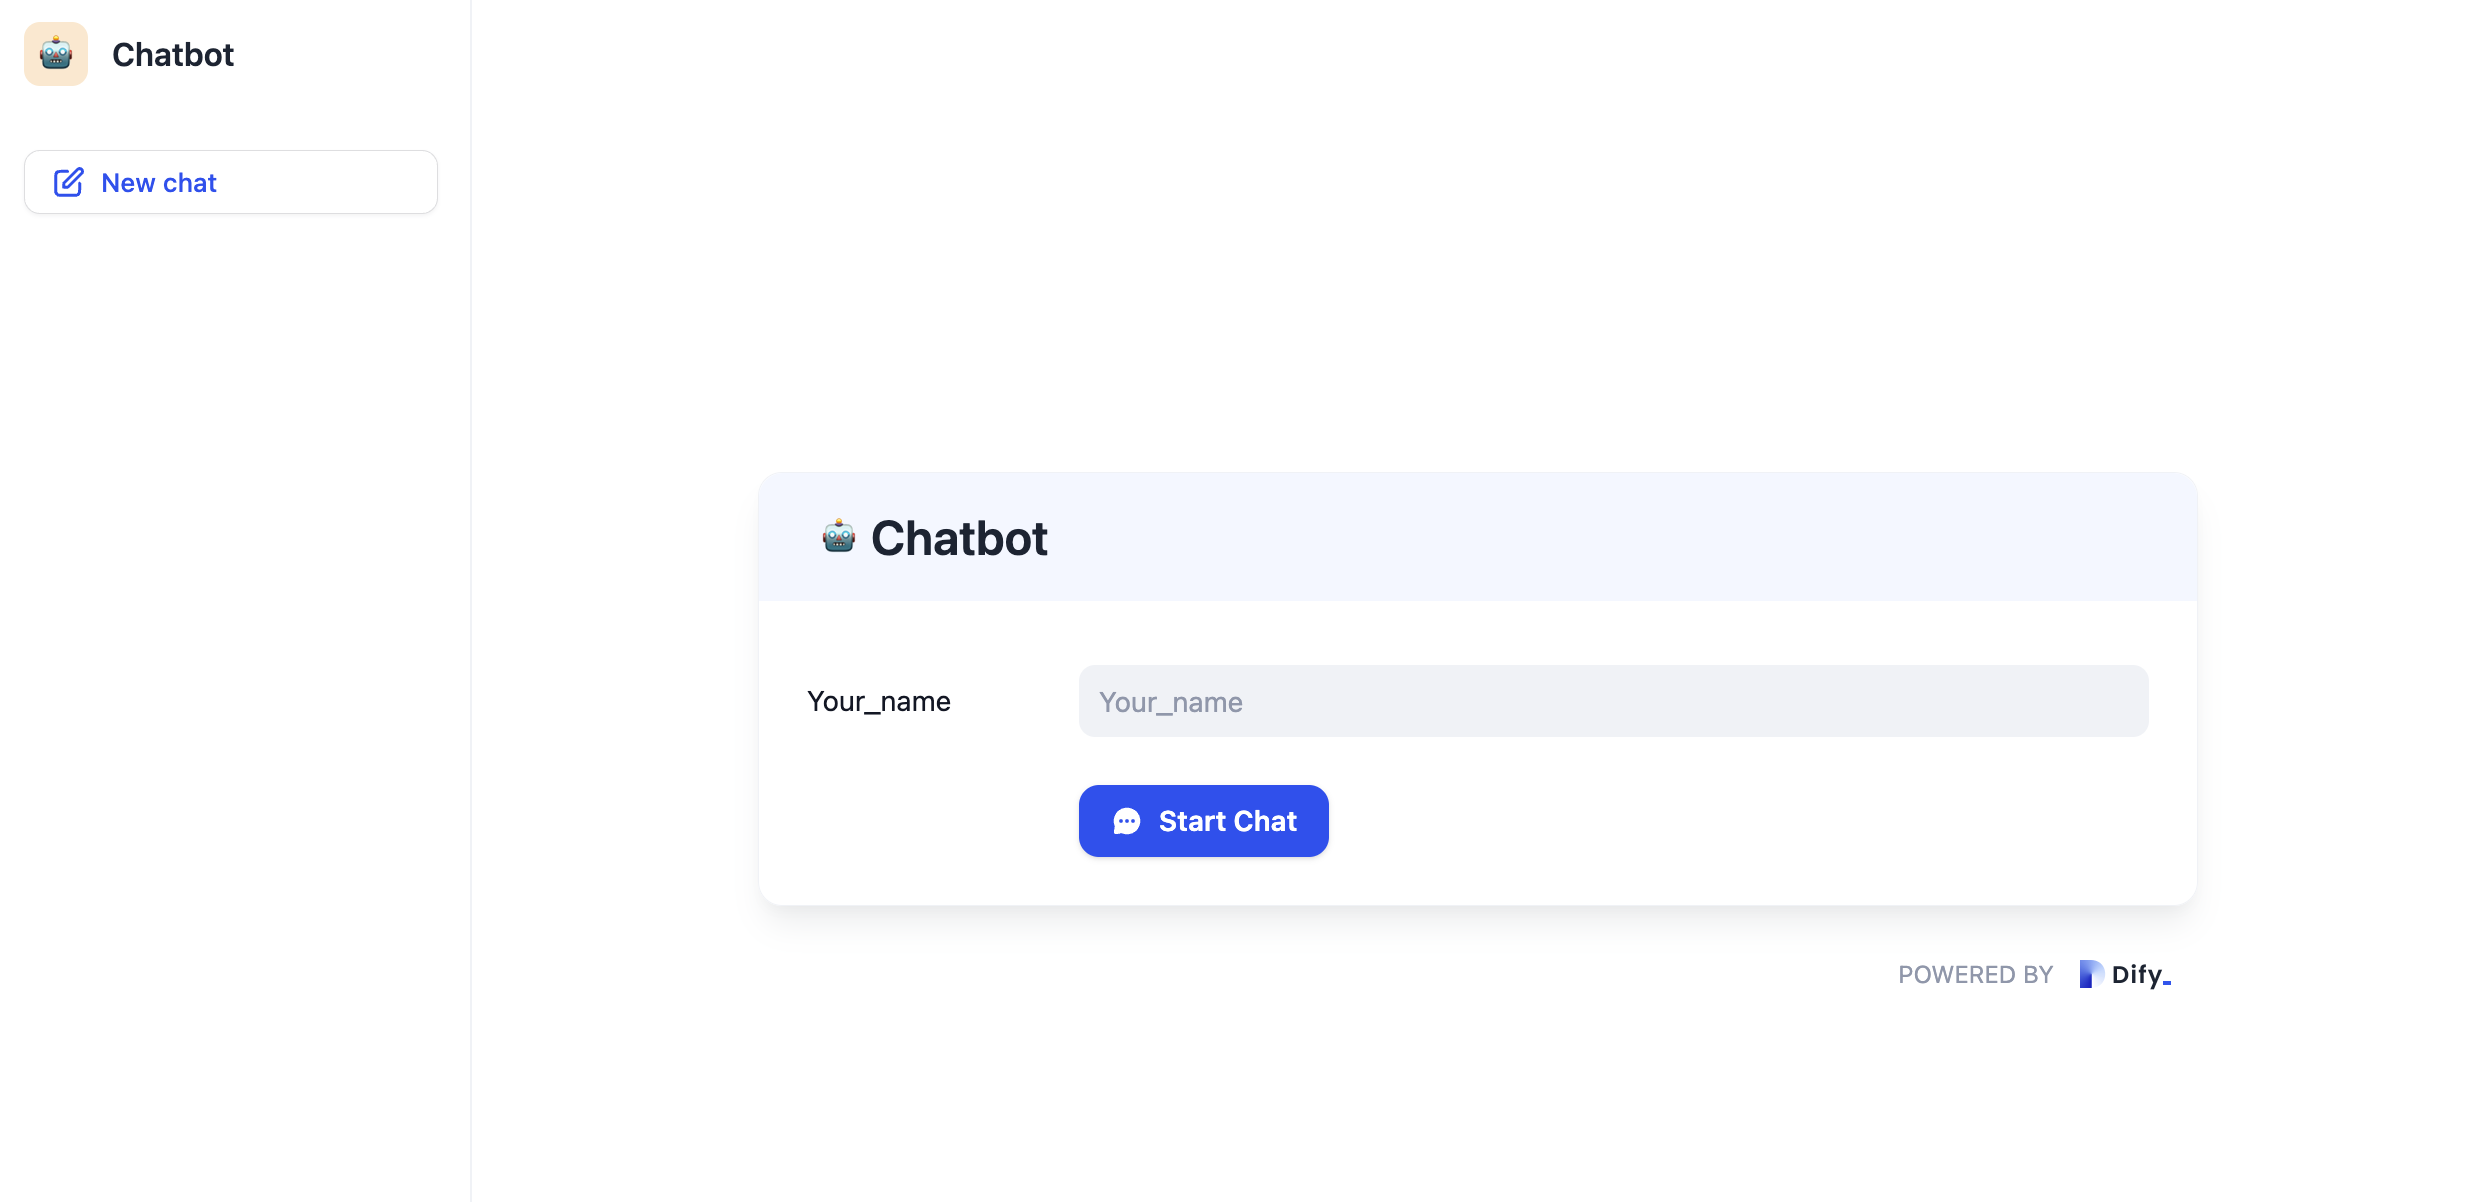
Here's how the user experience works:
They see a clean form requesting necessary context information.
The "Start Conversation" button activates only after required fields are filled.
The conversation begins with all the background information it needs.
Every form field adds friction. Only ask for information that meaningfully improves responses.
## Conversation Experience
Once chatting begins, users get an interface designed for natural interaction:

Every AI response includes these actions:
* **Copy button** - One-click copying for easy sharing or note-taking
* **Feedback buttons** - Like/dislike ratings to improve your app over time
* **Follow-up suggestions** - AI generates 3 contextually relevant next questions
## Session Management
Users can manage multiple conversation threads like modern messaging apps:

**Conversation Controls:**
* **Start new** - Begin fresh conversations without losing context from previous ones
* **Pin important** - Keep crucial conversations accessible at the top of the list
* **Delete finished** - Clean up conversations that are no longer relevant
Each conversation thread maintains its own memory and context. Users can seamlessly switch between different topics or projects.
## Conversation Openers
Enable conversation openers to eliminate the intimidating blank chat screen:
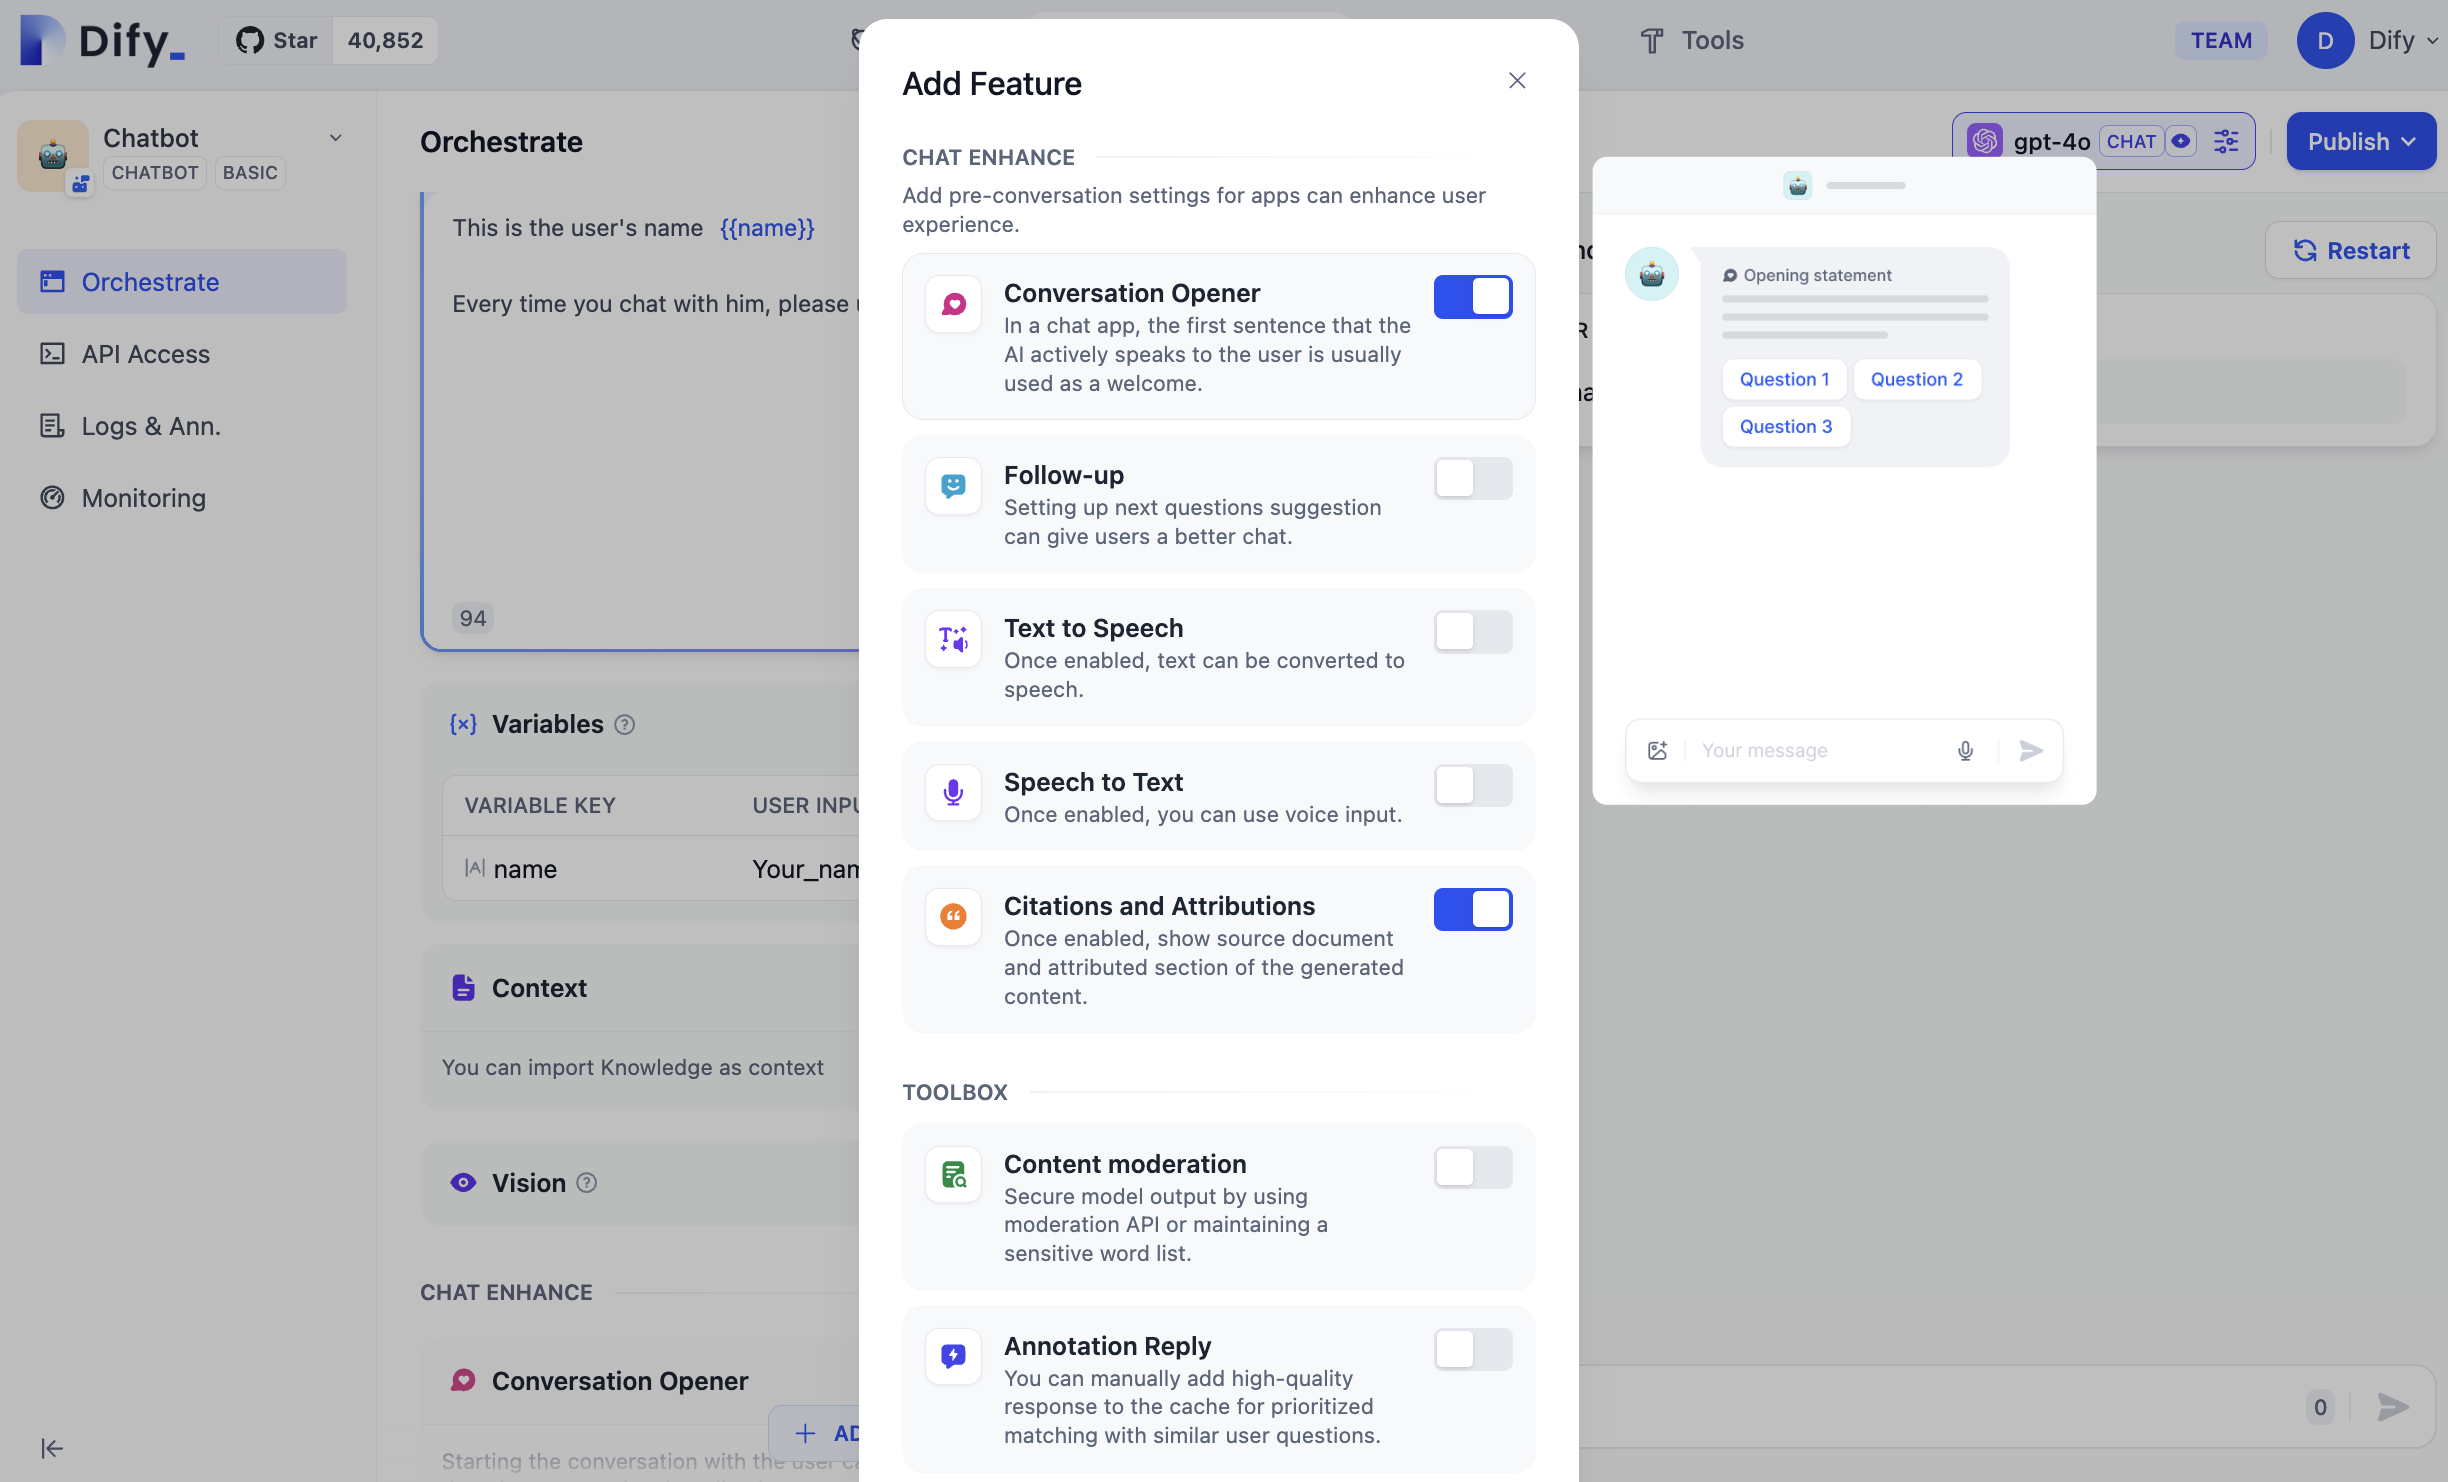
When users start new conversations, the AI proactively introduces itself and explains its capabilities. This immediately shows users what they can accomplish and increases engagement.
Conversation openers work especially well for specialized apps where users might not know all available features.
## Follow-up Questions
The system automatically generates contextual follow-up questions after each AI response:
These suggestions are:
* **Contextually relevant** to the current conversation topic
* **Dynamically generated** based on the AI's response
* **Clickable shortcuts** that help users explore deeper or pivot to related topics
## Voice Input
Speech-to-text transforms your chat app into a voice-first experience:
**How it works:**
1. The microphone button appears when you enable speech-to-text in your chatflow
2. Users click to start recording their question
3. Speech converts to text in real-time as they speak
4. They can edit the text before sending or send immediately
Users must grant microphone permissions in their browser. The app will prompt for this permission when they first try to use voice input.
## Citations and Attributions
When this feature is enabled, if the AI references content from the knowledge base while answering a user question, the specific knowledge sources will be displayed below the response.
Citations build user trust by providing transparency about information sources. Users can click through to verify details or explore source materials further.
# Embedding Your Web App
Source: https://docs.dify.ai/en/use-dify/publish/webapp/embedding-in-websites
Deploy your published web app on any website through iframes, chat widgets, or custom integrations
Your published web app can be embedded directly into any website. This isn't a separate publishing method—it's how you deploy the same web app you've already created, just presented within your existing website instead of as a standalone page.
## How Web App Embedding Works
When you publish an app in Dify, you get a web app URL. You can share this URL directly, or embed the same app into your website using these methods:
Your web app as a floating button—visitors click to open the full interface
Your web app embedded directly in page content—always visible and ready
Advanced embedding with custom styling and behavior control
Same web app adapts automatically to any presentation format
All embedding methods use your published web app. Changes to your app configuration automatically apply everywhere it's embedded.
## Chat Bubble Widget
The chat bubble presents your web app as a floating button. Visitors click it to open your app in an overlay—keeping them on your page while accessing your AI features.
### Configuration Options
The chat bubble can be customized through the `difyChatbotConfig` object:
```javascript theme={null}
window.difyChatbotConfig = {
// Required: Your app's token from Dify
token: 'YOUR_TOKEN',
// Optional: Environment settings
isDev: false,
baseUrl: 'https://udify.app', // Auto-set based on isDev
// Optional: Visual customization
containerProps: {
style: {
right: '20px',
bottom: '20px'
},
className: 'custom-chat-button'
},
// Optional: Interactive behavior
draggable: false, // Allow users to drag the button
dragAxis: 'both', // 'x', 'y', or 'both'
// Optional: Pre-fill user context
inputs: {
name: "John Doe", // Variable names from your Dify app
department: "Support"
},
// Optional: System variables for tracking
systemVariables: {
user_id: 'USER_123',
conversation_id: 'CONV_456'
},
// Optional: User profile information
userVariables: {
avatar_url: 'https://example.com/avatar.jpg',
name: 'John Doe'
}
}
```
In your Dify app, go to **Publish → Embed** to find your unique token.
Include the configuration and Dify's embed script in your website's HTML.
Adjust the `containerProps` to match your website's design.
Open your website and try the chat button to ensure everything works correctly.
## Iframe Integration
Embed your web app directly into your page content. This displays your app as an integral part of your website:
```html theme={null}
```
### Why Use Iframe Embedding
* **Always visible** - Your web app is immediately accessible, not hidden behind a button
* **Full functionality** - Everything from your web app works identically in the iframe
* **Page integration** - Appears as native content, not an overlay
* **Simple setup** - Just HTML, no JavaScript configuration needed
### Customization Options
**Size and Position:**
```html theme={null}
```
**Responsive Design:**
```html theme={null}
## Integration with Claude Desktop
To connect your Dify app to Claude Desktop, you'll need to add a Claude integration. Go to your Claude Profile > Settings > Integrations > Add integration. Replace the Integration URL with your Dify app's Server URL.
## Integration with Cursor
For Cursor, create or edit the `.cursor/mcp.json` file in your project root:
```json theme={null}
{
"mcpServers": {
"your-server-name": {
"url": "your-server-url"
}
}
}
```
Simply replace the URL with your Dify app's MCP Server address. Cursor will automatically detect this configuration and make your Dify app available as a tool. You can add multiple Dify apps by including additional entries in the `mcpServers` object.
## Practical Considerations
* Descriptiveness
When designing descriptions for your tool and its input parameters, think about how an AI would interpret them. Clear, specific descriptions lead to better invocations. Instead of "input data," specify "JSON object containing user profile with required fields: name, email, preferences."
* Latency
The MCP protocol handles the communication layer, but your Dify app's performance still matters. If your app typically takes 30 seconds to process, that latency will be felt in the client application. Consider adding progress indicators or breaking complex workflows into smaller, faster operations.
# Publish Apps to Marketplace
Source: https://docs.dify.ai/en/use-dify/publish/publish-to-marketplace
Publish your apps to Dify Marketplace and share them with the world
Publish your apps as templates to Dify Marketplace, where other Dify users can discover and use them.
## Submit Templates
To publish a template, submit it through the [Creator Center](https://creators.dify.ai) for review. Once approved, it will be listed on Marketplace.
While your template is pending review, you can withdraw it anytime to make changes and resubmit.
Before submission:
* Make sure all plugins used in the app are **installed directly from Marketplace**.
* Run the app at least once in Dify Cloud or the latest Community Edition to confirm it works as expected.
### Submit as Individual or Organization
You can submit templates under your personal account or an organization.
* **Individual**: For independent creators. When you first log in to the Creator Center, you're signed in with your personal account by default.
* **Organization**: For teams that want to build and manage templates together. To get started, click your avatar in the top-left corner and click **Create an organization**, then invite members to collaborate.
You can switch between your personal account and organizations anytime.
### Submission Methods
Available in [beta](https://github.com/langgenius/dify/releases/tag/1.14.0-rc1) environment only.
In your app, click **Publish** > **Publish to Marketplace**.
This takes you to the Creator Center with your app file automatically uploaded — just fill in the template details and submit for review.
Export your app, then go to the Creator Center and upload the export file. Fill in the template details and submit for review.
## Template Writing Guidelines
### Language Requirements
Keep the template library consistent and searchable.
**The following fields must be written in English**:
* Template name
* Overview
* Setup steps
**Inside the app, you can use any language (e.g. Chinese) for**:
* Node names
* Prompts / system messages
* Messages shown to end-users
If your template mainly targets non-English users, you can add a tag in the title. For example,
`Stock Investment Analysis Copilot [ZH]`.
### Template Name & Icon
From the name alone, users should know where it runs and what it does.
* Use a short English phrase, typically 3-7 words.
* Recommended pattern: \[Channel / target] + \[core task], for example:
* WeChat Customer Support Bot
* CSV Data Analyzer with Natural Language
* Internal Docs Q\&A Assistant
* GitHub Issue Triage Agent
* Include keywords users might search for: channel names (Slack, WeChat, Email, Notion) and task names (Summarizer, Assistant, Generator, Bot).
* Use an icon that clearly reflects the template's theme and purpose, rather than the default avatar.
### Categories
Help users discover your template when browsing or filtering by category.
* Select only **1-3** categories that best describe your template.
* Do not check every category just for exposure.
### Language
Help users discover your template via language filters.
* Select the language(s) your template is designed for in real usage.
* This refers to the language of the template's use case, input, or output — **not** the title or overview (which must be in English).
### Overview
In 2-4 English sentences, explain what it does and who it is for.
You don't need to list prerequisites, inputs, or outputs here.
**Recommended structure**
1. Sentence 1: **What it does**
A one-sentence summary of the main function.
2. Sentence 2-3: **Who and when**
Typical user roles or scenarios (support team, marketers, founders, individual knowledge workers, etc.).
This template creates a stock investment analysis copilot that uses Yahoo Finance tools to fetch news, analytics, and ticker data for any listed company.
It helps investors and analysts quickly generate structured research summaries, compare companies, and prepare reports without manually switching between multiple finance websites.
### Setup Steps
Write Setup steps as a numbered Markdown list (1., 2., 3.), with one short sentence per step, starting with a verb.
A new user should be able to get the template running in a few minutes just by following these steps.
**Writing principles**
1. Follow the real setup order, usually:
1. Use/import the template
2. Connect accounts / add API keys
3. Connect data sources (docs, databases, sheets, etc.)
4. Optional customization (assistant name, tone, filters)
5. Activate the workflow and run a test
2. Each step should answer:
* Where to click in the UI
* What to configure or fill in
3. Aim for 3-8 steps. Too few feels incomplete; too many feels overwhelming.
1) Click **Use template** to copy the "Investment Analysis Copilot (Yahoo Finance)" agent into your workspace.
2) Go to **Settings → Model provider** and add your LLM API key. For example, OpenAI, Anthropic, or another supported provider.
3) Open the agent's **Orchestrate** page and make sure the Yahoo Finance tools are enabled in the **Tools** section:
* `yahoo Analytics`
* `yahoo News`
* `yahoo Ticker`
4. (Optional) Customize the analysis style:
* In the **INSTRUCTIONS** area, adjust the system prompt to match your target users. For example, tone, report length, preferred language, or risk preference.
* Update the suggested questions in the **Debug & Preview** panel if you want different example queries.
5. Click **Publish** to make the agent available, then use the preview panel to test it:
* Enter a company name or ticker (e.g., `Nvidia`, `AAPL`, `TSLA`).
* Confirm that the copilot calls the Yahoo Finance tools and returns a structured investment analysis report.
### Quick Checklist Before You Submit
* The name is a short English phrase that clearly shows where it runs and what it does.
* The overview uses 2-4 English sentences to explain the value and typical use cases.
* Only 1-3 relevant categories are selected.
* Setup steps are a clear numbered list.
* Internal workflow texts and prompts are written in appropriate languages for your target users.
# Chat Web Apps
Source: https://docs.dify.ai/en/use-dify/publish/webapp/chatflow-webapp
Turn your chatflow into a fully-featured conversation interface with persistent history and interactive features
Chat web apps transform your chatflow into a complete conversation experience. Users get persistent chat sessions, smart interactions, and all the features you've configured—without installing anything.
## How Chat Apps Work
Your chatflow automatically becomes a web app when you publish it. The system creates a responsive interface that:
* **Maintains conversation context** across user sessions
* **Inherits all orchestration settings** from your chatflow configuration
* **Adapts to any screen size** from mobile to desktop
* **Handles user authentication** if you've enabled access controls
Unlike single-use text generators, chat apps maintain conversation memory and let users build on previous exchanges.
## Interactive Features
Your web app automatically includes these capabilities based on your chatflow settings:
Collect context before chatting starts—better than asking mid-conversation
Eliminate the blank page problem with helpful opening messages
System generates 3 contextual next questions after each response
Speech-to-text lets users talk instead of type
References show exactly where information comes from
Users can rate responses to help improve your app
## Pre-conversation Setup
When your chatflow uses variables, users complete a form before chatting starts. This front-loads context gathering instead of interrupting the conversation flow.

Here's how the user experience works:
They see a clean form requesting necessary context information.
The "Start Conversation" button activates only after required fields are filled.
The conversation begins with all the background information it needs.
Every form field adds friction. Only ask for information that meaningfully improves responses.
## Conversation Experience
Once chatting begins, users get an interface designed for natural interaction:

Every AI response includes these actions:
* **Copy button** - One-click copying for easy sharing or note-taking
* **Feedback buttons** - Like/dislike ratings to improve your app over time
* **Follow-up suggestions** - AI generates 3 contextually relevant next questions
## Session Management
Users can manage multiple conversation threads like modern messaging apps:

**Conversation Controls:**
* **Start new** - Begin fresh conversations without losing context from previous ones
* **Pin important** - Keep crucial conversations accessible at the top of the list
* **Delete finished** - Clean up conversations that are no longer relevant
Each conversation thread maintains its own memory and context. Users can seamlessly switch between different topics or projects.
## Conversation Openers
Enable conversation openers to eliminate the intimidating blank chat screen:

When users start new conversations, the AI proactively introduces itself and explains its capabilities. This immediately shows users what they can accomplish and increases engagement.
Conversation openers work especially well for specialized apps where users might not know all available features.
## Follow-up Questions
The system automatically generates contextual follow-up questions after each AI response:

These suggestions are:
* **Contextually relevant** to the current conversation topic
* **Dynamically generated** based on the AI's response
* **Clickable shortcuts** that help users explore deeper or pivot to related topics
## Voice Input
Speech-to-text transforms your chat app into a voice-first experience:

**How it works:**
1. The microphone button appears when you enable speech-to-text in your chatflow
2. Users click to start recording their question
3. Speech converts to text in real-time as they speak
4. They can edit the text before sending or send immediately
Users must grant microphone permissions in their browser. The app will prompt for this permission when they first try to use voice input.
## Citations and Attributions
When this feature is enabled, if the AI references content from the knowledge base while answering a user question, the specific knowledge sources will be displayed below the response.
Citations build user trust by providing transparency about information sources. Users can click through to verify details or explore source materials further.
# Embedding Your Web App
Source: https://docs.dify.ai/en/use-dify/publish/webapp/embedding-in-websites
Deploy your published web app on any website through iframes, chat widgets, or custom integrations
Your published web app can be embedded directly into any website. This isn't a separate publishing method—it's how you deploy the same web app you've already created, just presented within your existing website instead of as a standalone page.
## How Web App Embedding Works
When you publish an app in Dify, you get a web app URL. You can share this URL directly, or embed the same app into your website using these methods:
Your web app as a floating button—visitors click to open the full interface
Your web app embedded directly in page content—always visible and ready
Advanced embedding with custom styling and behavior control
Same web app adapts automatically to any presentation format
All embedding methods use your published web app. Changes to your app configuration automatically apply everywhere it's embedded.
## Chat Bubble Widget
The chat bubble presents your web app as a floating button. Visitors click it to open your app in an overlay—keeping them on your page while accessing your AI features.
### Configuration Options
The chat bubble can be customized through the `difyChatbotConfig` object:
```javascript theme={null}
window.difyChatbotConfig = {
// Required: Your app's token from Dify
token: 'YOUR_TOKEN',
// Optional: Environment settings
isDev: false,
baseUrl: 'https://udify.app', // Auto-set based on isDev
// Optional: Visual customization
containerProps: {
style: {
right: '20px',
bottom: '20px'
},
className: 'custom-chat-button'
},
// Optional: Interactive behavior
draggable: false, // Allow users to drag the button
dragAxis: 'both', // 'x', 'y', or 'both'
// Optional: Pre-fill user context
inputs: {
name: "John Doe", // Variable names from your Dify app
department: "Support"
},
// Optional: System variables for tracking
systemVariables: {
user_id: 'USER_123',
conversation_id: 'CONV_456'
},
// Optional: User profile information
userVariables: {
avatar_url: 'https://example.com/avatar.jpg',
name: 'John Doe'
}
}
```
In your Dify app, go to **Publish → Embed** to find your unique token.
Include the configuration and Dify's embed script in your website's HTML.
Adjust the `containerProps` to match your website's design.
Open your website and try the chat button to ensure everything works correctly.
## Iframe Integration
Embed your web app directly into your page content. This displays your app as an integral part of your website:
```html theme={null}
```
### Why Use Iframe Embedding
* **Always visible** - Your web app is immediately accessible, not hidden behind a button
* **Full functionality** - Everything from your web app works identically in the iframe
* **Page integration** - Appears as native content, not an overlay
* **Simple setup** - Just HTML, no JavaScript configuration needed
### Customization Options
**Size and Position:**
```html theme={null}
```
**Responsive Design:**
```html theme={null}
```
## Choosing Your Embedding Method
**Chat bubble** works best—stays out of the way until needed. The floating button lets visitors continue browsing while having quick access to help.
**Iframe embed** for dedicated pages where the app is the main content. Visitors see and use your app immediately without extra clicks.
**Iframe embed** on landing pages to let visitors try your AI capabilities instantly. No barriers between interest and engagement.
**Chat bubble** when you want the same app accessible across your entire site. One embed code provides access from every page.
## Troubleshooting
**Widget not appearing:**
* Verify your app token matches what's shown in Dify's Publish → Embed section
* Check that configuration loads before the embed script
* Look for JavaScript errors in browser console
**Iframe not loading:**
* Confirm the web app URL includes your correct token
* Ensure your site allows iframe content (check Content Security Policy)
* Both your site and Dify app should use HTTPS
Your web app must be published before embedding. If you update your app configuration, republish to see changes in embedded versions.
You can override the default button style using CSS variables or the `containerProps` option. Apply these methods based on CSS specificity to achieve your desired customizations.
### 1.Modifying CSS Variables
The following CSS variables are supported for customization:
```css theme={null}
/* Button distance to bottom, default is `1rem` */
--dify-chatbot-bubble-button-bottom
/* Button distance to right, default is `1rem` */
--dify-chatbot-bubble-button-right
/* Button distance to left, default is `unset` */
--dify-chatbot-bubble-button-left
/* Button distance to top, default is `unset` */
--dify-chatbot-bubble-button-top
/* Button background color, default is `#155EEF` */
--dify-chatbot-bubble-button-bg-color
/* Button width, default is `50px` */
--dify-chatbot-bubble-button-width
/* Button height, default is `50px` */
--dify-chatbot-bubble-button-height
/* Button border radius, default is `25px` */
--dify-chatbot-bubble-button-border-radius
/* Button box shadow, default is `rgba(0, 0, 0, 0.2) 0px 4px 8px 0px)` */
--dify-chatbot-bubble-button-box-shadow
/* Button hover transform, default is `scale(1.1)` */
--dify-chatbot-bubble-button-hover-transform
```
To change the background color to #ABCDEF, add this CSS:
```css theme={null}
#dify-chatbot-bubble-button {
--dify-chatbot-bubble-button-bg-color: #ABCDEF;
}
```
### 2.Using `containerProps`
Set inline styles using the `style` attribute:
```javascript theme={null}
window.difyChatbotConfig = {
// ... other configurations
containerProps: {
style: {
backgroundColor: '#ABCDEF',
width: '60px',
height: '60px',
borderRadius: '30px',
},
// For minor style overrides, you can also use a string value for the `style` attribute:
// style: 'background-color: #ABCDEF; width: 60px;',
},
}
```
Apply CSS classes using the `className` attribute:
```javascript theme={null}
window.difyChatbotConfig = {
// ... other configurations
containerProps: {
className: 'dify-chatbot-bubble-button-custom my-custom-class',
},
}
```
### 3. Passing `inputs`
There are four types of inputs supported:
1. **`text-input`**: Accepts any value. The input string will be truncated if its length exceeds the maximum allowed length.
2. **`paragraph`**: Similar to `text-input`, it accepts any value and truncates the string if it's longer than the maximum length.
3. **`number`**: Accepts a number or a numerical string. If a string is provided, it will be converted to a number using the `Number` function.
4. **`options`**: Accepts any value, provided it matches one of the pre-configured options.
Example configuration:
```javascript theme={null}
window.difyChatbotConfig = {
// Other configuration settings...
inputs: {
name: 'apple',
},
}
```
Note: When using the embed.js script to create an iframe, each input value will be processed—compressed using GZIP and encoded in base64—before being appended to the URL.
For example, the URL with processed input values will look like this:
`http://localhost/chatbot/{token}?name=H4sIAKUlmWYA%2FwWAIQ0AAACDsl7gLuiv2PQEUNAuqQUAAAA%3D`
# Access Control
Source: https://docs.dify.ai/en/use-dify/publish/webapp/web-app-access
Web app access controls who can use your published applications. By default, new apps are restricted to specific team members—you choose exactly who gets access.
Only Workspace Owner, Admin, and Editor roles can create and publish web apps.
## Access Permission Types
Configure access from the Studio → Web App Access Permissions, or from the Publish panel when editing your app.
Dify Enterprise offers four access levels:
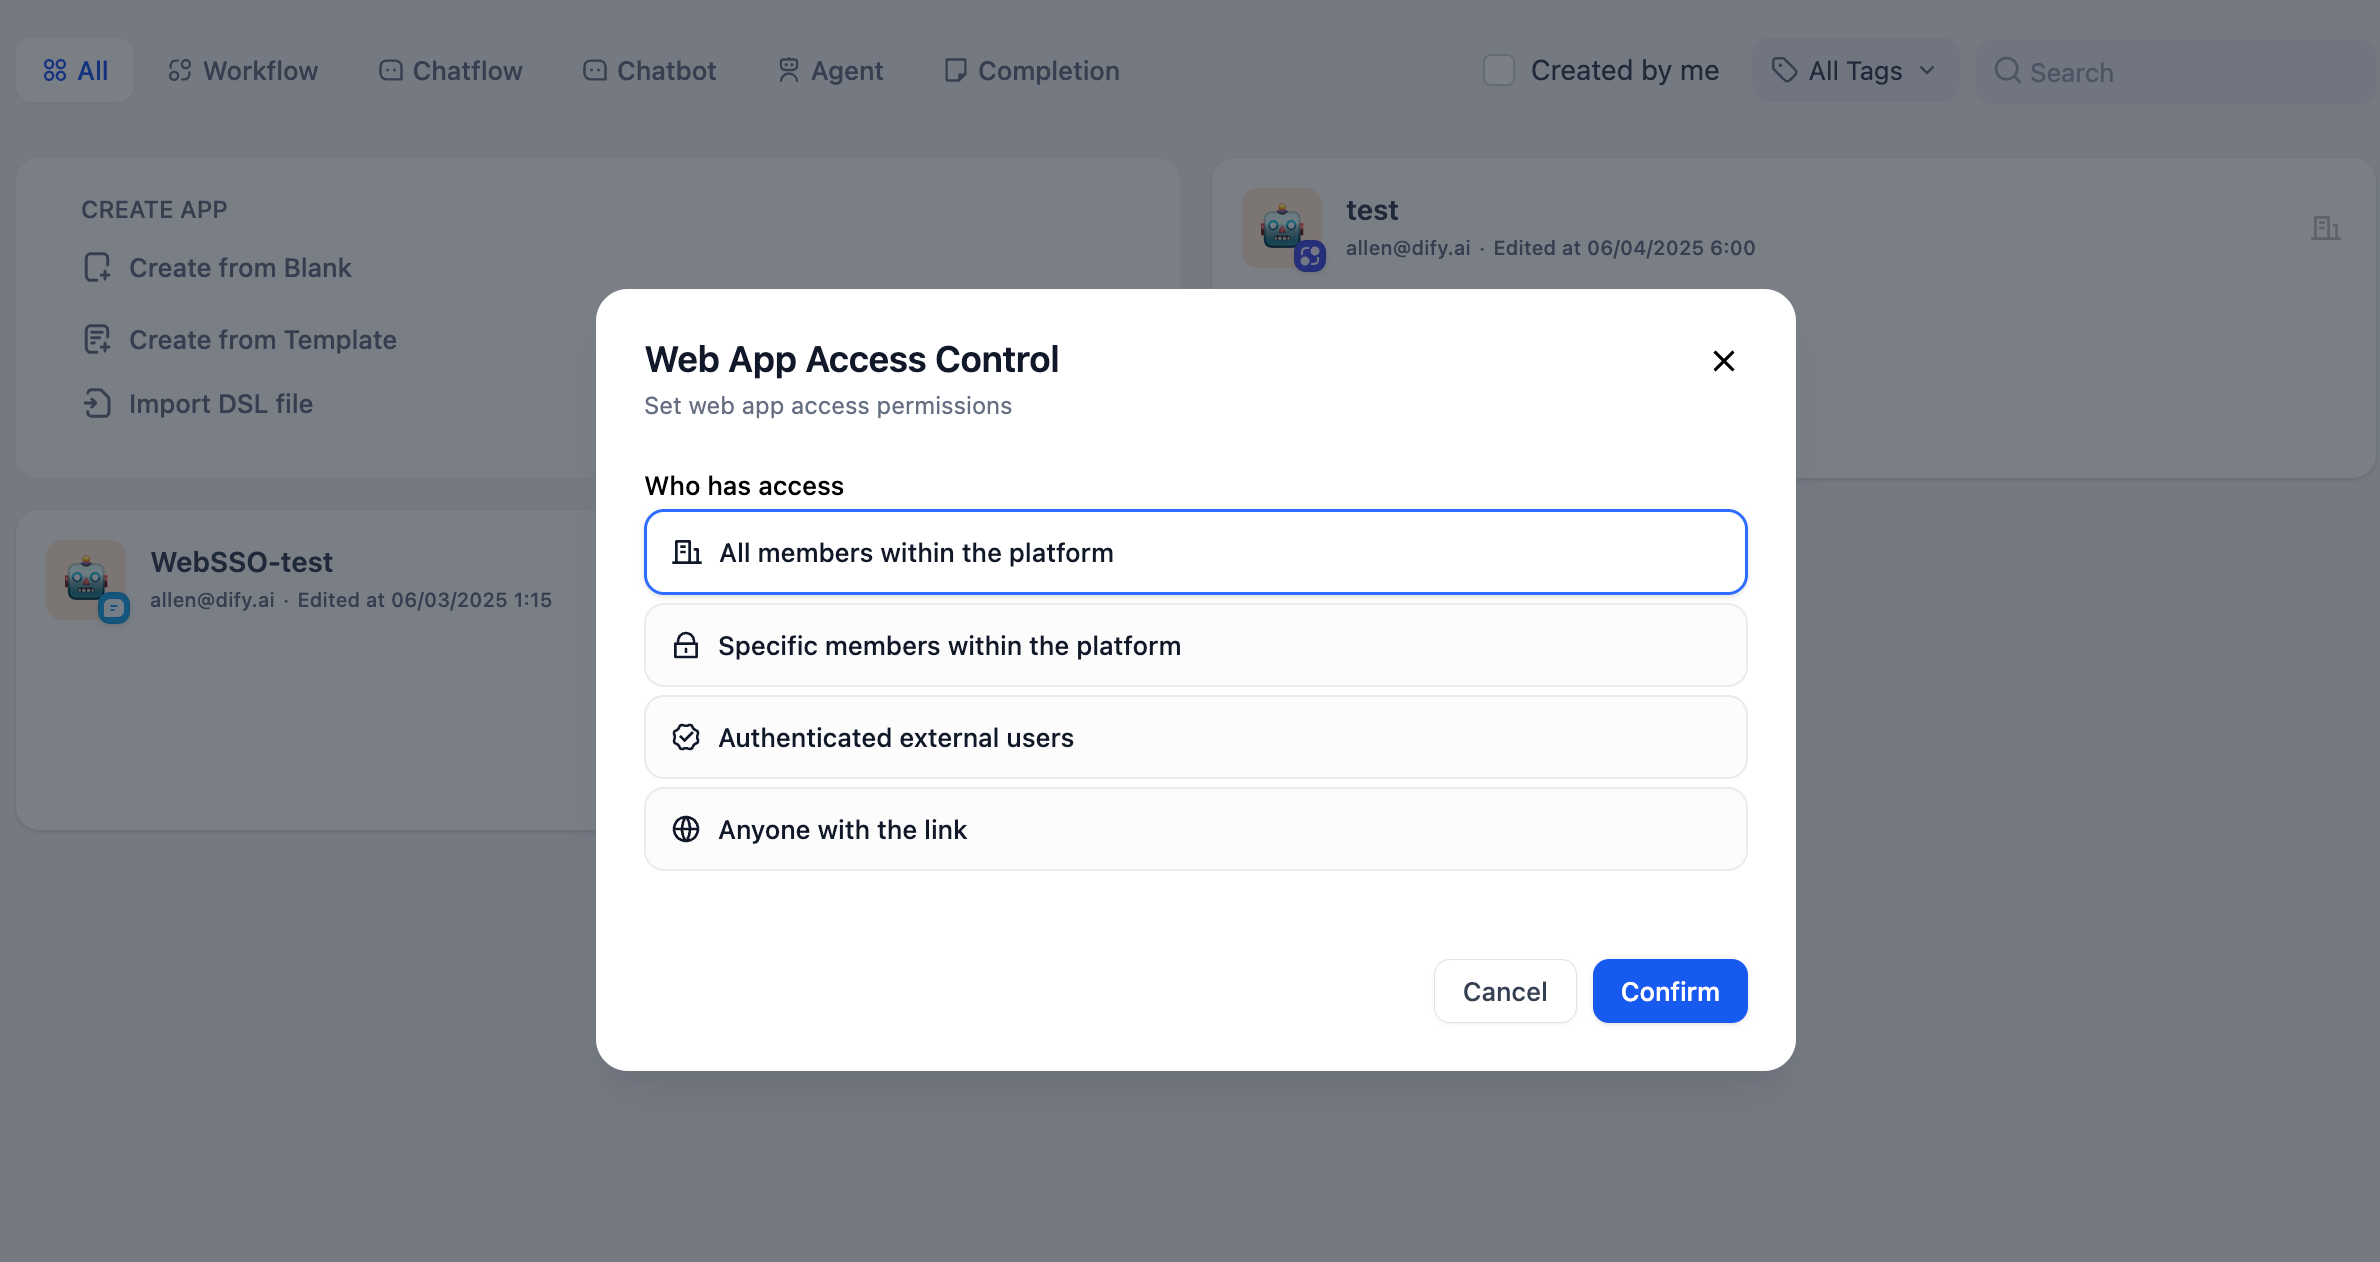
### All Members Within Platform
Any member of your Dify Enterprise workspace can access the app. Users must authenticate with their workspace credentials—password, verification code, or SSO.
Members can access the app through the direct URL or the workspace Explorer page.
If you upgraded from Dify Enterprise v2.7.x or earlier with Web App SSO enabled, your apps automatically switched to **Authenticated External Users** permission during the v2.8.x upgrade.
### Specific Members Within Platform
**Default setting for new apps.** Restricts access to chosen groups or individual members within your workspace. Perfect for department-specific tools or sensitive data applications.
Without any groups or members selected, nobody can access your app—including you.
Configure access by groups or individuals:
Add entire groups for automatic permission management. When someone joins the group, they get app access. When they leave, access is revoked.
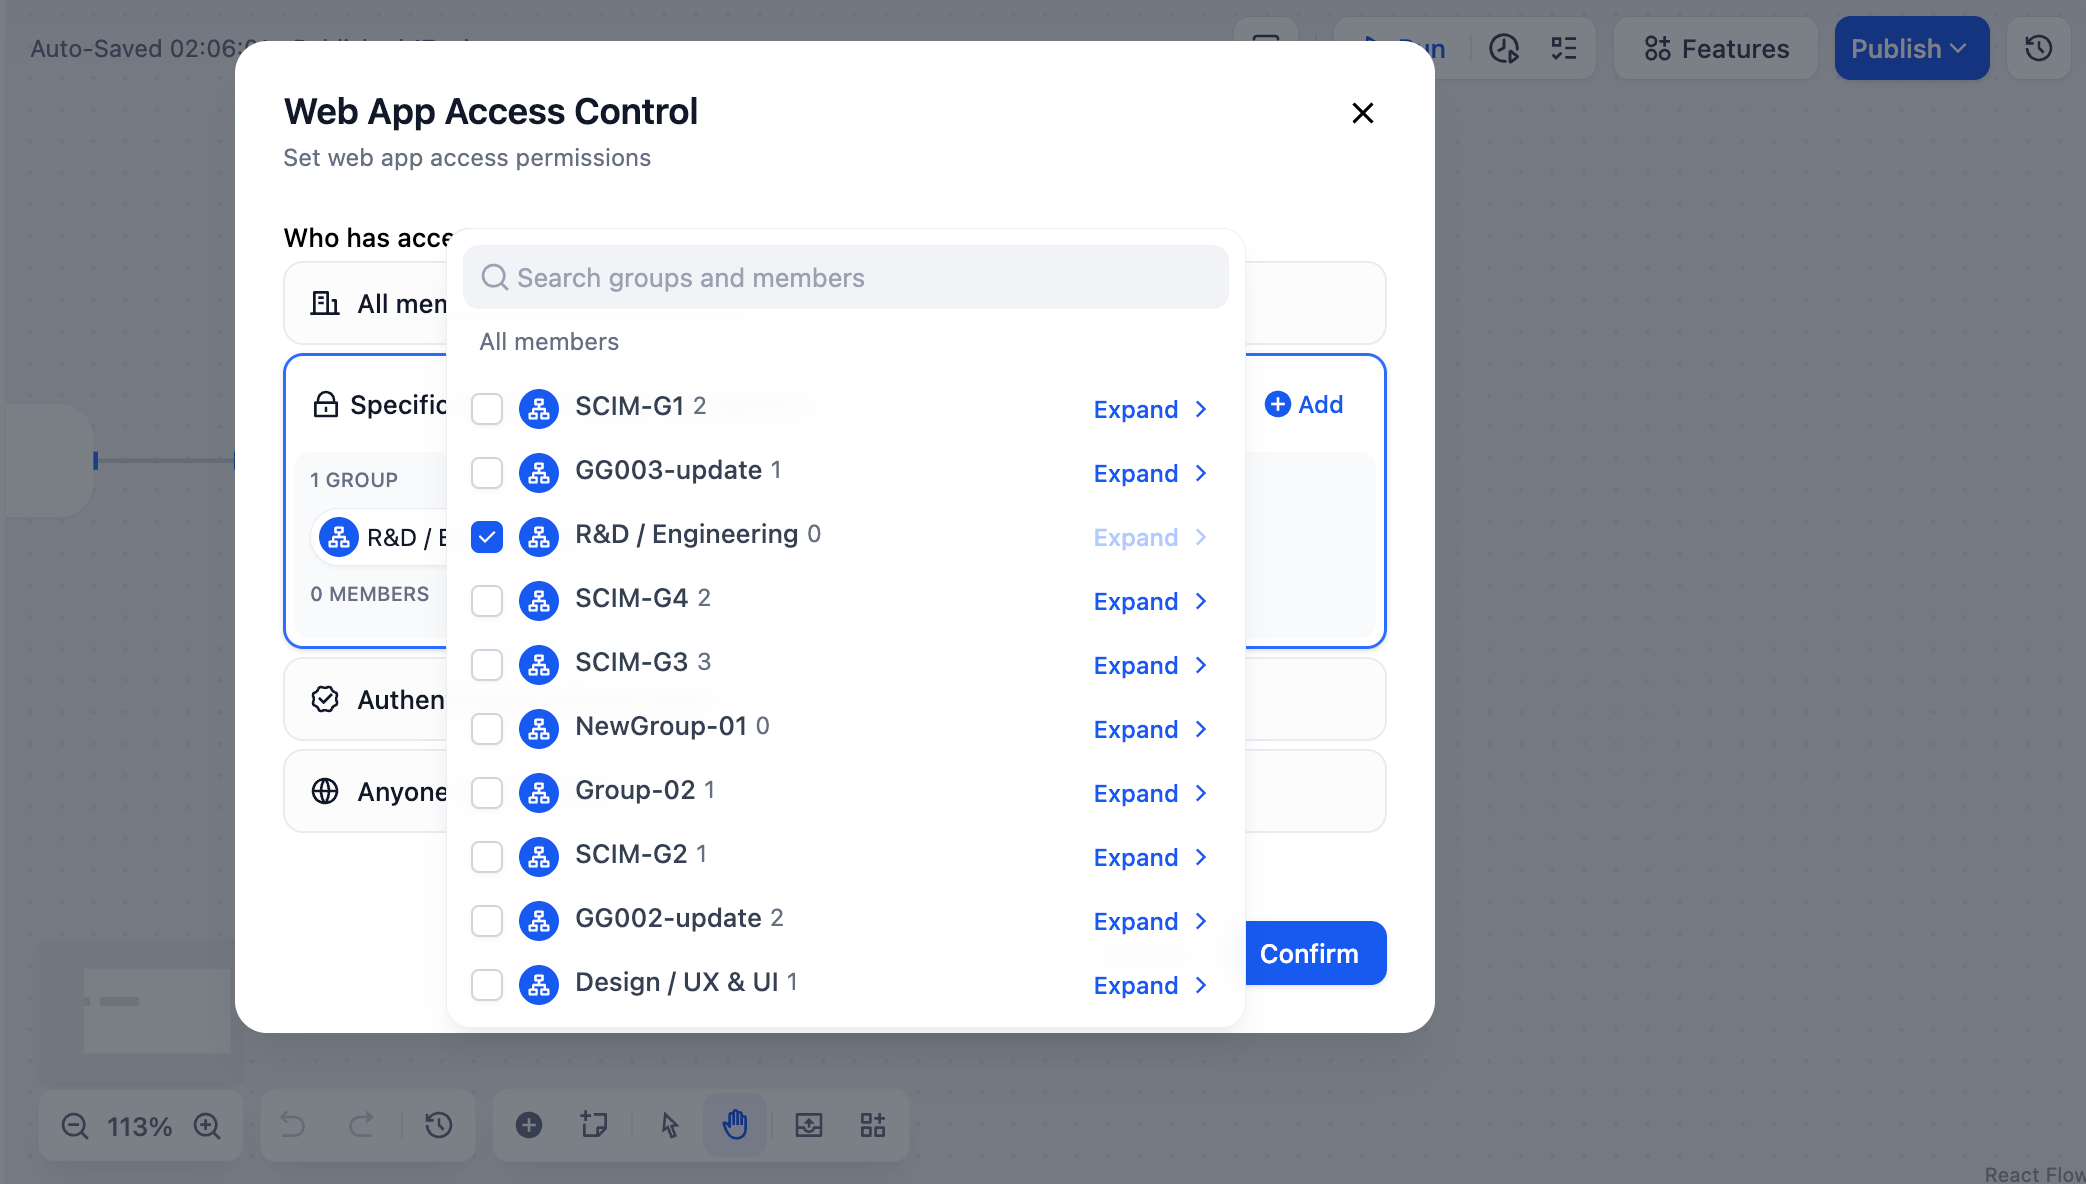
Grant access to specific people. They keep access even if removed from related groups. Other group members cannot access the app.
Workspace Owners, Admins, and Editors can always edit any app in the workspace. However, they still need to be explicitly added to the access list to use the published web app.
### Authenticated External Users
Users outside your Dify Enterprise workspace can access the app through SSO authentication. Admins manage external users through third-party identity providers, keeping them separate from internal workspace data.
IT builds apps, other departments use them without joining Dify
Provide AI services to suppliers, contractors, or clients
Public-facing tools for product help and consultation
If this option is disabled, ask your Dify administrator to configure Web App External User Authentication.
### Anyone
**No authentication required.** Anyone with the URL can access your app immediately. Use for public demos, customer tools, or open resources.
## Finding Your Apps
Team members see all accessible apps in the workspace Explorer page:
## Common Questions
No. Changes apply immediately. However, users with active sessions may need to wait for their session to expire before new restrictions take effect.
View current permissions in the **Who can access web app** section of your app's publish settings.
* **All Members**: Internal collaboration tools
* **Specific Members**: Department-specific or sensitive apps
* **External Users**: Customer service and partner tools
* **Anyone**: Public demos (use carefully)
No. API access is controlled separately by API keys. Changing web app permissions doesn't affect existing API functionality.
# Settings
Source: https://docs.dify.ai/en/use-dify/publish/webapp/web-app-settings
Configure branding, basic access controls, and user experience settings for your published web applications
Web app settings control how your published applications look and behave for end users. Every Dify application automatically generates a web interface that adapts to different devices and screen sizes.
## How Settings Work
Your web app reflects your application's current configuration. When you modify settings and hit "Publish", changes flow immediately to the live web application that users are accessing.
Web apps work without user accounts or logins by default, making them perfect for public tools and demos.
## Branding and Appearance
Make your web app look professional and recognizable:
Set your app name, description, and icon to create a clear first impression
Choose colors, themes, and layout options that match your brand
Configure interface language for your target audience
Add copyright information and privacy policy links for compliance
### Essential Branding Elements
**App Icon and Name**
* Your icon appears in browser tabs and when users bookmark your app
* Choose a clear, recognizable name that explains what your app does
* Icons can be images or emojis—pick what fits your app's personality
**Description and Messaging**
* Write a concise description that helps users understand your app's purpose
* This text appears on the app's landing page and in search results
* Keep it under 160 characters for best results
**Visual Consistency**
* Choose colors that align with your brand
* Consider your audience when selecting light or dark themes
* Test your app on different devices to ensure it looks good everywhere
## Access Controls
**Enterprise Feature:** Control who can access your apps with authentication, team restrictions, and external user management.
**Dify Community:** Web apps are public by default—anyone with the URL can access them. This works great for demos, public tools, and customer-facing applications.
**Privacy and Legal:**
* Add copyright information and privacy policy links
* Configure data handling preferences
* Set terms of service for compliance
## Feature Inheritance
Your web app automatically includes features you've enabled in your application configuration:
**Interactive Features:**
* Conversation openers and suggested follow-ups
* Pre-conversation forms for context gathering
* Voice input and speech-to-text capabilities
* Source citations and reference links
* Feedback collection and rating systems
**Functionality:**
* All workflow steps and AI model configurations
* Knowledge base integrations and tool connections
* Custom prompts and response formatting
* Rate limiting and usage controls
Disabling features in your app configuration immediately removes them from the published web app.
## App Types and Behavior
Your web app automatically adapts its interface based on your application type:
**Interface:** Conversation-style with message history
**Features:** Persistent sessions, conversation management, real-time responses
**Best for:** Customer support, consulting tools, interactive assistants
**Interface:** Form-based with result display
**Features:** Single runs, batch processing, result saving
**Best for:** Content generation, data processing, analysis tools
## Deployment Options
Once published, your web app can be accessed in multiple ways:
Share the web app URL for immediate access
Deploy as chat widgets or iframes on existing websites
## Publishing Best Practices
Before sharing your web app:
Try your app on different devices and browsers to ensure it works smoothly.
Set up your app name, icon, description, and any required legal information.
Decide if your app should be public or require authentication.
Determine whether to share directly or embed on your website.
Your web app configuration applies everywhere it's deployed. Changes to settings automatically update embedded versions too.
# Workflow Web Apps
Source: https://docs.dify.ai/en/use-dify/publish/webapp/workflow-webapp
Turn your workflows into powerful web applications with batch processing, result management, and streamlined user experiences
Workflow web apps transform your Dify workflows into production-ready applications that handle everything from single runs to large-scale batch operations. Users get a clean interface for input, real-time processing feedback, and comprehensive result management.
## How Workflow Apps Work
When you publish a workflow, Dify automatically creates a web interface that:
* **Collects input parameters** through forms based on your workflow's start variables
* **Processes requests** using your complete workflow logic
* **Handles results** with built-in saving, copying, and management features
* **Scales automatically** from single runs to batch processing hundreds of items
Unlike chat apps that maintain conversation context, workflow apps are designed for discrete tasks that produce specific outputs.
Run workflows one at a time with immediate results and feedback
Process hundreds of inputs simultaneously with CSV upload/download
Save, organize, and export outputs with built-in storage
Generate variations of successful outputs automatically
## Single Execution
The default mode for workflow apps handles individual requests with real-time processing:
**User Experience:**
1. **Fill input form** - Users provide parameters based on your workflow's start variables
2. **Click run** - The workflow executes with real-time progress indication
3. **View results** - Output appears with immediate access to copy, save, and feedback options
4. **Take actions** - Users can save important results, provide feedback, or generate similar outputs
Each result includes built-in actions:
* **Copy** - One-click copying to clipboard for easy sharing
* **Save** - Store results in the app's saved items for later access
* **Feedback** - Like/dislike ratings to help improve your workflow
* **More like this** - Generate variations based on the current result (if enabled)
## Batch Processing
When you need to run the same workflow on multiple inputs, batch processing handles hundreds of executions simultaneously:
Perfect for tasks like generating content for multiple topics, processing customer data, or analyzing large datasets.
### Setting Up Batch Runs
Click the "Run Batch" tab to access batch processing features.
Download the template file to see the required column structure for your workflow's input variables.
Fill the template with your input data. Each row becomes one workflow execution.
Upload your completed CSV file and start batch processing.
### Batch Processing Benefits
* **Parallel execution** - Multiple workflow runs happen simultaneously
* **Progress tracking** - Real-time updates on completion status
* **Bulk export** - Download all results as a CSV file when finished
* **Error handling** - Failed items are clearly marked with error details
CSV files must use Unicode encoding to prevent import failures. When saving from Excel or similar tools, explicitly select "Unicode (UTF-8)" encoding.
## Result Management
Workflow apps include comprehensive result management to help users organize and reuse outputs:
### Saving Results
**How saving works:**
* Users click "Save" on any result they want to keep
* Saved items appear in the dedicated "Saved" tab
* Each saved result includes the original inputs and full outputs
* Users can organize saved results and access them anytime
Saved results persist across user sessions, making workflow apps useful for building personal libraries of outputs.
### Generating Variations
When you enable "More like this" in your workflow settings, users can generate variations of successful results:
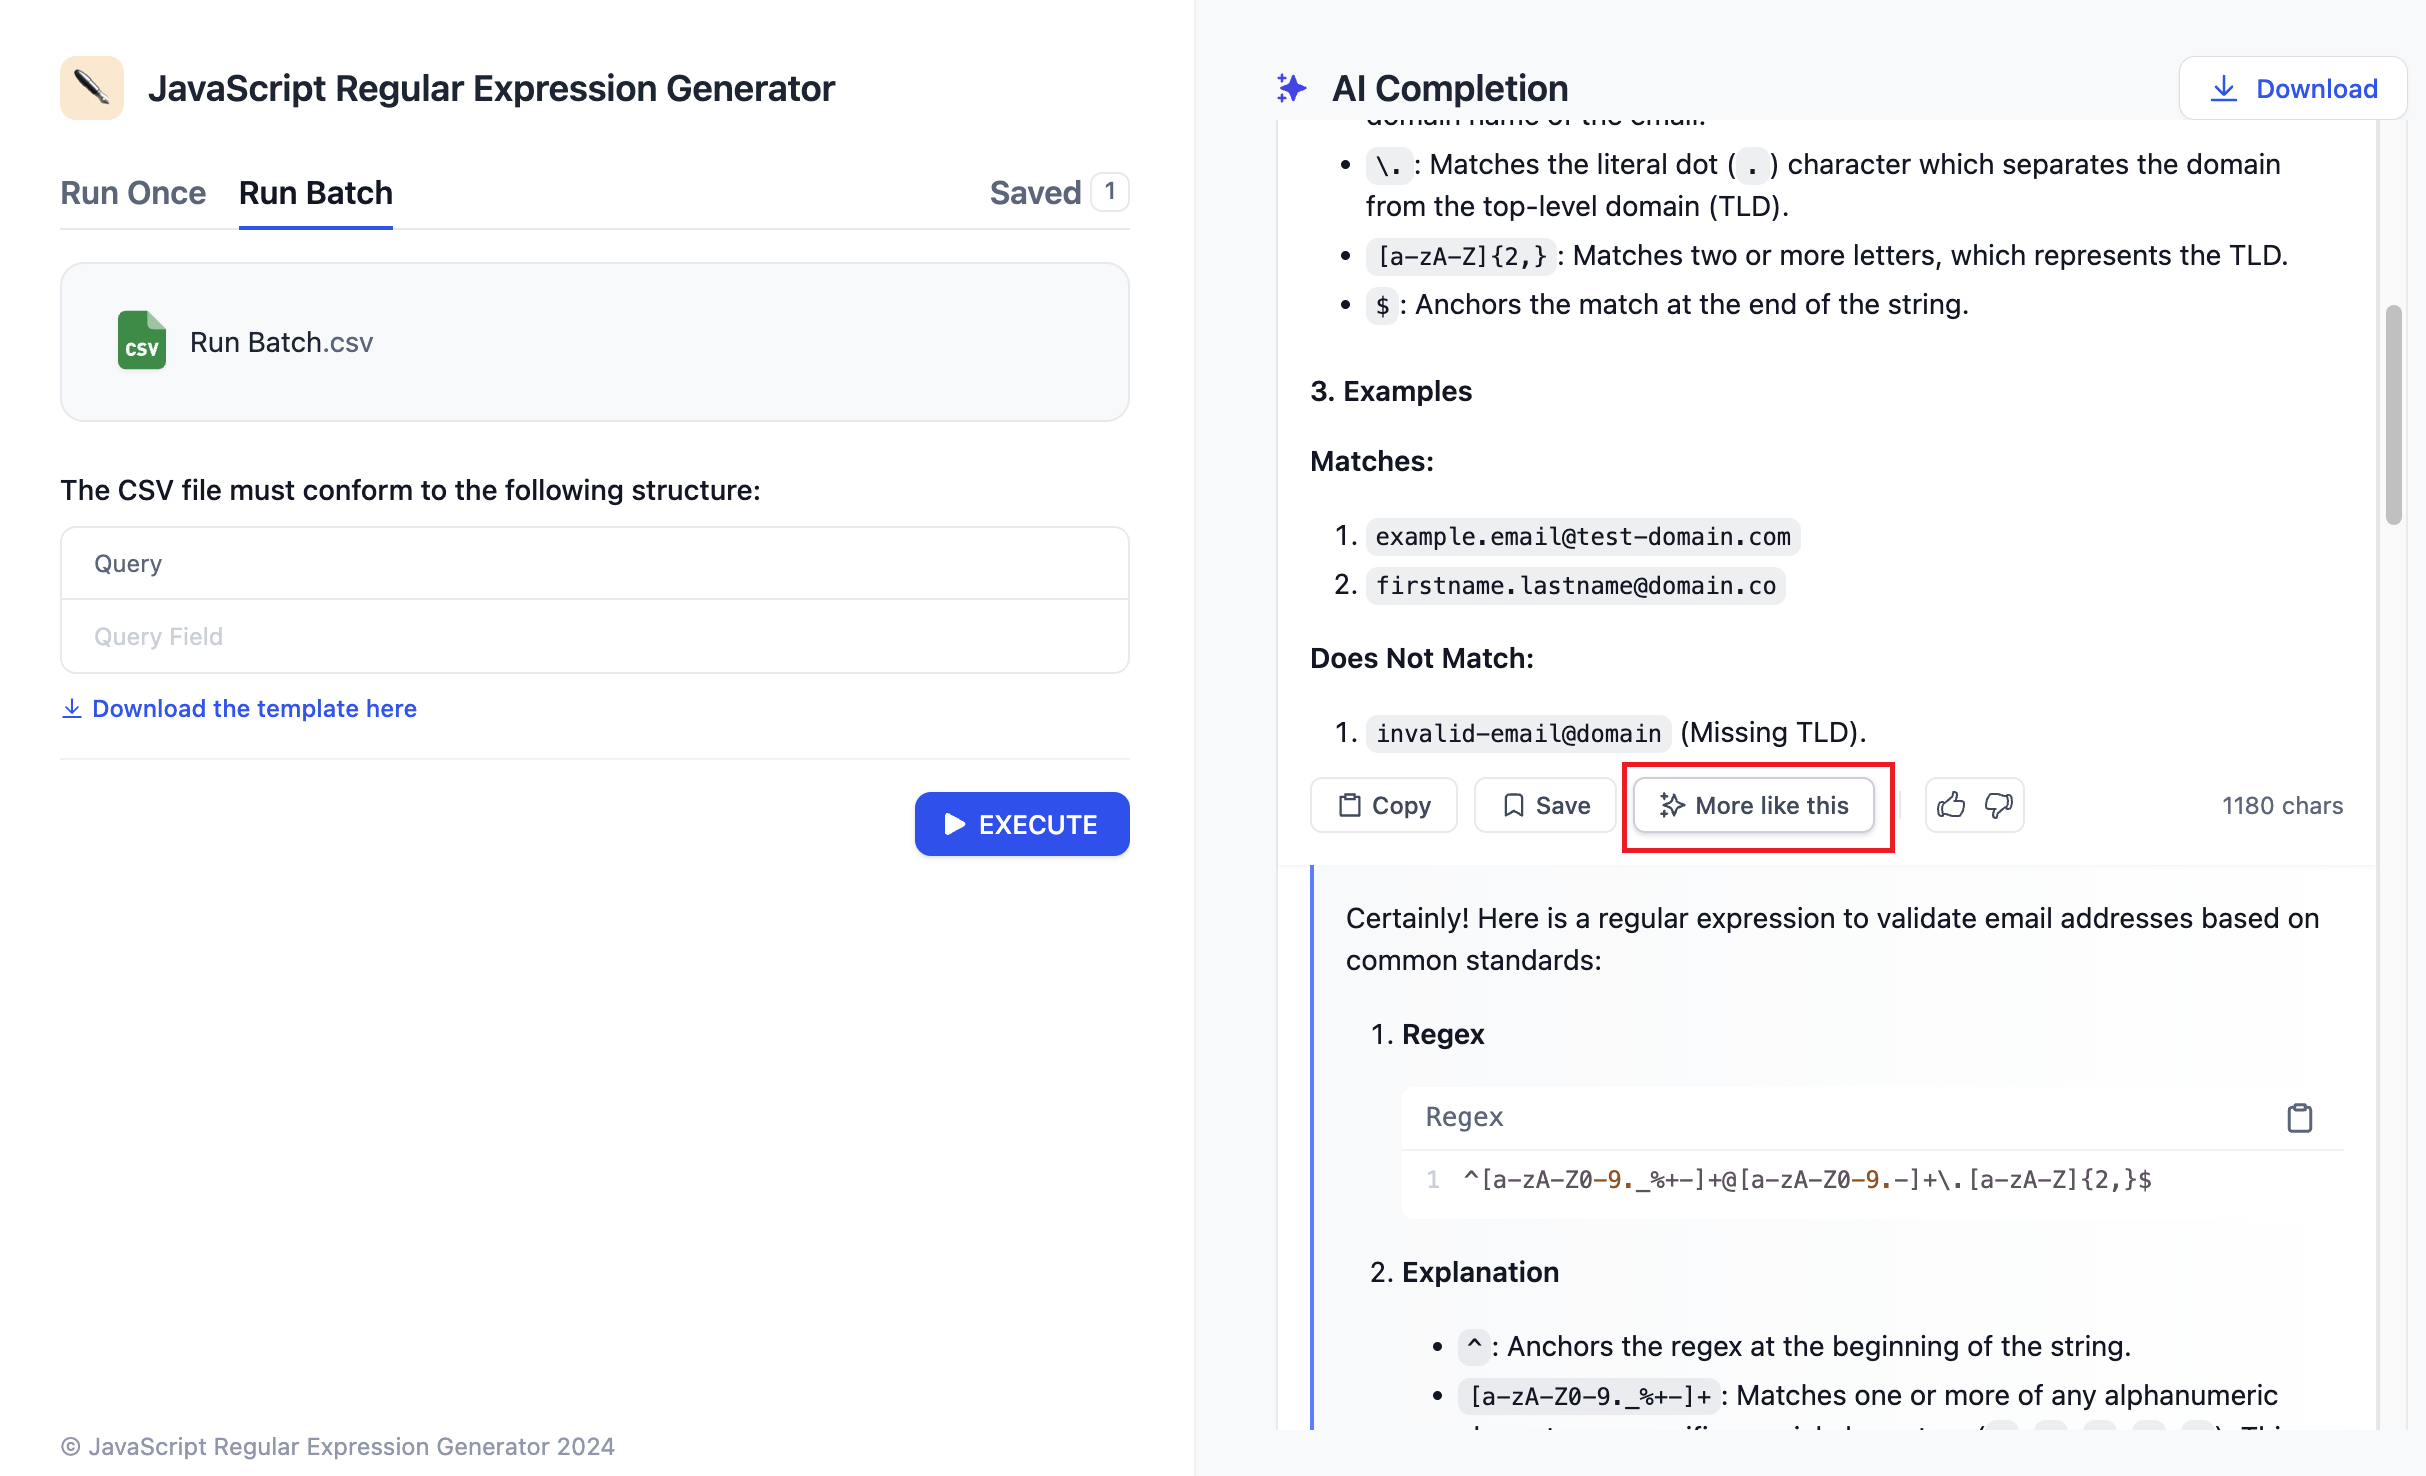
**How it works:**
1. User gets a result they like
2. They click "More like this" to generate similar outputs
3. The workflow runs again with slight variations to produce different but related results
4. Users can iterate until they find the perfect output
"More like this" works especially well for creative workflows like content generation, where users want to explore different approaches to the same topic.
# Lesson 1: What is a Workflow?
Source: https://docs.dify.ai/en/use-dify/tutorials/workflow-101/lesson-01
## 👋 Welcome to Dify 101
We are going to take you from Zero to Hero. By the end of this course, you will build your very own Advanced AI Email Assistant.
Let's leave coding behind for a second and talk about cooking.
Imagine you want to cook a dish that you haven't made before. To make that happen, you need a **Recipe**. A recipe is just like a workflow! It tells you exactly what to do, in what order, to get the dish you want.
## Meet Workflow
In Dify, you are the head chef who writes a Recipe for the AI to follow. Here're the things you need to prepare beforehand:
1. Input (Ingredients): The information you give the AI. This could be a user's question, a PDF document, or a messy email draft.
2. Process (Instructions): The steps you force the AI to take. For example: First, summarize this text. Next, translate it into Spanish. Finally, format it as a LinkedIn post.
3. Output (The Dish): The final result the AI hands back to you.
To sum up, a workflow is a flowchart that asks AI to complete tasks in a specific order.
This is a Smart ID Scanner workflow. Its job is to extract the information on front and back of an ID card, then send these texts back to you.
![Workflow Example]() ### Node
Let's have a closer look of the workflow above. That whole process is simply made up of a few connected steps: **Uploading the image, Extracting the information, and Combining the results**.
Each of these steps is called a **Node**.
Think of them like runners in a relay race: each node has a specific task. Once it finishes its turn, it passes the baton to the next node in line.
Dify offers you a box of ready-to-use nodes, such as the LLM, Knowledge Retrieval, If/Else, Tools, etc.
You can connect these nodes just by dragging and dropping—it's like building with the Lego blocks! You can easily snap them together to create a powerful automated workflow.
## It's Your Turn
1. Go [Dify](https://dify.ai/) and click **Get Started** in the upper right corner.
2. Click on Explore. This is a library which collects different workflow of different scenarios.
### Node
Let's have a closer look of the workflow above. That whole process is simply made up of a few connected steps: **Uploading the image, Extracting the information, and Combining the results**.
Each of these steps is called a **Node**.
Think of them like runners in a relay race: each node has a specific task. Once it finishes its turn, it passes the baton to the next node in line.
Dify offers you a box of ready-to-use nodes, such as the LLM, Knowledge Retrieval, If/Else, Tools, etc.
You can connect these nodes just by dragging and dropping—it's like building with the Lego blocks! You can easily snap them together to create a powerful automated workflow.
## It's Your Turn
1. Go [Dify](https://dify.ai/) and click **Get Started** in the upper right corner.
2. Click on Explore. This is a library which collects different workflow of different scenarios.
![Explore]() 3. Pick a template that looks like a right fit for you. Don't worry if you don't understand every setting yet—just look at how the nodes are connected.
# Lesson 2: Head and Tail (Start & Output Node)
Source: https://docs.dify.ai/en/use-dify/tutorials/workflow-101/lesson-02
In the last lesson, we compared a Workflow to a Recipe. Today, we are stepping into the professional kitchen to prep our ingredients (Start) and get our serving plates ready (Output).
## Create the App
Click on **Studio** at the top of the screen. Under Create App on the left, click **Create from Blank**.
3. Pick a template that looks like a right fit for you. Don't worry if you don't understand every setting yet—just look at how the nodes are connected.
# Lesson 2: Head and Tail (Start & Output Node)
Source: https://docs.dify.ai/en/use-dify/tutorials/workflow-101/lesson-02
In the last lesson, we compared a Workflow to a Recipe. Today, we are stepping into the professional kitchen to prep our ingredients (Start) and get our serving plates ready (Output).
## Create the App
Click on **Studio** at the top of the screen. Under Create App on the left, click **Create from Blank**.
![Create the App]() Select **Workflow** as the app type, fill up **App Name & Icon**, then click **Create**.
Select **Workflow** as the app type, fill up **App Name & Icon**, then click **Create**.
![App Name & Icon]() Click User Input, and you'll see a new popup window. There are two options here that decide how your app starts running:
* **User Input**
This is **Manual Mode**. The workflow only starts working when you (the user) type something into the chat box.
Best for: Most AI apps. For example, chatbots, writing assistants, translation, etc.
* **Trigger**
This is **Automatic Mode**. It runs automatically based on a signal (like 8:00 AM every morning, or a specific event).
Best for: Repetitive task that runs on a specific time, or run this workflow after a task is completed else where. For example, daily news summary.
Click User Input, and you'll see a new popup window. There are two options here that decide how your app starts running:
* **User Input**
This is **Manual Mode**. The workflow only starts working when you (the user) type something into the chat box.
Best for: Most AI apps. For example, chatbots, writing assistants, translation, etc.
* **Trigger**
This is **Automatic Mode**. It runs automatically based on a signal (like 8:00 AM every morning, or a specific event).
Best for: Repetitive task that runs on a specific time, or run this workflow after a task is completed else where. For example, daily news summary.
![Trigger]() ## Meet the Orchestration Canvas
After selecting the Start node, you will see a large blank area. This is your orchestration canvas where you will design, build, and test your workflow.
## Meet the Orchestration Canvas
After selecting the Start node, you will see a large blank area. This is your orchestration canvas where you will design, build, and test your workflow.
![Orchestration Studio]() Remember the Nodes we learned in Lesson 1? The user input node you see on the canvas now is where everything begins.
Every complete workflow relies on a basic skeleton: the Start Node (The Head) and the Output Node (The Tail).
## The Start Node
Remember the Nodes we learned in Lesson 1? The user input node you see on the canvas now is where everything begins.
Every complete workflow relies on a basic skeleton: the Start Node (The Head) and the Output Node (The Tail).
## The Start Node
![Start Node]() The Start Node is the only entrance to your entire workflow. It's like the Prep Ingredients step in cooking. Its job is to define what information the workflow needs to receive from the user to get started.
We just selected **User Input** as our Start Node.
### Core Concept: Variables
Inside the Start Node, you will see the word **Variable**. Don't panic! You can think of a variable as a **Storage Box with a Label**.
Each box is designed to hold a specific type of information:
For example, if you are building a Travel Planner, you need the user to provide two pieces of information: `Destination` and `Travel Days`.
User A might want to go to Japan for 5 days. User B might want to go to Paris for 3 days.
Every user provides different content, so every time the app runs, the stuff inside these boxes changes.
This is the meaning of a Variable—digging a hole for the user to fill, helping your workflow to handle different requests flexibly every time.
## The End Node (Output)
The Start Node is the only entrance to your entire workflow. It's like the Prep Ingredients step in cooking. Its job is to define what information the workflow needs to receive from the user to get started.
We just selected **User Input** as our Start Node.
### Core Concept: Variables
Inside the Start Node, you will see the word **Variable**. Don't panic! You can think of a variable as a **Storage Box with a Label**.
Each box is designed to hold a specific type of information:
For example, if you are building a Travel Planner, you need the user to provide two pieces of information: `Destination` and `Travel Days`.
User A might want to go to Japan for 5 days. User B might want to go to Paris for 3 days.
Every user provides different content, so every time the app runs, the stuff inside these boxes changes.
This is the meaning of a Variable—digging a hole for the user to fill, helping your workflow to handle different requests flexibly every time.
## The End Node (Output)
![Output]() This is the finish line of the workflow. Think of it as Serving the Dish and it defines what the user actually sees at the very end.
For example, remember that Travel Planner we talked about? If the user inputs Destination: Paris and Duration: 5 Days in the User Input Node. The Output Node is where the system finally hands over the result: Here is your complete 5-Day Itinerary for Paris.
To sum up, the Start Node and End Node define the basic input and output, shaping the skeleton of your app.
## Hands-On Practice: Start Building an AI Email Assistant
Let's build the basic framework for an AI Assistant that helps you write emails.
You can either:
* Continue on the canvas you just opened, or
* Go back to Studio → Create Blank App → select Workflow, and name it Email Assistant (Remember to select **User Input** in the popup!)
If you need AI to help you with a email reply, what information do you need to give it?
That's right: usually the Customer's Name and the Original Email Content.
1. Click on the **Start** node. In the panel on the right, look for **Input Field** and click the **+** button.
This is the finish line of the workflow. Think of it as Serving the Dish and it defines what the user actually sees at the very end.
For example, remember that Travel Planner we talked about? If the user inputs Destination: Paris and Duration: 5 Days in the User Input Node. The Output Node is where the system finally hands over the result: Here is your complete 5-Day Itinerary for Paris.
To sum up, the Start Node and End Node define the basic input and output, shaping the skeleton of your app.
## Hands-On Practice: Start Building an AI Email Assistant
Let's build the basic framework for an AI Assistant that helps you write emails.
You can either:
* Continue on the canvas you just opened, or
* Go back to Studio → Create Blank App → select Workflow, and name it Email Assistant (Remember to select **User Input** in the popup!)
If you need AI to help you with a email reply, what information do you need to give it?
That's right: usually the Customer's Name and the Original Email Content.
1. Click on the **Start** node. In the panel on the right, look for **Input Field** and click the **+** button.
![User Input Field]() 2. In the popup, we will create two variables (two storage boxes):
**Variable 1 (For the Customer Name)**
2. In the popup, we will create two variables (two storage boxes):
**Variable 1 (For the Customer Name)**
![Add First Variable]() * Field Type: Text (Short Text)
* Variable Name: `customer_name`
* Label Name: Customer Name
* Keep other options as default
**Variable 2 (For the Email Content)**
* Field Type: Text (Short Text)
* Variable Name: `customer_name`
* Label Name: Customer Name
* Keep other options as default
**Variable 2 (For the Email Content)**
![Add Second Variable]() * Field Type: Click the dropdown and select **Paragraph** (Since emails are usually long, a Paragraph box is bigger and holds more text)
* Variable Name: `email_content`
* Label Name: Original Email
* Max Length: Manually change this to **2000** to ensure it fits long emails
**Variable Name vs. Label Name**
You might notice we had to fill in two names. What's the difference?
* **Variable Name**: This is the ID card for the system. It must be unique, use English letters, and cannot have spaces.
* **Label Name**: This is the Label for the users. You can name it with any language (English, Chinese, etc.). It will be shown on the screen.
Right-click anywhere on the blank white space of the canvas. Select **Add Node** and select **Output** from the list.
* Field Type: Click the dropdown and select **Paragraph** (Since emails are usually long, a Paragraph box is bigger and holds more text)
* Variable Name: `email_content`
* Label Name: Original Email
* Max Length: Manually change this to **2000** to ensure it fits long emails
**Variable Name vs. Label Name**
You might notice we had to fill in two names. What's the difference?
* **Variable Name**: This is the ID card for the system. It must be unique, use English letters, and cannot have spaces.
* **Label Name**: This is the Label for the users. You can name it with any language (English, Chinese, etc.). It will be shown on the screen.
Right-click anywhere on the blank white space of the canvas. Select **Add Node** and select **Output** from the list.
![Create the End Node]() Here's everything on your canvas: a **Start Node** ready to receive a name and an email, and an **Output Node** waiting to send the final result.
Here's everything on your canvas: a **Start Node** ready to receive a name and an email, and an **Output Node** waiting to send the final result.
![Start Node and Output]() We have successfully built basic frame of the workflow. The empty space in the middle is where we will place the LLM (AI Brain) Node in the next lesson to process this information.
## Mini Challenge
**Task**: If you needed to create a Travel Plan Generator, what variables should the Start Node include?
Try exploring the Field Types in **Add Variable**.
# Lesson 3: The Brain of the Workflow (LLM Node)
Source: https://docs.dify.ai/en/use-dify/tutorials/workflow-101/lesson-03
We have successfully built basic frame of the workflow. The empty space in the middle is where we will place the LLM (AI Brain) Node in the next lesson to process this information.
## Mini Challenge
**Task**: If you needed to create a Travel Plan Generator, what variables should the Start Node include?
Try exploring the Field Types in **Add Variable**.
# Lesson 3: The Brain of the Workflow (LLM Node)
Source: https://docs.dify.ai/en/use-dify/tutorials/workflow-101/lesson-03
![LLM Node]() In Lesson 2, we set up the Ingredients (Start Node) and the Serving Plate (Output Node).
If the Start Node is the prep cook, the LLM Node is the Master Chef. It is the brain and core of your workflow.
It handles all the thinking, analyzing, and creative writing. Whether you want to summarize an article, write code, or draft an email, this is the node that does the heavy lifting.
## Configure the Model
Before getting started, we need to connect to a model provider.
Click on your avatar in the top right corner and select **Settings**.
In Lesson 2, we set up the Ingredients (Start Node) and the Serving Plate (Output Node).
If the Start Node is the prep cook, the LLM Node is the Master Chef. It is the brain and core of your workflow.
It handles all the thinking, analyzing, and creative writing. Whether you want to summarize an article, write code, or draft an email, this is the node that does the heavy lifting.
## Configure the Model
Before getting started, we need to connect to a model provider.
Click on your avatar in the top right corner and select **Settings**.
![Settings]() On the left menu, click **Model Provider**. Find OpenAI, and click **Install**.
On the left menu, click **Model Provider**. Find OpenAI, and click **Install**.
![Choose OpenAI]()
![Install OpenAI]() Once installed, you are ready to go! Click **ESC** (or the **X**) in the upper right corner to return to your canvas.
## Understand the Tags
A pastry chef is great at cakes but terrible at sushi. Similarly, different AI models have different strengths.
When selecting a model in Dify, you will see tags next to their names. Here's how to read them so you can pick the right one for you.
This is the bread and butter of AI. It's best for:
* Dialogue
* Writing articles
* Summarizing text
* Answering questions
This number represents the **Context Window**. You can think of it as short-term memory.
Here, K stands for thousand. **128K** means the model can hold 128,000 tokens (roughly equals to a word or a syllable). The bigger the number is, the better its memory is.
If you need to analyze a massive PDF report or a whole book, you need a model with a big number here.
Modal just means **Type of Information**. Most early AI models could only read text. Multi-modal models are evolved—they have senses like eyes and ears.
**VISION (The Eyes)**
Models with this tag can do more than read; they can see! You can upload a photo of a sunset and ask, What colors are in this? or upload a picture of your fridge ingredients and ask, What can I cook with this?
**AUDIO (The Ears)**
Models with this tag can hear. You can upload an audio recording of a meeting or a lecture, and the model can transcribe it into text or write a summary for you.
**VIDEO (The Movie Analyst)**
These models can watch and understand video content. They can analyze what is happening in a video clip, just like a human watching a movie.
**DOCUMENT (The Reader)**
These models are expert readers. Instead of copying and pasting text, you can just upload a file (like a PDF or Word document). The model will read the file directly and answer questions based on what is written inside.
For our Email Assistant, the LLM with the **CHAT** tag is exactly what we need.
## Hands-On 1: Add the LLM Node
Let's put the brain into our workflow.
Go back to the **AI Email Assistant** workflow we created in Lesson 2.
Right-click in the empty space between Start and Output node. Click on the new **LLM** block. In the right-side panel, look for **Model**. Select **gpt-4o-mini**.
Once installed, you are ready to go! Click **ESC** (or the **X**) in the upper right corner to return to your canvas.
## Understand the Tags
A pastry chef is great at cakes but terrible at sushi. Similarly, different AI models have different strengths.
When selecting a model in Dify, you will see tags next to their names. Here's how to read them so you can pick the right one for you.
This is the bread and butter of AI. It's best for:
* Dialogue
* Writing articles
* Summarizing text
* Answering questions
This number represents the **Context Window**. You can think of it as short-term memory.
Here, K stands for thousand. **128K** means the model can hold 128,000 tokens (roughly equals to a word or a syllable). The bigger the number is, the better its memory is.
If you need to analyze a massive PDF report or a whole book, you need a model with a big number here.
Modal just means **Type of Information**. Most early AI models could only read text. Multi-modal models are evolved—they have senses like eyes and ears.
**VISION (The Eyes)**
Models with this tag can do more than read; they can see! You can upload a photo of a sunset and ask, What colors are in this? or upload a picture of your fridge ingredients and ask, What can I cook with this?
**AUDIO (The Ears)**
Models with this tag can hear. You can upload an audio recording of a meeting or a lecture, and the model can transcribe it into text or write a summary for you.
**VIDEO (The Movie Analyst)**
These models can watch and understand video content. They can analyze what is happening in a video clip, just like a human watching a movie.
**DOCUMENT (The Reader)**
These models are expert readers. Instead of copying and pasting text, you can just upload a file (like a PDF or Word document). The model will read the file directly and answer questions based on what is written inside.
For our Email Assistant, the LLM with the **CHAT** tag is exactly what we need.
## Hands-On 1: Add the LLM Node
Let's put the brain into our workflow.
Go back to the **AI Email Assistant** workflow we created in Lesson 2.
Right-click in the empty space between Start and Output node. Click on the new **LLM** block. In the right-side panel, look for **Model**. Select **gpt-4o-mini**.
![Add the Node]() Drag a line from the Start node to the LLM node. Drag a line from the LLM node to the Output node. Your flow should look like this: **Start → LLM → Output**.
Drag a line from the Start node to the LLM node. Drag a line from the LLM node to the Output node. Your flow should look like this: **Start → LLM → Output**.
![Connect the Nodes]() Now we need to tell LLM exactly what to do by sending instructions which is called a **Prompt**.
Now we need to tell LLM exactly what to do by sending instructions which is called a **Prompt**.
![Add Prompt]() ### Key Concept: The Prompt (The Instructions)
**What is a Prompt?** Think of the Prompt as the specific note you attach to the order ticket. It tells the AI exactly **what to do** and **how to do it**.
The most critical part is the ability to use **Variables** from the Start Node directly within your Prompt. This allows the AI to adapt its output based on the different raw materials you provide each time.
In Dify, when you insert a variable like `customer_name` into the prompt, you are telling the AI: Go and look in the box labeled Customer Name and use the text inside.
## Hands-On 2: Write the Prompt
Now, let's apply this. We are going to write a prompt that mixes instructions with our variables.
Click the LLM Node to open the panel and find the **system** box. **System instructions** set the rules for how the model should respond—its role, tone, and behavioral guidelines.
Let's start by writing out the instructions. You can copy and paste the text below.
```plaintext wrap theme={null}
You are a professional customer service manager. Based on the customer's email, please draft a professional reply.
Requirements:
1. Start by addressing the customer name with a friendly tone.
2. Thank them for their email.
3. Let them know we have received it.
4. Sign off as Anne.
```
User messages are what you send to the model—a question, request, or task for the model to work on.
In this workflow, the customer's name and the email content change every single time. Instead of typing them out manually, we add Variables in user messages.
1. Click **Add Message** button below system box.
2. In the User Message box, type **customer name:**.
3. Press `/` on your keyboard.
4. The Variable Selection menu pops out, and click `customer_name`.
5. Press Enter to start a new line, and type **email content:.** Then, Press the / key again and click on `email_content`.
### Key Concept: The Prompt (The Instructions)
**What is a Prompt?** Think of the Prompt as the specific note you attach to the order ticket. It tells the AI exactly **what to do** and **how to do it**.
The most critical part is the ability to use **Variables** from the Start Node directly within your Prompt. This allows the AI to adapt its output based on the different raw materials you provide each time.
In Dify, when you insert a variable like `customer_name` into the prompt, you are telling the AI: Go and look in the box labeled Customer Name and use the text inside.
## Hands-On 2: Write the Prompt
Now, let's apply this. We are going to write a prompt that mixes instructions with our variables.
Click the LLM Node to open the panel and find the **system** box. **System instructions** set the rules for how the model should respond—its role, tone, and behavioral guidelines.
Let's start by writing out the instructions. You can copy and paste the text below.
```plaintext wrap theme={null}
You are a professional customer service manager. Based on the customer's email, please draft a professional reply.
Requirements:
1. Start by addressing the customer name with a friendly tone.
2. Thank them for their email.
3. Let them know we have received it.
4. Sign off as Anne.
```
User messages are what you send to the model—a question, request, or task for the model to work on.
In this workflow, the customer's name and the email content change every single time. Instead of typing them out manually, we add Variables in user messages.
1. Click **Add Message** button below system box.
2. In the User Message box, type **customer name:**.
3. Press `/` on your keyboard.
4. The Variable Selection menu pops out, and click `customer_name`.
5. Press Enter to start a new line, and type **email content:.** Then, Press the / key again and click on `email_content`.
![Add User Message]() You don't need to type out those curly brackets manually! Just hit `/`, then pick your variable from the menu.
4. Finally, your final Prompt will look like this:
You don't need to type out those curly brackets manually! Just hit `/`, then pick your variable from the menu.
4. Finally, your final Prompt will look like this:
![Final Prompt]() **Hooray!** You've finished your first AI workflow in Dify!
## Run and Test
The ingredients are prepared, the chef is stand-by, and the instructions are ready. But does the dish taste good? Before we serve it to the customer, let's do a recipe testing.
Testing is the secret sauce to a stable workflow. It helps us catch those sneaky little issues before they are put into work.
### Quick Concept: The Checklist
Think of the **Checklist** as your workflow's personal Health Check Doctor.
It monitors your work in real-time, automatically spotting incomplete settings or mistakes (like a node that isn't connected to anything).
Glancing at the Checklist before you hit **Publish** button is the best way to catch unnecessary errors early.
### Hands-On 3: Test & Debug
Look at the top right corner of your canvas. Do you see the **Checklist** icon with a little number **1** on it? This is Dify telling you: Wait a second! There's one small thing missing here\_.\_
**Hooray!** You've finished your first AI workflow in Dify!
## Run and Test
The ingredients are prepared, the chef is stand-by, and the instructions are ready. But does the dish taste good? Before we serve it to the customer, let's do a recipe testing.
Testing is the secret sauce to a stable workflow. It helps us catch those sneaky little issues before they are put into work.
### Quick Concept: The Checklist
Think of the **Checklist** as your workflow's personal Health Check Doctor.
It monitors your work in real-time, automatically spotting incomplete settings or mistakes (like a node that isn't connected to anything).
Glancing at the Checklist before you hit **Publish** button is the best way to catch unnecessary errors early.
### Hands-On 3: Test & Debug
Look at the top right corner of your canvas. Do you see the **Checklist** icon with a little number **1** on it? This is Dify telling you: Wait a second! There's one small thing missing here\_.\_
![Checklist]() Click on it, and you will see a warning: **output variable is required**. It means that the output node receives nothing.
Imagine your Head Chef (the LLM) has finished cooking the food, but the Waiter (the Output Node) has empty hands.
1. Click on the **Output Node**
2. Look for **Output Variable** and click the **Plus (+)** icon next to it
3. Type `email_reply` in the **Variable Name** field
4. Select the value: Click the variable selector and choose `{x} text` from the LLM Node
Click on it, and you will see a warning: **output variable is required**. It means that the output node receives nothing.
Imagine your Head Chef (the LLM) has finished cooking the food, but the Waiter (the Output Node) has empty hands.
1. Click on the **Output Node**
2. Look for **Output Variable** and click the **Plus (+)** icon next to it
3. Type `email_reply` in the **Variable Name** field
4. Select the value: Click the variable selector and choose `{x} text` from the LLM Node
![Fix the Issue]() Now, there's no pop-up number on checklist. Let's do a test run.
Click **Test Run** at the top right corner of the canvas. Enter the customer's name and the email, then click **Start Run**.
Now, there's no pop-up number on checklist. Let's do a test run.
Click **Test Run** at the top right corner of the canvas. Enter the customer's name and the email, then click **Start Run**.
![Test Run]() ```text Sample Email for Testing theme={null}
Customer Name: Amanda
Original Email:
Hi there,
I'm writing to ask for more information about Dify. Could you please tell me more on it?
Best regards,
Amanda
```
This time, you will see green checkmarks ✅ on each of the nodes and the generated reply from AI.
**Great job!**
You didn't just build a workflow, but also know how to use the checklist and check before it goes live.
## Mini Challenge
Use the same structure to build a travel planner.
Explore the **Prompt Generator** to help you craft better prompts!
```text Sample Email for Testing theme={null}
Customer Name: Amanda
Original Email:
Hi there,
I'm writing to ask for more information about Dify. Could you please tell me more on it?
Best regards,
Amanda
```
This time, you will see green checkmarks ✅ on each of the nodes and the generated reply from AI.
**Great job!**
You didn't just build a workflow, but also know how to use the checklist and check before it goes live.
## Mini Challenge
Use the same structure to build a travel planner.
Explore the **Prompt Generator** to help you craft better prompts!
![Prompt Generator]() # Lesson 4: The Cheat Sheet (Knowledge Retrieval)
Source: https://docs.dify.ai/en/use-dify/tutorials/workflow-101/lesson-04
In the previous lessons, our AI email assistant can draft basic emails. But what if a customer asks about specific pricing plans or refund policy, the AI might start Hallucinating—which is a fancy way of saying it's confidently making things up.
How do we stop the AI from hallucination? We give it a Cheat Sheet.
## What is Retrieval Augmented Generation (RAG)
The technical name for this is RAG (Retrieval-Augmented Generation). Think of it as turning the AI from a chef who memorizes general recipes into a chef who has a Specific Cookbook right on the counter.
It happens in three simple steps:
**1. Retrieval (Find the Recipe)**
When a user asks a question, the AI flips through your Cookbook (the files you uploaded) to find the most relevant pages.
Example: Someone asks for Grandma's Special Apple Pie. You go find that specific recipe page.
**2. Augmentation (Prepare the Ingredients)**
The AI takes that specific recipe and puts it right in front of its eyes so it doesn't have to rely on memory.
Example: You lay the recipe on the counter and get the exact apples and cinnamon ready.
**3. Generation (The Baking)**
The AI writes the answer based only on the facts it just found.
Example: You bake the pie exactly as the recipe says, ensuring it tastes like Grandma's, not a generic store-bought version.
## The Knowledge Retrieval Node
Think of this as placing a stack of reference materials right next to your AI Assistant. When a user asks a question, the AI first flips through this Cheat Sheet to find the most relevant pages. Then, it combines those findings with the user's original question to think of the best answer.
In this practice, we will use the Knowledge Retrieval node to provide our AI Assistant with official Cheat Sheets, ensuring its answers are always backed by facts!
### Hands-On 1: Create the Knowledge Base
Click **Knowledge** in the top navigation bar and click **Create Knowledge**.
# Lesson 4: The Cheat Sheet (Knowledge Retrieval)
Source: https://docs.dify.ai/en/use-dify/tutorials/workflow-101/lesson-04
In the previous lessons, our AI email assistant can draft basic emails. But what if a customer asks about specific pricing plans or refund policy, the AI might start Hallucinating—which is a fancy way of saying it's confidently making things up.
How do we stop the AI from hallucination? We give it a Cheat Sheet.
## What is Retrieval Augmented Generation (RAG)
The technical name for this is RAG (Retrieval-Augmented Generation). Think of it as turning the AI from a chef who memorizes general recipes into a chef who has a Specific Cookbook right on the counter.
It happens in three simple steps:
**1. Retrieval (Find the Recipe)**
When a user asks a question, the AI flips through your Cookbook (the files you uploaded) to find the most relevant pages.
Example: Someone asks for Grandma's Special Apple Pie. You go find that specific recipe page.
**2. Augmentation (Prepare the Ingredients)**
The AI takes that specific recipe and puts it right in front of its eyes so it doesn't have to rely on memory.
Example: You lay the recipe on the counter and get the exact apples and cinnamon ready.
**3. Generation (The Baking)**
The AI writes the answer based only on the facts it just found.
Example: You bake the pie exactly as the recipe says, ensuring it tastes like Grandma's, not a generic store-bought version.
## The Knowledge Retrieval Node
Think of this as placing a stack of reference materials right next to your AI Assistant. When a user asks a question, the AI first flips through this Cheat Sheet to find the most relevant pages. Then, it combines those findings with the user's original question to think of the best answer.
In this practice, we will use the Knowledge Retrieval node to provide our AI Assistant with official Cheat Sheets, ensuring its answers are always backed by facts!
### Hands-On 1: Create the Knowledge Base
Click **Knowledge** in the top navigation bar and click **Create Knowledge**.
![Create Knowledge]() In Dify, you can sync from Notion or a website, but for today, let's upload a file from your device. Click [here](https://drive.google.com/file/d/1imExB0-rtwASbmKjg3zdu-FAqSSI7-7K/view) to download Dify Intro for the upload later.
Click **Import from file**. Then, select the file we just downloaded for upload.
In Dify, you can sync from Notion or a website, but for today, let's upload a file from your device. Click [here](https://drive.google.com/file/d/1imExB0-rtwASbmKjg3zdu-FAqSSI7-7K/view) to download Dify Intro for the upload later.
Click **Import from file**. Then, select the file we just downloaded for upload.
![Import from File]() High-relevance chunks are crucial for AI applications to provide precise and comprehensive responses. Imagine a long book. It's hard to find one sentence in 500 pages. Dify chops the book into different Knowledge Cards so it can find the right answer faster.
**Chunk Structure**
Here, Dify automatically splits your long text into smaller, easier-to-retrieve chunks. We'll just stick with the General Mode here.
High-relevance chunks are crucial for AI applications to provide precise and comprehensive responses. Imagine a long book. It's hard to find one sentence in 500 pages. Dify chops the book into different Knowledge Cards so it can find the right answer faster.
**Chunk Structure**
Here, Dify automatically splits your long text into smaller, easier-to-retrieve chunks. We'll just stick with the General Mode here.
![Chunk Structure]() **Index Method**
* **High Quality**: Use LLM model to process documents for more precise retrieval helps LLM generate high-quality answers
* **Economical**: Using 10 keywords per chunk for retrieval, no tokens are consumed at the expense of reduced retrieval accuracy
**Index Method**
* **High Quality**: Use LLM model to process documents for more precise retrieval helps LLM generate high-quality answers
* **Economical**: Using 10 keywords per chunk for retrieval, no tokens are consumed at the expense of reduced retrieval accuracy
![Index Method]() After the document has been processed, we need to do one final check on the retrieval settings. Here, you can configure how Dify looks up the information.
In Economical mode, only the inverted index approach is available.
After the document has been processed, we need to do one final check on the retrieval settings. Here, you can configure how Dify looks up the information.
In Economical mode, only the inverted index approach is available.
![Retrieval Setting]() * **Inverted Index**
This is the default structure Dify uses. Think of it like the Index at the back of a book—it lists key terms and tells Dify exactly which pages they appear on.
This allows Dify to instantly jump to the right knowledge card based on keywords, rather than reading the whole book from start.
* **Top K**
You'll see a slider set to 3. This tells Dify: When the user asks a question, find the top 3 most relevant Knowledge Cards from the cookbook to show the AI.
If you set it higher, the AI gets more context to read, but if it's too high, it might get overwhelmed with too much information.
For now, let's just keep the default settings—they are already perfectly suited for our needs.
* **Inverted Index**
This is the default structure Dify uses. Think of it like the Index at the back of a book—it lists key terms and tells Dify exactly which pages they appear on.
This allows Dify to instantly jump to the right knowledge card based on keywords, rather than reading the whole book from start.
* **Top K**
You'll see a slider set to 3. This tells Dify: When the user asks a question, find the top 3 most relevant Knowledge Cards from the cookbook to show the AI.
If you set it higher, the AI gets more context to read, but if it's too high, it might get overwhelmed with too much information.
For now, let's just keep the default settings—they are already perfectly suited for our needs.
![Document Processing]() Click **Save and Process**. Your knowledge base is ready!
**Awesome!**
You have successfully created your first Knowledge Base. Next, we'll use this Knowledge Base to upgrade our AI Email Assistant.
### Hands-On 2: Add the Knowledge Retrieval Node
1. Go back to your Email Assistant Workflow.
2. Hover over the line between the Start and LLM nodes.
3. Click the **Plus (+)** icon and select the **Knowledge Retrieval** node.
Click **Save and Process**. Your knowledge base is ready!
**Awesome!**
You have successfully created your first Knowledge Base. Next, we'll use this Knowledge Base to upgrade our AI Email Assistant.
### Hands-On 2: Add the Knowledge Retrieval Node
1. Go back to your Email Assistant Workflow.
2. Hover over the line between the Start and LLM nodes.
3. Click the **Plus (+)** icon and select the **Knowledge Retrieval** node.
![Add Knowledge Retrieval Node]() 1. Click the node, and head to the right panel.
2. Click the **plus (+)** button next to **Knowledge** to add knowledge.
1. Click the node, and head to the right panel.
2. Click the **plus (+)** button next to **Knowledge** to add knowledge.
![Add Knowledge]() 3. Choose **What's Dify**, and click **Add**.
3. Choose **What's Dify**, and click **Add**.
![Select Knowledge]() Now the knowledge base is ready, how can we make sure that AI is looking through the knowledge base to search the answer with the email?
Stay at the panel, navigate to **Query text** above, and select `email_content`.
By doing this, we are telling AI: Take the customer's message and use it as a search keyword to flip through our cookbook and find the matching info. Without a query, the AI is just staring at a closed book.
Now the knowledge base is ready, how can we make sure that AI is looking through the knowledge base to search the answer with the email?
Stay at the panel, navigate to **Query text** above, and select `email_content`.
By doing this, we are telling AI: Take the customer's message and use it as a search keyword to flip through our cookbook and find the matching info. Without a query, the AI is just staring at a closed book.
![Query Text]() In this way, the Email Assistant will use the customer's original email as a search keyword to find the most relevant answers in the Knowledge Base.
### Hands-On 3: Upgrade the Email Assistant
Now, the knowledge base is ready. We need to tell the LLM node to actually read the knowledge as context before generating the reply.
1. Click the **LLM Node**. You'll see a new section called **Context**.
2. Click it and select **result** from the Knowledge Retrieval node.
In this way, the Email Assistant will use the customer's original email as a search keyword to find the most relevant answers in the Knowledge Base.
### Hands-On 3: Upgrade the Email Assistant
Now, the knowledge base is ready. We need to tell the LLM node to actually read the knowledge as context before generating the reply.
1. Click the **LLM Node**. You'll see a new section called **Context**.
2. Click it and select **result** from the Knowledge Retrieval node.
![Add Context]() We need to tell the AI to generate reply based on the context.
In **System**, add additional requirement **Generate response based on** `/` and select **Context**.
We need to tell the AI to generate reply based on the context.
In **System**, add additional requirement **Generate response based on** `/` and select **Context**.
![Update Prompt]() **Whoo!** You've just completed the most challenging part. Now, your email assistant has a knowledge base to check when generating responses. Let's see how it works.
Feel free to use the sample texts below to do the testing.
```text Sample Email for Testing theme={null}
Customer Name: Amanda
Original Email:
Hi,
What does the name 'Dify' actually stand for, and what can it do for my business?
Best regards,
Amanda
```
Check on the result and you'll find that instead of a generic guess, the AI will look at the knowledge base and explain what Dify stands for.
**Whoo!** You've just completed the most challenging part. Now, your email assistant has a knowledge base to check when generating responses. Let's see how it works.
Feel free to use the sample texts below to do the testing.
```text Sample Email for Testing theme={null}
Customer Name: Amanda
Original Email:
Hi,
What does the name 'Dify' actually stand for, and what can it do for my business?
Best regards,
Amanda
```
Check on the result and you'll find that instead of a generic guess, the AI will look at the knowledge base and explain what Dify stands for.
![Test Result]() ## Mini Challenge
1. What happens if a customer asks a question that isn't in the knowledge base?
2. What kind of information could you upload as a knowledge base?
3. Explore Chunk Structure, Index Method, and Retrieval Setting.
# Lesson 5: The Crossroads of Your Workflow (Sorting and Executing)
Source: https://docs.dify.ai/en/use-dify/tutorials/workflow-101/lesson-05
Right now, our Email Assistant treats every message following the same path of the workflow. That's not smart enough. An email asking about Dify's price should be handled differently than an email on bug reporting.
To make our assistant truly intelligent, we need to teach it how to Read the Room. We're going to set up a Crossroads that sends different types of emails down different tracks.
## The If/Else Node
## Mini Challenge
1. What happens if a customer asks a question that isn't in the knowledge base?
2. What kind of information could you upload as a knowledge base?
3. Explore Chunk Structure, Index Method, and Retrieval Setting.
# Lesson 5: The Crossroads of Your Workflow (Sorting and Executing)
Source: https://docs.dify.ai/en/use-dify/tutorials/workflow-101/lesson-05
Right now, our Email Assistant treats every message following the same path of the workflow. That's not smart enough. An email asking about Dify's price should be handled differently than an email on bug reporting.
To make our assistant truly intelligent, we need to teach it how to Read the Room. We're going to set up a Crossroads that sends different types of emails down different tracks.
## The If/Else Node
![If/Else Node]() If/Else node is just like a traffic light. It checks a condition (like Does this email mention pricing? ) and sends the flow left or right based on the result.
### Hands-On 1: Set up the Crossroads
Let's upgrade our assistant so it can tell the difference between Dify-related emails and Everything else.
Hover over the line between the Start and Knowledge Retrieval nodes. Click the **Plus (+)** icon and select the **If/Else** node.
1. Click the node to open the panel
2. Click **+ Add Condition** in the IF section. Choose the variable: `{x} email_content`
If/Else node is just like a traffic light. It checks a condition (like Does this email mention pricing? ) and sends the flow left or right based on the result.
### Hands-On 1: Set up the Crossroads
Let's upgrade our assistant so it can tell the difference between Dify-related emails and Everything else.
Hover over the line between the Start and Knowledge Retrieval nodes. Click the **Plus (+)** icon and select the **If/Else** node.
1. Click the node to open the panel
2. Click **+ Add Condition** in the IF section. Choose the variable: `{x} email_content`
![Add Condition]() 3. The Logic: Keep it as **Contains**. Type **Dify** in the input box
3. The Logic: Keep it as **Contains**. Type **Dify** in the input box
![Contains]() Now, the complete logic for the IF branch is: `If the email content contains the word Dify`.
**Understanding the Traffic Light**
When setting conditions, Dify offers several ways to judge information, much like the different signals at a crossroads:
* **Is / Is Not**
Like a perfect key for a lock. The content must match your value exactly.
* **Contains / Not Contains**
Like a magnifying glass. It checks if a specific keyword exists anywhere in the text. This is what we are using today.
* **Starts with / Ends with**
Check if the text begins or ends with specific characters.
* **Is Empty / Is Not Empty**
Check if the variable has any content. For example: Checking if a user actually uploaded an attachment. Understanding these helps you set accurate and flexible rules, building a much smarter workflow!
### Hands-On 2: Plan Different Paths
Now that we have the crossroad here, we need to decide what happens on each road.
#### A. The Dify-Related Email Track (IF Branch)
Click the **plus (+)** icon on the right side of the IF branch, drag out a line, and connect it to **Knowledge Retrieval** node.
What this means: When the email contains the word Dify, the flow will execute the professional reply process we built in the last lesson (which looks up information in the Knowledge Base).
Now, the complete logic for the IF branch is: `If the email content contains the word Dify`.
**Understanding the Traffic Light**
When setting conditions, Dify offers several ways to judge information, much like the different signals at a crossroads:
* **Is / Is Not**
Like a perfect key for a lock. The content must match your value exactly.
* **Contains / Not Contains**
Like a magnifying glass. It checks if a specific keyword exists anywhere in the text. This is what we are using today.
* **Starts with / Ends with**
Check if the text begins or ends with specific characters.
* **Is Empty / Is Not Empty**
Check if the variable has any content. For example: Checking if a user actually uploaded an attachment. Understanding these helps you set accurate and flexible rules, building a much smarter workflow!
### Hands-On 2: Plan Different Paths
Now that we have the crossroad here, we need to decide what happens on each road.
#### A. The Dify-Related Email Track (IF Branch)
Click the **plus (+)** icon on the right side of the IF branch, drag out a line, and connect it to **Knowledge Retrieval** node.
What this means: When the email contains the word Dify, the flow will execute the professional reply process we built in the last lesson (which looks up information in the Knowledge Base).
![Connect IF Branch]() #### B. The Unrelated Email Track (ELSE Branch)
For emails that are not related or mention Dify, we want to create a simple, polite, and general reply process.
Click the **(+)** next to ELSE and select a new **LLM Node (LLM 2)**
Copy and paste the prompt below
```plaintext wrap theme={null}
You are a professional customer service manager. Based on the customer's email, kindly inform the user that no relevant information was found and provide relevant guidance.
Requirements:
1. Address the customer name in a friendly tone.
2. Thank them for their letter.
3. Keep the tone professional and friendly.
4. Sign off as "Anne."
```
1. Click **Add Message** button below system.
2. In the User Message box, type **customer name:**.
3. Press `/` on your keyboard.
4. You can see the Variable Selection menu pops out, and click `customer_name`.
5. Press Enter to start a new line, and type **email content:**
6. Press the / key again and click on `email_content`.
#### B. The Unrelated Email Track (ELSE Branch)
For emails that are not related or mention Dify, we want to create a simple, polite, and general reply process.
Click the **(+)** next to ELSE and select a new **LLM Node (LLM 2)**
Copy and paste the prompt below
```plaintext wrap theme={null}
You are a professional customer service manager. Based on the customer's email, kindly inform the user that no relevant information was found and provide relevant guidance.
Requirements:
1. Address the customer name in a friendly tone.
2. Thank them for their letter.
3. Keep the tone professional and friendly.
4. Sign off as "Anne."
```
1. Click **Add Message** button below system.
2. In the User Message box, type **customer name:**.
3. Press `/` on your keyboard.
4. You can see the Variable Selection menu pops out, and click `customer_name`.
5. Press Enter to start a new line, and type **email content:**
6. Press the / key again and click on `email_content`.
![Prompt for LLM 2]() Now we have two tracks generating two different replies. Imagine if we had 10 tracks, our workflow would look like a messy plate of spaghetti.
To keep things clean, we use a Variable Aggregator. Think of it as a Traffic Hub where all the different roads merge back into one main highway.
## Variable Aggregator
Now we have two tracks generating two different replies. Imagine if we had 10 tracks, our workflow would look like a messy plate of spaghetti.
To keep things clean, we use a Variable Aggregator. Think of it as a Traffic Hub where all the different roads merge back into one main highway.
## Variable Aggregator
![Variable Aggregator]() Variable Aggregator is like a traffic hub where all the different roads merge back into one main highway.
### Hands-On 3: Add Variable Aggregator
1. Select the connection line between the End Node and the LLM node and delete it.
2. Right-click on the canvas, select **Add Node**, and choose the **Variable Aggregator** node.
Variable Aggregator is like a traffic hub where all the different roads merge back into one main highway.
### Hands-On 3: Add Variable Aggregator
1. Select the connection line between the End Node and the LLM node and delete it.
2. Right-click on the canvas, select **Add Node**, and choose the **Variable Aggregator** node.
![Add Variable Aggregator]() Connect LLM and LLM 2 node to the Variable Aggregator.
1. Click the Variable Aggregator node.
2. Click the **plus (+)** icon next to **Assign Variables**.
3. Select the **text** from LLM 1 AND the **text** from LLM 2.
Connect LLM and LLM 2 node to the Variable Aggregator.
1. Click the Variable Aggregator node.
2. Click the **plus (+)** icon next to **Assign Variables**.
3. Select the **text** from LLM 1 AND the **text** from LLM 2.
![Assign Variable]() Now, no matter which LLM node generates the response, the Variable Aggregator node gathers the content and hands it to the Output Node.
1. Connect the Variable Aggregator to the Output node.
2. Update the Output Variable to the Variable Aggregator's result instead of previous LLM results.
Now, no matter which LLM node generates the response, the Variable Aggregator node gathers the content and hands it to the Output Node.
1. Connect the Variable Aggregator to the Output node.
2. Update the Output Variable to the Variable Aggregator's result instead of previous LLM results.
![Update Output Variable]() Here's how the workflow looks:
Here's how the workflow looks:
![Final Workflow]() Click **Test Run**, enter a customer name, and try testing with inputs that both include and exclude the keyword Dify to see the different results.
## Mini Challenge
For business inquiry emails, how should we edit this workflow to generate proper response?
Don't forget to update knowledge base with business-related files.
# API Extensions
Source: https://docs.dify.ai/en/use-dify/workspace/api-extension/api-extension
You can extend module capabilities through API extensions. Currently, the following extension types are supported:
* `moderation` Sensitive content moderation
* `external_data_tool` External data tools
Before extending module capabilities, you need to prepare an API and an API Key for authentication.
In addition to developing the corresponding module capabilities, you also need to follow the specifications below to ensure Dify correctly calls the API.
## API Specification
Dify will call your interface with the following specification:
```
POST {Your-API-Endpoint}
```
### Header
| Header | Value | Desc |
| --------------- | ------------------ | ---------------------------------------------------------------------------------------------------------------------------------------------------- |
| `Content-Type` | application/json | The request content is in JSON format. |
| `Authorization` | Bearer \{api\_key} | The API Key is transmitted as a Token. You need to parse the `api_key` and verify that it matches the provided API Key to ensure interface security. |
### Request Body
```
{
"point": string, // Extension point, different modules may contain multiple extension points
"params": {
... // Parameters passed to each module extension point
}
}
```
### API Response
```
{
... // Content returned by the API, see the specification design of different modules for different extension point returns
}
```
## Validation
When configuring an API-based Extension in Dify, Dify will send a request to the API Endpoint to verify API availability.
When the API Endpoint receives `point=ping`, the interface should return `result=pong`, as follows:
### Header
```
Content-Type: application/json
Authorization: Bearer {api_key}
```
### Request Body
```
{
"point": "ping"
}
```
### Expected API Response
```
{
"result": "pong"
}
```
## Example
Here we use an external data tool as an example, where the scenario is to retrieve external weather information by region as context.
### API Example
```
POST https://fake-domain.com/api/dify/receive
```
**Header**
```
Content-Type: application/json
Authorization: Bearer 123456
```
**Request Body**
```
{
"point": "app.external_data_tool.query",
"params": {
"app_id": "61248ab4-1125-45be-ae32-0ce91334d021",
"tool_variable": "weather_retrieve",
"inputs": {
"location": "London"
},
"query": "How's the weather today?"
}
}
```
**API Response**
```
{
"result": "City: London\nTemperature: 10°C\nRealFeel®: 8°C\nAir Quality: Poor\nWind Direction: ENE\nWind Speed: 8 km/h\nWind Gusts: 14 km/h\nPrecipitation: Light rain"
}
```
### Code Example
The code is based on the Python FastAPI framework.
1. Install dependencies
```
pip install fastapi[all] uvicorn
```
2. Write code according to the interface specification
```
from fastapi import FastAPI, Body, HTTPException, Header
from pydantic import BaseModel
app = FastAPI()
class InputData(BaseModel):
point: str
params: dict = {}
@app.post("/api/dify/receive")
async def dify_receive(data: InputData = Body(...), authorization: str = Header(None)):
"""
Receive API query data from Dify.
"""
expected_api_key = "123456" # TODO Your API key of this API
auth_scheme, _, api_key = authorization.partition(' ')
if auth_scheme.lower() != "bearer" or api_key != expected_api_key:
raise HTTPException(status_code=401, detail="Unauthorized")
point = data.point
# for debug
print(f"point: {point}")
if point == "ping":
return {
"result": "pong"
}
if point == "app.external_data_tool.query":
return handle_app_external_data_tool_query(params=data.params)
# elif point == "{point name}":
# TODO other point implementation here
raise HTTPException(status_code=400, detail="Not implemented")
def handle_app_external_data_tool_query(params: dict):
app_id = params.get("app_id")
tool_variable = params.get("tool_variable")
inputs = params.get("inputs")
query = params.get("query")
# for debug
print(f"app_id: {app_id}")
print(f"tool_variable: {tool_variable}")
print(f"inputs: {inputs}")
print(f"query: {query}")
# TODO your external data tool query implementation here,
# return must be a dict with key "result", and the value is the query result
if inputs.get("location") == "London":
return {
"result": "City: London\nTemperature: 10°C\nRealFeel®: 8°C\nAir Quality: Poor\nWind Direction: ENE\nWind "
"Speed: 8 km/h\nWind Gusts: 14 km/h\nPrecipitation: Light rain"
}
else:
return {"result": "Unknown city"}
```
3. Start the API service. The default port is 8000, the complete API address is: `http://127.0.0.1:8000/api/dify/receive`, and the configured API Key is `123456`.
```
uvicorn main:app --reload --host 0.0.0.0
```
4. Configure this API in Dify.
5. Select this API extension in the App.
When debugging the App, Dify will request the configured API and send the following content (example):
```
{
"point": "app.external_data_tool.query",
"params": {
"app_id": "61248ab4-1125-45be-ae32-0ce91334d021",
"tool_variable": "weather_retrieve",
"inputs": {
"location": "London"
},
"query": "How's the weather today?"
}
}
```
The API response is:
```
{
"result": "City: London\nTemperature: 10°C\nRealFeel®: 8°C\nAir Quality: Poor\nWind Direction: ENE\nWind Speed: 8 km/h\nWind Gusts: 14 km/h\nPrecipitation: Light rain"
}
```
## Local Debugging
Since the Dify cloud version cannot access internal network API services, you can use [Ngrok](https://ngrok.com) to expose the API service endpoint to the public network to enable cloud debugging of local code. Steps:
1. Go to [https://ngrok.com](https://ngrok.com), register and download the Ngrok file.

2. After downloading, go to the download directory, extract the archive according to the instructions below, and execute the initialization script in the instructions.
```shell theme={null}
unzip /path/to/ngrok.zip
./ngrok config add-authtoken your-token
```
3. Check the port of your local API service:
And run the following command to start:
```shell theme={null}
./ngrok http port-number
```
A successful startup example looks like this:
4. Find the Forwarding address, as shown above: `https://177e-159-223-41-52.ngrok-free.app` (this is an example domain, please replace with your own), which is the public domain.
Following the example above, we expose the locally started service endpoint and replace the code example interface: `http://127.0.0.1:8000/api/dify/receive` with `https://177e-159-223-41-52.ngrok-free.app/api/dify/receive`
This API endpoint can now be accessed publicly. At this point, we can configure this API endpoint in Dify for local code debugging. For configuration steps, please refer to [External Data Tool](/en/use-dify/workspace/api-extension/external-data-tool-api-extension).
## Deploy API Extensions Using Cloudflare Workers
We recommend using Cloudflare Workers to deploy your API extensions because Cloudflare Workers can conveniently provide a public network address and can be used for free.
For detailed instructions, see [Deploy API Extensions Using Cloudflare Workers](/en/use-dify/workspace/api-extension/cloudflare-worker).
# Deploy API Extensions Using Cloudflare Workers
Source: https://docs.dify.ai/en/use-dify/workspace/api-extension/cloudflare-worker
## Procedure
Since Dify API extensions require a publicly accessible address as the API Endpoint, the API extension needs to be deployed to a public address.
Here we use Cloudflare Workers to deploy the API extension.
Clone the [Example GitHub Repository](https://github.com/crazywoola/dify-extension-workers). This repository contains a simple API extension that can be modified as a starting point.
```bash theme={null}
git clone https://github.com/crazywoola/dify-extension-workers.git
cp wrangler.toml.example wrangler.toml
```
Open the `wrangler.toml` file and modify `name` and `compatibility_date` to your application name and compatibility date.
The configuration we need to pay attention to here is the `TOKEN` in `vars`. When adding an API extension in Dify, we need to fill in this Token. For security reasons, we recommend using a random string as the Token. You should not write the Token directly in the source code, but pass it through environment variables. Therefore, please do not commit wrangler.toml to your code repository.
```toml theme={null}
name = "dify-extension-example"
compatibility_date = "2023-01-01"
[vars]
TOKEN = "bananaiscool"
```
This API extension will return a random Breaking Bad quote. You can modify the logic of this API extension in `src/index.ts`. This example demonstrates how to interact with third-party APIs.
```typescript theme={null}
// ⬇️ implement your logic here ⬇️
// point === "app.external_data_tool.query"
// https://api.breakingbadquotes.xyz/v1/quotes
const count = params?.inputs?.count ?? 1;
const url = `https://api.breakingbadquotes.xyz/v1/quotes/${count}`;
const result = await fetch(url).then(res => res.text())
// ⬆️ implement your logic here ⬆️
```
This repository simplifies all configurations except business logic. You can directly use `npm` commands to deploy your API extension.
```bash theme={null}
npm install
npm run deploy
```
After successful deployment, you will get a public address that you can add in Dify as the API Endpoint. Please note not to omit the `endpoint` path. The specific definition of this path can be found in `src/index.ts`.
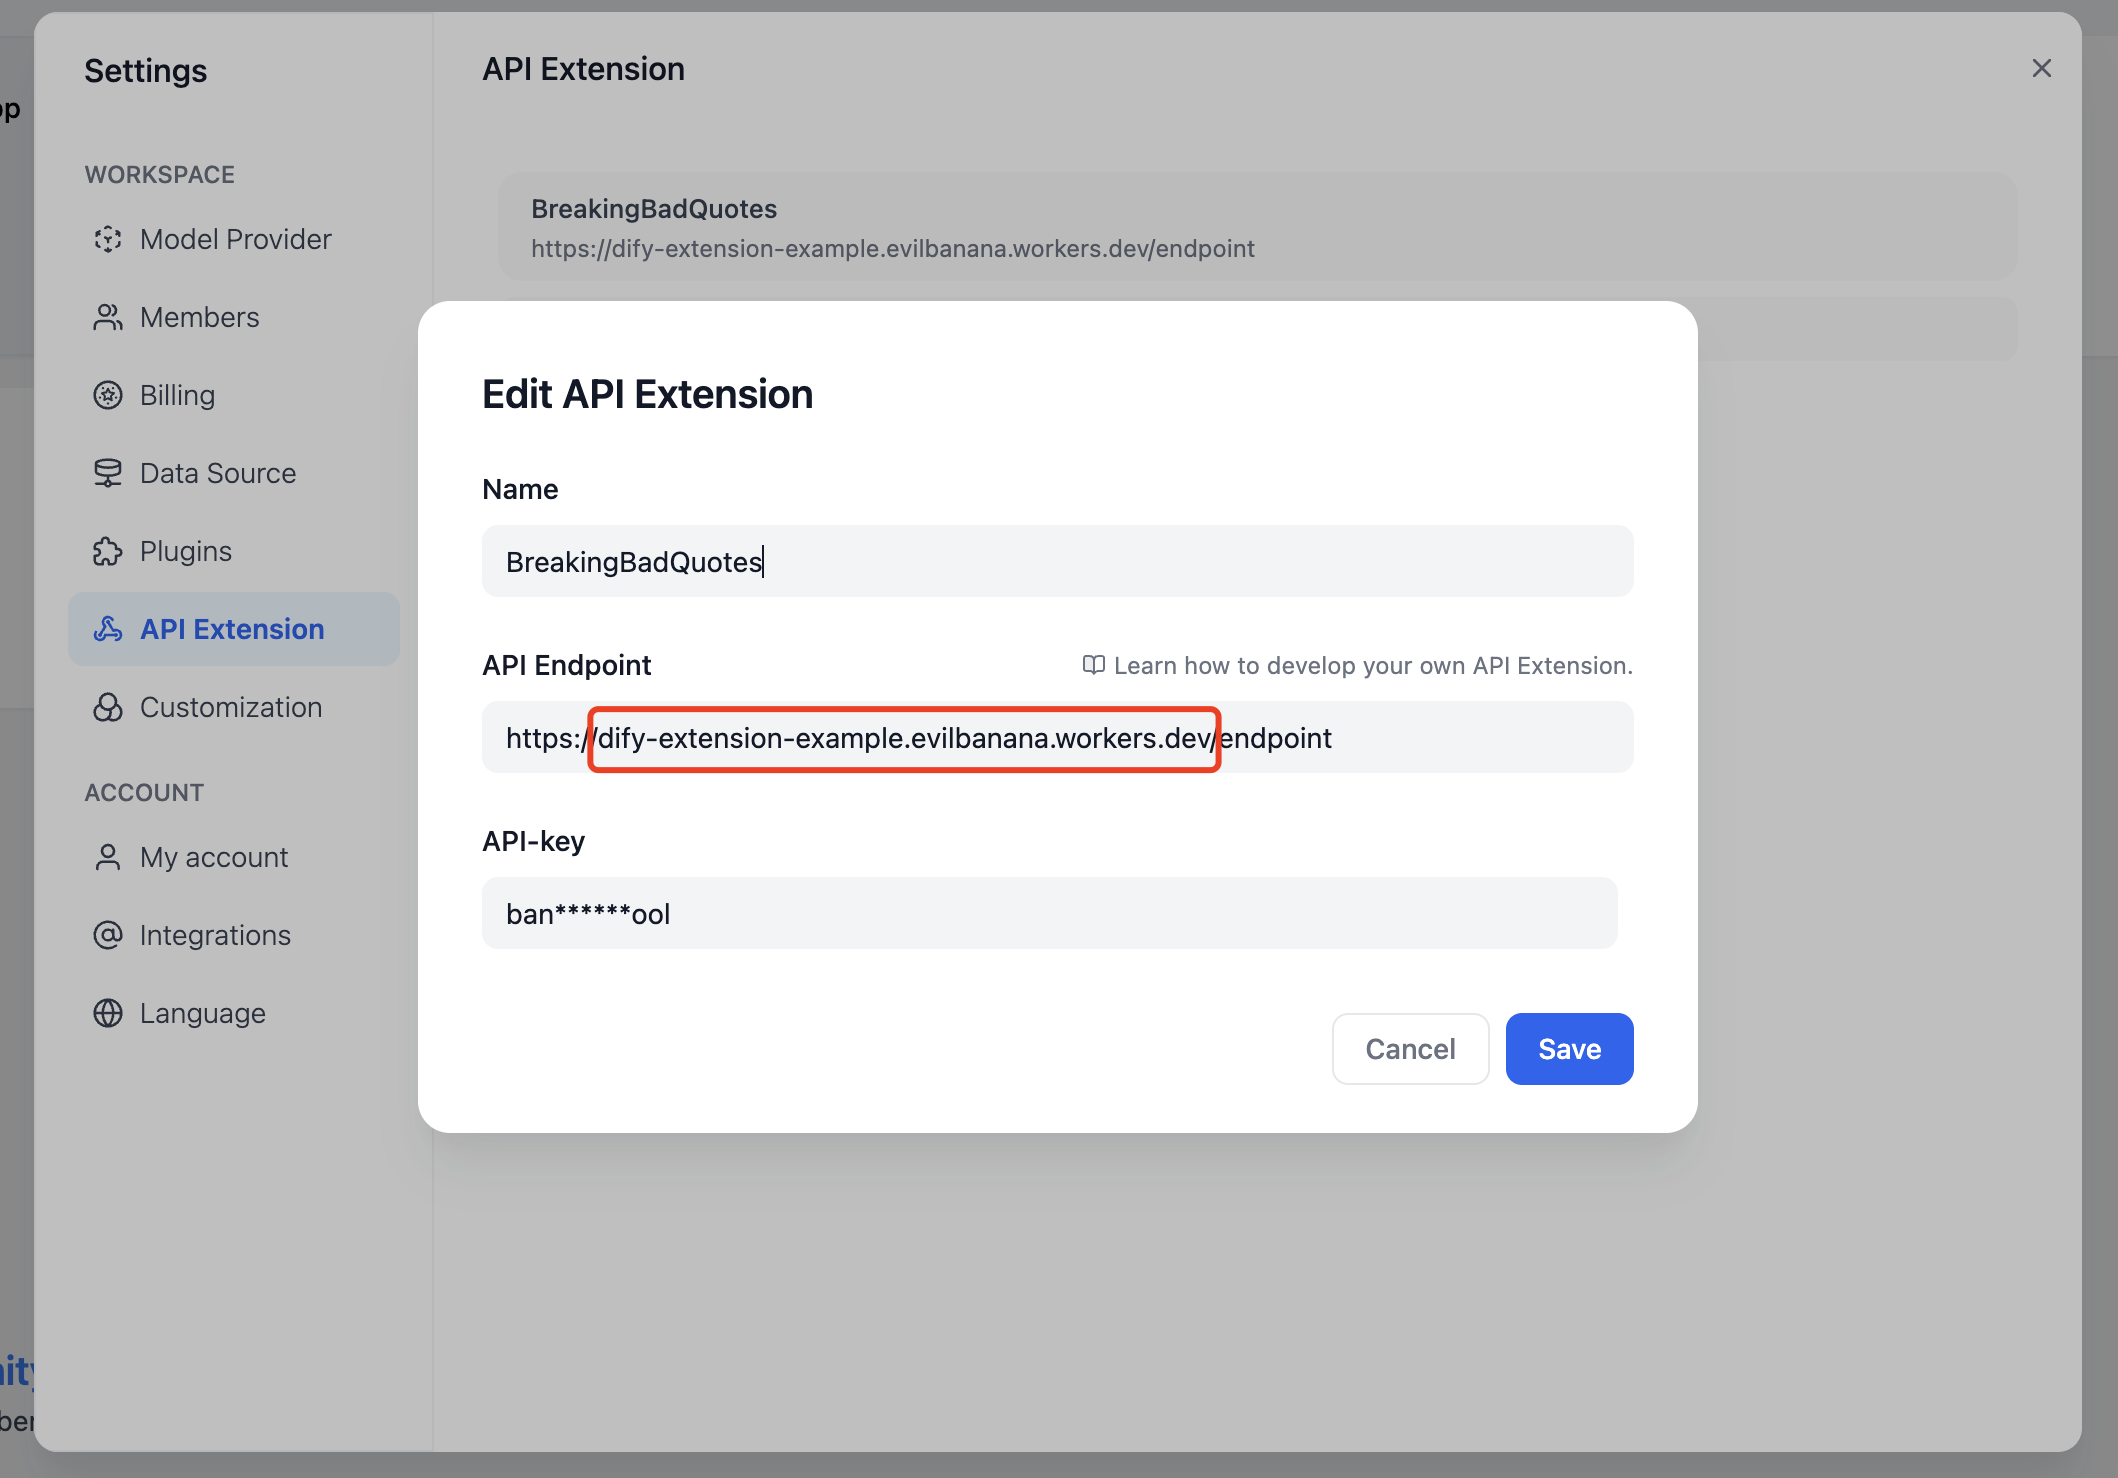
Alternatively, you can use the `npm run dev` command to deploy locally for testing.
```bash theme={null}
npm install
npm run dev
```
Related output:
```bash theme={null}
$ npm run dev
> dev
> wrangler dev src/index.ts
⛅️ wrangler 3.99.0
-------------------
Your worker has access to the following bindings:
- Vars:
- TOKEN: "ban****ool"
⎔ Starting local server...
[wrangler:inf] Ready on http://localhost:58445
```
After that, you can use tools like Postman for local interface debugging.
## About Bearer Auth
```typescript theme={null}
import { bearerAuth } from "hono/bearer-auth";
(c, next) => {
const auth = bearerAuth({ token: c.env.TOKEN });
return auth(c, next);
},
```
Our Bearer validation logic is in the above code. We use the `hono/bearer-auth` package to implement Bearer validation. You can use `c.env.TOKEN` in `src/index.ts` to get the Token.
## About Parameter Validation
```typescript theme={null}
import { z } from "zod";
import { zValidator } from "@hono/zod-validator";
const schema = z.object({
point: z.union([
z.literal("ping"),
z.literal("app.external_data_tool.query"),
]), // Restricts 'point' to two specific values
params: z
.object({
app_id: z.string().optional(),
tool_variable: z.string().optional(),
inputs: z.record(z.any()).optional(),
query: z.any().optional(), // string or null
})
.optional(),
});
```
We use `zod` to define parameter types here. You can use `zValidator` in `src/index.ts` to validate parameters. Use `const { point, params } = c.req.valid("json");` to get the validated parameters.
The `point` here has only two values, so we use `z.union` to define it. `params` is an optional parameter, so we use `z.optional` to define it. There will be an `inputs` parameter, which is a `Record` type. This type represents an object with string keys and any values. This type can represent any object. You can use `params?.inputs?.count` in `src/index.ts` to get the `count` parameter.
## Get Cloudflare Workers Logs
```bash theme={null}
wrangler tail
```
***
**Reference**:
* [Cloudflare Workers](https://workers.cloudflare.com/)
* [Cloudflare Workers CLI](https://developers.cloudflare.com/workers/cli-wrangler/install-update)
* [Example GitHub Repository](https://github.com/crazywoola/dify-extension-workers)
# External Data Tool
Source: https://docs.dify.ai/en/use-dify/workspace/api-extension/external-data-tool-api-extension
When creating AI applications, you can use external tools to obtain additional data through [API Extensions](/en/use-dify/workspace/api-extension/api-extension) and assemble it into the prompt as additional information for the LLM.
## Extension Point
`app.external_data_tool.query`: Application external data tool query extension point.
This extension point passes the application variable content input by the end user and the conversation input content (fixed parameter for conversational applications) to the API as parameters.
You need to implement the corresponding tool query logic and return query results as string type.
### Request Body
```
{
"point": "app.external_data_tool.query", // Extension point type, fixed as app.external_data_tool.query
"params": {
"app_id": string, // Application ID
"tool_variable": string, // External data tool variable name, indicating the source of the corresponding variable tool call
"inputs": { // Variable values passed by end user, key is variable name, value is variable value
"var_1": "value_1",
"var_2": "value_2",
...
},
"query": string | null // Current conversation input content from end user, fixed parameter for conversational applications.
}
}
```
**Example**:
```
{
"point": "app.external_data_tool.query",
"params": {
"app_id": "61248ab4-1125-45be-ae32-0ce91334d021",
"tool_variable": "weather_retrieve",
"inputs": {
"location": "London"
},
"query": "How's the weather today?"
}
}
```
### API Response
```
{
"result": string
}
```
**Example**:
```
{
"result": "City: London\nTemperature: 10°C\nRealFeel®: 8°C\nAir Quality: Poor\nWind Direction: ENE\nWind Speed: 8 km/h\nWind Gusts: 14 km/h\nPrecipitation: Light rain"
}
```
# Sensitive Content Moderation
Source: https://docs.dify.ai/en/use-dify/workspace/api-extension/moderation-api-extension
This module is used to review the content input by end users and the content output by LLM in applications. It is divided into two extension point types.
## Extension Points
* `app.moderation.input`: End user input content review extension point
* Used to review variable content passed in by end users and conversation input content in conversational applications.
* `app.moderation.output`: LLM output content review extension point
* Used to review content output by LLM.
* When the LLM output is streaming, the output content will be segmented into 100-character chunks for API requests to avoid delayed reviews when output content is lengthy.
### app.moderation.input
When **Content Moderation > Review Input Content** is enabled in applications such as Chatflow, Agent, or Chatbot, Dify will send the following HTTP POST request to the corresponding API extension:
#### Request Body
```
{
"point": "app.moderation.input", // Extension point type, fixed as app.moderation.input
"params": {
"app_id": string, // Application ID
"inputs": { // Variable values passed by end user, key is variable name, value is variable value
"var_1": "value_1",
"var_2": "value_2",
...
},
"query": string | null // Current conversation input content from end user, fixed parameter for conversational applications.
}
}
```
**Example**:
```
{
"point": "app.moderation.input",
"params": {
"app_id": "61248ab4-1125-45be-ae32-0ce91334d021",
"inputs": {
"var_1": "I will kill you.",
"var_2": "I will fuck you."
},
"query": "Happy everydays."
}
}
```
#### API Response
```
{
"flagged": bool, // Whether it violates validation rules
"action": string, // Action: direct_output outputs preset response; overridden overwrites input variable values
"preset_response": string, // Preset response (returned only when action=direct_output)
"inputs": { // Variable values passed by end user, key is variable name, value is variable value (returned only when action=overridden)
"var_1": "value_1",
"var_2": "value_2",
...
},
"query": string | null // Overwritten current conversation input content from end user, fixed parameter for conversational applications. (returned only when action=overridden)
}
```
**Example**:
* `action=direct_output`
```
{
"flagged": true,
"action": "direct_output",
"preset_response": "Your content violates our usage policy."
}
```
* `action=overridden`
```
{
"flagged": true,
"action": "overridden",
"inputs": {
"var_1": "I will *** you.",
"var_2": "I will *** you."
},
"query": "Happy everydays."
}
```
### app.moderation.output
When **Content Moderation > Review Output Content** is enabled in applications such as Chatflow, Agent, or Chat Assistant, Dify will send the following HTTP POST request to the corresponding API extension:
#### Request Body
```
{
"point": "app.moderation.output", // Extension point type, fixed as app.moderation.output
"params": {
"app_id": string, // Application ID
"text": string // LLM response content. When LLM output is streaming, this is content segmented into 100-character chunks.
}
}
```
**Example**:
```
{
"point": "app.moderation.output",
"params": {
"app_id": "61248ab4-1125-45be-ae32-0ce91334d021",
"text": "I will kill you."
}
}
```
#### API Response
```
{
"flagged": bool, // Whether it violates validation rules
"action": string, // Action: direct_output outputs preset response; overridden overwrites input variable values
"preset_response": string, // Preset response (returned only when action=direct_output)
"text": string // Overwritten LLM response content. (returned only when action=overridden)
}
```
**Example**:
* `action=direct_output`
```
{
"flagged": true,
"action": "direct_output",
"preset_response": "Your content violates our usage policy."
}
```
* `action=overridden`
```
{
"flagged": true,
"action": "overridden",
"text": "I will *** you."
}
```
## Code Example
Below is a piece of `src/index.ts` code that can be deployed on Cloudflare. (For complete Cloudflare usage, please refer to [this documentation](/en/use-dify/workspace/api-extension/cloudflare-worker))
The code works by performing keyword matching to filter both Input (content entered by users) and Output (content returned by the model). Users can modify the matching logic according to their needs.
```
import { Hono } from "hono";
import { bearerAuth } from "hono/bearer-auth";
import { z } from "zod";
import { zValidator } from "@hono/zod-validator";
import { generateSchema } from '@anatine/zod-openapi';
type Bindings = {
TOKEN: string;
};
const app = new Hono<{ Bindings: Bindings }>();
// API format validation ⬇️
const schema = z.object({
point: z.union([
z.literal("ping"),
z.literal("app.external_data_tool.query"),
z.literal("app.moderation.input"),
z.literal("app.moderation.output"),
]), // Restricts 'point' to two specific values
params: z
.object({
app_id: z.string().optional(),
tool_variable: z.string().optional(),
inputs: z.record(z.any()).optional(),
query: z.any(),
text: z.any()
})
.optional(),
});
// Generate OpenAPI schema
app.get("/", (c) => {
return c.json(generateSchema(schema));
});
app.post(
"/",
(c, next) => {
const auth = bearerAuth({ token: c.env.TOKEN });
return auth(c, next);
},
zValidator("json", schema),
async (c) => {
const { point, params } = c.req.valid("json");
if (point === "ping") {
return c.json({
result: "pong",
});
}
// ⬇️ implement your logic here ⬇️
// point === "app.external_data_tool.query"
else if (point === "app.moderation.input"){
// Input check ⬇️
const inputkeywords = ["input filter test 1", "input filter test 2", "input filter test 3"];
if (inputkeywords.some(keyword => params.query.includes(keyword)))
{
return c.json({
"flagged": true,
"action": "direct_output",
"preset_response": "The input contains illegal content. Please try a different question!"
});
} else {
return c.json({
"flagged": false,
"action": "direct_output",
"preset_response": "Input is normal"
});
}
// Input check complete
}
else {
// Output check ⬇️
const outputkeywords = ["output filter test 1", "output filter test 2", "output filter test 3"];
if (outputkeywords.some(keyword => params.text.includes(keyword)))
{
return c.json({
"flagged": true,
"action": "direct_output",
"preset_response": "The output contains sensitive content and has been filtered by the system. Please try a different question!"
});
}
else {
return c.json({
"flagged": false,
"action": "direct_output",
"preset_response": "Output is normal"
});
};
}
// Output check complete
}
);
export default app;
```
# Manage Apps
Source: https://docs.dify.ai/en/use-dify/workspace/app-management
Organize, maintain, and share your AI applications with powerful management tools and best practices
Managing your apps well is crucial for productive AI development. Dify provides comprehensive tools to organize, share, and maintain your applications throughout their lifecycle.
## App Organization
Update names, descriptions, icons, and branding for better organization
Create variations or use existing apps as templates for new projects
Share apps between workspaces using Dify's DSL format
Safely delete apps when no longer needed
## Editing Application Information
Keep your apps organized with clear, descriptive information:
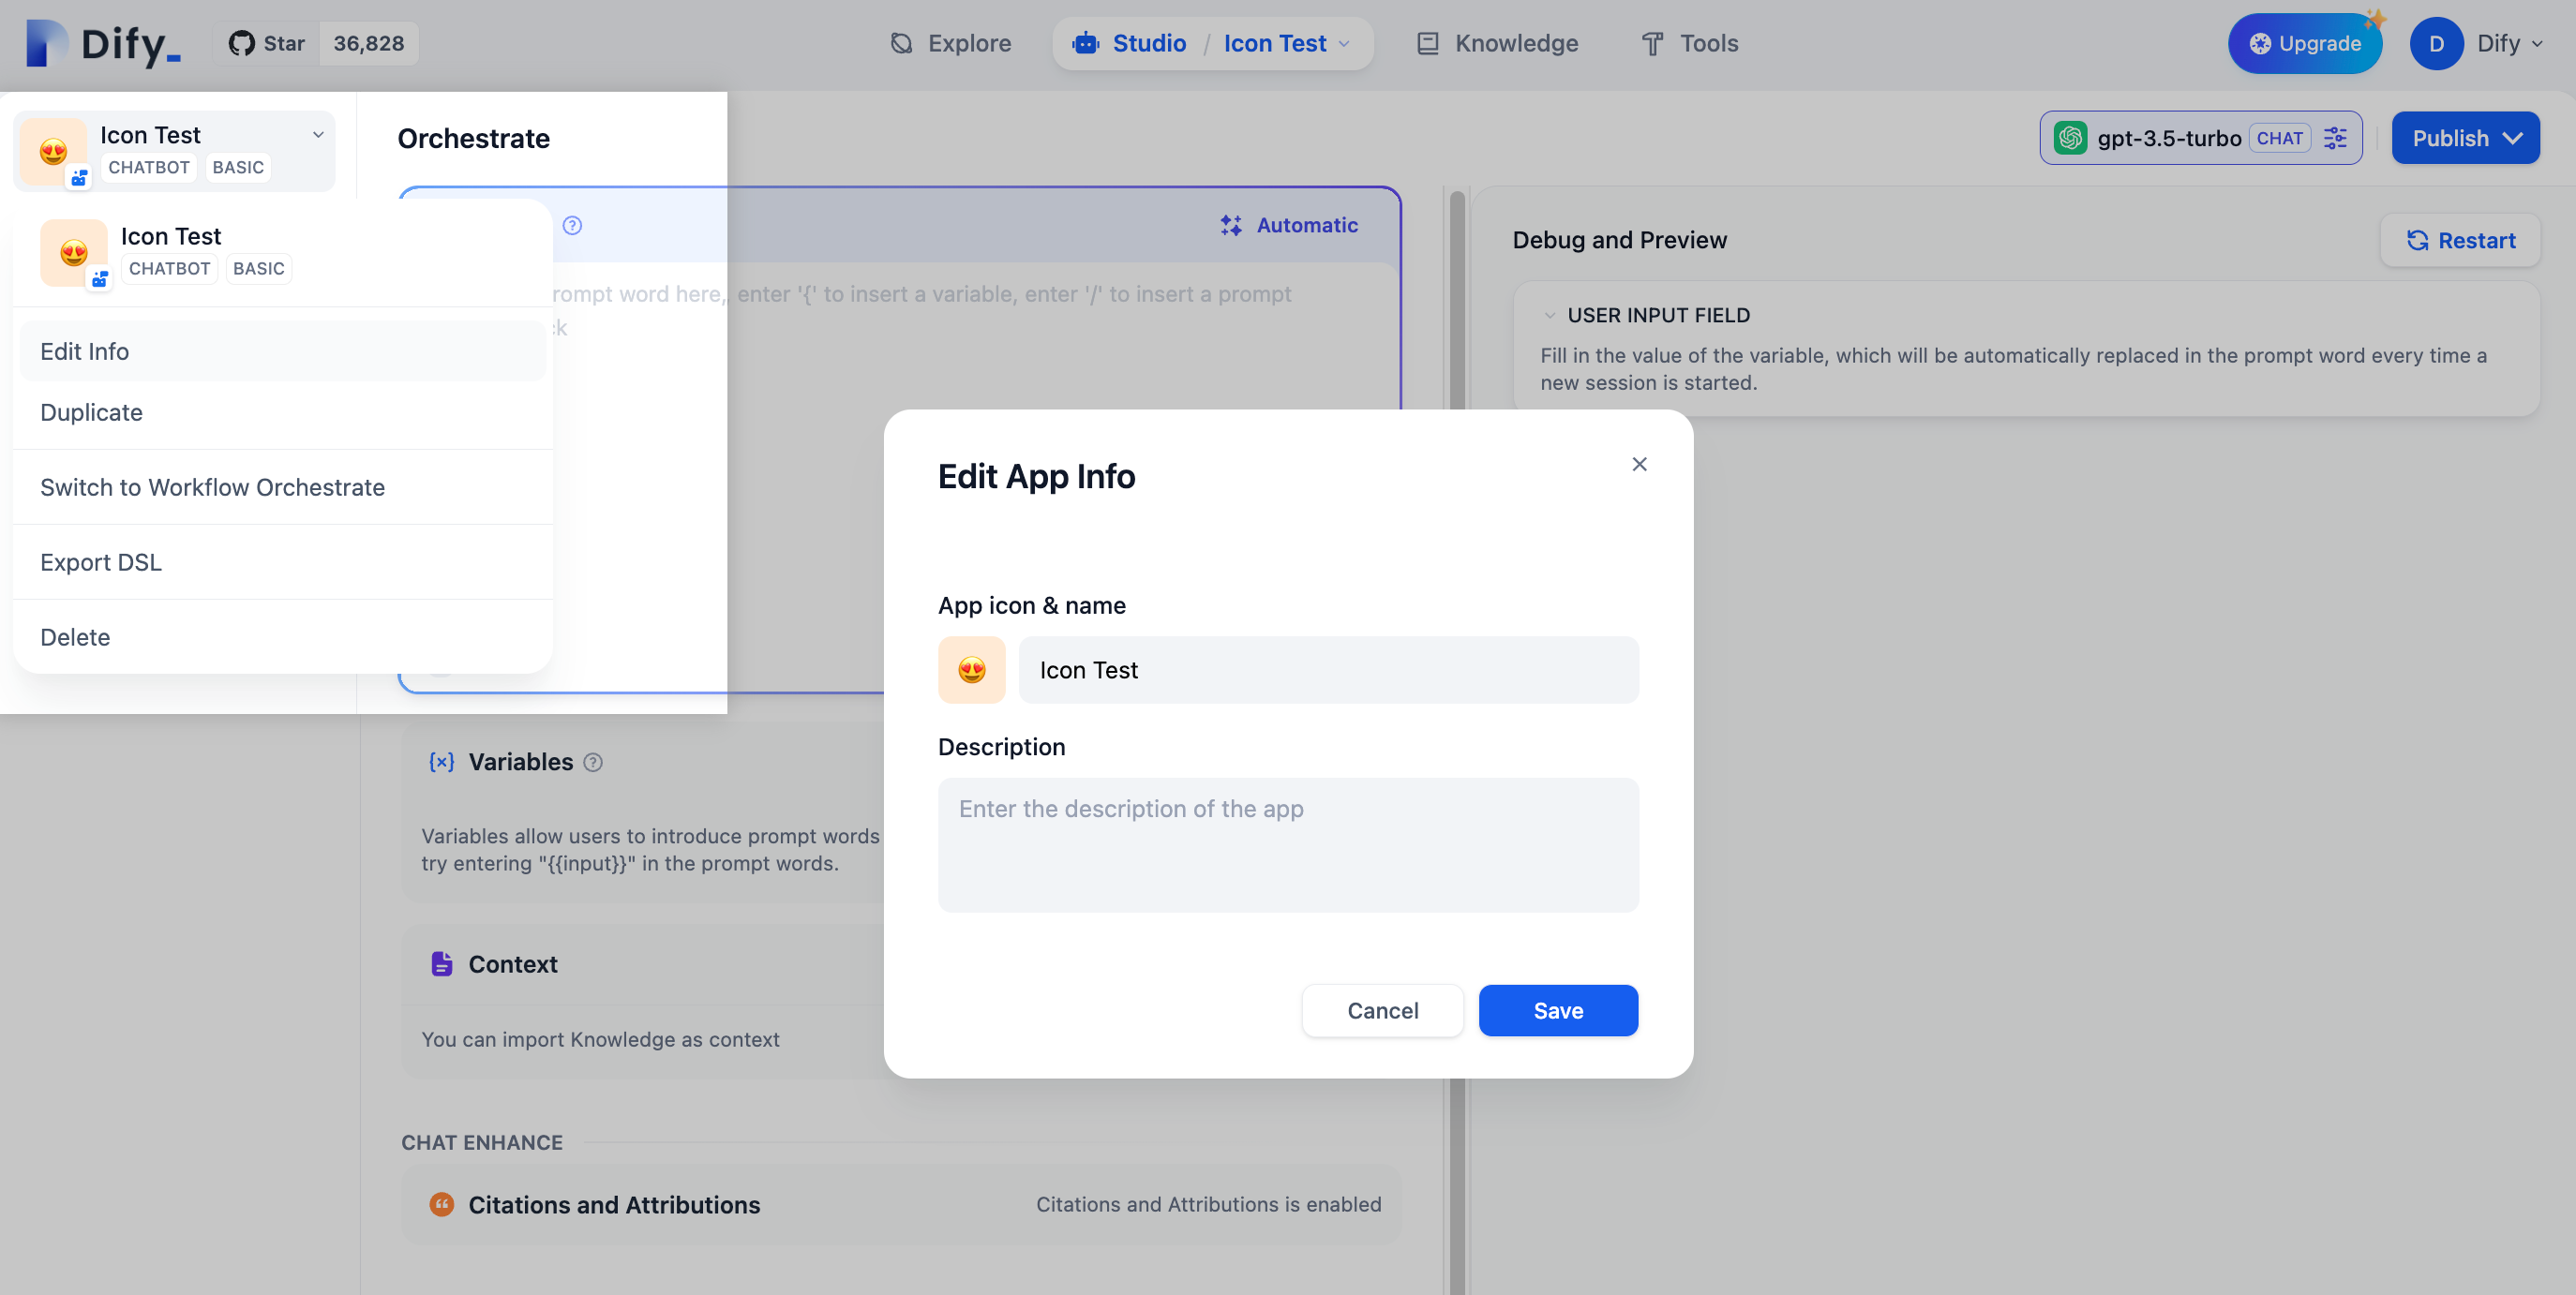
Click "Edit info" in the upper left corner of your application.
Modify the icon, name, or description to better reflect the app's purpose.
Use names and descriptions that help team members understand what the app does.
Use consistent naming conventions across your workspace. Consider prefixes like "Draft-", "Test-", or "Prod-" to indicate app status.
## Creating App Variations
Duplication is perfect for creating variations or starting new projects from existing work:
**When to duplicate:**
* Creating A/B test versions with different prompts or models
* Adapting an app for different audiences or use cases
* Starting a new project based on successful patterns
* Creating backups before major changes
**How duplication works:**
* All configuration, prompts, and workflows are copied
* The new app gets a default name you can customize
* Original app remains unchanged
* Both apps run independently
## App Export and Import
Dify's DSL (Domain Specific Language) format lets you share apps between workspaces and teams:
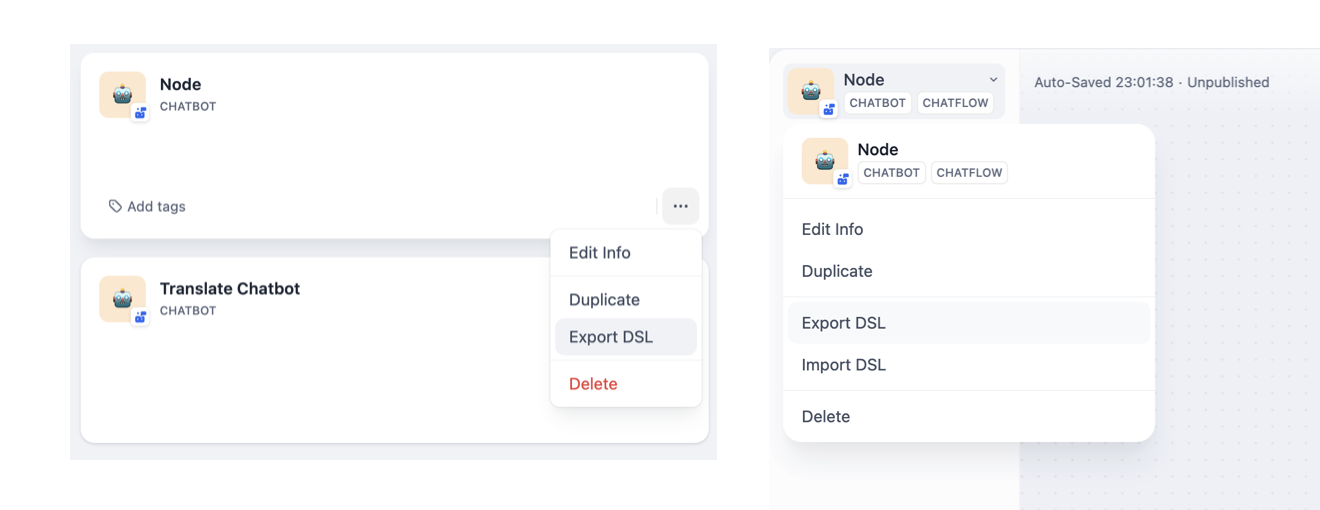
### Exporting Applications
**Two ways to export:**
1. **From Studio page** - Click "Export DSL" in the application menu
2. **From orchestration** - Click "Export DSL" in the upper left corner
**What gets exported:**
* App configuration and metadata
* Workflow orchestration and node settings
* Model parameters and prompt templates
* Knowledge base connections (not the data itself)
**What doesn't get exported:**
* API keys for third-party tools (security measure)
* Actual knowledge base content
* Usage logs and analytics data
If your app uses Secret-type environment variables, you'll be asked whether to include them in the export. Be careful with sensitive information.
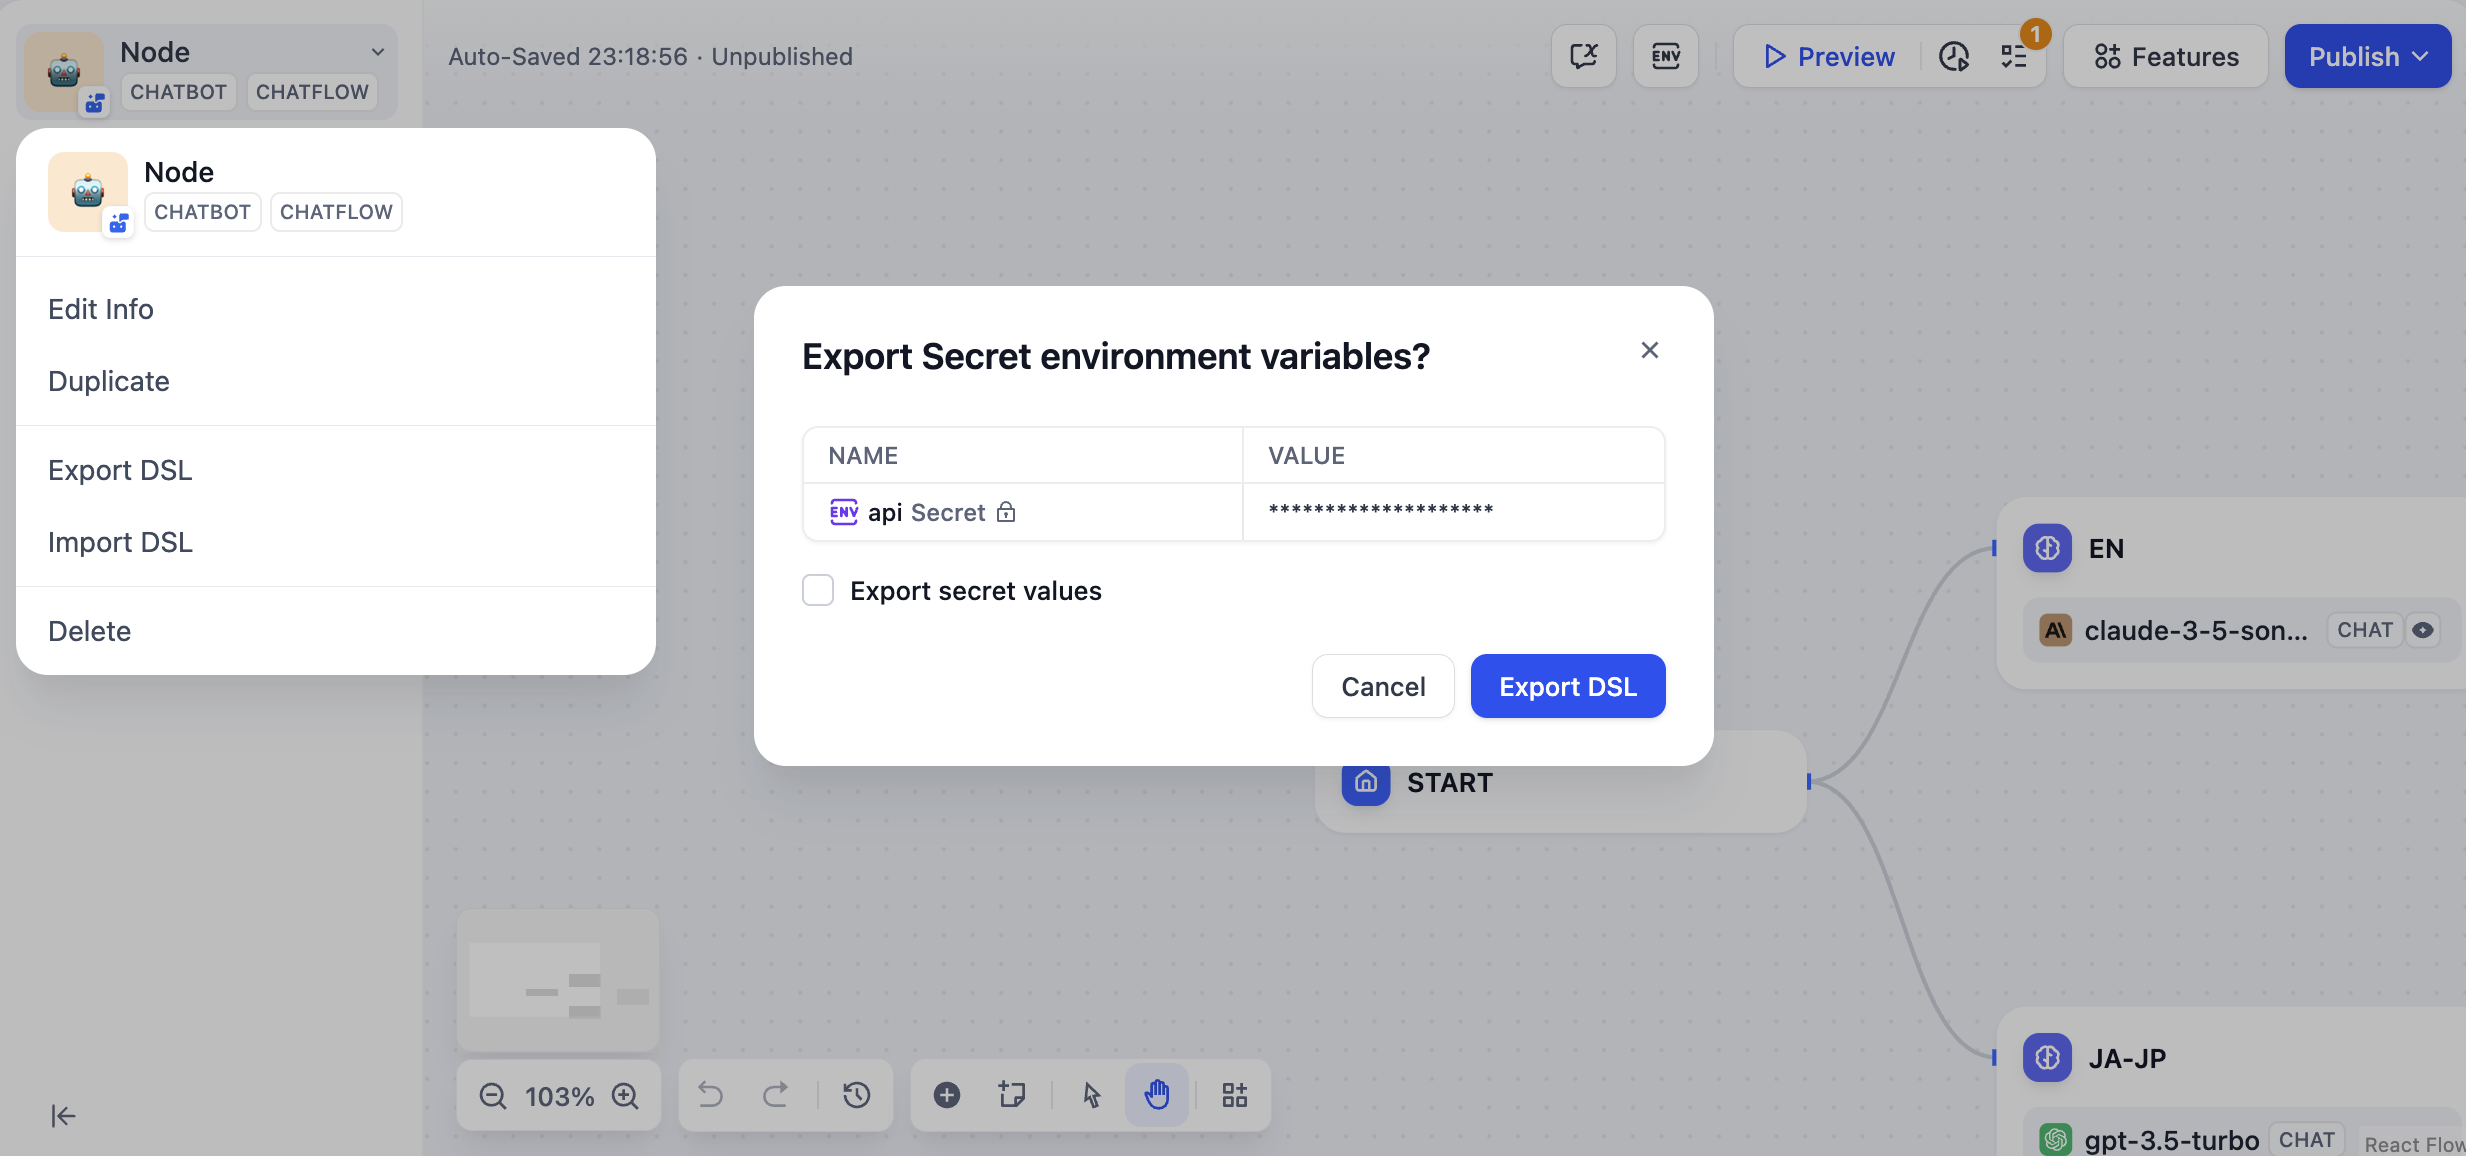
### Importing Applications
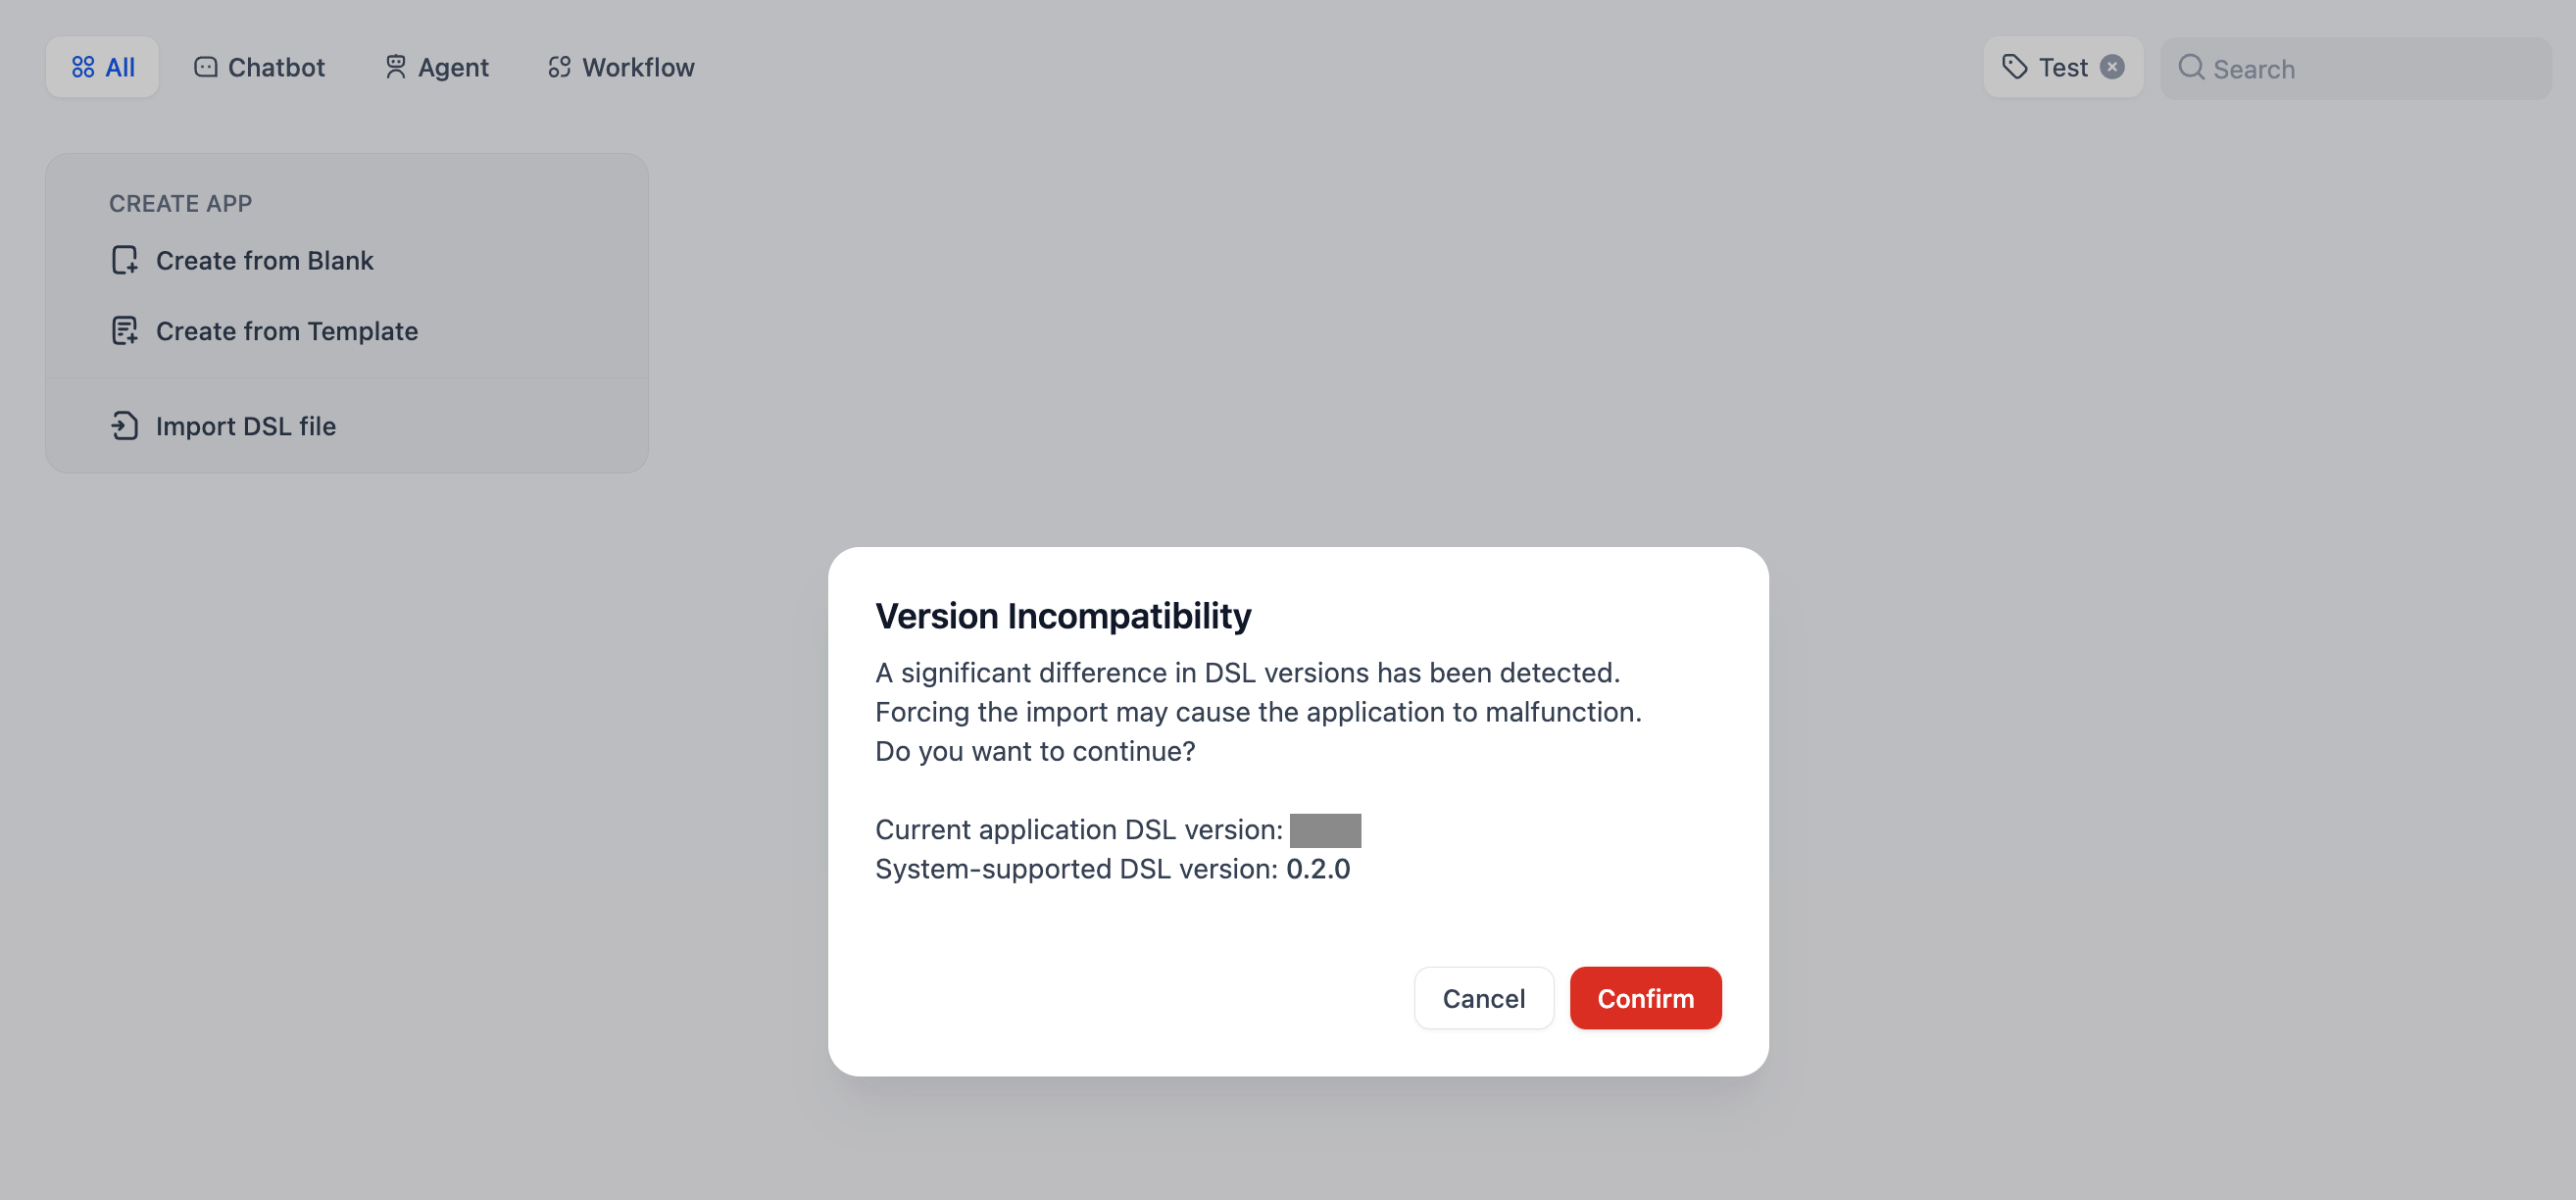
**Import process:**
1. Upload your DSL file (YAML format)
2. System checks version compatibility
3. Warning appears if DSL version is older than current platform
4. App is created with all configurations from the file
**Version compatibility:**
* **SaaS users**: DSL files are always the latest version
* **Community users**: May need to upgrade to avoid compatibility issues
Dify DSL is the AI application engineering standard (v0.6+) that captures complete app configurations in YAML format.
## Safe App Deletion
Before deleting apps, understand the impact:
**What gets deleted:**
* All app configurations and prompts
* Workflow orchestration and settings
* Usage logs and analytics
* Published web apps and API access
* All user conversations and data
**Impact on users:**
* Published web apps stop working immediately
* API calls start returning errors
* All existing user sessions are terminated
Could you duplicate the app for backup, or just unpublish instead of deleting?
Let team members and users know about planned deletions.
Create DSL backups of valuable configurations before deletion.
Click "Delete" and confirm—this action cannot be undone.
App deletion is permanent and cannot be undone. All associated data, logs, and user access will be lost immediately.
# Model Providers
Source: https://docs.dify.ai/en/use-dify/workspace/model-providers
Configure AI model access for your workspace—the foundation that powers all your applications
Model providers give your workspace access to AI models. Every application you build needs models to function, and configuring providers at the workspace level means all team members can use them across all projects.
## System vs Custom Providers
**System Providers** are managed by Dify. You get immediate access to models without setup, billing through your Dify subscription, and automatic updates when new models become available. Best for getting started quickly.
**Custom Providers** use your own API keys for direct access to model providers like OpenAI, Anthropic, or Google. You get full control, direct billing, and often higher rate limits. Best for production applications.
You can use both simultaneously—system providers for prototyping, custom providers for production.
## Configure Custom Providers
Only workspace admins and owners can configure model providers. The process is consistent across providers:
Access the model provider configuration in your workspace settings.
Choose from OpenAI, Anthropic, Google, Cohere, or other supported providers.
Enter your API key and any additional configuration required by the provider.
Dify validates your credentials before making the provider available to your workspace.
## Supported Providers
**Large Language Models:**
* OpenAI (GPT-4, GPT-3.5-turbo)
* Anthropic (Claude)
* Google (Gemini)
* Cohere
* Local models via Ollama
**Embedding Models:**
* OpenAI Embeddings
* Cohere Embeddings
* Azure OpenAI
* Local embedding models
**Specialized Models:**
* Image generation (DALL-E, Stable Diffusion)
* Speech (Whisper, ElevenLabs)
* Moderation APIs
## Provider Configuration Examples
**Required:** API Key from OpenAI Platform
**Optional:** Custom base URL for Azure OpenAI or proxies, Organization ID for organization-scoped usage
**Available Models:** GPT-4, GPT-3.5-turbo, DALL-E, Whisper, Text embeddings
**Required:** API Key from Anthropic Console
**Available Models:** Claude 3 (Opus, Sonnet, Haiku), Claude 2.1, Claude Instant
**Required:** Ollama server URL (typically [http://localhost:11434](http://localhost:11434))
**Setup:** Install Ollama, pull models (`ollama pull llama2`), configure Dify connection
**Benefits:** Complete data privacy, no external API costs, custom model fine-tuning
## Manage Model Credentials
Add multiple credentials for a model provider's predefined and custom models, and easily switch between, delete, or modify these credentials.
Here are some scenarios where adding multiple credentials is particularly helpful:
* **Environment Isolation**: Configure separate model credentials for different environments, such as development, testing, and production. For example, use a rate-limited credential in the development environment for debugging, and a paid credential with stable performance and a sufficient quota in the production environment to ensure service quality.
* **Cost Optimization**: Add and switch between multiple credentials from different accounts or model providers to maximize the use of free or low-cost quotas, thereby reducing application development and operational costs.
* **Model Testing**: During model fine-tuning or iteration, you may create multiple model versions. By adding credentials for these different versions, you can quickly switch between them to test and evaluate their performance.
Use multiple credentials to configure load balancing for a model.
After installing a model provider and configuring the first credential, click **Config** in the upper-right corner to perform the following actions:
* Add a new credential
* Select a credential as the default for all predefined models
* Edit a credential
* Delete a credential
If the default credential is deleted, you must manually specify a new one.
Click **Test Run**, enter a customer name, and try testing with inputs that both include and exclude the keyword Dify to see the different results.
## Mini Challenge
For business inquiry emails, how should we edit this workflow to generate proper response?
Don't forget to update knowledge base with business-related files.
# API Extensions
Source: https://docs.dify.ai/en/use-dify/workspace/api-extension/api-extension
You can extend module capabilities through API extensions. Currently, the following extension types are supported:
* `moderation` Sensitive content moderation
* `external_data_tool` External data tools
Before extending module capabilities, you need to prepare an API and an API Key for authentication.
In addition to developing the corresponding module capabilities, you also need to follow the specifications below to ensure Dify correctly calls the API.
## API Specification
Dify will call your interface with the following specification:
```
POST {Your-API-Endpoint}
```
### Header
| Header | Value | Desc |
| --------------- | ------------------ | ---------------------------------------------------------------------------------------------------------------------------------------------------- |
| `Content-Type` | application/json | The request content is in JSON format. |
| `Authorization` | Bearer \{api\_key} | The API Key is transmitted as a Token. You need to parse the `api_key` and verify that it matches the provided API Key to ensure interface security. |
### Request Body
```
{
"point": string, // Extension point, different modules may contain multiple extension points
"params": {
... // Parameters passed to each module extension point
}
}
```
### API Response
```
{
... // Content returned by the API, see the specification design of different modules for different extension point returns
}
```
## Validation
When configuring an API-based Extension in Dify, Dify will send a request to the API Endpoint to verify API availability.
When the API Endpoint receives `point=ping`, the interface should return `result=pong`, as follows:
### Header
```
Content-Type: application/json
Authorization: Bearer {api_key}
```
### Request Body
```
{
"point": "ping"
}
```
### Expected API Response
```
{
"result": "pong"
}
```
## Example
Here we use an external data tool as an example, where the scenario is to retrieve external weather information by region as context.
### API Example
```
POST https://fake-domain.com/api/dify/receive
```
**Header**
```
Content-Type: application/json
Authorization: Bearer 123456
```
**Request Body**
```
{
"point": "app.external_data_tool.query",
"params": {
"app_id": "61248ab4-1125-45be-ae32-0ce91334d021",
"tool_variable": "weather_retrieve",
"inputs": {
"location": "London"
},
"query": "How's the weather today?"
}
}
```
**API Response**
```
{
"result": "City: London\nTemperature: 10°C\nRealFeel®: 8°C\nAir Quality: Poor\nWind Direction: ENE\nWind Speed: 8 km/h\nWind Gusts: 14 km/h\nPrecipitation: Light rain"
}
```
### Code Example
The code is based on the Python FastAPI framework.
1. Install dependencies
```
pip install fastapi[all] uvicorn
```
2. Write code according to the interface specification
```
from fastapi import FastAPI, Body, HTTPException, Header
from pydantic import BaseModel
app = FastAPI()
class InputData(BaseModel):
point: str
params: dict = {}
@app.post("/api/dify/receive")
async def dify_receive(data: InputData = Body(...), authorization: str = Header(None)):
"""
Receive API query data from Dify.
"""
expected_api_key = "123456" # TODO Your API key of this API
auth_scheme, _, api_key = authorization.partition(' ')
if auth_scheme.lower() != "bearer" or api_key != expected_api_key:
raise HTTPException(status_code=401, detail="Unauthorized")
point = data.point
# for debug
print(f"point: {point}")
if point == "ping":
return {
"result": "pong"
}
if point == "app.external_data_tool.query":
return handle_app_external_data_tool_query(params=data.params)
# elif point == "{point name}":
# TODO other point implementation here
raise HTTPException(status_code=400, detail="Not implemented")
def handle_app_external_data_tool_query(params: dict):
app_id = params.get("app_id")
tool_variable = params.get("tool_variable")
inputs = params.get("inputs")
query = params.get("query")
# for debug
print(f"app_id: {app_id}")
print(f"tool_variable: {tool_variable}")
print(f"inputs: {inputs}")
print(f"query: {query}")
# TODO your external data tool query implementation here,
# return must be a dict with key "result", and the value is the query result
if inputs.get("location") == "London":
return {
"result": "City: London\nTemperature: 10°C\nRealFeel®: 8°C\nAir Quality: Poor\nWind Direction: ENE\nWind "
"Speed: 8 km/h\nWind Gusts: 14 km/h\nPrecipitation: Light rain"
}
else:
return {"result": "Unknown city"}
```
3. Start the API service. The default port is 8000, the complete API address is: `http://127.0.0.1:8000/api/dify/receive`, and the configured API Key is `123456`.
```
uvicorn main:app --reload --host 0.0.0.0
```
4. Configure this API in Dify.
5. Select this API extension in the App.
When debugging the App, Dify will request the configured API and send the following content (example):
```
{
"point": "app.external_data_tool.query",
"params": {
"app_id": "61248ab4-1125-45be-ae32-0ce91334d021",
"tool_variable": "weather_retrieve",
"inputs": {
"location": "London"
},
"query": "How's the weather today?"
}
}
```
The API response is:
```
{
"result": "City: London\nTemperature: 10°C\nRealFeel®: 8°C\nAir Quality: Poor\nWind Direction: ENE\nWind Speed: 8 km/h\nWind Gusts: 14 km/h\nPrecipitation: Light rain"
}
```
## Local Debugging
Since the Dify cloud version cannot access internal network API services, you can use [Ngrok](https://ngrok.com) to expose the API service endpoint to the public network to enable cloud debugging of local code. Steps:
1. Go to [https://ngrok.com](https://ngrok.com), register and download the Ngrok file.

2. After downloading, go to the download directory, extract the archive according to the instructions below, and execute the initialization script in the instructions.
```shell theme={null}
unzip /path/to/ngrok.zip
./ngrok config add-authtoken your-token
```
3. Check the port of your local API service:

And run the following command to start:
```shell theme={null}
./ngrok http port-number
```
A successful startup example looks like this:

4. Find the Forwarding address, as shown above: `https://177e-159-223-41-52.ngrok-free.app` (this is an example domain, please replace with your own), which is the public domain.
Following the example above, we expose the locally started service endpoint and replace the code example interface: `http://127.0.0.1:8000/api/dify/receive` with `https://177e-159-223-41-52.ngrok-free.app/api/dify/receive`
This API endpoint can now be accessed publicly. At this point, we can configure this API endpoint in Dify for local code debugging. For configuration steps, please refer to [External Data Tool](/en/use-dify/workspace/api-extension/external-data-tool-api-extension).
## Deploy API Extensions Using Cloudflare Workers
We recommend using Cloudflare Workers to deploy your API extensions because Cloudflare Workers can conveniently provide a public network address and can be used for free.
For detailed instructions, see [Deploy API Extensions Using Cloudflare Workers](/en/use-dify/workspace/api-extension/cloudflare-worker).
# Deploy API Extensions Using Cloudflare Workers
Source: https://docs.dify.ai/en/use-dify/workspace/api-extension/cloudflare-worker
## Procedure
Since Dify API extensions require a publicly accessible address as the API Endpoint, the API extension needs to be deployed to a public address.
Here we use Cloudflare Workers to deploy the API extension.
Clone the [Example GitHub Repository](https://github.com/crazywoola/dify-extension-workers). This repository contains a simple API extension that can be modified as a starting point.
```bash theme={null}
git clone https://github.com/crazywoola/dify-extension-workers.git
cp wrangler.toml.example wrangler.toml
```
Open the `wrangler.toml` file and modify `name` and `compatibility_date` to your application name and compatibility date.
The configuration we need to pay attention to here is the `TOKEN` in `vars`. When adding an API extension in Dify, we need to fill in this Token. For security reasons, we recommend using a random string as the Token. You should not write the Token directly in the source code, but pass it through environment variables. Therefore, please do not commit wrangler.toml to your code repository.
```toml theme={null}
name = "dify-extension-example"
compatibility_date = "2023-01-01"
[vars]
TOKEN = "bananaiscool"
```
This API extension will return a random Breaking Bad quote. You can modify the logic of this API extension in `src/index.ts`. This example demonstrates how to interact with third-party APIs.
```typescript theme={null}
// ⬇️ implement your logic here ⬇️
// point === "app.external_data_tool.query"
// https://api.breakingbadquotes.xyz/v1/quotes
const count = params?.inputs?.count ?? 1;
const url = `https://api.breakingbadquotes.xyz/v1/quotes/${count}`;
const result = await fetch(url).then(res => res.text())
// ⬆️ implement your logic here ⬆️
```
This repository simplifies all configurations except business logic. You can directly use `npm` commands to deploy your API extension.
```bash theme={null}
npm install
npm run deploy
```
After successful deployment, you will get a public address that you can add in Dify as the API Endpoint. Please note not to omit the `endpoint` path. The specific definition of this path can be found in `src/index.ts`.

Alternatively, you can use the `npm run dev` command to deploy locally for testing.
```bash theme={null}
npm install
npm run dev
```
Related output:
```bash theme={null}
$ npm run dev
> dev
> wrangler dev src/index.ts
⛅️ wrangler 3.99.0
-------------------
Your worker has access to the following bindings:
- Vars:
- TOKEN: "ban****ool"
⎔ Starting local server...
[wrangler:inf] Ready on http://localhost:58445
```
After that, you can use tools like Postman for local interface debugging.
## About Bearer Auth
```typescript theme={null}
import { bearerAuth } from "hono/bearer-auth";
(c, next) => {
const auth = bearerAuth({ token: c.env.TOKEN });
return auth(c, next);
},
```
Our Bearer validation logic is in the above code. We use the `hono/bearer-auth` package to implement Bearer validation. You can use `c.env.TOKEN` in `src/index.ts` to get the Token.
## About Parameter Validation
```typescript theme={null}
import { z } from "zod";
import { zValidator } from "@hono/zod-validator";
const schema = z.object({
point: z.union([
z.literal("ping"),
z.literal("app.external_data_tool.query"),
]), // Restricts 'point' to two specific values
params: z
.object({
app_id: z.string().optional(),
tool_variable: z.string().optional(),
inputs: z.record(z.any()).optional(),
query: z.any().optional(), // string or null
})
.optional(),
});
```
We use `zod` to define parameter types here. You can use `zValidator` in `src/index.ts` to validate parameters. Use `const { point, params } = c.req.valid("json");` to get the validated parameters.
The `point` here has only two values, so we use `z.union` to define it. `params` is an optional parameter, so we use `z.optional` to define it. There will be an `inputs` parameter, which is a `Record` type. This type represents an object with string keys and any values. This type can represent any object. You can use `params?.inputs?.count` in `src/index.ts` to get the `count` parameter.
## Get Cloudflare Workers Logs
```bash theme={null}
wrangler tail
```
***
**Reference**:
* [Cloudflare Workers](https://workers.cloudflare.com/)
* [Cloudflare Workers CLI](https://developers.cloudflare.com/workers/cli-wrangler/install-update)
* [Example GitHub Repository](https://github.com/crazywoola/dify-extension-workers)
# External Data Tool
Source: https://docs.dify.ai/en/use-dify/workspace/api-extension/external-data-tool-api-extension
When creating AI applications, you can use external tools to obtain additional data through [API Extensions](/en/use-dify/workspace/api-extension/api-extension) and assemble it into the prompt as additional information for the LLM.
## Extension Point
`app.external_data_tool.query`: Application external data tool query extension point.
This extension point passes the application variable content input by the end user and the conversation input content (fixed parameter for conversational applications) to the API as parameters.
You need to implement the corresponding tool query logic and return query results as string type.
### Request Body
```
{
"point": "app.external_data_tool.query", // Extension point type, fixed as app.external_data_tool.query
"params": {
"app_id": string, // Application ID
"tool_variable": string, // External data tool variable name, indicating the source of the corresponding variable tool call
"inputs": { // Variable values passed by end user, key is variable name, value is variable value
"var_1": "value_1",
"var_2": "value_2",
...
},
"query": string | null // Current conversation input content from end user, fixed parameter for conversational applications.
}
}
```
**Example**:
```
{
"point": "app.external_data_tool.query",
"params": {
"app_id": "61248ab4-1125-45be-ae32-0ce91334d021",
"tool_variable": "weather_retrieve",
"inputs": {
"location": "London"
},
"query": "How's the weather today?"
}
}
```
### API Response
```
{
"result": string
}
```
**Example**:
```
{
"result": "City: London\nTemperature: 10°C\nRealFeel®: 8°C\nAir Quality: Poor\nWind Direction: ENE\nWind Speed: 8 km/h\nWind Gusts: 14 km/h\nPrecipitation: Light rain"
}
```
# Sensitive Content Moderation
Source: https://docs.dify.ai/en/use-dify/workspace/api-extension/moderation-api-extension
This module is used to review the content input by end users and the content output by LLM in applications. It is divided into two extension point types.
## Extension Points
* `app.moderation.input`: End user input content review extension point
* Used to review variable content passed in by end users and conversation input content in conversational applications.
* `app.moderation.output`: LLM output content review extension point
* Used to review content output by LLM.
* When the LLM output is streaming, the output content will be segmented into 100-character chunks for API requests to avoid delayed reviews when output content is lengthy.
### app.moderation.input
When **Content Moderation > Review Input Content** is enabled in applications such as Chatflow, Agent, or Chatbot, Dify will send the following HTTP POST request to the corresponding API extension:
#### Request Body
```
{
"point": "app.moderation.input", // Extension point type, fixed as app.moderation.input
"params": {
"app_id": string, // Application ID
"inputs": { // Variable values passed by end user, key is variable name, value is variable value
"var_1": "value_1",
"var_2": "value_2",
...
},
"query": string | null // Current conversation input content from end user, fixed parameter for conversational applications.
}
}
```
**Example**:
```
{
"point": "app.moderation.input",
"params": {
"app_id": "61248ab4-1125-45be-ae32-0ce91334d021",
"inputs": {
"var_1": "I will kill you.",
"var_2": "I will fuck you."
},
"query": "Happy everydays."
}
}
```
#### API Response
```
{
"flagged": bool, // Whether it violates validation rules
"action": string, // Action: direct_output outputs preset response; overridden overwrites input variable values
"preset_response": string, // Preset response (returned only when action=direct_output)
"inputs": { // Variable values passed by end user, key is variable name, value is variable value (returned only when action=overridden)
"var_1": "value_1",
"var_2": "value_2",
...
},
"query": string | null // Overwritten current conversation input content from end user, fixed parameter for conversational applications. (returned only when action=overridden)
}
```
**Example**:
* `action=direct_output`
```
{
"flagged": true,
"action": "direct_output",
"preset_response": "Your content violates our usage policy."
}
```
* `action=overridden`
```
{
"flagged": true,
"action": "overridden",
"inputs": {
"var_1": "I will *** you.",
"var_2": "I will *** you."
},
"query": "Happy everydays."
}
```
### app.moderation.output
When **Content Moderation > Review Output Content** is enabled in applications such as Chatflow, Agent, or Chat Assistant, Dify will send the following HTTP POST request to the corresponding API extension:
#### Request Body
```
{
"point": "app.moderation.output", // Extension point type, fixed as app.moderation.output
"params": {
"app_id": string, // Application ID
"text": string // LLM response content. When LLM output is streaming, this is content segmented into 100-character chunks.
}
}
```
**Example**:
```
{
"point": "app.moderation.output",
"params": {
"app_id": "61248ab4-1125-45be-ae32-0ce91334d021",
"text": "I will kill you."
}
}
```
#### API Response
```
{
"flagged": bool, // Whether it violates validation rules
"action": string, // Action: direct_output outputs preset response; overridden overwrites input variable values
"preset_response": string, // Preset response (returned only when action=direct_output)
"text": string // Overwritten LLM response content. (returned only when action=overridden)
}
```
**Example**:
* `action=direct_output`
```
{
"flagged": true,
"action": "direct_output",
"preset_response": "Your content violates our usage policy."
}
```
* `action=overridden`
```
{
"flagged": true,
"action": "overridden",
"text": "I will *** you."
}
```
## Code Example
Below is a piece of `src/index.ts` code that can be deployed on Cloudflare. (For complete Cloudflare usage, please refer to [this documentation](/en/use-dify/workspace/api-extension/cloudflare-worker))
The code works by performing keyword matching to filter both Input (content entered by users) and Output (content returned by the model). Users can modify the matching logic according to their needs.
```
import { Hono } from "hono";
import { bearerAuth } from "hono/bearer-auth";
import { z } from "zod";
import { zValidator } from "@hono/zod-validator";
import { generateSchema } from '@anatine/zod-openapi';
type Bindings = {
TOKEN: string;
};
const app = new Hono<{ Bindings: Bindings }>();
// API format validation ⬇️
const schema = z.object({
point: z.union([
z.literal("ping"),
z.literal("app.external_data_tool.query"),
z.literal("app.moderation.input"),
z.literal("app.moderation.output"),
]), // Restricts 'point' to two specific values
params: z
.object({
app_id: z.string().optional(),
tool_variable: z.string().optional(),
inputs: z.record(z.any()).optional(),
query: z.any(),
text: z.any()
})
.optional(),
});
// Generate OpenAPI schema
app.get("/", (c) => {
return c.json(generateSchema(schema));
});
app.post(
"/",
(c, next) => {
const auth = bearerAuth({ token: c.env.TOKEN });
return auth(c, next);
},
zValidator("json", schema),
async (c) => {
const { point, params } = c.req.valid("json");
if (point === "ping") {
return c.json({
result: "pong",
});
}
// ⬇️ implement your logic here ⬇️
// point === "app.external_data_tool.query"
else if (point === "app.moderation.input"){
// Input check ⬇️
const inputkeywords = ["input filter test 1", "input filter test 2", "input filter test 3"];
if (inputkeywords.some(keyword => params.query.includes(keyword)))
{
return c.json({
"flagged": true,
"action": "direct_output",
"preset_response": "The input contains illegal content. Please try a different question!"
});
} else {
return c.json({
"flagged": false,
"action": "direct_output",
"preset_response": "Input is normal"
});
}
// Input check complete
}
else {
// Output check ⬇️
const outputkeywords = ["output filter test 1", "output filter test 2", "output filter test 3"];
if (outputkeywords.some(keyword => params.text.includes(keyword)))
{
return c.json({
"flagged": true,
"action": "direct_output",
"preset_response": "The output contains sensitive content and has been filtered by the system. Please try a different question!"
});
}
else {
return c.json({
"flagged": false,
"action": "direct_output",
"preset_response": "Output is normal"
});
};
}
// Output check complete
}
);
export default app;
```
# Manage Apps
Source: https://docs.dify.ai/en/use-dify/workspace/app-management
Organize, maintain, and share your AI applications with powerful management tools and best practices
Managing your apps well is crucial for productive AI development. Dify provides comprehensive tools to organize, share, and maintain your applications throughout their lifecycle.
## App Organization
Update names, descriptions, icons, and branding for better organization
Create variations or use existing apps as templates for new projects
Share apps between workspaces using Dify's DSL format
Safely delete apps when no longer needed
## Editing Application Information
Keep your apps organized with clear, descriptive information:

Click "Edit info" in the upper left corner of your application.
Modify the icon, name, or description to better reflect the app's purpose.
Use names and descriptions that help team members understand what the app does.
Use consistent naming conventions across your workspace. Consider prefixes like "Draft-", "Test-", or "Prod-" to indicate app status.
## Creating App Variations
Duplication is perfect for creating variations or starting new projects from existing work:
**When to duplicate:**
* Creating A/B test versions with different prompts or models
* Adapting an app for different audiences or use cases
* Starting a new project based on successful patterns
* Creating backups before major changes
**How duplication works:**
* All configuration, prompts, and workflows are copied
* The new app gets a default name you can customize
* Original app remains unchanged
* Both apps run independently
## App Export and Import
Dify's DSL (Domain Specific Language) format lets you share apps between workspaces and teams:

### Exporting Applications
**Two ways to export:**
1. **From Studio page** - Click "Export DSL" in the application menu
2. **From orchestration** - Click "Export DSL" in the upper left corner
**What gets exported:**
* App configuration and metadata
* Workflow orchestration and node settings
* Model parameters and prompt templates
* Knowledge base connections (not the data itself)
**What doesn't get exported:**
* API keys for third-party tools (security measure)
* Actual knowledge base content
* Usage logs and analytics data
If your app uses Secret-type environment variables, you'll be asked whether to include them in the export. Be careful with sensitive information.

### Importing Applications

**Import process:**
1. Upload your DSL file (YAML format)
2. System checks version compatibility
3. Warning appears if DSL version is older than current platform
4. App is created with all configurations from the file
**Version compatibility:**
* **SaaS users**: DSL files are always the latest version
* **Community users**: May need to upgrade to avoid compatibility issues
Dify DSL is the AI application engineering standard (v0.6+) that captures complete app configurations in YAML format.
## Safe App Deletion
Before deleting apps, understand the impact:
**What gets deleted:**
* All app configurations and prompts
* Workflow orchestration and settings
* Usage logs and analytics
* Published web apps and API access
* All user conversations and data
**Impact on users:**
* Published web apps stop working immediately
* API calls start returning errors
* All existing user sessions are terminated
Could you duplicate the app for backup, or just unpublish instead of deleting?
Let team members and users know about planned deletions.
Create DSL backups of valuable configurations before deletion.
Click "Delete" and confirm—this action cannot be undone.
App deletion is permanent and cannot be undone. All associated data, logs, and user access will be lost immediately.
# Model Providers
Source: https://docs.dify.ai/en/use-dify/workspace/model-providers
Configure AI model access for your workspace—the foundation that powers all your applications
Model providers give your workspace access to AI models. Every application you build needs models to function, and configuring providers at the workspace level means all team members can use them across all projects.
## System vs Custom Providers
**System Providers** are managed by Dify. You get immediate access to models without setup, billing through your Dify subscription, and automatic updates when new models become available. Best for getting started quickly.
**Custom Providers** use your own API keys for direct access to model providers like OpenAI, Anthropic, or Google. You get full control, direct billing, and often higher rate limits. Best for production applications.
You can use both simultaneously—system providers for prototyping, custom providers for production.
## Configure Custom Providers
Only workspace admins and owners can configure model providers. The process is consistent across providers:
Access the model provider configuration in your workspace settings.
Choose from OpenAI, Anthropic, Google, Cohere, or other supported providers.
Enter your API key and any additional configuration required by the provider.
Dify validates your credentials before making the provider available to your workspace.
## Supported Providers
**Large Language Models:**
* OpenAI (GPT-4, GPT-3.5-turbo)
* Anthropic (Claude)
* Google (Gemini)
* Cohere
* Local models via Ollama
**Embedding Models:**
* OpenAI Embeddings
* Cohere Embeddings
* Azure OpenAI
* Local embedding models
**Specialized Models:**
* Image generation (DALL-E, Stable Diffusion)
* Speech (Whisper, ElevenLabs)
* Moderation APIs
## Provider Configuration Examples
**Required:** API Key from OpenAI Platform
**Optional:** Custom base URL for Azure OpenAI or proxies, Organization ID for organization-scoped usage
**Available Models:** GPT-4, GPT-3.5-turbo, DALL-E, Whisper, Text embeddings
**Required:** API Key from Anthropic Console
**Available Models:** Claude 3 (Opus, Sonnet, Haiku), Claude 2.1, Claude Instant
**Required:** Ollama server URL (typically [http://localhost:11434](http://localhost:11434))
**Setup:** Install Ollama, pull models (`ollama pull llama2`), configure Dify connection
**Benefits:** Complete data privacy, no external API costs, custom model fine-tuning
## Manage Model Credentials
Add multiple credentials for a model provider's predefined and custom models, and easily switch between, delete, or modify these credentials.
Here are some scenarios where adding multiple credentials is particularly helpful:
* **Environment Isolation**: Configure separate model credentials for different environments, such as development, testing, and production. For example, use a rate-limited credential in the development environment for debugging, and a paid credential with stable performance and a sufficient quota in the production environment to ensure service quality.
* **Cost Optimization**: Add and switch between multiple credentials from different accounts or model providers to maximize the use of free or low-cost quotas, thereby reducing application development and operational costs.
* **Model Testing**: During model fine-tuning or iteration, you may create multiple model versions. By adding credentials for these different versions, you can quickly switch between them to test and evaluate their performance.
Use multiple credentials to configure load balancing for a model.
After installing a model provider and configuring the first credential, click **Config** in the upper-right corner to perform the following actions:
* Add a new credential
* Select a credential as the default for all predefined models
* Edit a credential
* Delete a credential
If the default credential is deleted, you must manually specify a new one.
![Manage Credentials for Predefined Models]() ### Manage Credentials for a Single Custom Model
After installing a model provider and adding a custom model, follow these steps:
1. In the model list, click the corresponding **Config**.
2. In the **Specify model credential** panel, click the default credential to open the credential list, then perform the following actions:
* Add a new credential
* Select a credential as the default for that custom model
* Edit a credential
* Delete a credential
If you delete the only credential for a custom model, the model will also be deleted.
### Manage Credentials for a Single Custom Model
After installing a model provider and adding a custom model, follow these steps:
1. In the model list, click the corresponding **Config**.
2. In the **Specify model credential** panel, click the default credential to open the credential list, then perform the following actions:
* Add a new credential
* Select a credential as the default for that custom model
* Edit a credential
* Delete a credential
If you delete the only credential for a custom model, the model will also be deleted.
![Manage Credentials for a Single Custom Model]() When you add a new custom model with a name and type identical to an existing custom model, the system will add the new credential to that existing model rather than creating a duplicate.
### Manage Credentials for All Custom Models
Click **Manage Credentials** to view, edit, or delete the credentials for all custom models.
When you add a new custom model with a name and type identical to an existing custom model, the system will add the new credential to that existing model rather than creating a duplicate.
### Manage Credentials for All Custom Models
Click **Manage Credentials** to view, edit, or delete the credentials for all custom models.
![Manage Credentials for All Custom Models]() After a custom model is removed, its credentials will remain in the **Manage Credentials** list. When you click **Add Model**, the system will display all removed custom models whose credentials still exist, allowing you to quickly re-add them.
After a custom model is removed, its credentials will remain in the **Manage Credentials** list. When you click **Add Model**, the system will display all removed custom models whose credentials still exist, allowing you to quickly re-add them.
![Removed Models Displayed for Quick Re-add]() If you delete all credentials for a removed custom model from the **Manage Credentials** list, that model will no longer appear when you click **Add Model**.
## Configure Model Load Balancing
Load balancing is a paid feature. You can enable it through [a paid SaaS subscription or an Enterprise license](https://dify.ai/pricing).
Model providers typically enforce rate limits on API access within a specific timeframe to ensure stability and fair use. For enterprise applications, a high volume of concurrent requests from a single credential can easily trigger these limits, disrupting user access.
An effective solution is load balancing, which distributes request traffic across multiple model credentials. This prevents rate limit issues and single points of failure, ensuring business continuity and faster response times for all users.
Dify employs a round-robin strategy for load balancing, sequentially routing model requests to each credential in the load balancing pool. If a credential hits a rate limit, it is temporarily removed from rotation for one minute to avoid futile retries.
To configure load balancing for a model, follow these steps:
1. In the model list, find the target model, click the corresponding **Config**, and select **Load balancing**.
2. In the load balancing pool, click **Add credential** to select from existing credentials or add a new one.
**Default Config** refers to the default credential currently specified for that model.
If a credential has a higher quota or better performance, you can add it multiple times to increase its weight in the load balancing rotation, allowing it to handle a larger share of the request load.
If you delete all credentials for a removed custom model from the **Manage Credentials** list, that model will no longer appear when you click **Add Model**.
## Configure Model Load Balancing
Load balancing is a paid feature. You can enable it through [a paid SaaS subscription or an Enterprise license](https://dify.ai/pricing).
Model providers typically enforce rate limits on API access within a specific timeframe to ensure stability and fair use. For enterprise applications, a high volume of concurrent requests from a single credential can easily trigger these limits, disrupting user access.
An effective solution is load balancing, which distributes request traffic across multiple model credentials. This prevents rate limit issues and single points of failure, ensuring business continuity and faster response times for all users.
Dify employs a round-robin strategy for load balancing, sequentially routing model requests to each credential in the load balancing pool. If a credential hits a rate limit, it is temporarily removed from rotation for one minute to avoid futile retries.
To configure load balancing for a model, follow these steps:
1. In the model list, find the target model, click the corresponding **Config**, and select **Load balancing**.
2. In the load balancing pool, click **Add credential** to select from existing credentials or add a new one.
**Default Config** refers to the default credential currently specified for that model.
If a credential has a higher quota or better performance, you can add it multiple times to increase its weight in the load balancing rotation, allowing it to handle a larger share of the request load.
![Add Credentials for Load Balancing]() 3. Enable at least two credentials in the load balancing pool, then click **Save**. Models with load balancing enabled will be marked with a special icon.
3. Enable at least two credentials in the load balancing pool, then click **Save**. Models with load balancing enabled will be marked with a special icon.
![Load Balancing Icon]() When you switch from load-balancing mode back to the default single-credential mode, your load-balancing configuration is preserved for future use.
## Access and Billing
System providers are billed through your Dify subscription with usage limits based on your plan. Custom providers bill you directly through the provider (OpenAI, Anthropic, etc.) and often provide higher rate limits.
Team access follows workspace permissions:
* **Owners/Admins** can configure, modify, and remove providers
* **Editors/Members** can view available providers and use them in applications
API keys are stored securely but grant workspace-wide model access. Only give admin privileges to trusted team members who should have billing responsibility.
## Troubleshooting
**Authentication Failed:** Verify API key accuracy, check expiration, ensure sufficient credits, confirm key permissions.
**Model Not Available:** Check provider configuration includes the model, verify API key tier access, refresh provider settings.
**Rate Limits:** Upgrade provider account, implement request queuing, consider custom providers for higher limits.
# Personal Settings
Source: https://docs.dify.ai/en/use-dify/workspace/personal-account-management
Manage your profile and preferences across all workspaces
Your personal account spans all workspaces you belong to. Profile settings, language preferences, and login credentials follow you everywhere, while each workspace maintains its own team dynamics and permissions.
## Account Setup
**Dify Cloud** creates your account automatically on first login. You can use GitHub, Google, or email verification. Accounts with matching email addresses are automatically linked.
**Community Edition** requires email and password setup during installation. The administrator account is configured when the system is first deployed.
## Multi-Workspace Access
Your personal account can belong to multiple workspaces. Each workspace has its own team, applications, and billing, but your profile remains consistent across all of them.
**Switching Workspaces:** Use the workspace selector in the top-left corner to switch between workspaces you have access to.
**Workspace Independence:** Your role and permissions are set per-workspace. You might be an Owner in one workspace and a Member in another.
## Profile Management
Update your profile information in Settings → Account → Profile. Changes apply across all workspaces you belong to.
**Profile Picture:** Upload a custom avatar. This replaces the default initials-based avatar and appears in all workspaces.
**Display Name:** How you appear to team members across all workspaces. Choose something that helps teammates identify you.
**Email Address:** Your primary login credential and unique identifier. Changing your email affects all workspaces using the old address.
## Language and Interface
**Display Language:** Available languages include English, Simplified Chinese, and Traditional Chinese. This setting affects interface elements but not your application content.
**Change Language:** Click your avatar → Language, then select your preferred language.
## Login Methods by Edition
When you switch from load-balancing mode back to the default single-credential mode, your load-balancing configuration is preserved for future use.
## Access and Billing
System providers are billed through your Dify subscription with usage limits based on your plan. Custom providers bill you directly through the provider (OpenAI, Anthropic, etc.) and often provide higher rate limits.
Team access follows workspace permissions:
* **Owners/Admins** can configure, modify, and remove providers
* **Editors/Members** can view available providers and use them in applications
API keys are stored securely but grant workspace-wide model access. Only give admin privileges to trusted team members who should have billing responsibility.
## Troubleshooting
**Authentication Failed:** Verify API key accuracy, check expiration, ensure sufficient credits, confirm key permissions.
**Model Not Available:** Check provider configuration includes the model, verify API key tier access, refresh provider settings.
**Rate Limits:** Upgrade provider account, implement request queuing, consider custom providers for higher limits.
# Personal Settings
Source: https://docs.dify.ai/en/use-dify/workspace/personal-account-management
Manage your profile and preferences across all workspaces
Your personal account spans all workspaces you belong to. Profile settings, language preferences, and login credentials follow you everywhere, while each workspace maintains its own team dynamics and permissions.
## Account Setup
**Dify Cloud** creates your account automatically on first login. You can use GitHub, Google, or email verification. Accounts with matching email addresses are automatically linked.
**Community Edition** requires email and password setup during installation. The administrator account is configured when the system is first deployed.
## Multi-Workspace Access
Your personal account can belong to multiple workspaces. Each workspace has its own team, applications, and billing, but your profile remains consistent across all of them.
**Switching Workspaces:** Use the workspace selector in the top-left corner to switch between workspaces you have access to.
**Workspace Independence:** Your role and permissions are set per-workspace. You might be an Owner in one workspace and a Member in another.
## Profile Management
Update your profile information in Settings → Account → Profile. Changes apply across all workspaces you belong to.
**Profile Picture:** Upload a custom avatar. This replaces the default initials-based avatar and appears in all workspaces.
**Display Name:** How you appear to team members across all workspaces. Choose something that helps teammates identify you.
**Email Address:** Your primary login credential and unique identifier. Changing your email affects all workspaces using the old address.
## Language and Interface
**Display Language:** Available languages include English, Simplified Chinese, and Traditional Chinese. This setting affects interface elements but not your application content.
**Change Language:** Click your avatar → Language, then select your preferred language.
## Login Methods by Edition
| Edition |
Login Methods |
| Community |
Email and password only |
| Cloud |
GitHub, Google, Email with verification code |
**Account Linking:** Dify Cloud automatically links accounts with the same email address. If you sign up with GitHub using [email@company.com](mailto:email@company.com), then later use email verification with the same address, the system recognizes them as the same account.
## Security
**Cloud Users:** Leverage social login (GitHub/Google) for enhanced security. Review your chosen provider's security settings and monitor login activity through their platform.
**Community Edition Users:** Use strong, unique passwords and change them regularly. Don't share login credentials with others.
**Cross-Workspace:** Your personal settings follow you everywhere, but remember that each workspace has its own security model and permissions.
Changing your email address affects all workspaces. If you want to change the email for just one workspace, consider having that workspace invite the new email as a separate user account.
# Plugins
Source: https://docs.dify.ai/en/use-dify/workspace/plugins
Extend Dify with custom models, tools, and integrations through modular components
Plugins are how Dify connects to everything—model providers, external APIs, custom tools. They're modular components that extend your workspace capabilities that you install once but can use everywhere.
![Plugins Tab]() Access plugin management through the Plugins tab in your workspace.
## How Plugins Work
Access plugin management through the Plugins tab in your workspace.
## How Plugins Work
![Plugin Management]() Plugins are workspace-scoped. When you install a plugin, every application in your workspace can use it. Team members access plugins based on their roles:
Install, configure, and remove plugins for the entire workspace
Use installed plugins in applications they create or edit
## Installing Plugins
Official and partner plugins, tested and maintained
Install from any public repository with URL + version
Custom .zip packages for private or internal plugins
## What Plugins Really Are
Think of plugins as the bridge between Dify and the outside world:
Every LLM in Dify (OpenAI, Anthropic, etc.) is actually a plugin
API calls, data processing, calculations—all plugin-based
Expose your Dify apps as APIs that external systems can call
Plugins can call back into Dify to use models, tools, or workflows
## Workspace Plugin Settings
Control plugin permissions in your workspace settings:
**Everyone** - Any member can install plugins
**Admin Only** - Only workspace admins can install (recommended)
**Everyone** - All members can debug plugin issues
**Admin Only** - Restrict debugging to admins
Choose update strategy (security only vs. all updates) and specify which plugins to include or exclude
After installing, most plugins need configuration—API keys, endpoints, or service settings. These apply workspace-wide.
## Plugin Installation Restrictions
Enterprise Only
In enterprise workspaces, you might see installation restrictions when browsing the plugin marketplace:
**What you'll encounter:**
* The "Install Plugin" dropdown in Plugins → Explore Marketplace may show limited options
* Installation confirmation dialogs will indicate if a plugin is blocked by policy
* When importing apps with plugins (DSL files), you'll see notices about restricted plugins
**Plugin badges in marketplace:**

Look for these badges to identify plugin types—your workspace may only allow certain types based on admin settings.
If you can't install a needed plugin, contact your workspace admin. They control which plugin sources (marketplace, GitHub, local files) and types (official, partner, third-party) are allowed.
## Building Custom Plugins
Develop plugins using Dify's SDK when you need custom functionality:
1. Get a debugging key from Settings → Plugins → Debugging
2. Build and test your plugin locally
3. Package as a .zip with manifest and dependencies
4. Distribute privately or publish to the marketplace
# Overview
Source: https://docs.dify.ai/en/use-dify/workspace/readme
Workspaces are the foundational organizational unit in Dify—everything your team builds, configures, and manages exists within a workspace
A workspace is your team's complete AI environment in Dify. It contains and isolates everything your organization needs: applications, knowledge bases, team members, model configurations, plugins, and billing.
## The Workspace Mental Model
Every resource in Dify belongs to a workspace. When you create an app, it inherits the workspace's model configurations. When you add team members, they get access to workspace resources based on their role. When you configure models or install plugins, they become available to the entire workspace.
```
🏢 Your Organization
└── 📁 Workspace
├── 🤖 Apps (chatbots, workflows, agents)
├── 📊 Knowledge Bases (documents, embeddings)
├── 👥 Team Members (roles & permissions)
├── 🧠 Model Providers (API keys, configurations)
├── 🔧 Tools & Plugins (integrations, custom code)
└── 💳 Billing (subscription, limits, usage)
```
This workspace-first design means your resources are completely isolated from other organizations, team members can only access what they're permitted to see, and you configure models and billing once for the entire workspace.
## Workspace Creation
**Dify Cloud** automatically creates a workspace on first login. You become the owner with full permissions.
**Community Edition** creates one workspace during installation. The administrator email and password are set during setup.
**Multiple workspaces** are supported when you need complete isolation between different legal entities, regulatory environments, or client projects. Most organizations use a single workspace.
Your personal account can belong to multiple workspaces. Switch between them using the workspace selector in the top-left corner.
## How Resources Connect
Applications you build can use any model providers configured in the workspace, access all workspace knowledge bases, and utilize installed plugins. Team members see applications based on their workspace permissions.
Workspace roles determine access across all resources:
* **Owners** control billing, model providers, and workspace settings
* **Admins** manage team members and configure models/plugins
* **Editors** build applications and manage knowledge bases
* **Members** use published applications
* **Dataset Operators** focus on knowledge base management
## Workspace Navigation
Dify organizes everything around the workspace concept. The main navigation shows Apps, Knowledge, and Tools available in your workspace. Settings contains workspace-wide configurations: Members, Model Providers, Plugins, Billing (Cloud only), and personal Account settings.
# Billing
Source: https://docs.dify.ai/en/use-dify/workspace/subscription-management
Manage workspace subscriptions and billing to control team size and feature access
Billing in Dify is workspace-scoped. Your subscription determines team member limits, feature availability, and usage quotas for the entire workspace.
## Subscription Plans
1 team member, basic features, community support
Up to 3 team members, advanced features, priority support
Up to 50 team members, full feature set, dedicated support
## Plan Comparison
| Resource | Free | Professional | Team |
| ------------ | ---------------- | -------------- | ---------------------- |
| Team Members | 1 | 3 | 50 |
| Applications | 5 | 50 | 200 |
| API Calls | 5000 calls / day | Unlimited | Unlimited |
| Support | Community | Priority Email | Priority Email & Slack |
## Managing Subscriptions
Only workspace owners and admins can access billing settings and change subscriptions.
**Upgrading:** Navigate to Settings → Billing and click the Upgrade button. Select your desired plan and complete payment. Changes take effect immediately.
**Plan Changes:**
* **Upgrades** are prorated for the current billing period
* **Downgrades** take effect immediately with billing adjustments on the next invoice
* **Cancellations** continue until the end of the current cycle, then revert to Free plan
When downgrading, team members exceeding the new plan limits will lose workspace access immediately.
## Dify for Education
Current students and teachers can use Dify's Professional plan for free through Dify for Education.
### Getting the Education Discount
**Prerequisites:**
* Be 18 or older
* Current student, teacher, or educational staff member
* Valid educational email address ending in `.edu`
**Steps:**
1. **Create account** - Register at [cloud.dify.ai](https://cloud.dify.ai/signin) with your educational email
2. **Apply for verification** - Go to Settings → Billing → Get Education Verified. Enter your school's full name and select your role.
3. **Activate subscription** - After approval, upgrade to Professional plan with annual billing. The education coupon applies automatically, making it free.
Your subscription will show as `Pro(Edu)` once activated. Renewal is required annually.
### Education FAQ
**What if I already have a paid subscription?**
The education coupon cannot be applied to paid subscriptions at this time. We suggest you activate the free Professional plan after your current billing cycle ends.
**Why was my verification rejected?**
Common reasons: non-educational email, fraudulent information, or misuse of privileges. Appeal via [support@dify.ai](mailto:support@dify.ai).
**Can I use a personal email?**
No, institutional email required for verification.
# Manage Members
Source: https://docs.dify.ai/en/use-dify/workspace/team-members-management
Manage workspace members, roles, and permissions to build effective AI teams
Team management in Dify is workspace-centric. When you add members to your workspace, they get access to workspace resources based on their assigned role. Understanding these roles helps you build secure, productive AI teams.
## Team Size Limits
Your workspace can include different numbers of team members based on your Dify edition:
* **Free:** 1 member (solo development)
* **Professional:** 3 members (small teams)
* **Team:** Unlimited members (growing companies)
* **Community/Enterprise:** Unlimited members (self-hosted)
## Workspace Roles
**Full workspace control.** Only one owner per workspace. Controls all team members, billing, model providers, and can delete the workspace. Cannot transfer ownership to another member.
**Team and resource management.** Can add/remove team members, configure model providers, manage all applications, and install plugins. Cannot change member roles or manage billing.
**Application development.** Can create, edit, and delete applications, manage knowledge bases, and use all workspace tools. Cannot manage team members or configure providers.
**Application usage only.** Can use published applications and tools they have access to. Cannot create or modify applications.
**Knowledge base specialist.** Focused role for managing datasets and knowledge bases. Can create and manage knowledge bases but has limited application access.
## Adding Team Members
Only workspace owners can invite new team members:
Navigate to Settings → Members in your workspace.
Enter email addresses and select the appropriate role for each new member.
New users receive registration emails. Existing Dify users are added immediately and can access the workspace through the workspace switcher.
Community Edition requires email service configuration before invitations work properly.
## Member Management
**Removing Members:** Only workspace owners can remove team members. When removed, members immediately lose workspace access, but applications they created remain in the workspace.
**Role Changes:** Only workspace owners can modify member roles. Role changes take effect immediately and alter what the member can access across the workspace.
**Multiple Workspaces:** Team members can belong to multiple workspaces. They switch between workspaces using the selector in the top-left corner.
## Access Patterns
**Resource Inheritance:** All workspace resources (model providers, plugins, knowledge bases) are available to team members based on their role permissions.
**Application Access:** Members see applications based on sharing settings and their role. Owners and Admins see all applications. Editors see applications they can modify. Members see only published applications they're permitted to use.
**Configuration Access:** Model providers and plugins configured at the workspace level become available to all applications created by team members with appropriate permissions.
# Dify Tools
Source: https://docs.dify.ai/en/use-dify/workspace/tools
Manage tools that enable LLMs to interact with external services and APIs
Dify tools enable LLMs to interact with external services and APIs, so they can access real-time data and perform actions (e.g., web searches, database queries, or content processing).
Each tool has a clear interface: what inputs it accepts, what action it performs, and what output it returns. This helps LLMs decide when and how to call a tool based on user requests.
Use tools in:
* Workflow / Chatflow apps (as standalone [Tool nodes](/en/use-dify/nodes/tools), or within [Agent nodes](/en/use-dify/nodes/agent#tool-configuration))
* [Agent apps](/en/use-dify/build/agent#extend-the-agent-with-dify-tools)
All your tools can be managed on the **Tools** page.
Plugins are workspace-scoped. When you install a plugin, every application in your workspace can use it. Team members access plugins based on their roles:
Install, configure, and remove plugins for the entire workspace
Use installed plugins in applications they create or edit
## Installing Plugins
Official and partner plugins, tested and maintained
Install from any public repository with URL + version
Custom .zip packages for private or internal plugins
## What Plugins Really Are
Think of plugins as the bridge between Dify and the outside world:
Every LLM in Dify (OpenAI, Anthropic, etc.) is actually a plugin
API calls, data processing, calculations—all plugin-based
Expose your Dify apps as APIs that external systems can call
Plugins can call back into Dify to use models, tools, or workflows
## Workspace Plugin Settings
Control plugin permissions in your workspace settings:
**Everyone** - Any member can install plugins
**Admin Only** - Only workspace admins can install (recommended)
**Everyone** - All members can debug plugin issues
**Admin Only** - Restrict debugging to admins
Choose update strategy (security only vs. all updates) and specify which plugins to include or exclude
After installing, most plugins need configuration—API keys, endpoints, or service settings. These apply workspace-wide.
## Plugin Installation Restrictions
Enterprise Only
In enterprise workspaces, you might see installation restrictions when browsing the plugin marketplace:
**What you'll encounter:**
* The "Install Plugin" dropdown in Plugins → Explore Marketplace may show limited options
* Installation confirmation dialogs will indicate if a plugin is blocked by policy
* When importing apps with plugins (DSL files), you'll see notices about restricted plugins
**Plugin badges in marketplace:**

Look for these badges to identify plugin types—your workspace may only allow certain types based on admin settings.
If you can't install a needed plugin, contact your workspace admin. They control which plugin sources (marketplace, GitHub, local files) and types (official, partner, third-party) are allowed.
## Building Custom Plugins
Develop plugins using Dify's SDK when you need custom functionality:
1. Get a debugging key from Settings → Plugins → Debugging
2. Build and test your plugin locally
3. Package as a .zip with manifest and dependencies
4. Distribute privately or publish to the marketplace
# Overview
Source: https://docs.dify.ai/en/use-dify/workspace/readme
Workspaces are the foundational organizational unit in Dify—everything your team builds, configures, and manages exists within a workspace
A workspace is your team's complete AI environment in Dify. It contains and isolates everything your organization needs: applications, knowledge bases, team members, model configurations, plugins, and billing.
## The Workspace Mental Model
Every resource in Dify belongs to a workspace. When you create an app, it inherits the workspace's model configurations. When you add team members, they get access to workspace resources based on their role. When you configure models or install plugins, they become available to the entire workspace.
```
🏢 Your Organization
└── 📁 Workspace
├── 🤖 Apps (chatbots, workflows, agents)
├── 📊 Knowledge Bases (documents, embeddings)
├── 👥 Team Members (roles & permissions)
├── 🧠 Model Providers (API keys, configurations)
├── 🔧 Tools & Plugins (integrations, custom code)
└── 💳 Billing (subscription, limits, usage)
```
This workspace-first design means your resources are completely isolated from other organizations, team members can only access what they're permitted to see, and you configure models and billing once for the entire workspace.
## Workspace Creation
**Dify Cloud** automatically creates a workspace on first login. You become the owner with full permissions.
**Community Edition** creates one workspace during installation. The administrator email and password are set during setup.
**Multiple workspaces** are supported when you need complete isolation between different legal entities, regulatory environments, or client projects. Most organizations use a single workspace.
Your personal account can belong to multiple workspaces. Switch between them using the workspace selector in the top-left corner.
## How Resources Connect
Applications you build can use any model providers configured in the workspace, access all workspace knowledge bases, and utilize installed plugins. Team members see applications based on their workspace permissions.
Workspace roles determine access across all resources:
* **Owners** control billing, model providers, and workspace settings
* **Admins** manage team members and configure models/plugins
* **Editors** build applications and manage knowledge bases
* **Members** use published applications
* **Dataset Operators** focus on knowledge base management
## Workspace Navigation
Dify organizes everything around the workspace concept. The main navigation shows Apps, Knowledge, and Tools available in your workspace. Settings contains workspace-wide configurations: Members, Model Providers, Plugins, Billing (Cloud only), and personal Account settings.
# Billing
Source: https://docs.dify.ai/en/use-dify/workspace/subscription-management
Manage workspace subscriptions and billing to control team size and feature access
Billing in Dify is workspace-scoped. Your subscription determines team member limits, feature availability, and usage quotas for the entire workspace.
## Subscription Plans
1 team member, basic features, community support
Up to 3 team members, advanced features, priority support
Up to 50 team members, full feature set, dedicated support
## Plan Comparison
| Resource | Free | Professional | Team |
| ------------ | ---------------- | -------------- | ---------------------- |
| Team Members | 1 | 3 | 50 |
| Applications | 5 | 50 | 200 |
| API Calls | 5000 calls / day | Unlimited | Unlimited |
| Support | Community | Priority Email | Priority Email & Slack |
## Managing Subscriptions
Only workspace owners and admins can access billing settings and change subscriptions.
**Upgrading:** Navigate to Settings → Billing and click the Upgrade button. Select your desired plan and complete payment. Changes take effect immediately.
**Plan Changes:**
* **Upgrades** are prorated for the current billing period
* **Downgrades** take effect immediately with billing adjustments on the next invoice
* **Cancellations** continue until the end of the current cycle, then revert to Free plan
When downgrading, team members exceeding the new plan limits will lose workspace access immediately.
## Dify for Education
Current students and teachers can use Dify's Professional plan for free through Dify for Education.
### Getting the Education Discount
**Prerequisites:**
* Be 18 or older
* Current student, teacher, or educational staff member
* Valid educational email address ending in `.edu`
**Steps:**
1. **Create account** - Register at [cloud.dify.ai](https://cloud.dify.ai/signin) with your educational email
2. **Apply for verification** - Go to Settings → Billing → Get Education Verified. Enter your school's full name and select your role.
3. **Activate subscription** - After approval, upgrade to Professional plan with annual billing. The education coupon applies automatically, making it free.
Your subscription will show as `Pro(Edu)` once activated. Renewal is required annually.
### Education FAQ
**What if I already have a paid subscription?**
The education coupon cannot be applied to paid subscriptions at this time. We suggest you activate the free Professional plan after your current billing cycle ends.
**Why was my verification rejected?**
Common reasons: non-educational email, fraudulent information, or misuse of privileges. Appeal via [support@dify.ai](mailto:support@dify.ai).
**Can I use a personal email?**
No, institutional email required for verification.
# Manage Members
Source: https://docs.dify.ai/en/use-dify/workspace/team-members-management
Manage workspace members, roles, and permissions to build effective AI teams
Team management in Dify is workspace-centric. When you add members to your workspace, they get access to workspace resources based on their assigned role. Understanding these roles helps you build secure, productive AI teams.
## Team Size Limits
Your workspace can include different numbers of team members based on your Dify edition:
* **Free:** 1 member (solo development)
* **Professional:** 3 members (small teams)
* **Team:** Unlimited members (growing companies)
* **Community/Enterprise:** Unlimited members (self-hosted)
## Workspace Roles
**Full workspace control.** Only one owner per workspace. Controls all team members, billing, model providers, and can delete the workspace. Cannot transfer ownership to another member.
**Team and resource management.** Can add/remove team members, configure model providers, manage all applications, and install plugins. Cannot change member roles or manage billing.
**Application development.** Can create, edit, and delete applications, manage knowledge bases, and use all workspace tools. Cannot manage team members or configure providers.
**Application usage only.** Can use published applications and tools they have access to. Cannot create or modify applications.
**Knowledge base specialist.** Focused role for managing datasets and knowledge bases. Can create and manage knowledge bases but has limited application access.
## Adding Team Members
Only workspace owners can invite new team members:
Navigate to Settings → Members in your workspace.
Enter email addresses and select the appropriate role for each new member.
New users receive registration emails. Existing Dify users are added immediately and can access the workspace through the workspace switcher.
Community Edition requires email service configuration before invitations work properly.
## Member Management
**Removing Members:** Only workspace owners can remove team members. When removed, members immediately lose workspace access, but applications they created remain in the workspace.
**Role Changes:** Only workspace owners can modify member roles. Role changes take effect immediately and alter what the member can access across the workspace.
**Multiple Workspaces:** Team members can belong to multiple workspaces. They switch between workspaces using the selector in the top-left corner.
## Access Patterns
**Resource Inheritance:** All workspace resources (model providers, plugins, knowledge bases) are available to team members based on their role permissions.
**Application Access:** Members see applications based on sharing settings and their role. Owners and Admins see all applications. Editors see applications they can modify. Members see only published applications they're permitted to use.
**Configuration Access:** Model providers and plugins configured at the workspace level become available to all applications created by team members with appropriate permissions.
# Dify Tools
Source: https://docs.dify.ai/en/use-dify/workspace/tools
Manage tools that enable LLMs to interact with external services and APIs
Dify tools enable LLMs to interact with external services and APIs, so they can access real-time data and perform actions (e.g., web searches, database queries, or content processing).
Each tool has a clear interface: what inputs it accepts, what action it performs, and what output it returns. This helps LLMs decide when and how to call a tool based on user requests.
Use tools in:
* Workflow / Chatflow apps (as standalone [Tool nodes](/en/use-dify/nodes/tools), or within [Agent nodes](/en/use-dify/nodes/agent#tool-configuration))
* [Agent apps](/en/use-dify/build/agent#extend-the-agent-with-dify-tools)
All your tools can be managed on the **Tools** page.
![Dify Tools]() ## Tool Types
[Plugin](/en/use-dify/workspace/plugins) tools are ready-to-use integrations provided by Dify and the community for common utilities and popular third-party services.
In addition to built-in plugin tools (like CurrentTime) available out of the box, you can explore and install more from [Dify Marketplace](https://marketplace.dify.ai/).
**Manage Authorization**
Some plugin tools (e.g., Google and GitHub) require authentication—such as API keys or OAuth—before use.
You can manage workspace-level credentials for these tools from the **Tools** or **Plugins** page, or directly within the tool settings inside an app or node.
Integrate external services as custom tools using a standard OpenAPI (Swagger) specification. This is ideal for connecting Dify to internal systems or third-party services not available as plugins.
Paste your OpenAPI schema, import it from a URL, or start from a provided example. Dify will parse the spec and generate the tool interface automatically.
Turn any workflow that starts with a User Input node into a reusable tool. **Chatflows are not supported**.
This allows you to encapsulate complex, multi-step logic into a single function that can be easily reused across different Dify apps.
## Tool Types
[Plugin](/en/use-dify/workspace/plugins) tools are ready-to-use integrations provided by Dify and the community for common utilities and popular third-party services.
In addition to built-in plugin tools (like CurrentTime) available out of the box, you can explore and install more from [Dify Marketplace](https://marketplace.dify.ai/).
**Manage Authorization**
Some plugin tools (e.g., Google and GitHub) require authentication—such as API keys or OAuth—before use.
You can manage workspace-level credentials for these tools from the **Tools** or **Plugins** page, or directly within the tool settings inside an app or node.
Integrate external services as custom tools using a standard OpenAPI (Swagger) specification. This is ideal for connecting Dify to internal systems or third-party services not available as plugins.
Paste your OpenAPI schema, import it from a URL, or start from a provided example. Dify will parse the spec and generate the tool interface automatically.
Turn any workflow that starts with a User Input node into a reusable tool. **Chatflows are not supported**.
This allows you to encapsulate complex, multi-step logic into a single function that can be easily reused across different Dify apps.
![Workflow as Tool]() [Model Context Protocol (MCP)](https://modelcontextprotocol.io/) lets AI apps connect to external data and tools through a standard interface. An MCP server wraps external resources—like databases, file systems, or APIs—and makes them accessible to AI apps via this protocol.
By connecting to an MCP server, you can import these external resources as tools in Dify and refresh the list anytime to pull the latest updates.
# Configure Annotation Reply
Source: https://docs.dify.ai/api-reference/annotations/configure-annotation-reply
/en/api-reference/openapi_chatflow.json post /apps/annotation-reply/{action}
Enables or disables the annotation reply feature. Requires embedding model configuration when enabling. Executes asynchronously — use [Get Annotation Reply Job Status](/api-reference/annotations/get-annotation-reply-job-status) to track progress.
# Create Annotation
Source: https://docs.dify.ai/api-reference/annotations/create-annotation
/en/api-reference/openapi_chatflow.json post /apps/annotations
Creates a new annotation. Annotations provide predefined question-answer pairs that the app can match and return directly instead of generating a response.
# Delete Annotation
Source: https://docs.dify.ai/api-reference/annotations/delete-annotation
/en/api-reference/openapi_chatflow.json delete /apps/annotations/{annotation_id}
Deletes an annotation and its associated hit history.
# Get Annotation Reply Job Status
Source: https://docs.dify.ai/api-reference/annotations/get-annotation-reply-job-status
/en/api-reference/openapi_chatflow.json get /apps/annotation-reply/{action}/status/{job_id}
Retrieves the status of an asynchronous annotation reply configuration job started by [Configure Annotation Reply](/api-reference/annotations/configure-annotation-reply).
# List Annotations
Source: https://docs.dify.ai/api-reference/annotations/list-annotations
/en/api-reference/openapi_chatflow.json get /apps/annotations
Retrieves a paginated list of annotations for the application. Supports keyword search filtering.
# Update Annotation
Source: https://docs.dify.ai/api-reference/annotations/update-annotation
/en/api-reference/openapi_chatflow.json put /apps/annotations/{annotation_id}
Updates the question and answer of an existing annotation.
# Get App Info
Source: https://docs.dify.ai/api-reference/applications/get-app-info
/en/api-reference/openapi_completion.json get /info
Retrieve basic information about this application, including name, description, tags, and mode.
# Get App Meta
Source: https://docs.dify.ai/api-reference/applications/get-app-meta
/en/api-reference/openapi_completion.json get /meta
Retrieve metadata about this application, including tool icons and other configuration details.
# Get App Parameters
Source: https://docs.dify.ai/api-reference/applications/get-app-parameters
/en/api-reference/openapi_completion.json get /parameters
Retrieve the application's input form configuration, including feature switches, input parameter names, types, and default values.
# Get App WebApp Settings
Source: https://docs.dify.ai/api-reference/applications/get-app-webapp-settings
/en/api-reference/openapi_completion.json get /site
Retrieve the WebApp settings of this application, including site configuration, theme, and customization options.
# Get Next Suggested Questions
Source: https://docs.dify.ai/api-reference/chats/get-next-suggested-questions
/en/api-reference/openapi_chatflow.json get /messages/{message_id}/suggested
Get next questions suggestions for the current message.
# Send Chat Message
Source: https://docs.dify.ai/api-reference/chats/send-chat-message
/en/api-reference/openapi_chatflow.json post /chat-messages
Send a request to the chat application.
# Stop Chat Message Generation
Source: https://docs.dify.ai/api-reference/chats/stop-chat-message-generation
/en/api-reference/openapi_chatflow.json post /chat-messages/{task_id}/stop
Stops a chat message generation task. Only supported in `streaming` mode.
# Delete Conversation
Source: https://docs.dify.ai/api-reference/conversations/delete-conversation
/en/api-reference/openapi_chatflow.json delete /conversations/{conversation_id}
Delete a conversation.
# List Conversation Messages
Source: https://docs.dify.ai/api-reference/conversations/list-conversation-messages
/en/api-reference/openapi_chatflow.json get /messages
Returns historical chat records in a scrolling load format, with the first page returning the latest `limit` messages, i.e., in reverse order.
# List Conversation Variables
Source: https://docs.dify.ai/api-reference/conversations/list-conversation-variables
/en/api-reference/openapi_chatflow.json get /conversations/{conversation_id}/variables
Retrieve variables from a specific conversation.
# List Conversations
Source: https://docs.dify.ai/api-reference/conversations/list-conversations
/en/api-reference/openapi_chatflow.json get /conversations
Retrieve the conversation list for the current user, ordered by most recently active.
# Rename Conversation
Source: https://docs.dify.ai/api-reference/conversations/rename-conversation
/en/api-reference/openapi_chatflow.json post /conversations/{conversation_id}/name
Rename a conversation or auto-generate a name. The conversation name is used for display on clients that support multiple conversations.
# Update Conversation Variable
Source: https://docs.dify.ai/api-reference/conversations/update-conversation-variable
/en/api-reference/openapi_chatflow.json put /conversations/{conversation_id}/variables/{variable_id}
Update the value of a specific conversation variable. The value must match the expected type.
# Create Document by File
Source: https://docs.dify.ai/api-reference/documents/create-document-by-file
/en/api-reference/openapi_knowledge.json post /datasets/{dataset_id}/document/create-by-file
Create a document by uploading a file. Supports common document formats (PDF, TXT, DOCX, etc.). Processing is asynchronous — use the returned `batch` ID with [Get Document Indexing Status](/api-reference/documents/get-document-indexing-status) to track progress.
# Create Document by Text
Source: https://docs.dify.ai/api-reference/documents/create-document-by-text
/en/api-reference/openapi_knowledge.json post /datasets/{dataset_id}/document/create-by-text
Create a document from raw text content. The document is processed asynchronously — use the returned `batch` ID with [Get Document Indexing Status](/api-reference/documents/get-document-indexing-status) to track progress.
# Get Document
Source: https://docs.dify.ai/api-reference/documents/get-document
/en/api-reference/openapi_knowledge.json get /datasets/{dataset_id}/documents/{document_id}
Retrieve detailed information about a specific document, including its indexing status, metadata, and processing statistics.
# List Documents
Source: https://docs.dify.ai/api-reference/documents/list-documents
/en/api-reference/openapi_knowledge.json get /datasets/{dataset_id}/documents
Returns a paginated list of documents in the knowledge base. Supports filtering by keyword and indexing status.
# Get End User Info
Source: https://docs.dify.ai/api-reference/end-users/get-end-user-info
/en/api-reference/openapi_completion.json get /end-users/{end_user_id}
Retrieve an end user by ID. Useful when other APIs return an end-user ID (e.g., `created_by` from [Upload File](/api-reference/files/upload-file)).
# List App Feedbacks
Source: https://docs.dify.ai/api-reference/feedback/list-app-feedbacks
/en/api-reference/openapi_completion.json get /app/feedbacks
Retrieve a paginated list of all feedback submitted for messages in this application, including both end-user and admin feedback.
# Submit Message Feedback
Source: https://docs.dify.ai/api-reference/feedback/submit-message-feedback
/en/api-reference/openapi_completion.json post /messages/{message_id}/feedbacks
Submit feedback for a message. End users can rate messages as `like` or `dislike`, and optionally provide text feedback. Pass `null` for `rating` to revoke previously submitted feedback.
# Download File
Source: https://docs.dify.ai/api-reference/files/download-file
/en/api-reference/openapi_completion.json get /files/{file_id}/preview
Preview or download uploaded files previously uploaded via the [Upload File](/api-reference/files/upload-file) API. Files can only be accessed if they belong to messages within the requesting application.
# Upload File
Source: https://docs.dify.ai/api-reference/files/upload-file
/en/api-reference/openapi_completion.json post /files/upload
Upload a file for use when sending messages, enabling multimodal understanding of images, documents, audio, and video. Uploaded files are for use by the current end-user only.
# Create an Empty Knowledge Base
Source: https://docs.dify.ai/api-reference/knowledge-bases/create-an-empty-knowledge-base
/en/api-reference/openapi_knowledge.json post /datasets
Create a new empty knowledge base. After creation, use [Create Document by Text](/api-reference/documents/create-document-by-text) or [Create Document by File](/api-reference/documents/create-document-by-file) to add documents.
# Delete Knowledge Base
Source: https://docs.dify.ai/api-reference/knowledge-bases/delete-knowledge-base
/en/api-reference/openapi_knowledge.json delete /datasets/{dataset_id}
Permanently delete a knowledge base and all its documents. The knowledge base must not be in use by any application.
# Get Knowledge Base
Source: https://docs.dify.ai/api-reference/knowledge-bases/get-knowledge-base
/en/api-reference/openapi_knowledge.json get /datasets/{dataset_id}
Retrieve detailed information about a specific knowledge base, including its embedding model, retrieval configuration, and document statistics.
# List Knowledge Bases
Source: https://docs.dify.ai/api-reference/knowledge-bases/list-knowledge-bases
/en/api-reference/openapi_knowledge.json get /datasets
Returns a paginated list of knowledge bases. Supports filtering by keyword and tags.
# Retrieve Chunks from a Knowledge Base / Test Retrieval
Source: https://docs.dify.ai/api-reference/knowledge-bases/retrieve-chunks-from-a-knowledge-base-test-retrieval
/en/api-reference/openapi_knowledge.json post /datasets/{dataset_id}/retrieve
Performs a search query against a knowledge base to retrieve the most relevant chunks. This endpoint can be used for both production retrieval and test retrieval.
# Update Knowledge Base
Source: https://docs.dify.ai/api-reference/knowledge-bases/update-knowledge-base
/en/api-reference/openapi_knowledge.json patch /datasets/{dataset_id}
Update the name, description, permissions, or retrieval settings of an existing knowledge base. Only the fields provided in the request body are updated.
# Convert Audio to Text
Source: https://docs.dify.ai/api-reference/tts/convert-audio-to-text
/en/api-reference/openapi_completion.json post /audio-to-text
Convert audio file to text. Supported formats: `mp3`, `mp4`, `mpeg`, `mpga`, `m4a`, `wav`, `webm`. File size limit is `30 MB`.
# Convert Text to Audio
Source: https://docs.dify.ai/api-reference/tts/convert-text-to-audio
/en/api-reference/openapi_completion.json post /text-to-audio
Convert text to speech.
# Get Workflow Run Detail
Source: https://docs.dify.ai/api-reference/workflow-runs/get-workflow-run-detail
/en/api-reference/openapi_chatflow.json get /workflows/run/{workflow_run_id}
Retrieve the current execution results of a workflow task based on the workflow execution ID.
# List Workflow Logs
Source: https://docs.dify.ai/api-reference/workflow-runs/list-workflow-logs
/en/api-reference/openapi_chatflow.json get /workflows/logs
Retrieve paginated workflow execution logs with filtering options.
# Get Workflow Run Detail
Source: https://docs.dify.ai/api-reference/workflows/get-workflow-run-detail
/en/api-reference/openapi_workflow.json get /workflows/run/{workflow_run_id}
Retrieve the current execution results of a workflow task based on the workflow execution ID.
# List Workflow Logs
Source: https://docs.dify.ai/api-reference/workflows/list-workflow-logs
/en/api-reference/openapi_workflow.json get /workflows/logs
Retrieve paginated workflow execution logs with filtering options.
# Run Workflow
Source: https://docs.dify.ai/api-reference/workflows/run-workflow
/en/api-reference/openapi_workflow.json post /workflows/run
Execute a workflow. Cannot be executed without a published workflow.
# Run Workflow by ID
Source: https://docs.dify.ai/api-reference/workflows/run-workflow-by-id
/en/api-reference/openapi_workflow.json post /workflows/{workflow_id}/run
Execute a specific workflow version identified by its ID. Useful for running a particular published version of the workflow.
# Stop Workflow Task
Source: https://docs.dify.ai/api-reference/workflows/stop-workflow-task
/en/api-reference/openapi_workflow.json post /workflows/tasks/{task_id}/stop
Stop a running workflow task. Only supported in `streaming` mode.
# Local Source Code Start
Source: https://docs.dify.ai/en/self-host/advanced-deployments/local-source-code
## Prerequisites
### Setup Docker and Docker Compose
> Before installing Dify, make sure your machine meets the following minimum system requirements:
>
> * CPU >= 2 Core
> * RAM >= 4 GiB
| Operating System | Software | Explanation |
| -------------------------- | ---------------------------------------------------- | ----------------------------------------------------------------------------------------------------------------------------------------------------------------------------------------------------------------------------------------------------------------------------------------------------------------------------------------- |
| macOS 10.14 or later | Docker Desktop | Set the Docker virtual machine (VM) to use a minimum of 2 virtual CPUs (vCPUs) and 8 GB of initial memory. Otherwise, the installation may fail. For more information, please refer to the [Docker Desktop installation guide for Mac](https://docs.docker.com/desktop/mac/install/). |
| Linux platforms | Docker 19.03 or later Docker Compose 1.25.1 or later | Please refer to the [Docker installation guide](https://docs.docker.com/engine/install/) and [the Docker Compose installation guide](https://docs.docker.com/compose/install/) for more information on how to install Docker and Docker Compose, respectively. |
| Windows with WSL 2 enabled | Docker Desktop | We recommend storing the source code and other data that is bound to Linux containers in the Linux file system rather than the Windows file system. For more information, please refer to the [Docker Desktop installation guide for using the WSL 2 backend on Windows.](https://docs.docker.com/desktop/windows/install/#wsl-2-backend) |
> If you need to use OpenAI TTS, `FFmpeg` must be installed on the system for it to function properly. For more details, refer to: [Link](https://docs.dify.ai/en/self-host/troubleshooting/integrations#text-to-speech-tts).
### Clone Dify Repository
Run the git command to clone the [Dify repository](https://github.com/langgenius/dify).
```bash theme={null}
git clone https://github.com/langgenius/dify.git
```
### Start Middlewares with Docker Compose
A series of middlewares for storage (e.g. PostgreSQL / Redis / Weaviate (if not locally available)) and extended capabilities (e.g. Dify's [sandbox](https://github.com/langgenius/dify-sandbox) and [plugin-daemon](https://github.com/langgenius/dify-plugin-daemon) services) are required by Dify backend services. Start the middlewares with Docker Compose by running these commands:
```bash theme={null}
cd docker
cp middleware.env.example middleware.env
# change the profile to mysql if you are not using postgresql
# change the profile to other vector database if you are not using weaviate
docker compose -f docker-compose.middleware.yaml --profile postgresql --profile weaviate -p dify up -d
```
***
## Setup Backend Services
The backend services include
1. API Service: serving API requests for Frontend service and API accessing
2. Worker Service: serving the aync tasks for datasets processing, workspaces, cleaning-ups etc.
### Start API Service
1. Navigate to the `api` directory:
```
cd api
```
2. Prepare the environment variable config file:
```
cp .env.example .env
```
When the frontend and backend run on different subdomains, set `COOKIE_DOMAIN` to the site's top-level domain (e.g., `example.com`) in the `.env` file.
The frontend and backend must be under the same top-level domain to share authentication cookies.
3. Generate a random secret key and replace the value of SECRET\_KEY in the `.env` file:
```
awk -v key="$(openssl rand -base64 42)" '/^SECRET_KEY=/ {sub(/=.*/, "=" key)} 1' .env > temp_env && mv temp_env .env
```
4. Install dependencies:
[uv](https://docs.astral.sh/uv/getting-started/installation/) is used to manage dependencies.
Install the required dependencies with `uv` by running:
```
uv sync --dev
```
> For macOS: install libmagic with `brew install libmagic`.
5. Perform the database migration:
Perform database migrations to the latest version:
```
uv run flask db upgrade
```
6. Start the API service:
```
uv run flask run --host 0.0.0.0 --port=5001 --debug
```
Expected output:
```
* Debug mode: on
INFO:werkzeug:WARNING: This is a development server. Do not use it in a production deployment. Use a production WSGI server instead.
* Running on all addresses (0.0.0.0)
* Running on http://127.0.0.1:5001
INFO:werkzeug:Press CTRL+C to quit
INFO:werkzeug: * Restarting with stat
WARNING:werkzeug: * Debugger is active!
INFO:werkzeug: * Debugger PIN: 695-801-919
```
### Start the Worker Service
To consume asynchronous tasks from the queue, such as dataset file import and dataset document updates, follow these steps to start the Worker service
* for macOS or Linux
```
uv run celery -A app.celery worker -P gevent -c 1 --loglevel INFO -Q dataset,dataset_summary,priority_dataset,priority_pipeline,pipeline,mail,ops_trace,app_deletion,plugin,workflow_storage,conversation,workflow,schedule_poller,schedule_executor,triggered_workflow_dispatcher,trigger_refresh_executor,retention,workflow_based_app_execution
```
If you are using a Windows system to start the Worker service, please use the following command instead:
* for Windows
```
uv run celery -A app.celery worker -P solo --without-gossip --without-mingle --loglevel INFO -Q dataset,dataset_summary,priority_dataset,priority_pipeline,pipeline,mail,ops_trace,app_deletion,plugin,workflow_storage,conversation,workflow,schedule_poller,schedule_executor,triggered_workflow_dispatcher,trigger_refresh_executor,retention,workflow_based_app_execution
```
Expected output:
```
-------------- celery@bwdeMacBook-Pro-2.local v5.4.0 (opalescent)
--- ***** -----
-- ******* ---- macOS-15.4.1-arm64-arm-64bit 2025-04-28 17:07:14
- *** --- * ---
- ** ---------- [config]
- ** ---------- .> app: app_factory:0x1439e8590
- ** ---------- .> transport: redis://:**@localhost:6379/1
- ** ---------- .> results: postgresql://postgres:**@localhost:5432/dify
- *** --- * --- .> concurrency: 1 (gevent)
-- ******* ---- .> task events: OFF (enable -E to monitor tasks in this worker)
--- ***** -----
-------------- [queues]
.> dataset exchange=dataset(direct) key=dataset
.> generation exchange=generation(direct) key=generation
.> mail exchange=mail(direct) key=mail
.> ops_trace exchange=ops_trace(direct) key=ops_trace
[tasks]
. schedule.clean_embedding_cache_task.clean_embedding_cache_task
. schedule.clean_messages.clean_messages
. schedule.clean_unused_datasets_task.clean_unused_datasets_task
. schedule.create_tidb_serverless_task.create_tidb_serverless_task
. schedule.mail_clean_document_notify_task.mail_clean_document_notify_task
. schedule.update_tidb_serverless_status_task.update_tidb_serverless_status_task
. tasks.add_document_to_index_task.add_document_to_index_task
. tasks.annotation.add_annotation_to_index_task.add_annotation_to_index_task
. tasks.annotation.batch_import_annotations_task.batch_import_annotations_task
. tasks.annotation.delete_annotation_index_task.delete_annotation_index_task
. tasks.annotation.disable_annotation_reply_task.disable_annotation_reply_task
. tasks.annotation.enable_annotation_reply_task.enable_annotation_reply_task
. tasks.annotation.update_annotation_to_index_task.update_annotation_to_index_task
. tasks.batch_clean_document_task.batch_clean_document_task
. tasks.batch_create_segment_to_index_task.batch_create_segment_to_index_task
. tasks.clean_dataset_task.clean_dataset_task
. tasks.clean_document_task.clean_document_task
. tasks.clean_notion_document_task.clean_notion_document_task
. tasks.deal_dataset_vector_index_task.deal_dataset_vector_index_task
. tasks.delete_account_task.delete_account_task
. tasks.delete_segment_from_index_task.delete_segment_from_index_task
. tasks.disable_segment_from_index_task.disable_segment_from_index_task
. tasks.disable_segments_from_index_task.disable_segments_from_index_task
. tasks.document_indexing_sync_task.document_indexing_sync_task
. tasks.document_indexing_task.document_indexing_task
. tasks.document_indexing_update_task.document_indexing_update_task
. tasks.duplicate_document_indexing_task.duplicate_document_indexing_task
. tasks.enable_segments_to_index_task.enable_segments_to_index_task
. tasks.mail_account_deletion_task.send_account_deletion_verification_code
. tasks.mail_account_deletion_task.send_deletion_success_task
. tasks.mail_email_code_login.send_email_code_login_mail_task
. tasks.mail_invite_member_task.send_invite_member_mail_task
. tasks.mail_reset_password_task.send_reset_password_mail_task
. tasks.ops_trace_task.process_trace_tasks
. tasks.recover_document_indexing_task.recover_document_indexing_task
. tasks.remove_app_and_related_data_task.remove_app_and_related_data_task
. tasks.remove_document_from_index_task.remove_document_from_index_task
. tasks.retry_document_indexing_task.retry_document_indexing_task
. tasks.sync_website_document_indexing_task.sync_website_document_indexing_task
2025-04-28 17:07:14,681 INFO [connection.py:22] Connected to redis://:**@localhost:6379/1
2025-04-28 17:07:14,684 INFO [mingle.py:40] mingle: searching for neighbors
2025-04-28 17:07:15,704 INFO [mingle.py:49] mingle: all alone
2025-04-28 17:07:15,733 INFO [worker.py:175] celery@bwdeMacBook-Pro-2.local ready.
2025-04-28 17:07:15,742 INFO [pidbox.py:111] pidbox: Connected to redis://:**@localhost:6379/1.
```
### Start the Beat Service
Additionally, if you want to debug the celery scheduled tasks or run the Schedule Trigger node, you can run the following command in another terminal to start the beat service:
```bash theme={null}
uv run celery -A app.celery beat
```
***
## Setup Web Service
Start the web service is built for frontend pages .
### Environment Preparation
To start the web frontend service, [Node.js v22 (LTS)](https://nodejs.org/en) and [PNPM v10](https://pnpm.io/) are required.
* Install NodeJS
Please visit [https://nodejs.org/en/download](https://nodejs.org/en/download) and choose the installation package for your respective operating system that is v18.x or higher. LTS version is recommanded for common usages.
* Install PNPM
Follow the [the installation guidance](https://pnpm.io/installation) to install PNPM. Or just run this command to install `pnpm` with `npm`.
```
npm i -g pnpm
```
### Start Web Service
1. Enter the web directory:
```
cd web
```
2. Install dependencies:
```
pnpm install --frozen-lockfile
```
3. Prepare the environment variable configuration file\
Create a file named `.env.local` in the current directory and copy the contents from `.env.example`. Modify the values of these environment variables according to your requirements:
```
# For production release, change this to PRODUCTION
NEXT_PUBLIC_DEPLOY_ENV=DEVELOPMENT
# The deployment edition, SELF_HOSTED or CLOUD
NEXT_PUBLIC_EDITION=SELF_HOSTED
# The base URL of console application, refers to the Console base URL of WEB service if console domain is different from api or web app domain.
# example: http://cloud.dify.ai/console/api
NEXT_PUBLIC_API_PREFIX=http://localhost:5001/console/api
# The URL for Web APP, refers to the Web App base URL of WEB service if web app domain is different from console or api domain.
# example: http://udify.app/api
NEXT_PUBLIC_PUBLIC_API_PREFIX=http://localhost:5001/api
# When the frontend and backend run on different subdomains, set NEXT_PUBLIC_COOKIE_DOMAIN=1.
NEXT_PUBLIC_COOKIE_DOMAIN=
# SENTRY
NEXT_PUBLIC_SENTRY_DSN=
NEXT_PUBLIC_SENTRY_ORG=
NEXT_PUBLIC_SENTRY_PROJECT=
```
4. Build the web service:
```
pnpm build
```
5. Start the web service:
```
pnpm start
```
Expected output:
```
▲ Next.js 15
- Local: http://localhost:3000
- Network: http://0.0.0.0:3000
✓ Starting...
✓ Ready in 73ms
```
### Access Dify
Access [http://localhost:3000](http://localhost:3000/) via browsers to enjoy all the exciting features of Dify.
Cheers ! 🍻
# Start Frontend Docker Container Separately
Source: https://docs.dify.ai/en/self-host/advanced-deployments/start-the-frontend-docker-container
When developing the backend separately, you may only need to start the backend service from source code without building and launching the frontend locally. In this case, you can directly start the frontend service by pulling the Docker image and running the container. Here are the specific steps:
#### Pull the Docker image for the frontend service from DockerHub:
```bash theme={null}
docker run -it -p 3000:3000 -e CONSOLE_URL=http://127.0.0.1:5001 -e APP_URL=http://127.0.0.1:5001 langgenius/dify-web:latest
```
#### Build Docker Image from Source Code
1. Build the frontend image
```
cd web && docker build . -t dify-web
```
2. Start the frontend image
```
docker run -it -p 3000:3000 -e CONSOLE_URL=http://127.0.0.1:5001 -e APP_URL=http://127.0.0.1:5001 dify-web
```
3. When the console domain and web app domain are different, you can set the CONSOLE\_URL and APP\_URL separately
4. To access it locally, you can visit [http://127.0.0.1:3000](http://127.0.0.1:3000/)
# Environment Variables
Source: https://docs.dify.ai/en/self-host/configuration/environments
Reference for all environment variables used by Dify self-hosted deployments.
Dify works out of the box with default settings. You can customize your deployment by modifying the environment variables in the `.env` file.
After upgrading Dify, run `diff .env .env.example` in the `docker` directory to check for newly added or changed variables, then update your `.env` file accordingly.
## Common Variables
These URL variables configure the addresses of Dify's various services.
For single-domain deployments behind Nginx (the default Docker Compose setup), these can be left empty—the system auto-detects from the incoming request. Configure them when using custom domains, split-domain deployments, or a reverse proxy.
### CONSOLE\_API\_URL
Default: (empty)
The public URL of Dify's backend API. Set this if you use OAuth login (GitHub, Google), Notion integration, or any plugin that requires OAuth—these features need an absolute callback URL to redirect users back after authorization. Also determines whether secure (HTTPS-only) cookies are used.
Example: `https://api.console.dify.ai`
### CONSOLE\_WEB\_URL
Default: (empty)
The public URL of Dify's console frontend. Used to build links in all system emails (invitations, password resets, notifications) and to redirect users back to the console after OAuth login. Also serves as the default CORS allowed origin if `CONSOLE_CORS_ALLOW_ORIGINS` is not set.
If empty, email links will be broken—even in single-domain setups, set this if you use email features.
Example: `https://console.dify.ai`
### SERVICE\_API\_URL
Default: (empty)
The API Base URL shown to developers in the Dify console—the URL they copy into their code to call the Dify API. If empty, auto-detects from the current request (e.g., `http://localhost/v1`). Set this to ensure a consistent URL when your server is accessible via multiple addresses.
Example: `https://api.dify.ai`
### APP\_API\_URL
Default: (empty)
The backend API URL for the WebApp frontend (published apps). This variable is only used by the web frontend container, not the Python backend. If empty, the Docker image defaults to `http://127.0.0.1:5001`.
Example: `https://api.app.dify.ai`
### APP\_WEB\_URL
Default: (empty)
The public URL where published WebApps are accessible. Required for the **Human Input node** in workflows—form links in email notifications are built as `{APP_WEB_URL}/form/{token}`. If empty, Human Input email delivery will not include valid form links.
Example: `https://app.dify.ai`
### TRIGGER\_URL
Default: `http://localhost`
The publicly accessible URL for webhook and plugin trigger endpoints. External systems use this address to invoke your workflows. Dify builds trigger callback URLs like `{TRIGGER_URL}/triggers/webhook/{id}` and displays them in the console.
For triggers to work from external systems, this must point to a public domain or IP address they can reach.
### FILES\_URL
Default: (empty; falls back to `CONSOLE_API_URL`)
The base URL for file preview and download links. Dify generates signed, time-limited URLs for all files (uploaded documents, tool outputs, workspace logos) and serves them to the frontend and multi-modal models.
Set this if you use file processing plugins, or if you want file URLs on a dedicated domain. If both `FILES_URL` and `CONSOLE_API_URL` are empty, file previews will not work.
Example: `https://upload.example.com` or `http://:5001`
### INTERNAL\_FILES\_URL
Default: (empty; falls back to `FILES_URL`)
The file access URL used for communication between services inside the Docker network (e.g., plugin daemon, PDF/Word extractors). These internal services may not be able to reach the external `FILES_URL` if it routes through Nginx or a public domain.
If empty, internal services use `FILES_URL`. Set this when internal services can't reach the external URL.
Example: `http://api:5001`
### FILES\_ACCESS\_TIMEOUT
Default: `300` (5 minutes)
How long signed file URLs remain valid, in seconds. After this time, the URL is rejected and the file must be re-requested. Increase for long-running processes; decrease for tighter security.
### System Encoding
| Variable | Default | Description |
| ------------------ | ---------------- | ------------------------------------------------------------------------------------------------ |
| `LANG` | `C.UTF-8` | System locale setting. Ensures UTF-8 encoding. |
| `LC_ALL` | `C.UTF-8` | Locale override for all categories. |
| `PYTHONIOENCODING` | `utf-8` | Python I/O encoding. |
| `UV_CACHE_DIR` | `/tmp/.uv-cache` | UV package manager cache directory. Avoids permission issues with non-existent home directories. |
## Server Configuration
### Logging
| Variable | Default | Description |
| ----------------------- | ---------------------- | ------------------------------------------------------------------------------------------------------------------------------------------------------------------------ |
| `LOG_LEVEL` | `INFO` | Minimum log severity. Controls what gets logged across all handlers (file + console). Levels from least to most severe: `DEBUG`, `INFO`, `WARNING`, `ERROR`, `CRITICAL`. |
| `LOG_OUTPUT_FORMAT` | `text` | `text` produces human-readable lines with timestamp, level, thread, and trace ID. `json` produces structured JSON for log aggregation tools (ELK, Datadog, etc.). |
| `LOG_FILE` | `/app/logs/server.log` | Log file path. When set, enables file-based logging with automatic rotation. The directory is created automatically. When empty, logs only go to console. |
| `LOG_FILE_MAX_SIZE` | `20` | Maximum log file size in MB before rotation. When exceeded, the active file is renamed to `.1` and a new file is started. |
| `LOG_FILE_BACKUP_COUNT` | `5` | Number of rotated log files to keep. With defaults, at most 6 files exist: the active file plus 5 backups. |
| `LOG_DATEFORMAT` | `%Y-%m-%d %H:%M:%S` | Timestamp format for text-format logs (strftime codes). Ignored by JSON format. |
| `LOG_TZ` | `UTC` | Timezone for log timestamps (pytz format, e.g., `Asia/Shanghai`). Only applies to text format—JSON always uses UTC. Also sets Celery's task scheduling timezone. |
### General
| Variable | Default | Description |
| ------------------------ | --------------------------- | -------------------------------------------------------------------------------------------------------------------------------------------------------------------------------------------------------------------------------------------- |
| `DEBUG` | `false` | Enables verbose logging: workflow node inputs/outputs, tool execution details, full LLM prompts and responses, and app startup timing. Useful for local development; not recommended for production as it may expose sensitive data in logs. |
| `FLASK_DEBUG` | `false` | Standard Flask debug mode flag. Not actively used by Dify—`DEBUG` is the primary control. |
| `ENABLE_REQUEST_LOGGING` | `false` | Logs a compact access line (`METHOD PATH STATUS DURATION TRACE_ID`) for every HTTP request. When `LOG_LEVEL` is also set to `DEBUG`, additionally logs full request and response bodies as JSON. |
| `DEPLOY_ENV` | `PRODUCTION` | Tags monitoring data in Sentry and OpenTelemetry so you can filter errors and traces by environment. Also sent as the `X-Env` response header. Does not change application behavior. |
| `MIGRATION_ENABLED` | `true` | When `true`, runs database schema migrations (`flask upgrade-db`) automatically on container startup. Docker only. Set to `false` if you run migrations separately. For source code launches, run `flask db upgrade` manually. |
| `CHECK_UPDATE_URL` | `https://updates.dify.ai` | The console checks this URL for newer Dify versions. Set to empty to disable—useful for air-gapped environments or to prevent external HTTP calls. |
| `OPENAI_API_BASE` | `https://api.openai.com/v1` | Legacy variable. Not actively used by Dify's own code. May be picked up by the OpenAI Python SDK if present in the environment. |
### SECRET\_KEY
Default: (pre-filled in `.env.example`; must be replaced for production)
Used for session cookie signing, JWT authentication tokens, file URL signatures (HMAC-SHA256), and encrypting third-party OAuth credentials (AES-256). Generate a strong key before first launch:
```bash theme={null}
openssl rand -base64 42
```
Changing this key after deployment will immediately log out all users, invalidate all file URLs, and break any plugin integrations that use OAuth—their encrypted credentials become unrecoverable.
### INIT\_PASSWORD
Default: (empty)
Optional security gate for first-time setup. When set, the `/install` page requires this password before the admin account can be created—preventing unauthorized setup if your server is exposed. Once setup is complete, this variable has no further effect. Maximum length: 30 characters.
### Token & Request Limits
| Variable | Default | Description |
| ----------------------------- | ------- | ------------------------------------------------------------------------------------------------------------------------------------------------------------------------------------------------------------------------------------------------------------------------------------------------------------------------ |
| `ACCESS_TOKEN_EXPIRE_MINUTES` | `60` | How long a login session's access token stays valid (in minutes). When it expires, the browser silently refreshes it using the refresh token—users are not logged out. |
| `REFRESH_TOKEN_EXPIRE_DAYS` | `30` | How long a user can stay logged in without re-entering credentials (in days). If the user doesn't visit within this period, they must log in again. |
| `APP_MAX_EXECUTION_TIME` | `1200` | Maximum time (in seconds) an app execution can run before being terminated. Works alongside `WORKFLOW_MAX_EXECUTION_TIME`—both enforce the same default of 20 minutes, but this one applies at the app queue level while the other applies at the workflow engine level. Increase both if your workflows need more time. |
| `APP_DEFAULT_ACTIVE_REQUESTS` | `0` | Default concurrent request limit per app, used when an app doesn't have a custom limit set in the UI. `0` means unlimited. The effective limit is the smaller of this and `APP_MAX_ACTIVE_REQUESTS`. |
| `APP_MAX_ACTIVE_REQUESTS` | `0` | Global ceiling for concurrent requests per app. Overrides per-app settings if they exceed this value. `0` means unlimited. |
### Container Startup Configuration
Only effective when starting with Docker image or Docker Compose.
| Variable | Default | Description |
| --------------------------- | ------------------------------ | ------------------------------------------------------------------------------------------------------------------------------------------------------------------------------------------------------------------------------------------------------------------- |
| `DIFY_BIND_ADDRESS` | `0.0.0.0` | Network interface the API server binds to. `0.0.0.0` listens on all interfaces; set to `127.0.0.1` to restrict to localhost only. |
| `DIFY_PORT` | `5001` | Port the API server listens on. |
| `SERVER_WORKER_AMOUNT` | `1` | Number of Gunicorn worker processes. With gevent (default), each worker handles multiple concurrent connections via greenlets, so 1 is usually sufficient. For sync workers, use `(2 x CPU cores) + 1`. [Reference](https://gunicorn.org/design/#how-many-workers). |
| `SERVER_WORKER_CLASS` | `gevent` | Gunicorn worker type. Gevent provides lightweight async concurrency. Changing this breaks psycopg2 and gRPC patching—it is strongly discouraged. |
| `SERVER_WORKER_CONNECTIONS` | `10` | Maximum concurrent connections per worker. Only applies to async workers (gevent). If you experience connection rejections or slow responses under load, try increasing this value. |
| `GUNICORN_TIMEOUT` | `360` | If a worker doesn't respond within this many seconds, Gunicorn kills and restarts it. Set to 360 (6 minutes) to support long-lived SSE connections used for streaming LLM responses. |
| `CELERY_WORKER_CLASS` | (empty; defaults to gevent) | Celery worker type. Same gevent patching requirements as `SERVER_WORKER_CLASS`—it is strongly discouraged to change. |
| `CELERY_WORKER_AMOUNT` | (empty; defaults to 1) | Number of Celery worker processes. Only used when autoscaling is disabled. |
| `CELERY_AUTO_SCALE` | `false` | Enable dynamic autoscaling. When enabled, Celery monitors queue depth and spawns/kills workers between `CELERY_MIN_WORKERS` and `CELERY_MAX_WORKERS`. |
| `CELERY_MAX_WORKERS` | (empty; defaults to CPU count) | Maximum workers when autoscaling is enabled. |
| `CELERY_MIN_WORKERS` | (empty; defaults to 1) | Minimum workers when autoscaling is enabled. |
### API Tool Configuration
| Variable | Default | Description |
| ---------------------------------- | ------- | ----------------------------------------------------------------------------------------------------------- |
| `API_TOOL_DEFAULT_CONNECT_TIMEOUT` | `10` | Maximum time (in seconds) to wait for establishing a TCP connection when API Tool nodes call external APIs. |
| `API_TOOL_DEFAULT_READ_TIMEOUT` | `60` | Maximum time (in seconds) to wait for receiving response data from external APIs called by API Tool nodes. |
### Database Configuration
The database uses PostgreSQL by default. OceanBase, MySQL, and seekdb are also supported.
| Variable | Default | Description |
| ------------- | -------------- | ------------------------------------------------------------------------------------------------------------------------------------ |
| `DB_TYPE` | `postgresql` | Database type. Supported values: `postgresql`, `mysql`, `oceanbase`, `seekdb`. MySQL-compatible databases like TiDB can use `mysql`. |
| `DB_USERNAME` | `postgres` | Database username. URL-encoded in the connection string, so special characters are safe to use. |
| `DB_PASSWORD` | `difyai123456` | Database password. URL-encoded in the connection string, so characters like `@`, `:`, `%` are safe to use. |
| `DB_HOST` | `db_postgres` | Database server hostname. |
| `DB_PORT` | `5432` | Database server port. If using MySQL, set this to `3306`. |
| `DB_DATABASE` | `dify` | Database name. |
#### Connection Pool
These control how Dify manages its pool of database connections. The defaults work well for most deployments.
| Variable | Default | Description |
| -------------------------- | ------- | ------------------------------------------------------------------------------------------------------------------------------------------------------------------------------ |
| `SQLALCHEMY_POOL_SIZE` | `30` | Number of persistent connections kept in the pool. |
| `SQLALCHEMY_MAX_OVERFLOW` | `10` | Additional temporary connections allowed when the pool is full. With default settings, up to 40 connections (30 + 10) can exist simultaneously. |
| `SQLALCHEMY_POOL_RECYCLE` | `3600` | Recycle connections after this many seconds to prevent stale connections. |
| `SQLALCHEMY_POOL_TIMEOUT` | `30` | How long to wait for a connection when the pool is exhausted. Requests fail with a timeout error if no connection frees up in time. |
| `SQLALCHEMY_POOL_PRE_PING` | `false` | Test each connection with a lightweight query before using it. Prevents "connection lost" errors but adds slight latency. Recommended for production with unreliable networks. |
| `SQLALCHEMY_POOL_USE_LIFO` | `false` | Reuse the most recently returned connection (LIFO) instead of rotating evenly (FIFO). LIFO keeps fewer connections "warm" and can reduce overhead. |
| `SQLALCHEMY_ECHO` | `false` | Print all SQL statements to logs. Useful for debugging query issues. |
#### PostgreSQL Performance Tuning
These are passed as startup arguments to the PostgreSQL container—they configure the database server, not the Dify application.
| Variable | Default | Description |
| ---------------------------------------------- | -------- | -------------------------------------------------------------------------------------------------------------------------------------------------------------------------------------------- |
| `POSTGRES_MAX_CONNECTIONS` | `100` | Maximum number of database connections. [Reference](https://www.postgresql.org/docs/current/runtime-config-connection.html#GUC-MAX-CONNECTIONS) |
| `POSTGRES_SHARED_BUFFERS` | `128MB` | Shared memory for buffers. Recommended: 25% of available memory. [Reference](https://www.postgresql.org/docs/current/runtime-config-resource.html#GUC-SHARED-BUFFERS) |
| `POSTGRES_WORK_MEM` | `4MB` | Memory per database worker for working space. [Reference](https://www.postgresql.org/docs/current/runtime-config-resource.html#GUC-WORK-MEM) |
| `POSTGRES_MAINTENANCE_WORK_MEM` | `64MB` | Memory reserved for maintenance activities. [Reference](https://www.postgresql.org/docs/current/runtime-config-resource.html#GUC-MAINTENANCE-WORK-MEM) |
| `POSTGRES_EFFECTIVE_CACHE_SIZE` | `4096MB` | Planner's assumption about effective cache size. [Reference](https://www.postgresql.org/docs/current/runtime-config-query.html#GUC-EFFECTIVE-CACHE-SIZE) |
| `POSTGRES_STATEMENT_TIMEOUT` | `0` | Max statement duration before termination (ms). `0` means no timeout. [Reference](https://www.postgresql.org/docs/current/runtime-config-client.html#GUC-STATEMENT-TIMEOUT) |
| `POSTGRES_IDLE_IN_TRANSACTION_SESSION_TIMEOUT` | `0` | Max idle-in-transaction session duration (ms). `0` means no timeout. [Reference](https://www.postgresql.org/docs/current/runtime-config-client.html#GUC-IDLE-IN-TRANSACTION-SESSION-TIMEOUT) |
#### MySQL Performance Tuning
These are passed as startup arguments to the MySQL container—they configure the database server, not the Dify application.
| Variable | Default | Description |
| -------------------------------------- | ------- | --------------------------------------------------------------------------------------------------------------------------------------------------------------------------------------------------------------------------------- |
| `MYSQL_MAX_CONNECTIONS` | `1000` | Maximum number of MySQL connections. |
| `MYSQL_INNODB_BUFFER_POOL_SIZE` | `512M` | InnoDB buffer pool size. Recommended: 70-80% of available memory for dedicated MySQL server. [Reference](https://dev.mysql.com/doc/refman/8.0/en/innodb-parameters.html#sysvar_innodb_buffer_pool_size) |
| `MYSQL_INNODB_LOG_FILE_SIZE` | `128M` | InnoDB log file size. [Reference](https://dev.mysql.com/doc/refman/8.0/en/innodb-parameters.html#sysvar_innodb_log_file_size) |
| `MYSQL_INNODB_FLUSH_LOG_AT_TRX_COMMIT` | `2` | InnoDB flush log at transaction commit. Options: `0` (no flush), `1` (flush and sync), `2` (flush to OS cache). [Reference](https://dev.mysql.com/doc/refman/8.0/en/innodb-parameters.html#sysvar_innodb_flush_log_at_trx_commit) |
### Redis Configuration
Configure these to connect Dify to your Redis instance. Dify supports three deployment modes: standalone (default), Sentinel, and Cluster.
| Variable | Default | Description |
| ----------------------- | -------------- | ---------------------------------------------------------------------------------------------------------------------------------------------------------------------------------------- |
| `REDIS_HOST` | `redis` | Redis server hostname. Only used in standalone mode; ignored when Sentinel or Cluster mode is enabled. |
| `REDIS_PORT` | `6379` | Redis server port. Only used in standalone mode. |
| `REDIS_USERNAME` | (empty) | Redis 6.0+ ACL username. Applies to all modes (standalone, Sentinel, Cluster). |
| `REDIS_PASSWORD` | `difyai123456` | Redis authentication password. For Cluster mode, use `REDIS_CLUSTERS_PASSWORD` instead. |
| `REDIS_DB` | `0` | Redis database number (0–15). Only applies to standalone and Sentinel modes. Make sure this doesn't collide with Celery's database (configured in `CELERY_BROKER_URL`; default is DB 1). |
| `REDIS_USE_SSL` | `false` | Enable SSL/TLS for the Redis connection. Does not automatically apply to Sentinel protocol. |
| `REDIS_MAX_CONNECTIONS` | (empty) | Maximum connections in the Redis pool. Leave unset for the library default. Set this to match your Redis server's `maxclients` if needed. |
#### Redis SSL Configuration
Only applies when `REDIS_USE_SSL=true`. These same settings are also used by the Celery broker when its URL uses the `rediss://` scheme.
| Variable | Default | Description |
| --------------------- | ----------- | ----------------------------------------------------------------------------------------------------------------------- |
| `REDIS_SSL_CERT_REQS` | `CERT_NONE` | Certificate verification level: `CERT_NONE` (no verification), `CERT_OPTIONAL`, or `CERT_REQUIRED` (full verification). |
| `REDIS_SSL_CA_CERTS` | (empty) | Path to CA certificate file for verifying the Redis server. |
| `REDIS_SSL_CERTFILE` | (empty) | Path to client certificate for mutual TLS authentication. |
| `REDIS_SSL_KEYFILE` | (empty) | Path to client private key for mutual TLS authentication. |
#### Redis Sentinel Mode
Sentinel provides automatic master discovery and failover for high availability. Mutually exclusive with Cluster mode.
| Variable | Default | Description |
| ------------------------------- | ------- | --------------------------------------------------------------------------------------------------------------------------------------------------------------------------------------------- |
| `REDIS_USE_SENTINEL` | `false` | Enable Redis Sentinel mode. When enabled, `REDIS_HOST`/`REDIS_PORT` are ignored; Dify connects to Sentinel nodes instead and asks for the current master. |
| `REDIS_SENTINELS` | (empty) | Sentinel node addresses. Format: `:,:,:`. These are the Sentinel instances, not the Redis servers. |
| `REDIS_SENTINEL_SERVICE_NAME` | (empty) | The logical service name Sentinel monitors (configured in `sentinel.conf`). Dify calls `master_for(service_name)` to discover the current master. |
| `REDIS_SENTINEL_USERNAME` | (empty) | Username for authenticating with Sentinel nodes. Separate from `REDIS_USERNAME`, which authenticates with the Redis master/replicas. |
| `REDIS_SENTINEL_PASSWORD` | (empty) | Password for authenticating with Sentinel nodes. Separate from `REDIS_PASSWORD`. |
| `REDIS_SENTINEL_SOCKET_TIMEOUT` | `0.1` | Socket timeout (in seconds) for communicating with Sentinel nodes. Default 0.1s assumes fast local network. For cloud/WAN deployments, increase to 1.0–5.0s to prevent intermittent timeouts. |
#### Redis Cluster Mode
Cluster mode provides automatic sharding across multiple Redis nodes. Mutually exclusive with Sentinel mode.
| Variable | Default | Description |
| ------------------------- | ------- | ------------------------------------------------------------------ |
| `REDIS_USE_CLUSTERS` | `false` | Enable Redis Cluster mode. |
| `REDIS_CLUSTERS` | (empty) | Cluster nodes. Format: `:,:,:` |
| `REDIS_CLUSTERS_PASSWORD` | (empty) | Password for the Redis Cluster. |
### Celery Configuration
Configure the background task queue used for dataset indexing, email sending, and scheduled jobs.
### CELERY\_BROKER\_URL
Default: `redis://:difyai123456@redis:6379/1`
Redis connection URL for the Celery message broker.
Direct connection format:
```
redis://:@:/
```
Sentinel mode format (separate multiple nodes with semicolons):
```
sentinel://:@:/
```
| Variable | Default | Description |
| -------------------------------- | ------- | -------------------------------------------------------------------------------------------------------------------------------------------------------------------- |
| `CELERY_BACKEND` | `redis` | Where Celery stores task results. Options: `redis` (fast, in-memory) or `database` (stores in your main database). |
| `BROKER_USE_SSL` | `false` | Auto-enabled when `CELERY_BROKER_URL` uses `rediss://` scheme. Applies the Redis SSL certificate settings to the broker connection. |
| `CELERY_USE_SENTINEL` | `false` | Enable Redis Sentinel mode for the Celery broker. |
| `CELERY_SENTINEL_MASTER_NAME` | (empty) | Sentinel service name (Master Name). |
| `CELERY_SENTINEL_PASSWORD` | (empty) | Password for Sentinel authentication. Separate from `REDIS_SENTINEL_PASSWORD`—they can differ if you use different Sentinel clusters for caching vs task queuing. |
| `CELERY_SENTINEL_SOCKET_TIMEOUT` | `0.1` | Timeout for connecting to Sentinel in seconds. |
| `CELERY_TASK_ANNOTATIONS` | `null` | Apply runtime settings to specific tasks (e.g., rate limits). Format: JSON dictionary. Example: `{"tasks.add": {"rate_limit": "10/s"}}`. Most users don't need this. |
### CORS Configuration
Controls cross-domain access policies for the frontend.
| Variable | Default | Description |
| ------------------------------- | ------- | ------------------------------------------------------------------------------------------------------------------------------------------------------------------------------------------------------------------------------------------------------------------------------ |
| `WEB_API_CORS_ALLOW_ORIGINS` | `*` | Allowed origins for cross-origin requests to the Web API. Example: `https://dify.app` |
| `CONSOLE_CORS_ALLOW_ORIGINS` | `*` | Allowed origins for cross-origin requests to the console API. If not set, falls back to `CONSOLE_WEB_URL`. |
| `COOKIE_DOMAIN` | (empty) | Set to the shared top-level domain (e.g., `example.com`) when frontend and backend run on different subdomains. This allows authentication cookies to be shared across subdomains. When empty, cookies use the most secure `__Host-` prefix and are locked to a single domain. |
| `NEXT_PUBLIC_COOKIE_DOMAIN` | (empty) | Frontend flag for cross-subdomain cookies. Set to `1` (or any non-empty value) to enable—the actual domain is read from `COOKIE_DOMAIN` on the backend. |
| `NEXT_PUBLIC_BATCH_CONCURRENCY` | `5` | Frontend-only. Controls how many concurrent API calls the UI makes during batch operations. |
### File Storage Configuration
Configure where Dify stores uploaded files, dataset documents, and encryption keys. Each storage type has its own credential variables—configure only the one you're using.
### STORAGE\_TYPE
Default: `opendal`
Selects the file storage backend. Supported values: `opendal`, `s3`, `azure-blob`, `aliyun-oss`, `google-storage`, `huawei-obs`, `volcengine-tos`, `tencent-cos`, `baidu-obs`, `oci-storage`, `supabase`, `clickzetta-volume`, `local` (deprecated; internally uses OpenDAL with filesystem scheme).
Default storage backend using [Apache OpenDAL](https://opendal.apache.org/), a unified interface supporting many storage services. Dify automatically scans environment variables matching `OPENDAL__*` and passes them to OpenDAL. For example, with `OPENDAL_SCHEME=s3`, set `OPENDAL_S3_ACCESS_KEY_ID`, `OPENDAL_S3_SECRET_ACCESS_KEY`, etc.
| Variable | Default | Description |
| ---------------- | ------- | --------------------------------------------------------------------------------- |
| `OPENDAL_SCHEME` | `fs` | Storage service to use. Examples: `fs` (local filesystem), `s3`, `gcs`, `azblob`. |
For the default `fs` scheme:
| Variable | Default | Description |
| ----------------- | --------- | --------------------------------------------------------------------------------------- |
| `OPENDAL_FS_ROOT` | `storage` | Root directory for local filesystem storage. Created automatically if it doesn't exist. |
For all available schemes and their configuration options, see the [OpenDAL services documentation](https://github.com/apache/opendal/tree/main/core/services).
| Variable | Default | Description |
| ------------------------ | ----------- | ------------------------------------------------------------------------------------------------------------------------------------------------------------------------------------------------------ |
| `S3_ENDPOINT` | (empty) | S3 endpoint address. Required for non-AWS S3-compatible services (MinIO, etc.). |
| `S3_REGION` | `us-east-1` | S3 region. |
| `S3_BUCKET_NAME` | `difyai` | S3 bucket name. |
| `S3_ACCESS_KEY` | (empty) | S3 Access Key. Not needed when using IAM roles. |
| `S3_SECRET_KEY` | (empty) | S3 Secret Key. Not needed when using IAM roles. |
| `S3_ADDRESS_STYLE` | `auto` | S3 addressing style: `auto`, `path`, or `virtual`. Controls whether bucket names appear in the URL path (`path`) or as a subdomain (`virtual`). Only applies when `S3_USE_AWS_MANAGED_IAM` is `false`. |
| `S3_USE_AWS_MANAGED_IAM` | `false` | Use AWS IAM roles (EC2 instance profile, ECS task role) instead of explicit access key/secret key. When enabled, credentials are auto-discovered from the instance metadata. |
| Variable | Default | Description |
| --------------------------- | --------------------------------------------------- | --------------------------- |
| `AZURE_BLOB_ACCOUNT_NAME` | `difyai` | Azure storage account name. |
| `AZURE_BLOB_ACCOUNT_KEY` | `difyai` | Azure storage account key. |
| `AZURE_BLOB_CONTAINER_NAME` | `difyai-container` | Azure Blob container name. |
| `AZURE_BLOB_ACCOUNT_URL` | `https://.blob.core.windows.net` | Azure Blob account URL. |
| Variable | Default | Description |
| -------------------------------------------- | ------- | ---------------------------------------- |
| `GOOGLE_STORAGE_BUCKET_NAME` | (empty) | Google Cloud Storage bucket name. |
| `GOOGLE_STORAGE_SERVICE_ACCOUNT_JSON_BASE64` | (empty) | Base64-encoded service account JSON key. |
| Variable | Default | Description |
| ------------------------- | -------------------------------------------------- | --------------------------------------------------------------------------------------------------------------------------- |
| `ALIYUN_OSS_BUCKET_NAME` | (empty) | OSS bucket name. |
| `ALIYUN_OSS_ACCESS_KEY` | (empty) | OSS access key. |
| `ALIYUN_OSS_SECRET_KEY` | (empty) | OSS secret key. |
| `ALIYUN_OSS_ENDPOINT` | `https://oss-ap-southeast-1-internal.aliyuncs.com` | OSS endpoint. [Regions and endpoints reference](https://www.alibabacloud.com/help/en/oss/user-guide/regions-and-endpoints). |
| `ALIYUN_OSS_REGION` | `ap-southeast-1` | OSS region. |
| `ALIYUN_OSS_AUTH_VERSION` | `v4` | OSS authentication version. |
| `ALIYUN_OSS_PATH` | (empty) | Object path prefix. Don't start with `/`. [Reference](https://www.alibabacloud.com/help/en/oss/support/0016-00000005). |
| `ALIYUN_CLOUDBOX_ID` | (empty) | CloudBox ID for CloudBox-based OSS deployments. |
| Variable | Default | Description |
| --------------------------- | ------- | --------------------------------------------------------------------------------------------------- |
| `TENCENT_COS_BUCKET_NAME` | (empty) | COS bucket name. |
| `TENCENT_COS_SECRET_KEY` | (empty) | COS secret key. |
| `TENCENT_COS_SECRET_ID` | (empty) | COS secret ID. |
| `TENCENT_COS_REGION` | (empty) | COS region, e.g., `ap-guangzhou`. [Reference](https://cloud.tencent.com/document/product/436/6224). |
| `TENCENT_COS_SCHEME` | (empty) | Protocol to access COS (`http` or `https`). |
| `TENCENT_COS_CUSTOM_DOMAIN` | (empty) | Custom domain for COS access. |
| Variable | Default | Description |
| ----------------- | -------------- | ----------------- |
| `OCI_ENDPOINT` | (empty) | OCI endpoint URL. |
| `OCI_BUCKET_NAME` | (empty) | OCI bucket name. |
| `OCI_ACCESS_KEY` | (empty) | OCI access key. |
| `OCI_SECRET_KEY` | (empty) | OCI secret key. |
| `OCI_REGION` | `us-ashburn-1` | OCI region. |
| Variable | Default | Description |
| ------------------------ | ------- | -------------------------------------------------------------------------------------------------- |
| `HUAWEI_OBS_BUCKET_NAME` | (empty) | OBS bucket name. |
| `HUAWEI_OBS_ACCESS_KEY` | (empty) | OBS access key. |
| `HUAWEI_OBS_SECRET_KEY` | (empty) | OBS secret key. |
| `HUAWEI_OBS_SERVER` | (empty) | OBS server URL. [Reference](https://support.huaweicloud.com/sdk-python-devg-obs/obs_22_0500.html). |
| `HUAWEI_OBS_PATH_STYLE` | `false` | Use path-style URLs instead of virtual-hosted-style. |
| Variable | Default | Description |
| ---------------------------- | ------- | --------------------------------------------------------------------------- |
| `VOLCENGINE_TOS_BUCKET_NAME` | (empty) | TOS bucket name. |
| `VOLCENGINE_TOS_ACCESS_KEY` | (empty) | TOS access key. |
| `VOLCENGINE_TOS_SECRET_KEY` | (empty) | TOS secret key. |
| `VOLCENGINE_TOS_ENDPOINT` | (empty) | TOS endpoint URL. [Reference](https://www.volcengine.com/docs/6349/107356). |
| `VOLCENGINE_TOS_REGION` | (empty) | TOS region, e.g., `cn-guangzhou`. |
| Variable | Default | Description |
| ----------------------- | ------- | ---------------------- |
| `BAIDU_OBS_BUCKET_NAME` | (empty) | Baidu OBS bucket name. |
| `BAIDU_OBS_ACCESS_KEY` | (empty) | Baidu OBS access key. |
| `BAIDU_OBS_SECRET_KEY` | (empty) | Baidu OBS secret key. |
| `BAIDU_OBS_ENDPOINT` | (empty) | Baidu OBS server URL. |
| Variable | Default | Description |
| ---------------------- | ------- | ----------------------------- |
| `SUPABASE_BUCKET_NAME` | (empty) | Supabase storage bucket name. |
| `SUPABASE_API_KEY` | (empty) | Supabase API key. |
| `SUPABASE_URL` | (empty) | Supabase server URL. |
| Variable | Default | Description |
| -------------------------------- | ---------- | -------------------------------------------------------------------------------------------------------------------------- |
| `CLICKZETTA_VOLUME_TYPE` | `user` | Volume type. Options: `user` (personal/small team), `table` (enterprise multi-tenant), `external` (data lake integration). |
| `CLICKZETTA_VOLUME_NAME` | (empty) | External volume name (required only when `TYPE=external`). |
| `CLICKZETTA_VOLUME_TABLE_PREFIX` | `dataset_` | Table volume table prefix (used only when `TYPE=table`). |
| `CLICKZETTA_VOLUME_DIFY_PREFIX` | `dify_km` | Dify file directory prefix for isolation from other apps. |
ClickZetta Volume reuses the `CLICKZETTA_*` connection parameters configured in the Vector Database section.
#### Archive Storage
Separate S3-compatible storage for archiving workflow run logs. Used by the paid plan retention system to archive workflow runs older than the retention period to JSONL format. Requires `BILLING_ENABLED=true`.
| Variable | Default | Description |
| -------------------------------- | ------- | ------------------------------------------------- |
| `ARCHIVE_STORAGE_ENABLED` | `false` | Enable archive storage for workflow log archival. |
| `ARCHIVE_STORAGE_ENDPOINT` | (empty) | S3-compatible endpoint URL. |
| `ARCHIVE_STORAGE_ARCHIVE_BUCKET` | (empty) | Bucket for archived workflow run logs. |
| `ARCHIVE_STORAGE_EXPORT_BUCKET` | (empty) | Bucket for workflow run exports. |
| `ARCHIVE_STORAGE_ACCESS_KEY` | (empty) | Access key. |
| `ARCHIVE_STORAGE_SECRET_KEY` | (empty) | Secret key. |
| `ARCHIVE_STORAGE_REGION` | `auto` | Storage region. |
### Vector Database Configuration
Configure the vector database used for knowledge base embedding storage and similarity search. Each provider has its own set of credential variables—configure only the one you're using.
### VECTOR\_STORE
Default: `weaviate`
Selects the vector database backend. If a dataset already has an index, the dataset's stored type takes precedence over this setting. When switching providers in Docker Compose, `COMPOSE_PROFILES` automatically starts the matching container based on this value.
Supported values: `weaviate`, `oceanbase`, `seekdb`, `qdrant`, `milvus`, `myscale`, `relyt`, `pgvector`, `pgvecto-rs`, `chroma`, `opensearch`, `oracle`, `tencent`, `elasticsearch`, `elasticsearch-ja`, `analyticdb`, `couchbase`, `vikingdb`, `opengauss`, `tablestore`, `vastbase`, `tidb`, `tidb_on_qdrant`, `baidu`, `lindorm`, `huawei_cloud`, `upstash`, `matrixone`, `clickzetta`, `alibabacloud_mysql`, `iris`, `hologres`.
| Variable | Default | Description |
| -------------------------- | -------------- | ---------------------------------------------------------------------------------------------------------------------------------------------- |
| `VECTOR_INDEX_NAME_PREFIX` | `Vector_index` | Prefix added to collection names in the vector database. Change this if you share a vector database instance across multiple Dify deployments. |
| Variable | Default | Description |
| ------------------------ | ----------------------- | ----------------------------------------------------------------------------------------------------------------------------------------------------------------------------------------------- |
| `WEAVIATE_ENDPOINT` | `http://weaviate:8080` | Weaviate REST API endpoint. |
| `WEAVIATE_API_KEY` | (empty) | API key for Weaviate authentication. |
| `WEAVIATE_GRPC_ENDPOINT` | `grpc://weaviate:50051` | Separate gRPC endpoint for high-performance binary protocol. Significantly faster for batch operations. Falls back to inferring from HTTP endpoint if not set. |
| `WEAVIATE_TOKENIZATION` | `word` | Tokenization method for text fields. Options: `word` (splits on whitespace and punctuation), `whitespace` (splits on whitespace only), `character` (character-level, better for CJK languages). |
seekdb is the lite version of OceanBase and shares the same connection configuration.
| Variable | Default | Description |
| -------------------------------- | -------------- | -------------------------------------------------------------------------------------------------------------------------------------------- |
| `OCEANBASE_VECTOR_HOST` | `oceanbase` | Hostname or IP address. |
| `OCEANBASE_VECTOR_PORT` | `2881` | Port number. |
| `OCEANBASE_VECTOR_USER` | `root@test` | Database username. |
| `OCEANBASE_VECTOR_PASSWORD` | `difyai123456` | Database password. |
| `OCEANBASE_VECTOR_DATABASE` | `test` | Database name. |
| `OCEANBASE_CLUSTER_NAME` | `difyai` | Cluster name (Docker deployment only). |
| `OCEANBASE_MEMORY_LIMIT` | `6G` | Memory limit for OceanBase (Docker deployment only). |
| `SEEKDB_MEMORY_LIMIT` | `2G` | Memory limit for seekdb (Docker deployment only). |
| `OCEANBASE_ENABLE_HYBRID_SEARCH` | `false` | Enable fulltext index for BM25 queries alongside vector search. Requires OceanBase >= 4.3.5.1. Collections must be recreated after enabling. |
| `OCEANBASE_FULLTEXT_PARSER` | `ik` | Fulltext parser. Built-in: `ngram`, `beng`, `space`, `ngram2`, `ik`. External (require plugin): `japanese_ftparser`, `thai_ftparser`. |
| Variable | Default | Description |
| --------------------------- | -------------------- | ----------------------------- |
| `QDRANT_URL` | `http://qdrant:6333` | Qdrant endpoint address. |
| `QDRANT_API_KEY` | `difyai123456` | API key for Qdrant. |
| `QDRANT_CLIENT_TIMEOUT` | `20` | Client timeout in seconds. |
| `QDRANT_GRPC_ENABLED` | `false` | Enable gRPC communication. |
| `QDRANT_GRPC_PORT` | `6334` | gRPC port. |
| `QDRANT_REPLICATION_FACTOR` | `1` | Number of replicas per shard. |
| Variable | Default | Description |
| ----------------------------- | ----------------------------------- | ------------------------------------------------------------------------------------------------------------------------------------------------------------------------------ |
| `MILVUS_URI` | `http://host.docker.internal:19530` | Milvus URI. For [Zilliz Cloud](https://docs.zilliz.com/docs/free-trials), use the Public Endpoint. |
| `MILVUS_DATABASE` | (empty) | Database name. |
| `MILVUS_TOKEN` | (empty) | Authentication token. For Zilliz Cloud, use the API Key. |
| `MILVUS_USER` | (empty) | Username. |
| `MILVUS_PASSWORD` | (empty) | Password. |
| `MILVUS_ENABLE_HYBRID_SEARCH` | `false` | Enable BM25 sparse index for full-text search alongside vector similarity. Requires Milvus >= 2.5.0. If the collection was created without this enabled, it must be recreated. |
| `MILVUS_ANALYZER_PARAMS` | (empty) | Analyzer parameters for text fields. |
| Variable | Default | Description |
| -------------------- | --------- | ----------------------------------------------------------------------------------------------------------------------------------------- |
| `MYSCALE_HOST` | `myscale` | MyScale host. |
| `MYSCALE_PORT` | `8123` | MyScale port. |
| `MYSCALE_USER` | `default` | Username. |
| `MYSCALE_PASSWORD` | (empty) | Password. |
| `MYSCALE_DATABASE` | `dify` | Database name. |
| `MYSCALE_FTS_PARAMS` | (empty) | Full-text search params. [Multi-language support reference](https://myscale.com/docs/en/text-search/#understanding-fts-index-parameters). |
| Variable | Default | Description |
| ----------------------------- | ------------------------------ | -------------------------------------------- |
| `COUCHBASE_CONNECTION_STRING` | `couchbase://couchbase-server` | Connection string for the Couchbase cluster. |
| `COUCHBASE_USER` | `Administrator` | Username. |
| `COUCHBASE_PASSWORD` | `password` | Password. |
| `COUCHBASE_BUCKET_NAME` | `Embeddings` | Bucket name. |
| `COUCHBASE_SCOPE_NAME` | `_default` | Scope name. |
| Variable | Default | Description |
| --------------------------------- | -------- | ---------------------------------------- |
| `HOLOGRES_HOST` | (empty) | Hostname. |
| `HOLOGRES_PORT` | `80` | Port number. |
| `HOLOGRES_DATABASE` | (empty) | Database name. |
| `HOLOGRES_ACCESS_KEY_ID` | (empty) | Access key ID (used as PG username). |
| `HOLOGRES_ACCESS_KEY_SECRET` | (empty) | Access key secret (used as PG password). |
| `HOLOGRES_SCHEMA` | `public` | Schema name. |
| `HOLOGRES_TOKENIZER` | `jieba` | Tokenizer for text fields. |
| `HOLOGRES_DISTANCE_METHOD` | `Cosine` | Distance method. |
| `HOLOGRES_BASE_QUANTIZATION_TYPE` | `rabitq` | Quantization type. |
| `HOLOGRES_MAX_DEGREE` | `64` | HNSW max degree. |
| `HOLOGRES_EF_CONSTRUCTION` | `400` | HNSW ef\_construction parameter. |
| Variable | Default | Description |
| ------------------------- | -------------- | ----------------------------------------------- |
| `PGVECTOR_HOST` | `pgvector` | Hostname. |
| `PGVECTOR_PORT` | `5432` | Port number. |
| `PGVECTOR_USER` | `postgres` | Username. |
| `PGVECTOR_PASSWORD` | `difyai123456` | Password. |
| `PGVECTOR_DATABASE` | `dify` | Database name. |
| `PGVECTOR_MIN_CONNECTION` | `1` | Minimum pool connections. |
| `PGVECTOR_MAX_CONNECTION` | `5` | Maximum pool connections. |
| `PGVECTOR_PG_BIGM` | `false` | Enable pg\_bigm extension for full-text search. |
| Variable | Default | Description |
| ------------------------- | -------------- | ------------------------- |
| `VASTBASE_HOST` | `vastbase` | Hostname. |
| `VASTBASE_PORT` | `5432` | Port number. |
| `VASTBASE_USER` | `dify` | Username. |
| `VASTBASE_PASSWORD` | `Difyai123456` | Password. |
| `VASTBASE_DATABASE` | `dify` | Database name. |
| `VASTBASE_MIN_CONNECTION` | `1` | Minimum pool connections. |
| `VASTBASE_MAX_CONNECTION` | `5` | Maximum pool connections. |
| Variable | Default | Description |
| --------------------- | -------------- | -------------- |
| `PGVECTO_RS_HOST` | `pgvecto-rs` | Hostname. |
| `PGVECTO_RS_PORT` | `5432` | Port number. |
| `PGVECTO_RS_USER` | `postgres` | Username. |
| `PGVECTO_RS_PASSWORD` | `difyai123456` | Password. |
| `PGVECTO_RS_DATABASE` | `dify` | Database name. |
| Variable | Default | Description |
| ------------------------------- | ------------- | -------------------------------------------------------------------------------------------------------------------------------------------------------- |
| `ANALYTICDB_KEY_ID` | (empty) | Aliyun access key ID. [Create AccessKey](https://help.aliyun.com/zh/analyticdb/analyticdb-for-postgresql/support/create-an-accesskey-pair). |
| `ANALYTICDB_KEY_SECRET` | (empty) | Aliyun access key secret. |
| `ANALYTICDB_REGION_ID` | `cn-hangzhou` | Region identifier. |
| `ANALYTICDB_INSTANCE_ID` | (empty) | Instance ID, e.g., `gp-xxxxxx`. [Create instance](https://help.aliyun.com/zh/analyticdb/analyticdb-for-postgresql/getting-started/create-an-instance-1). |
| `ANALYTICDB_ACCOUNT` | (empty) | Account name. [Create account](https://help.aliyun.com/zh/analyticdb/analyticdb-for-postgresql/getting-started/createa-a-privileged-account). |
| `ANALYTICDB_PASSWORD` | (empty) | Account password. |
| `ANALYTICDB_NAMESPACE` | `dify` | Namespace (schema). Created automatically if not exists. |
| `ANALYTICDB_NAMESPACE_PASSWORD` | (empty) | Namespace password. Used when creating a new namespace. |
| `ANALYTICDB_HOST` | (empty) | Direct connection host (alternative to API-based access). |
| `ANALYTICDB_PORT` | `5432` | Direct connection port. |
| `ANALYTICDB_MIN_CONNECTION` | `1` | Minimum pool connections. |
| `ANALYTICDB_MAX_CONNECTION` | `5` | Maximum pool connections. |
| Variable | Default | Description |
| ---------------------- | ------- | -------------- |
| `TIDB_VECTOR_HOST` | `tidb` | Hostname. |
| `TIDB_VECTOR_PORT` | `4000` | Port number. |
| `TIDB_VECTOR_USER` | (empty) | Username. |
| `TIDB_VECTOR_PASSWORD` | (empty) | Password. |
| `TIDB_VECTOR_DATABASE` | `dify` | Database name. |
| Variable | Default | Description |
| -------------------- | ----------- | -------------- |
| `MATRIXONE_HOST` | `matrixone` | Hostname. |
| `MATRIXONE_PORT` | `6001` | Port number. |
| `MATRIXONE_USER` | `dump` | Username. |
| `MATRIXONE_PASSWORD` | `111` | Password. |
| `MATRIXONE_DATABASE` | `dify` | Database name. |
| Variable | Default | Description |
| ------------------------- | --------------------------------------------------- | -------------------- |
| `CHROMA_HOST` | `127.0.0.1` | Chroma server host. |
| `CHROMA_PORT` | `8000` | Chroma server port. |
| `CHROMA_TENANT` | `default_tenant` | Tenant name. |
| `CHROMA_DATABASE` | `default_database` | Database name. |
| `CHROMA_AUTH_PROVIDER` | `chromadb.auth.token_authn.TokenAuthClientProvider` | Auth provider class. |
| `CHROMA_AUTH_CREDENTIALS` | (empty) | Auth credentials. |
| Variable | Default | Description |
| ------------------------ | ------------------------- | ----------------------------------------- |
| `ORACLE_USER` | `dify` | Oracle username. |
| `ORACLE_PASSWORD` | `dify` | Oracle password. |
| `ORACLE_DSN` | `oracle:1521/FREEPDB1` | Data source name. |
| `ORACLE_CONFIG_DIR` | `/app/api/storage/wallet` | Oracle configuration directory. |
| `ORACLE_WALLET_LOCATION` | `/app/api/storage/wallet` | Wallet location for Autonomous DB. |
| `ORACLE_WALLET_PASSWORD` | `dify` | Wallet password. |
| `ORACLE_IS_AUTONOMOUS` | `false` | Whether using Oracle Autonomous Database. |
| Variable | Default | Description |
| ----------------------------------- | -------------- | ------------------------- |
| `ALIBABACLOUD_MYSQL_HOST` | `127.0.0.1` | Hostname. |
| `ALIBABACLOUD_MYSQL_PORT` | `3306` | Port number. |
| `ALIBABACLOUD_MYSQL_USER` | `root` | Username. |
| `ALIBABACLOUD_MYSQL_PASSWORD` | `difyai123456` | Password. |
| `ALIBABACLOUD_MYSQL_DATABASE` | `dify` | Database name. |
| `ALIBABACLOUD_MYSQL_MAX_CONNECTION` | `5` | Maximum pool connections. |
| `ALIBABACLOUD_MYSQL_HNSW_M` | `6` | HNSW M parameter. |
| Variable | Default | Description |
| ---------------- | -------------- | -------------- |
| `RELYT_HOST` | `db` | Hostname. |
| `RELYT_PORT` | `5432` | Port number. |
| `RELYT_USER` | `postgres` | Username. |
| `RELYT_PASSWORD` | `difyai123456` | Password. |
| `RELYT_DATABASE` | `postgres` | Database name. |
| Variable | Default | Description |
| ------------------------- | ---------------- | -------------------------------------------------------------------------------------------------------------------------------------------------- |
| `OPENSEARCH_HOST` | `opensearch` | Hostname. |
| `OPENSEARCH_PORT` | `9200` | Port number. |
| `OPENSEARCH_SECURE` | `true` | Use HTTPS. |
| `OPENSEARCH_VERIFY_CERTS` | `true` | Verify SSL certificates. |
| `OPENSEARCH_AUTH_METHOD` | `basic` | `basic` uses username/password. `aws_managed_iam` uses AWS SigV4 request signing via Boto3 credentials (for AWS Managed OpenSearch or Serverless). |
| `OPENSEARCH_USER` | `admin` | Username. Only used with `basic` auth. |
| `OPENSEARCH_PASSWORD` | `admin` | Password. Only used with `basic` auth. |
| `OPENSEARCH_AWS_REGION` | `ap-southeast-1` | AWS region. Only used with `aws_managed_iam` auth. |
| `OPENSEARCH_AWS_SERVICE` | `aoss` | AWS service type: `es` (Managed Cluster) or `aoss` (OpenSearch Serverless). Only used with `aws_managed_iam` auth. |
| Variable | Default | Description |
| ---------------------------------------- | ------------------ | --------------------------------------------------------------------------------------------------- |
| `TENCENT_VECTOR_DB_URL` | `http://127.0.0.1` | Access address. [Console](https://console.cloud.tencent.com/vdb). |
| `TENCENT_VECTOR_DB_API_KEY` | `dify` | API key. [Key Management](https://cloud.tencent.com/document/product/1709/95108). |
| `TENCENT_VECTOR_DB_TIMEOUT` | `30` | Request timeout in seconds. |
| `TENCENT_VECTOR_DB_USERNAME` | `dify` | Account name. [Account Management](https://cloud.tencent.com/document/product/1709/115833). |
| `TENCENT_VECTOR_DB_DATABASE` | `dify` | Database name. [Create Database](https://cloud.tencent.com/document/product/1709/95822). |
| `TENCENT_VECTOR_DB_SHARD` | `1` | Number of shards. |
| `TENCENT_VECTOR_DB_REPLICAS` | `2` | Number of replicas. |
| `TENCENT_VECTOR_DB_ENABLE_HYBRID_SEARCH` | `false` | Enable hybrid search. [Sparse Vector docs](https://cloud.tencent.com/document/product/1709/110110). |
| Variable | Default | Description |
| -------------------------------- | --------- | --------------------------------------------------------------------------------------------------------------------------------------------- |
| `ELASTICSEARCH_HOST` | `0.0.0.0` | Hostname. |
| `ELASTICSEARCH_PORT` | `9200` | Port number. |
| `ELASTICSEARCH_USERNAME` | `elastic` | Username. |
| `ELASTICSEARCH_PASSWORD` | `elastic` | Password. |
| `ELASTICSEARCH_USE_CLOUD` | `false` | Switch to Elastic Cloud mode. When `true`, uses `ELASTICSEARCH_CLOUD_URL` and `ELASTICSEARCH_API_KEY` instead of host/port/username/password. |
| `ELASTICSEARCH_CLOUD_URL` | (empty) | Elastic Cloud endpoint URL. Required when `ELASTICSEARCH_USE_CLOUD=true`. |
| `ELASTICSEARCH_API_KEY` | (empty) | Elastic Cloud API key. Required when `ELASTICSEARCH_USE_CLOUD=true`. |
| `ELASTICSEARCH_VERIFY_CERTS` | `false` | Verify SSL certificates. |
| `ELASTICSEARCH_CA_CERTS` | (empty) | Path to CA certificates. |
| `ELASTICSEARCH_REQUEST_TIMEOUT` | `100000` | Request timeout in milliseconds. |
| `ELASTICSEARCH_RETRY_ON_TIMEOUT` | `true` | Retry on timeout. |
| `ELASTICSEARCH_MAX_RETRIES` | `10` | Maximum retry attempts. |
| Variable | Default | Description |
| -------------------------------------------- | ----------------------- | ----------------------------------- |
| `BAIDU_VECTOR_DB_ENDPOINT` | `http://127.0.0.1:5287` | Endpoint URL. |
| `BAIDU_VECTOR_DB_CONNECTION_TIMEOUT_MS` | `30000` | Connection timeout in milliseconds. |
| `BAIDU_VECTOR_DB_ACCOUNT` | `root` | Account name. |
| `BAIDU_VECTOR_DB_API_KEY` | `dify` | API key. |
| `BAIDU_VECTOR_DB_DATABASE` | `dify` | Database name. |
| `BAIDU_VECTOR_DB_SHARD` | `1` | Number of shards. |
| `BAIDU_VECTOR_DB_REPLICAS` | `3` | Number of replicas. |
| `BAIDU_VECTOR_DB_INVERTED_INDEX_ANALYZER` | `DEFAULT_ANALYZER` | Inverted index analyzer. |
| `BAIDU_VECTOR_DB_INVERTED_INDEX_PARSER_MODE` | `COARSE_MODE` | Inverted index parser mode. |
| Variable | Default | Description |
| ----------------------------- | ----------------------------- | ----------------------------------------------------- |
| `VIKINGDB_ACCESS_KEY` | (empty) | Access key. |
| `VIKINGDB_SECRET_KEY` | (empty) | Secret key. |
| `VIKINGDB_REGION` | `cn-shanghai` | Region. |
| `VIKINGDB_HOST` | `api-vikingdb.xxx.volces.com` | API host. Replace with your region-specific endpoint. |
| `VIKINGDB_SCHEMA` | `http` | Protocol scheme (`http` or `https`). |
| `VIKINGDB_CONNECTION_TIMEOUT` | `30` | Connection timeout in seconds. |
| `VIKINGDB_SOCKET_TIMEOUT` | `30` | Socket timeout in seconds. |
| Variable | Default | Description |
| ----------------------- | ------------------------ | -------------------------------------------------------------------------- |
| `LINDORM_URL` | `http://localhost:30070` | Lindorm search engine URL. [Console](https://lindorm.console.aliyun.com/). |
| `LINDORM_USERNAME` | `admin` | Username. |
| `LINDORM_PASSWORD` | `admin` | Password. |
| `LINDORM_USING_UGC` | `true` | Use UGC mode. |
| `LINDORM_QUERY_TIMEOUT` | `1` | Query timeout in seconds. |
| Variable | Default | Description |
| -------------------------- | ----------- | ------------------------- |
| `OPENGAUSS_HOST` | `opengauss` | Hostname. |
| `OPENGAUSS_PORT` | `6600` | Port number. |
| `OPENGAUSS_USER` | `postgres` | Username. |
| `OPENGAUSS_PASSWORD` | `Dify@123` | Password. |
| `OPENGAUSS_DATABASE` | `dify` | Database name. |
| `OPENGAUSS_MIN_CONNECTION` | `1` | Minimum pool connections. |
| `OPENGAUSS_MAX_CONNECTION` | `5` | Maximum pool connections. |
| `OPENGAUSS_ENABLE_PQ` | `false` | Enable PQ acceleration. |
| Variable | Default | Description |
| ----------------------- | ------------------------ | --------------------- |
| `HUAWEI_CLOUD_HOSTS` | `https://127.0.0.1:9200` | Cluster endpoint URL. |
| `HUAWEI_CLOUD_USER` | `admin` | Username. |
| `HUAWEI_CLOUD_PASSWORD` | `admin` | Password. |
| Variable | Default | Description |
| ---------------------- | ------- | ---------------------------- |
| `UPSTASH_VECTOR_URL` | (empty) | Upstash Vector endpoint URL. |
| `UPSTASH_VECTOR_TOKEN` | (empty) | Upstash Vector API token. |
| Variable | Default | Description |
| ------------------------------------------ | ---------------------------------------------------- | ------------------------------------------------------------- |
| `TABLESTORE_ENDPOINT` | `https://instance-name.cn-hangzhou.ots.aliyuncs.com` | Endpoint address. Replace `instance-name` with your instance. |
| `TABLESTORE_INSTANCE_NAME` | (empty) | Instance name. |
| `TABLESTORE_ACCESS_KEY_ID` | (empty) | Access key ID. |
| `TABLESTORE_ACCESS_KEY_SECRET` | (empty) | Access key secret. |
| `TABLESTORE_NORMALIZE_FULLTEXT_BM25_SCORE` | `false` | Normalize fulltext BM25 scores. |
| Variable | Default | Description |
| ------------------------------------- | -------------------- | -------------------------- |
| `CLICKZETTA_USERNAME` | (empty) | Username. |
| `CLICKZETTA_PASSWORD` | (empty) | Password. |
| `CLICKZETTA_INSTANCE` | (empty) | Instance name. |
| `CLICKZETTA_SERVICE` | `api.clickzetta.com` | Service endpoint. |
| `CLICKZETTA_WORKSPACE` | `quick_start` | Workspace name. |
| `CLICKZETTA_VCLUSTER` | `default_ap` | Virtual cluster. |
| `CLICKZETTA_SCHEMA` | `dify` | Schema name. |
| `CLICKZETTA_BATCH_SIZE` | `100` | Batch size for operations. |
| `CLICKZETTA_ENABLE_INVERTED_INDEX` | `true` | Enable inverted index. |
| `CLICKZETTA_ANALYZER_TYPE` | `chinese` | Analyzer type. |
| `CLICKZETTA_ANALYZER_MODE` | `smart` | Analyzer mode. |
| `CLICKZETTA_VECTOR_DISTANCE_FUNCTION` | `cosine_distance` | Distance function. |
| Variable | Default | Description |
| -------------------------- | ----------- | ---------------------------------------------------- |
| `IRIS_HOST` | `iris` | Hostname. |
| `IRIS_SUPER_SERVER_PORT` | `1972` | Super server port. |
| `IRIS_USER` | `_SYSTEM` | Username. |
| `IRIS_PASSWORD` | `Dify@1234` | Password. |
| `IRIS_DATABASE` | `USER` | Database name. |
| `IRIS_SCHEMA` | `dify` | Schema name. |
| `IRIS_CONNECTION_URL` | (empty) | Full connection URL (overrides individual settings). |
| `IRIS_MIN_CONNECTION` | `1` | Minimum pool connections. |
| `IRIS_MAX_CONNECTION` | `3` | Maximum pool connections. |
| `IRIS_TEXT_INDEX` | `true` | Enable text indexing. |
| `IRIS_TEXT_INDEX_LANGUAGE` | `en` | Text index language. |
### Knowledge Configuration
| Variable | Default | Description |
| ----------------------------------- | ------- | ------------------------------------------------------------------------------------------------------------------------------------------------------------------------------------------------------------ |
| `UPLOAD_FILE_SIZE_LIMIT` | `15` | Maximum file size in MB for document uploads (PDFs, Word docs, etc.). Users see a "file too large" error when exceeded. Does not apply to images, videos, or audio—they have separate limits below. |
| `UPLOAD_FILE_BATCH_LIMIT` | `5` | Maximum number of files the frontend allows per upload batch. |
| `UPLOAD_FILE_EXTENSION_BLACKLIST` | (empty) | Security blocklist of file extensions that cannot be uploaded. Comma-separated, lowercase, no dots. Example: `exe,bat,cmd,com,scr,vbs,ps1,msi,dll`. Empty allows all types. |
| `SINGLE_CHUNK_ATTACHMENT_LIMIT` | `10` | Maximum number of images that can be embedded in a single knowledge base segment (chunk). |
| `IMAGE_FILE_BATCH_LIMIT` | `10` | Maximum number of image files per upload batch. |
| `ATTACHMENT_IMAGE_FILE_SIZE_LIMIT` | `2` | Maximum size in MB for images fetched from external URLs during knowledge base indexing. Images larger than this are skipped. Different from `UPLOAD_IMAGE_FILE_SIZE_LIMIT` which applies to direct uploads. |
| `ATTACHMENT_IMAGE_DOWNLOAD_TIMEOUT` | `60` | Timeout in seconds when downloading images from external URLs during knowledge base indexing. Slow or unresponsive image servers are abandoned after this timeout. |
| `ETL_TYPE` | `dify` | Document extraction library. `dify` supports txt, md, pdf, html, xlsx, docx, csv. `Unstructured` adds support for doc, msg, eml, ppt, pptx, xml, epub (requires `UNSTRUCTURED_API_URL`). |
| `UNSTRUCTURED_API_URL` | (empty) | Unstructured.io API endpoint. Required when `ETL_TYPE` is `Unstructured`. Also needed for `.ppt` file support. Example: `http://unstructured:8000/general/v0/general`. |
| `UNSTRUCTURED_API_KEY` | (empty) | API key for Unstructured.io authentication. |
| `SCARF_NO_ANALYTICS` | `true` | Disable Unstructured library's telemetry/analytics collection. |
| `TOP_K_MAX_VALUE` | `10` | Maximum value users can set for the `top_k` parameter in knowledge base retrieval (how many results to return per search). |
| `DATASET_MAX_SEGMENTS_PER_REQUEST` | `0` | Maximum number of segments per dataset API request. `0` means unlimited. |
#### Annotation Import
| Variable | Default | Description |
| ----------------------------------------- | ------- | ------------------------------------------------------------------------------------------------------- |
| `ANNOTATION_IMPORT_FILE_SIZE_LIMIT` | `2` | Maximum CSV file size in MB for annotation import. Returns HTTP 413 when exceeded. |
| `ANNOTATION_IMPORT_MAX_RECORDS` | `10000` | Maximum number of records per annotation import. Files with more records must be split into batches. |
| `ANNOTATION_IMPORT_MIN_RECORDS` | `1` | Minimum number of valid records required per annotation import. |
| `ANNOTATION_IMPORT_RATE_LIMIT_PER_MINUTE` | `5` | Maximum annotation import requests per minute per workspace. Returns HTTP 429 when exceeded. |
| `ANNOTATION_IMPORT_RATE_LIMIT_PER_HOUR` | `20` | Maximum annotation import requests per hour per workspace. |
| `ANNOTATION_IMPORT_MAX_CONCURRENT` | `5` | Maximum concurrent annotation import tasks per workspace. Stale tasks are auto-cleaned after 2 minutes. |
### Model Configuration
| Variable | Default | Description |
| ------------------------------------- | ------- | ------------------------------------------------------------------------------------------------------------------------------------------------- |
| `PROMPT_GENERATION_MAX_TOKENS` | `512` | Maximum tokens when the system auto-generates a prompt using an LLM. Prevents runaway generations that waste API quota. |
| `CODE_GENERATION_MAX_TOKENS` | `1024` | Maximum tokens when the system auto-generates code using an LLM. |
| `PLUGIN_BASED_TOKEN_COUNTING_ENABLED` | `false` | Use plugin-based token counting for accurate usage tracking. When disabled, token counting returns 0 (faster but cost tracking is less accurate). |
### Multi-modal Configuration
| Variable | Default | Description |
| ------------------------------ | -------- | ---------------------------------------------------------------------------------------------------------------------------------------------------------------------------------------------------------------------------------------------------------------- |
| `MULTIMODAL_SEND_FORMAT` | `base64` | How files are sent to multi-modal LLMs. `base64` embeds file data in the request (more compatible, works offline, larger payloads). `url` sends a signed URL for the model to fetch (faster, smaller requests, but the model must be able to reach `FILES_URL`). |
| `UPLOAD_IMAGE_FILE_SIZE_LIMIT` | `10` | Maximum image file size in MB for direct uploads (jpg, png, webp, gif, svg). |
| `UPLOAD_VIDEO_FILE_SIZE_LIMIT` | `100` | Maximum video file size in MB for direct uploads (mp4, mov, mpeg, webm). |
| `UPLOAD_AUDIO_FILE_SIZE_LIMIT` | `50` | Maximum audio file size in MB for direct uploads (mp3, m4a, wav, amr, mpga). |
All upload size limits are also gated by `NGINX_CLIENT_MAX_BODY_SIZE` (default `100M`). If you increase any upload limit above 100 MB, also increase `NGINX_CLIENT_MAX_BODY_SIZE` to match—otherwise Nginx rejects the upload with a 413 error.
### Sentry Configuration
Sentry provides error tracking and performance monitoring. Each service has its own DSN to separate error reporting.
| Variable | Default | Description |
| --------------------------------- | ------- | -------------------------------------------------------------------------------------------------------------------------- |
| `SENTRY_DSN` | (empty) | Sentry DSN shared across services. |
| `API_SENTRY_DSN` | (empty) | Sentry DSN for the API service. Overrides `SENTRY_DSN` if set. Empty disables Sentry for the backend. |
| `API_SENTRY_TRACES_SAMPLE_RATE` | `1.0` | Fraction of requests to include in performance tracing (0.01 = 1%, 1.0 = 100%). Traces track request flow across services. |
| `API_SENTRY_PROFILES_SAMPLE_RATE` | `1.0` | Fraction of requests to include in CPU/memory profiling (0.01 = 1%). Profiles show where time is spent in code. |
| `WEB_SENTRY_DSN` | (empty) | Sentry DSN for the web frontend (Next.js). Frontend-only. |
| `PLUGIN_SENTRY_ENABLED` | `false` | Enable Sentry for the plugin daemon service. |
| `PLUGIN_SENTRY_DSN` | (empty) | Sentry DSN for the plugin daemon. |
### Notion Integration Configuration
Connect Dify to Notion as a knowledge base data source. Get integration credentials at [https://www.notion.so/my-integrations](https://www.notion.so/my-integrations).
| Variable | Default | Description |
| ------------------------- | -------- | ------------------------------------------------------------------------------------------------------------------------------------------------------------------------------------------------------ |
| `NOTION_INTEGRATION_TYPE` | `public` | `public` uses standard OAuth 2.0 (requires HTTPS redirect URL, needs CLIENT\_ID + CLIENT\_SECRET). `internal` uses a direct integration token (works with HTTP). Use `internal` for local deployments. |
| `NOTION_CLIENT_SECRET` | (empty) | OAuth client secret. Required for `public` integration. |
| `NOTION_CLIENT_ID` | (empty) | OAuth client ID. Required for `public` integration. |
| `NOTION_INTERNAL_SECRET` | (empty) | Direct integration token from Notion. Required for `internal` integration. |
### Mail Configuration
Dify sends emails for account invitations, password resets, login codes, and Human Input node notifications. Configure one of the three supported providers. Email links require `CONSOLE_WEB_URL` to be set—see [Common Variables](#console_web_url).
| Variable | Default | Description |
| ------------------------ | -------- | --------------------------------------------------------- |
| `MAIL_TYPE` | `resend` | Mail provider: `resend`, `smtp`, or `sendgrid`. |
| `MAIL_DEFAULT_SEND_FROM` | (empty) | Default "From" address for all outgoing emails. Required. |
| Variable | Default | Description |
| ---------------- | ------------------------ | -------------------------------------------------------------- |
| `RESEND_API_URL` | `https://api.resend.com` | Resend API endpoint. Override for self-hosted Resend or proxy. |
| `RESEND_API_KEY` | (empty) | Resend API key. Required when `MAIL_TYPE=resend`. |
Three TLS modes: implicit TLS (`SMTP_USE_TLS=true`, `SMTP_OPPORTUNISTIC_TLS=false`, port 465), STARTTLS (`SMTP_USE_TLS=true`, `SMTP_OPPORTUNISTIC_TLS=true`, port 587), or plain (`SMTP_USE_TLS=false`, port 25).
| Variable | Default | Description |
| ------------------------ | ------- | ------------------------------------------------------------------------------------------------------------------------------------------------------------------------------------------------------------------ |
| `SMTP_SERVER` | (empty) | SMTP server address. |
| `SMTP_PORT` | `465` | SMTP server port. Use `587` for STARTTLS mode. |
| `SMTP_USERNAME` | (empty) | SMTP username. Can be empty for IP-whitelisted servers. |
| `SMTP_PASSWORD` | (empty) | SMTP password. Can be empty for IP-whitelisted servers. |
| `SMTP_USE_TLS` | `true` | Enable TLS. When `true` with `SMTP_OPPORTUNISTIC_TLS=false`, uses implicit TLS (`SMTP_SSL`). |
| `SMTP_OPPORTUNISTIC_TLS` | `false` | Use STARTTLS (explicit TLS) instead of implicit TLS. Must be used with `SMTP_USE_TLS=true`. |
| `SMTP_LOCAL_HOSTNAME` | (empty) | Override the hostname sent in SMTP HELO/EHLO. Required in Docker when your SMTP server rejects container hostnames (common with Google Workspace, Microsoft 365). Set to your domain, e.g., `mail.yourdomain.com`. |
| Variable | Default | Description |
| ------------------ | ------- | ----------------------------------------------------- |
| `SENDGRID_API_KEY` | (empty) | SendGrid API key. Required when `MAIL_TYPE=sendgrid`. |
For more details, see the [SendGrid documentation](https://www.twilio.com/docs/sendgrid/for-developers/sending-email/api-getting-started).
### Others Configuration
#### Indexing
| Variable | Default | Description |
| ----------------------------------------- | ------- | ---------------------------------------------------------------------------------------------------------------------------------------------------------------------------- |
| `INDEXING_MAX_SEGMENTATION_TOKENS_LENGTH` | `4000` | Maximum token length per text segment when chunking documents for the knowledge base. Larger values retain more context per chunk; smaller values provide finer granularity. |
#### Token & Invitation
All token expiry variables control how long a one-time-use token stored in Redis remains valid. After expiry, the user must request a new token.
| Variable | Default | Description |
| ------------------------------------- | ------- | ------------------------------------------------------------ |
| `INVITE_EXPIRY_HOURS` | `72` | How long a workspace invitation link stays valid (in hours). |
| `RESET_PASSWORD_TOKEN_EXPIRY_MINUTES` | `5` | Password reset token validity in minutes. |
| `EMAIL_REGISTER_TOKEN_EXPIRY_MINUTES` | `5` | Email registration token validity in minutes. |
| `CHANGE_EMAIL_TOKEN_EXPIRY_MINUTES` | `5` | Change email token validity in minutes. |
| `OWNER_TRANSFER_TOKEN_EXPIRY_MINUTES` | `5` | Workspace owner transfer token validity in minutes. |
#### Code Execution Sandbox
The sandbox is a separate service that runs Python, JavaScript, and Jinja2 code nodes in isolation.
| Variable | Default | Description |
| ----------------------------------------------- | ---------------------- | ------------------------------------------------------------------------------------------------------- |
| `CODE_EXECUTION_ENDPOINT` | `http://sandbox:8194` | Sandbox service endpoint. |
| `CODE_EXECUTION_API_KEY` | `dify-sandbox` | API key for sandbox authentication. Must match `SANDBOX_API_KEY` in the sandbox service. |
| `CODE_EXECUTION_SSL_VERIFY` | `true` | Verify SSL for sandbox connections. Disable for development with self-signed certificates. |
| `CODE_EXECUTION_CONNECT_TIMEOUT` | `10` | Connection timeout in seconds. |
| `CODE_EXECUTION_READ_TIMEOUT` | `60` | Read timeout in seconds. |
| `CODE_EXECUTION_WRITE_TIMEOUT` | `10` | Write timeout in seconds. |
| `CODE_EXECUTION_POOL_MAX_CONNECTIONS` | `100` | Maximum concurrent HTTP connections to the sandbox service. |
| `CODE_EXECUTION_POOL_MAX_KEEPALIVE_CONNECTIONS` | `20` | Maximum idle connections kept alive in the sandbox connection pool. |
| `CODE_EXECUTION_POOL_KEEPALIVE_EXPIRY` | `5.0` | Seconds before idle sandbox connections are closed. |
| `CODE_MAX_NUMBER` | `9223372036854775807` | Maximum numeric value allowed in code node output (max 64-bit signed integer). |
| `CODE_MIN_NUMBER` | `-9223372036854775808` | Minimum numeric value allowed in code node output (min 64-bit signed integer). |
| `CODE_MAX_STRING_LENGTH` | `400000` | Maximum string length in code node output. Prevents memory exhaustion from unbounded string generation. |
| `CODE_MAX_DEPTH` | `5` | Maximum nesting depth for output data structures. |
| `CODE_MAX_PRECISION` | `20` | Maximum decimal places for floating-point numbers in output. |
| `CODE_MAX_STRING_ARRAY_LENGTH` | `30` | Maximum number of elements in a string array output. |
| `CODE_MAX_OBJECT_ARRAY_LENGTH` | `30` | Maximum number of elements in an object array output. |
| `CODE_MAX_NUMBER_ARRAY_LENGTH` | `1000` | Maximum number of elements in a number array output. |
| `TEMPLATE_TRANSFORM_MAX_LENGTH` | `400000` | Maximum character length for Template Transform node output. |
#### Workflow Runtime
| Variable | Default | Description |
| --------------------------------- | -------- | ------------------------------------------------------------------------------------------------------------------------------------------------------------ |
| `WORKFLOW_MAX_EXECUTION_STEPS` | `500` | Maximum number of node executions per workflow run. Exceeding this terminates the workflow. |
| `WORKFLOW_MAX_EXECUTION_TIME` | `1200` | Maximum wall-clock time in seconds per workflow run. Exceeding this terminates the workflow. |
| `WORKFLOW_CALL_MAX_DEPTH` | `5` | Maximum depth for nested workflow-calls-workflow. Prevents infinite recursion. |
| `MAX_VARIABLE_SIZE` | `204800` | Maximum size in bytes (200 KB) for a single workflow variable. |
| `WORKFLOW_FILE_UPLOAD_LIMIT` | `10` | Maximum number of files that can be uploaded in a single workflow execution. |
| `WORKFLOW_NODE_EXECUTION_STORAGE` | `rdbms` | Where workflow node execution records are stored. `rdbms` stores everything in the database. `hybrid` stores new data in object storage and reads from both. |
| `DSL_EXPORT_ENCRYPT_DATASET_ID` | `true` | Encrypt dataset IDs when exporting DSL files. Set to `false` to export plain IDs for easier cross-environment import. |
#### Workflow Storage Repository
These select which backend implementation handles workflow execution data. The default `SQLAlchemy` repositories store everything in the database. Alternative implementations (e.g., Celery, Logstore) can be used for different storage strategies.
| Variable | Default | Description |
| ----------------------------------------- | ----------------------------------------------------------------------------------------------------------------- | -------------------------------------------------------------------- |
| `CORE_WORKFLOW_EXECUTION_REPOSITORY` | `core.repositories.sqlalchemy_workflow_execution_repository.SQLAlchemyWorkflowExecutionRepository` | Repository implementation for workflow execution records. |
| `CORE_WORKFLOW_NODE_EXECUTION_REPOSITORY` | `core.repositories.sqlalchemy_workflow_node_execution_repository.SQLAlchemyWorkflowNodeExecutionRepository` | Repository implementation for workflow node execution records. |
| `API_WORKFLOW_RUN_REPOSITORY` | `repositories.sqlalchemy_api_workflow_run_repository.DifyAPISQLAlchemyWorkflowRunRepository` | Service-layer repository for workflow run API operations. |
| `API_WORKFLOW_NODE_EXECUTION_REPOSITORY` | `repositories.sqlalchemy_api_workflow_node_execution_repository.DifyAPISQLAlchemyWorkflowNodeExecutionRepository` | Service-layer repository for workflow node execution API operations. |
| `LOOP_NODE_MAX_COUNT` | `100` | Maximum iterations for Loop nodes. Prevents infinite loops. |
| `MAX_PARALLEL_LIMIT` | `10` | Maximum number of parallel branches in a workflow. |
#### GraphEngine Worker Pool
| Variable | Default | Description |
| ----------------------------------- | ------- | ------------------------------------------------------- |
| `GRAPH_ENGINE_MIN_WORKERS` | `1` | Minimum workers per GraphEngine instance. |
| `GRAPH_ENGINE_MAX_WORKERS` | `10` | Maximum workers per GraphEngine instance. |
| `GRAPH_ENGINE_SCALE_UP_THRESHOLD` | `3` | Queue depth that triggers spawning additional workers. |
| `GRAPH_ENGINE_SCALE_DOWN_IDLE_TIME` | `5.0` | Seconds of idle time before excess workers are removed. |
#### Workflow Log Cleanup
| Variable | Default | Description |
| -------------------------------------------- | ------- | ---------------------------------------------------------------------------------------------------- |
| `WORKFLOW_LOG_CLEANUP_ENABLED` | `false` | Enable automatic cleanup of workflow execution logs at 2:00 AM daily. |
| `WORKFLOW_LOG_RETENTION_DAYS` | `30` | Number of days to retain workflow logs before cleanup. |
| `WORKFLOW_LOG_CLEANUP_BATCH_SIZE` | `100` | Number of log entries processed per cleanup batch. Adjust based on system performance. |
| `WORKFLOW_LOG_CLEANUP_SPECIFIC_WORKFLOW_IDS` | (empty) | Comma-separated list of workflow IDs to limit cleanup to. When empty, all workflow logs are cleaned. |
#### HTTP Request Node
These configure the HTTP Request node used in workflows to call external APIs.
| Variable | Default | Description |
| ----------------------------------- | ---------- | ---------------------------------------------------------------------------------------------------------------- |
| `HTTP_REQUEST_NODE_MAX_TEXT_SIZE` | `1048576` | Maximum text response size in bytes (1 MB). Responses larger than this are truncated. |
| `HTTP_REQUEST_NODE_MAX_BINARY_SIZE` | `10485760` | Maximum binary response size in bytes (10 MB). |
| `HTTP_REQUEST_NODE_SSL_VERIFY` | `true` | Verify SSL certificates. Disable for testing with self-signed certificates. |
| `HTTP_REQUEST_MAX_CONNECT_TIMEOUT` | `10` | Maximum connect timeout users can set in the workflow editor (in seconds). Per-node timeouts cannot exceed this. |
| `HTTP_REQUEST_MAX_READ_TIMEOUT` | `600` | Maximum read timeout ceiling (in seconds). |
| `HTTP_REQUEST_MAX_WRITE_TIMEOUT` | `600` | Maximum write timeout ceiling (in seconds). |
#### Webhook
| Variable | Default | Description |
| ------------------------------- | ---------- | --------------------------------------------------------------------------------------------- |
| `WEBHOOK_REQUEST_BODY_MAX_SIZE` | `10485760` | Maximum webhook payload size in bytes (10 MB). Larger payloads are rejected with a 413 error. |
#### SSRF Protection
All outbound HTTP requests from Dify (HTTP nodes, image downloads, etc.) are routed through a proxy that blocks requests to internal/private IP ranges, preventing Server-Side Request Forgery (SSRF) attacks.
| Variable | Default | Description |
| ------------------------------------- | ------------------------ | ---------------------------------------------------------------------------------------------------------------------------------------------- |
| `SSRF_PROXY_HTTP_URL` | `http://ssrf_proxy:3128` | SSRF proxy URL for HTTP requests. |
| `SSRF_PROXY_HTTPS_URL` | `http://ssrf_proxy:3128` | SSRF proxy URL for HTTPS requests. |
| `SSRF_POOL_MAX_CONNECTIONS` | `100` | Maximum concurrent connections in the SSRF HTTP client pool. |
| `SSRF_POOL_MAX_KEEPALIVE_CONNECTIONS` | `20` | Maximum idle connections kept alive in the SSRF pool. |
| `SSRF_POOL_KEEPALIVE_EXPIRY` | `5.0` | Seconds before idle SSRF connections are closed. |
| `RESPECT_XFORWARD_HEADERS_ENABLED` | `false` | Trust X-Forwarded-For/Proto/Port headers from reverse proxies. Only enable behind a single trusted reverse proxy—otherwise allows IP spoofing. |
#### Agent Configuration
| Variable | Default | Description |
| -------------------- | ------- | -------------------------------------------------------------------------------- |
| `MAX_TOOLS_NUM` | `10` | Maximum number of tools an agent can use simultaneously. |
| `MAX_ITERATIONS_NUM` | `99` | Maximum reasoning iterations per agent execution. Prevents infinite agent loops. |
## Web Frontend Service
These variables are used by the Next.js web frontend container only—they do not affect the Python backend.
| Variable | Default | Description |
| ---------------------------- | ------- | -------------------------------------------------------------------------------------------------------------------- |
| `TEXT_GENERATION_TIMEOUT_MS` | `60000` | Frontend timeout for streaming text generation UI. If a stream stalls for longer than this, the UI pauses rendering. |
| `ALLOW_UNSAFE_DATA_SCHEME` | `false` | Allow rendering URLs with the `data:` scheme. Disabled by default for security. |
| `MAX_TREE_DEPTH` | `50` | Maximum node tree depth in the workflow editor UI. |
## Database Service
These configure the database containers directly in Docker Compose.
| Variable | Default | Description |
| ------------------- | --------------------------------- | ----------------------------------------------- |
| `PGDATA` | `/var/lib/postgresql/data/pgdata` | PostgreSQL data directory inside the container. |
| `MYSQL_HOST_VOLUME` | `./volumes/mysql/data` | Host path mounted as MySQL data volume. |
## Sandbox Service
The sandbox is an isolated service for executing code nodes (Python, JavaScript, Jinja2). Network access can be disabled for security.
| Variable | Default | Description |
| ------------------------ | ------------------------ | ---------------------------------------------------------------------------------------------------------- |
| `SANDBOX_API_KEY` | `dify-sandbox` | API key for sandbox authentication. Must match `CODE_EXECUTION_API_KEY` in the API service. |
| `SANDBOX_GIN_MODE` | `release` | Sandbox service mode: `release` or `debug`. |
| `SANDBOX_WORKER_TIMEOUT` | `15` | Maximum execution time in seconds for a single code run. |
| `SANDBOX_ENABLE_NETWORK` | `true` | Allow code to make outbound HTTP requests. Disable to prevent code nodes from accessing external services. |
| `SANDBOX_HTTP_PROXY` | `http://ssrf_proxy:3128` | HTTP proxy for SSRF protection when network is enabled. |
| `SANDBOX_HTTPS_PROXY` | `http://ssrf_proxy:3128` | HTTPS proxy for SSRF protection. |
| `SANDBOX_PORT` | `8194` | Sandbox service port. |
## Nginx Reverse Proxy
| Variable | Default | Description |
| -------------------------------- | ----------------- | ------------------------------------------------------------------------------------------------------------------------- |
| `NGINX_SERVER_NAME` | `_` | Nginx server name. `_` matches any hostname. |
| `NGINX_HTTPS_ENABLED` | `false` | Enable HTTPS. When `true`, place your SSL certificate and key in `./nginx/ssl/`. |
| `NGINX_PORT` | `80` | HTTP port. |
| `NGINX_SSL_PORT` | `443` | HTTPS port (only used when `NGINX_HTTPS_ENABLED=true`). |
| `NGINX_SSL_CERT_FILENAME` | `dify.crt` | SSL certificate filename in `./nginx/ssl/`. |
| `NGINX_SSL_CERT_KEY_FILENAME` | `dify.key` | SSL private key filename in `./nginx/ssl/`. |
| `NGINX_SSL_PROTOCOLS` | `TLSv1.2 TLSv1.3` | Allowed TLS protocol versions. |
| `NGINX_WORKER_PROCESSES` | `auto` | Number of Nginx worker processes. `auto` matches CPU core count. |
| `NGINX_CLIENT_MAX_BODY_SIZE` | `100M` | Maximum request body size. Affects file upload limits at the proxy level. |
| `NGINX_KEEPALIVE_TIMEOUT` | `65` | Keepalive timeout in seconds. |
| `NGINX_PROXY_READ_TIMEOUT` | `3600s` | Proxy read timeout. Set high (1 hour) to support long-running SSE streams. |
| `NGINX_PROXY_SEND_TIMEOUT` | `3600s` | Proxy send timeout. |
| `NGINX_ENABLE_CERTBOT_CHALLENGE` | `false` | Accept Let's Encrypt ACME challenge requests at `/.well-known/acme-challenge/`. Enable for automated certificate renewal. |
After enabling HTTPS, also update the URL variables in [Common Variables](#common-variables) (e.g., `CONSOLE_API_URL`, `CONSOLE_WEB_URL`) to use `https://`.
#### Certbot Configuration
| Variable | Default | Description |
| ----------------- | ------- | ---------------------------------------------------------------------- |
| `CERTBOT_EMAIL` | (empty) | Email address required by Let's Encrypt for certificate notifications. |
| `CERTBOT_DOMAIN` | (empty) | Domain name for the SSL certificate. |
| `CERTBOT_OPTIONS` | (empty) | Additional certbot CLI options (e.g., `--force-renewal`, `--dry-run`). |
## SSRF Proxy
These configure the Squid-based SSRF proxy container that blocks requests to internal/private networks.
| Variable | Default | Description |
| ------------------------------- | ------------------ | -------------------------------------------------------- |
| `SSRF_HTTP_PORT` | `3128` | Proxy listening port. |
| `SSRF_COREDUMP_DIR` | `/var/spool/squid` | Core dump directory. |
| `SSRF_REVERSE_PROXY_PORT` | `8194` | Reverse proxy port forwarded to the sandbox service. |
| `SSRF_SANDBOX_HOST` | `sandbox` | Hostname of the sandbox service. |
| `SSRF_DEFAULT_TIME_OUT` | `5` | Default overall timeout in seconds for proxied requests. |
| `SSRF_DEFAULT_CONNECT_TIME_OUT` | `5` | Default connection timeout in seconds. |
| `SSRF_DEFAULT_READ_TIME_OUT` | `5` | Default read timeout in seconds. |
| `SSRF_DEFAULT_WRITE_TIME_OUT` | `5` | Default write timeout in seconds. |
## Docker Compose
| Variable | Default | Description |
| ----------------------- | -------------------------------------------------- | --------------------------------------------------------------------------------------------------------------------------------------------------------------------------------- |
| `COMPOSE_PROFILES` | `${VECTOR_STORE:-weaviate},${DB_TYPE:-postgresql}` | Automatically selects which service containers to start based on your database and vector store choices. For example, setting `DB_TYPE=mysql` starts MySQL instead of PostgreSQL. |
| `EXPOSE_NGINX_PORT` | `80` | Host port mapped to Nginx HTTP. |
| `EXPOSE_NGINX_SSL_PORT` | `443` | Host port mapped to Nginx HTTPS. |
## ModelProvider & Tool Position Configuration
Customize which tools and model providers are available in the app interface and their display order. Use comma-separated values with no spaces between items.
| Variable | Default | Description |
| ---------------------------- | ------- | --------------------------------------------------------------------- |
| `POSITION_TOOL_PINS` | (empty) | Pin specific tools to the top of the list. Example: `bing,google`. |
| `POSITION_TOOL_INCLUDES` | (empty) | Only show listed tools. If unset, all tools are available. |
| `POSITION_TOOL_EXCLUDES` | (empty) | Hide specific tools (pinned tools are not affected). |
| `POSITION_PROVIDER_PINS` | (empty) | Pin specific model providers to the top. Example: `openai,anthropic`. |
| `POSITION_PROVIDER_INCLUDES` | (empty) | Only show listed providers. If unset, all providers are available. |
| `POSITION_PROVIDER_EXCLUDES` | (empty) | Hide specific providers (pinned providers are not affected). |
## Plugin Daemon Configuration
The plugin daemon is a separate service that manages plugin lifecycle (installation, execution, upgrades). The API communicates with it via HTTP.
| Variable | Default | Description |
| ------------------------------- | ----------------------------- | -------------------------------------------------------------------------------------------------------------------------------------------- |
| `PLUGIN_DAEMON_URL` | `http://plugin_daemon:5002` | Plugin daemon service URL. |
| `PLUGIN_DAEMON_KEY` | (auto-generated) | Authentication key for the plugin daemon. |
| `PLUGIN_DAEMON_PORT` | `5002` | Plugin daemon listening port. |
| `PLUGIN_DAEMON_TIMEOUT` | `600.0` | Timeout in seconds for all plugin daemon requests (installation, execution, listing). |
| `PLUGIN_MAX_PACKAGE_SIZE` | `52428800` | Maximum plugin package size in bytes (50 MB). Validated during marketplace downloads. |
| `PLUGIN_MODEL_SCHEMA_CACHE_TTL` | `3600` | How long to cache plugin model schemas in seconds. Reduces repeated lookups. |
| `PLUGIN_DIFY_INNER_API_KEY` | (auto-generated) | API key the plugin daemon uses to call back to the Dify API. Must match `DIFY_INNER_API_KEY` in the plugin daemon service config. |
| `PLUGIN_DIFY_INNER_API_URL` | `http://api:5001` | Internal API URL the plugin daemon calls back to. |
| `PLUGIN_DEBUGGING_HOST` | `0.0.0.0` | Host for plugin remote debugging connections. |
| `PLUGIN_DEBUGGING_PORT` | `5003` | Port for plugin remote debugging connections. |
| `MARKETPLACE_ENABLED` | `true` | Enable the plugin marketplace. When disabled, only locally installed plugins are available—browsing and auto-upgrades are unavailable. |
| `MARKETPLACE_API_URL` | `https://marketplace.dify.ai` | Marketplace API endpoint for plugin browsing, downloading, and upgrade checking. |
| `FORCE_VERIFYING_SIGNATURE` | `true` | Require valid signatures before installing plugins. Prevents installing tampered or unsigned packages. |
| `PLUGIN_MAX_EXECUTION_TIMEOUT` | `600` | Plugin execution timeout in seconds (plugin daemon side). Should match `PLUGIN_DAEMON_TIMEOUT` on the API side. |
| `PIP_MIRROR_URL` | (empty) | Custom PyPI mirror URL used by the plugin daemon when installing plugin dependencies. Useful for faster installs or air-gapped environments. |
## OTLP / OpenTelemetry Configuration
OpenTelemetry provides distributed tracing and metrics collection. When enabled, Dify instruments Flask and exports telemetry data to an OTLP collector.
| Variable | Default | Description |
| ---------------------------------- | ----------------------- | ---------------------------------------------------------------------------------------------------------------- |
| `ENABLE_OTEL` | `false` | Master switch for OpenTelemetry instrumentation. |
| `OTLP_TRACE_ENDPOINT` | (empty) | Dedicated trace endpoint URL. If unset, falls back to `{OTLP_BASE_ENDPOINT}/v1/traces`. |
| `OTLP_METRIC_ENDPOINT` | (empty) | Dedicated metric endpoint URL. If unset, falls back to `{OTLP_BASE_ENDPOINT}/v1/metrics`. |
| `OTLP_BASE_ENDPOINT` | `http://localhost:4318` | Base OTLP collector URL. Used as fallback when specific trace/metric endpoints are not set. |
| `OTLP_API_KEY` | (empty) | API key for OTLP authentication. Sent as `Authorization: Bearer` header. |
| `OTEL_EXPORTER_TYPE` | `otlp` | Exporter type. `otlp` exports to a collector; other values use a console exporter (for debugging). |
| `OTEL_EXPORTER_OTLP_PROTOCOL` | (empty) | Protocol for OTLP export. `grpc` uses gRPC exporters; anything else uses HTTP. |
| `OTEL_SAMPLING_RATE` | `0.1` | Fraction of requests to trace (0.1 = 10%). Lower values reduce overhead in high-traffic production environments. |
| `OTEL_BATCH_EXPORT_SCHEDULE_DELAY` | `5000` | Delay in milliseconds between batch exports. |
| `OTEL_MAX_QUEUE_SIZE` | `2048` | Maximum number of spans queued before dropping. |
| `OTEL_MAX_EXPORT_BATCH_SIZE` | `512` | Maximum spans per export batch. |
| `OTEL_METRIC_EXPORT_INTERVAL` | `60000` | Metric export interval in milliseconds. |
| `OTEL_BATCH_EXPORT_TIMEOUT` | `10000` | Batch span export timeout in milliseconds. |
| `OTEL_METRIC_EXPORT_TIMEOUT` | `30000` | Metric export timeout in milliseconds. |
## Miscellaneous
| Variable | Default | Description |
| ---------------------------------- | ------------------ | -------------------------------------------------------------------------------------------------------------------------------------------- |
| `CSP_WHITELIST` | (empty) | Additional domains to allow in Content Security Policy headers. |
| `ALLOW_EMBED` | `false` | Allow Dify pages to be embedded in iframes. When `false`, sets `X-Frame-Options: DENY` to prevent clickjacking. |
| `SWAGGER_UI_ENABLED` | `false` | Expose Swagger UI at `SWAGGER_UI_PATH` for browsing API documentation. Swagger endpoints bypass authentication. |
| `SWAGGER_UI_PATH` | `/swagger-ui.html` | URL path for Swagger UI. |
| `MAX_SUBMIT_COUNT` | `100` | Maximum concurrent task submissions in the thread pool used for parallel workflow node execution. |
| `TENANT_ISOLATED_TASK_CONCURRENCY` | `1` | Number of document indexing or RAG pipeline tasks processed simultaneously per tenant. Increase for faster indexing with more database load. |
### Scheduled Tasks Configuration
Dify uses Celery Beat to run background maintenance tasks on configurable schedules.
| Variable | Default | Description |
| ------------------------------------------- | ------- | ---------------------------------------------------------------------------------------------------------------------------------------- |
| `ENABLE_CLEAN_EMBEDDING_CACHE_TASK` | `false` | Delete expired embedding cache records from the database at 2:00 AM daily. Manages database size. |
| `ENABLE_CLEAN_UNUSED_DATASETS_TASK` | `false` | Disable documents in knowledge bases that haven't had activity within the retention period. Runs at 3:00 AM daily. |
| `ENABLE_CLEAN_MESSAGES` | `false` | Delete conversation messages older than the retention period at 4:00 AM daily. |
| `ENABLE_MAIL_CLEAN_DOCUMENT_NOTIFY_TASK` | `false` | Email workspace owners a list of knowledge bases that had documents auto-disabled by the cleanup task. Runs every Monday at 10:00 AM. |
| `ENABLE_DATASETS_QUEUE_MONITOR` | `false` | Monitor the dataset processing queue backlog in Redis. Sends email alerts when the queue exceeds the threshold. |
| `QUEUE_MONITOR_INTERVAL` | `30` | How often to check the queue (in minutes). |
| `QUEUE_MONITOR_THRESHOLD` | `200` | Queue size that triggers an alert email. |
| `QUEUE_MONITOR_ALERT_EMAILS` | (empty) | Email addresses to receive queue alerts (comma-separated). |
| `ENABLE_CHECK_UPGRADABLE_PLUGIN_TASK` | `true` | Check the marketplace for newer plugin versions every 15 minutes. Dispatches upgrade tasks based on each tenant's auto-upgrade schedule. |
| `ENABLE_WORKFLOW_SCHEDULE_POLLER_TASK` | `true` | Enable the workflow schedule poller that checks for and triggers scheduled workflow runs. |
| `WORKFLOW_SCHEDULE_POLLER_INTERVAL` | `1` | How often to check for due scheduled workflows (in minutes). |
| `WORKFLOW_SCHEDULE_POLLER_BATCH_SIZE` | `100` | Maximum number of due schedules fetched per poll cycle. |
| `WORKFLOW_SCHEDULE_MAX_DISPATCH_PER_TICK` | `0` | Circuit breaker: maximum schedules dispatched per tick. `0` means unlimited. |
| `ENABLE_WORKFLOW_RUN_CLEANUP_TASK` | `false` | Enable automatic cleanup of workflow run records. |
| `ENABLE_CREATE_TIDB_SERVERLESS_TASK` | `false` | Pre-create TiDB Serverless clusters for vector database pooling. |
| `ENABLE_UPDATE_TIDB_SERVERLESS_STATUS_TASK` | `false` | Update TiDB Serverless cluster status periodically. |
| `ENABLE_HUMAN_INPUT_TIMEOUT_TASK` | `true` | Check for expired Human Input forms and resume or stop timed-out workflows. |
| `HUMAN_INPUT_TIMEOUT_TASK_INTERVAL` | `1` | How often to check for expired Human Input forms (in minutes). |
#### Record Retention & Cleanup
These control how old records are cleaned up. When `BILLING_ENABLED` is active, cleanup targets sandbox-tier tenants with a grace period. When billing is disabled (self-hosted), cleanup applies to all records within the retention window.
| Variable | Default | Description |
| -------------------------------------------------- | ------- | ----------------------------------------------------------------------------------------------------- |
| `SANDBOX_EXPIRED_RECORDS_RETENTION_DAYS` | `30` | Records older than this many days are eligible for deletion. |
| `SANDBOX_EXPIRED_RECORDS_CLEAN_GRACEFUL_PERIOD` | `21` | Grace period in days after subscription expiration before records are deleted (billing-enabled only). |
| `SANDBOX_EXPIRED_RECORDS_CLEAN_BATCH_SIZE` | `1000` | Number of records processed per cleanup batch. |
| `SANDBOX_EXPIRED_RECORDS_CLEAN_BATCH_MAX_INTERVAL` | `200` | Maximum random delay in milliseconds between cleanup batches to reduce database load. |
| `SANDBOX_EXPIRED_RECORDS_CLEAN_TASK_LOCK_TTL` | `90000` | Redis lock TTL in seconds (\~25 hours) to prevent concurrent cleanup task execution. |
## Aliyun SLS Logstore Configuration
Optional integration with Aliyun Simple Log Service for storing workflow execution logs externally instead of in the database. Enable by setting the repository configuration variables to use logstore implementations.
| Variable | Default | Description |
| --------------------------------- | ------- | ------------------------------------------------------------------------------------------------------------------------------ |
| `ALIYUN_SLS_ACCESS_KEY_ID` | (empty) | Aliyun access key ID for SLS authentication. |
| `ALIYUN_SLS_ACCESS_KEY_SECRET` | (empty) | Aliyun access key secret for SLS authentication. |
| `ALIYUN_SLS_ENDPOINT` | (empty) | SLS service endpoint URL (e.g., `cn-hangzhou.log.aliyuncs.com`). |
| `ALIYUN_SLS_REGION` | (empty) | Aliyun region (e.g., `cn-hangzhou`). |
| `ALIYUN_SLS_PROJECT_NAME` | (empty) | SLS project name for storing workflow logs. |
| `ALIYUN_SLS_LOGSTORE_TTL` | `365` | Data retention in days for SLS logstores. Use `3650` for permanent storage. |
| `LOGSTORE_DUAL_WRITE_ENABLED` | `false` | Write workflow data to both SLS and PostgreSQL simultaneously. Useful during migration to SLS. |
| `LOGSTORE_DUAL_READ_ENABLED` | `true` | Fall back to PostgreSQL when SLS returns no results. Useful during migration when historical data exists only in the database. |
| `LOGSTORE_ENABLE_PUT_GRAPH_FIELD` | `true` | Include the full workflow graph definition in SLS logs. Set to `false` to reduce storage by omitting large graph data. |
## Event Bus Configuration
Redis-based event transport between API and Celery workers.
| Variable | Default | Description |
| ------------------------------ | -------- | --------------------------------------------------------------------------------------------------------------------------------------------- |
| `EVENT_BUS_REDIS_URL` | (empty) | Redis connection URL for event streaming. When empty, uses the main Redis connection settings. |
| `EVENT_BUS_REDIS_CHANNEL_TYPE` | `pubsub` | Transport type: `pubsub` (Pub/Sub, at-most-once delivery), `sharded` (sharded Pub/Sub), or `streams` (Redis Streams, at-least-once delivery). |
| `EVENT_BUS_REDIS_USE_CLUSTERS` | `false` | Enable Redis Cluster mode for event bus. Recommended for large deployments. |
## Vector Database Service Configuration
These configure the vector database containers themselves (not the Dify client connection). Only the variables for your chosen `VECTOR_STORE` are relevant.
| Variable | Default | Description |
| -------------------------------------------------- | ------------------- | --------------------------------------------------------------------- |
| `WEAVIATE_PERSISTENCE_DATA_PATH` | `/var/lib/weaviate` | Data persistence directory inside the container. |
| `WEAVIATE_QUERY_DEFAULTS_LIMIT` | `25` | Default query result limit. |
| `WEAVIATE_AUTHENTICATION_ANONYMOUS_ACCESS_ENABLED` | `true` | Allow anonymous access. |
| `WEAVIATE_DEFAULT_VECTORIZER_MODULE` | `none` | Default vectorizer module. |
| `WEAVIATE_CLUSTER_HOSTNAME` | `node1` | Cluster node hostname. |
| `WEAVIATE_AUTHENTICATION_APIKEY_ENABLED` | `true` | Enable API key authentication. |
| `WEAVIATE_AUTHENTICATION_APIKEY_ALLOWED_KEYS` | (auto-generated) | Allowed API keys. Must match `WEAVIATE_API_KEY` in the client config. |
| `WEAVIATE_AUTHENTICATION_APIKEY_USERS` | `hello@dify.ai` | Users associated with API keys. |
| `WEAVIATE_AUTHORIZATION_ADMINLIST_ENABLED` | `true` | Enable admin list authorization. |
| `WEAVIATE_AUTHORIZATION_ADMINLIST_USERS` | `hello@dify.ai` | Admin users. |
| `WEAVIATE_DISABLE_TELEMETRY` | `false` | Disable Weaviate telemetry. |
| `WEAVIATE_ENABLE_TOKENIZER_GSE` | `false` | Enable GSE tokenizer (Chinese). |
| `WEAVIATE_ENABLE_TOKENIZER_KAGOME_JA` | `false` | Enable Kagome tokenizer (Japanese). |
| `WEAVIATE_ENABLE_TOKENIZER_KAGOME_KR` | `false` | Enable Kagome tokenizer (Korean). |
| Variable | Default | Description |
| -------------------------------- | ------------ | ------------------------------------------------- |
| `ETCD_AUTO_COMPACTION_MODE` | `revision` | ETCD auto compaction mode. |
| `ETCD_AUTO_COMPACTION_RETENTION` | `1000` | Auto compaction retention in number of revisions. |
| `ETCD_QUOTA_BACKEND_BYTES` | `4294967296` | Backend quota in bytes (4 GB). |
| `ETCD_SNAPSHOT_COUNT` | `50000` | Number of changes before triggering a snapshot. |
| `ETCD_ENDPOINTS` | `etcd:2379` | ETCD service endpoints. |
| `MINIO_ACCESS_KEY` | `minioadmin` | MinIO access key. |
| `MINIO_SECRET_KEY` | `minioadmin` | MinIO secret key. |
| `MINIO_ADDRESS` | `minio:9000` | MinIO service address. |
| `MILVUS_AUTHORIZATION_ENABLED` | `true` | Enable Milvus security authorization. |
| Variable | Default | Description |
| ----------------------------------- | ----------------- | -------------------------------------------------- |
| `OPENSEARCH_DISCOVERY_TYPE` | `single-node` | Discovery type for cluster formation. |
| `OPENSEARCH_BOOTSTRAP_MEMORY_LOCK` | `true` | Lock memory on startup to prevent swapping. |
| `OPENSEARCH_JAVA_OPTS_MIN` | `512m` | Minimum JVM heap size. |
| `OPENSEARCH_JAVA_OPTS_MAX` | `1024m` | Maximum JVM heap size. |
| `OPENSEARCH_INITIAL_ADMIN_PASSWORD` | `Qazwsxedc!@#123` | Initial admin password for the OpenSearch service. |
| `OPENSEARCH_MEMLOCK_SOFT` | `-1` | Soft memory lock limit (`-1` = unlimited). |
| `OPENSEARCH_MEMLOCK_HARD` | `-1` | Hard memory lock limit (`-1` = unlimited). |
| `OPENSEARCH_NOFILE_SOFT` | `65536` | Soft file descriptor limit. |
| `OPENSEARCH_NOFILE_HARD` | `65536` | Hard file descriptor limit. |
| Variable | Default | Description |
| ---------------------------- | --------------------------------- | ----------------------------------------------- |
| `PGVECTOR_PGUSER` | `postgres` | PostgreSQL user for the PGVector container. |
| `PGVECTOR_POSTGRES_PASSWORD` | (auto-generated) | PostgreSQL password for the PGVector container. |
| `PGVECTOR_POSTGRES_DB` | `dify` | Database name in the PGVector container. |
| `PGVECTOR_PGDATA` | `/var/lib/postgresql/data/pgdata` | Data directory inside the container. |
| `PGVECTOR_PG_BIGM_VERSION` | `1.2-20240606` | Version of the pg\_bigm extension. |
| Variable | Default | Description |
| --------------------------------- | ------------------------------------------------------------- | ----------------------------------------------------------- |
| `ORACLE_PWD` | `Dify123456` | Oracle database password for the container. |
| `ORACLE_CHARACTERSET` | `AL32UTF8` | Oracle character set. |
| `CHROMA_SERVER_AUTHN_CREDENTIALS` | (auto-generated) | Authentication credentials for the Chroma server container. |
| `CHROMA_SERVER_AUTHN_PROVIDER` | `chromadb.auth.token_authn.TokenAuthenticationServerProvider` | Authentication provider for the Chroma server. |
| `CHROMA_IS_PERSISTENT` | `TRUE` | Enable persistent storage for Chroma. |
| `KIBANA_PORT` | `5601` | Kibana port (Elasticsearch UI). |
| Variable | Default | Description |
| ---------------------- | ------------- | --------------------------------------- |
| `IRIS_WEB_SERVER_PORT` | `52773` | IRIS web server management port. |
| `IRIS_TIMEZONE` | `UTC` | Timezone for the IRIS container. |
| `DB_PLUGIN_DATABASE` | `dify_plugin` | Separate database name for plugin data. |
## Plugin Daemon Storage Configuration
The plugin daemon can store plugin packages in different storage backends. Configure only the provider matching `PLUGIN_STORAGE_TYPE`.
| Variable | Default | Description |
| -------------------------------------- | ------------------------------ | ------------------------------------------------------------------------------------------------------- |
| `PLUGIN_STORAGE_TYPE` | `local` | Plugin storage backend: `local`, `aws_s3`, `tencent_cos`, `azure_blob`, `aliyun_oss`, `volcengine_tos`. |
| `PLUGIN_STORAGE_LOCAL_ROOT` | `/app/storage` | Root directory for local plugin storage. |
| `PLUGIN_WORKING_PATH` | `/app/storage/cwd` | Working directory for plugin execution. |
| `PLUGIN_INSTALLED_PATH` | `plugin` | Subdirectory for installed plugins. |
| `PLUGIN_PACKAGE_CACHE_PATH` | `plugin_packages` | Subdirectory for cached plugin packages. |
| `PLUGIN_MEDIA_CACHE_PATH` | `assets` | Subdirectory for cached media assets. |
| `PLUGIN_STORAGE_OSS_BUCKET` | (empty) | Object storage bucket name (shared across S3/COS/OSS/TOS providers). |
| `PLUGIN_PPROF_ENABLED` | `false` | Enable Go pprof profiling for the plugin daemon. |
| `PLUGIN_PYTHON_ENV_INIT_TIMEOUT` | `120` | Timeout in seconds for initializing Python environments for plugins. |
| `PLUGIN_STDIO_BUFFER_SIZE` | `1024` | Buffer size in bytes for plugin stdio communication. |
| `PLUGIN_STDIO_MAX_BUFFER_SIZE` | `5242880` | Maximum buffer size in bytes (5 MB) for plugin stdio communication. |
| `ENFORCE_LANGGENIUS_PLUGIN_SIGNATURES` | `true` | Enforce signature verification for LangGenius official plugins. |
| `ENDPOINT_URL_TEMPLATE` | `http://localhost/e/{hook_id}` | URL template for plugin endpoints. `{hook_id}` is replaced with the actual hook ID. |
| `EXPOSE_PLUGIN_DAEMON_PORT` | `5002` | Host port mapped to the plugin daemon. |
| `EXPOSE_PLUGIN_DEBUGGING_HOST` | `localhost` | Host for plugin remote debugging. |
| `EXPOSE_PLUGIN_DEBUGGING_PORT` | `5003` | Host port for plugin remote debugging. |
| Variable | Default | Description |
| ------------------------------- | ------- | ---------------------------------------------- |
| `PLUGIN_S3_USE_AWS` | `false` | Use AWS S3 (vs S3-compatible services). |
| `PLUGIN_S3_USE_AWS_MANAGED_IAM` | `false` | Use IAM roles instead of explicit credentials. |
| `PLUGIN_S3_ENDPOINT` | (empty) | S3 endpoint URL. |
| `PLUGIN_S3_USE_PATH_STYLE` | `false` | Use path-style URLs instead of virtual-hosted. |
| `PLUGIN_AWS_ACCESS_KEY` | (empty) | AWS access key. |
| `PLUGIN_AWS_SECRET_KEY` | (empty) | AWS secret key. |
| `PLUGIN_AWS_REGION` | (empty) | AWS region. |
| Variable | Default | Description |
| --------------------------------------------- | ------- | ----------------------------- |
| `PLUGIN_AZURE_BLOB_STORAGE_CONTAINER_NAME` | (empty) | Azure Blob container name. |
| `PLUGIN_AZURE_BLOB_STORAGE_CONNECTION_STRING` | (empty) | Azure Blob connection string. |
| Variable | Default | Description |
| ------------------------------- | ------- | ----------------------- |
| `PLUGIN_TENCENT_COS_SECRET_KEY` | (empty) | Tencent COS secret key. |
| `PLUGIN_TENCENT_COS_SECRET_ID` | (empty) | Tencent COS secret ID. |
| `PLUGIN_TENCENT_COS_REGION` | (empty) | Tencent COS region. |
| Variable | Default | Description |
| ------------------------------------- | ------- | ---------------------------------- |
| `PLUGIN_ALIYUN_OSS_REGION` | (empty) | Aliyun OSS region. |
| `PLUGIN_ALIYUN_OSS_ENDPOINT` | (empty) | Aliyun OSS endpoint. |
| `PLUGIN_ALIYUN_OSS_ACCESS_KEY_ID` | (empty) | Aliyun OSS access key ID. |
| `PLUGIN_ALIYUN_OSS_ACCESS_KEY_SECRET` | (empty) | Aliyun OSS access key secret. |
| `PLUGIN_ALIYUN_OSS_AUTH_VERSION` | `v4` | Aliyun OSS authentication version. |
| `PLUGIN_ALIYUN_OSS_PATH` | (empty) | Aliyun OSS path prefix. |
| Variable | Default | Description |
| ---------------------------------- | ------- | -------------------------- |
| `PLUGIN_VOLCENGINE_TOS_ENDPOINT` | (empty) | Volcengine TOS endpoint. |
| `PLUGIN_VOLCENGINE_TOS_ACCESS_KEY` | (empty) | Volcengine TOS access key. |
| `PLUGIN_VOLCENGINE_TOS_SECRET_KEY` | (empty) | Volcengine TOS secret key. |
| `PLUGIN_VOLCENGINE_TOS_REGION` | (empty) | Volcengine TOS region. |
# Deploy with aaPanel
Source: https://docs.dify.ai/en/self-host/platform-guides/bt-panel
## Prerequisites
> Before installing Dify, make sure your machine meets the following minimum system requirements:
>
> * CPU >= 2 Core
> * RAM >= 4 GiB
[Model Context Protocol (MCP)](https://modelcontextprotocol.io/) lets AI apps connect to external data and tools through a standard interface. An MCP server wraps external resources—like databases, file systems, or APIs—and makes them accessible to AI apps via this protocol.
By connecting to an MCP server, you can import these external resources as tools in Dify and refresh the list anytime to pull the latest updates.
# Configure Annotation Reply
Source: https://docs.dify.ai/api-reference/annotations/configure-annotation-reply
/en/api-reference/openapi_chatflow.json post /apps/annotation-reply/{action}
Enables or disables the annotation reply feature. Requires embedding model configuration when enabling. Executes asynchronously — use [Get Annotation Reply Job Status](/api-reference/annotations/get-annotation-reply-job-status) to track progress.
# Create Annotation
Source: https://docs.dify.ai/api-reference/annotations/create-annotation
/en/api-reference/openapi_chatflow.json post /apps/annotations
Creates a new annotation. Annotations provide predefined question-answer pairs that the app can match and return directly instead of generating a response.
# Delete Annotation
Source: https://docs.dify.ai/api-reference/annotations/delete-annotation
/en/api-reference/openapi_chatflow.json delete /apps/annotations/{annotation_id}
Deletes an annotation and its associated hit history.
# Get Annotation Reply Job Status
Source: https://docs.dify.ai/api-reference/annotations/get-annotation-reply-job-status
/en/api-reference/openapi_chatflow.json get /apps/annotation-reply/{action}/status/{job_id}
Retrieves the status of an asynchronous annotation reply configuration job started by [Configure Annotation Reply](/api-reference/annotations/configure-annotation-reply).
# List Annotations
Source: https://docs.dify.ai/api-reference/annotations/list-annotations
/en/api-reference/openapi_chatflow.json get /apps/annotations
Retrieves a paginated list of annotations for the application. Supports keyword search filtering.
# Update Annotation
Source: https://docs.dify.ai/api-reference/annotations/update-annotation
/en/api-reference/openapi_chatflow.json put /apps/annotations/{annotation_id}
Updates the question and answer of an existing annotation.
# Get App Info
Source: https://docs.dify.ai/api-reference/applications/get-app-info
/en/api-reference/openapi_completion.json get /info
Retrieve basic information about this application, including name, description, tags, and mode.
# Get App Meta
Source: https://docs.dify.ai/api-reference/applications/get-app-meta
/en/api-reference/openapi_completion.json get /meta
Retrieve metadata about this application, including tool icons and other configuration details.
# Get App Parameters
Source: https://docs.dify.ai/api-reference/applications/get-app-parameters
/en/api-reference/openapi_completion.json get /parameters
Retrieve the application's input form configuration, including feature switches, input parameter names, types, and default values.
# Get App WebApp Settings
Source: https://docs.dify.ai/api-reference/applications/get-app-webapp-settings
/en/api-reference/openapi_completion.json get /site
Retrieve the WebApp settings of this application, including site configuration, theme, and customization options.
# Get Next Suggested Questions
Source: https://docs.dify.ai/api-reference/chats/get-next-suggested-questions
/en/api-reference/openapi_chatflow.json get /messages/{message_id}/suggested
Get next questions suggestions for the current message.
# Send Chat Message
Source: https://docs.dify.ai/api-reference/chats/send-chat-message
/en/api-reference/openapi_chatflow.json post /chat-messages
Send a request to the chat application.
# Stop Chat Message Generation
Source: https://docs.dify.ai/api-reference/chats/stop-chat-message-generation
/en/api-reference/openapi_chatflow.json post /chat-messages/{task_id}/stop
Stops a chat message generation task. Only supported in `streaming` mode.
# Delete Conversation
Source: https://docs.dify.ai/api-reference/conversations/delete-conversation
/en/api-reference/openapi_chatflow.json delete /conversations/{conversation_id}
Delete a conversation.
# List Conversation Messages
Source: https://docs.dify.ai/api-reference/conversations/list-conversation-messages
/en/api-reference/openapi_chatflow.json get /messages
Returns historical chat records in a scrolling load format, with the first page returning the latest `limit` messages, i.e., in reverse order.
# List Conversation Variables
Source: https://docs.dify.ai/api-reference/conversations/list-conversation-variables
/en/api-reference/openapi_chatflow.json get /conversations/{conversation_id}/variables
Retrieve variables from a specific conversation.
# List Conversations
Source: https://docs.dify.ai/api-reference/conversations/list-conversations
/en/api-reference/openapi_chatflow.json get /conversations
Retrieve the conversation list for the current user, ordered by most recently active.
# Rename Conversation
Source: https://docs.dify.ai/api-reference/conversations/rename-conversation
/en/api-reference/openapi_chatflow.json post /conversations/{conversation_id}/name
Rename a conversation or auto-generate a name. The conversation name is used for display on clients that support multiple conversations.
# Update Conversation Variable
Source: https://docs.dify.ai/api-reference/conversations/update-conversation-variable
/en/api-reference/openapi_chatflow.json put /conversations/{conversation_id}/variables/{variable_id}
Update the value of a specific conversation variable. The value must match the expected type.
# Create Document by File
Source: https://docs.dify.ai/api-reference/documents/create-document-by-file
/en/api-reference/openapi_knowledge.json post /datasets/{dataset_id}/document/create-by-file
Create a document by uploading a file. Supports common document formats (PDF, TXT, DOCX, etc.). Processing is asynchronous — use the returned `batch` ID with [Get Document Indexing Status](/api-reference/documents/get-document-indexing-status) to track progress.
# Create Document by Text
Source: https://docs.dify.ai/api-reference/documents/create-document-by-text
/en/api-reference/openapi_knowledge.json post /datasets/{dataset_id}/document/create-by-text
Create a document from raw text content. The document is processed asynchronously — use the returned `batch` ID with [Get Document Indexing Status](/api-reference/documents/get-document-indexing-status) to track progress.
# Get Document
Source: https://docs.dify.ai/api-reference/documents/get-document
/en/api-reference/openapi_knowledge.json get /datasets/{dataset_id}/documents/{document_id}
Retrieve detailed information about a specific document, including its indexing status, metadata, and processing statistics.
# List Documents
Source: https://docs.dify.ai/api-reference/documents/list-documents
/en/api-reference/openapi_knowledge.json get /datasets/{dataset_id}/documents
Returns a paginated list of documents in the knowledge base. Supports filtering by keyword and indexing status.
# Get End User Info
Source: https://docs.dify.ai/api-reference/end-users/get-end-user-info
/en/api-reference/openapi_completion.json get /end-users/{end_user_id}
Retrieve an end user by ID. Useful when other APIs return an end-user ID (e.g., `created_by` from [Upload File](/api-reference/files/upload-file)).
# List App Feedbacks
Source: https://docs.dify.ai/api-reference/feedback/list-app-feedbacks
/en/api-reference/openapi_completion.json get /app/feedbacks
Retrieve a paginated list of all feedback submitted for messages in this application, including both end-user and admin feedback.
# Submit Message Feedback
Source: https://docs.dify.ai/api-reference/feedback/submit-message-feedback
/en/api-reference/openapi_completion.json post /messages/{message_id}/feedbacks
Submit feedback for a message. End users can rate messages as `like` or `dislike`, and optionally provide text feedback. Pass `null` for `rating` to revoke previously submitted feedback.
# Download File
Source: https://docs.dify.ai/api-reference/files/download-file
/en/api-reference/openapi_completion.json get /files/{file_id}/preview
Preview or download uploaded files previously uploaded via the [Upload File](/api-reference/files/upload-file) API. Files can only be accessed if they belong to messages within the requesting application.
# Upload File
Source: https://docs.dify.ai/api-reference/files/upload-file
/en/api-reference/openapi_completion.json post /files/upload
Upload a file for use when sending messages, enabling multimodal understanding of images, documents, audio, and video. Uploaded files are for use by the current end-user only.
# Create an Empty Knowledge Base
Source: https://docs.dify.ai/api-reference/knowledge-bases/create-an-empty-knowledge-base
/en/api-reference/openapi_knowledge.json post /datasets
Create a new empty knowledge base. After creation, use [Create Document by Text](/api-reference/documents/create-document-by-text) or [Create Document by File](/api-reference/documents/create-document-by-file) to add documents.
# Delete Knowledge Base
Source: https://docs.dify.ai/api-reference/knowledge-bases/delete-knowledge-base
/en/api-reference/openapi_knowledge.json delete /datasets/{dataset_id}
Permanently delete a knowledge base and all its documents. The knowledge base must not be in use by any application.
# Get Knowledge Base
Source: https://docs.dify.ai/api-reference/knowledge-bases/get-knowledge-base
/en/api-reference/openapi_knowledge.json get /datasets/{dataset_id}
Retrieve detailed information about a specific knowledge base, including its embedding model, retrieval configuration, and document statistics.
# List Knowledge Bases
Source: https://docs.dify.ai/api-reference/knowledge-bases/list-knowledge-bases
/en/api-reference/openapi_knowledge.json get /datasets
Returns a paginated list of knowledge bases. Supports filtering by keyword and tags.
# Retrieve Chunks from a Knowledge Base / Test Retrieval
Source: https://docs.dify.ai/api-reference/knowledge-bases/retrieve-chunks-from-a-knowledge-base-test-retrieval
/en/api-reference/openapi_knowledge.json post /datasets/{dataset_id}/retrieve
Performs a search query against a knowledge base to retrieve the most relevant chunks. This endpoint can be used for both production retrieval and test retrieval.
# Update Knowledge Base
Source: https://docs.dify.ai/api-reference/knowledge-bases/update-knowledge-base
/en/api-reference/openapi_knowledge.json patch /datasets/{dataset_id}
Update the name, description, permissions, or retrieval settings of an existing knowledge base. Only the fields provided in the request body are updated.
# Convert Audio to Text
Source: https://docs.dify.ai/api-reference/tts/convert-audio-to-text
/en/api-reference/openapi_completion.json post /audio-to-text
Convert audio file to text. Supported formats: `mp3`, `mp4`, `mpeg`, `mpga`, `m4a`, `wav`, `webm`. File size limit is `30 MB`.
# Convert Text to Audio
Source: https://docs.dify.ai/api-reference/tts/convert-text-to-audio
/en/api-reference/openapi_completion.json post /text-to-audio
Convert text to speech.
# Get Workflow Run Detail
Source: https://docs.dify.ai/api-reference/workflow-runs/get-workflow-run-detail
/en/api-reference/openapi_chatflow.json get /workflows/run/{workflow_run_id}
Retrieve the current execution results of a workflow task based on the workflow execution ID.
# List Workflow Logs
Source: https://docs.dify.ai/api-reference/workflow-runs/list-workflow-logs
/en/api-reference/openapi_chatflow.json get /workflows/logs
Retrieve paginated workflow execution logs with filtering options.
# Get Workflow Run Detail
Source: https://docs.dify.ai/api-reference/workflows/get-workflow-run-detail
/en/api-reference/openapi_workflow.json get /workflows/run/{workflow_run_id}
Retrieve the current execution results of a workflow task based on the workflow execution ID.
# List Workflow Logs
Source: https://docs.dify.ai/api-reference/workflows/list-workflow-logs
/en/api-reference/openapi_workflow.json get /workflows/logs
Retrieve paginated workflow execution logs with filtering options.
# Run Workflow
Source: https://docs.dify.ai/api-reference/workflows/run-workflow
/en/api-reference/openapi_workflow.json post /workflows/run
Execute a workflow. Cannot be executed without a published workflow.
# Run Workflow by ID
Source: https://docs.dify.ai/api-reference/workflows/run-workflow-by-id
/en/api-reference/openapi_workflow.json post /workflows/{workflow_id}/run
Execute a specific workflow version identified by its ID. Useful for running a particular published version of the workflow.
# Stop Workflow Task
Source: https://docs.dify.ai/api-reference/workflows/stop-workflow-task
/en/api-reference/openapi_workflow.json post /workflows/tasks/{task_id}/stop
Stop a running workflow task. Only supported in `streaming` mode.
# Local Source Code Start
Source: https://docs.dify.ai/en/self-host/advanced-deployments/local-source-code
## Prerequisites
### Setup Docker and Docker Compose
> Before installing Dify, make sure your machine meets the following minimum system requirements:
>
> * CPU >= 2 Core
> * RAM >= 4 GiB
| Operating System | Software | Explanation |
| -------------------------- | ---------------------------------------------------- | ----------------------------------------------------------------------------------------------------------------------------------------------------------------------------------------------------------------------------------------------------------------------------------------------------------------------------------------- |
| macOS 10.14 or later | Docker Desktop | Set the Docker virtual machine (VM) to use a minimum of 2 virtual CPUs (vCPUs) and 8 GB of initial memory. Otherwise, the installation may fail. For more information, please refer to the [Docker Desktop installation guide for Mac](https://docs.docker.com/desktop/mac/install/). |
| Linux platforms | Docker 19.03 or later Docker Compose 1.25.1 or later | Please refer to the [Docker installation guide](https://docs.docker.com/engine/install/) and [the Docker Compose installation guide](https://docs.docker.com/compose/install/) for more information on how to install Docker and Docker Compose, respectively. |
| Windows with WSL 2 enabled | Docker Desktop | We recommend storing the source code and other data that is bound to Linux containers in the Linux file system rather than the Windows file system. For more information, please refer to the [Docker Desktop installation guide for using the WSL 2 backend on Windows.](https://docs.docker.com/desktop/windows/install/#wsl-2-backend) |
> If you need to use OpenAI TTS, `FFmpeg` must be installed on the system for it to function properly. For more details, refer to: [Link](https://docs.dify.ai/en/self-host/troubleshooting/integrations#text-to-speech-tts).
### Clone Dify Repository
Run the git command to clone the [Dify repository](https://github.com/langgenius/dify).
```bash theme={null}
git clone https://github.com/langgenius/dify.git
```
### Start Middlewares with Docker Compose
A series of middlewares for storage (e.g. PostgreSQL / Redis / Weaviate (if not locally available)) and extended capabilities (e.g. Dify's [sandbox](https://github.com/langgenius/dify-sandbox) and [plugin-daemon](https://github.com/langgenius/dify-plugin-daemon) services) are required by Dify backend services. Start the middlewares with Docker Compose by running these commands:
```bash theme={null}
cd docker
cp middleware.env.example middleware.env
# change the profile to mysql if you are not using postgresql
# change the profile to other vector database if you are not using weaviate
docker compose -f docker-compose.middleware.yaml --profile postgresql --profile weaviate -p dify up -d
```
***
## Setup Backend Services
The backend services include
1. API Service: serving API requests for Frontend service and API accessing
2. Worker Service: serving the aync tasks for datasets processing, workspaces, cleaning-ups etc.
### Start API Service
1. Navigate to the `api` directory:
```
cd api
```
2. Prepare the environment variable config file:
```
cp .env.example .env
```
When the frontend and backend run on different subdomains, set `COOKIE_DOMAIN` to the site's top-level domain (e.g., `example.com`) in the `.env` file.
The frontend and backend must be under the same top-level domain to share authentication cookies.
3. Generate a random secret key and replace the value of SECRET\_KEY in the `.env` file:
```
awk -v key="$(openssl rand -base64 42)" '/^SECRET_KEY=/ {sub(/=.*/, "=" key)} 1' .env > temp_env && mv temp_env .env
```
4. Install dependencies:
[uv](https://docs.astral.sh/uv/getting-started/installation/) is used to manage dependencies.
Install the required dependencies with `uv` by running:
```
uv sync --dev
```
> For macOS: install libmagic with `brew install libmagic`.
5. Perform the database migration:
Perform database migrations to the latest version:
```
uv run flask db upgrade
```
6. Start the API service:
```
uv run flask run --host 0.0.0.0 --port=5001 --debug
```
Expected output:
```
* Debug mode: on
INFO:werkzeug:WARNING: This is a development server. Do not use it in a production deployment. Use a production WSGI server instead.
* Running on all addresses (0.0.0.0)
* Running on http://127.0.0.1:5001
INFO:werkzeug:Press CTRL+C to quit
INFO:werkzeug: * Restarting with stat
WARNING:werkzeug: * Debugger is active!
INFO:werkzeug: * Debugger PIN: 695-801-919
```
### Start the Worker Service
To consume asynchronous tasks from the queue, such as dataset file import and dataset document updates, follow these steps to start the Worker service
* for macOS or Linux
```
uv run celery -A app.celery worker -P gevent -c 1 --loglevel INFO -Q dataset,dataset_summary,priority_dataset,priority_pipeline,pipeline,mail,ops_trace,app_deletion,plugin,workflow_storage,conversation,workflow,schedule_poller,schedule_executor,triggered_workflow_dispatcher,trigger_refresh_executor,retention,workflow_based_app_execution
```
If you are using a Windows system to start the Worker service, please use the following command instead:
* for Windows
```
uv run celery -A app.celery worker -P solo --without-gossip --without-mingle --loglevel INFO -Q dataset,dataset_summary,priority_dataset,priority_pipeline,pipeline,mail,ops_trace,app_deletion,plugin,workflow_storage,conversation,workflow,schedule_poller,schedule_executor,triggered_workflow_dispatcher,trigger_refresh_executor,retention,workflow_based_app_execution
```
Expected output:
```
-------------- celery@bwdeMacBook-Pro-2.local v5.4.0 (opalescent)
--- ***** -----
-- ******* ---- macOS-15.4.1-arm64-arm-64bit 2025-04-28 17:07:14
- *** --- * ---
- ** ---------- [config]
- ** ---------- .> app: app_factory:0x1439e8590
- ** ---------- .> transport: redis://:**@localhost:6379/1
- ** ---------- .> results: postgresql://postgres:**@localhost:5432/dify
- *** --- * --- .> concurrency: 1 (gevent)
-- ******* ---- .> task events: OFF (enable -E to monitor tasks in this worker)
--- ***** -----
-------------- [queues]
.> dataset exchange=dataset(direct) key=dataset
.> generation exchange=generation(direct) key=generation
.> mail exchange=mail(direct) key=mail
.> ops_trace exchange=ops_trace(direct) key=ops_trace
[tasks]
. schedule.clean_embedding_cache_task.clean_embedding_cache_task
. schedule.clean_messages.clean_messages
. schedule.clean_unused_datasets_task.clean_unused_datasets_task
. schedule.create_tidb_serverless_task.create_tidb_serverless_task
. schedule.mail_clean_document_notify_task.mail_clean_document_notify_task
. schedule.update_tidb_serverless_status_task.update_tidb_serverless_status_task
. tasks.add_document_to_index_task.add_document_to_index_task
. tasks.annotation.add_annotation_to_index_task.add_annotation_to_index_task
. tasks.annotation.batch_import_annotations_task.batch_import_annotations_task
. tasks.annotation.delete_annotation_index_task.delete_annotation_index_task
. tasks.annotation.disable_annotation_reply_task.disable_annotation_reply_task
. tasks.annotation.enable_annotation_reply_task.enable_annotation_reply_task
. tasks.annotation.update_annotation_to_index_task.update_annotation_to_index_task
. tasks.batch_clean_document_task.batch_clean_document_task
. tasks.batch_create_segment_to_index_task.batch_create_segment_to_index_task
. tasks.clean_dataset_task.clean_dataset_task
. tasks.clean_document_task.clean_document_task
. tasks.clean_notion_document_task.clean_notion_document_task
. tasks.deal_dataset_vector_index_task.deal_dataset_vector_index_task
. tasks.delete_account_task.delete_account_task
. tasks.delete_segment_from_index_task.delete_segment_from_index_task
. tasks.disable_segment_from_index_task.disable_segment_from_index_task
. tasks.disable_segments_from_index_task.disable_segments_from_index_task
. tasks.document_indexing_sync_task.document_indexing_sync_task
. tasks.document_indexing_task.document_indexing_task
. tasks.document_indexing_update_task.document_indexing_update_task
. tasks.duplicate_document_indexing_task.duplicate_document_indexing_task
. tasks.enable_segments_to_index_task.enable_segments_to_index_task
. tasks.mail_account_deletion_task.send_account_deletion_verification_code
. tasks.mail_account_deletion_task.send_deletion_success_task
. tasks.mail_email_code_login.send_email_code_login_mail_task
. tasks.mail_invite_member_task.send_invite_member_mail_task
. tasks.mail_reset_password_task.send_reset_password_mail_task
. tasks.ops_trace_task.process_trace_tasks
. tasks.recover_document_indexing_task.recover_document_indexing_task
. tasks.remove_app_and_related_data_task.remove_app_and_related_data_task
. tasks.remove_document_from_index_task.remove_document_from_index_task
. tasks.retry_document_indexing_task.retry_document_indexing_task
. tasks.sync_website_document_indexing_task.sync_website_document_indexing_task
2025-04-28 17:07:14,681 INFO [connection.py:22] Connected to redis://:**@localhost:6379/1
2025-04-28 17:07:14,684 INFO [mingle.py:40] mingle: searching for neighbors
2025-04-28 17:07:15,704 INFO [mingle.py:49] mingle: all alone
2025-04-28 17:07:15,733 INFO [worker.py:175] celery@bwdeMacBook-Pro-2.local ready.
2025-04-28 17:07:15,742 INFO [pidbox.py:111] pidbox: Connected to redis://:**@localhost:6379/1.
```
### Start the Beat Service
Additionally, if you want to debug the celery scheduled tasks or run the Schedule Trigger node, you can run the following command in another terminal to start the beat service:
```bash theme={null}
uv run celery -A app.celery beat
```
***
## Setup Web Service
Start the web service is built for frontend pages .
### Environment Preparation
To start the web frontend service, [Node.js v22 (LTS)](https://nodejs.org/en) and [PNPM v10](https://pnpm.io/) are required.
* Install NodeJS
Please visit [https://nodejs.org/en/download](https://nodejs.org/en/download) and choose the installation package for your respective operating system that is v18.x or higher. LTS version is recommanded for common usages.
* Install PNPM
Follow the [the installation guidance](https://pnpm.io/installation) to install PNPM. Or just run this command to install `pnpm` with `npm`.
```
npm i -g pnpm
```
### Start Web Service
1. Enter the web directory:
```
cd web
```
2. Install dependencies:
```
pnpm install --frozen-lockfile
```
3. Prepare the environment variable configuration file\
Create a file named `.env.local` in the current directory and copy the contents from `.env.example`. Modify the values of these environment variables according to your requirements:
```
# For production release, change this to PRODUCTION
NEXT_PUBLIC_DEPLOY_ENV=DEVELOPMENT
# The deployment edition, SELF_HOSTED or CLOUD
NEXT_PUBLIC_EDITION=SELF_HOSTED
# The base URL of console application, refers to the Console base URL of WEB service if console domain is different from api or web app domain.
# example: http://cloud.dify.ai/console/api
NEXT_PUBLIC_API_PREFIX=http://localhost:5001/console/api
# The URL for Web APP, refers to the Web App base URL of WEB service if web app domain is different from console or api domain.
# example: http://udify.app/api
NEXT_PUBLIC_PUBLIC_API_PREFIX=http://localhost:5001/api
# When the frontend and backend run on different subdomains, set NEXT_PUBLIC_COOKIE_DOMAIN=1.
NEXT_PUBLIC_COOKIE_DOMAIN=
# SENTRY
NEXT_PUBLIC_SENTRY_DSN=
NEXT_PUBLIC_SENTRY_ORG=
NEXT_PUBLIC_SENTRY_PROJECT=
```
4. Build the web service:
```
pnpm build
```
5. Start the web service:
```
pnpm start
```
Expected output:
```
▲ Next.js 15
- Local: http://localhost:3000
- Network: http://0.0.0.0:3000
✓ Starting...
✓ Ready in 73ms
```
### Access Dify
Access [http://localhost:3000](http://localhost:3000/) via browsers to enjoy all the exciting features of Dify.
Cheers ! 🍻
# Start Frontend Docker Container Separately
Source: https://docs.dify.ai/en/self-host/advanced-deployments/start-the-frontend-docker-container
When developing the backend separately, you may only need to start the backend service from source code without building and launching the frontend locally. In this case, you can directly start the frontend service by pulling the Docker image and running the container. Here are the specific steps:
#### Pull the Docker image for the frontend service from DockerHub:
```bash theme={null}
docker run -it -p 3000:3000 -e CONSOLE_URL=http://127.0.0.1:5001 -e APP_URL=http://127.0.0.1:5001 langgenius/dify-web:latest
```
#### Build Docker Image from Source Code
1. Build the frontend image
```
cd web && docker build . -t dify-web
```
2. Start the frontend image
```
docker run -it -p 3000:3000 -e CONSOLE_URL=http://127.0.0.1:5001 -e APP_URL=http://127.0.0.1:5001 dify-web
```
3. When the console domain and web app domain are different, you can set the CONSOLE\_URL and APP\_URL separately
4. To access it locally, you can visit [http://127.0.0.1:3000](http://127.0.0.1:3000/)
# Environment Variables
Source: https://docs.dify.ai/en/self-host/configuration/environments
Reference for all environment variables used by Dify self-hosted deployments.
Dify works out of the box with default settings. You can customize your deployment by modifying the environment variables in the `.env` file.
After upgrading Dify, run `diff .env .env.example` in the `docker` directory to check for newly added or changed variables, then update your `.env` file accordingly.
## Common Variables
These URL variables configure the addresses of Dify's various services.
For single-domain deployments behind Nginx (the default Docker Compose setup), these can be left empty—the system auto-detects from the incoming request. Configure them when using custom domains, split-domain deployments, or a reverse proxy.
### CONSOLE\_API\_URL
Default: (empty)
The public URL of Dify's backend API. Set this if you use OAuth login (GitHub, Google), Notion integration, or any plugin that requires OAuth—these features need an absolute callback URL to redirect users back after authorization. Also determines whether secure (HTTPS-only) cookies are used.
Example: `https://api.console.dify.ai`
### CONSOLE\_WEB\_URL
Default: (empty)
The public URL of Dify's console frontend. Used to build links in all system emails (invitations, password resets, notifications) and to redirect users back to the console after OAuth login. Also serves as the default CORS allowed origin if `CONSOLE_CORS_ALLOW_ORIGINS` is not set.
If empty, email links will be broken—even in single-domain setups, set this if you use email features.
Example: `https://console.dify.ai`
### SERVICE\_API\_URL
Default: (empty)
The API Base URL shown to developers in the Dify console—the URL they copy into their code to call the Dify API. If empty, auto-detects from the current request (e.g., `http://localhost/v1`). Set this to ensure a consistent URL when your server is accessible via multiple addresses.
Example: `https://api.dify.ai`
### APP\_API\_URL
Default: (empty)
The backend API URL for the WebApp frontend (published apps). This variable is only used by the web frontend container, not the Python backend. If empty, the Docker image defaults to `http://127.0.0.1:5001`.
Example: `https://api.app.dify.ai`
### APP\_WEB\_URL
Default: (empty)
The public URL where published WebApps are accessible. Required for the **Human Input node** in workflows—form links in email notifications are built as `{APP_WEB_URL}/form/{token}`. If empty, Human Input email delivery will not include valid form links.
Example: `https://app.dify.ai`
### TRIGGER\_URL
Default: `http://localhost`
The publicly accessible URL for webhook and plugin trigger endpoints. External systems use this address to invoke your workflows. Dify builds trigger callback URLs like `{TRIGGER_URL}/triggers/webhook/{id}` and displays them in the console.
For triggers to work from external systems, this must point to a public domain or IP address they can reach.
### FILES\_URL
Default: (empty; falls back to `CONSOLE_API_URL`)
The base URL for file preview and download links. Dify generates signed, time-limited URLs for all files (uploaded documents, tool outputs, workspace logos) and serves them to the frontend and multi-modal models.
Set this if you use file processing plugins, or if you want file URLs on a dedicated domain. If both `FILES_URL` and `CONSOLE_API_URL` are empty, file previews will not work.
Example: `https://upload.example.com` or `http://:5001`
### INTERNAL\_FILES\_URL
Default: (empty; falls back to `FILES_URL`)
The file access URL used for communication between services inside the Docker network (e.g., plugin daemon, PDF/Word extractors). These internal services may not be able to reach the external `FILES_URL` if it routes through Nginx or a public domain.
If empty, internal services use `FILES_URL`. Set this when internal services can't reach the external URL.
Example: `http://api:5001`
### FILES\_ACCESS\_TIMEOUT
Default: `300` (5 minutes)
How long signed file URLs remain valid, in seconds. After this time, the URL is rejected and the file must be re-requested. Increase for long-running processes; decrease for tighter security.
### System Encoding
| Variable | Default | Description |
| ------------------ | ---------------- | ------------------------------------------------------------------------------------------------ |
| `LANG` | `C.UTF-8` | System locale setting. Ensures UTF-8 encoding. |
| `LC_ALL` | `C.UTF-8` | Locale override for all categories. |
| `PYTHONIOENCODING` | `utf-8` | Python I/O encoding. |
| `UV_CACHE_DIR` | `/tmp/.uv-cache` | UV package manager cache directory. Avoids permission issues with non-existent home directories. |
## Server Configuration
### Logging
| Variable | Default | Description |
| ----------------------- | ---------------------- | ------------------------------------------------------------------------------------------------------------------------------------------------------------------------ |
| `LOG_LEVEL` | `INFO` | Minimum log severity. Controls what gets logged across all handlers (file + console). Levels from least to most severe: `DEBUG`, `INFO`, `WARNING`, `ERROR`, `CRITICAL`. |
| `LOG_OUTPUT_FORMAT` | `text` | `text` produces human-readable lines with timestamp, level, thread, and trace ID. `json` produces structured JSON for log aggregation tools (ELK, Datadog, etc.). |
| `LOG_FILE` | `/app/logs/server.log` | Log file path. When set, enables file-based logging with automatic rotation. The directory is created automatically. When empty, logs only go to console. |
| `LOG_FILE_MAX_SIZE` | `20` | Maximum log file size in MB before rotation. When exceeded, the active file is renamed to `.1` and a new file is started. |
| `LOG_FILE_BACKUP_COUNT` | `5` | Number of rotated log files to keep. With defaults, at most 6 files exist: the active file plus 5 backups. |
| `LOG_DATEFORMAT` | `%Y-%m-%d %H:%M:%S` | Timestamp format for text-format logs (strftime codes). Ignored by JSON format. |
| `LOG_TZ` | `UTC` | Timezone for log timestamps (pytz format, e.g., `Asia/Shanghai`). Only applies to text format—JSON always uses UTC. Also sets Celery's task scheduling timezone. |
### General
| Variable | Default | Description |
| ------------------------ | --------------------------- | -------------------------------------------------------------------------------------------------------------------------------------------------------------------------------------------------------------------------------------------- |
| `DEBUG` | `false` | Enables verbose logging: workflow node inputs/outputs, tool execution details, full LLM prompts and responses, and app startup timing. Useful for local development; not recommended for production as it may expose sensitive data in logs. |
| `FLASK_DEBUG` | `false` | Standard Flask debug mode flag. Not actively used by Dify—`DEBUG` is the primary control. |
| `ENABLE_REQUEST_LOGGING` | `false` | Logs a compact access line (`METHOD PATH STATUS DURATION TRACE_ID`) for every HTTP request. When `LOG_LEVEL` is also set to `DEBUG`, additionally logs full request and response bodies as JSON. |
| `DEPLOY_ENV` | `PRODUCTION` | Tags monitoring data in Sentry and OpenTelemetry so you can filter errors and traces by environment. Also sent as the `X-Env` response header. Does not change application behavior. |
| `MIGRATION_ENABLED` | `true` | When `true`, runs database schema migrations (`flask upgrade-db`) automatically on container startup. Docker only. Set to `false` if you run migrations separately. For source code launches, run `flask db upgrade` manually. |
| `CHECK_UPDATE_URL` | `https://updates.dify.ai` | The console checks this URL for newer Dify versions. Set to empty to disable—useful for air-gapped environments or to prevent external HTTP calls. |
| `OPENAI_API_BASE` | `https://api.openai.com/v1` | Legacy variable. Not actively used by Dify's own code. May be picked up by the OpenAI Python SDK if present in the environment. |
### SECRET\_KEY
Default: (pre-filled in `.env.example`; must be replaced for production)
Used for session cookie signing, JWT authentication tokens, file URL signatures (HMAC-SHA256), and encrypting third-party OAuth credentials (AES-256). Generate a strong key before first launch:
```bash theme={null}
openssl rand -base64 42
```
Changing this key after deployment will immediately log out all users, invalidate all file URLs, and break any plugin integrations that use OAuth—their encrypted credentials become unrecoverable.
### INIT\_PASSWORD
Default: (empty)
Optional security gate for first-time setup. When set, the `/install` page requires this password before the admin account can be created—preventing unauthorized setup if your server is exposed. Once setup is complete, this variable has no further effect. Maximum length: 30 characters.
### Token & Request Limits
| Variable | Default | Description |
| ----------------------------- | ------- | ------------------------------------------------------------------------------------------------------------------------------------------------------------------------------------------------------------------------------------------------------------------------------------------------------------------------ |
| `ACCESS_TOKEN_EXPIRE_MINUTES` | `60` | How long a login session's access token stays valid (in minutes). When it expires, the browser silently refreshes it using the refresh token—users are not logged out. |
| `REFRESH_TOKEN_EXPIRE_DAYS` | `30` | How long a user can stay logged in without re-entering credentials (in days). If the user doesn't visit within this period, they must log in again. |
| `APP_MAX_EXECUTION_TIME` | `1200` | Maximum time (in seconds) an app execution can run before being terminated. Works alongside `WORKFLOW_MAX_EXECUTION_TIME`—both enforce the same default of 20 minutes, but this one applies at the app queue level while the other applies at the workflow engine level. Increase both if your workflows need more time. |
| `APP_DEFAULT_ACTIVE_REQUESTS` | `0` | Default concurrent request limit per app, used when an app doesn't have a custom limit set in the UI. `0` means unlimited. The effective limit is the smaller of this and `APP_MAX_ACTIVE_REQUESTS`. |
| `APP_MAX_ACTIVE_REQUESTS` | `0` | Global ceiling for concurrent requests per app. Overrides per-app settings if they exceed this value. `0` means unlimited. |
### Container Startup Configuration
Only effective when starting with Docker image or Docker Compose.
| Variable | Default | Description |
| --------------------------- | ------------------------------ | ------------------------------------------------------------------------------------------------------------------------------------------------------------------------------------------------------------------------------------------------------------------- |
| `DIFY_BIND_ADDRESS` | `0.0.0.0` | Network interface the API server binds to. `0.0.0.0` listens on all interfaces; set to `127.0.0.1` to restrict to localhost only. |
| `DIFY_PORT` | `5001` | Port the API server listens on. |
| `SERVER_WORKER_AMOUNT` | `1` | Number of Gunicorn worker processes. With gevent (default), each worker handles multiple concurrent connections via greenlets, so 1 is usually sufficient. For sync workers, use `(2 x CPU cores) + 1`. [Reference](https://gunicorn.org/design/#how-many-workers). |
| `SERVER_WORKER_CLASS` | `gevent` | Gunicorn worker type. Gevent provides lightweight async concurrency. Changing this breaks psycopg2 and gRPC patching—it is strongly discouraged. |
| `SERVER_WORKER_CONNECTIONS` | `10` | Maximum concurrent connections per worker. Only applies to async workers (gevent). If you experience connection rejections or slow responses under load, try increasing this value. |
| `GUNICORN_TIMEOUT` | `360` | If a worker doesn't respond within this many seconds, Gunicorn kills and restarts it. Set to 360 (6 minutes) to support long-lived SSE connections used for streaming LLM responses. |
| `CELERY_WORKER_CLASS` | (empty; defaults to gevent) | Celery worker type. Same gevent patching requirements as `SERVER_WORKER_CLASS`—it is strongly discouraged to change. |
| `CELERY_WORKER_AMOUNT` | (empty; defaults to 1) | Number of Celery worker processes. Only used when autoscaling is disabled. |
| `CELERY_AUTO_SCALE` | `false` | Enable dynamic autoscaling. When enabled, Celery monitors queue depth and spawns/kills workers between `CELERY_MIN_WORKERS` and `CELERY_MAX_WORKERS`. |
| `CELERY_MAX_WORKERS` | (empty; defaults to CPU count) | Maximum workers when autoscaling is enabled. |
| `CELERY_MIN_WORKERS` | (empty; defaults to 1) | Minimum workers when autoscaling is enabled. |
### API Tool Configuration
| Variable | Default | Description |
| ---------------------------------- | ------- | ----------------------------------------------------------------------------------------------------------- |
| `API_TOOL_DEFAULT_CONNECT_TIMEOUT` | `10` | Maximum time (in seconds) to wait for establishing a TCP connection when API Tool nodes call external APIs. |
| `API_TOOL_DEFAULT_READ_TIMEOUT` | `60` | Maximum time (in seconds) to wait for receiving response data from external APIs called by API Tool nodes. |
### Database Configuration
The database uses PostgreSQL by default. OceanBase, MySQL, and seekdb are also supported.
| Variable | Default | Description |
| ------------- | -------------- | ------------------------------------------------------------------------------------------------------------------------------------ |
| `DB_TYPE` | `postgresql` | Database type. Supported values: `postgresql`, `mysql`, `oceanbase`, `seekdb`. MySQL-compatible databases like TiDB can use `mysql`. |
| `DB_USERNAME` | `postgres` | Database username. URL-encoded in the connection string, so special characters are safe to use. |
| `DB_PASSWORD` | `difyai123456` | Database password. URL-encoded in the connection string, so characters like `@`, `:`, `%` are safe to use. |
| `DB_HOST` | `db_postgres` | Database server hostname. |
| `DB_PORT` | `5432` | Database server port. If using MySQL, set this to `3306`. |
| `DB_DATABASE` | `dify` | Database name. |
#### Connection Pool
These control how Dify manages its pool of database connections. The defaults work well for most deployments.
| Variable | Default | Description |
| -------------------------- | ------- | ------------------------------------------------------------------------------------------------------------------------------------------------------------------------------ |
| `SQLALCHEMY_POOL_SIZE` | `30` | Number of persistent connections kept in the pool. |
| `SQLALCHEMY_MAX_OVERFLOW` | `10` | Additional temporary connections allowed when the pool is full. With default settings, up to 40 connections (30 + 10) can exist simultaneously. |
| `SQLALCHEMY_POOL_RECYCLE` | `3600` | Recycle connections after this many seconds to prevent stale connections. |
| `SQLALCHEMY_POOL_TIMEOUT` | `30` | How long to wait for a connection when the pool is exhausted. Requests fail with a timeout error if no connection frees up in time. |
| `SQLALCHEMY_POOL_PRE_PING` | `false` | Test each connection with a lightweight query before using it. Prevents "connection lost" errors but adds slight latency. Recommended for production with unreliable networks. |
| `SQLALCHEMY_POOL_USE_LIFO` | `false` | Reuse the most recently returned connection (LIFO) instead of rotating evenly (FIFO). LIFO keeps fewer connections "warm" and can reduce overhead. |
| `SQLALCHEMY_ECHO` | `false` | Print all SQL statements to logs. Useful for debugging query issues. |
#### PostgreSQL Performance Tuning
These are passed as startup arguments to the PostgreSQL container—they configure the database server, not the Dify application.
| Variable | Default | Description |
| ---------------------------------------------- | -------- | -------------------------------------------------------------------------------------------------------------------------------------------------------------------------------------------- |
| `POSTGRES_MAX_CONNECTIONS` | `100` | Maximum number of database connections. [Reference](https://www.postgresql.org/docs/current/runtime-config-connection.html#GUC-MAX-CONNECTIONS) |
| `POSTGRES_SHARED_BUFFERS` | `128MB` | Shared memory for buffers. Recommended: 25% of available memory. [Reference](https://www.postgresql.org/docs/current/runtime-config-resource.html#GUC-SHARED-BUFFERS) |
| `POSTGRES_WORK_MEM` | `4MB` | Memory per database worker for working space. [Reference](https://www.postgresql.org/docs/current/runtime-config-resource.html#GUC-WORK-MEM) |
| `POSTGRES_MAINTENANCE_WORK_MEM` | `64MB` | Memory reserved for maintenance activities. [Reference](https://www.postgresql.org/docs/current/runtime-config-resource.html#GUC-MAINTENANCE-WORK-MEM) |
| `POSTGRES_EFFECTIVE_CACHE_SIZE` | `4096MB` | Planner's assumption about effective cache size. [Reference](https://www.postgresql.org/docs/current/runtime-config-query.html#GUC-EFFECTIVE-CACHE-SIZE) |
| `POSTGRES_STATEMENT_TIMEOUT` | `0` | Max statement duration before termination (ms). `0` means no timeout. [Reference](https://www.postgresql.org/docs/current/runtime-config-client.html#GUC-STATEMENT-TIMEOUT) |
| `POSTGRES_IDLE_IN_TRANSACTION_SESSION_TIMEOUT` | `0` | Max idle-in-transaction session duration (ms). `0` means no timeout. [Reference](https://www.postgresql.org/docs/current/runtime-config-client.html#GUC-IDLE-IN-TRANSACTION-SESSION-TIMEOUT) |
#### MySQL Performance Tuning
These are passed as startup arguments to the MySQL container—they configure the database server, not the Dify application.
| Variable | Default | Description |
| -------------------------------------- | ------- | --------------------------------------------------------------------------------------------------------------------------------------------------------------------------------------------------------------------------------- |
| `MYSQL_MAX_CONNECTIONS` | `1000` | Maximum number of MySQL connections. |
| `MYSQL_INNODB_BUFFER_POOL_SIZE` | `512M` | InnoDB buffer pool size. Recommended: 70-80% of available memory for dedicated MySQL server. [Reference](https://dev.mysql.com/doc/refman/8.0/en/innodb-parameters.html#sysvar_innodb_buffer_pool_size) |
| `MYSQL_INNODB_LOG_FILE_SIZE` | `128M` | InnoDB log file size. [Reference](https://dev.mysql.com/doc/refman/8.0/en/innodb-parameters.html#sysvar_innodb_log_file_size) |
| `MYSQL_INNODB_FLUSH_LOG_AT_TRX_COMMIT` | `2` | InnoDB flush log at transaction commit. Options: `0` (no flush), `1` (flush and sync), `2` (flush to OS cache). [Reference](https://dev.mysql.com/doc/refman/8.0/en/innodb-parameters.html#sysvar_innodb_flush_log_at_trx_commit) |
### Redis Configuration
Configure these to connect Dify to your Redis instance. Dify supports three deployment modes: standalone (default), Sentinel, and Cluster.
| Variable | Default | Description |
| ----------------------- | -------------- | ---------------------------------------------------------------------------------------------------------------------------------------------------------------------------------------- |
| `REDIS_HOST` | `redis` | Redis server hostname. Only used in standalone mode; ignored when Sentinel or Cluster mode is enabled. |
| `REDIS_PORT` | `6379` | Redis server port. Only used in standalone mode. |
| `REDIS_USERNAME` | (empty) | Redis 6.0+ ACL username. Applies to all modes (standalone, Sentinel, Cluster). |
| `REDIS_PASSWORD` | `difyai123456` | Redis authentication password. For Cluster mode, use `REDIS_CLUSTERS_PASSWORD` instead. |
| `REDIS_DB` | `0` | Redis database number (0–15). Only applies to standalone and Sentinel modes. Make sure this doesn't collide with Celery's database (configured in `CELERY_BROKER_URL`; default is DB 1). |
| `REDIS_USE_SSL` | `false` | Enable SSL/TLS for the Redis connection. Does not automatically apply to Sentinel protocol. |
| `REDIS_MAX_CONNECTIONS` | (empty) | Maximum connections in the Redis pool. Leave unset for the library default. Set this to match your Redis server's `maxclients` if needed. |
#### Redis SSL Configuration
Only applies when `REDIS_USE_SSL=true`. These same settings are also used by the Celery broker when its URL uses the `rediss://` scheme.
| Variable | Default | Description |
| --------------------- | ----------- | ----------------------------------------------------------------------------------------------------------------------- |
| `REDIS_SSL_CERT_REQS` | `CERT_NONE` | Certificate verification level: `CERT_NONE` (no verification), `CERT_OPTIONAL`, or `CERT_REQUIRED` (full verification). |
| `REDIS_SSL_CA_CERTS` | (empty) | Path to CA certificate file for verifying the Redis server. |
| `REDIS_SSL_CERTFILE` | (empty) | Path to client certificate for mutual TLS authentication. |
| `REDIS_SSL_KEYFILE` | (empty) | Path to client private key for mutual TLS authentication. |
#### Redis Sentinel Mode
Sentinel provides automatic master discovery and failover for high availability. Mutually exclusive with Cluster mode.
| Variable | Default | Description |
| ------------------------------- | ------- | --------------------------------------------------------------------------------------------------------------------------------------------------------------------------------------------- |
| `REDIS_USE_SENTINEL` | `false` | Enable Redis Sentinel mode. When enabled, `REDIS_HOST`/`REDIS_PORT` are ignored; Dify connects to Sentinel nodes instead and asks for the current master. |
| `REDIS_SENTINELS` | (empty) | Sentinel node addresses. Format: `:,:,:`. These are the Sentinel instances, not the Redis servers. |
| `REDIS_SENTINEL_SERVICE_NAME` | (empty) | The logical service name Sentinel monitors (configured in `sentinel.conf`). Dify calls `master_for(service_name)` to discover the current master. |
| `REDIS_SENTINEL_USERNAME` | (empty) | Username for authenticating with Sentinel nodes. Separate from `REDIS_USERNAME`, which authenticates with the Redis master/replicas. |
| `REDIS_SENTINEL_PASSWORD` | (empty) | Password for authenticating with Sentinel nodes. Separate from `REDIS_PASSWORD`. |
| `REDIS_SENTINEL_SOCKET_TIMEOUT` | `0.1` | Socket timeout (in seconds) for communicating with Sentinel nodes. Default 0.1s assumes fast local network. For cloud/WAN deployments, increase to 1.0–5.0s to prevent intermittent timeouts. |
#### Redis Cluster Mode
Cluster mode provides automatic sharding across multiple Redis nodes. Mutually exclusive with Sentinel mode.
| Variable | Default | Description |
| ------------------------- | ------- | ------------------------------------------------------------------ |
| `REDIS_USE_CLUSTERS` | `false` | Enable Redis Cluster mode. |
| `REDIS_CLUSTERS` | (empty) | Cluster nodes. Format: `:,:,:` |
| `REDIS_CLUSTERS_PASSWORD` | (empty) | Password for the Redis Cluster. |
### Celery Configuration
Configure the background task queue used for dataset indexing, email sending, and scheduled jobs.
### CELERY\_BROKER\_URL
Default: `redis://:difyai123456@redis:6379/1`
Redis connection URL for the Celery message broker.
Direct connection format:
```
redis://:@:/
```
Sentinel mode format (separate multiple nodes with semicolons):
```
sentinel://:@:/
```
| Variable | Default | Description |
| -------------------------------- | ------- | -------------------------------------------------------------------------------------------------------------------------------------------------------------------- |
| `CELERY_BACKEND` | `redis` | Where Celery stores task results. Options: `redis` (fast, in-memory) or `database` (stores in your main database). |
| `BROKER_USE_SSL` | `false` | Auto-enabled when `CELERY_BROKER_URL` uses `rediss://` scheme. Applies the Redis SSL certificate settings to the broker connection. |
| `CELERY_USE_SENTINEL` | `false` | Enable Redis Sentinel mode for the Celery broker. |
| `CELERY_SENTINEL_MASTER_NAME` | (empty) | Sentinel service name (Master Name). |
| `CELERY_SENTINEL_PASSWORD` | (empty) | Password for Sentinel authentication. Separate from `REDIS_SENTINEL_PASSWORD`—they can differ if you use different Sentinel clusters for caching vs task queuing. |
| `CELERY_SENTINEL_SOCKET_TIMEOUT` | `0.1` | Timeout for connecting to Sentinel in seconds. |
| `CELERY_TASK_ANNOTATIONS` | `null` | Apply runtime settings to specific tasks (e.g., rate limits). Format: JSON dictionary. Example: `{"tasks.add": {"rate_limit": "10/s"}}`. Most users don't need this. |
### CORS Configuration
Controls cross-domain access policies for the frontend.
| Variable | Default | Description |
| ------------------------------- | ------- | ------------------------------------------------------------------------------------------------------------------------------------------------------------------------------------------------------------------------------------------------------------------------------ |
| `WEB_API_CORS_ALLOW_ORIGINS` | `*` | Allowed origins for cross-origin requests to the Web API. Example: `https://dify.app` |
| `CONSOLE_CORS_ALLOW_ORIGINS` | `*` | Allowed origins for cross-origin requests to the console API. If not set, falls back to `CONSOLE_WEB_URL`. |
| `COOKIE_DOMAIN` | (empty) | Set to the shared top-level domain (e.g., `example.com`) when frontend and backend run on different subdomains. This allows authentication cookies to be shared across subdomains. When empty, cookies use the most secure `__Host-` prefix and are locked to a single domain. |
| `NEXT_PUBLIC_COOKIE_DOMAIN` | (empty) | Frontend flag for cross-subdomain cookies. Set to `1` (or any non-empty value) to enable—the actual domain is read from `COOKIE_DOMAIN` on the backend. |
| `NEXT_PUBLIC_BATCH_CONCURRENCY` | `5` | Frontend-only. Controls how many concurrent API calls the UI makes during batch operations. |
### File Storage Configuration
Configure where Dify stores uploaded files, dataset documents, and encryption keys. Each storage type has its own credential variables—configure only the one you're using.
### STORAGE\_TYPE
Default: `opendal`
Selects the file storage backend. Supported values: `opendal`, `s3`, `azure-blob`, `aliyun-oss`, `google-storage`, `huawei-obs`, `volcengine-tos`, `tencent-cos`, `baidu-obs`, `oci-storage`, `supabase`, `clickzetta-volume`, `local` (deprecated; internally uses OpenDAL with filesystem scheme).
Default storage backend using [Apache OpenDAL](https://opendal.apache.org/), a unified interface supporting many storage services. Dify automatically scans environment variables matching `OPENDAL__*` and passes them to OpenDAL. For example, with `OPENDAL_SCHEME=s3`, set `OPENDAL_S3_ACCESS_KEY_ID`, `OPENDAL_S3_SECRET_ACCESS_KEY`, etc.
| Variable | Default | Description |
| ---------------- | ------- | --------------------------------------------------------------------------------- |
| `OPENDAL_SCHEME` | `fs` | Storage service to use. Examples: `fs` (local filesystem), `s3`, `gcs`, `azblob`. |
For the default `fs` scheme:
| Variable | Default | Description |
| ----------------- | --------- | --------------------------------------------------------------------------------------- |
| `OPENDAL_FS_ROOT` | `storage` | Root directory for local filesystem storage. Created automatically if it doesn't exist. |
For all available schemes and their configuration options, see the [OpenDAL services documentation](https://github.com/apache/opendal/tree/main/core/services).
| Variable | Default | Description |
| ------------------------ | ----------- | ------------------------------------------------------------------------------------------------------------------------------------------------------------------------------------------------------ |
| `S3_ENDPOINT` | (empty) | S3 endpoint address. Required for non-AWS S3-compatible services (MinIO, etc.). |
| `S3_REGION` | `us-east-1` | S3 region. |
| `S3_BUCKET_NAME` | `difyai` | S3 bucket name. |
| `S3_ACCESS_KEY` | (empty) | S3 Access Key. Not needed when using IAM roles. |
| `S3_SECRET_KEY` | (empty) | S3 Secret Key. Not needed when using IAM roles. |
| `S3_ADDRESS_STYLE` | `auto` | S3 addressing style: `auto`, `path`, or `virtual`. Controls whether bucket names appear in the URL path (`path`) or as a subdomain (`virtual`). Only applies when `S3_USE_AWS_MANAGED_IAM` is `false`. |
| `S3_USE_AWS_MANAGED_IAM` | `false` | Use AWS IAM roles (EC2 instance profile, ECS task role) instead of explicit access key/secret key. When enabled, credentials are auto-discovered from the instance metadata. |
| Variable | Default | Description |
| --------------------------- | --------------------------------------------------- | --------------------------- |
| `AZURE_BLOB_ACCOUNT_NAME` | `difyai` | Azure storage account name. |
| `AZURE_BLOB_ACCOUNT_KEY` | `difyai` | Azure storage account key. |
| `AZURE_BLOB_CONTAINER_NAME` | `difyai-container` | Azure Blob container name. |
| `AZURE_BLOB_ACCOUNT_URL` | `https://.blob.core.windows.net` | Azure Blob account URL. |
| Variable | Default | Description |
| -------------------------------------------- | ------- | ---------------------------------------- |
| `GOOGLE_STORAGE_BUCKET_NAME` | (empty) | Google Cloud Storage bucket name. |
| `GOOGLE_STORAGE_SERVICE_ACCOUNT_JSON_BASE64` | (empty) | Base64-encoded service account JSON key. |
| Variable | Default | Description |
| ------------------------- | -------------------------------------------------- | --------------------------------------------------------------------------------------------------------------------------- |
| `ALIYUN_OSS_BUCKET_NAME` | (empty) | OSS bucket name. |
| `ALIYUN_OSS_ACCESS_KEY` | (empty) | OSS access key. |
| `ALIYUN_OSS_SECRET_KEY` | (empty) | OSS secret key. |
| `ALIYUN_OSS_ENDPOINT` | `https://oss-ap-southeast-1-internal.aliyuncs.com` | OSS endpoint. [Regions and endpoints reference](https://www.alibabacloud.com/help/en/oss/user-guide/regions-and-endpoints). |
| `ALIYUN_OSS_REGION` | `ap-southeast-1` | OSS region. |
| `ALIYUN_OSS_AUTH_VERSION` | `v4` | OSS authentication version. |
| `ALIYUN_OSS_PATH` | (empty) | Object path prefix. Don't start with `/`. [Reference](https://www.alibabacloud.com/help/en/oss/support/0016-00000005). |
| `ALIYUN_CLOUDBOX_ID` | (empty) | CloudBox ID for CloudBox-based OSS deployments. |
| Variable | Default | Description |
| --------------------------- | ------- | --------------------------------------------------------------------------------------------------- |
| `TENCENT_COS_BUCKET_NAME` | (empty) | COS bucket name. |
| `TENCENT_COS_SECRET_KEY` | (empty) | COS secret key. |
| `TENCENT_COS_SECRET_ID` | (empty) | COS secret ID. |
| `TENCENT_COS_REGION` | (empty) | COS region, e.g., `ap-guangzhou`. [Reference](https://cloud.tencent.com/document/product/436/6224). |
| `TENCENT_COS_SCHEME` | (empty) | Protocol to access COS (`http` or `https`). |
| `TENCENT_COS_CUSTOM_DOMAIN` | (empty) | Custom domain for COS access. |
| Variable | Default | Description |
| ----------------- | -------------- | ----------------- |
| `OCI_ENDPOINT` | (empty) | OCI endpoint URL. |
| `OCI_BUCKET_NAME` | (empty) | OCI bucket name. |
| `OCI_ACCESS_KEY` | (empty) | OCI access key. |
| `OCI_SECRET_KEY` | (empty) | OCI secret key. |
| `OCI_REGION` | `us-ashburn-1` | OCI region. |
| Variable | Default | Description |
| ------------------------ | ------- | -------------------------------------------------------------------------------------------------- |
| `HUAWEI_OBS_BUCKET_NAME` | (empty) | OBS bucket name. |
| `HUAWEI_OBS_ACCESS_KEY` | (empty) | OBS access key. |
| `HUAWEI_OBS_SECRET_KEY` | (empty) | OBS secret key. |
| `HUAWEI_OBS_SERVER` | (empty) | OBS server URL. [Reference](https://support.huaweicloud.com/sdk-python-devg-obs/obs_22_0500.html). |
| `HUAWEI_OBS_PATH_STYLE` | `false` | Use path-style URLs instead of virtual-hosted-style. |
| Variable | Default | Description |
| ---------------------------- | ------- | --------------------------------------------------------------------------- |
| `VOLCENGINE_TOS_BUCKET_NAME` | (empty) | TOS bucket name. |
| `VOLCENGINE_TOS_ACCESS_KEY` | (empty) | TOS access key. |
| `VOLCENGINE_TOS_SECRET_KEY` | (empty) | TOS secret key. |
| `VOLCENGINE_TOS_ENDPOINT` | (empty) | TOS endpoint URL. [Reference](https://www.volcengine.com/docs/6349/107356). |
| `VOLCENGINE_TOS_REGION` | (empty) | TOS region, e.g., `cn-guangzhou`. |
| Variable | Default | Description |
| ----------------------- | ------- | ---------------------- |
| `BAIDU_OBS_BUCKET_NAME` | (empty) | Baidu OBS bucket name. |
| `BAIDU_OBS_ACCESS_KEY` | (empty) | Baidu OBS access key. |
| `BAIDU_OBS_SECRET_KEY` | (empty) | Baidu OBS secret key. |
| `BAIDU_OBS_ENDPOINT` | (empty) | Baidu OBS server URL. |
| Variable | Default | Description |
| ---------------------- | ------- | ----------------------------- |
| `SUPABASE_BUCKET_NAME` | (empty) | Supabase storage bucket name. |
| `SUPABASE_API_KEY` | (empty) | Supabase API key. |
| `SUPABASE_URL` | (empty) | Supabase server URL. |
| Variable | Default | Description |
| -------------------------------- | ---------- | -------------------------------------------------------------------------------------------------------------------------- |
| `CLICKZETTA_VOLUME_TYPE` | `user` | Volume type. Options: `user` (personal/small team), `table` (enterprise multi-tenant), `external` (data lake integration). |
| `CLICKZETTA_VOLUME_NAME` | (empty) | External volume name (required only when `TYPE=external`). |
| `CLICKZETTA_VOLUME_TABLE_PREFIX` | `dataset_` | Table volume table prefix (used only when `TYPE=table`). |
| `CLICKZETTA_VOLUME_DIFY_PREFIX` | `dify_km` | Dify file directory prefix for isolation from other apps. |
ClickZetta Volume reuses the `CLICKZETTA_*` connection parameters configured in the Vector Database section.
#### Archive Storage
Separate S3-compatible storage for archiving workflow run logs. Used by the paid plan retention system to archive workflow runs older than the retention period to JSONL format. Requires `BILLING_ENABLED=true`.
| Variable | Default | Description |
| -------------------------------- | ------- | ------------------------------------------------- |
| `ARCHIVE_STORAGE_ENABLED` | `false` | Enable archive storage for workflow log archival. |
| `ARCHIVE_STORAGE_ENDPOINT` | (empty) | S3-compatible endpoint URL. |
| `ARCHIVE_STORAGE_ARCHIVE_BUCKET` | (empty) | Bucket for archived workflow run logs. |
| `ARCHIVE_STORAGE_EXPORT_BUCKET` | (empty) | Bucket for workflow run exports. |
| `ARCHIVE_STORAGE_ACCESS_KEY` | (empty) | Access key. |
| `ARCHIVE_STORAGE_SECRET_KEY` | (empty) | Secret key. |
| `ARCHIVE_STORAGE_REGION` | `auto` | Storage region. |
### Vector Database Configuration
Configure the vector database used for knowledge base embedding storage and similarity search. Each provider has its own set of credential variables—configure only the one you're using.
### VECTOR\_STORE
Default: `weaviate`
Selects the vector database backend. If a dataset already has an index, the dataset's stored type takes precedence over this setting. When switching providers in Docker Compose, `COMPOSE_PROFILES` automatically starts the matching container based on this value.
Supported values: `weaviate`, `oceanbase`, `seekdb`, `qdrant`, `milvus`, `myscale`, `relyt`, `pgvector`, `pgvecto-rs`, `chroma`, `opensearch`, `oracle`, `tencent`, `elasticsearch`, `elasticsearch-ja`, `analyticdb`, `couchbase`, `vikingdb`, `opengauss`, `tablestore`, `vastbase`, `tidb`, `tidb_on_qdrant`, `baidu`, `lindorm`, `huawei_cloud`, `upstash`, `matrixone`, `clickzetta`, `alibabacloud_mysql`, `iris`, `hologres`.
| Variable | Default | Description |
| -------------------------- | -------------- | ---------------------------------------------------------------------------------------------------------------------------------------------- |
| `VECTOR_INDEX_NAME_PREFIX` | `Vector_index` | Prefix added to collection names in the vector database. Change this if you share a vector database instance across multiple Dify deployments. |
| Variable | Default | Description |
| ------------------------ | ----------------------- | ----------------------------------------------------------------------------------------------------------------------------------------------------------------------------------------------- |
| `WEAVIATE_ENDPOINT` | `http://weaviate:8080` | Weaviate REST API endpoint. |
| `WEAVIATE_API_KEY` | (empty) | API key for Weaviate authentication. |
| `WEAVIATE_GRPC_ENDPOINT` | `grpc://weaviate:50051` | Separate gRPC endpoint for high-performance binary protocol. Significantly faster for batch operations. Falls back to inferring from HTTP endpoint if not set. |
| `WEAVIATE_TOKENIZATION` | `word` | Tokenization method for text fields. Options: `word` (splits on whitespace and punctuation), `whitespace` (splits on whitespace only), `character` (character-level, better for CJK languages). |
seekdb is the lite version of OceanBase and shares the same connection configuration.
| Variable | Default | Description |
| -------------------------------- | -------------- | -------------------------------------------------------------------------------------------------------------------------------------------- |
| `OCEANBASE_VECTOR_HOST` | `oceanbase` | Hostname or IP address. |
| `OCEANBASE_VECTOR_PORT` | `2881` | Port number. |
| `OCEANBASE_VECTOR_USER` | `root@test` | Database username. |
| `OCEANBASE_VECTOR_PASSWORD` | `difyai123456` | Database password. |
| `OCEANBASE_VECTOR_DATABASE` | `test` | Database name. |
| `OCEANBASE_CLUSTER_NAME` | `difyai` | Cluster name (Docker deployment only). |
| `OCEANBASE_MEMORY_LIMIT` | `6G` | Memory limit for OceanBase (Docker deployment only). |
| `SEEKDB_MEMORY_LIMIT` | `2G` | Memory limit for seekdb (Docker deployment only). |
| `OCEANBASE_ENABLE_HYBRID_SEARCH` | `false` | Enable fulltext index for BM25 queries alongside vector search. Requires OceanBase >= 4.3.5.1. Collections must be recreated after enabling. |
| `OCEANBASE_FULLTEXT_PARSER` | `ik` | Fulltext parser. Built-in: `ngram`, `beng`, `space`, `ngram2`, `ik`. External (require plugin): `japanese_ftparser`, `thai_ftparser`. |
| Variable | Default | Description |
| --------------------------- | -------------------- | ----------------------------- |
| `QDRANT_URL` | `http://qdrant:6333` | Qdrant endpoint address. |
| `QDRANT_API_KEY` | `difyai123456` | API key for Qdrant. |
| `QDRANT_CLIENT_TIMEOUT` | `20` | Client timeout in seconds. |
| `QDRANT_GRPC_ENABLED` | `false` | Enable gRPC communication. |
| `QDRANT_GRPC_PORT` | `6334` | gRPC port. |
| `QDRANT_REPLICATION_FACTOR` | `1` | Number of replicas per shard. |
| Variable | Default | Description |
| ----------------------------- | ----------------------------------- | ------------------------------------------------------------------------------------------------------------------------------------------------------------------------------ |
| `MILVUS_URI` | `http://host.docker.internal:19530` | Milvus URI. For [Zilliz Cloud](https://docs.zilliz.com/docs/free-trials), use the Public Endpoint. |
| `MILVUS_DATABASE` | (empty) | Database name. |
| `MILVUS_TOKEN` | (empty) | Authentication token. For Zilliz Cloud, use the API Key. |
| `MILVUS_USER` | (empty) | Username. |
| `MILVUS_PASSWORD` | (empty) | Password. |
| `MILVUS_ENABLE_HYBRID_SEARCH` | `false` | Enable BM25 sparse index for full-text search alongside vector similarity. Requires Milvus >= 2.5.0. If the collection was created without this enabled, it must be recreated. |
| `MILVUS_ANALYZER_PARAMS` | (empty) | Analyzer parameters for text fields. |
| Variable | Default | Description |
| -------------------- | --------- | ----------------------------------------------------------------------------------------------------------------------------------------- |
| `MYSCALE_HOST` | `myscale` | MyScale host. |
| `MYSCALE_PORT` | `8123` | MyScale port. |
| `MYSCALE_USER` | `default` | Username. |
| `MYSCALE_PASSWORD` | (empty) | Password. |
| `MYSCALE_DATABASE` | `dify` | Database name. |
| `MYSCALE_FTS_PARAMS` | (empty) | Full-text search params. [Multi-language support reference](https://myscale.com/docs/en/text-search/#understanding-fts-index-parameters). |
| Variable | Default | Description |
| ----------------------------- | ------------------------------ | -------------------------------------------- |
| `COUCHBASE_CONNECTION_STRING` | `couchbase://couchbase-server` | Connection string for the Couchbase cluster. |
| `COUCHBASE_USER` | `Administrator` | Username. |
| `COUCHBASE_PASSWORD` | `password` | Password. |
| `COUCHBASE_BUCKET_NAME` | `Embeddings` | Bucket name. |
| `COUCHBASE_SCOPE_NAME` | `_default` | Scope name. |
| Variable | Default | Description |
| --------------------------------- | -------- | ---------------------------------------- |
| `HOLOGRES_HOST` | (empty) | Hostname. |
| `HOLOGRES_PORT` | `80` | Port number. |
| `HOLOGRES_DATABASE` | (empty) | Database name. |
| `HOLOGRES_ACCESS_KEY_ID` | (empty) | Access key ID (used as PG username). |
| `HOLOGRES_ACCESS_KEY_SECRET` | (empty) | Access key secret (used as PG password). |
| `HOLOGRES_SCHEMA` | `public` | Schema name. |
| `HOLOGRES_TOKENIZER` | `jieba` | Tokenizer for text fields. |
| `HOLOGRES_DISTANCE_METHOD` | `Cosine` | Distance method. |
| `HOLOGRES_BASE_QUANTIZATION_TYPE` | `rabitq` | Quantization type. |
| `HOLOGRES_MAX_DEGREE` | `64` | HNSW max degree. |
| `HOLOGRES_EF_CONSTRUCTION` | `400` | HNSW ef\_construction parameter. |
| Variable | Default | Description |
| ------------------------- | -------------- | ----------------------------------------------- |
| `PGVECTOR_HOST` | `pgvector` | Hostname. |
| `PGVECTOR_PORT` | `5432` | Port number. |
| `PGVECTOR_USER` | `postgres` | Username. |
| `PGVECTOR_PASSWORD` | `difyai123456` | Password. |
| `PGVECTOR_DATABASE` | `dify` | Database name. |
| `PGVECTOR_MIN_CONNECTION` | `1` | Minimum pool connections. |
| `PGVECTOR_MAX_CONNECTION` | `5` | Maximum pool connections. |
| `PGVECTOR_PG_BIGM` | `false` | Enable pg\_bigm extension for full-text search. |
| Variable | Default | Description |
| ------------------------- | -------------- | ------------------------- |
| `VASTBASE_HOST` | `vastbase` | Hostname. |
| `VASTBASE_PORT` | `5432` | Port number. |
| `VASTBASE_USER` | `dify` | Username. |
| `VASTBASE_PASSWORD` | `Difyai123456` | Password. |
| `VASTBASE_DATABASE` | `dify` | Database name. |
| `VASTBASE_MIN_CONNECTION` | `1` | Minimum pool connections. |
| `VASTBASE_MAX_CONNECTION` | `5` | Maximum pool connections. |
| Variable | Default | Description |
| --------------------- | -------------- | -------------- |
| `PGVECTO_RS_HOST` | `pgvecto-rs` | Hostname. |
| `PGVECTO_RS_PORT` | `5432` | Port number. |
| `PGVECTO_RS_USER` | `postgres` | Username. |
| `PGVECTO_RS_PASSWORD` | `difyai123456` | Password. |
| `PGVECTO_RS_DATABASE` | `dify` | Database name. |
| Variable | Default | Description |
| ------------------------------- | ------------- | -------------------------------------------------------------------------------------------------------------------------------------------------------- |
| `ANALYTICDB_KEY_ID` | (empty) | Aliyun access key ID. [Create AccessKey](https://help.aliyun.com/zh/analyticdb/analyticdb-for-postgresql/support/create-an-accesskey-pair). |
| `ANALYTICDB_KEY_SECRET` | (empty) | Aliyun access key secret. |
| `ANALYTICDB_REGION_ID` | `cn-hangzhou` | Region identifier. |
| `ANALYTICDB_INSTANCE_ID` | (empty) | Instance ID, e.g., `gp-xxxxxx`. [Create instance](https://help.aliyun.com/zh/analyticdb/analyticdb-for-postgresql/getting-started/create-an-instance-1). |
| `ANALYTICDB_ACCOUNT` | (empty) | Account name. [Create account](https://help.aliyun.com/zh/analyticdb/analyticdb-for-postgresql/getting-started/createa-a-privileged-account). |
| `ANALYTICDB_PASSWORD` | (empty) | Account password. |
| `ANALYTICDB_NAMESPACE` | `dify` | Namespace (schema). Created automatically if not exists. |
| `ANALYTICDB_NAMESPACE_PASSWORD` | (empty) | Namespace password. Used when creating a new namespace. |
| `ANALYTICDB_HOST` | (empty) | Direct connection host (alternative to API-based access). |
| `ANALYTICDB_PORT` | `5432` | Direct connection port. |
| `ANALYTICDB_MIN_CONNECTION` | `1` | Minimum pool connections. |
| `ANALYTICDB_MAX_CONNECTION` | `5` | Maximum pool connections. |
| Variable | Default | Description |
| ---------------------- | ------- | -------------- |
| `TIDB_VECTOR_HOST` | `tidb` | Hostname. |
| `TIDB_VECTOR_PORT` | `4000` | Port number. |
| `TIDB_VECTOR_USER` | (empty) | Username. |
| `TIDB_VECTOR_PASSWORD` | (empty) | Password. |
| `TIDB_VECTOR_DATABASE` | `dify` | Database name. |
| Variable | Default | Description |
| -------------------- | ----------- | -------------- |
| `MATRIXONE_HOST` | `matrixone` | Hostname. |
| `MATRIXONE_PORT` | `6001` | Port number. |
| `MATRIXONE_USER` | `dump` | Username. |
| `MATRIXONE_PASSWORD` | `111` | Password. |
| `MATRIXONE_DATABASE` | `dify` | Database name. |
| Variable | Default | Description |
| ------------------------- | --------------------------------------------------- | -------------------- |
| `CHROMA_HOST` | `127.0.0.1` | Chroma server host. |
| `CHROMA_PORT` | `8000` | Chroma server port. |
| `CHROMA_TENANT` | `default_tenant` | Tenant name. |
| `CHROMA_DATABASE` | `default_database` | Database name. |
| `CHROMA_AUTH_PROVIDER` | `chromadb.auth.token_authn.TokenAuthClientProvider` | Auth provider class. |
| `CHROMA_AUTH_CREDENTIALS` | (empty) | Auth credentials. |
| Variable | Default | Description |
| ------------------------ | ------------------------- | ----------------------------------------- |
| `ORACLE_USER` | `dify` | Oracle username. |
| `ORACLE_PASSWORD` | `dify` | Oracle password. |
| `ORACLE_DSN` | `oracle:1521/FREEPDB1` | Data source name. |
| `ORACLE_CONFIG_DIR` | `/app/api/storage/wallet` | Oracle configuration directory. |
| `ORACLE_WALLET_LOCATION` | `/app/api/storage/wallet` | Wallet location for Autonomous DB. |
| `ORACLE_WALLET_PASSWORD` | `dify` | Wallet password. |
| `ORACLE_IS_AUTONOMOUS` | `false` | Whether using Oracle Autonomous Database. |
| Variable | Default | Description |
| ----------------------------------- | -------------- | ------------------------- |
| `ALIBABACLOUD_MYSQL_HOST` | `127.0.0.1` | Hostname. |
| `ALIBABACLOUD_MYSQL_PORT` | `3306` | Port number. |
| `ALIBABACLOUD_MYSQL_USER` | `root` | Username. |
| `ALIBABACLOUD_MYSQL_PASSWORD` | `difyai123456` | Password. |
| `ALIBABACLOUD_MYSQL_DATABASE` | `dify` | Database name. |
| `ALIBABACLOUD_MYSQL_MAX_CONNECTION` | `5` | Maximum pool connections. |
| `ALIBABACLOUD_MYSQL_HNSW_M` | `6` | HNSW M parameter. |
| Variable | Default | Description |
| ---------------- | -------------- | -------------- |
| `RELYT_HOST` | `db` | Hostname. |
| `RELYT_PORT` | `5432` | Port number. |
| `RELYT_USER` | `postgres` | Username. |
| `RELYT_PASSWORD` | `difyai123456` | Password. |
| `RELYT_DATABASE` | `postgres` | Database name. |
| Variable | Default | Description |
| ------------------------- | ---------------- | -------------------------------------------------------------------------------------------------------------------------------------------------- |
| `OPENSEARCH_HOST` | `opensearch` | Hostname. |
| `OPENSEARCH_PORT` | `9200` | Port number. |
| `OPENSEARCH_SECURE` | `true` | Use HTTPS. |
| `OPENSEARCH_VERIFY_CERTS` | `true` | Verify SSL certificates. |
| `OPENSEARCH_AUTH_METHOD` | `basic` | `basic` uses username/password. `aws_managed_iam` uses AWS SigV4 request signing via Boto3 credentials (for AWS Managed OpenSearch or Serverless). |
| `OPENSEARCH_USER` | `admin` | Username. Only used with `basic` auth. |
| `OPENSEARCH_PASSWORD` | `admin` | Password. Only used with `basic` auth. |
| `OPENSEARCH_AWS_REGION` | `ap-southeast-1` | AWS region. Only used with `aws_managed_iam` auth. |
| `OPENSEARCH_AWS_SERVICE` | `aoss` | AWS service type: `es` (Managed Cluster) or `aoss` (OpenSearch Serverless). Only used with `aws_managed_iam` auth. |
| Variable | Default | Description |
| ---------------------------------------- | ------------------ | --------------------------------------------------------------------------------------------------- |
| `TENCENT_VECTOR_DB_URL` | `http://127.0.0.1` | Access address. [Console](https://console.cloud.tencent.com/vdb). |
| `TENCENT_VECTOR_DB_API_KEY` | `dify` | API key. [Key Management](https://cloud.tencent.com/document/product/1709/95108). |
| `TENCENT_VECTOR_DB_TIMEOUT` | `30` | Request timeout in seconds. |
| `TENCENT_VECTOR_DB_USERNAME` | `dify` | Account name. [Account Management](https://cloud.tencent.com/document/product/1709/115833). |
| `TENCENT_VECTOR_DB_DATABASE` | `dify` | Database name. [Create Database](https://cloud.tencent.com/document/product/1709/95822). |
| `TENCENT_VECTOR_DB_SHARD` | `1` | Number of shards. |
| `TENCENT_VECTOR_DB_REPLICAS` | `2` | Number of replicas. |
| `TENCENT_VECTOR_DB_ENABLE_HYBRID_SEARCH` | `false` | Enable hybrid search. [Sparse Vector docs](https://cloud.tencent.com/document/product/1709/110110). |
| Variable | Default | Description |
| -------------------------------- | --------- | --------------------------------------------------------------------------------------------------------------------------------------------- |
| `ELASTICSEARCH_HOST` | `0.0.0.0` | Hostname. |
| `ELASTICSEARCH_PORT` | `9200` | Port number. |
| `ELASTICSEARCH_USERNAME` | `elastic` | Username. |
| `ELASTICSEARCH_PASSWORD` | `elastic` | Password. |
| `ELASTICSEARCH_USE_CLOUD` | `false` | Switch to Elastic Cloud mode. When `true`, uses `ELASTICSEARCH_CLOUD_URL` and `ELASTICSEARCH_API_KEY` instead of host/port/username/password. |
| `ELASTICSEARCH_CLOUD_URL` | (empty) | Elastic Cloud endpoint URL. Required when `ELASTICSEARCH_USE_CLOUD=true`. |
| `ELASTICSEARCH_API_KEY` | (empty) | Elastic Cloud API key. Required when `ELASTICSEARCH_USE_CLOUD=true`. |
| `ELASTICSEARCH_VERIFY_CERTS` | `false` | Verify SSL certificates. |
| `ELASTICSEARCH_CA_CERTS` | (empty) | Path to CA certificates. |
| `ELASTICSEARCH_REQUEST_TIMEOUT` | `100000` | Request timeout in milliseconds. |
| `ELASTICSEARCH_RETRY_ON_TIMEOUT` | `true` | Retry on timeout. |
| `ELASTICSEARCH_MAX_RETRIES` | `10` | Maximum retry attempts. |
| Variable | Default | Description |
| -------------------------------------------- | ----------------------- | ----------------------------------- |
| `BAIDU_VECTOR_DB_ENDPOINT` | `http://127.0.0.1:5287` | Endpoint URL. |
| `BAIDU_VECTOR_DB_CONNECTION_TIMEOUT_MS` | `30000` | Connection timeout in milliseconds. |
| `BAIDU_VECTOR_DB_ACCOUNT` | `root` | Account name. |
| `BAIDU_VECTOR_DB_API_KEY` | `dify` | API key. |
| `BAIDU_VECTOR_DB_DATABASE` | `dify` | Database name. |
| `BAIDU_VECTOR_DB_SHARD` | `1` | Number of shards. |
| `BAIDU_VECTOR_DB_REPLICAS` | `3` | Number of replicas. |
| `BAIDU_VECTOR_DB_INVERTED_INDEX_ANALYZER` | `DEFAULT_ANALYZER` | Inverted index analyzer. |
| `BAIDU_VECTOR_DB_INVERTED_INDEX_PARSER_MODE` | `COARSE_MODE` | Inverted index parser mode. |
| Variable | Default | Description |
| ----------------------------- | ----------------------------- | ----------------------------------------------------- |
| `VIKINGDB_ACCESS_KEY` | (empty) | Access key. |
| `VIKINGDB_SECRET_KEY` | (empty) | Secret key. |
| `VIKINGDB_REGION` | `cn-shanghai` | Region. |
| `VIKINGDB_HOST` | `api-vikingdb.xxx.volces.com` | API host. Replace with your region-specific endpoint. |
| `VIKINGDB_SCHEMA` | `http` | Protocol scheme (`http` or `https`). |
| `VIKINGDB_CONNECTION_TIMEOUT` | `30` | Connection timeout in seconds. |
| `VIKINGDB_SOCKET_TIMEOUT` | `30` | Socket timeout in seconds. |
| Variable | Default | Description |
| ----------------------- | ------------------------ | -------------------------------------------------------------------------- |
| `LINDORM_URL` | `http://localhost:30070` | Lindorm search engine URL. [Console](https://lindorm.console.aliyun.com/). |
| `LINDORM_USERNAME` | `admin` | Username. |
| `LINDORM_PASSWORD` | `admin` | Password. |
| `LINDORM_USING_UGC` | `true` | Use UGC mode. |
| `LINDORM_QUERY_TIMEOUT` | `1` | Query timeout in seconds. |
| Variable | Default | Description |
| -------------------------- | ----------- | ------------------------- |
| `OPENGAUSS_HOST` | `opengauss` | Hostname. |
| `OPENGAUSS_PORT` | `6600` | Port number. |
| `OPENGAUSS_USER` | `postgres` | Username. |
| `OPENGAUSS_PASSWORD` | `Dify@123` | Password. |
| `OPENGAUSS_DATABASE` | `dify` | Database name. |
| `OPENGAUSS_MIN_CONNECTION` | `1` | Minimum pool connections. |
| `OPENGAUSS_MAX_CONNECTION` | `5` | Maximum pool connections. |
| `OPENGAUSS_ENABLE_PQ` | `false` | Enable PQ acceleration. |
| Variable | Default | Description |
| ----------------------- | ------------------------ | --------------------- |
| `HUAWEI_CLOUD_HOSTS` | `https://127.0.0.1:9200` | Cluster endpoint URL. |
| `HUAWEI_CLOUD_USER` | `admin` | Username. |
| `HUAWEI_CLOUD_PASSWORD` | `admin` | Password. |
| Variable | Default | Description |
| ---------------------- | ------- | ---------------------------- |
| `UPSTASH_VECTOR_URL` | (empty) | Upstash Vector endpoint URL. |
| `UPSTASH_VECTOR_TOKEN` | (empty) | Upstash Vector API token. |
| Variable | Default | Description |
| ------------------------------------------ | ---------------------------------------------------- | ------------------------------------------------------------- |
| `TABLESTORE_ENDPOINT` | `https://instance-name.cn-hangzhou.ots.aliyuncs.com` | Endpoint address. Replace `instance-name` with your instance. |
| `TABLESTORE_INSTANCE_NAME` | (empty) | Instance name. |
| `TABLESTORE_ACCESS_KEY_ID` | (empty) | Access key ID. |
| `TABLESTORE_ACCESS_KEY_SECRET` | (empty) | Access key secret. |
| `TABLESTORE_NORMALIZE_FULLTEXT_BM25_SCORE` | `false` | Normalize fulltext BM25 scores. |
| Variable | Default | Description |
| ------------------------------------- | -------------------- | -------------------------- |
| `CLICKZETTA_USERNAME` | (empty) | Username. |
| `CLICKZETTA_PASSWORD` | (empty) | Password. |
| `CLICKZETTA_INSTANCE` | (empty) | Instance name. |
| `CLICKZETTA_SERVICE` | `api.clickzetta.com` | Service endpoint. |
| `CLICKZETTA_WORKSPACE` | `quick_start` | Workspace name. |
| `CLICKZETTA_VCLUSTER` | `default_ap` | Virtual cluster. |
| `CLICKZETTA_SCHEMA` | `dify` | Schema name. |
| `CLICKZETTA_BATCH_SIZE` | `100` | Batch size for operations. |
| `CLICKZETTA_ENABLE_INVERTED_INDEX` | `true` | Enable inverted index. |
| `CLICKZETTA_ANALYZER_TYPE` | `chinese` | Analyzer type. |
| `CLICKZETTA_ANALYZER_MODE` | `smart` | Analyzer mode. |
| `CLICKZETTA_VECTOR_DISTANCE_FUNCTION` | `cosine_distance` | Distance function. |
| Variable | Default | Description |
| -------------------------- | ----------- | ---------------------------------------------------- |
| `IRIS_HOST` | `iris` | Hostname. |
| `IRIS_SUPER_SERVER_PORT` | `1972` | Super server port. |
| `IRIS_USER` | `_SYSTEM` | Username. |
| `IRIS_PASSWORD` | `Dify@1234` | Password. |
| `IRIS_DATABASE` | `USER` | Database name. |
| `IRIS_SCHEMA` | `dify` | Schema name. |
| `IRIS_CONNECTION_URL` | (empty) | Full connection URL (overrides individual settings). |
| `IRIS_MIN_CONNECTION` | `1` | Minimum pool connections. |
| `IRIS_MAX_CONNECTION` | `3` | Maximum pool connections. |
| `IRIS_TEXT_INDEX` | `true` | Enable text indexing. |
| `IRIS_TEXT_INDEX_LANGUAGE` | `en` | Text index language. |
### Knowledge Configuration
| Variable | Default | Description |
| ----------------------------------- | ------- | ------------------------------------------------------------------------------------------------------------------------------------------------------------------------------------------------------------ |
| `UPLOAD_FILE_SIZE_LIMIT` | `15` | Maximum file size in MB for document uploads (PDFs, Word docs, etc.). Users see a "file too large" error when exceeded. Does not apply to images, videos, or audio—they have separate limits below. |
| `UPLOAD_FILE_BATCH_LIMIT` | `5` | Maximum number of files the frontend allows per upload batch. |
| `UPLOAD_FILE_EXTENSION_BLACKLIST` | (empty) | Security blocklist of file extensions that cannot be uploaded. Comma-separated, lowercase, no dots. Example: `exe,bat,cmd,com,scr,vbs,ps1,msi,dll`. Empty allows all types. |
| `SINGLE_CHUNK_ATTACHMENT_LIMIT` | `10` | Maximum number of images that can be embedded in a single knowledge base segment (chunk). |
| `IMAGE_FILE_BATCH_LIMIT` | `10` | Maximum number of image files per upload batch. |
| `ATTACHMENT_IMAGE_FILE_SIZE_LIMIT` | `2` | Maximum size in MB for images fetched from external URLs during knowledge base indexing. Images larger than this are skipped. Different from `UPLOAD_IMAGE_FILE_SIZE_LIMIT` which applies to direct uploads. |
| `ATTACHMENT_IMAGE_DOWNLOAD_TIMEOUT` | `60` | Timeout in seconds when downloading images from external URLs during knowledge base indexing. Slow or unresponsive image servers are abandoned after this timeout. |
| `ETL_TYPE` | `dify` | Document extraction library. `dify` supports txt, md, pdf, html, xlsx, docx, csv. `Unstructured` adds support for doc, msg, eml, ppt, pptx, xml, epub (requires `UNSTRUCTURED_API_URL`). |
| `UNSTRUCTURED_API_URL` | (empty) | Unstructured.io API endpoint. Required when `ETL_TYPE` is `Unstructured`. Also needed for `.ppt` file support. Example: `http://unstructured:8000/general/v0/general`. |
| `UNSTRUCTURED_API_KEY` | (empty) | API key for Unstructured.io authentication. |
| `SCARF_NO_ANALYTICS` | `true` | Disable Unstructured library's telemetry/analytics collection. |
| `TOP_K_MAX_VALUE` | `10` | Maximum value users can set for the `top_k` parameter in knowledge base retrieval (how many results to return per search). |
| `DATASET_MAX_SEGMENTS_PER_REQUEST` | `0` | Maximum number of segments per dataset API request. `0` means unlimited. |
#### Annotation Import
| Variable | Default | Description |
| ----------------------------------------- | ------- | ------------------------------------------------------------------------------------------------------- |
| `ANNOTATION_IMPORT_FILE_SIZE_LIMIT` | `2` | Maximum CSV file size in MB for annotation import. Returns HTTP 413 when exceeded. |
| `ANNOTATION_IMPORT_MAX_RECORDS` | `10000` | Maximum number of records per annotation import. Files with more records must be split into batches. |
| `ANNOTATION_IMPORT_MIN_RECORDS` | `1` | Minimum number of valid records required per annotation import. |
| `ANNOTATION_IMPORT_RATE_LIMIT_PER_MINUTE` | `5` | Maximum annotation import requests per minute per workspace. Returns HTTP 429 when exceeded. |
| `ANNOTATION_IMPORT_RATE_LIMIT_PER_HOUR` | `20` | Maximum annotation import requests per hour per workspace. |
| `ANNOTATION_IMPORT_MAX_CONCURRENT` | `5` | Maximum concurrent annotation import tasks per workspace. Stale tasks are auto-cleaned after 2 minutes. |
### Model Configuration
| Variable | Default | Description |
| ------------------------------------- | ------- | ------------------------------------------------------------------------------------------------------------------------------------------------- |
| `PROMPT_GENERATION_MAX_TOKENS` | `512` | Maximum tokens when the system auto-generates a prompt using an LLM. Prevents runaway generations that waste API quota. |
| `CODE_GENERATION_MAX_TOKENS` | `1024` | Maximum tokens when the system auto-generates code using an LLM. |
| `PLUGIN_BASED_TOKEN_COUNTING_ENABLED` | `false` | Use plugin-based token counting for accurate usage tracking. When disabled, token counting returns 0 (faster but cost tracking is less accurate). |
### Multi-modal Configuration
| Variable | Default | Description |
| ------------------------------ | -------- | ---------------------------------------------------------------------------------------------------------------------------------------------------------------------------------------------------------------------------------------------------------------- |
| `MULTIMODAL_SEND_FORMAT` | `base64` | How files are sent to multi-modal LLMs. `base64` embeds file data in the request (more compatible, works offline, larger payloads). `url` sends a signed URL for the model to fetch (faster, smaller requests, but the model must be able to reach `FILES_URL`). |
| `UPLOAD_IMAGE_FILE_SIZE_LIMIT` | `10` | Maximum image file size in MB for direct uploads (jpg, png, webp, gif, svg). |
| `UPLOAD_VIDEO_FILE_SIZE_LIMIT` | `100` | Maximum video file size in MB for direct uploads (mp4, mov, mpeg, webm). |
| `UPLOAD_AUDIO_FILE_SIZE_LIMIT` | `50` | Maximum audio file size in MB for direct uploads (mp3, m4a, wav, amr, mpga). |
All upload size limits are also gated by `NGINX_CLIENT_MAX_BODY_SIZE` (default `100M`). If you increase any upload limit above 100 MB, also increase `NGINX_CLIENT_MAX_BODY_SIZE` to match—otherwise Nginx rejects the upload with a 413 error.
### Sentry Configuration
Sentry provides error tracking and performance monitoring. Each service has its own DSN to separate error reporting.
| Variable | Default | Description |
| --------------------------------- | ------- | -------------------------------------------------------------------------------------------------------------------------- |
| `SENTRY_DSN` | (empty) | Sentry DSN shared across services. |
| `API_SENTRY_DSN` | (empty) | Sentry DSN for the API service. Overrides `SENTRY_DSN` if set. Empty disables Sentry for the backend. |
| `API_SENTRY_TRACES_SAMPLE_RATE` | `1.0` | Fraction of requests to include in performance tracing (0.01 = 1%, 1.0 = 100%). Traces track request flow across services. |
| `API_SENTRY_PROFILES_SAMPLE_RATE` | `1.0` | Fraction of requests to include in CPU/memory profiling (0.01 = 1%). Profiles show where time is spent in code. |
| `WEB_SENTRY_DSN` | (empty) | Sentry DSN for the web frontend (Next.js). Frontend-only. |
| `PLUGIN_SENTRY_ENABLED` | `false` | Enable Sentry for the plugin daemon service. |
| `PLUGIN_SENTRY_DSN` | (empty) | Sentry DSN for the plugin daemon. |
### Notion Integration Configuration
Connect Dify to Notion as a knowledge base data source. Get integration credentials at [https://www.notion.so/my-integrations](https://www.notion.so/my-integrations).
| Variable | Default | Description |
| ------------------------- | -------- | ------------------------------------------------------------------------------------------------------------------------------------------------------------------------------------------------------ |
| `NOTION_INTEGRATION_TYPE` | `public` | `public` uses standard OAuth 2.0 (requires HTTPS redirect URL, needs CLIENT\_ID + CLIENT\_SECRET). `internal` uses a direct integration token (works with HTTP). Use `internal` for local deployments. |
| `NOTION_CLIENT_SECRET` | (empty) | OAuth client secret. Required for `public` integration. |
| `NOTION_CLIENT_ID` | (empty) | OAuth client ID. Required for `public` integration. |
| `NOTION_INTERNAL_SECRET` | (empty) | Direct integration token from Notion. Required for `internal` integration. |
### Mail Configuration
Dify sends emails for account invitations, password resets, login codes, and Human Input node notifications. Configure one of the three supported providers. Email links require `CONSOLE_WEB_URL` to be set—see [Common Variables](#console_web_url).
| Variable | Default | Description |
| ------------------------ | -------- | --------------------------------------------------------- |
| `MAIL_TYPE` | `resend` | Mail provider: `resend`, `smtp`, or `sendgrid`. |
| `MAIL_DEFAULT_SEND_FROM` | (empty) | Default "From" address for all outgoing emails. Required. |
| Variable | Default | Description |
| ---------------- | ------------------------ | -------------------------------------------------------------- |
| `RESEND_API_URL` | `https://api.resend.com` | Resend API endpoint. Override for self-hosted Resend or proxy. |
| `RESEND_API_KEY` | (empty) | Resend API key. Required when `MAIL_TYPE=resend`. |
Three TLS modes: implicit TLS (`SMTP_USE_TLS=true`, `SMTP_OPPORTUNISTIC_TLS=false`, port 465), STARTTLS (`SMTP_USE_TLS=true`, `SMTP_OPPORTUNISTIC_TLS=true`, port 587), or plain (`SMTP_USE_TLS=false`, port 25).
| Variable | Default | Description |
| ------------------------ | ------- | ------------------------------------------------------------------------------------------------------------------------------------------------------------------------------------------------------------------ |
| `SMTP_SERVER` | (empty) | SMTP server address. |
| `SMTP_PORT` | `465` | SMTP server port. Use `587` for STARTTLS mode. |
| `SMTP_USERNAME` | (empty) | SMTP username. Can be empty for IP-whitelisted servers. |
| `SMTP_PASSWORD` | (empty) | SMTP password. Can be empty for IP-whitelisted servers. |
| `SMTP_USE_TLS` | `true` | Enable TLS. When `true` with `SMTP_OPPORTUNISTIC_TLS=false`, uses implicit TLS (`SMTP_SSL`). |
| `SMTP_OPPORTUNISTIC_TLS` | `false` | Use STARTTLS (explicit TLS) instead of implicit TLS. Must be used with `SMTP_USE_TLS=true`. |
| `SMTP_LOCAL_HOSTNAME` | (empty) | Override the hostname sent in SMTP HELO/EHLO. Required in Docker when your SMTP server rejects container hostnames (common with Google Workspace, Microsoft 365). Set to your domain, e.g., `mail.yourdomain.com`. |
| Variable | Default | Description |
| ------------------ | ------- | ----------------------------------------------------- |
| `SENDGRID_API_KEY` | (empty) | SendGrid API key. Required when `MAIL_TYPE=sendgrid`. |
For more details, see the [SendGrid documentation](https://www.twilio.com/docs/sendgrid/for-developers/sending-email/api-getting-started).
### Others Configuration
#### Indexing
| Variable | Default | Description |
| ----------------------------------------- | ------- | ---------------------------------------------------------------------------------------------------------------------------------------------------------------------------- |
| `INDEXING_MAX_SEGMENTATION_TOKENS_LENGTH` | `4000` | Maximum token length per text segment when chunking documents for the knowledge base. Larger values retain more context per chunk; smaller values provide finer granularity. |
#### Token & Invitation
All token expiry variables control how long a one-time-use token stored in Redis remains valid. After expiry, the user must request a new token.
| Variable | Default | Description |
| ------------------------------------- | ------- | ------------------------------------------------------------ |
| `INVITE_EXPIRY_HOURS` | `72` | How long a workspace invitation link stays valid (in hours). |
| `RESET_PASSWORD_TOKEN_EXPIRY_MINUTES` | `5` | Password reset token validity in minutes. |
| `EMAIL_REGISTER_TOKEN_EXPIRY_MINUTES` | `5` | Email registration token validity in minutes. |
| `CHANGE_EMAIL_TOKEN_EXPIRY_MINUTES` | `5` | Change email token validity in minutes. |
| `OWNER_TRANSFER_TOKEN_EXPIRY_MINUTES` | `5` | Workspace owner transfer token validity in minutes. |
#### Code Execution Sandbox
The sandbox is a separate service that runs Python, JavaScript, and Jinja2 code nodes in isolation.
| Variable | Default | Description |
| ----------------------------------------------- | ---------------------- | ------------------------------------------------------------------------------------------------------- |
| `CODE_EXECUTION_ENDPOINT` | `http://sandbox:8194` | Sandbox service endpoint. |
| `CODE_EXECUTION_API_KEY` | `dify-sandbox` | API key for sandbox authentication. Must match `SANDBOX_API_KEY` in the sandbox service. |
| `CODE_EXECUTION_SSL_VERIFY` | `true` | Verify SSL for sandbox connections. Disable for development with self-signed certificates. |
| `CODE_EXECUTION_CONNECT_TIMEOUT` | `10` | Connection timeout in seconds. |
| `CODE_EXECUTION_READ_TIMEOUT` | `60` | Read timeout in seconds. |
| `CODE_EXECUTION_WRITE_TIMEOUT` | `10` | Write timeout in seconds. |
| `CODE_EXECUTION_POOL_MAX_CONNECTIONS` | `100` | Maximum concurrent HTTP connections to the sandbox service. |
| `CODE_EXECUTION_POOL_MAX_KEEPALIVE_CONNECTIONS` | `20` | Maximum idle connections kept alive in the sandbox connection pool. |
| `CODE_EXECUTION_POOL_KEEPALIVE_EXPIRY` | `5.0` | Seconds before idle sandbox connections are closed. |
| `CODE_MAX_NUMBER` | `9223372036854775807` | Maximum numeric value allowed in code node output (max 64-bit signed integer). |
| `CODE_MIN_NUMBER` | `-9223372036854775808` | Minimum numeric value allowed in code node output (min 64-bit signed integer). |
| `CODE_MAX_STRING_LENGTH` | `400000` | Maximum string length in code node output. Prevents memory exhaustion from unbounded string generation. |
| `CODE_MAX_DEPTH` | `5` | Maximum nesting depth for output data structures. |
| `CODE_MAX_PRECISION` | `20` | Maximum decimal places for floating-point numbers in output. |
| `CODE_MAX_STRING_ARRAY_LENGTH` | `30` | Maximum number of elements in a string array output. |
| `CODE_MAX_OBJECT_ARRAY_LENGTH` | `30` | Maximum number of elements in an object array output. |
| `CODE_MAX_NUMBER_ARRAY_LENGTH` | `1000` | Maximum number of elements in a number array output. |
| `TEMPLATE_TRANSFORM_MAX_LENGTH` | `400000` | Maximum character length for Template Transform node output. |
#### Workflow Runtime
| Variable | Default | Description |
| --------------------------------- | -------- | ------------------------------------------------------------------------------------------------------------------------------------------------------------ |
| `WORKFLOW_MAX_EXECUTION_STEPS` | `500` | Maximum number of node executions per workflow run. Exceeding this terminates the workflow. |
| `WORKFLOW_MAX_EXECUTION_TIME` | `1200` | Maximum wall-clock time in seconds per workflow run. Exceeding this terminates the workflow. |
| `WORKFLOW_CALL_MAX_DEPTH` | `5` | Maximum depth for nested workflow-calls-workflow. Prevents infinite recursion. |
| `MAX_VARIABLE_SIZE` | `204800` | Maximum size in bytes (200 KB) for a single workflow variable. |
| `WORKFLOW_FILE_UPLOAD_LIMIT` | `10` | Maximum number of files that can be uploaded in a single workflow execution. |
| `WORKFLOW_NODE_EXECUTION_STORAGE` | `rdbms` | Where workflow node execution records are stored. `rdbms` stores everything in the database. `hybrid` stores new data in object storage and reads from both. |
| `DSL_EXPORT_ENCRYPT_DATASET_ID` | `true` | Encrypt dataset IDs when exporting DSL files. Set to `false` to export plain IDs for easier cross-environment import. |
#### Workflow Storage Repository
These select which backend implementation handles workflow execution data. The default `SQLAlchemy` repositories store everything in the database. Alternative implementations (e.g., Celery, Logstore) can be used for different storage strategies.
| Variable | Default | Description |
| ----------------------------------------- | ----------------------------------------------------------------------------------------------------------------- | -------------------------------------------------------------------- |
| `CORE_WORKFLOW_EXECUTION_REPOSITORY` | `core.repositories.sqlalchemy_workflow_execution_repository.SQLAlchemyWorkflowExecutionRepository` | Repository implementation for workflow execution records. |
| `CORE_WORKFLOW_NODE_EXECUTION_REPOSITORY` | `core.repositories.sqlalchemy_workflow_node_execution_repository.SQLAlchemyWorkflowNodeExecutionRepository` | Repository implementation for workflow node execution records. |
| `API_WORKFLOW_RUN_REPOSITORY` | `repositories.sqlalchemy_api_workflow_run_repository.DifyAPISQLAlchemyWorkflowRunRepository` | Service-layer repository for workflow run API operations. |
| `API_WORKFLOW_NODE_EXECUTION_REPOSITORY` | `repositories.sqlalchemy_api_workflow_node_execution_repository.DifyAPISQLAlchemyWorkflowNodeExecutionRepository` | Service-layer repository for workflow node execution API operations. |
| `LOOP_NODE_MAX_COUNT` | `100` | Maximum iterations for Loop nodes. Prevents infinite loops. |
| `MAX_PARALLEL_LIMIT` | `10` | Maximum number of parallel branches in a workflow. |
#### GraphEngine Worker Pool
| Variable | Default | Description |
| ----------------------------------- | ------- | ------------------------------------------------------- |
| `GRAPH_ENGINE_MIN_WORKERS` | `1` | Minimum workers per GraphEngine instance. |
| `GRAPH_ENGINE_MAX_WORKERS` | `10` | Maximum workers per GraphEngine instance. |
| `GRAPH_ENGINE_SCALE_UP_THRESHOLD` | `3` | Queue depth that triggers spawning additional workers. |
| `GRAPH_ENGINE_SCALE_DOWN_IDLE_TIME` | `5.0` | Seconds of idle time before excess workers are removed. |
#### Workflow Log Cleanup
| Variable | Default | Description |
| -------------------------------------------- | ------- | ---------------------------------------------------------------------------------------------------- |
| `WORKFLOW_LOG_CLEANUP_ENABLED` | `false` | Enable automatic cleanup of workflow execution logs at 2:00 AM daily. |
| `WORKFLOW_LOG_RETENTION_DAYS` | `30` | Number of days to retain workflow logs before cleanup. |
| `WORKFLOW_LOG_CLEANUP_BATCH_SIZE` | `100` | Number of log entries processed per cleanup batch. Adjust based on system performance. |
| `WORKFLOW_LOG_CLEANUP_SPECIFIC_WORKFLOW_IDS` | (empty) | Comma-separated list of workflow IDs to limit cleanup to. When empty, all workflow logs are cleaned. |
#### HTTP Request Node
These configure the HTTP Request node used in workflows to call external APIs.
| Variable | Default | Description |
| ----------------------------------- | ---------- | ---------------------------------------------------------------------------------------------------------------- |
| `HTTP_REQUEST_NODE_MAX_TEXT_SIZE` | `1048576` | Maximum text response size in bytes (1 MB). Responses larger than this are truncated. |
| `HTTP_REQUEST_NODE_MAX_BINARY_SIZE` | `10485760` | Maximum binary response size in bytes (10 MB). |
| `HTTP_REQUEST_NODE_SSL_VERIFY` | `true` | Verify SSL certificates. Disable for testing with self-signed certificates. |
| `HTTP_REQUEST_MAX_CONNECT_TIMEOUT` | `10` | Maximum connect timeout users can set in the workflow editor (in seconds). Per-node timeouts cannot exceed this. |
| `HTTP_REQUEST_MAX_READ_TIMEOUT` | `600` | Maximum read timeout ceiling (in seconds). |
| `HTTP_REQUEST_MAX_WRITE_TIMEOUT` | `600` | Maximum write timeout ceiling (in seconds). |
#### Webhook
| Variable | Default | Description |
| ------------------------------- | ---------- | --------------------------------------------------------------------------------------------- |
| `WEBHOOK_REQUEST_BODY_MAX_SIZE` | `10485760` | Maximum webhook payload size in bytes (10 MB). Larger payloads are rejected with a 413 error. |
#### SSRF Protection
All outbound HTTP requests from Dify (HTTP nodes, image downloads, etc.) are routed through a proxy that blocks requests to internal/private IP ranges, preventing Server-Side Request Forgery (SSRF) attacks.
| Variable | Default | Description |
| ------------------------------------- | ------------------------ | ---------------------------------------------------------------------------------------------------------------------------------------------- |
| `SSRF_PROXY_HTTP_URL` | `http://ssrf_proxy:3128` | SSRF proxy URL for HTTP requests. |
| `SSRF_PROXY_HTTPS_URL` | `http://ssrf_proxy:3128` | SSRF proxy URL for HTTPS requests. |
| `SSRF_POOL_MAX_CONNECTIONS` | `100` | Maximum concurrent connections in the SSRF HTTP client pool. |
| `SSRF_POOL_MAX_KEEPALIVE_CONNECTIONS` | `20` | Maximum idle connections kept alive in the SSRF pool. |
| `SSRF_POOL_KEEPALIVE_EXPIRY` | `5.0` | Seconds before idle SSRF connections are closed. |
| `RESPECT_XFORWARD_HEADERS_ENABLED` | `false` | Trust X-Forwarded-For/Proto/Port headers from reverse proxies. Only enable behind a single trusted reverse proxy—otherwise allows IP spoofing. |
#### Agent Configuration
| Variable | Default | Description |
| -------------------- | ------- | -------------------------------------------------------------------------------- |
| `MAX_TOOLS_NUM` | `10` | Maximum number of tools an agent can use simultaneously. |
| `MAX_ITERATIONS_NUM` | `99` | Maximum reasoning iterations per agent execution. Prevents infinite agent loops. |
## Web Frontend Service
These variables are used by the Next.js web frontend container only—they do not affect the Python backend.
| Variable | Default | Description |
| ---------------------------- | ------- | -------------------------------------------------------------------------------------------------------------------- |
| `TEXT_GENERATION_TIMEOUT_MS` | `60000` | Frontend timeout for streaming text generation UI. If a stream stalls for longer than this, the UI pauses rendering. |
| `ALLOW_UNSAFE_DATA_SCHEME` | `false` | Allow rendering URLs with the `data:` scheme. Disabled by default for security. |
| `MAX_TREE_DEPTH` | `50` | Maximum node tree depth in the workflow editor UI. |
## Database Service
These configure the database containers directly in Docker Compose.
| Variable | Default | Description |
| ------------------- | --------------------------------- | ----------------------------------------------- |
| `PGDATA` | `/var/lib/postgresql/data/pgdata` | PostgreSQL data directory inside the container. |
| `MYSQL_HOST_VOLUME` | `./volumes/mysql/data` | Host path mounted as MySQL data volume. |
## Sandbox Service
The sandbox is an isolated service for executing code nodes (Python, JavaScript, Jinja2). Network access can be disabled for security.
| Variable | Default | Description |
| ------------------------ | ------------------------ | ---------------------------------------------------------------------------------------------------------- |
| `SANDBOX_API_KEY` | `dify-sandbox` | API key for sandbox authentication. Must match `CODE_EXECUTION_API_KEY` in the API service. |
| `SANDBOX_GIN_MODE` | `release` | Sandbox service mode: `release` or `debug`. |
| `SANDBOX_WORKER_TIMEOUT` | `15` | Maximum execution time in seconds for a single code run. |
| `SANDBOX_ENABLE_NETWORK` | `true` | Allow code to make outbound HTTP requests. Disable to prevent code nodes from accessing external services. |
| `SANDBOX_HTTP_PROXY` | `http://ssrf_proxy:3128` | HTTP proxy for SSRF protection when network is enabled. |
| `SANDBOX_HTTPS_PROXY` | `http://ssrf_proxy:3128` | HTTPS proxy for SSRF protection. |
| `SANDBOX_PORT` | `8194` | Sandbox service port. |
## Nginx Reverse Proxy
| Variable | Default | Description |
| -------------------------------- | ----------------- | ------------------------------------------------------------------------------------------------------------------------- |
| `NGINX_SERVER_NAME` | `_` | Nginx server name. `_` matches any hostname. |
| `NGINX_HTTPS_ENABLED` | `false` | Enable HTTPS. When `true`, place your SSL certificate and key in `./nginx/ssl/`. |
| `NGINX_PORT` | `80` | HTTP port. |
| `NGINX_SSL_PORT` | `443` | HTTPS port (only used when `NGINX_HTTPS_ENABLED=true`). |
| `NGINX_SSL_CERT_FILENAME` | `dify.crt` | SSL certificate filename in `./nginx/ssl/`. |
| `NGINX_SSL_CERT_KEY_FILENAME` | `dify.key` | SSL private key filename in `./nginx/ssl/`. |
| `NGINX_SSL_PROTOCOLS` | `TLSv1.2 TLSv1.3` | Allowed TLS protocol versions. |
| `NGINX_WORKER_PROCESSES` | `auto` | Number of Nginx worker processes. `auto` matches CPU core count. |
| `NGINX_CLIENT_MAX_BODY_SIZE` | `100M` | Maximum request body size. Affects file upload limits at the proxy level. |
| `NGINX_KEEPALIVE_TIMEOUT` | `65` | Keepalive timeout in seconds. |
| `NGINX_PROXY_READ_TIMEOUT` | `3600s` | Proxy read timeout. Set high (1 hour) to support long-running SSE streams. |
| `NGINX_PROXY_SEND_TIMEOUT` | `3600s` | Proxy send timeout. |
| `NGINX_ENABLE_CERTBOT_CHALLENGE` | `false` | Accept Let's Encrypt ACME challenge requests at `/.well-known/acme-challenge/`. Enable for automated certificate renewal. |
After enabling HTTPS, also update the URL variables in [Common Variables](#common-variables) (e.g., `CONSOLE_API_URL`, `CONSOLE_WEB_URL`) to use `https://`.
#### Certbot Configuration
| Variable | Default | Description |
| ----------------- | ------- | ---------------------------------------------------------------------- |
| `CERTBOT_EMAIL` | (empty) | Email address required by Let's Encrypt for certificate notifications. |
| `CERTBOT_DOMAIN` | (empty) | Domain name for the SSL certificate. |
| `CERTBOT_OPTIONS` | (empty) | Additional certbot CLI options (e.g., `--force-renewal`, `--dry-run`). |
## SSRF Proxy
These configure the Squid-based SSRF proxy container that blocks requests to internal/private networks.
| Variable | Default | Description |
| ------------------------------- | ------------------ | -------------------------------------------------------- |
| `SSRF_HTTP_PORT` | `3128` | Proxy listening port. |
| `SSRF_COREDUMP_DIR` | `/var/spool/squid` | Core dump directory. |
| `SSRF_REVERSE_PROXY_PORT` | `8194` | Reverse proxy port forwarded to the sandbox service. |
| `SSRF_SANDBOX_HOST` | `sandbox` | Hostname of the sandbox service. |
| `SSRF_DEFAULT_TIME_OUT` | `5` | Default overall timeout in seconds for proxied requests. |
| `SSRF_DEFAULT_CONNECT_TIME_OUT` | `5` | Default connection timeout in seconds. |
| `SSRF_DEFAULT_READ_TIME_OUT` | `5` | Default read timeout in seconds. |
| `SSRF_DEFAULT_WRITE_TIME_OUT` | `5` | Default write timeout in seconds. |
## Docker Compose
| Variable | Default | Description |
| ----------------------- | -------------------------------------------------- | --------------------------------------------------------------------------------------------------------------------------------------------------------------------------------- |
| `COMPOSE_PROFILES` | `${VECTOR_STORE:-weaviate},${DB_TYPE:-postgresql}` | Automatically selects which service containers to start based on your database and vector store choices. For example, setting `DB_TYPE=mysql` starts MySQL instead of PostgreSQL. |
| `EXPOSE_NGINX_PORT` | `80` | Host port mapped to Nginx HTTP. |
| `EXPOSE_NGINX_SSL_PORT` | `443` | Host port mapped to Nginx HTTPS. |
## ModelProvider & Tool Position Configuration
Customize which tools and model providers are available in the app interface and their display order. Use comma-separated values with no spaces between items.
| Variable | Default | Description |
| ---------------------------- | ------- | --------------------------------------------------------------------- |
| `POSITION_TOOL_PINS` | (empty) | Pin specific tools to the top of the list. Example: `bing,google`. |
| `POSITION_TOOL_INCLUDES` | (empty) | Only show listed tools. If unset, all tools are available. |
| `POSITION_TOOL_EXCLUDES` | (empty) | Hide specific tools (pinned tools are not affected). |
| `POSITION_PROVIDER_PINS` | (empty) | Pin specific model providers to the top. Example: `openai,anthropic`. |
| `POSITION_PROVIDER_INCLUDES` | (empty) | Only show listed providers. If unset, all providers are available. |
| `POSITION_PROVIDER_EXCLUDES` | (empty) | Hide specific providers (pinned providers are not affected). |
## Plugin Daemon Configuration
The plugin daemon is a separate service that manages plugin lifecycle (installation, execution, upgrades). The API communicates with it via HTTP.
| Variable | Default | Description |
| ------------------------------- | ----------------------------- | -------------------------------------------------------------------------------------------------------------------------------------------- |
| `PLUGIN_DAEMON_URL` | `http://plugin_daemon:5002` | Plugin daemon service URL. |
| `PLUGIN_DAEMON_KEY` | (auto-generated) | Authentication key for the plugin daemon. |
| `PLUGIN_DAEMON_PORT` | `5002` | Plugin daemon listening port. |
| `PLUGIN_DAEMON_TIMEOUT` | `600.0` | Timeout in seconds for all plugin daemon requests (installation, execution, listing). |
| `PLUGIN_MAX_PACKAGE_SIZE` | `52428800` | Maximum plugin package size in bytes (50 MB). Validated during marketplace downloads. |
| `PLUGIN_MODEL_SCHEMA_CACHE_TTL` | `3600` | How long to cache plugin model schemas in seconds. Reduces repeated lookups. |
| `PLUGIN_DIFY_INNER_API_KEY` | (auto-generated) | API key the plugin daemon uses to call back to the Dify API. Must match `DIFY_INNER_API_KEY` in the plugin daemon service config. |
| `PLUGIN_DIFY_INNER_API_URL` | `http://api:5001` | Internal API URL the plugin daemon calls back to. |
| `PLUGIN_DEBUGGING_HOST` | `0.0.0.0` | Host for plugin remote debugging connections. |
| `PLUGIN_DEBUGGING_PORT` | `5003` | Port for plugin remote debugging connections. |
| `MARKETPLACE_ENABLED` | `true` | Enable the plugin marketplace. When disabled, only locally installed plugins are available—browsing and auto-upgrades are unavailable. |
| `MARKETPLACE_API_URL` | `https://marketplace.dify.ai` | Marketplace API endpoint for plugin browsing, downloading, and upgrade checking. |
| `FORCE_VERIFYING_SIGNATURE` | `true` | Require valid signatures before installing plugins. Prevents installing tampered or unsigned packages. |
| `PLUGIN_MAX_EXECUTION_TIMEOUT` | `600` | Plugin execution timeout in seconds (plugin daemon side). Should match `PLUGIN_DAEMON_TIMEOUT` on the API side. |
| `PIP_MIRROR_URL` | (empty) | Custom PyPI mirror URL used by the plugin daemon when installing plugin dependencies. Useful for faster installs or air-gapped environments. |
## OTLP / OpenTelemetry Configuration
OpenTelemetry provides distributed tracing and metrics collection. When enabled, Dify instruments Flask and exports telemetry data to an OTLP collector.
| Variable | Default | Description |
| ---------------------------------- | ----------------------- | ---------------------------------------------------------------------------------------------------------------- |
| `ENABLE_OTEL` | `false` | Master switch for OpenTelemetry instrumentation. |
| `OTLP_TRACE_ENDPOINT` | (empty) | Dedicated trace endpoint URL. If unset, falls back to `{OTLP_BASE_ENDPOINT}/v1/traces`. |
| `OTLP_METRIC_ENDPOINT` | (empty) | Dedicated metric endpoint URL. If unset, falls back to `{OTLP_BASE_ENDPOINT}/v1/metrics`. |
| `OTLP_BASE_ENDPOINT` | `http://localhost:4318` | Base OTLP collector URL. Used as fallback when specific trace/metric endpoints are not set. |
| `OTLP_API_KEY` | (empty) | API key for OTLP authentication. Sent as `Authorization: Bearer` header. |
| `OTEL_EXPORTER_TYPE` | `otlp` | Exporter type. `otlp` exports to a collector; other values use a console exporter (for debugging). |
| `OTEL_EXPORTER_OTLP_PROTOCOL` | (empty) | Protocol for OTLP export. `grpc` uses gRPC exporters; anything else uses HTTP. |
| `OTEL_SAMPLING_RATE` | `0.1` | Fraction of requests to trace (0.1 = 10%). Lower values reduce overhead in high-traffic production environments. |
| `OTEL_BATCH_EXPORT_SCHEDULE_DELAY` | `5000` | Delay in milliseconds between batch exports. |
| `OTEL_MAX_QUEUE_SIZE` | `2048` | Maximum number of spans queued before dropping. |
| `OTEL_MAX_EXPORT_BATCH_SIZE` | `512` | Maximum spans per export batch. |
| `OTEL_METRIC_EXPORT_INTERVAL` | `60000` | Metric export interval in milliseconds. |
| `OTEL_BATCH_EXPORT_TIMEOUT` | `10000` | Batch span export timeout in milliseconds. |
| `OTEL_METRIC_EXPORT_TIMEOUT` | `30000` | Metric export timeout in milliseconds. |
## Miscellaneous
| Variable | Default | Description |
| ---------------------------------- | ------------------ | -------------------------------------------------------------------------------------------------------------------------------------------- |
| `CSP_WHITELIST` | (empty) | Additional domains to allow in Content Security Policy headers. |
| `ALLOW_EMBED` | `false` | Allow Dify pages to be embedded in iframes. When `false`, sets `X-Frame-Options: DENY` to prevent clickjacking. |
| `SWAGGER_UI_ENABLED` | `false` | Expose Swagger UI at `SWAGGER_UI_PATH` for browsing API documentation. Swagger endpoints bypass authentication. |
| `SWAGGER_UI_PATH` | `/swagger-ui.html` | URL path for Swagger UI. |
| `MAX_SUBMIT_COUNT` | `100` | Maximum concurrent task submissions in the thread pool used for parallel workflow node execution. |
| `TENANT_ISOLATED_TASK_CONCURRENCY` | `1` | Number of document indexing or RAG pipeline tasks processed simultaneously per tenant. Increase for faster indexing with more database load. |
### Scheduled Tasks Configuration
Dify uses Celery Beat to run background maintenance tasks on configurable schedules.
| Variable | Default | Description |
| ------------------------------------------- | ------- | ---------------------------------------------------------------------------------------------------------------------------------------- |
| `ENABLE_CLEAN_EMBEDDING_CACHE_TASK` | `false` | Delete expired embedding cache records from the database at 2:00 AM daily. Manages database size. |
| `ENABLE_CLEAN_UNUSED_DATASETS_TASK` | `false` | Disable documents in knowledge bases that haven't had activity within the retention period. Runs at 3:00 AM daily. |
| `ENABLE_CLEAN_MESSAGES` | `false` | Delete conversation messages older than the retention period at 4:00 AM daily. |
| `ENABLE_MAIL_CLEAN_DOCUMENT_NOTIFY_TASK` | `false` | Email workspace owners a list of knowledge bases that had documents auto-disabled by the cleanup task. Runs every Monday at 10:00 AM. |
| `ENABLE_DATASETS_QUEUE_MONITOR` | `false` | Monitor the dataset processing queue backlog in Redis. Sends email alerts when the queue exceeds the threshold. |
| `QUEUE_MONITOR_INTERVAL` | `30` | How often to check the queue (in minutes). |
| `QUEUE_MONITOR_THRESHOLD` | `200` | Queue size that triggers an alert email. |
| `QUEUE_MONITOR_ALERT_EMAILS` | (empty) | Email addresses to receive queue alerts (comma-separated). |
| `ENABLE_CHECK_UPGRADABLE_PLUGIN_TASK` | `true` | Check the marketplace for newer plugin versions every 15 minutes. Dispatches upgrade tasks based on each tenant's auto-upgrade schedule. |
| `ENABLE_WORKFLOW_SCHEDULE_POLLER_TASK` | `true` | Enable the workflow schedule poller that checks for and triggers scheduled workflow runs. |
| `WORKFLOW_SCHEDULE_POLLER_INTERVAL` | `1` | How often to check for due scheduled workflows (in minutes). |
| `WORKFLOW_SCHEDULE_POLLER_BATCH_SIZE` | `100` | Maximum number of due schedules fetched per poll cycle. |
| `WORKFLOW_SCHEDULE_MAX_DISPATCH_PER_TICK` | `0` | Circuit breaker: maximum schedules dispatched per tick. `0` means unlimited. |
| `ENABLE_WORKFLOW_RUN_CLEANUP_TASK` | `false` | Enable automatic cleanup of workflow run records. |
| `ENABLE_CREATE_TIDB_SERVERLESS_TASK` | `false` | Pre-create TiDB Serverless clusters for vector database pooling. |
| `ENABLE_UPDATE_TIDB_SERVERLESS_STATUS_TASK` | `false` | Update TiDB Serverless cluster status periodically. |
| `ENABLE_HUMAN_INPUT_TIMEOUT_TASK` | `true` | Check for expired Human Input forms and resume or stop timed-out workflows. |
| `HUMAN_INPUT_TIMEOUT_TASK_INTERVAL` | `1` | How often to check for expired Human Input forms (in minutes). |
#### Record Retention & Cleanup
These control how old records are cleaned up. When `BILLING_ENABLED` is active, cleanup targets sandbox-tier tenants with a grace period. When billing is disabled (self-hosted), cleanup applies to all records within the retention window.
| Variable | Default | Description |
| -------------------------------------------------- | ------- | ----------------------------------------------------------------------------------------------------- |
| `SANDBOX_EXPIRED_RECORDS_RETENTION_DAYS` | `30` | Records older than this many days are eligible for deletion. |
| `SANDBOX_EXPIRED_RECORDS_CLEAN_GRACEFUL_PERIOD` | `21` | Grace period in days after subscription expiration before records are deleted (billing-enabled only). |
| `SANDBOX_EXPIRED_RECORDS_CLEAN_BATCH_SIZE` | `1000` | Number of records processed per cleanup batch. |
| `SANDBOX_EXPIRED_RECORDS_CLEAN_BATCH_MAX_INTERVAL` | `200` | Maximum random delay in milliseconds between cleanup batches to reduce database load. |
| `SANDBOX_EXPIRED_RECORDS_CLEAN_TASK_LOCK_TTL` | `90000` | Redis lock TTL in seconds (\~25 hours) to prevent concurrent cleanup task execution. |
## Aliyun SLS Logstore Configuration
Optional integration with Aliyun Simple Log Service for storing workflow execution logs externally instead of in the database. Enable by setting the repository configuration variables to use logstore implementations.
| Variable | Default | Description |
| --------------------------------- | ------- | ------------------------------------------------------------------------------------------------------------------------------ |
| `ALIYUN_SLS_ACCESS_KEY_ID` | (empty) | Aliyun access key ID for SLS authentication. |
| `ALIYUN_SLS_ACCESS_KEY_SECRET` | (empty) | Aliyun access key secret for SLS authentication. |
| `ALIYUN_SLS_ENDPOINT` | (empty) | SLS service endpoint URL (e.g., `cn-hangzhou.log.aliyuncs.com`). |
| `ALIYUN_SLS_REGION` | (empty) | Aliyun region (e.g., `cn-hangzhou`). |
| `ALIYUN_SLS_PROJECT_NAME` | (empty) | SLS project name for storing workflow logs. |
| `ALIYUN_SLS_LOGSTORE_TTL` | `365` | Data retention in days for SLS logstores. Use `3650` for permanent storage. |
| `LOGSTORE_DUAL_WRITE_ENABLED` | `false` | Write workflow data to both SLS and PostgreSQL simultaneously. Useful during migration to SLS. |
| `LOGSTORE_DUAL_READ_ENABLED` | `true` | Fall back to PostgreSQL when SLS returns no results. Useful during migration when historical data exists only in the database. |
| `LOGSTORE_ENABLE_PUT_GRAPH_FIELD` | `true` | Include the full workflow graph definition in SLS logs. Set to `false` to reduce storage by omitting large graph data. |
## Event Bus Configuration
Redis-based event transport between API and Celery workers.
| Variable | Default | Description |
| ------------------------------ | -------- | --------------------------------------------------------------------------------------------------------------------------------------------- |
| `EVENT_BUS_REDIS_URL` | (empty) | Redis connection URL for event streaming. When empty, uses the main Redis connection settings. |
| `EVENT_BUS_REDIS_CHANNEL_TYPE` | `pubsub` | Transport type: `pubsub` (Pub/Sub, at-most-once delivery), `sharded` (sharded Pub/Sub), or `streams` (Redis Streams, at-least-once delivery). |
| `EVENT_BUS_REDIS_USE_CLUSTERS` | `false` | Enable Redis Cluster mode for event bus. Recommended for large deployments. |
## Vector Database Service Configuration
These configure the vector database containers themselves (not the Dify client connection). Only the variables for your chosen `VECTOR_STORE` are relevant.
| Variable | Default | Description |
| -------------------------------------------------- | ------------------- | --------------------------------------------------------------------- |
| `WEAVIATE_PERSISTENCE_DATA_PATH` | `/var/lib/weaviate` | Data persistence directory inside the container. |
| `WEAVIATE_QUERY_DEFAULTS_LIMIT` | `25` | Default query result limit. |
| `WEAVIATE_AUTHENTICATION_ANONYMOUS_ACCESS_ENABLED` | `true` | Allow anonymous access. |
| `WEAVIATE_DEFAULT_VECTORIZER_MODULE` | `none` | Default vectorizer module. |
| `WEAVIATE_CLUSTER_HOSTNAME` | `node1` | Cluster node hostname. |
| `WEAVIATE_AUTHENTICATION_APIKEY_ENABLED` | `true` | Enable API key authentication. |
| `WEAVIATE_AUTHENTICATION_APIKEY_ALLOWED_KEYS` | (auto-generated) | Allowed API keys. Must match `WEAVIATE_API_KEY` in the client config. |
| `WEAVIATE_AUTHENTICATION_APIKEY_USERS` | `hello@dify.ai` | Users associated with API keys. |
| `WEAVIATE_AUTHORIZATION_ADMINLIST_ENABLED` | `true` | Enable admin list authorization. |
| `WEAVIATE_AUTHORIZATION_ADMINLIST_USERS` | `hello@dify.ai` | Admin users. |
| `WEAVIATE_DISABLE_TELEMETRY` | `false` | Disable Weaviate telemetry. |
| `WEAVIATE_ENABLE_TOKENIZER_GSE` | `false` | Enable GSE tokenizer (Chinese). |
| `WEAVIATE_ENABLE_TOKENIZER_KAGOME_JA` | `false` | Enable Kagome tokenizer (Japanese). |
| `WEAVIATE_ENABLE_TOKENIZER_KAGOME_KR` | `false` | Enable Kagome tokenizer (Korean). |
| Variable | Default | Description |
| -------------------------------- | ------------ | ------------------------------------------------- |
| `ETCD_AUTO_COMPACTION_MODE` | `revision` | ETCD auto compaction mode. |
| `ETCD_AUTO_COMPACTION_RETENTION` | `1000` | Auto compaction retention in number of revisions. |
| `ETCD_QUOTA_BACKEND_BYTES` | `4294967296` | Backend quota in bytes (4 GB). |
| `ETCD_SNAPSHOT_COUNT` | `50000` | Number of changes before triggering a snapshot. |
| `ETCD_ENDPOINTS` | `etcd:2379` | ETCD service endpoints. |
| `MINIO_ACCESS_KEY` | `minioadmin` | MinIO access key. |
| `MINIO_SECRET_KEY` | `minioadmin` | MinIO secret key. |
| `MINIO_ADDRESS` | `minio:9000` | MinIO service address. |
| `MILVUS_AUTHORIZATION_ENABLED` | `true` | Enable Milvus security authorization. |
| Variable | Default | Description |
| ----------------------------------- | ----------------- | -------------------------------------------------- |
| `OPENSEARCH_DISCOVERY_TYPE` | `single-node` | Discovery type for cluster formation. |
| `OPENSEARCH_BOOTSTRAP_MEMORY_LOCK` | `true` | Lock memory on startup to prevent swapping. |
| `OPENSEARCH_JAVA_OPTS_MIN` | `512m` | Minimum JVM heap size. |
| `OPENSEARCH_JAVA_OPTS_MAX` | `1024m` | Maximum JVM heap size. |
| `OPENSEARCH_INITIAL_ADMIN_PASSWORD` | `Qazwsxedc!@#123` | Initial admin password for the OpenSearch service. |
| `OPENSEARCH_MEMLOCK_SOFT` | `-1` | Soft memory lock limit (`-1` = unlimited). |
| `OPENSEARCH_MEMLOCK_HARD` | `-1` | Hard memory lock limit (`-1` = unlimited). |
| `OPENSEARCH_NOFILE_SOFT` | `65536` | Soft file descriptor limit. |
| `OPENSEARCH_NOFILE_HARD` | `65536` | Hard file descriptor limit. |
| Variable | Default | Description |
| ---------------------------- | --------------------------------- | ----------------------------------------------- |
| `PGVECTOR_PGUSER` | `postgres` | PostgreSQL user for the PGVector container. |
| `PGVECTOR_POSTGRES_PASSWORD` | (auto-generated) | PostgreSQL password for the PGVector container. |
| `PGVECTOR_POSTGRES_DB` | `dify` | Database name in the PGVector container. |
| `PGVECTOR_PGDATA` | `/var/lib/postgresql/data/pgdata` | Data directory inside the container. |
| `PGVECTOR_PG_BIGM_VERSION` | `1.2-20240606` | Version of the pg\_bigm extension. |
| Variable | Default | Description |
| --------------------------------- | ------------------------------------------------------------- | ----------------------------------------------------------- |
| `ORACLE_PWD` | `Dify123456` | Oracle database password for the container. |
| `ORACLE_CHARACTERSET` | `AL32UTF8` | Oracle character set. |
| `CHROMA_SERVER_AUTHN_CREDENTIALS` | (auto-generated) | Authentication credentials for the Chroma server container. |
| `CHROMA_SERVER_AUTHN_PROVIDER` | `chromadb.auth.token_authn.TokenAuthenticationServerProvider` | Authentication provider for the Chroma server. |
| `CHROMA_IS_PERSISTENT` | `TRUE` | Enable persistent storage for Chroma. |
| `KIBANA_PORT` | `5601` | Kibana port (Elasticsearch UI). |
| Variable | Default | Description |
| ---------------------- | ------------- | --------------------------------------- |
| `IRIS_WEB_SERVER_PORT` | `52773` | IRIS web server management port. |
| `IRIS_TIMEZONE` | `UTC` | Timezone for the IRIS container. |
| `DB_PLUGIN_DATABASE` | `dify_plugin` | Separate database name for plugin data. |
## Plugin Daemon Storage Configuration
The plugin daemon can store plugin packages in different storage backends. Configure only the provider matching `PLUGIN_STORAGE_TYPE`.
| Variable | Default | Description |
| -------------------------------------- | ------------------------------ | ------------------------------------------------------------------------------------------------------- |
| `PLUGIN_STORAGE_TYPE` | `local` | Plugin storage backend: `local`, `aws_s3`, `tencent_cos`, `azure_blob`, `aliyun_oss`, `volcengine_tos`. |
| `PLUGIN_STORAGE_LOCAL_ROOT` | `/app/storage` | Root directory for local plugin storage. |
| `PLUGIN_WORKING_PATH` | `/app/storage/cwd` | Working directory for plugin execution. |
| `PLUGIN_INSTALLED_PATH` | `plugin` | Subdirectory for installed plugins. |
| `PLUGIN_PACKAGE_CACHE_PATH` | `plugin_packages` | Subdirectory for cached plugin packages. |
| `PLUGIN_MEDIA_CACHE_PATH` | `assets` | Subdirectory for cached media assets. |
| `PLUGIN_STORAGE_OSS_BUCKET` | (empty) | Object storage bucket name (shared across S3/COS/OSS/TOS providers). |
| `PLUGIN_PPROF_ENABLED` | `false` | Enable Go pprof profiling for the plugin daemon. |
| `PLUGIN_PYTHON_ENV_INIT_TIMEOUT` | `120` | Timeout in seconds for initializing Python environments for plugins. |
| `PLUGIN_STDIO_BUFFER_SIZE` | `1024` | Buffer size in bytes for plugin stdio communication. |
| `PLUGIN_STDIO_MAX_BUFFER_SIZE` | `5242880` | Maximum buffer size in bytes (5 MB) for plugin stdio communication. |
| `ENFORCE_LANGGENIUS_PLUGIN_SIGNATURES` | `true` | Enforce signature verification for LangGenius official plugins. |
| `ENDPOINT_URL_TEMPLATE` | `http://localhost/e/{hook_id}` | URL template for plugin endpoints. `{hook_id}` is replaced with the actual hook ID. |
| `EXPOSE_PLUGIN_DAEMON_PORT` | `5002` | Host port mapped to the plugin daemon. |
| `EXPOSE_PLUGIN_DEBUGGING_HOST` | `localhost` | Host for plugin remote debugging. |
| `EXPOSE_PLUGIN_DEBUGGING_PORT` | `5003` | Host port for plugin remote debugging. |
| Variable | Default | Description |
| ------------------------------- | ------- | ---------------------------------------------- |
| `PLUGIN_S3_USE_AWS` | `false` | Use AWS S3 (vs S3-compatible services). |
| `PLUGIN_S3_USE_AWS_MANAGED_IAM` | `false` | Use IAM roles instead of explicit credentials. |
| `PLUGIN_S3_ENDPOINT` | (empty) | S3 endpoint URL. |
| `PLUGIN_S3_USE_PATH_STYLE` | `false` | Use path-style URLs instead of virtual-hosted. |
| `PLUGIN_AWS_ACCESS_KEY` | (empty) | AWS access key. |
| `PLUGIN_AWS_SECRET_KEY` | (empty) | AWS secret key. |
| `PLUGIN_AWS_REGION` | (empty) | AWS region. |
| Variable | Default | Description |
| --------------------------------------------- | ------- | ----------------------------- |
| `PLUGIN_AZURE_BLOB_STORAGE_CONTAINER_NAME` | (empty) | Azure Blob container name. |
| `PLUGIN_AZURE_BLOB_STORAGE_CONNECTION_STRING` | (empty) | Azure Blob connection string. |
| Variable | Default | Description |
| ------------------------------- | ------- | ----------------------- |
| `PLUGIN_TENCENT_COS_SECRET_KEY` | (empty) | Tencent COS secret key. |
| `PLUGIN_TENCENT_COS_SECRET_ID` | (empty) | Tencent COS secret ID. |
| `PLUGIN_TENCENT_COS_REGION` | (empty) | Tencent COS region. |
| Variable | Default | Description |
| ------------------------------------- | ------- | ---------------------------------- |
| `PLUGIN_ALIYUN_OSS_REGION` | (empty) | Aliyun OSS region. |
| `PLUGIN_ALIYUN_OSS_ENDPOINT` | (empty) | Aliyun OSS endpoint. |
| `PLUGIN_ALIYUN_OSS_ACCESS_KEY_ID` | (empty) | Aliyun OSS access key ID. |
| `PLUGIN_ALIYUN_OSS_ACCESS_KEY_SECRET` | (empty) | Aliyun OSS access key secret. |
| `PLUGIN_ALIYUN_OSS_AUTH_VERSION` | `v4` | Aliyun OSS authentication version. |
| `PLUGIN_ALIYUN_OSS_PATH` | (empty) | Aliyun OSS path prefix. |
| Variable | Default | Description |
| ---------------------------------- | ------- | -------------------------- |
| `PLUGIN_VOLCENGINE_TOS_ENDPOINT` | (empty) | Volcengine TOS endpoint. |
| `PLUGIN_VOLCENGINE_TOS_ACCESS_KEY` | (empty) | Volcengine TOS access key. |
| `PLUGIN_VOLCENGINE_TOS_SECRET_KEY` | (empty) | Volcengine TOS secret key. |
| `PLUGIN_VOLCENGINE_TOS_REGION` | (empty) | Volcengine TOS region. |
# Deploy with aaPanel
Source: https://docs.dify.ai/en/self-host/platform-guides/bt-panel
## Prerequisites
> Before installing Dify, make sure your machine meets the following minimum system requirements:
>
> * CPU >= 2 Core
> * RAM >= 4 GiB
| Operating System |
Software |
Explanation |
| Linux platforms |
aaPanel 7.0.11 or later
|
Please refer to the aaPanel installation guide for more information on how to install aaPanel. |
## Deployment
1. Log in to aaPanel and click `Docker` in the menu bar
2. The first time you will be prompteINLINE\_CODE\_P`Docker Compose` the `Docker` and `Docker Compose` services, click Install Now. If it is already installed, please ignore it.
3. INLINE\_COD`One-Click Install`e ins`install` is complete, find `Dify` in `One-Click Install` and click `install`
4. configure basic information such as the domain name, ports to complete the installation
> \[!IMPORTANT]
>
> The domain name is optional, if the domain name is filled, it can be managed through \[Website]--> \[Proxy Project], and you do not need to check \[Allow external access] after filling in the domain name, otherwise you need to check it before you can access it through the port
5. After installation, enter the domain name or IP+ port s`Dify-characters`s step in the browser `latest`s.
* Name: application name, default `Dify-characters`
* Version selection: default `latest`
* Domain name: If you need to access directly through the domain name, please configure the domain na`IP+Port`nd resolve the domain name to the server
* Allow external access: If you nee`8088`ct access through `IP+Port`, please check. If you have set up a domain name, please do not check here.
* Port: De`Docker`0 `8088`, can be modified by yourself
6. After submission, the panel will automatically initialize the application, which will take about `1-3` minutes. It can be accessed after the initialization is completed.
### Access Dify
Access administrator initialization page to set up the admin account:
```bash theme={null}
# If you have set domain
http://yourdomain/install
# If you choose to access through `IP+Port`
http://your_server_ip:8088/install
```
Dify web interface address:
```bash theme={null}
# If you have set domain
http://yourdomain/
# If you choose to access through `IP+Port`
http://your_server_ip:8088/
```
# Dify Premium on AWS
Source: https://docs.dify.ai/en/self-host/platform-guides/dify-premium
Dify Premium is our AWS AMI offering that allows custom branding and is one-click deployable to your AWS VPC as an EC2 instance. Head to [AWS Marketplace](https://aws.amazon.com/marketplace/pp/prodview-t22mebxzwjhu6) to subscribe. It's useful in a couple of scenarios:
* You're looking to create one or a few applications as a small/medium business and you care about data residency.
* You are interested in [Dify Cloud](https://cloud.dify.ai), but your use case requires more resources than supported by the [plans](https://dify.ai/pricing).
* You'd like to run a POC before adopting Dify Enterprise within your organization.
## Access & Set up
After the AMI is deployed, access Dify via the instance's public IP found in the EC2 console (HTTP port 80 is used by default).
If this is your first time accessing Dify, enter the Admin initialization password (your EC2's instance ID) to start the setup process.
## Customize
### Configuration
Just like a self-hosted deployment, you may modify the environment variables in the `.env` file in your EC2 instance as you see fit. Then, restart Dify with:
```bash theme={null}
docker-compose down
docker-compose -f docker-compose.yaml -f docker-compose.override.yaml up -d
```
### Web App Logo & Branding
In **Settings** > **Customization**, you can remove the `Powered by Dify` branding or replace it with your own logo.
## Upgrade
Before upgrading, check the [Release Notes](https://github.com/langgenius/dify/releases) on GitHub for version-specific upgrade instructions. Some versions may require additional steps such as database migrations or configuration changes.
In the EC2 instance, run the following commands:
```bash theme={null}
cd /dify
docker-compose down
```
Back up your `.env` file and the `volumes` directory, which contains your database, storage, and other persistent data:
```bash theme={null}
cp /dify/.env /dify/.env.bak
tar -cvf volumes-$(date +%s).tgz volumes
```
The upgrade process will overwrite configuration files but will not affect your `.env` file or runtime data (such as databases and uploaded files) in the `volumes/` directory.
If you have manually modified any configuration files beyond `.env`, back them up before upgrading.
Pull the latest code and sync the configuration files:
```bash theme={null}
git clone https://github.com/langgenius/dify.git /tmp/dify
rsync -av /tmp/dify/docker/ /dify/
rm -rf /tmp/dify
```
New versions may introduce new environment variables in `.env.example`. Compare it with your current `.env` and add any missing variables:
```bash theme={null}
diff /dify/.env /dify/.env.example
```
```bash theme={null}
docker-compose pull
docker-compose -f docker-compose.yaml -f docker-compose.override.yaml up -d
```
# Deploy Dify with Docker Compose
Source: https://docs.dify.ai/en/self-host/quick-start/docker-compose
For common deployment questions, see [FAQs](/en/self-host/quick-start/faqs).
## Before Deployment
Make sure your machine meets the following minimum system requirements.
### Hardware
* CPU >= 2 Core
* RAM >= 4 GiB
### Software
| Operating System | Required Software | Notes |
| :------------------------- | :-------------------------------------------- | :----------------------------------------------------------------------------------------------------------------------------------------------------------------------------------------------------------------------------------------------------- |
| macOS 10.14 or later | Docker Desktop | Configure the Docker virtual machine with at least 2 virtual CPUs and 8 GiB of memory.
For installation instructions, see [Install Docker Desktop on Mac](https://docs.docker.com/desktop/mac/install/). |
| Linux distributions | Docker 19.03+
Docker Compose 1.28+ | For installation instructions, see [Install Docker Engine](https://docs.docker.com/engine/install/) and [Install Docker Compose](https://docs.docker.com/compose/install/). |
| Windows with WSL 2 enabled | Docker Desktop | Store source code and data bound to Linux containers in the Linux file system rather than Windows.
For installation instructions, see [Install Docker Desktop on Windows](https://docs.docker.com/desktop/windows/install/#wsl-2-backend). |
## Deploy and Start Dify
Clone the Dify source code to your local machine.
```bash theme={null}
git clone --branch "$(curl -s https://api.github.com/repos/langgenius/dify/releases/latest | jq -r .tag_name)" https://github.com/langgenius/dify.git
```
1. Navigate to the `docker` directory in the Dify source code:
```bash theme={null}
cd dify/docker
```
2. Copy the example environment configuration file:
```bash theme={null}
cp .env.example .env
```
When the frontend and backend run on different subdomains, set `COOKIE_DOMAIN` to the site's top-level domain (e.g., `example.com`) and set `NEXT_PUBLIC_COOKIE_DOMAIN` to `1` in the `.env` file.
The frontend and backend must be under the same top-level domain to share authentication cookies.
3. Start the containers using the command that matches your Docker Compose version:
```bash Docker Compose V2 theme={null}
docker compose up -d
```
```bash Docker Compose V1 theme={null}
docker-compose up -d
```
Run `docker compose version` to check your Docker Compose version.
The following containers will be started:
* 5 core services: `api`, `worker`, `worker_beat`, `web`, `plugin_daemon`
* 6 dependent components: `weaviate`, `db_postgres`, `redis`, `nginx`, `ssrf_proxy`, `sandbox`
You should see output similar to the following, showing the status and start time of each container:
```bash theme={null}
[+] Running 13/13
✔ Network docker_ssrf_proxy_network Created 10.0s
✔ Network docker_default Created 0.1s
✔ Container docker-sandbox-1 Started 0.3s
✔ Container docker-db_postgres-1 Healthy 2.8s
✔ Container docker-web-1 Started 0.3s
✔ Container docker-redis-1 Started 0.3s
✔ Container docker-ssrf_proxy-1 Started 0.4s
✔ Container docker-weaviate-1 Started 0.3s
✔ Container docker-worker_beat-1 Started 3.2s
✔ Container docker-api-1 Started 3.2s
✔ Container docker-worker-1 Started 3.2s
✔ Container docker-plugin_daemon-1 Started 3.2s
✔ Container docker-nginx-1 Started 3.4s
```
4. Verify that all containers are running successfully:
```bash theme={null}
docker compose ps
```
You should see output similar to the following, with each container in the `Up` or `healthy` status:
```bash theme={null}
NAME IMAGE COMMAND SERVICE CREATED STATUS PORTS
docker-api-1 langgenius/dify-api:1.10.1 "/bin/bash /entrypoi…" api 26 seconds ago Up 22 seconds 5001/tcp
docker-db_postgres-1 postgres:15-alpine "docker-entrypoint.s…" db_postgres 26 seconds ago Up 25 seconds (healthy) 5432/tcp
docker-nginx-1 nginx:latest "sh -c 'cp /docker-e…" nginx 26 seconds ago Up 22 seconds 0.0.0.0:80->80/tcp, :::80->80/tcp, 0.0.0.0:443->443/tcp, :::443->443/tcp
docker-plugin_daemon-1 langgenius/dify-plugin-daemon:0.4.1-local "/bin/bash -c /app/e…" plugin_daemon 26 seconds ago Up 22 seconds 0.0.0.0:5003->5003/tcp, :::5003->5003/tcp
docker-redis-1 redis:6-alpine "docker-entrypoint.s…" redis 26 seconds ago Up 25 seconds (health: starting) 6379/tcp
docker-sandbox-1 langgenius/dify-sandbox:0.2.12 "/main" sandbox 26 seconds ago Up 25 seconds (health: starting)
docker-ssrf_proxy-1 ubuntu/squid:latest "sh -c 'cp /docker-e…" ssrf_proxy 26 seconds ago Up 25 seconds 3128/tcp
docker-weaviate-1 semitechnologies/weaviate:1.27.0 "/bin/weaviate --hos…" weaviate 26 seconds ago Up 25 seconds
docker-web-1 langgenius/dify-web:1.10.1 "/bin/sh ./entrypoin…" web 26 seconds ago Up 25 seconds 3000/tcp
docker-worker-1 langgenius/dify-api:1.10.1 "/bin/bash /entrypoi…" worker 26 seconds ago Up 22 seconds 5001/tcp
docker-worker_beat-1 langgenius/dify-api:1.10.1 "/bin/bash /entrypoi…" worker_beat 26 seconds ago Up 22 seconds 5001/tcp
```
## Access Dify
1. Open the administrator initialization page to set up the admin account:
```bash theme={null}
# Local environment
http://localhost/install
# Server environment
http://your_server_ip/install
```
2. After completing the admin account setup, log in to Dify at:
```bash theme={null}
# Local environment
http://localhost
# Server environment
http://your_server_ip
```
## Customize Dify
Modify the environment variable values in your local `.env` file, then restart Dify to apply the changes:
```
docker compose down
docker compose up -d
```
For more information, see [environment variables](/en/self-host/configuration/environments).
## Upgrade Dify
Upgrade steps may vary between releases. Refer to the upgrade guide for your target version provided in the [Releases](https://github.com/langgenius/dify/releases) page.
After upgrading, check whether the `.env.example` file has changed and update your local `.env` file accordingly.
# FAQs
Source: https://docs.dify.ai/en/self-host/quick-start/faqs
## Deployment Methods
### Install older version
Use the `--branch` flag to install a specific version:
```bash theme={null}
git clone https://github.com/langgenius/dify.git --branch 0.15.3
```
The rest of the setup is identical to installing the latest version.
### Install using ZIP archive
For network-restricted environments or when git is unavailable:
```bash theme={null}
# Download latest release
wget -O dify.zip "$(curl -s https://api.github.com/repos/langgenius/dify/releases/latest | jq -r '.zipball_url')"
unzip dify.zip && rm dify.zip
```
Alternatively, download the ZIP on another device and transfer it manually.
**To upgrade:**
```bash theme={null}
wget -O dify-latest.zip "$(curl -s https://api.github.com/repos/langgenius/dify/releases/latest | jq -r '.zipball_url')"
unzip dify-latest.zip && rm dify-latest.zip
rsync -a dify-latest/ dify/
rm -rf dify-latest/
cd dify/docker
docker compose pull
docker compose up -d
```
## Backup Procedures
### Create backup before upgrading
Always backup before upgrading to prevent data loss:
```bash theme={null}
cp -r dify "dify.bak.$(date +%Y%m%d%H%M%S)"
```
This creates a timestamped backup for easy restoration.
# Common Issues
Source: https://docs.dify.ai/en/self-host/troubleshooting/common-issues
## Authentication & Access
### Reset admin password
For Docker Compose deployments:
```bash theme={null}
docker exec -it docker-api-1 flask reset-password
```
Enter the account email and new password when prompted.
For source code deployments, run the same command from the `api` directory.
### 401 errors after login
This typically happens after changing domains. Update these environment variables:
* `CONSOLE_CORS_ALLOW_ORIGINS` - Console CORS policy
* `WEB_API_CORS_ALLOW_ORIGINS` - WebApp CORS policy
* `CONSOLE_API_URL` - Backend URL for console API
* `CONSOLE_WEB_URL` - Frontend URL for console web
* `SERVICE_API_URL` - Service API URL
* `APP_API_URL` - WebApp API backend URL
* `APP_WEB_URL` - WebApp URL
Restart after updating configuration.
## Configuration
### Change default port
Modify `.env` configuration:
```
EXPOSE_NGINX_PORT=80
EXPOSE_NGINX_SSL_PORT=443
```
For API service port changes, update the nginx configuration in `docker-compose.yaml`.
### Increase file upload limits
Update in `.env`:
* `UPLOAD_FILE_SIZE_LIMIT` - Maximum file size
* `NGINX_CLIENT_MAX_BODY_SIZE` - Must match to avoid issues
### Workflow complexity limits
Adjust `MAX_TREE_DEPTH` in `web/app/components/workflow/constants.ts` (default: 50).
Note: Excessive depth impacts performance.
### Node execution timeout
Set `TEXT_GENERATION_TIMEOUT_MS` in `.env` to control runtime per node.
## Email Configuration
Not receiving password reset emails? Configure mail settings in `.env`:
1. Set up mail parameters (SMTP settings)
2. Restart services:
```bash theme={null}
docker compose down
docker compose up -d
```
Check spam folder if emails still don't arrive.
### Invite members without email service
In local deployments without email configured, the invitation page displays a link after sending. Copy and forward this link to users manually.
## Database Issues
### Connection errors with pg\_hba.conf
If you see:
```
FATAL: no pg_hba.conf entry for host "172.19.0.7", user "postgres", database "dify", no encryption
```
Allow connections from the error's network segment:
```bash theme={null}
docker exec -it docker-db-1 sh -c "echo 'host all all 172.19.0.0/16 trust' >> /var/lib/postgresql/data/pgdata/pg_hba.conf"
docker-compose restart
```
### File not found error for encryption keys
This error occurs after changing deployment methods or deleting `api/storage/privkeys`:
```
FileNotFoundError: File not found
File "/www/wwwroot/dify/dify/api/libs/rsa.py", line 45, in decrypt
```
Reset encryption key pairs:
Docker Compose:
```bash theme={null}
docker exec -it docker-api-1 flask reset-encrypt-key-pair
```
Source code (from `api` directory):
```bash theme={null}
flask reset-encrypt-key-pair
```
**Warning**: This is irreversible - existing encrypted data will be lost.
## Workspace Management
### Rename workspace
Modify the `tenants` table in the database directly.
### Change application access domain
Update `APP_WEB_URL` in `docker-compose.yaml`.
# Docker Issues
Source: https://docs.dify.ai/en/self-host/troubleshooting/docker-issues
## Network & Connectivity
### 502 Bad Gateway
Nginx is forwarding to wrong container IPs. Get current container IPs:
```bash theme={null}
docker ps -q | xargs -n 1 docker inspect --format '{{ .Name }}: {{range .NetworkSettings.Networks}}{{.IPAddress}}{{end}}'
```
Find these lines:
```
/docker-web-1: 172.19.0.5
/docker-api-1: 172.19.0.7
```
Update `dify/docker/nginx/conf.d`:
* Replace `http://api:5001` with `http://172.19.0.7:5001`
* Replace `http://web:3000` with `http://172.19.0.5:3000`
Restart nginx or reload configuration. Note: IPs change on container restart.
### Cannot access localhost services
Docker containers can't reach host services via `127.0.0.1`. Use your machine's local network IP instead.
Example: For OpenLLM running on host, configure Dify with `http://192.168.1.100:port` (your actual local IP).
### Page loads forever with CORS errors
Domain/URL changes cause cross-origin issues. Update in `docker-compose.yml`:
* `CONSOLE_API_URL` - Backend URL for console API
* `CONSOLE_WEB_URL` - Frontend URL for console web
* `SERVICE_API_URL` - Service API URL
* `APP_API_URL` - WebApp API backend URL
* `APP_WEB_URL` - WebApp URL
## Mounting & Volumes
### Nginx configuration mount failure
Error:
```
Error mounting "/run/desktop/mnt/host/d/Documents/docker/nginx/nginx.conf" to rootfs at "/etc/nginx/nginx.conf": not a directory
```
Clone the complete project and run from docker directory:
```bash theme={null}
git clone https://github.com/langgenius/dify.git
cd dify/docker
docker compose up -d
```
### Port conflicts
Port 80 already in use? Either:
1. Stop the conflicting service (usually Apache/Nginx):
```bash theme={null}
sudo service nginx stop
sudo service apache2 stop
```
2. Or change port mapping in `docker-compose.yaml`:
```yaml theme={null}
ports:
- "8080:80" # Map to different port
```
## Container Management
### View background shell outputs
List running shells:
```bash theme={null}
docker exec -it docker-api-1 ls /tmp/shells/
```
Check shell output:
```bash theme={null}
docker exec -it docker-api-1 cat /tmp/shells/[shell-id]/output.log
```
### Container restart issues
After system reboot, containers may fail to connect. Ensure proper startup order:
```bash theme={null}
docker compose down
docker compose up -d
```
Wait for all services to be healthy before accessing.
## SSRF Proxy
The `ssrf_proxy` container prevents Server-Side Request Forgery attacks.
### Customize proxy rules
Edit `docker/volumes/ssrf_proxy/squid.conf` to add ACL rules:
```
# Block access to sensitive internal IP
acl restricted_ip dst 192.168.101.19
acl localnet src 192.168.101.0/24
http_access deny restricted_ip
http_access allow localnet
http_access deny all
```
Restart the proxy container after changes.
### Why is SSRF\_PROXY needed?
Prevents services from making unauthorized requests to internal network resources. The proxy intercepts and filters all outbound requests from sandboxed services.
# Third-Party Integrations
Source: https://docs.dify.ai/en/self-host/troubleshooting/integrations
## Notion Integration
Notion OAuth only supports HTTPS, so local deployments must use internal integration.
### Configure environment variables
Set in `.env`:
```
NOTION_INTEGRATION_TYPE=internal
NOTION_INTERNAL_SECRET=your_internal_secret_here
```
For public integration (HTTPS only):
```
NOTION_INTEGRATION_TYPE=public
NOTION_CLIENT_SECRET=oauth_client_secret
NOTION_CLIENT_ID=oauth_client_id
```
Get credentials from [Notion Integrations](https://www.notion.so/my-integrations).
## Text-to-Speech (TTS)
### FFmpeg not installed error
OpenAI TTS requires FFmpeg for audio stream segmentation.
**macOS:**
```bash theme={null}
brew install ffmpeg
```
**Ubuntu:**
```bash theme={null}
sudo apt-get update
sudo apt-get install ffmpeg
```
**CentOS:**
```bash theme={null}
sudo yum install epel-release
sudo rpm -Uvh http://li.nux.ro/download/nux/dextop/el7/x86_64/nux-dextop-release-0-5.el7.nux.noarch.rpm
sudo yum update
sudo yum install ffmpeg ffmpeg-devel
```
**Windows:**
1. Download from [FFmpeg website](https://ffmpeg.org/download.html)
2. Extract and move to `C:\Program Files\`
3. Add FFmpeg bin directory to system PATH
4. Verify: `ffmpeg -version`
## Model Tokenizers
### Can't load tokenizer for 'gpt2'
Error:
```
Can't load tokenizer for 'gpt2'. If you were trying to load it from 'https://huggingface.co/models'...
```
Configure Hugging Face mirror or proxy in environment variables. See [environment documentation](https://docs.dify.ai/en/self-host/configuration/environments) for details.
## Security Policies
### Content Security Policy (CSP)
Enable CSP to reduce XSS attacks.
In `.env`:
```
CSP_WHITELIST=https://api.example.com,https://cdn.example.com
```
Add all domains used by your application (APIs, CDNs, analytics, etc.).
See [MDN CSP documentation](https://developer.mozilla.org/en-US/docs/Web/HTTP/CSP) for more information.
## Application Templates
### Custom templates
Currently not supported in community edition. Default templates are provided by Dify for reference only.
Cloud version users can:
* Add applications to workspace
* Customize and save as personal applications
For enterprise custom templates, contact: [business@dify.ai](mailto:business@dify.ai)
# Storage & Migration
Source: https://docs.dify.ai/en/self-host/troubleshooting/storage-and-migration
## Vector Database Migration
### Migrate from Weaviate to another database
1. **Update configuration**
Source code deployment (`.env`):
```
VECTOR_STORE=qdrant
```
Docker Compose (`docker-compose.yaml`):
```yaml theme={null}
VECTOR_STORE: qdrant
```
2. **Run migration**
```bash theme={null}
# Source code
flask vdb-migrate
# Docker
docker exec -it docker-api-1 flask vdb-migrate
```
Tested databases: Qdrant, Milvus, AnalyticDB
## Storage Migration
### Move from local to cloud storage
Migrate files from local storage to cloud providers (e.g., Alibaba Cloud OSS):
1. **Configure cloud storage**
`.env` or `docker-compose.yaml`:
```
STORAGE_TYPE=aliyun-oss
# Add OSS credentials
```
2. **Migrate data**
Source code:
```bash theme={null}
flask upload-private-key-file-to-cloud-storage
flask upload-local-files-to-cloud-storage
```
Docker:
```bash theme={null}
docker exec -it docker-api-1 flask upload-private-key-file-to-cloud-storage
docker exec -it docker-api-1 flask upload-local-files-to-cloud-storage
```
## Data Cleanup
### Delete old logs
1. **Get tenant ID**
```bash theme={null}
docker exec -it docker-api-1 bash -c "echo 'from models import Tenant; db.session.query(Tenant.id, Tenant.name).all(); quit()' | flask shell"
```
2. **Delete logs older than X days**
```bash theme={null}
docker exec -it docker-api-1 flask clear-free-plan-tenant-expired-logs \
--days 30 \
--batch 100 \
--tenant_ids 618b5d66-a1f5-4b6b-8d12-f171182a1cb2
```
3. **Remove exported logs** (optional)
```bash theme={null}
docker exec -it docker-api-1 bash -c 'rm -rf ${OPENDAL_FS_ROOT}/free_plan_tenant_expired_logs'
```
### Remove orphaned files
**Warning**: Back up database and storage before running. Run during maintenance window.
1. **Clean database records**
```bash theme={null}
docker exec -it docker-api-1 flask clear-orphaned-file-records
# Use -f flag to skip confirmation
```
2. **Delete orphaned files from storage**
```bash theme={null}
docker exec -it docker-api-1 flask remove-orphaned-files-on-storage
# Use -f flag to skip confirmation
```
Note: Only works with OpenDAL storage (`STORAGE_TYPE=opendal`).
## Backup & Recovery
### Create backup before upgrade
```bash theme={null}
cp -r dify "dify.bak.$(date +%Y%m%d%H%M%S)"
```
### What to backup
For Docker Compose deployments:
* Entire `dify/docker/volumes` directory
For source deployments:
* Database
* Storage configuration
* Vector database data
* Environment files
### Database maintenance
After deleting logs, reclaim storage:
PostgreSQL:
```sql theme={null}
VACUUM FULL;
```
## Upgrade Process
### Version upgrade
Image deployment:
```bash theme={null}
docker compose pull
docker compose up -d
```
Source code:
```bash theme={null}
git pull
cd api
flask db upgrade
```
### Database schema migration
Always required for source code updates:
```bash theme={null}
cd api
flask db upgrade
```
# Weaviate Migration Guide upgrading to Client v4 and Server 1.27+
Source: https://docs.dify.ai/en/self-host/troubleshooting/weaviate-v4-migration
> This guide explains how to migrate from Weaviate client v3 to v4.17.0 and upgrade your Weaviate server from version 1.19.0 to 1.27.0 or higher. This migration is required for Dify versions that include the weaviate-client v4 upgrade.
## Overview
Starting with **Dify v1.9.2**, the weaviate-client has been upgraded from v3 to v4.17.0. This upgrade brings significant performance improvements and better stability, but requires **Weaviate server version 1.27.0 or higher**.
**BREAKING CHANGE**: The new weaviate-client v4 is NOT backward compatible with Weaviate server versions below 1.27.0. If you are running a self-hosted Weaviate instance on version 1.19.0 or older, you must upgrade your Weaviate server before upgrading Dify.
### Who Is Affected?
This migration affects:
* Self-hosted Dify users running their own Weaviate instances on versions below 1.27.0
* Users currently on Weaviate server version 1.19.0-1.26.x
* Users upgrading to Dify versions with weaviate-client v4
**Not affected**:
* Cloud-hosted Weaviate users (Weaviate Cloud manages the server version)
* Users already on Weaviate 1.27.0+ can upgrade Dify without additional steps
* Users running Dify's default Docker Compose setup (Weaviate version is updated automatically)
## Breaking Changes
### Client v4 Requirements
The weaviate-client v4 introduces several breaking changes:
1. **Minimum Server Version**: Requires Weaviate server 1.27.0 or higher
2. **API Changes**: New import structure (`weaviate.classes` instead of `weaviate.client`)
3. **gRPC Support**: Uses gRPC by default on port 50051 for improved performance
4. **Authentication Changes**: Updated authentication methods and configuration
### Why Upgrade?
* **Performance**: Significantly faster query and import operations via gRPC (50051)
* **Stability**: Better connection handling and error recovery
* **Future Compatibility**: Access to latest Weaviate features and ongoing support
* **Security**: Weaviate 1.19.0 is over a year old and no longer receives security updates
## Version Compatibility Matrix
| Dify Version | Weaviate-client Version | Compatible Weaviate Server Versions |
| ------------ | ----------------------- | ----------------------------------- |
| ≤ 1.9.1 | v3.x | 1.19.0 - 1.26.x |
| ≥ 1.9.2 | v4.17.0 | 1.27.0+ (tested up to 1.33.1) |
This migration applies to any Dify version using weaviate-client v4.17.0 or higher.
Weaviate server version 1.19.0 was released over a year ago and is now outdated. Upgrading to 1.27.0+ provides access to numerous improvements in performance, stability, and features.
## Prerequisites
Before starting the migration, complete these steps:
1. **Check Your Current Weaviate Version**
```bash theme={null}
curl http://localhost:8080/v1/meta
```
Look for the `version` field in the response.
2. **Backup Your Data**
* Create a complete backup of your Weaviate data
* Backup your Docker volumes if using Docker Compose
* Document your current configuration settings
3. **Review System Requirements**
* Ensure sufficient disk space for database migration
* Verify network connectivity between Dify and Weaviate
* Confirm gRPC port (50051) is accessible if using external Weaviate
4. **Plan Downtime**
* The migration will require service downtime
* Notify users if running in production
* Schedule migration during low-traffic periods
## Migration Paths
Choose the migration path that matches your deployment setup and current Weaviate version.
### Choose Your Path
* **Path A – Migration with Backup (from 1.19)**: Recommended if you are still on Weaviate 1.19. You will create a backup, upgrade to 1.27+, repair any orphaned data, and then migrate the schema.
* **Path B – Direct Recovery (already on 1.27+)**: Use this if you already upgraded to 1.27+ and your knowledge bases stopped working. This path focuses on repairing the data layout and running the schema migration.
Do **not** attempt to downgrade back to 1.19. The schema format is incompatible and will lead to data loss.
### Path A: Migration with Backup (From 1.19)
Safest path. Creates a backup before upgrading so you can restore if anything goes wrong.
#### Prerequisites
* Currently running Weaviate 1.19
* Docker + Docker Compose installed
* Python 3.12 for the [schema migration script](https://github.com/langgenius/dify-docs/blob/main/assets/migrate_weaviate_collections.py)
#### Step A1: Enable the Backup Module on Weaviate 1.19
Edit `docker/docker-compose.yaml` so the `weaviate` service includes backup configuration:
```yaml theme={null}
weaviate:
image: semitechnologies/weaviate:1.19.0
volumes:
- ./volumes/weaviate:/var/lib/weaviate
- ./volumes/weaviate_backups:/var/lib/weaviate/backups
ports:
- "8080:8080"
- "50051:50051"
environment:
ENABLE_MODULES: backup-filesystem
BACKUP_FILESYSTEM_PATH: /var/lib/weaviate/backups
# ... rest of your environment variables
```
Restart Weaviate to apply the change:
```bash theme={null}
cd docker
docker compose down
docker compose --profile up -d
sleep 10
```
#### Step A2: Create a Backup
1. **List your collections**:
```bash theme={null}
curl -s -H "Authorization: Bearer " \
"http://localhost:8080/v1/schema" | \
python3 -c "
import json, sys
data = json.load(sys.stdin)
print("Collections:")
for cls in data.get('classes', []):
print(f" - {cls['class']}")
"
```
2. **Trigger the backup**: include specific collection names if you prefer.
```bash theme={null}
curl -X POST \
-H "Authorization: Bearer " \
-H "Content-Type: application/json" \
"http://localhost:8080/v1/backups/filesystem" \
-d '{
"id": "kb-backup",
"include": ["Vector_index_COLLECTION1_Node", "Vector_index_COLLECTION2_Node"]
}'
```
3. **Check backup status**:
```bash theme={null}
sleep 5
curl -s -H "Authorization: Bearer " \
"http://localhost:8080/v1/backups/filesystem/kb-backup" | \
python3 -m json.tool | grep status
```
4. **Verify backup files exist**:
```bash theme={null}
ls -lh docker/volumes/weaviate_backups/kb-backup/
```
#### Step A3: Upgrade to Weaviate 1.27+
1. **Upgrade Dify to a version that ships Weaviate 1.27+**:
```bash theme={null}
cd /path/to/dify
git fetch origin
git checkout main # or a tagged release that includes the upgrade
```
2. **Confirm the new Weaviate image**:
```bash theme={null}
grep "image: semitechnologies/weaviate" docker/docker-compose.yaml
```
3. **Restart with the new version**:
```bash theme={null}
cd docker
docker compose down
docker compose up -d
sleep 20
```
#### Step A4: Fix Orphaned LSM Data (if present)
You can fix orphaned LSM data either from the host or inside the container:
**Option A: From host (if volumes are mounted)**:
```bash theme={null}
cd docker/volumes/weaviate
for dir in vector_index_*_node_*_lsm; do
[ -d "$dir" ] || continue
index_id=$(echo "$dir" | sed -n 's/vector_index_\([^_]*_[^_]*_[^_]*_[^_]*_[^_]*\)_node_.*/\1/p')
shard_id=$(echo "$dir" | sed -n 's/.*_node_\([^_]*\)_lsm/\1/p')
mkdir -p "vector_index_${index_id}_node/$shard_id/lsm"
cp -a "$dir/"* "vector_index_${index_id}_node/$shard_id/lsm/"
echo "✓ Copied $dir"
done
cd ../../
docker compose restart weaviate
sleep 15
```
**Option B: Inside Weaviate container (recommended)**:
```bash theme={null}
cd /path/to/dify/docker
docker compose exec -it weaviate /bin/sh
# Inside container
cd /var/lib/weaviate
for dir in vector_index_*_node_*_lsm; do
[ -d "$dir" ] || continue
index_id=$(echo "$dir" | sed -n 's/vector_index_\([^_]*_[^_]*_[^_]*_[^_]*_[^_]*\)_node_.*/\1/p')
shard_id=$(echo "$dir" | sed -n 's/.*_node_\([^_]*\)_lsm/\1/p')
mkdir -p "vector_index_${index_id}_node/$shard_id/lsm"
cp -a "$dir/"* "vector_index_${index_id}_node/$shard_id/lsm/"
echo "✓ Copied $dir"
done
exit
# Restart Weaviate
docker compose restart weaviate
sleep 15
```
#### Step A5: Migrate the Schema
1. **Install dependencies** (in a temporary virtualenv is fine):
```bash theme={null}
cd /path/to/dify
python3 -m venv weaviate_migration_env
source weaviate_migration_env/bin/activate
pip install weaviate-client requests
```
2. **Run the [migration script](https://github.com/langgenius/dify-docs/blob/main/assets/migrate_weaviate_collections.py)** either locally or inside the Worker container.\
**Option A: Run locally (if you have Python 3.12 and dependencies installed)**:
```bash theme={null}
python3 migrate_weaviate_collections.py
```
**Option B: Run inside Worker container (recommended for Docker setups)**:
```bash theme={null}
# Copy script to storage directory
cp migrate_weaviate_collections.py /path/to/dify/docker/volumes/app/storage/
# Enter worker container
cd /path/to/dify/docker
docker compose exec -it worker /bin/bash
# Run migration script (use --no-cache for Dify 1.11.0+)
uv run --no-cache /app/api/storage/migrate_weaviate_collections.py
# Exit container
exit
```
The migration script uses environment variables for configuration, making it suitable for running inside Docker containers. For Dify 1.11.0+, if you encounter permission errors with `uv`, use `uv run --no-cache` instead.
3. **Restart Dify services**:
```bash theme={null}
cd docker
docker compose restart api worker worker_beat
sleep 15
```
4. **Verify in the UI**: open Dify, test retrieval against your migrated knowledge bases.
For large collections (over 10,000 objects), verify that the object count matches between old and new collections. The migration script will display verification counts automatically.
After confirming a healthy migration, you can delete `weaviate_migration_env` and the backup files to reclaim disk space.
### Path B: Direct Recovery (Already on 1.27+)
Only use this path if you already upgraded to 1.27+ and your knowledge bases stopped working. You cannot create a 1.19 backup anymore, so you must repair the data in place.
#### Prerequisites
* Currently running Weaviate 1.27+ (including 1.33)
* Docker + Docker Compose installed
* Python 3.12 for the [migration script](https://github.com/langgenius/dify-docs/blob/main/assets/migrate_weaviate_collections.py)
#### Step B1: Repair Orphaned LSM Data
Stop Weaviate and fix orphaned LSM data:
```bash theme={null}
cd /path/to/dify/docker
docker compose stop weaviate
# Option A: From host (if volumes are mounted)
cd volumes/weaviate
for dir in vector_index_*_node_*_lsm; do
[ -d "$dir" ] || continue
index_id=$(echo "$dir" | sed -n 's/vector_index_\([^_]*_[^_]*_[^_]*_[^_]*_[^_]*\)_node_.*/\1/p')
shard_id=$(echo "$dir" | sed -n 's/.*_node_\([^_]*\)_lsm/\1/p')
mkdir -p "vector_index_${index_id}_node/$shard_id/lsm"
cp -a "$dir/"* "vector_index_${index_id}_node/$shard_id/lsm/"
echo "✓ Copied $dir"
done
# Option B: Inside container (recommended)
docker compose run --rm --entrypoint /bin/sh weaviate -c "
cd /var/lib/weaviate
for dir in vector_index_*_node_*_lsm; do
[ -d \"\$dir\" ] || continue
index_id=\$(echo \"\$dir\" | sed -n 's/vector_index_\([^_]*_[^_]*_[^_]*_[^_]*_[^_]*\)_node_.*/\1/p')
shard_id=\$(echo \"\$dir\" | sed -n 's/.*_node_\([^_]*\)_lsm/\1/p')
mkdir -p \"vector_index_\${index_id}_node/\$shard_id/lsm\"
cp -a \"\$dir/\"* \"vector_index_\${index_id}_node/\$shard_id/lsm/\"
echo \"✓ Copied \$dir\"
done
"
```
Restart Weaviate:
```bash theme={null}
docker compose start weaviate
sleep 15
```
List collections and confirm object counts are non-zero:
```bash theme={null}
curl -s -H "Authorization: Bearer " \
"http://localhost:8080/v1/schema" | python3 -c "
import sys, json
for cls in json.load(sys.stdin).get('classes', []):
if cls['class'].startswith('Vector_index_'):
print(cls['class'])
"
curl -s -H "Authorization: Bearer " \
"http://localhost:8080/v1/objects?class=YOUR_COLLECTION_NAME&limit=0" | \
python3 -c "import sys, json; print(json.load(sys.stdin).get('totalResults', 0))"
```
#### Step B2: Run the Schema Migration
Follow the same commands as [Step A5](#step-a5-migrate-the-schema). You can run the script locally or inside the Worker container:
**To run inside Worker container**:
```bash theme={null}
# Copy script to storage directory
cp migrate_weaviate_collections.py /path/to/dify/docker/volumes/app/storage/
# Enter worker container
cd /path/to/dify/docker
docker compose exec -it worker /bin/bash
# Run migration script
uv run --no-cache /app/api/storage/migrate_weaviate_collections.py
# Exit and restart services
exit
docker compose restart api worker worker_beat
```
The migration script uses cursor-based pagination to safely handle large
collections. Verify object counts match after migration completes.
#### Step B3: Verify in Dify
* Open Dify’s Knowledge Base UI.
* Use Retrieval Testing to confirm queries return results.
* If errors persist, inspect `docker compose logs weaviate` for additional repair steps (see [Troubleshooting](#troubleshooting)).
## Data Migration for Legacy Versions
**CRITICAL: Data Migration Required**
**Your existing knowledge bases will NOT work after upgrade without migration!**
**Why Migration is Needed**:
* Old data: Created with Weaviate v3 client (simple schema)
* New code: Requires Weaviate v4 format (extended schema)
* **Incompatible**: Old data missing required properties
**Migration Options**:
* Option A: Use Weaviate Backup/Restore
* Option B: Re-index from Original Documents
* Option C: Keep Old Weaviate (Don't Upgrade Yet) If you can't afford downtime or data loss.
### Automatic Migration
In most cases, Weaviate 1.27.0 will automatically migrate data from 1.19.0:
1. Stop Weaviate 1.19.0
2. Start Weaviate 1.27.0 with the same data directory
3. Weaviate will detect the old format and migrate automatically
4. Monitor logs for migration progress and any errors
### Manual Migration (If Automatic Fails)
If automatic migration fails, use Weaviate's export/import tools:
#### 1. Export Data from Old Version
Use the Cursor API or backup feature to export all data. For large datasets, use Weaviate's backup API:
```bash theme={null}
# Using backup API (recommended)
curl -X POST "http://localhost:8080/v1/backups/filesystem" \
-H "Content-Type: application/json" \
-d '{"id": "pre-migration-backup"}'
```
#### 2. Import Data to New Version
After upgrading to Weaviate 1.27.0, restore the backup:
```bash theme={null}
curl -X POST "http://localhost:8080/v1/backups/filesystem/pre-migration-backup/restore" \
-H "Content-Type: application/json"
```
For comprehensive migration guidance, especially for complex schemas or large datasets, refer to the official [Weaviate Migration Guide](https://weaviate.io/developers/weaviate/installation/migration).
## Configuration Changes
### New Environment Variables
The following new environment variable is available in Dify versions with weaviate-client v4:
#### WEAVIATE\_GRPC\_ENDPOINT
**Description**: Specifies the gRPC endpoint for Weaviate connections. Using gRPC significantly improves performance for batch operations and queries.
**Format**: `hostname:port` (NO protocol prefix)
**Default Ports**:
* Insecure: 50051
* Secure (TLS): 443
**Examples**:
```bash theme={null}
# Docker Compose (internal network)
WEAVIATE_GRPC_ENDPOINT=weaviate:50051
# External server (insecure)
WEAVIATE_GRPC_ENDPOINT=192.168.1.100:50051
# External server with custom port
WEAVIATE_GRPC_ENDPOINT=weaviate.example.com:9090
# Weaviate Cloud (secure/TLS on port 443)
WEAVIATE_GRPC_ENDPOINT=your-instance.weaviate.cloud:443
```
Do NOT include protocol prefixes like `grpc://` or `http://` in the WEAVIATE\_GRPC\_ENDPOINT value. Use only `hostname:port`.
### Updated Environment Variables
All existing Weaviate environment variables remain the same:
* **WEAVIATE\_ENDPOINT**: HTTP endpoint for Weaviate (e.g., `http://weaviate:8080`)
* **WEAVIATE\_API\_KEY**: API key for authentication (if enabled)
* **WEAVIATE\_BATCH\_SIZE**: Batch size for imports (default: 100)
* **WEAVIATE\_GRPC\_ENABLED**: Enable/disable gRPC (default: true in v4)
### Complete Configuration Example
```bash theme={null}
# docker/.env or environment configuration
VECTOR_STORE=weaviate
# HTTP Endpoint (required)
WEAVIATE_ENDPOINT=http://weaviate:8080
# Authentication (if enabled on your Weaviate instance)
WEAVIATE_API_KEY=your-secret-api-key
# gRPC Configuration (recommended for performance)
WEAVIATE_GRPC_ENABLED=true
WEAVIATE_GRPC_ENDPOINT=weaviate:50051
# Batch Import Settings
WEAVIATE_BATCH_SIZE=100
```
## Verification Steps
After completing the migration, verify everything is working correctly:
### 1. Check Weaviate Connection
Verify Weaviate is accessible and running the correct version:
```bash theme={null}
# Check HTTP endpoint and version
curl http://your-weaviate-host:8080/v1/meta | jq '.version'
# Should return 1.27.0 or higher
```
### 2. Verify Dify Connection
Check the Dify logs for successful Weaviate connection:
```bash theme={null}
docker compose logs api | grep -i weaviate
```
Look for messages indicating successful connection without "No module named 'weaviate.classes'" errors.
### 3. Test Knowledge Base Creation
1. Log into your Dify instance
2. Navigate to **Knowledge Base** section
3. Create a new knowledge base
4. Upload a test document (PDF, TXT, or MD)
5. Wait for indexing to complete
6. Check that status changes from "QUEUING" → "INDEXING" → "AVAILABLE"
If documents get stuck in "QUEUING" status, check that the Celery worker is running: `docker compose logs worker`.
### 4. Test Vector Search
1. Create or open a chat application with knowledge base integration
2. Ask a question that should retrieve information from your knowledge base
3. Verify that relevant results are returned with correct scores
4. Check the citation/source links work correctly
### 5. Verify gRPC Performance
If gRPC is enabled, you should see improved performance:
```bash theme={null}
# Check if gRPC port is accessible
docker exec -it dify-api-1 nc -zv weaviate 50051
# Monitor query times in logs
docker compose logs -f api | grep -i "query_time\|duration"
```
With gRPC properly configured, vector search queries should be 2-5x faster compared to HTTP-only connections.
## Troubleshooting
### Issue: "No module named 'weaviate.classes'"
**Cause**: The weaviate-client v4 is not installed, or v3 is still being used.
**Solution**:
```bash theme={null}
# For Docker installations, ensure you're running the correct Dify version
docker compose pull
docker compose down
docker compose up -d
# For source installations
pip uninstall weaviate-client
pip install weaviate-client==4.17.0
```
### Issue: Connection Refused on gRPC Port (50051)
**Cause**: Port 50051 is not exposed, not accessible, or Weaviate is not listening on it.
**Solution**:
1. **For Docker Compose users with bundled Weaviate**:
The port is available internally between containers. No action needed unless you're connecting from outside Docker.
2. **For external Weaviate**:
```bash theme={null}
# Check if Weaviate is listening on 50051
docker ps | grep weaviate
# Look for "0.0.0.0:50051->50051/tcp"
# If not exposed, restart with port mapping
docker run -p 8080:8080 -p 50051:50051 ...
```
3. **Check firewall rules**:
```bash theme={null}
# Linux
sudo ufw allow 50051/tcp
# Check if port is listening
netstat -tlnp | grep 50051
```
### Issue: Authentication Errors (401 Unauthorized)
**Cause**: API key mismatch or authentication configuration issue.
**Solution**:
1. Verify API key matches in both Weaviate and Dify:
```bash theme={null}
# Check Weaviate authentication
curl http://localhost:8080/v1/meta | jq '.authentication'
# Check Dify configuration
docker compose exec api env | grep WEAVIATE_API_KEY
```
2. If using anonymous access:
```yaml theme={null}
# Weaviate docker-compose.yaml
weaviate:
environment:
AUTHENTICATION_ANONYMOUS_ACCESS_ENABLED: "true"
AUTHENTICATION_APIKEY_ENABLED: "false"
```
Then remove `WEAVIATE_API_KEY` from Dify configuration.
### Issue: Documents Stuck in "QUEUING" Status
**Cause**: Celery worker not running or not connected to Redis.
**Solution**:
```bash theme={null}
# Check if worker is running
docker compose ps worker
# Check worker logs
docker compose logs worker | tail -50
# Check Redis connection
docker compose exec api redis-cli -h redis -p 6379 -a difyai123456 ping
# Should return "PONG"
# Restart worker
docker compose restart worker
```
### Issue: Slow Performance After Migration
**Cause**: gRPC not enabled or configured incorrectly.
**Solution**:
1. Verify gRPC configuration:
```bash theme={null}
docker compose exec api env | grep WEAVIATE_GRPC
```
Should show:
```
WEAVIATE_GRPC_ENABLED=true
WEAVIATE_GRPC_ENDPOINT=weaviate:50051
```
2. Test gRPC connectivity:
```bash theme={null}
docker exec -it dify-api-1 nc -zv weaviate 50051
# Should return "succeeded"
```
3. If still slow, check network latency between Dify and Weaviate
### Issue: Schema Migration Errors
**Cause**: Incompatible schema changes between Weaviate versions or corrupted data.
**Solution**:
1. Check Weaviate logs for specific error messages:
```bash theme={null}
docker compose logs weaviate | tail -100
```
2. List current schema:
```bash theme={null}
curl http://localhost:8080/v1/schema
```
3. If necessary, delete corrupted collections (⚠️ this deletes all data):
```bash theme={null}
# Backup first!
curl -X DELETE http://localhost:8080/v1/schema/YourCollectionName
```
4. Restart Dify to recreate schema:
```bash theme={null}
docker compose restart api worker
```
Deleting collections removes all data. Only do this if you have a backup and are prepared to re-index all content.
### Issue: Docker Volume Permission Errors
**Cause**: User ID mismatch in Docker containers.
**Solution**:
```bash theme={null}
# Check ownership of Weaviate data directory
ls -la docker/volumes/weaviate/
# Fix permissions (use the UID shown in error messages)
sudo chown -R 1000:1000 docker/volumes/weaviate/
# Restart services
docker compose restart weaviate
```
### Issue: Permission Denied When Running Migration Script (Dify 1.11.0+)
**Cause**: The `/home/dify` directory may not exist in newer Dify versions, causing `uv` cache creation to fail.
**Solution**:
```bash theme={null}
# Option 1: Use --no-cache flag (recommended)
uv run --no-cache migrate_weaviate_collections.py
# Option 2: Run as root user
docker compose exec -u root worker /bin/bash
uv run migrate_weaviate_collections.py
```
## Rollback Plan
If the migration fails and you need to rollback:
### Step 1: Stop Services
```bash theme={null}
cd /path/to/dify/docker
docker compose down
```
### Step 2: Restore Backup
```bash theme={null}
# Remove current volumes
rm -rf volumes/weaviate
# Restore from backup
tar -xvf ../weaviate-backup-TIMESTAMP.tgz
```
### Step 3: Revert Dify Version
```bash theme={null}
cd /path/to/dify
git checkout
cd docker
docker compose pull
```
### Step 4: Restart Services
```bash theme={null}
docker compose up -d
```
### Step 5: Verify Rollback
Check that services are running with old versions:
```bash theme={null}
# Check versions
docker compose exec api pip show weaviate-client
curl http://localhost:8080/v1/meta | jq '.version'
# Check for errors
docker compose logs | grep -i error
```
Always test the rollback procedure in a staging environment first if possible. Maintain multiple backup copies before attempting major migrations.
## Additional Resources
### Official Documentation
* [Weaviate Migration Guide](https://weaviate.io/developers/weaviate/installation/migration)
* [Weaviate v4 Client Documentation](https://weaviate.io/developers/weaviate/client-libraries/python)
* [Weaviate Backup and Restore](https://weaviate.io/developers/weaviate/configuration/backups)
* [Dify Self-Hosting Guide](/en/self-host/quick-start/docker-compose)
* [Dify Environment Variables](/en/self-host/configuration/environments)
### Community Resources
* [Dify GitHub Repository](https://github.com/langgenius/dify)
* [Dify GitHub Issues - Weaviate](https://github.com/langgenius/dify/issues?q=is%3Aissue+weaviate)
* [Weaviate Community Forum](https://forum.weaviate.io/)
* [Dify Community Forum](https://forum.dify.ai/)
### Migration Tools
* [Weaviate Python Client v4](https://github.com/weaviate/weaviate-python-client)
* [Weaviate Backup Tools](https://github.com/weaviate/weaviate/tree/main/tools)
## Summary
This migration brings important improvements to Dify's vector storage capabilities:
* **Better Performance**: gRPC support dramatically improves query and import speeds (2-5x faster)
* **Improved Stability**: Enhanced connection handling and error recovery
* **Security**: Access to security updates and patches not available in Weaviate 1.19.0
* **Future-Proof**: Access to latest Weaviate features and ongoing support
While this is a breaking change requiring server upgrade for users on old versions, the benefits significantly outweigh the migration effort. Most Docker Compose users can complete the migration in under 15 minutes with the automatic update.
If you encounter any issues not covered in this guide, please report them on the [Dify GitHub Issues page](https://github.com/langgenius/dify/issues) with the label "weaviate" and "migration".
# Article Reader Using File Upload
Source: https://docs.dify.ai/en/use-dify/tutorials/article-reader
In Dify, you can use the knowledge base to allow agent to obtain accurate information from a large amount of text content. However, in many cases, the local files provided are not large enough to warrant the use of the knowledge base. In such cases, you can use the file upload feature to directly provide local files as context for the LLM to read.
In this experiment, we will build the article reader as a case study. This assistant will ask questions based on the uploaded document, helping users to read papers and other materials with those questions in mind.
## You Will Learn
* File upload usage
* Basic usage of Chatflow
* Prompt writing skill
* Iteration node usage
* Doc extractor and list operator usage
## **Prerequisites**
Create a Chatflow in Dify. Make sure you have added a model provider and have sufficient quota.
## **Adding Nodes**
In this experiment, at least four types of nodes are required: start node, document extractor node, LLM node, and answer node.
### **Start Node**
In the start node, you need to add a file variable. File upload is supported in v0.10.0 Dify, allowing you to add files as variable.
In the start node, you need to add a file variable and check the document in the supported file types.
Some readers might notice the `sys.files` in the system variables, which are files or file lists uploaded by users in the dialog box.
The difference between creating your own file variables is that this feature requires enabling file upload in the functions and setting the upload file types, and each time a new file is uploaded in the dialog, this variable will be overwritten.
Please choose the appropriate file upload method according to your business scenario.
### **Doc Extractor**
**LLM cannot read files directly.** This is a common misconception among many users when they first use file upload, as they might think simply using the file as a variable in an LLM node would work. However, in reality, the LLM reads nothing from file variables.
Thus, Dify introduced the **doc extractor** node, which can extract text from the file variable and output it as a text variable.
The **doc extractor** node takes the file variable from the **start** node as input and converts document files into text output.
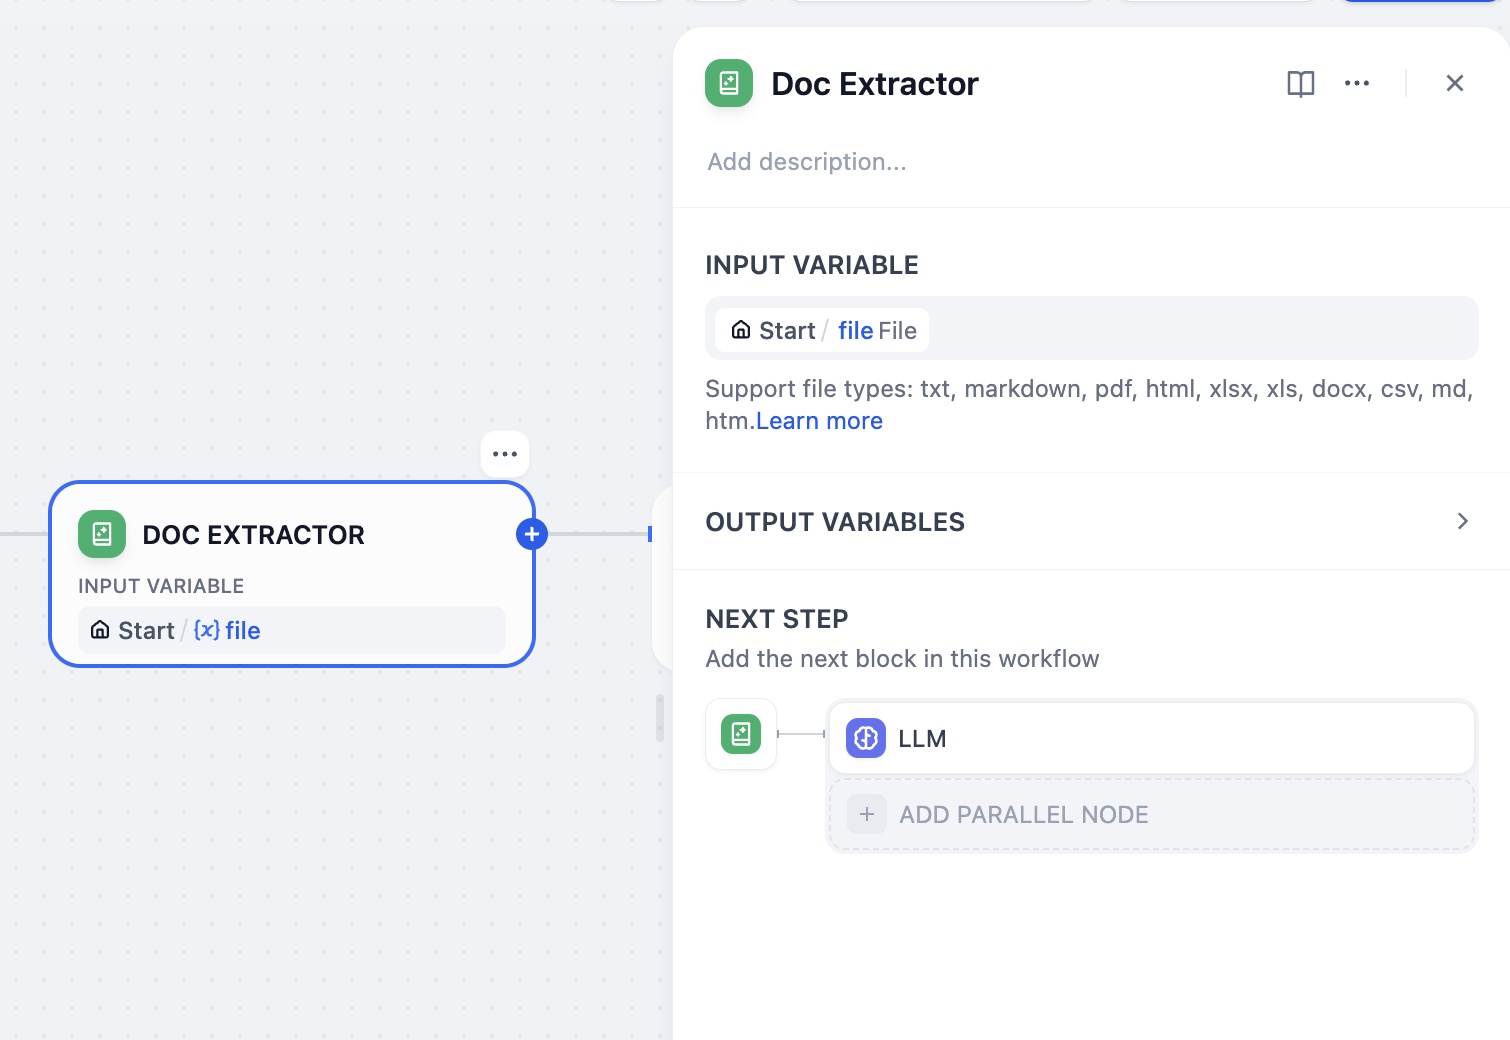
### **LLM**
In this experiment, two LLM nodes need to be designed: structure extraction and question generation.
#### **Structure Extraction**
The structure extraction node can extract the structure of the original text, summarizing key content.
The prompts are as follow:
```
Read the following article content and perform the task
{{Result variable of the document extractor}}
# Task
- **Main Objective**: Thoroughly analyze the structure of the article.
- **Objective**: Detail the content of each part of the article.
- **Requirements**: Analyze as detailed as possible.
- **Restrictions**: No specific format restrictions, but the analysis must be organized and logical.
- **Expected Output**: A detailed analysis of the article structure, including the main content and role of each part.
# Reasoning Order
- **Reasoning Part**: By carefully reading the article, identify and analyze its structure.
- **Conclusion Part**: Provide specific content and role for each part.
# Output Format
- **Analysis Format**: Each part should be listed in a headline format, followed by a detailed explanation of that part's content.
- **Structure Form**: Markdown, to enhance readability.
- **Specific Description**: The content and role of each part, including but not limited to the introduction, body, conclusion, citations, etc.
```
#### **Question Generation**
The question generation node can summarize the issues of the article from the content summarized by the structure extraction node, assisting the reader in thinking through the questions during the reading process.
The prompts are as follow:
```
Read the following article content and perform the task
{{Output of the structure extraction}}
# Task
- **Main Objective**: Thoroughly read the above text, and propose as many questions as possible for each part of the article.
- **Requirements**: Questions should be meaningful and valuable, worthy of consideration.
- **Restrictions**: No specific restrictions.
- **Expected Output**: A series of questions for each part of the article, each question should have depth and thinking value.
# Reasoning Order
- **Reasoning Part**: Thoroughly read the article, analyze the content of each part, and consider the deep questions each part may raise.
- **Conclusion Part**: Pose meaningful and valuable questions, ensuring they provoke in-depth thought.
# Output Format
- **Format**: Each question should be listed separately, numbered.
- **Content**: Propose questions for each part of the article (such as introduction, background, methods, results, discussion, conclusion, etc.).
- **Quantity**: As many as possible, but each question should be meaningful and valuable.
```
## **Question 1: Handling Multiple Uploaded Files**
To handle multiple uploaded files, an iterative node is needed.
The iterative node is similar to the while loop in many programming languages, except that Dify has no conditional restrictions, and the **input variable can only be of type `array` (list)**. The reason is that Dify will execute all the content in the list until it is done.
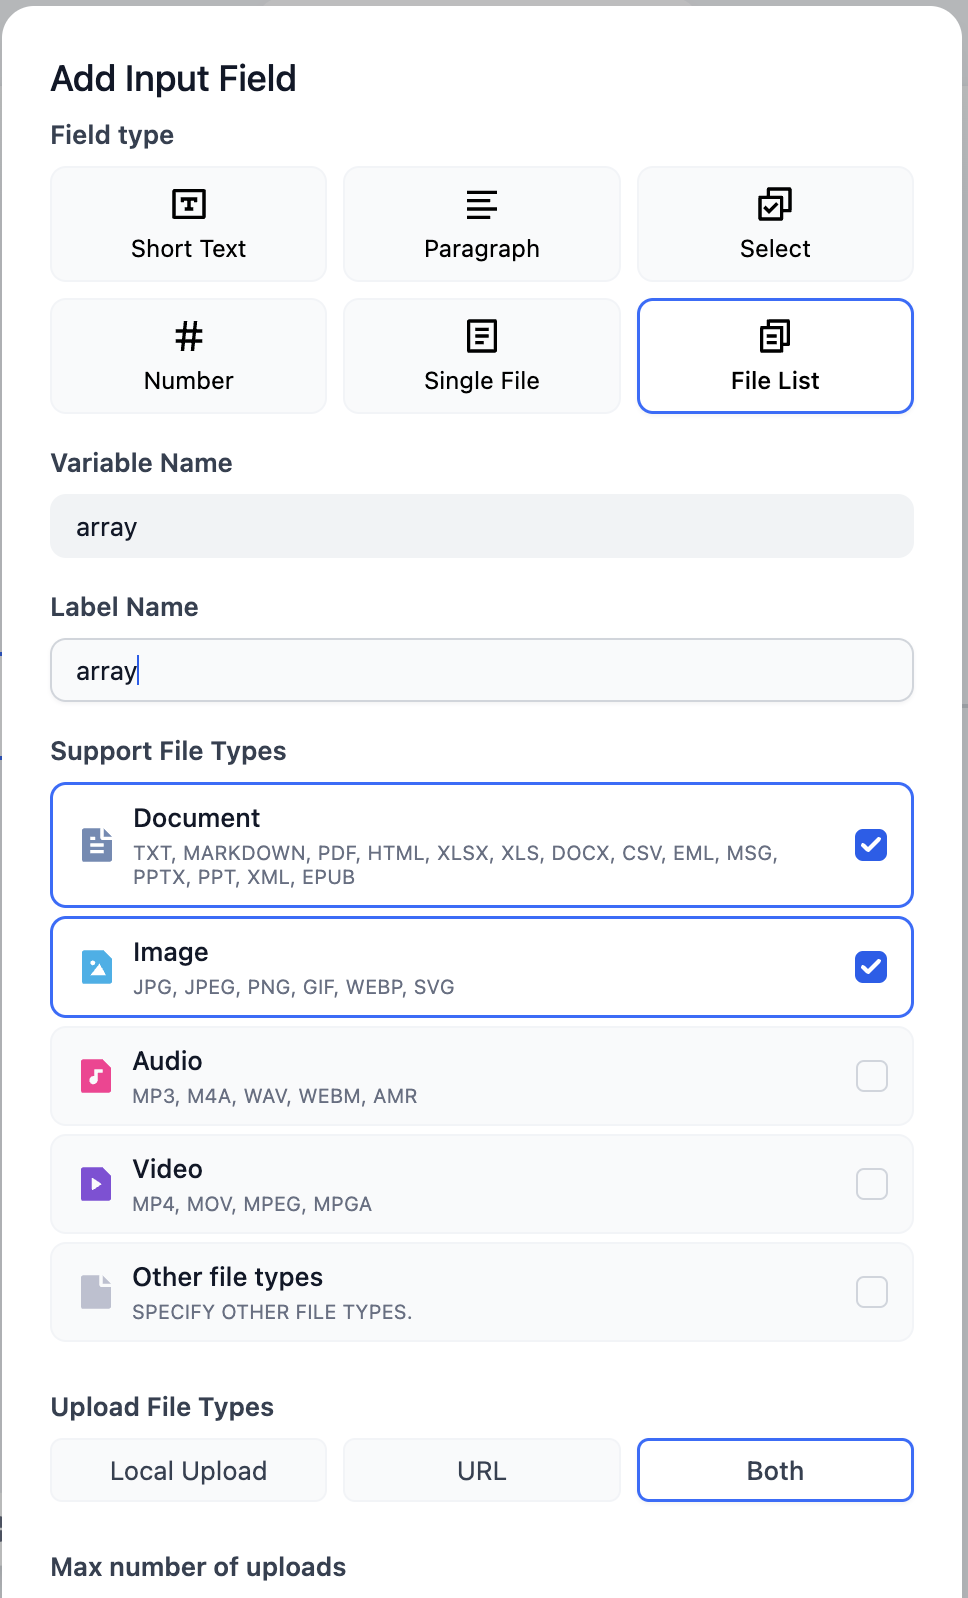
Therefore, you need to adjust the file variable in the start node to an `array` type, i.e., a file list.
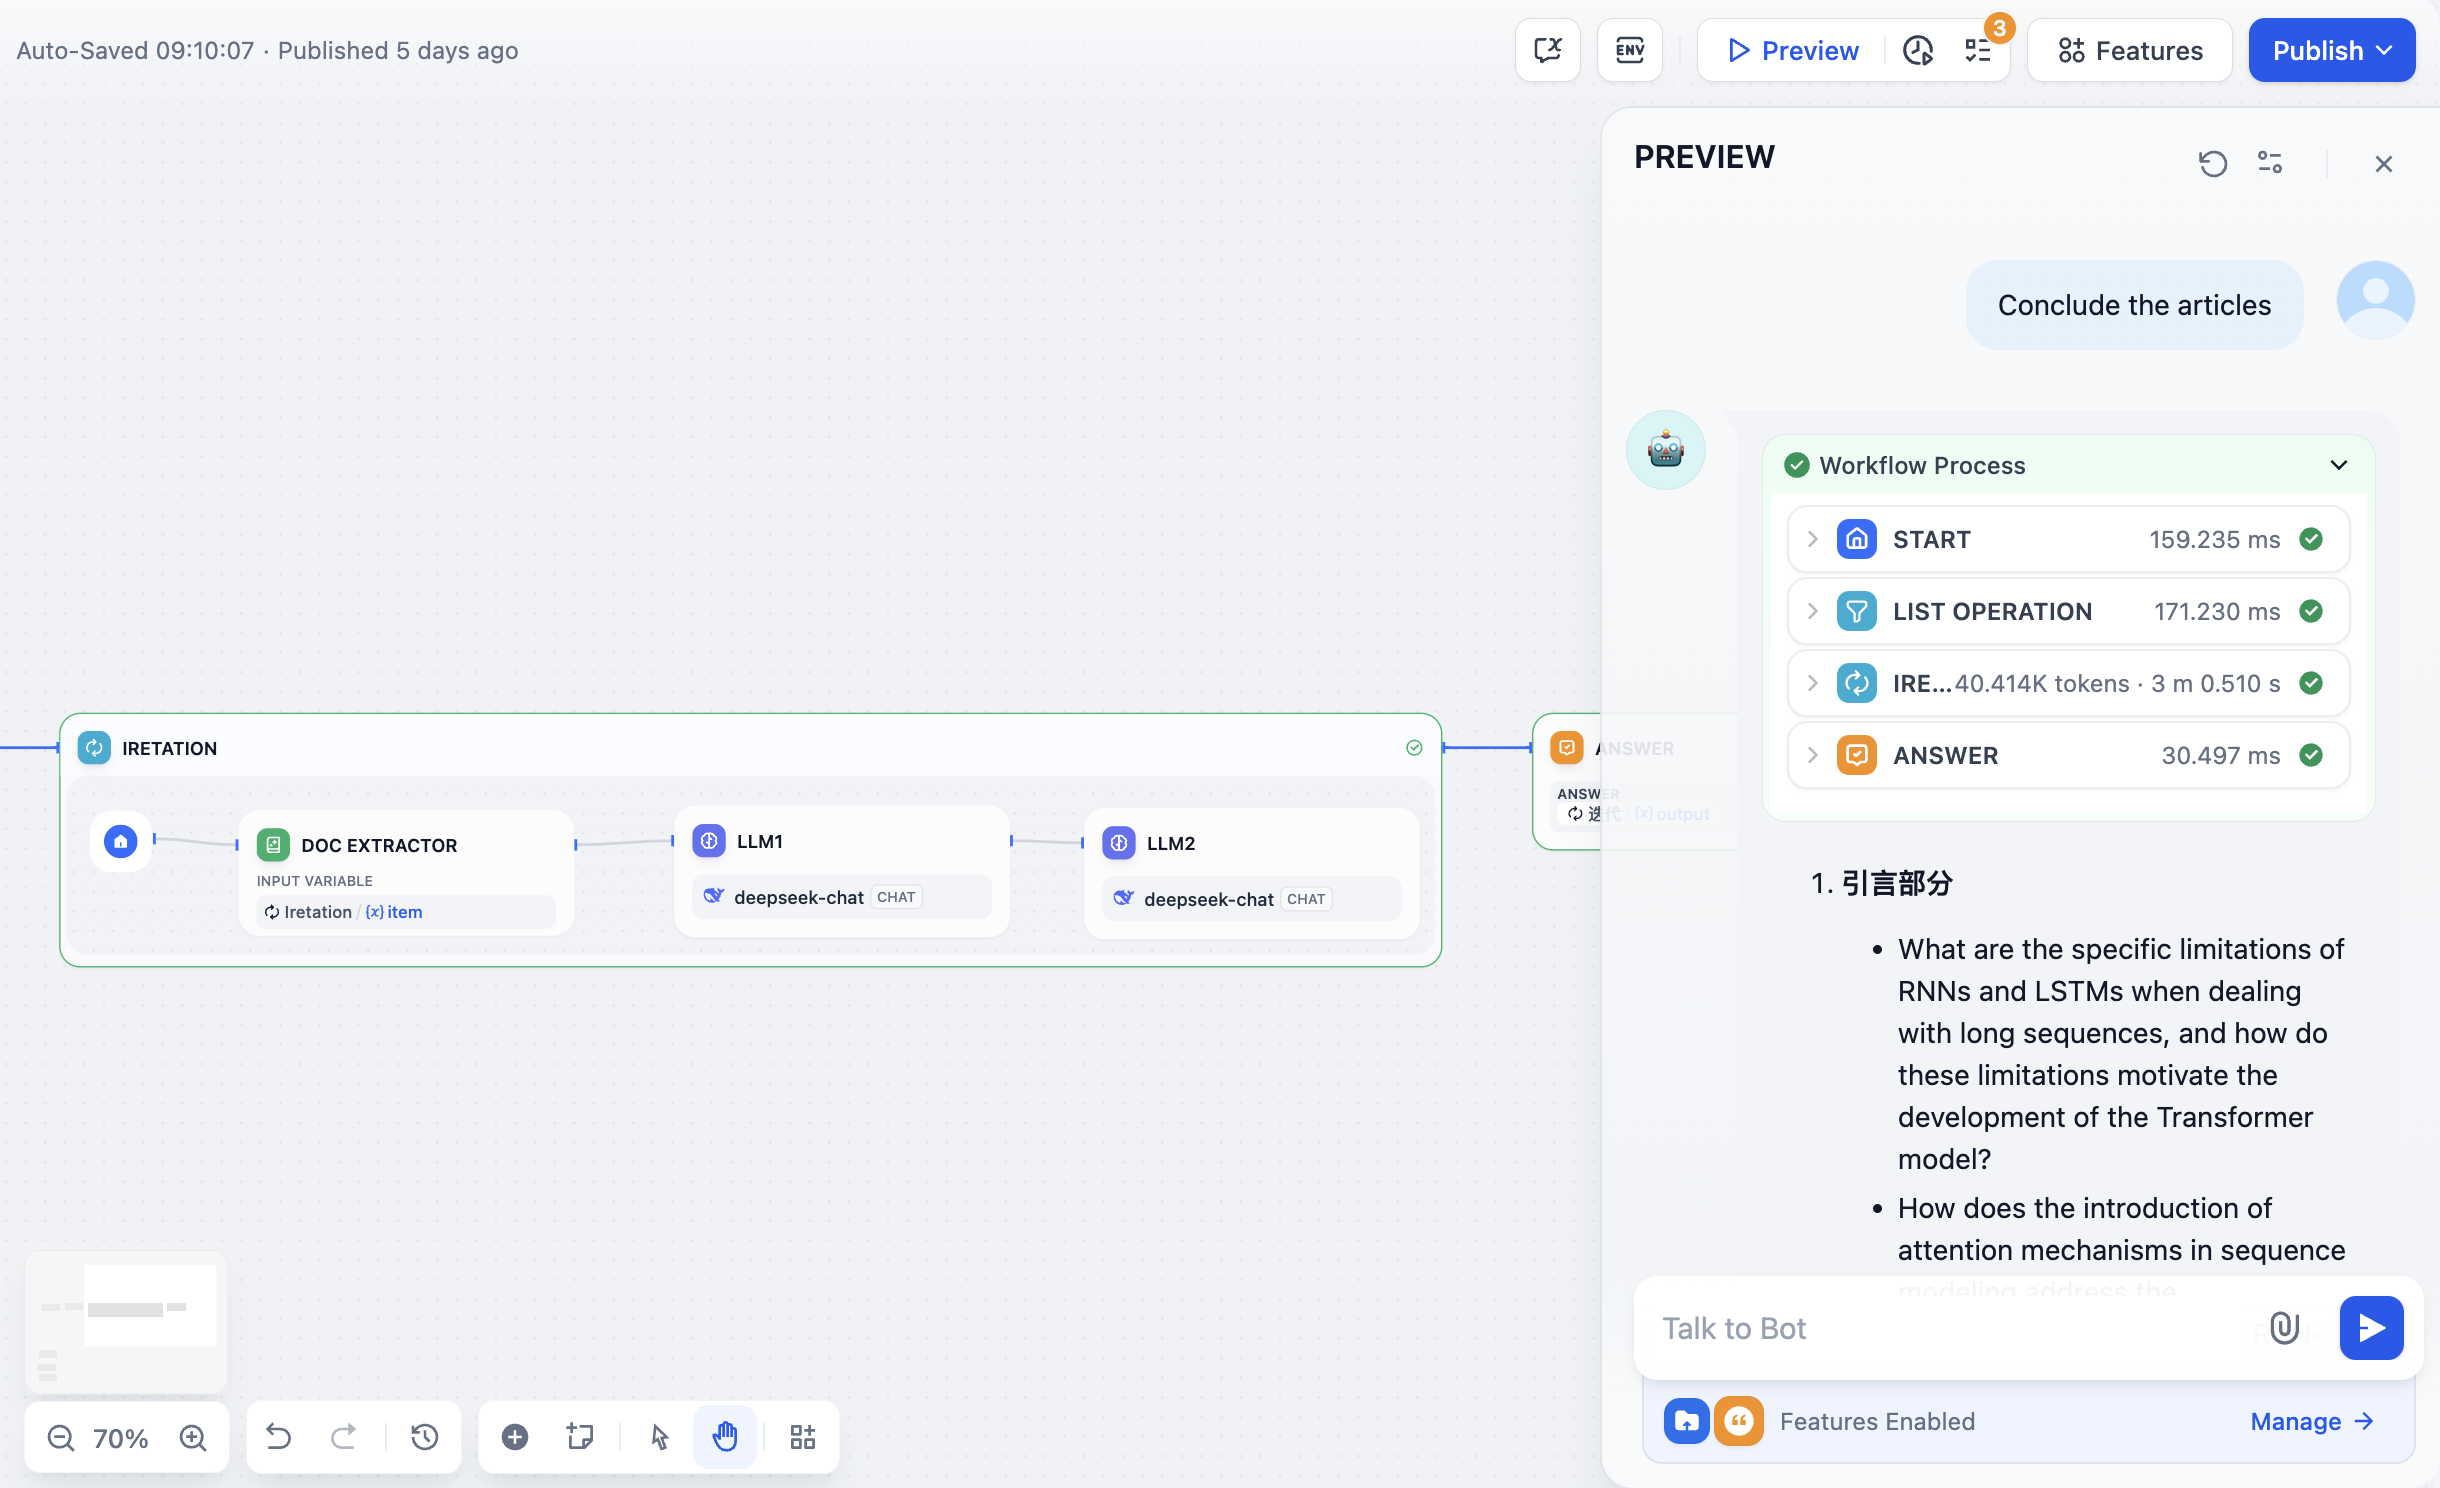
## **Question 2: Handling Specific Files from a File List**
In Question 1, some readers might notice that Dify will process all files before ending the loop, while in some cases, only a part of the files need to be operated on, not all. For this issue, you can process the file list in Dify using the **list operation** node. List operations can operate on all array-type variables, not just file lists.
For example, limit the analysis to only document-type files and sort the files to be processed in order of file names.
Before the iterative node, add a list operation, adjust the **filter condiftion** and **order by**, then change the input of the iterative node to the output of the list operation node.
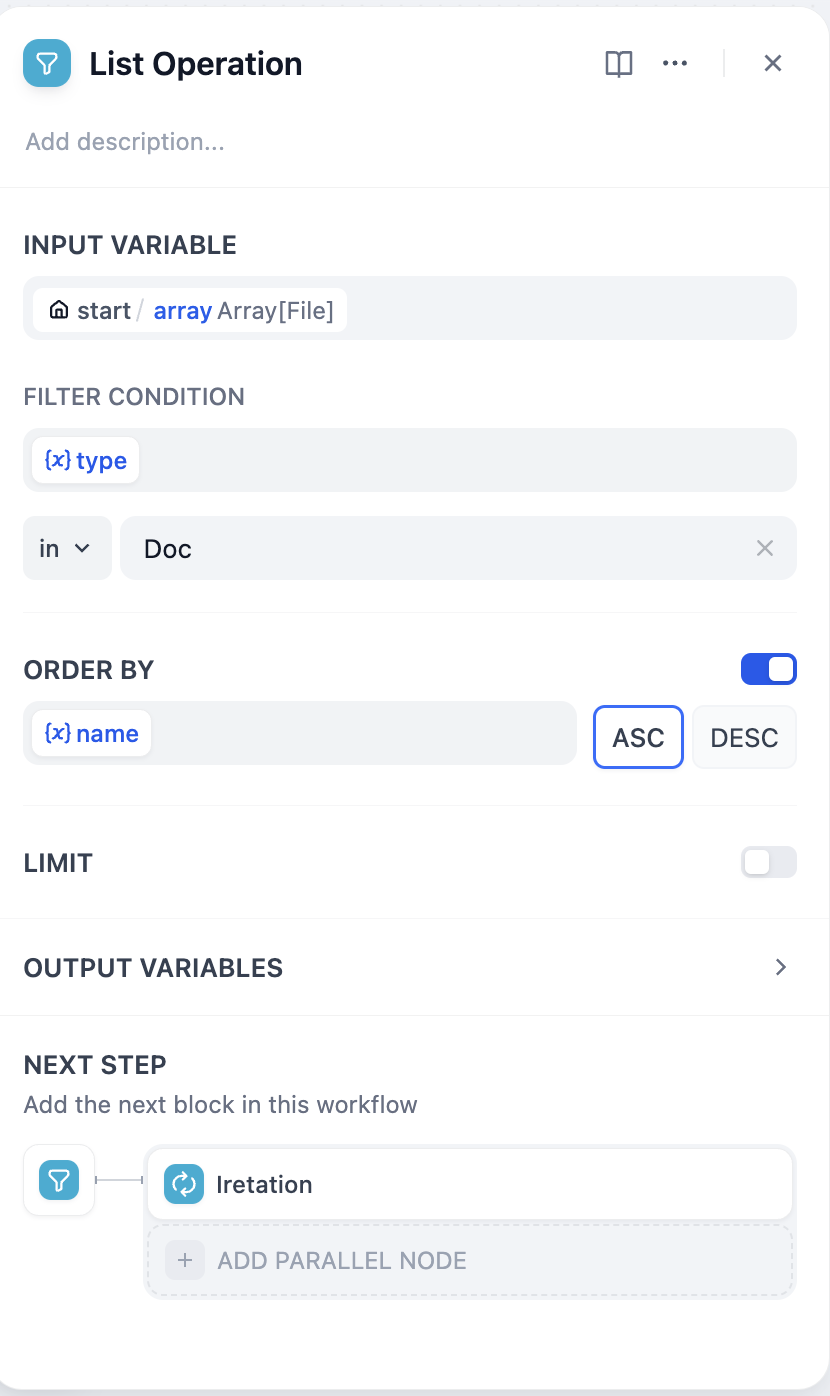
# AI Image Generation App
Source: https://docs.dify.ai/en/use-dify/tutorials/build-ai-image-generation-app
With the rise of image generation, many excellent image generation products have emerged, such as Dall-e, Flux, Stable Diffusion, etc.
In this article, you will learn how to develop an AI image generation app using Dify.

## You Will Learn
* Methods for building an Agent using Dify
* Basic concepts of Agent
* Fundamentals of prompt engineering
* Tool usage
* Concepts of large model hallucinations
## 1. Setting Stablility API Key
[Click here](https://platform.stability.ai/account/keys) to go to the Stability API key management page.
If you haven't registered yet, you will be asked to register before entering the API management page.
After entering the management page, click `copy` to copy the key.

Next, you need to fill in the key in [Dify - Tools - Stability](https://cloud.dify.ai/tools) by following these steps:
* Log in to Dify
* Enter Tools
* Select Stability
* Click `Authorize`

* Fill in the key and save
## 2. Configure Model Providers
To optimize interaction, we need an LLM to concretize user instructions, i.e., to write prompts for generating images. Next, we will configure model providers in Dify following these steps.
The Free version of Dify provides 200 free OpenAI message credits.
If the message credits are insufficient, you can customize other model providers by following the steps in the image below:
Click **Your Avatar - Settings - Model Provider**

If you haven't found a suitable model provider, the groq platform provides free call credits for LLMs like Llama.
Log in to [groq API Management Page](https://console.groq.com/keys)
Click **Create API Key**, set a desired name, and copy the API Key.
Back to **Dify - Model Providers**, select **groqcloud**, and click **Setup**.

Paste the API Key and save.
## 3. Build an Agent
Back to **Dify - Studio**, select **Create from Blank**.

In this experiment, we only need to understand the basic usage of Agent.
**What is an Agent**
An Agent is an AI system that simulates human behavior and capabilities. It interacts with the environment through natural language processing, understands input information, and generates corresponding outputs. The Agent also has "perception" capabilities, can process and analyze various forms of data, and can call and use various external tools and APIs to complete tasks, extending its functional scope. This design allows the Agent to handle complex situations more flexibly and simulate human thinking and behavior patterns to some extent.
Select **Agent**, fill in the name.
Next, you will enter the Agent orchestration interface as shown below.
Select the LLM. Here we use Llama-3.1-70B provided by groq as an example:
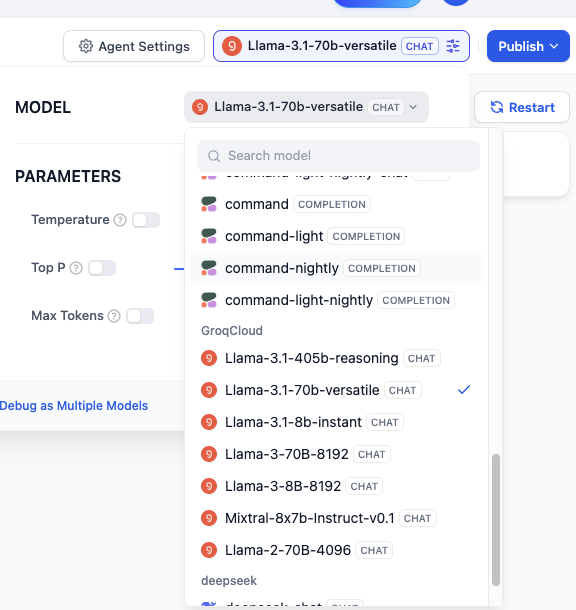
Select Stability in **Tools**:
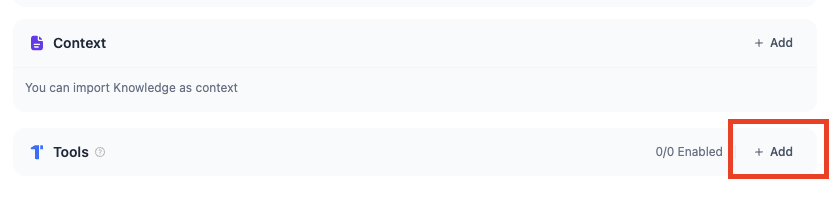
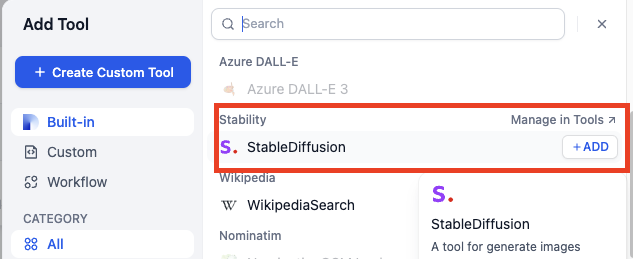
### Write Prompts
Prompts are the soul of the Agent and directly affect the output effect. Generally, the more specific the prompts, the better the output, but overly lengthy prompts can also lead to negative effects.
The engineering of adjusting prompts is called Prompt Engineering.
In this experiment, you don't need to worry about not mastering Prompt Engineering; we will learn it step by step later.
Let's start with the simplest prompts:
```
Draw the specified content according to the user's prompt using stability_text2image.
```
Each time the user inputs a command, the Agent will know this system-level instruction, thus understanding that when executing a user's drawing task, it needs to call stability tool.
For example: Draw a girl holding an open book.

### Don't want to write prompts? Of course you can!
Click **Generate** in the upper right corner of Instructions.
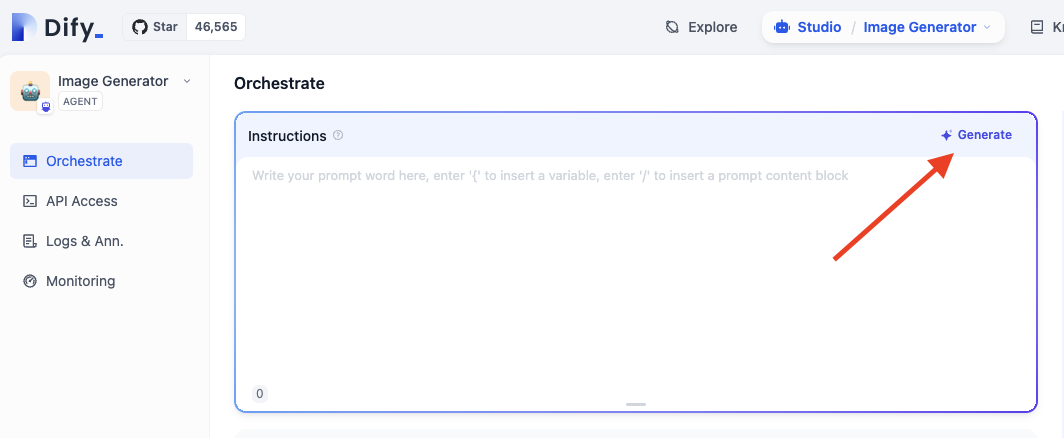
Enter your requirements in the **Instructions** and click **Generate**. The generated prompts on the right will show AI-generated prompts.
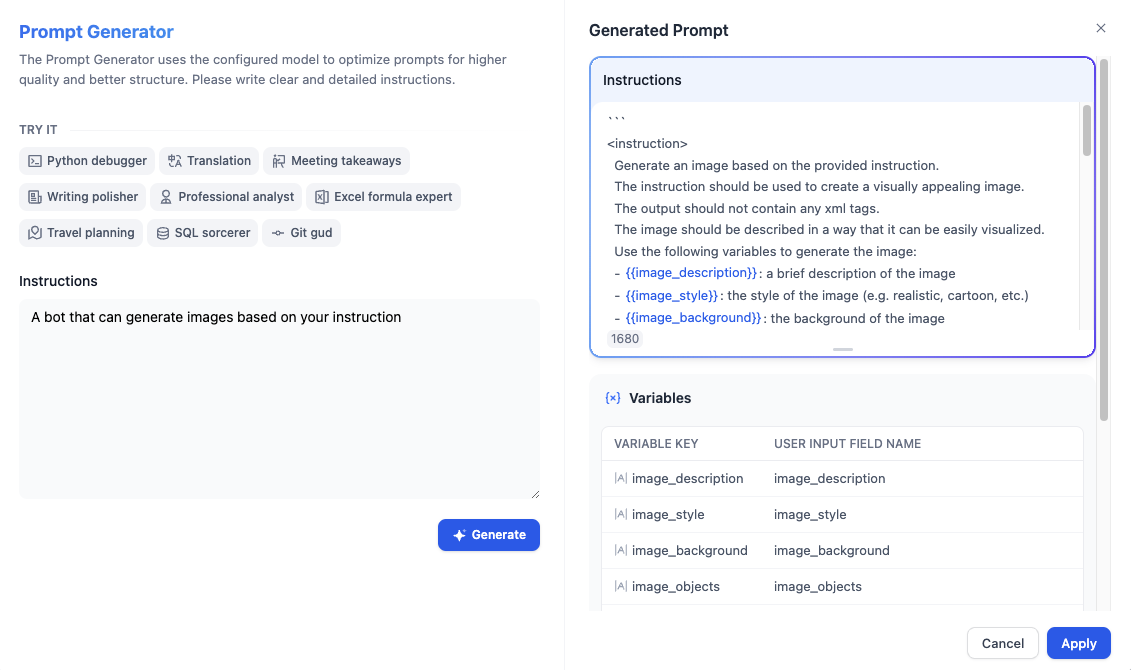
However, to develop a good understanding of prompts, we should not rely on this feature in the early stages.
## Publish
Click the publish button in the upper right corner, and after publishing, select **Run App** to get a web page for an online running Agent.

Copy the URL of this web page to share with other friends.
## Question 1: How to Specify the Style of Generated Images?
We can add style instructions in the user's input command, for example: Anime style, draw a girl holding an open book.
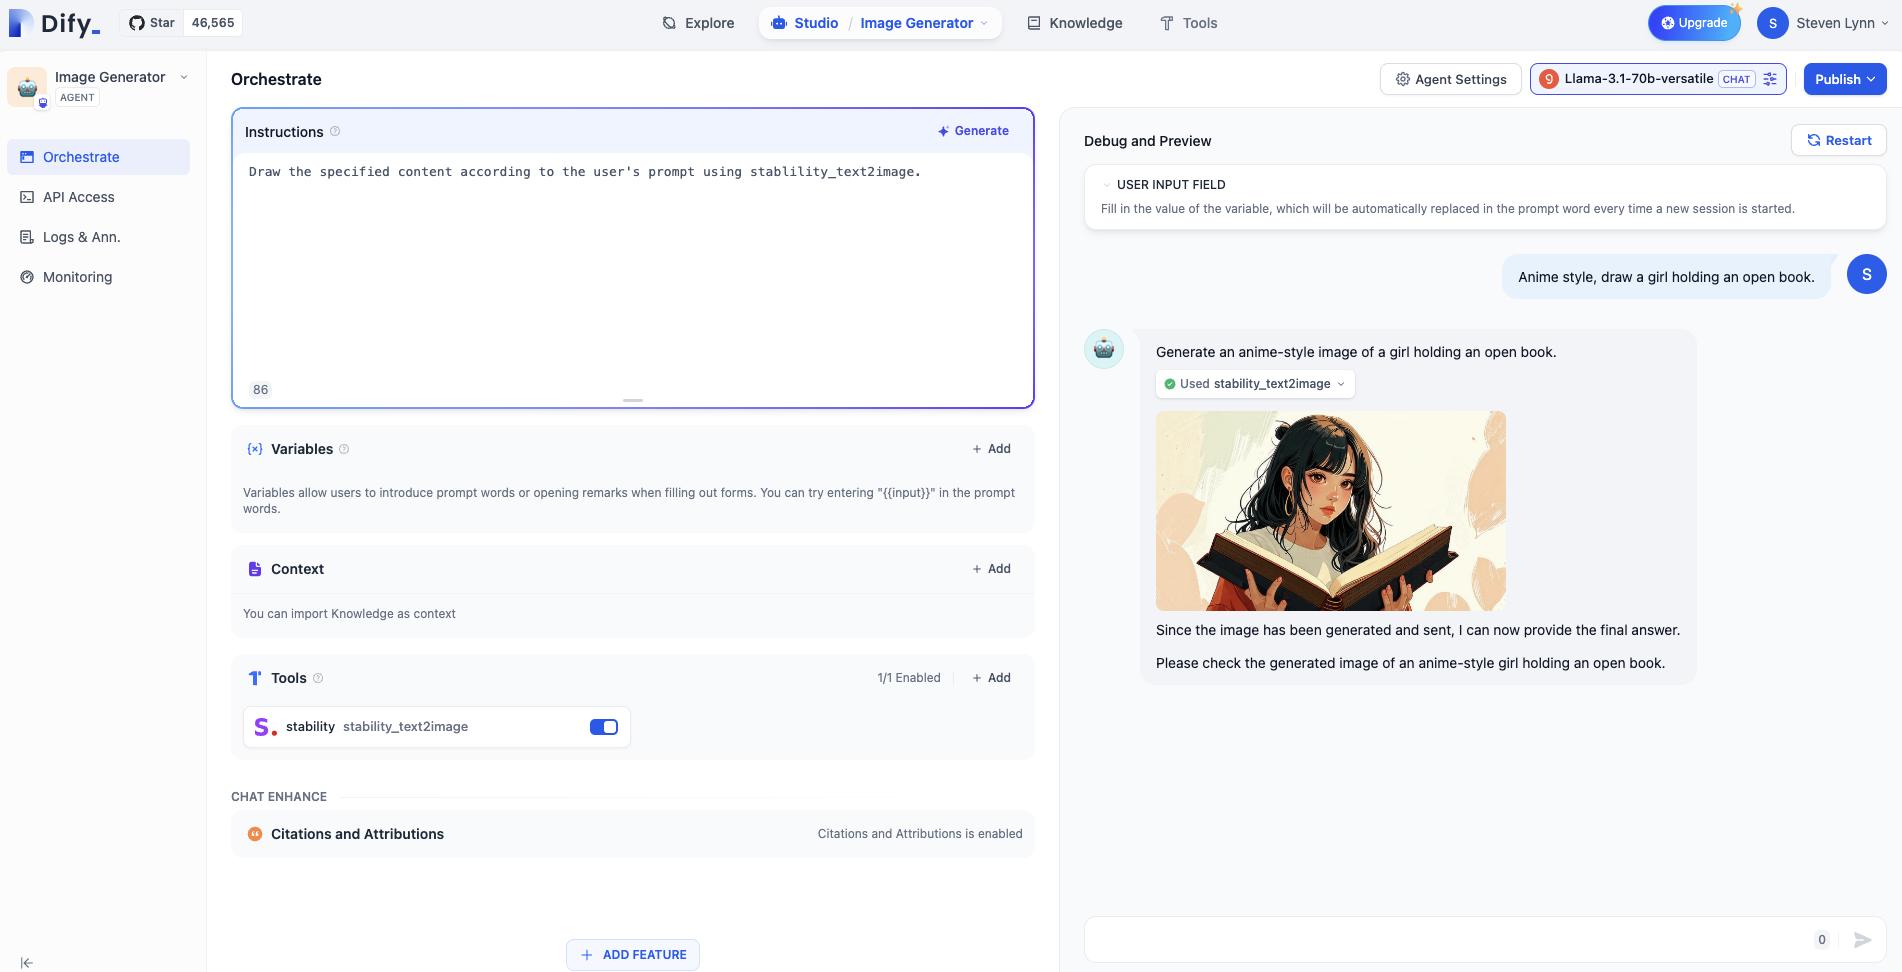
But if we want set the default style to anime style, we can add it to the system prompt because we previously learned that the system prompt is known each time the user command is executed and has a higher priority.
```
Draw the specified content according to the user's prompt using stability_text2image, the picture is in anime style.
```
## Question 2: How to Reject Certain Requests from Some Users?
In many business scenarios, we need to avoid outputting some unreasonable content, but LLMs are often "dumb" and will follow user instructions without question, even if the output content is wrong. This phenomenon of the model trying hard to answer users by fabricating false content is called **model hallucinations**. Therefore, we need the model to refuse user requests when necessary.
Additionally, users may also ask some content unrelated to the business, and we also need the Agent to refuse such requests.
We can use markdown format to categorize different prompts, writing the prompts that teach the Agent to refuse unreasonable content under the "Constraints" title. Of course, this format is just for standardization, and you can have your own format.
```
## Task
Draw the specified content according to the user's prompt using stability_text2image, the picture is in anime style.
## Constraints
If the user requests content unrelated to drawing, reply: "Sorry, I don't understand what you're saying."
```
For example, let's ask: What's for dinner tonight?

In some more formal business scenarios, we can call a sensitive word library to refuse user requests.
Add the keyword "dinner" in **Add Feature - Content Moderation**. When the user inputs the keyword, the Agent app outputs "Sorry, I don't understand what you're saying."

# Customer Service Bot With Knowledge Base
Source: https://docs.dify.ai/en/use-dify/tutorials/customer-service-bot
In the last experiment, we learned the basic usage of file uploads. However, when the text we need to read exceeds the LLM's context window, we need to use a knowledge base.
> **What is context?**
>
> The context window refers to the range of text that the LLM can "see" and "remember" when processing text. It determines how much previous text information the model can refer to when generating responses or continuing text. The larger the window, the more contextual information the model can utilize, and the generated content is usually more accurate and coherent.
Previously, we learned about the concept of LLM hallucinations. In many cases, an LLM knowledge base allows the Agent to locate accurate information, thus accurately answering questions. It has applications in specific fields such as customer service and search tools.
Traditional customer service bots are often based on keyword retrieval. When users input questions outside of the keywords, the bot cannot solve the problem. The knowledge base is designed to solve this problem, enabling semantic-level retrieval and reducing the burden on human agents.
Before starting the experiment, remember that the core of the knowledge base is retrieval, not the LLM. The LLM enhances the output process, but the real need is still to generate answers.
### What You Will Learn in This Experiment
* Basic usage of Chatflow
* Usage of knowledge bases and external knowledge bases
* The concept of embeddings
### Prerequisites
#### Create an Application
In Dify, select **Create from Blank - Chatflow.**
#### Add a Model Provider
This experiment involves using embedding models. Currently, supported embedding model providers include OpenAI and Cohere. In Dify's model providers, those with the `TEXT EMBEDDING` label are supported. Ensure you have added at least one and have sufficient balance.
> **What is embedding?**
>
> "Embedding" is a technique that converts discrete variables (such as words, sentences, or entire documents) into continuous vector representations.
>
> Simply put, when we process natural language into data, we convert text into vectors. This process is called embedding. Vectors of semantically similar texts will be close together, while vectors of semantically opposite texts will be far apart. LLMs use this data for training, predicting subsequent vectors, and thus generating text.
### Create a Knowledge Base
Log in to Dify -> Knowledge -> Create Knowledge
Dify supports three data sources: documents, Notion, and web pages.
For local text files, note the file type and size limitations; syncing Notion content requires binding a Notion account; syncing a website requires using the **Jina** or **Firecrawl API**.
We will start with a uploading local document as an example.
#### Chunk Settings
After uploading the document, you will enter the following page:

You can see a segmentation preview on the right. The default selection is automatic segmentation and cleaning. Dify will automatically divide the article into many paragraphs based on the content. You can also set other segmentation rules in the custom settings.
#### Index Method
Normally we prefer to select **High Quality**, but this will consume extra tokens. Selecting **Economic** will not consume any tokens.
The community edition of Dify uses a Q\&A segmentation mode. Selecting the corresponding language can organize the text content into a Q\&A format, which requires additional token consumption.
#### Embedding Model
Please refer to the model provider's documentation and pricing information before use.
Different embedding models are suitable for different scenarios. For example, Cohere's `embed-english` is suitable for English documents, and `embed-multilingual` is suitable for multilingual documents.
#### Retrieval Settings
Dify provides three retrieval functions: vector retrieval, full-text retrieval, and hybrid retrieval. Hybrid retrieval is the most commonly used.
In hybrid retrieval, you can set weights or use a reranking model. When setting weights, you can set whether the retrieval should focus more on semantics or keywords. For example, in the image below, semantics account for 70% of the weight, and keywords account for 30%.
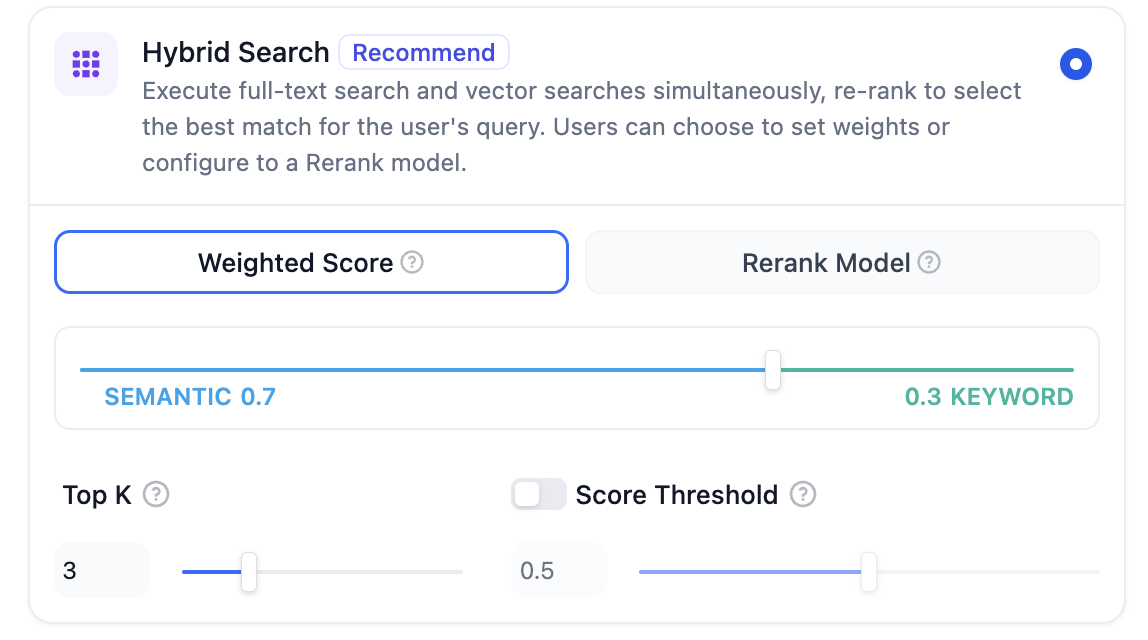
Clicking **Save and Process** will process the document. After processing, the document can be used in the application.
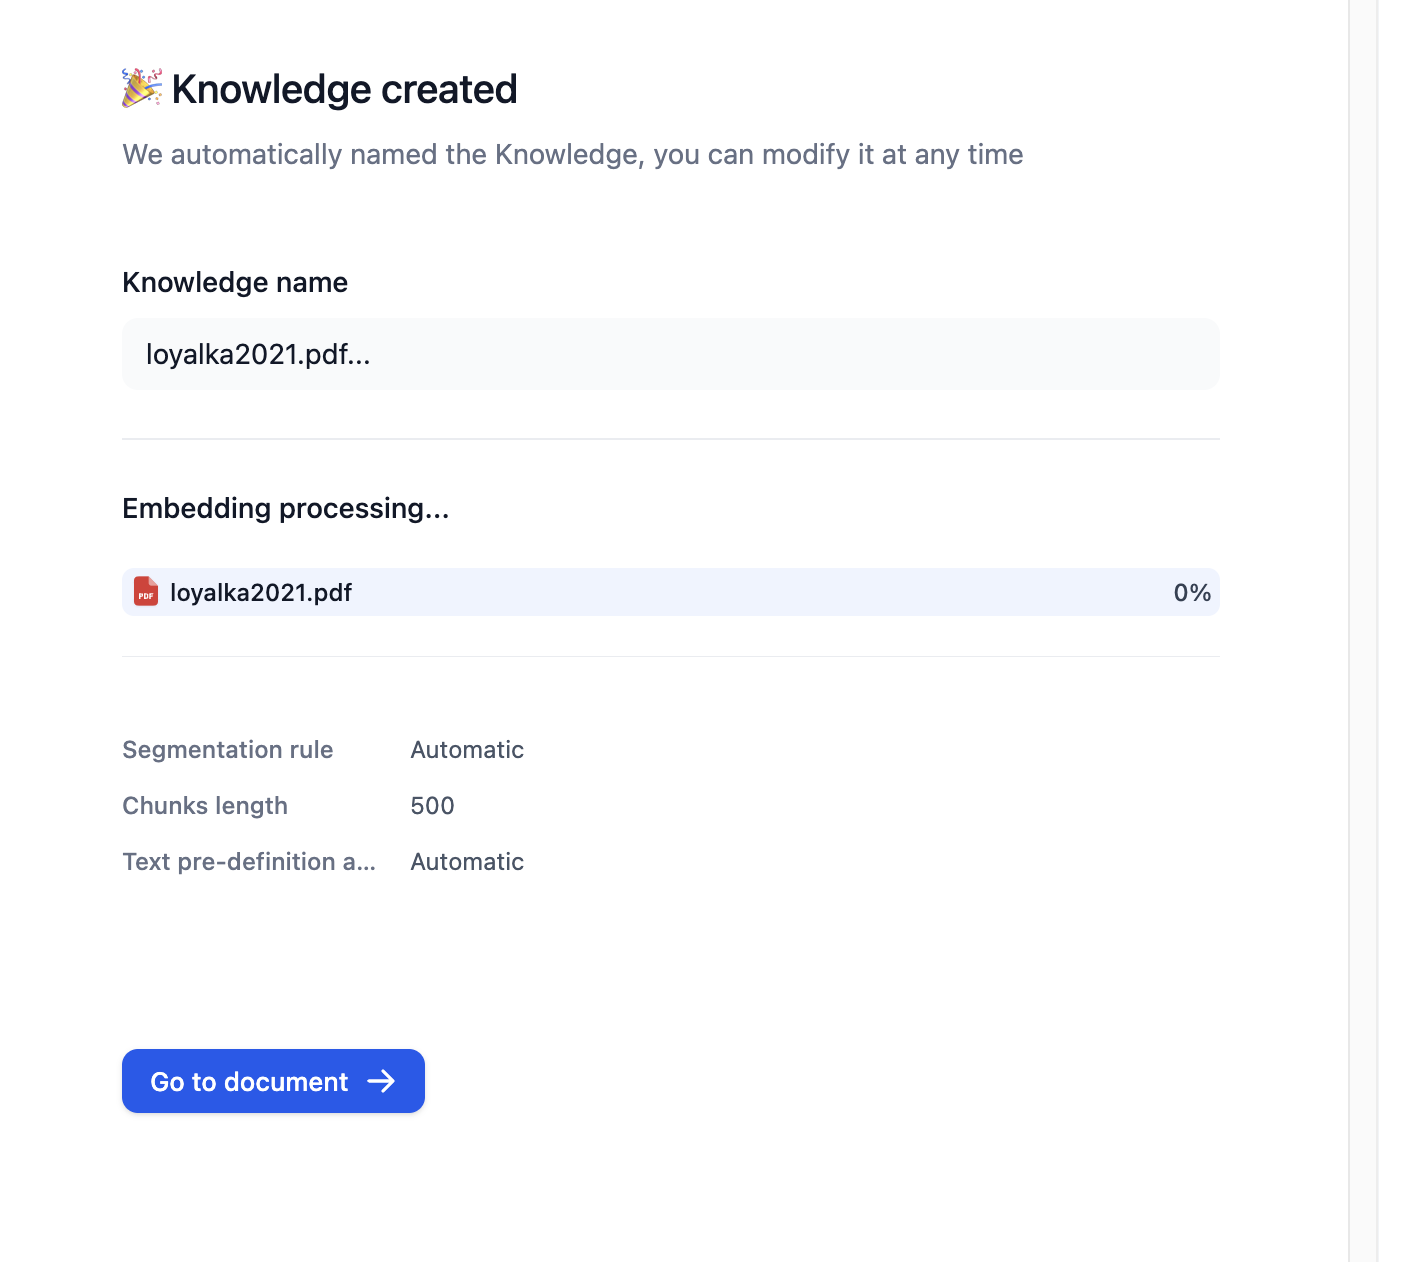
#### Syncing from a Website
In many cases, we need to build a smart customer service bot based on help documentation. Taking Dify as an example, we can convert the [Dify help documentation](https://docs.dify.ai) into a knowledge base.
Currently, Dify supports processing up to 50 pages. Please pay attention to the quantity limit. If exceeded, you can create a new knowledge base.
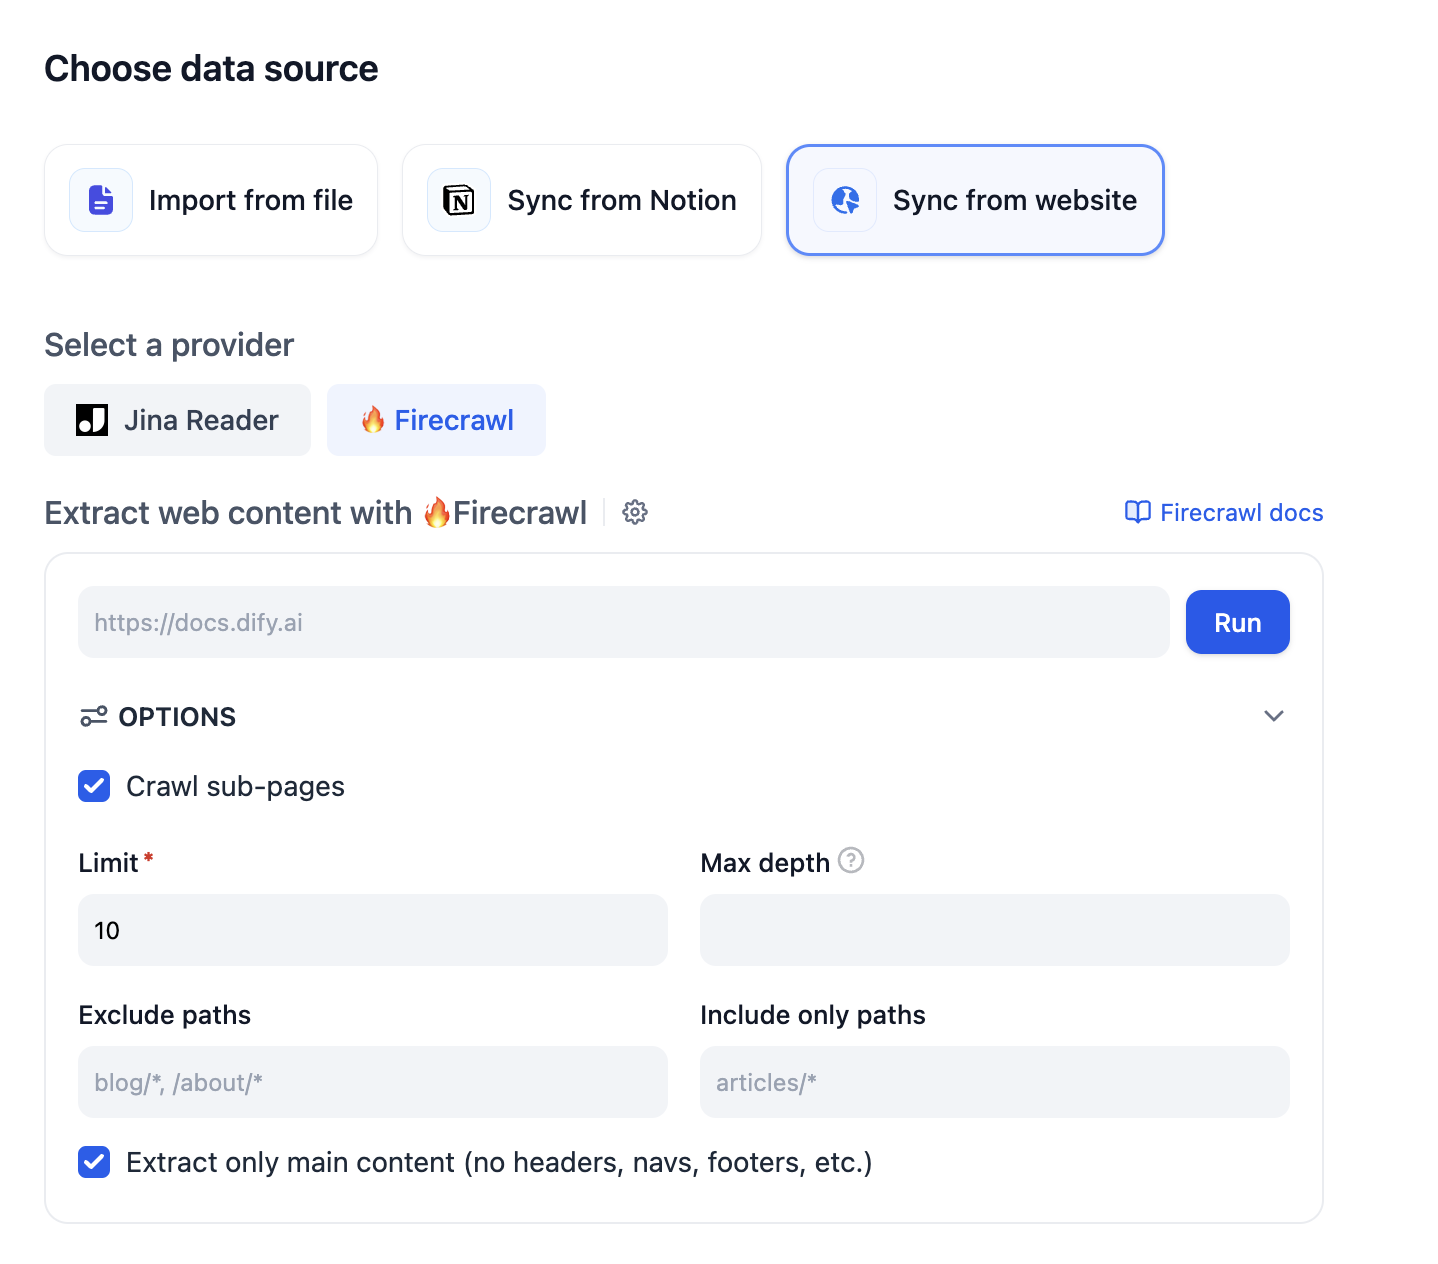
#### Adjusting Knowledge Base Content
After the knowledge base has processed all documents, it is best to check the coherence of the segmentation in the knowledge base. Incoherence will affect the retrieval effect and needs to be manually adjusted.
Click on the document content to browse the segmented content. If there is irrelevant content, you can disable or delete it.
If content is segmented into another paragraph, it also needs to be adjusted back.
#### Recall Test
In the document page of the knowledge base, click Recall Test in the left sidebar to input keywords to test the accuracy of the retrieval results.
### Add Nodes
Enter the created APP, and let's start building the smart customer service bot.
#### Question Classification Node
You need to use a question classification node to separate different user needs. In some cases, users may even chat about irrelevant topics, so you need to set a classification for this as well.
To make the classification more accurate, you need to choose a better LLM, and the classification needs to be specific enough with sufficient distinction.
Here is a reference classification:
* User asks irrelevant questions
* User asks Dify-related questions
* User requests explanation of technical terms
* User asks about joining the community
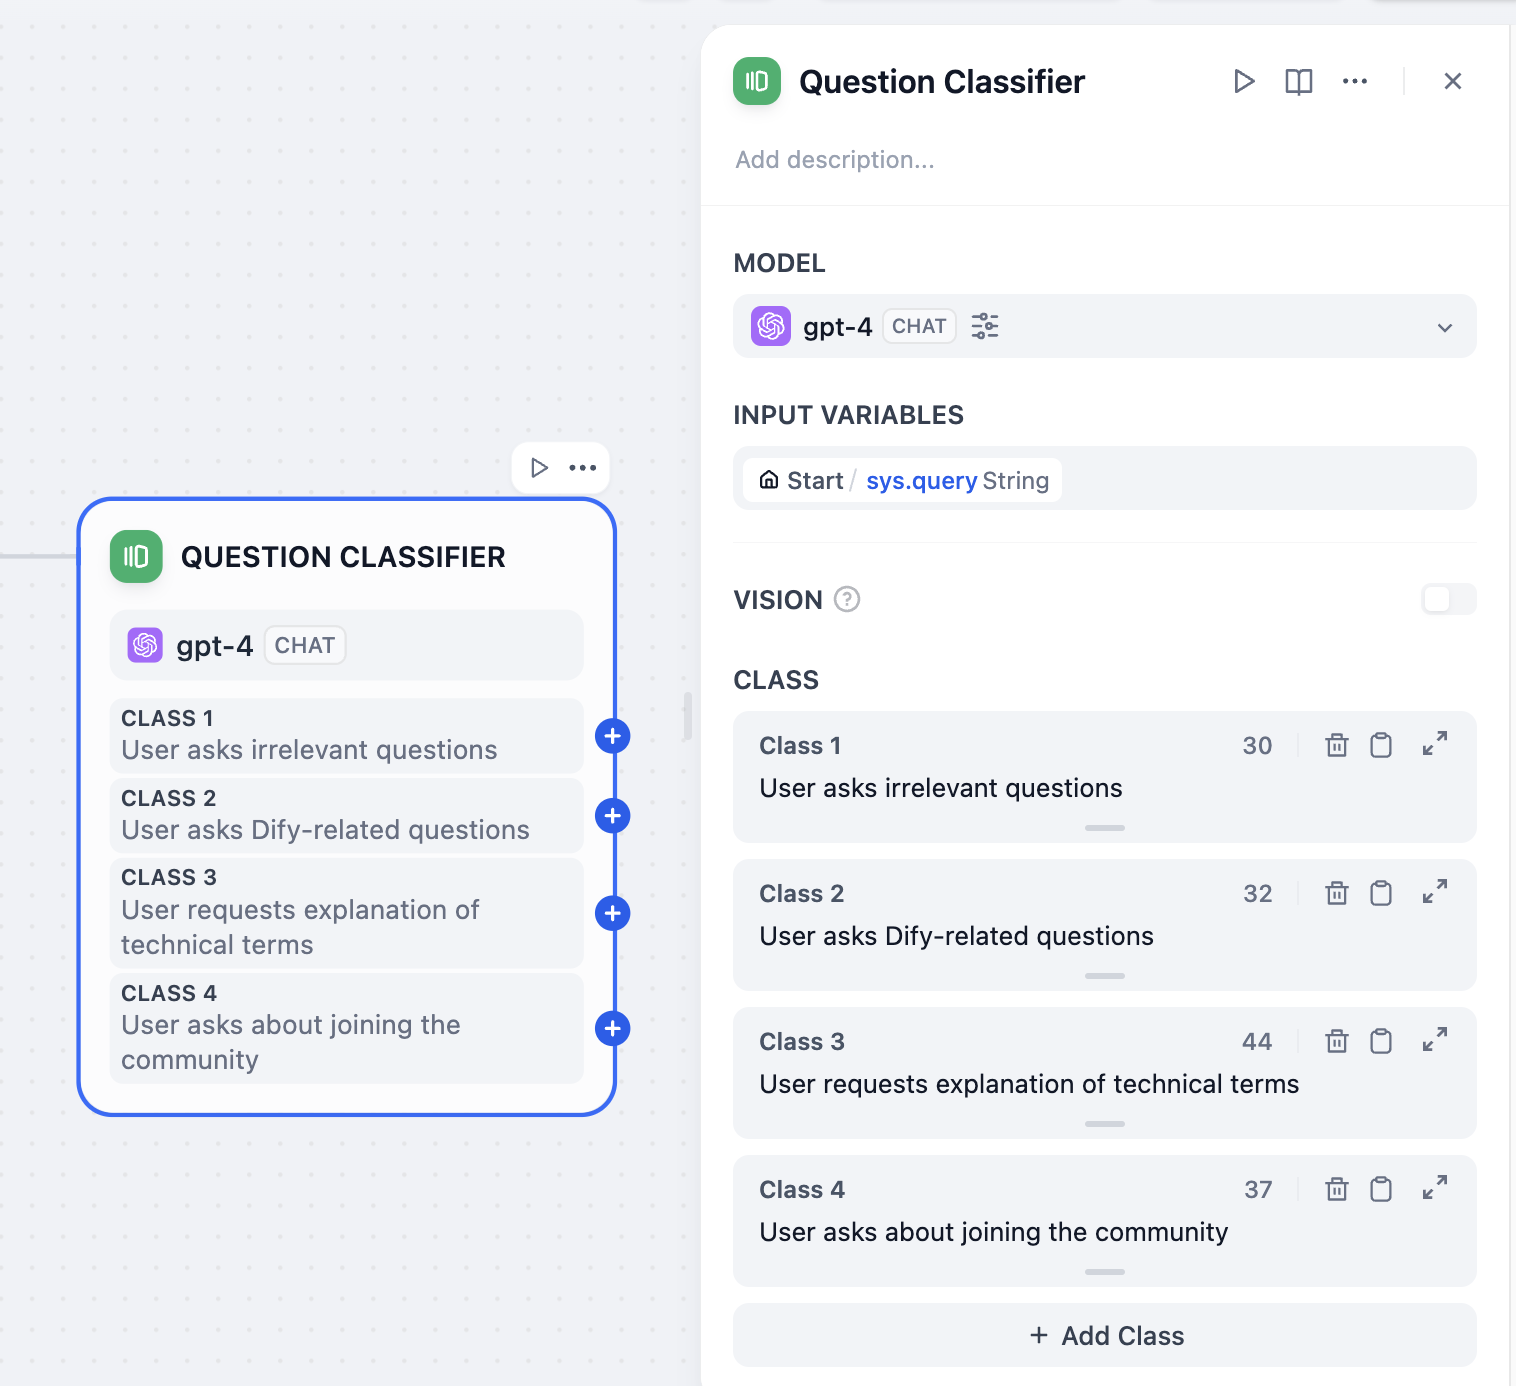
#### Direct Reply Node
In the question classification, "User asks irrelevant questions" and "User asks about joining the community" do not need LLM processing to reply. Therefore, you can directly connect a direct reply node after these two questions.
"User asks irrelevant questions":
You can guide the user to the help documentation, allowing them to try to solve the problem themselves, for example:
```
I'm sorry, I can't answer your question. If you need more help, please check the [help documentation](https://docs.dify.ai).
```
Dify supports Markdown formatted text output. You can use Markdown to enrich the text format in the output. You can even insert images in the text using Markdown.
#### Knowledge Retrieval Node
Add a knowledge retrieval node after "User asks Dify-related questions" and check the knowledge base to be used.
#### LLM Node
In the next node after the knowledge retrieval node, you need to select an LLM node to organize the content retrieved from the knowledge base.
The LLM needs to adjust the reply based on the user's question to make the reply more appropriate.
Context: You need to use the output of the knowledge retrieval node as the context of the LLM node.
System prompt: Based on `{{context}}`, answer `{{user question}}`.
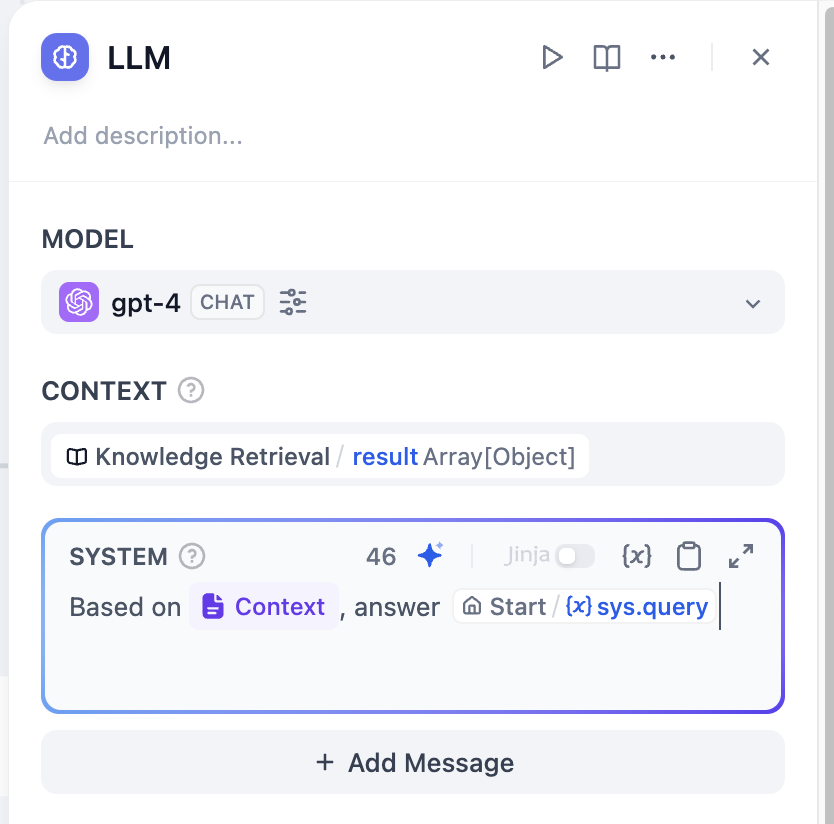
You can use `/` or `{` to reference variables in the prompt writing area. In variables, variables starting with `sys.` are system variables. Please refer to the help documentation for details.
In addition, you can enable LLM memory to make the user's conversation experience more coherent.
### Question 1: How to Connect External Knowledge Bases
In the knowledge base function, you can connect external knowledge bases through external knowledge base APIs, such as the AWS Bedrock knowledge base.
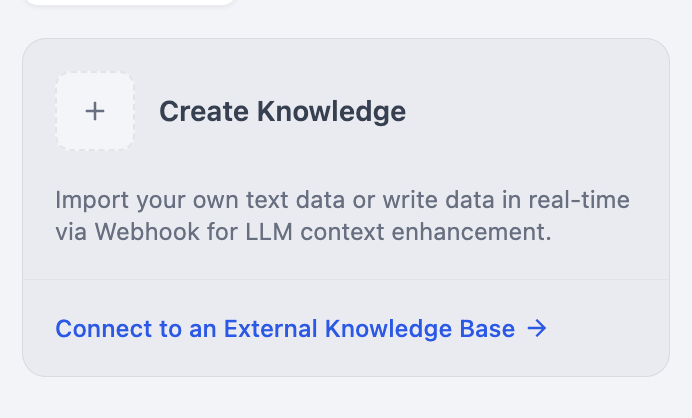
### Question 2: How to Manage Knowledge Bases Through APIs
In both the community edition and SaaS version of Dify, you can add, delete, and query the status of knowledge bases through the knowledge base API.
In the instance with the knowledge base deployed, go to **Knowledge Base -> API** and create an API key. Please keep the API key safe.
### Question 3: How to Embed the Customer Service Bot into a Webpage
After application deployment, select embed webpage, choose a suitable embedding method, and paste the code into the appropriate location on the webpage.
# Simple Chatbot
Source: https://docs.dify.ai/en/use-dify/tutorials/simple-chatbot
Hello World
The real value of Dify lies in how easily you can build, deploy, and scale an idea no matter how complex. It's built for fast prototyping, smooth iteration, and reliable deployment at any level.
Let's start by learning reliable LLM integration into your applications. In this guide, you'll build a simple chatbot that classifies the user's question, respond directly using the LLM, and enhance the response with a country-specific fun fact.
## Step 1: Create a New Workflow (2 min)
1. Go to **Studio** > **Workflow** > **Create from Blank** > **Orchestrate** > **New Chatflow** > **Create**
## Step 2: Add Workflow Nodes (6 min)
When you want to reference any variable, type `{` or `/` first and you can see the different variables available in your workflow.
### 1. LLM Node and Output: Understand and Answer the Question
`LLM` node sends a prompt to a language model to generate a response based on user input. It abstracts away the complexity of API calls, rate limits, and infrastructure, so you can just focus on designing logic.
Create an LLM node using the `Add Node` button and connect it to your Start node
Choose a default model
Paste this into the System Prompt field:
```text theme={null}
The user will ask a question about a country. The question is {{sys.query}}
Tasks:
1. Identify the country mentioned.
2. Rephrase the question clearly.
3. Answer the question using general knowledge.
Respond in the following JSON format:
{
"country": "",
"question": "",
"answer": ""
}
```
**Enable Structured Output** allows you to easily control what the LLM will return and ensure consistent, machine-readable outputs for downstream use in precise data extraction or conditional logic.
* Toggle Output Variables Structured ON > `Configure` and click `Import from JSON`
* Paste:
```json theme={null}
{
"country": "string",
"question": "string",
"answer": "string"
}
```
### 2. Code Block: Get Fun Fact
`Code` node executes custom logic using code. It lets you inject code exactly where needed—within a visual workflow—saving you from wiring up an entire backend.
Create a `Code` Node using the `Add Node` button and connect to LLM block
Change one `Input Variable` name to "country" and set the variable to `structured_output` > `country`
Paste this code into `PYTHON3`:
```python theme={null}
def main(country: str) -> dict:
country_name = country.lower()
fun_facts = {
"japan": "Japan has more than 5 million vending machines.",
"france": "France is the most visited country in the world.",
"italy": "Italy has more UNESCO World Heritage sites than any other country."
}
fun_fact = fun_facts.get(country_name, f"No fun fact available for {country.title()}.")
return {"fun_fact": fun_fact}
```
Change output variable `result` to `fun_fact` to have a better labeled variable
### 3. Answer Node: Final Answer to User
`Answer` Node creates a clean final output to return.
Create an `Answer` Node using the `Add Node` button
Paste into the Answer Field:
```text theme={null}
Q: {{ structured_output.question }}
A: {{ structured_output.answer }}
Fun Fact: {{ fun_fact }}
```
End Workflow:
![Complete workflow diagram showing LLM, Code, and Answer nodes connected]() ***
## Step 3: Test the Bot (3 min)
Click `Preview`, then ask:
* "What is the capital of France?"
* "Tell me about Japanese cuisine"
* "Describe the culture in Italy"
* Any other questions
Make sure your Bot works as expected!
## You've Completed the Bot!
This guide showed how to integrate language models reliably and scalably without reinventing infrastructure. With Dify's visual workflows and modular nodes, you're not just building faster, you're adopting a clean, production-ready architecture for LLM-powered apps.
# Twitter Account Analyzer
Source: https://docs.dify.ai/en/use-dify/tutorials/twitter-chatflow
## Introduction
In Dify, you can use some crawler tools, such as Jina, which can convert web pages into markdown format that LLMs can read.
Recently, [wordware.ai](https://www.wordware.ai/) has brought to our attention that we can use crawlers to scrape social media for LLM analysis, creating more interesting applications.
However, knowing that X (formerly Twitter) stopped providing free API access on February 2, 2023, and has since upgraded its anti-crawling measures. Tools like Jina are unable to access X's content directly.
> Starting February 9, we will no longer support free access to the Twitter API, both v2 and v1.1. A paid basic tier will be available instead 🧵
>
> — Developers (@XDevelopers) [February 2, 2023](https://twitter.com/XDevelopers/status/1621026986784337922?ref_src=twsrc%5Etfw)
Fortunately, Dify also has an HTTP tool, which allows us to call external crawling tools by sending HTTP requests. Let's get started!
## **Prerequisites**
### Register Crawlbase
Crawlbase is an all-in-one data crawling and scraping platform designed for businesses and developers.
Moreover, using Crawlbase Scraper allows you to scrape data from social platforms like X, Facebook and Instagram.
Click to register: [crawlbase.com](https://crawlbase.com)
### Deploy Dify locally
Dify is an open-source LLM app development platform. You can choose cloud service or deploy it locally using docker compose.
In this article, If you don’t want to deploy it locally, register a free Dify Cloud sandbox account here: [https://cloud.dify.ai/signin](https://cloud.dify.ai/signin).
Dify Cloud Sandbox users get 200 free credits, equivalent to 200 GPT-3.5 messages or 20 GPT-4 messages.
The following are brief tutorials on how to deploy Dify:
#### Clone Dify
```bash theme={null}
git clone https://github.com/langgenius/dify.git
```
#### **Start Dify**
```bash theme={null}
cd dify/docker
cp .env.example .env
docker compose up -d
```
### Configure LLM Providers
Configure Model Provider in account setting:
## Create a chatflow
Now, let's get started on the chatflow.
Click on `Create from Blank` to start:

The initialized chatflow should be like:
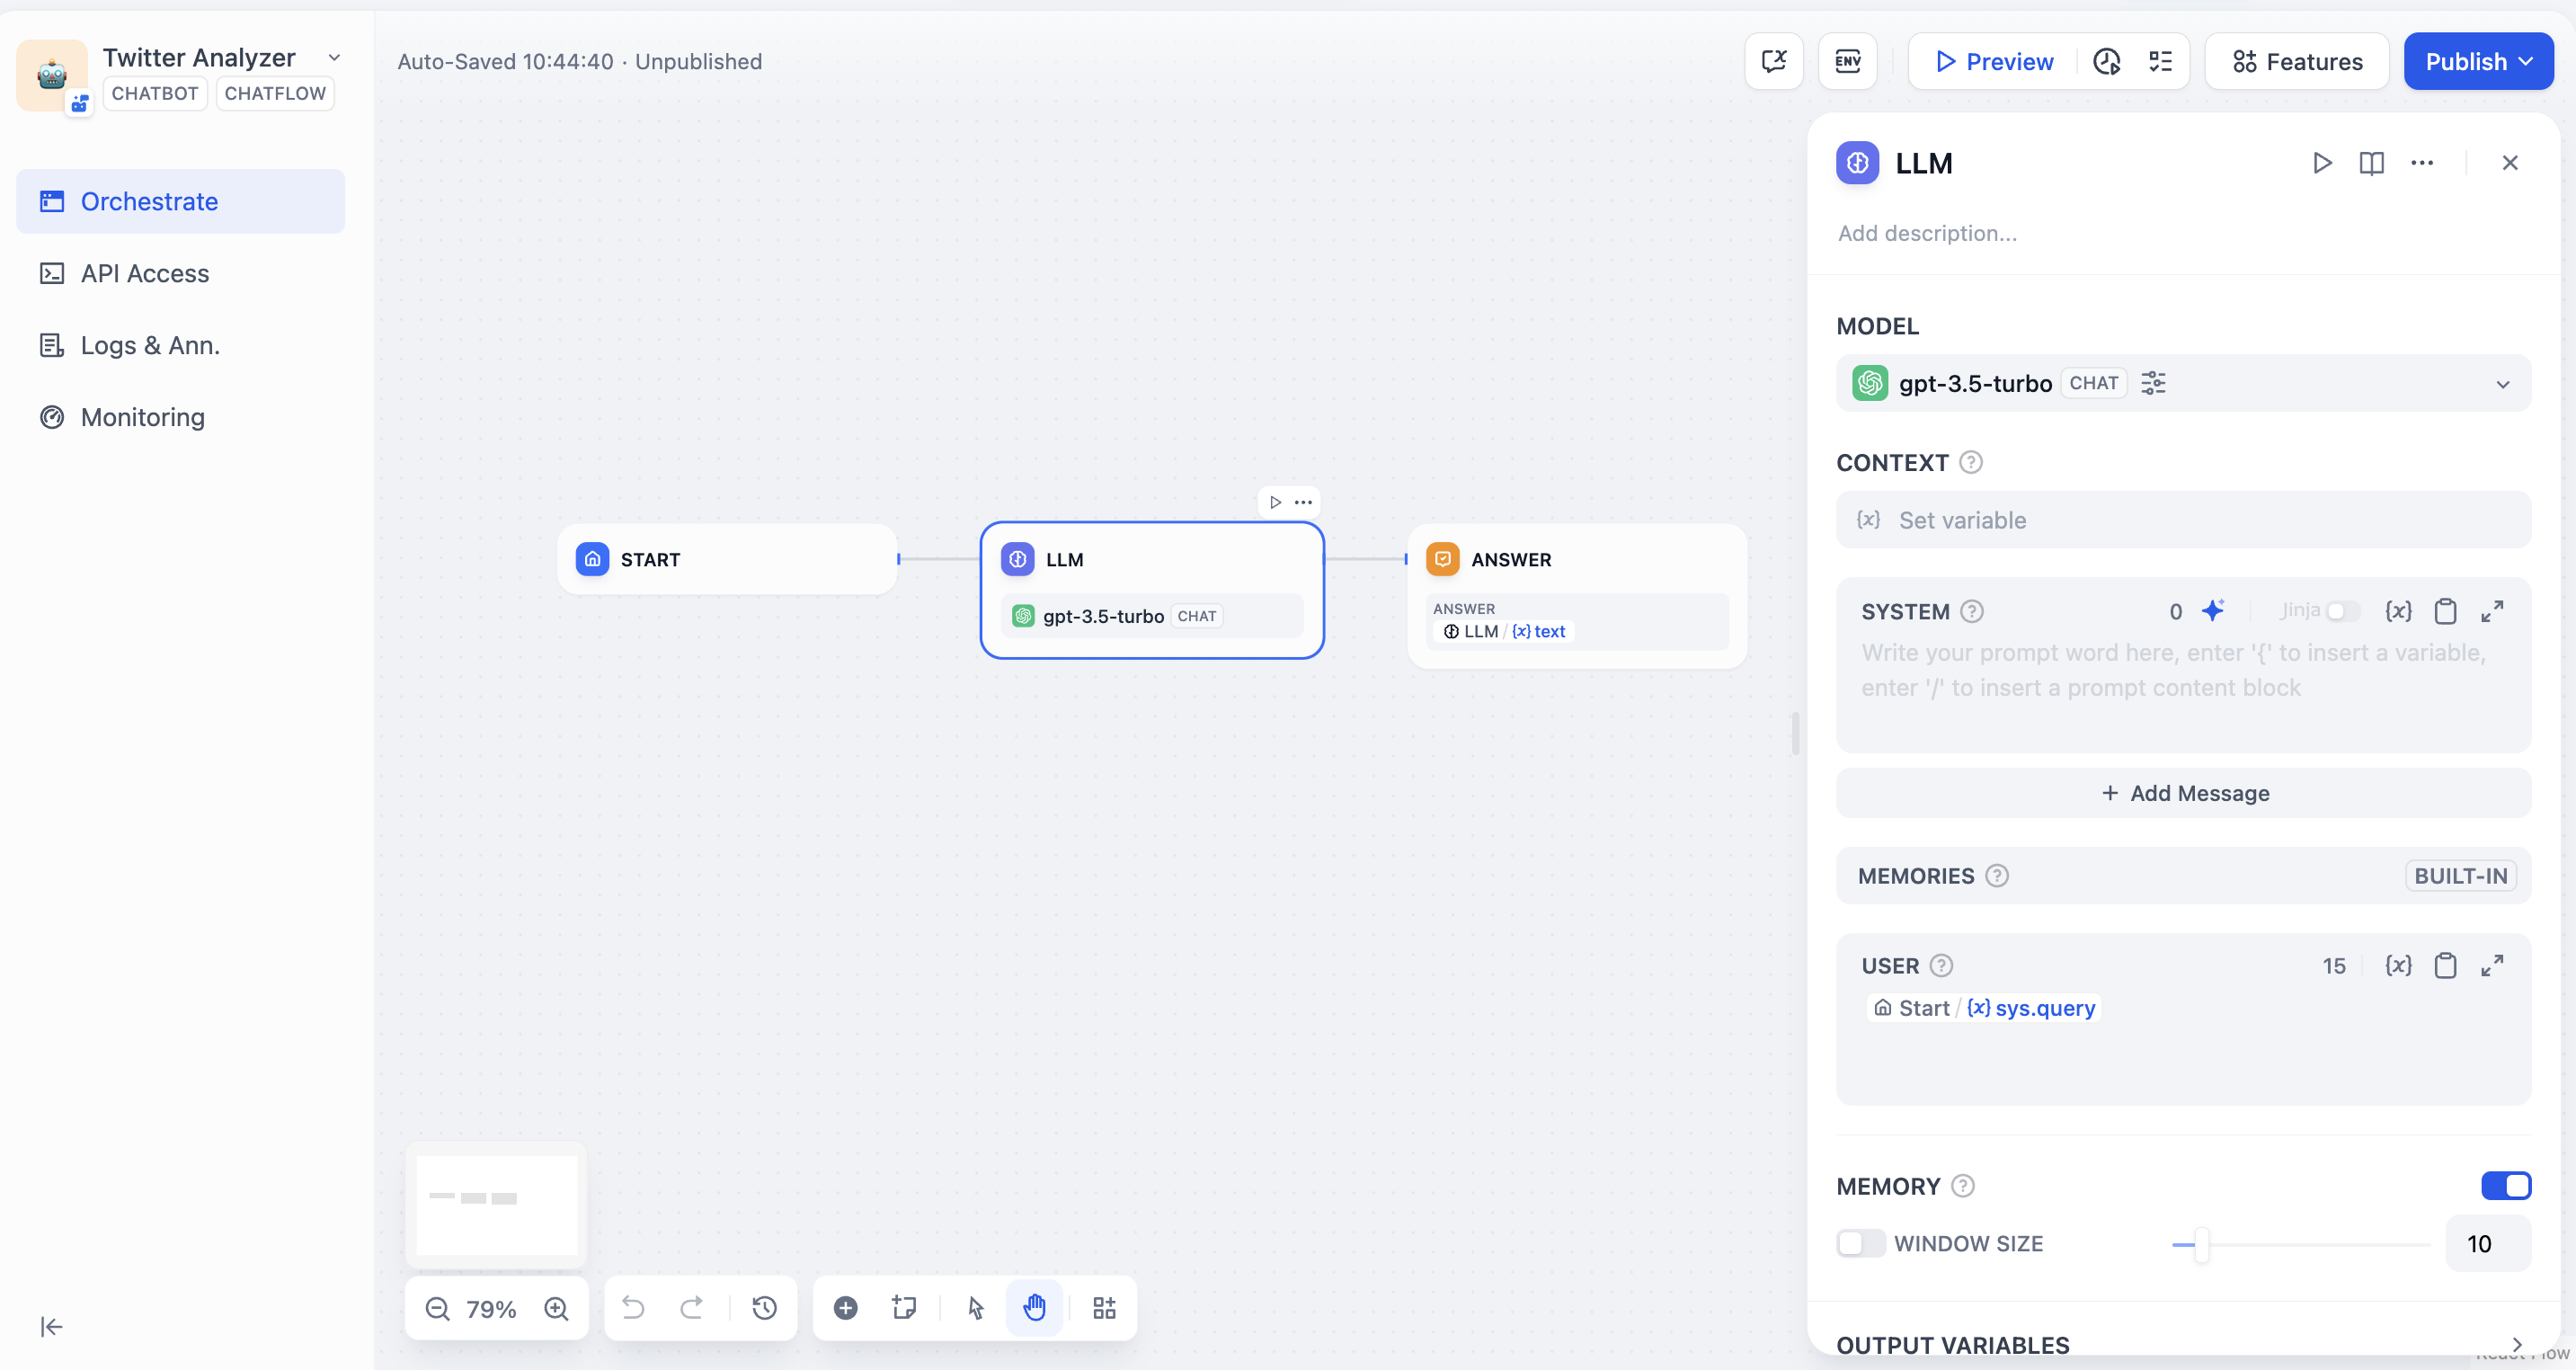
## Add nodes to chatflow

### Start node
In start node, we can add some system variables at the beginning of a chat. In this article, we need a Twitter user’s ID as a string variable. Let’s name it `id` .
Click on Start node and add a new variable:
### Code node
According to [Crawlbase docs](https://crawlbase.com/docs/crawling-api/scrapers/#twitter-profile), the variable `url` (this will be used in the following node) should be `https://twitter.com/` + `user id` , such as `https://twitter.com/elonmusk` for Elon Musk.
To convert the user ID into a complete URL, we can use the following Python code to integrate the prefix `https://twitter.com/` with the user ID:
```python theme={null}
def main(id: str) -> dict:
return {
"url": "https://twitter.com/"+id,
}
```
Add a code node and select python, and set input and output variable names:

### HTTP request node
Based on the [Crawlbase docs](https://crawlbase.com/docs/crawling-api/scrapers/#twitter-profile), to scrape a Twitter user’s profile in http format, we need to complete HTTP request node in the following format:
Importantly, it is best not to directly enter the token value as plain text for security reasons, as this is not a good practice. Actually, in the latest version of Dify, we can set token values in **`Environment Variables`**. Click `env` - `Add Variable` to set the token value, so plain text will not appear in the node.
Check [https://crawlbase.com/dashboard/account/docs](https://crawlbase.com/dashboard/account/docs) for your crawlbase API Key.

By typing `/` , you can easily insert the API Key as a variable.
Tap the start button of this node to check whether it works correctly:
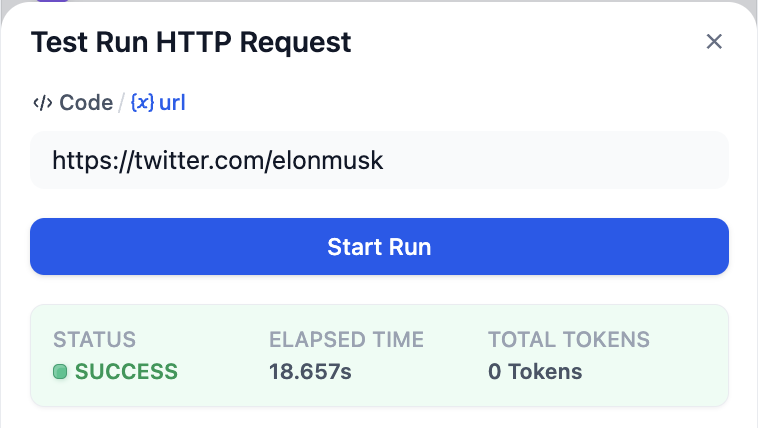
### LLM node
Now, we can use LLM to analyze the result scraped by crawlbase and execute our command.
The value `context` should be `body` from HTTP Request node.
The following is a sample system prompt.

## Test run
Click `Preview` to start a test run and input twitter user id in `id`

For example, I want to analyze Elon Musk's tweets and write a tweet about global warming in his tone.
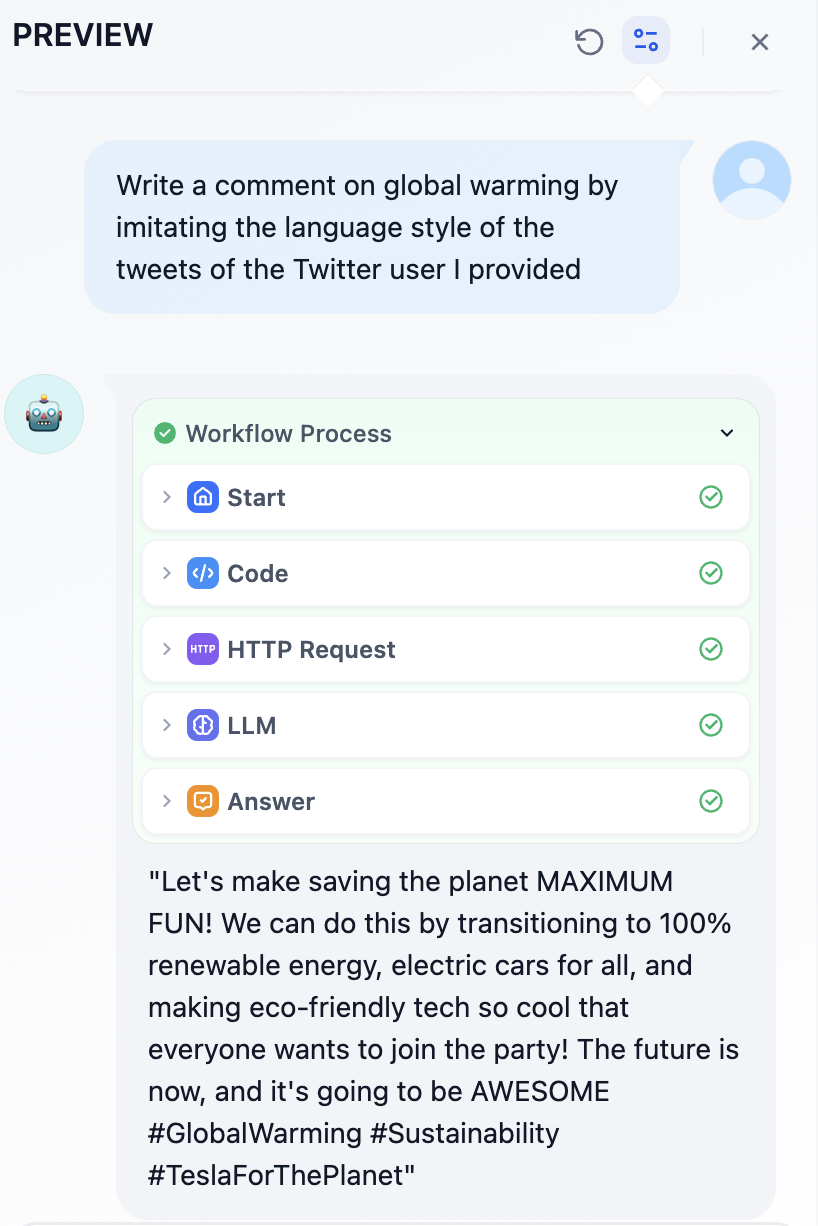
Does this sound like Elon? lol
Click `Publish` in the upper right corner and add it in your website.
Have fun!
## Lastly…
### Other X(Twitter) Crawlers
In this article, I’ve introduced crawlbase. It should be the cheapest Twitter crawler service available, but sometimes it cannot correctly scrape the content of user tweets.
The Twitter crawler service used by [wordware.ai](https://www.wordware.ai/) mentioned earlier is **Tweet Scraper V2**, but the subscription for the hosted platform **apify** is \$49 per month.
## Links
* [X@dify\_ai](https://x.com/dify_ai)
* Dify’s repo on GitHub:[https://github.com/langgenius/dify](https://github.com/langgenius/dify)
# Lesson 6: Handle Multiple Tasks (Parameter Extraction & Iteration)
Source: https://docs.dify.ai/en/use-dify/tutorials/workflow-101/lesson-06
Imagine you get an email saying:
> Hi! What exactly is Dify? Also, which models does it support? And do you have a free plan?
If we send this to our current AI assistant, it might only answer the first question or give a vague response to both.
We need a way to identify every question first, and then loop through our Knowledge Base to answer them one by one.
## Parameter Extractor
***
## Step 3: Test the Bot (3 min)
Click `Preview`, then ask:
* "What is the capital of France?"
* "Tell me about Japanese cuisine"
* "Describe the culture in Italy"
* Any other questions
Make sure your Bot works as expected!
## You've Completed the Bot!
This guide showed how to integrate language models reliably and scalably without reinventing infrastructure. With Dify's visual workflows and modular nodes, you're not just building faster, you're adopting a clean, production-ready architecture for LLM-powered apps.
# Twitter Account Analyzer
Source: https://docs.dify.ai/en/use-dify/tutorials/twitter-chatflow
## Introduction
In Dify, you can use some crawler tools, such as Jina, which can convert web pages into markdown format that LLMs can read.
Recently, [wordware.ai](https://www.wordware.ai/) has brought to our attention that we can use crawlers to scrape social media for LLM analysis, creating more interesting applications.
However, knowing that X (formerly Twitter) stopped providing free API access on February 2, 2023, and has since upgraded its anti-crawling measures. Tools like Jina are unable to access X's content directly.
> Starting February 9, we will no longer support free access to the Twitter API, both v2 and v1.1. A paid basic tier will be available instead 🧵
>
> — Developers (@XDevelopers) [February 2, 2023](https://twitter.com/XDevelopers/status/1621026986784337922?ref_src=twsrc%5Etfw)
Fortunately, Dify also has an HTTP tool, which allows us to call external crawling tools by sending HTTP requests. Let's get started!
## **Prerequisites**
### Register Crawlbase
Crawlbase is an all-in-one data crawling and scraping platform designed for businesses and developers.
Moreover, using Crawlbase Scraper allows you to scrape data from social platforms like X, Facebook and Instagram.
Click to register: [crawlbase.com](https://crawlbase.com)
### Deploy Dify locally
Dify is an open-source LLM app development platform. You can choose cloud service or deploy it locally using docker compose.
In this article, If you don’t want to deploy it locally, register a free Dify Cloud sandbox account here: [https://cloud.dify.ai/signin](https://cloud.dify.ai/signin).
Dify Cloud Sandbox users get 200 free credits, equivalent to 200 GPT-3.5 messages or 20 GPT-4 messages.
The following are brief tutorials on how to deploy Dify:
#### Clone Dify
```bash theme={null}
git clone https://github.com/langgenius/dify.git
```
#### **Start Dify**
```bash theme={null}
cd dify/docker
cp .env.example .env
docker compose up -d
```
### Configure LLM Providers
Configure Model Provider in account setting:

## Create a chatflow
Now, let's get started on the chatflow.
Click on `Create from Blank` to start:

The initialized chatflow should be like:

## Add nodes to chatflow

### Start node
In start node, we can add some system variables at the beginning of a chat. In this article, we need a Twitter user’s ID as a string variable. Let’s name it `id` .
Click on Start node and add a new variable:

### Code node
According to [Crawlbase docs](https://crawlbase.com/docs/crawling-api/scrapers/#twitter-profile), the variable `url` (this will be used in the following node) should be `https://twitter.com/` + `user id` , such as `https://twitter.com/elonmusk` for Elon Musk.
To convert the user ID into a complete URL, we can use the following Python code to integrate the prefix `https://twitter.com/` with the user ID:
```python theme={null}
def main(id: str) -> dict:
return {
"url": "https://twitter.com/"+id,
}
```
Add a code node and select python, and set input and output variable names:

### HTTP request node
Based on the [Crawlbase docs](https://crawlbase.com/docs/crawling-api/scrapers/#twitter-profile), to scrape a Twitter user’s profile in http format, we need to complete HTTP request node in the following format:

Importantly, it is best not to directly enter the token value as plain text for security reasons, as this is not a good practice. Actually, in the latest version of Dify, we can set token values in **`Environment Variables`**. Click `env` - `Add Variable` to set the token value, so plain text will not appear in the node.
Check [https://crawlbase.com/dashboard/account/docs](https://crawlbase.com/dashboard/account/docs) for your crawlbase API Key.

By typing `/` , you can easily insert the API Key as a variable.

Tap the start button of this node to check whether it works correctly:

### LLM node
Now, we can use LLM to analyze the result scraped by crawlbase and execute our command.
The value `context` should be `body` from HTTP Request node.
The following is a sample system prompt.

## Test run
Click `Preview` to start a test run and input twitter user id in `id`

For example, I want to analyze Elon Musk's tweets and write a tweet about global warming in his tone.

Does this sound like Elon? lol
Click `Publish` in the upper right corner and add it in your website.
Have fun!
## Lastly…
### Other X(Twitter) Crawlers
In this article, I’ve introduced crawlbase. It should be the cheapest Twitter crawler service available, but sometimes it cannot correctly scrape the content of user tweets.
The Twitter crawler service used by [wordware.ai](https://www.wordware.ai/) mentioned earlier is **Tweet Scraper V2**, but the subscription for the hosted platform **apify** is \$49 per month.
## Links
* [X@dify\_ai](https://x.com/dify_ai)
* Dify’s repo on GitHub:[https://github.com/langgenius/dify](https://github.com/langgenius/dify)
# Lesson 6: Handle Multiple Tasks (Parameter Extraction & Iteration)
Source: https://docs.dify.ai/en/use-dify/tutorials/workflow-101/lesson-06
Imagine you get an email saying:
> Hi! What exactly is Dify? Also, which models does it support? And do you have a free plan?
If we send this to our current AI assistant, it might only answer the first question or give a vague response to both.
We need a way to identify every question first, and then loop through our Knowledge Base to answer them one by one.
## Parameter Extractor
![Parameter Extractor]() You can take Parameter Extractor as a highly organized scout. It reads a paragraph of texts (like an email) and picks out the specific piece of information you asked for, putting them into a neat and organized list.
### Hands-On 1: Add Parameter Extractor
Before we upgrade the email assistant, let's remove these nodes: Knowledge Retrieval, If/Else, LLM, LLM 2, and Variable Aggregator.
Right after the Start node, add the **Parameter Extractor** node.
You can take Parameter Extractor as a highly organized scout. It reads a paragraph of texts (like an email) and picks out the specific piece of information you asked for, putting them into a neat and organized list.
### Hands-On 1: Add Parameter Extractor
Before we upgrade the email assistant, let's remove these nodes: Knowledge Retrieval, If/Else, LLM, LLM 2, and Variable Aggregator.
Right after the Start node, add the **Parameter Extractor** node.
![Add Parameter Extractor]() Click Parameter Extractor, and in the **Input Variable** section on the right panel, choose `email_content`.
Click Parameter Extractor, and in the **Input Variable** section on the right panel, choose `email_content`.
![Set the Input]() Since AI doesn't automatically know which specific information we need from the email, we must tell it to collect all the questions.
Click the **plus (+)** icon next to **Extract Parameters** to start defining what the AI should look for. Let's call it `question_list`.
Since AI doesn't automatically know which specific information we need from the email, we must tell it to collect all the questions.
Click the **plus (+)** icon next to **Extract Parameters** to start defining what the AI should look for. Let's call it `question_list`.
![Add Extract Parameter]() **Parameter Types**
If Parameter Extractor is a scout, then Type is the bucket they use to carry the info. You need the right bucket for the right information.
**Single Items (The Small Buckets)**
* **String (Text)**: For a single piece of text, e.g. customer's name
* **Number**: For a single digit, e.g. order quantity
* **Boolean**: A simple Yes or No (True/False), good for a judgement result or a decision
**List Items (The Arrays)**
* **Array\[String]**: Array means List, and String means Text. So, `Array[String]` means we are using a basket that can hold multiple pieces of text—like all the separate questions in an email
* **Array\[Number]**: A container that holds different numbers, e.g. a list of prices or commodities
* **Array\[Boolean]**: Used to store multiple Yes/No judgment results. For example, checking a list containing multiple to-do items and returning whether each item is completed, such as `[Yes, No, Yes]`
* **Array\[Object]**: An advanced folder that holds sets of data (like a contact list where each entry has a Name and a Phone Number)
1. Based on our needs, choose `Array[String]` for the email content.
2. Add description for providing additional context. You can write: All the questions raised by the user in the email. After that, click **Add**.
**Parameter Types**
If Parameter Extractor is a scout, then Type is the bucket they use to carry the info. You need the right bucket for the right information.
**Single Items (The Small Buckets)**
* **String (Text)**: For a single piece of text, e.g. customer's name
* **Number**: For a single digit, e.g. order quantity
* **Boolean**: A simple Yes or No (True/False), good for a judgement result or a decision
**List Items (The Arrays)**
* **Array\[String]**: Array means List, and String means Text. So, `Array[String]` means we are using a basket that can hold multiple pieces of text—like all the separate questions in an email
* **Array\[Number]**: A container that holds different numbers, e.g. a list of prices or commodities
* **Array\[Boolean]**: Used to store multiple Yes/No judgment results. For example, checking a list containing multiple to-do items and returning whether each item is completed, such as `[Yes, No, Yes]`
* **Array\[Object]**: An advanced folder that holds sets of data (like a contact list where each entry has a Name and a Phone Number)
1. Based on our needs, choose `Array[String]` for the email content.
2. Add description for providing additional context. You can write: All the questions raised by the user in the email. After that, click **Add**.
![Finish Adding Extract Parameter]() In the **Instructions** box below the extracted parameters, type a clear command to tell the AI how to act.
For example: Extract all questions from the email, and make each question as a single item on the list.
By doing this, the node will be able to find all the questions in the email. Now that our scout has successfully gathered the Golden Nuggets, we need to move to the next step: teaching the AI to process each question.
## Iteration
In the **Instructions** box below the extracted parameters, type a clear command to tell the AI how to act.
For example: Extract all questions from the email, and make each question as a single item on the list.
By doing this, the node will be able to find all the questions in the email. Now that our scout has successfully gathered the Golden Nuggets, we need to move to the next step: teaching the AI to process each question.
## Iteration
![Iteration]() With iteration, your assistant has a team of identical twins. When you hand over a list (like questions in the mail list), a twin appears for every single item on that list.
Each twin takes their assigned item and performs the exact same task you've set up, ensuring nothing gets missed.
### Hands-On 2: Set up Iteration Node
1. Add an Iteration node after the Parameter Extractor.
2. Click on the Iteration node and navigate to the Input panel on the right.
3. Select `{x} question_list` from the Parameter Extractor. Leave the output variable blank for now.
With iteration, your assistant has a team of identical twins. When you hand over a list (like questions in the mail list), a twin appears for every single item on that list.
Each twin takes their assigned item and performs the exact same task you've set up, ensuring nothing gets missed.
### Hands-On 2: Set up Iteration Node
1. Add an Iteration node after the Parameter Extractor.
2. Click on the Iteration node and navigate to the Input panel on the right.
3. Select `{x} question_list` from the Parameter Extractor. Leave the output variable blank for now.
![Add Iteration Node]() **Advanced Options in Iteration**
In the Iteration panel, you'll see more settings. Let's have a quick walk-through.
**Advanced Options in Iteration**
In the Iteration panel, you'll see more settings. Let's have a quick walk-through.
![Advanced Options in Iteration]() **Parallel Mode**: OFF (Default)
* When disabled, the workflow processes each item in the list one after another (finish Question 1, then move to Question 2).
* When enabled, the workflow attempts to process all items in the list simultaneously (similar to 5 chefs cooking 5 different dishes at the same time).
**Error Response Method**: Terminate on error by default.
* **Terminate**: This means if any single item in the list (e.g., the 2nd question) fails during the sub-process, the entire workflow will stop immediately
* **Ignore Error and Continue**: This means even if the 2nd question fails, the workflow will skip it and move on to process the remaining questions
* **Remove Abnormal Output**: Similar to ignore, but it also removes that specific failed item from the final output list results
Back to the workflow, you'll see a sub-process area under the Iteration node. Every node inside this box will run once for every question.
1. Inside the Iteration box, add a Knowledge Retrieval node.
2. Set the query text to `{x} item`. In Iteration, item always refers to the question that is currently being processed.
**Parallel Mode**: OFF (Default)
* When disabled, the workflow processes each item in the list one after another (finish Question 1, then move to Question 2).
* When enabled, the workflow attempts to process all items in the list simultaneously (similar to 5 chefs cooking 5 different dishes at the same time).
**Error Response Method**: Terminate on error by default.
* **Terminate**: This means if any single item in the list (e.g., the 2nd question) fails during the sub-process, the entire workflow will stop immediately
* **Ignore Error and Continue**: This means even if the 2nd question fails, the workflow will skip it and move on to process the remaining questions
* **Remove Abnormal Output**: Similar to ignore, but it also removes that specific failed item from the final output list results
Back to the workflow, you'll see a sub-process area under the Iteration node. Every node inside this box will run once for every question.
1. Inside the Iteration box, add a Knowledge Retrieval node.
2. Set the query text to `{x} item`. In Iteration, item always refers to the question that is currently being processed.
![Add Knowledge Retrieval Node and Set Query Text]() 1. Add an LLM node after Knowledge Retrieval.
2. Configure it to answer the question based on the retrieved context.
Remember Lesson 4? Use those Prompt skills and don't forget context!
Feel free to use the prompt below:
**System**:
```plaintext wrap theme={null}
You are a professional Dify Customer Service Manager. Please provide a response to questions strictly based on the `Context`.
```
**User**:
```plaintext wrap theme={null}
questions: Iteration/{x} item
```
1. Add an LLM node after Knowledge Retrieval.
2. Configure it to answer the question based on the retrieved context.
Remember Lesson 4? Use those Prompt skills and don't forget context!
Feel free to use the prompt below:
**System**:
```plaintext wrap theme={null}
You are a professional Dify Customer Service Manager. Please provide a response to questions strictly based on the `Context`.
```
**User**:
```plaintext wrap theme={null}
questions: Iteration/{x} item
```
![Add LLM Prompt]() Since the iteration node generates an answer for each individual question, we need to gather all these answers to create one complete reply email.
1. Click the Iteration node.
2. In the **Output Variable**, select the variable representing the LLM's answer inside the loop. Now, the Iteration node will collect every answer and gather them into a new list.
Since the iteration node generates an answer for each individual question, we need to gather all these answers to create one complete reply email.
1. Click the Iteration node.
2. In the **Output Variable**, select the variable representing the LLM's answer inside the loop. Now, the Iteration node will collect every answer and gather them into a new list.
![Set Iteration Output]() Finally, connect one last LLM node. This final editor will take all the collected answers and polish them into one professional email.
Don't forget to add prompt in system and user message. Feel free to refer the prompt below.
```plaintext wrap theme={null}
You are a professional customer service assistant. Please organize the answers prepared for customer into a clear and complete email reply.
Sign the email as Anne.
```
**User**:
```plaintext wrap theme={null}
answers: Iteration/{x}output
customer: User Input/{x}customer_name
```
Finally, connect one last LLM node. This final editor will take all the collected answers and polish them into one professional email.
Don't forget to add prompt in system and user message. Feel free to refer the prompt below.
```plaintext wrap theme={null}
You are a professional customer service assistant. Please organize the answers prepared for customer into a clear and complete email reply.
Sign the email as Anne.
```
**User**:
```plaintext wrap theme={null}
answers: Iteration/{x}output
customer: User Input/{x}customer_name
```
![Add Final LLM Node]() 1. Click on the checklist to see if there's any missing spot. According to the notes, we need to connect Output node while fix the invalid variable issue.
2. Connect Output node with LLM 2 node before it, remove its previous variable, then select text in LLM 2 as the output variable.
1. Click on the checklist to see if there's any missing spot. According to the notes, we need to connect Output node while fix the invalid variable issue.
2. Connect Output node with LLM 2 node before it, remove its previous variable, then select text in LLM 2 as the output variable.
![Select Output Variable]() Now, you can write a test email with 3 different questions and check on the generated reply.
## Mini Challenge
What else could Parameter Extractor find?
Try exploring the parameter type in it.
# Lesson 7: Enhance Workflows (Plugins)
Source: https://docs.dify.ai/en/use-dify/tutorials/workflow-101/lesson-07
Our email assistant can now flip through our knowledge base. But what if a customer asks a beyond-knowledge-base question, like: What is in the latest Dify release?
If the knowledge base hasn't been updated yet, the workflow will be at a loss. To fix this, we need to equip it with a Live Search skill!
## Tools
Now, you can write a test email with 3 different questions and check on the generated reply.
## Mini Challenge
What else could Parameter Extractor find?
Try exploring the parameter type in it.
# Lesson 7: Enhance Workflows (Plugins)
Source: https://docs.dify.ai/en/use-dify/tutorials/workflow-101/lesson-07
Our email assistant can now flip through our knowledge base. But what if a customer asks a beyond-knowledge-base question, like: What is in the latest Dify release?
If the knowledge base hasn't been updated yet, the workflow will be at a loss. To fix this, we need to equip it with a Live Search skill!
## Tools
![Tools]() Tools are the superpower for your AI workflow.
The [Dify Marketplace](https://marketplace.dify.ai/) is like a Plugin Supermarket. It's filled with ready-made superpowers—searching Google, checking the weather, drawing images, or calculating complex math. You just install and plug them into your workflow with several clicks.
Now, let's continue to upgrade on current workflow.
### Hands-On 1: Upgrade the Sub-process Area in Iteration
We are going to add a new logic to our assistant: Check the Knowledge Base first; if the answer isn't there, go search Google.
To focus on the new logic, let's keep only these nodes: **User input, Parameter Extractor, and Iteration**.
#### Step 1: Knowledge Query and the Judge
1. Click to enter the sub-process area of the Iteration node.
2. Keep Knowledge Retrieval node, and make sure the query variable is `{x} item`.
3. Delete the previous LLM node.
Add an LLM node right after Knowledge Retrieval node. Its job is to decide if the Knowledge Base info can actually respond to the questions.
* **For Context session**: Select the `Knowledge Retrieval / {x} result Array [Object]` from Knowledge Retrieval
* **System Prompt**:
```plaintext wrap theme={null}
Based on the `Context`, determine if the answer contains enough information to answer the questions. If the information is insufficient, you MUST reply with: "Information not found in knowledge base".
```
* **User Message**:
```plaintext wrap theme={null}
questions: Iteration/{x} item
```
Tools are the superpower for your AI workflow.
The [Dify Marketplace](https://marketplace.dify.ai/) is like a Plugin Supermarket. It's filled with ready-made superpowers—searching Google, checking the weather, drawing images, or calculating complex math. You just install and plug them into your workflow with several clicks.
Now, let's continue to upgrade on current workflow.
### Hands-On 1: Upgrade the Sub-process Area in Iteration
We are going to add a new logic to our assistant: Check the Knowledge Base first; if the answer isn't there, go search Google.
To focus on the new logic, let's keep only these nodes: **User input, Parameter Extractor, and Iteration**.
#### Step 1: Knowledge Query and the Judge
1. Click to enter the sub-process area of the Iteration node.
2. Keep Knowledge Retrieval node, and make sure the query variable is `{x} item`.
3. Delete the previous LLM node.
Add an LLM node right after Knowledge Retrieval node. Its job is to decide if the Knowledge Base info can actually respond to the questions.
* **For Context session**: Select the `Knowledge Retrieval / {x} result Array [Object]` from Knowledge Retrieval
* **System Prompt**:
```plaintext wrap theme={null}
Based on the `Context`, determine if the answer contains enough information to answer the questions. If the information is insufficient, you MUST reply with: "Information not found in knowledge base".
```
* **User Message**:
```plaintext wrap theme={null}
questions: Iteration/{x} item
```
![LLM Settings]() Here's what it looks like on the canvas.
Here's what it looks like on the canvas.
![Workflow Preview]() #### Step 2: Setting the Crossroads
After LLM node, let's add If/Else node. Set the rule: If LLM Output **Contains** **Information not found in knowledge base**.
This means, when we can't respond with the information in knowledge base.
#### Step 2: Setting the Crossroads
After LLM node, let's add If/Else node. Set the rule: If LLM Output **Contains** **Information not found in knowledge base**.
This means, when we can't respond with the information in knowledge base.
![Add if/Else Node]() Let's connect a search tool after the IF branch. This indicates that when the knowledge base cannot find relevant answer information, we use web search to find the answers.
1. After the IF node, click plus(+) icon and select Tool.
2. In the search box, type Google. Hover over Google, click Install on the right, and then click Install again in the pop-up window.
Let's connect a search tool after the IF branch. This indicates that when the knowledge base cannot find relevant answer information, we use web search to find the answers.
1. After the IF node, click plus(+) icon and select Tool.
2. In the search box, type Google. Hover over Google, click Install on the right, and then click Install again in the pop-up window.
![Install Plugin]() Click Google Search in Google.
Click Google Search in Google.
![Install Google Search]() Using Google Search for the first time requires authorization—it's like needing a Wi-Fi password.
Using Google Search for the first time requires authorization—it's like needing a Wi-Fi password.
![Google Search Setup]() 1. Click API Key Authorization Configuration, then click Get your SerpApi API key from SerpApi. Sign in to get your private API key.
Your API Key is your passport to the outside world. Keep it safe and avoid sharing it with others.
1. Click API Key Authorization Configuration, then click Get your SerpApi API key from SerpApi. Sign in to get your private API key.
Your API Key is your passport to the outside world. Keep it safe and avoid sharing it with others.
![API Key Authorization Configuration]() 2. Copy and paste the API key in SerpApi API key. Click **Save**.
3. Once the API key is successfully authorized, the settings panel shows up immediately. Head to Query string field, and select `Iteration/{x} item`.
2. Copy and paste the API key in SerpApi API key. Click **Save**.
3. Once the API key is successfully authorized, the settings panel shows up immediately. Head to Query string field, and select `Iteration/{x} item`.
![Add Query String]() Now, we need different ways to answer depending on which path we're looking at.
**The Search Answer Path**
Add a new LLM node to answer the question based on the search results. Connect it to the Google Search node.
**System**:
```plaintext wrap theme={null}
You are a Web Research Specialist. Based on Google Search, concisely answer the user's questions. Please do not mention the knowledge base in your response.
```
**User Message**:
```plaintext wrap theme={null}
results: GOOGLESEARCH/{x} text
questions: Iteration/{x} item
```
Now, we need different ways to answer depending on which path we're looking at.
**The Search Answer Path**
Add a new LLM node to answer the question based on the search results. Connect it to the Google Search node.
**System**:
```plaintext wrap theme={null}
You are a Web Research Specialist. Based on Google Search, concisely answer the user's questions. Please do not mention the knowledge base in your response.
```
**User Message**:
```plaintext wrap theme={null}
results: GOOGLESEARCH/{x} text
questions: Iteration/{x} item
```
![Prompt for LLM 2]() **The Knowledge Searching Path**
After the Else node, add a new LLM node to handle answers based on the knowledge base.
**System**:
```plaintext wrap theme={null}
You are a professional Dify Customer Service Manager. Strictly follow the `Context` to reply to questions.
```
**User Message**:
```plaintext wrap theme={null}
questions: Iteration/{x} item
```
**The Knowledge Searching Path**
After the Else node, add a new LLM node to handle answers based on the knowledge base.
**System**:
```plaintext wrap theme={null}
You are a professional Dify Customer Service Manager. Strictly follow the `Context` to reply to questions.
```
**User Message**:
```plaintext wrap theme={null}
questions: Iteration/{x} item
```
![Prompt for LLM 3]() 1. In the sub-process (inside the Iteration box), add a Variable Aggregator node that connects both LLM 2 and LLM 3 at the very end.
2. In the Variable Aggregator panel, select the variables `LLM 2/{x}text String` and `LLM 3/{x}text String` as the Assign Variables.
In this way, we're merging the two possible answers into a single path.
1. In the sub-process (inside the Iteration box), add a Variable Aggregator node that connects both LLM 2 and LLM 3 at the very end.
2. In the Variable Aggregator panel, select the variables `LLM 2/{x}text String` and `LLM 3/{x}text String` as the Assign Variables.
In this way, we're merging the two possible answers into a single path.
![Variable Aggregator Setup]() This is how the current workflow looks.
This is how the current workflow looks.
![Workflow Preview 2]() #### Step 3: The Final Email Assembly
Now that our logic branches have finished processing, let's combine all the answers into a single, polished email.
Click on the Iteration node, and set `{x}Variable Aggregator/{x}output String` as the output variables.
#### Step 3: The Final Email Assembly
Now that our logic branches have finished processing, let's combine all the answers into a single, polished email.
Click on the Iteration node, and set `{x}Variable Aggregator/{x}output String` as the output variables.
![Iteration Output]() After the Iteration node, connect a new LLM node to summarize all outputs. Feel free to use the prompt below.
**System**:
```plaintext wrap theme={null}
You are a professional Customer Service Manager. Summarize all the answers of the questions, and organize a clear and complete email reply for the customer.
Do not include content where the knowledge base could not find relevant information.
Signature: Anne.
```
**User Message**:
```plaintext wrap theme={null}
questions: Iteration/ {x} output
customer: User Input / {x} customer_name
```
After the Iteration node, connect a new LLM node to summarize all outputs. Feel free to use the prompt below.
**System**:
```plaintext wrap theme={null}
You are a professional Customer Service Manager. Summarize all the answers of the questions, and organize a clear and complete email reply for the customer.
Do not include content where the knowledge base could not find relevant information.
Signature: Anne.
```
**User Message**:
```plaintext wrap theme={null}
questions: Iteration/ {x} output
customer: User Input / {x} customer_name
```
![Prompt for LLM 4]() After the LLM node, add an End node. Set the output variable as `LLM 4/{x}text String`.
After the LLM node, add an End node. Set the output variable as `LLM 4/{x}text String`.
![Output Setup]() We have now completed the entire setup and configuration of the workflow. Our email assistant can now answer questions based on the Knowledge Base and use Google Search for supplementary answers when needed.
We have now completed the entire setup and configuration of the workflow. Our email assistant can now answer questions based on the Knowledge Base and use Google Search for supplementary answers when needed.
![Final Workflow Preview]() Try sending an email with question that definitely isn't in the knowledge base. Let's see if the AI successfully uses Google to find the related answers.
## Mini Challenge
1. What are other conditions you can choose in If/Else node?
2. Browse marketplace to see if you can add another tool for this workflow?
# Lesson 8: The Agent Node
Source: https://docs.dify.ai/en/use-dify/tutorials/workflow-101/lesson-08
Let's look back the upgrades we've made for our email assistants.
* Learned to Read: It can search a Knowledge Base
* Learned to Choose: It uses Conditions to make decisions
* Learned to Multitask: It handles multiple questions via Iteration
* Learned to Use Tools: It can access the Internet via Google Search
You might have noticed that our workflow is no longer just a straight line (Step 1 → Step 2 → Step 3).
It's becoming a system that analyzes, judges, and calls upon different abilities to solve problems. This advanced pattern is what we call an Agentic Workflow.
## Agentic Workflow
An Agentic Workflow isn't just Input > Process > Output.
It involves thinking, planning, using tools, and adjusting based on results. It transforms the AI from a simple Executor (who just follows orders) into an intelligent Agent (who solves problems autonomously).
## Agent Strategies
To make Agents work smarter, researchers designed Strategies—think of these as different modes of thinking that guide the Agent.
* **ReAct (Reason + Act)**
The Think, then Do approach. The Agent thinks (What should I do?), acts (calls a tool), observes the result, and then thinks again. It loops until the job is done.
* **Plan-and-Execute**
Make a full plan first, then do it step-by-step.
* **Chain of Thought (CoT)**
Writing out the reasoning steps before giving an answer to improve accuracy.
* **Self-Correction**
Checking its own work and fixing mistakes.
* **Memory**
Equipping the Agent with short-term or long-term memory allows it to recall previous conversations or key details, enabling more coherent and personalized responses.
In Lesson 7, we manually built a Brain using Knowledge Retrieval -> LLM to Decide-> If/Else -> Search. It worked, but it was complicated to build.
Is there a simpler way? Yes, and here it is.
## Agent Node
The Agent Node is a highly packaged intelligent unit.
You just need to set a Goal for it through instructions and provide the Tools it might need. Then, it can autonomously think, plan, select, and call tools internally (using the selected Agent Strategy, such as ReAct, and the model's Function Calling capability) until it completes your set goal.
In Dify, this greatly simplifies the process of building complex Agentic Workflows.
## Hands-on 1: Build with Agent Node
Our goal is to replace that complex manual logic inside our Iteration loop with a single, smart Agent Node.
Go to the sub-process of the Iteration. Keep knowledge retrieval node, and delete other nodes in side it.
Try sending an email with question that definitely isn't in the knowledge base. Let's see if the AI successfully uses Google to find the related answers.
## Mini Challenge
1. What are other conditions you can choose in If/Else node?
2. Browse marketplace to see if you can add another tool for this workflow?
# Lesson 8: The Agent Node
Source: https://docs.dify.ai/en/use-dify/tutorials/workflow-101/lesson-08
Let's look back the upgrades we've made for our email assistants.
* Learned to Read: It can search a Knowledge Base
* Learned to Choose: It uses Conditions to make decisions
* Learned to Multitask: It handles multiple questions via Iteration
* Learned to Use Tools: It can access the Internet via Google Search
You might have noticed that our workflow is no longer just a straight line (Step 1 → Step 2 → Step 3).
It's becoming a system that analyzes, judges, and calls upon different abilities to solve problems. This advanced pattern is what we call an Agentic Workflow.
## Agentic Workflow
An Agentic Workflow isn't just Input > Process > Output.
It involves thinking, planning, using tools, and adjusting based on results. It transforms the AI from a simple Executor (who just follows orders) into an intelligent Agent (who solves problems autonomously).
## Agent Strategies
To make Agents work smarter, researchers designed Strategies—think of these as different modes of thinking that guide the Agent.
* **ReAct (Reason + Act)**
The Think, then Do approach. The Agent thinks (What should I do?), acts (calls a tool), observes the result, and then thinks again. It loops until the job is done.
* **Plan-and-Execute**
Make a full plan first, then do it step-by-step.
* **Chain of Thought (CoT)**
Writing out the reasoning steps before giving an answer to improve accuracy.
* **Self-Correction**
Checking its own work and fixing mistakes.
* **Memory**
Equipping the Agent with short-term or long-term memory allows it to recall previous conversations or key details, enabling more coherent and personalized responses.
In Lesson 7, we manually built a Brain using Knowledge Retrieval -> LLM to Decide-> If/Else -> Search. It worked, but it was complicated to build.
Is there a simpler way? Yes, and here it is.
## Agent Node
The Agent Node is a highly packaged intelligent unit.
You just need to set a Goal for it through instructions and provide the Tools it might need. Then, it can autonomously think, plan, select, and call tools internally (using the selected Agent Strategy, such as ReAct, and the model's Function Calling capability) until it completes your set goal.
In Dify, this greatly simplifies the process of building complex Agentic Workflows.
## Hands-on 1: Build with Agent Node
Our goal is to replace that complex manual logic inside our Iteration loop with a single, smart Agent Node.
Go to the sub-process of the Iteration. Keep knowledge retrieval node, and delete other nodes in side it.
![Iteration]() Add an Agent node right after the Knowledge Retrieval node.
Add an Agent node right after the Knowledge Retrieval node.
![Add Agent Node]() Since we haven't used this before, we need to install a strategy from the Marketplace.
Click the Agent node. In the right panel, look for Agent Strategy. Click Find more in Marketplace.
Since we haven't used this before, we need to install a strategy from the Marketplace.
Click the Agent node. In the right panel, look for Agent Strategy. Click Find more in Marketplace.
![Search Agent Strategy]() In the Marketplace, find Dify Agent Strategy and install it.
In the Marketplace, find Dify Agent Strategy and install it.
![Choose Agent Strategy]() Back in your workflow (refresh if needed), select ReAct under Agent Strategy.
Back in your workflow (refresh if needed), select ReAct under Agent Strategy.
![Select ReAct]() **Why ReAct here?**
ReAct (Reason + Act) is a strategy that mimics human problem-solving using a Think → Do → Check loop.
1. Reason: The Agent thinks, What should I do next? (e.g., Check the Knowledge Base).
2. Act: It performs the action.
3. Observe: It checks the result. If the answer isn't found, it repeats the cycle (e.g., Okay, I need to search Google).
This thinking-while-doing approach is perfect for complex tasks where the next step depends on the previous result.
ReAct is a thinking strategy, but to actually pull off the action part, AI needs the right "physical" skills which is called **Function Calling**. Select a model that supports Function Calling. Here, we choose gpt-5.
**Why Function Calling?**
One of the core capabilities of an Agent Node is to autonomously call tools. Function Calling is the key technology that allows the model to understand when and how to use the tools you provide (like Google Search).
If the model doesn't support this feature, the Agent cannot effectively interact with tools and loses most of its autonomous decision-making capabilities.
**Why ReAct here?**
ReAct (Reason + Act) is a strategy that mimics human problem-solving using a Think → Do → Check loop.
1. Reason: The Agent thinks, What should I do next? (e.g., Check the Knowledge Base).
2. Act: It performs the action.
3. Observe: It checks the result. If the answer isn't found, it repeats the cycle (e.g., Okay, I need to search Google).
This thinking-while-doing approach is perfect for complex tasks where the next step depends on the previous result.
ReAct is a thinking strategy, but to actually pull off the action part, AI needs the right "physical" skills which is called **Function Calling**. Select a model that supports Function Calling. Here, we choose gpt-5.
**Why Function Calling?**
One of the core capabilities of an Agent Node is to autonomously call tools. Function Calling is the key technology that allows the model to understand when and how to use the tools you provide (like Google Search).
If the model doesn't support this feature, the Agent cannot effectively interact with tools and loses most of its autonomous decision-making capabilities.
![Choose a Model]() Click Agent node. Click plus(+) icon in tool list and select Google Search.
Click Agent node. Click plus(+) icon in tool list and select Google Search.
![Add Tool]() We need to tell the Agent specifically what to do with the tools and context we are giving it. Use and paste the instructions into the Instruction field:
```plaintext wrap theme={null}
Goal: Answer user questions about Dify products.
Steps:
1. I have provided a relevant internal knowledge base retrieval result. First, judge if this result can fully answer the user's questions.
2. If the context clearly answers it, generate the final answer based on the context.
3. If the answer is insufficient or irrelevant, use the Google Search tool to find the latest information and generate the answer based on search results.
Requirement: Keep the final answer concise and accurate.
```
We need to tell the Agent specifically what to do with the tools and context we are giving it. Use and paste the instructions into the Instruction field:
```plaintext wrap theme={null}
Goal: Answer user questions about Dify products.
Steps:
1. I have provided a relevant internal knowledge base retrieval result. First, judge if this result can fully answer the user's questions.
2. If the context clearly answers it, generate the final answer based on the context.
3. If the answer is insufficient or irrelevant, use the Google Search tool to find the latest information and generate the answer based on search results.
Requirement: Keep the final answer concise and accurate.
```
![Add Instructions]() Your configuration here is crucial for the Agent to see the data.
* **Context**: Select `Knowledge Retrieval / (x) result Array[Object]` from the Knowledge Retrieval node (This passes the knowledge base content to the Agent).
* **Query**: Select `Iteration/{x} item` from the Iteration node.
**Why item instead of the original email\_content?**
We used the Parameter Extractor to extract a list of questions (`question_list`) from the `email_content`. The Iteration node is processing this list one by one, where item represents the specific question currently being handled.
Using item as the query input allows Agent to focus on the current task, improving the accuracy of decision-making and actions.
Your configuration here is crucial for the Agent to see the data.
* **Context**: Select `Knowledge Retrieval / (x) result Array[Object]` from the Knowledge Retrieval node (This passes the knowledge base content to the Agent).
* **Query**: Select `Iteration/{x} item` from the Iteration node.
**Why item instead of the original email\_content?**
We used the Parameter Extractor to extract a list of questions (`question_list`) from the `email_content`. The Iteration node is processing this list one by one, where item represents the specific question currently being handled.
Using item as the query input allows Agent to focus on the current task, improving the accuracy of decision-making and actions.
![Context and Query]() Click `Agent/{x}text String` as the output variables.
Click `Agent/{x}text String` as the output variables.
![Set Iteration Output]() 🎉 The Iteration node is now upgraded.
Since the Iteration node generates a list of answers, we need to stitch them back together into one email.
## Hands-on 2: Final Assembly
1. Add an LLM node after the Iteration node.
2. Click on it and add prompt into the system. Feel free to check on the prompt below, or edit by yourself.
```plaintext wrap theme={null}
Combine all answers for the original email.
Write a complete, clear, and friendly reply to the customer.
Signature: Anne
```
3. Add user message to replace answers, email content and customer name with variables respectively. Here's how the LLM looks like right now.
🎉 The Iteration node is now upgraded.
Since the Iteration node generates a list of answers, we need to stitch them back together into one email.
## Hands-on 2: Final Assembly
1. Add an LLM node after the Iteration node.
2. Click on it and add prompt into the system. Feel free to check on the prompt below, or edit by yourself.
```plaintext wrap theme={null}
Combine all answers for the original email.
Write a complete, clear, and friendly reply to the customer.
Signature: Anne
```
3. Add user message to replace answers, email content and customer name with variables respectively. Here's how the LLM looks like right now.
![Final LLM]() Set the output variable to the LLM's text and name it `email_reply`.
Set the output variable to the LLM's text and name it `email_reply`.
![Add Output Node]() Here comes the final workflow.
Here comes the final workflow.
![Final Workflow]() Click **Test Run**. Ask a mix of questions. Watch how the Agent Node autonomously decides when to use the context and when to use Google search.
## Mini Challenge
1. Could we use an Agent Node to replace the entire Iteration loop? How would you design the prompt to handle a list of questions all at once?
2. What other information could you feed into the Agent's Context field to help it make better decisions?
# Lesson 9: Layout Designer (Template)
Source: https://docs.dify.ai/en/use-dify/tutorials/workflow-101/lesson-09
In Lesson 8, we successfully built a powerful Agent that can think and search. However, you might have noticed a tiny issue: even though we asked the final LLM to list the answers, sometimes the formatting can be a bit messy or inconsistent (e.g., mixing bullet points with paragraphs).
To fix this, we need a dedicated format assistant to organize the answers into a beautiful, standardized format before the final LLM writes the email.
## Template
It takes the original data (like your list of answers), follows a strict design template/standards you provide, and generates a perfectly formatted block of text, ensuring consistency every single time.
## Hands-On: Polish the Email Layout
Since the Template node will be handling the greetings, we need to tell LLM to focus solely on the questions and answers. Copy and paste the prompt below or feel free to edit it.
```plaintext wrap theme={null}
Combine all answers for the original email. Write a complete, clear, and friendly reply that only includes the summarized answers.
IMPORTANT: Focus SOLELY on the answers. Do NOT include greetings (like "Hi Name"), do
NOT write intro paragraphs (like "Thank you for reaching out"), and do NOT include
signatures.
```
List the different variables respectively.
Click **Test Run**. Ask a mix of questions. Watch how the Agent Node autonomously decides when to use the context and when to use Google search.
## Mini Challenge
1. Could we use an Agent Node to replace the entire Iteration loop? How would you design the prompt to handle a list of questions all at once?
2. What other information could you feed into the Agent's Context field to help it make better decisions?
# Lesson 9: Layout Designer (Template)
Source: https://docs.dify.ai/en/use-dify/tutorials/workflow-101/lesson-09
In Lesson 8, we successfully built a powerful Agent that can think and search. However, you might have noticed a tiny issue: even though we asked the final LLM to list the answers, sometimes the formatting can be a bit messy or inconsistent (e.g., mixing bullet points with paragraphs).
To fix this, we need a dedicated format assistant to organize the answers into a beautiful, standardized format before the final LLM writes the email.
## Template
It takes the original data (like your list of answers), follows a strict design template/standards you provide, and generates a perfectly formatted block of text, ensuring consistency every single time.
## Hands-On: Polish the Email Layout
Since the Template node will be handling the greetings, we need to tell LLM to focus solely on the questions and answers. Copy and paste the prompt below or feel free to edit it.
```plaintext wrap theme={null}
Combine all answers for the original email. Write a complete, clear, and friendly reply that only includes the summarized answers.
IMPORTANT: Focus SOLELY on the answers. Do NOT include greetings (like "Hi Name"), do
NOT write intro paragraphs (like "Thank you for reaching out"), and do NOT include
signatures.
```
List the different variables respectively.
![Edit LLM Node]() After LLM node, click to add Template node.
After LLM node, click to add Template node.
![Add Template Node]() Click the Template node, go to the Input Variables section, and add these two items:
* `customer`: Choose `User Input / {x} customer_name String`
* `body`: Choose `LLM / {x} text String`
Click the Template node, go to the Input Variables section, and add these two items:
* `customer`: Choose `User Input / {x} customer_name String`
* `body`: Choose `LLM / {x} text String`
![Template Input Variable]() **What is Jinja2?**
In simple terms, Jinja2 is a tool that allows you to format variables (like your list of answers) into a text template exactly how you want. It uses simple symbols to mark where variables go and perform basic logic. With it, we can turn a raw list of data into a neat, standardized text block.
Here, we can put together opening, signatures, and email body to make sure the email is professional and consistent every time.
Copy and paste this exact layout into the Template code box:
```jinja theme={null}
Hi {{ customer }},
Thank you for reaching out to us, and we are more than happy to provide you with the information you are seeking.
Here are the details regarding your specific questions:
{{ body }}
---
Thank you for reaching out to us!
Best regards,
Anne
```
Here's the final workflow.
**What is Jinja2?**
In simple terms, Jinja2 is a tool that allows you to format variables (like your list of answers) into a text template exactly how you want. It uses simple symbols to mark where variables go and perform basic logic. With it, we can turn a raw list of data into a neat, standardized text block.
Here, we can put together opening, signatures, and email body to make sure the email is professional and consistent every time.
Copy and paste this exact layout into the Template code box:
```jinja theme={null}
Hi {{ customer }},
Thank you for reaching out to us, and we are more than happy to provide you with the information you are seeking.
Here are the details regarding your specific questions:
{{ body }}
---
Thank you for reaching out to us!
Best regards,
Anne
```
Here's the final workflow.
![Final Workflow]() Click **Test Run**. Ask multiple questions in one email. Notice how your final output has a perfectly written custom intro, the LLM's beautifully summarized answers in the middle, and a standard, professional signature at the bottom.
## Mini Challenge
1. How would you change the Jinja2 code to make a numbered list (1. Answer, 2. Answer) instead of bullet points?
Check the [Template Designer Documentation](https://jinja.palletsprojects.com/en/stable/templates/) or ask an LLM about it.
2. What else can Template node do?
# Lesson 10: Publish and Monitor Your AI App
Source: https://docs.dify.ai/en/use-dify/tutorials/workflow-101/lesson-10
After building and tuning, your Email Assistant is now fully ready. It can read knowledge bases, use search tools, and generate beautifully formatted replies. But right now, it's still sitting inside your Dify Studio and only you can see it.
How do we share it with others? How do we know if it's working correctly when we aren't watching?
It's time for the final two critical steps: Publish and Monitor.
## Publish Your Application
1. Move your mouse to the top right corner of the canvas and click the **Publish** button. You'll see other buttons light up.
Whenever you make changes to your workflow, you must click **Publish → Update** to save them.
If you don't update, the live version will remain the old one.
Click **Test Run**. Ask multiple questions in one email. Notice how your final output has a perfectly written custom intro, the LLM's beautifully summarized answers in the middle, and a standard, professional signature at the bottom.
## Mini Challenge
1. How would you change the Jinja2 code to make a numbered list (1. Answer, 2. Answer) instead of bullet points?
Check the [Template Designer Documentation](https://jinja.palletsprojects.com/en/stable/templates/) or ask an LLM about it.
2. What else can Template node do?
# Lesson 10: Publish and Monitor Your AI App
Source: https://docs.dify.ai/en/use-dify/tutorials/workflow-101/lesson-10
After building and tuning, your Email Assistant is now fully ready. It can read knowledge bases, use search tools, and generate beautifully formatted replies. But right now, it's still sitting inside your Dify Studio and only you can see it.
How do we share it with others? How do we know if it's working correctly when we aren't watching?
It's time for the final two critical steps: Publish and Monitor.
## Publish Your Application
1. Move your mouse to the top right corner of the canvas and click the **Publish** button. You'll see other buttons light up.
Whenever you make changes to your workflow, you must click **Publish → Update** to save them.
If you don't update, the live version will remain the old one.
![Publish]() 2. Once published, the gray-out buttons turned clickable now.
1. **Share Your App**
Click **Run App**. Dify automatically generates a WebApp for you. This is a ready-to-use chat interface for your Email Assistant.
You can send this URL to colleagues or friends. They don't need to log in to Dify to use the email assistant.
2. Once published, the gray-out buttons turned clickable now.
1. **Share Your App**
Click **Run App**. Dify automatically generates a WebApp for you. This is a ready-to-use chat interface for your Email Assistant.
You can send this URL to colleagues or friends. They don't need to log in to Dify to use the email assistant.
![WebApp]() 2. **Batch Run App**
If you have 100 emails to reply, copying and pasting them one by one will drag you down.
In Dify, all you need to do is to prepare a CSV file with the 100 emails. Upload it to Dify's Batch Run feature. Dify processes all 100 emails automatically and gives you back a spreadsheet with all the generated replies.
Since we set specific variables (like `email_content`), your CSV must match that format. Dify provides a template you can download to make this easy.
2. **Batch Run App**
If you have 100 emails to reply, copying and pasting them one by one will drag you down.
In Dify, all you need to do is to prepare a CSV file with the 100 emails. Upload it to Dify's Batch Run feature. Dify processes all 100 emails automatically and gives you back a spreadsheet with all the generated replies.
Since we set specific variables (like `email_content`), your CSV must match that format. Dify provides a template you can download to make this easy.
![Download Template]() 3. **Others**
* **Access API Reference**: If you know coding, you can get an API Key to integrate this workflow directly into your own website or mobile app
* **Open in Explore**: Pin this app to your workspace sidebar for quick access next time
* **Publish as a Tool**: Package your workflow as a plugin so other Agents can use your Email Assistant as a tool
## Monitor Your App
As the creator, you need to understand the status of this assistant. By monitoring and using logs, you can check the health, performance, and costs.
### The Command Center: Monitoring
Click **Monitoring** on the left sidebar to see how your app is performing.
| Name | Explanation |
| :--------------------- | :----------------------------------------------------------------------------------- |
| Total Messages | How many times users interacted with the AI today. It shows how popular your app is. |
| Active Users | The number of unique people engaging with the AI. |
| Token Usage | How much tokens the AI used. Watch for sudden spikes to control costs. |
| Avg. User Interactions | Do the users ask follow-up questions? |
### The Magnifying Glass: Logs
Logs record the details of every single run: time, input, duration, and output. To access detailed records, click Logs in the left sidebar.
**Why Logs?**
* **Debugging**: User says *It doesn't work*? Check the logs to replay the *crime scene* and see exactly which node failed.
* **Performance**: See how long each node took. Find the blocker that is slowing things down.
* **Understand Users**: Read what users are actually asking. Use this real data to update your Knowledge Base or improve your Prompts.
* **Cost Control**: Check exactly how many tokens a specific run cost.
| Name | Explanation |
| :------------------ | :---------------------------------------------------------- |
| Start Time | The time when the workflow was triggered |
| Status | Success or Failure. |
| Run Time | How long the whole process took. |
| Tokens | The tokens consumed by this run. |
| End User or Account | The specific user ID or account that initiated the session. |
| Triggered By | WebApp interface or called via API. |
You can click on each log entry to view more details. For example, you can identify frequently asked user questions and use them to timely update and modify your Knowledge Base.
Building AI app is a new starting point, and this is the core of **LLMOps** (Large language model operations).
1. **Observe**: Look at the Logs. What are users asking? Are they happy with the answers?
2. **Analyze**: Hallucination happens on certain questions or some tools run out often
3. **Optimize**: Go back to the Canvas. Edit the Prompt, add a document to the Knowledge Base, or tweak the workflow logic
4. **Publish**: Release the upgraded version
By repeating this cycle, your Email Assistant gets smarter and faster.
## Thank You
**Thank you for your time and you're now a Dify builder with a new way of thinking:**
```plaintext wrap theme={null}
Break down the task → Choose Nodes and Tools → Connect them with the right logic → Monitor and upgrade
```
Now, feel free to open a template in Dify explore. Break it down, analyze it, or start building a workflow that solves a task in your daily work from the scratch.
May your workload get lighter and your imagination goes higher. Happy building with Dify.
# Get App Info
Source: https://docs.dify.ai/api-reference/applications/get-app-info
/en/api-reference/openapi_completion.json get /info
Retrieve basic information about this application, including name, description, tags, and mode.
# Get App Meta
Source: https://docs.dify.ai/api-reference/applications/get-app-meta
/en/api-reference/openapi_completion.json get /meta
Retrieve metadata about this application, including tool icons and other configuration details.
# Get App Parameters
Source: https://docs.dify.ai/api-reference/applications/get-app-parameters
/en/api-reference/openapi_completion.json get /parameters
Retrieve the application's input form configuration, including feature switches, input parameter names, types, and default values.
# Get App WebApp Settings
Source: https://docs.dify.ai/api-reference/applications/get-app-webapp-settings
/en/api-reference/openapi_completion.json get /site
Retrieve the WebApp settings of this application, including site configuration, theme, and customization options.
# Create Child Chunk
Source: https://docs.dify.ai/api-reference/chunks/create-child-chunk
/en/api-reference/openapi_knowledge.json post /datasets/{dataset_id}/documents/{document_id}/segments/{segment_id}/child_chunks
Create a child chunk under a parent chunk. Only available for documents using the `hierarchical_model` chunking mode.
# Create Chunks
Source: https://docs.dify.ai/api-reference/chunks/create-chunks
/en/api-reference/openapi_knowledge.json post /datasets/{dataset_id}/documents/{document_id}/segments
Create one or more chunks within a document. Each chunk can include optional keywords and an answer field (for QA-mode documents).
# Delete Child Chunk
Source: https://docs.dify.ai/api-reference/chunks/delete-child-chunk
/en/api-reference/openapi_knowledge.json delete /datasets/{dataset_id}/documents/{document_id}/segments/{segment_id}/child_chunks/{child_chunk_id}
Permanently delete a child chunk from its parent chunk.
# Delete Chunk
Source: https://docs.dify.ai/api-reference/chunks/delete-chunk
/en/api-reference/openapi_knowledge.json delete /datasets/{dataset_id}/documents/{document_id}/segments/{segment_id}
Permanently delete a chunk from the document.
# Get Chunk
Source: https://docs.dify.ai/api-reference/chunks/get-chunk
/en/api-reference/openapi_knowledge.json get /datasets/{dataset_id}/documents/{document_id}/segments/{segment_id}
Retrieve detailed information about a specific chunk, including its content, keywords, and indexing status.
# List Child Chunks
Source: https://docs.dify.ai/api-reference/chunks/list-child-chunks
/en/api-reference/openapi_knowledge.json get /datasets/{dataset_id}/documents/{document_id}/segments/{segment_id}/child_chunks
Returns a paginated list of child chunks under a specific parent chunk.
# List Chunks
Source: https://docs.dify.ai/api-reference/chunks/list-chunks
/en/api-reference/openapi_knowledge.json get /datasets/{dataset_id}/documents/{document_id}/segments
Returns a paginated list of chunks within a document. Supports filtering by keyword and status.
# Update Child Chunk
Source: https://docs.dify.ai/api-reference/chunks/update-child-chunk
/en/api-reference/openapi_knowledge.json patch /datasets/{dataset_id}/documents/{document_id}/segments/{segment_id}/child_chunks/{child_chunk_id}
Update the content of an existing child chunk.
# Update Chunk
Source: https://docs.dify.ai/api-reference/chunks/update-chunk
/en/api-reference/openapi_knowledge.json post /datasets/{dataset_id}/documents/{document_id}/segments/{segment_id}
Update a chunk's content, keywords, or answer. Re-triggers indexing for the modified chunk.
# Send Completion Message
Source: https://docs.dify.ai/api-reference/completions/send-completion-message
/en/api-reference/openapi_completion.json post /completion-messages
Send a request to the text generation application.
# Stop Completion Message Generation
Source: https://docs.dify.ai/api-reference/completions/stop-completion-message-generation
/en/api-reference/openapi_completion.json post /completion-messages/{task_id}/stop
Stops a completion message generation task. Only supported in `streaming` mode.
# Delete Document
Source: https://docs.dify.ai/api-reference/documents/delete-document
/en/api-reference/openapi_knowledge.json delete /datasets/{dataset_id}/documents/{document_id}
Permanently delete a document and all its chunks from the knowledge base.
# Download Document
Source: https://docs.dify.ai/api-reference/documents/download-document
/en/api-reference/openapi_knowledge.json get /datasets/{dataset_id}/documents/{document_id}/download
Get a signed download URL for a document's original uploaded file.
# Download Documents as ZIP
Source: https://docs.dify.ai/api-reference/documents/download-documents-as-zip
/en/api-reference/openapi_knowledge.json post /datasets/{dataset_id}/documents/download-zip
Download multiple uploaded-file documents as a single ZIP archive. Accepts up to `100` document IDs.
# Get Document Indexing Status
Source: https://docs.dify.ai/api-reference/documents/get-document-indexing-status
/en/api-reference/openapi_knowledge.json get /datasets/{dataset_id}/documents/{batch}/indexing-status
Check the indexing progress of documents in a batch. Returns the current processing stage and chunk completion counts for each document. Poll this endpoint until `indexing_status` reaches `completed` or `error`. The status progresses through: `waiting` → `parsing` → `cleaning` → `splitting` → `indexing` → `completed`.
# Update Document by File
Source: https://docs.dify.ai/api-reference/documents/update-document-by-file
/en/api-reference/openapi_knowledge.json post /datasets/{dataset_id}/documents/{document_id}/update-by-file
Update an existing document by uploading a new file. Re-triggers indexing — use the returned `batch` ID with [Get Document Indexing Status](/api-reference/documents/get-document-indexing-status) to track progress.
# Update Document by Text
Source: https://docs.dify.ai/api-reference/documents/update-document-by-text
/en/api-reference/openapi_knowledge.json post /datasets/{dataset_id}/documents/{document_id}/update-by-text
Update an existing document's text content, name, or processing configuration. Re-triggers indexing if content changes — use the returned `batch` ID with [Get Document Indexing Status](/api-reference/documents/get-document-indexing-status) to track progress.
# Update Document Status in Batch
Source: https://docs.dify.ai/api-reference/documents/update-document-status-in-batch
/en/api-reference/openapi_knowledge.json patch /datasets/{dataset_id}/documents/status/{action}
Enable, disable, archive, or unarchive multiple documents at once.
# Get End User Info
Source: https://docs.dify.ai/api-reference/end-users/get-end-user-info
/en/api-reference/openapi_completion.json get /end-users/{end_user_id}
Retrieve an end user by ID. Useful when other APIs return an end-user ID (e.g., `created_by` from [Upload File](/api-reference/files/upload-file)).
# List App Feedbacks
Source: https://docs.dify.ai/api-reference/feedback/list-app-feedbacks
/en/api-reference/openapi_completion.json get /app/feedbacks
Retrieve a paginated list of all feedback submitted for messages in this application, including both end-user and admin feedback.
# Submit Message Feedback
Source: https://docs.dify.ai/api-reference/feedback/submit-message-feedback
/en/api-reference/openapi_completion.json post /messages/{message_id}/feedbacks
Submit feedback for a message. End users can rate messages as `like` or `dislike`, and optionally provide text feedback. Pass `null` for `rating` to revoke previously submitted feedback.
# Download File
Source: https://docs.dify.ai/api-reference/files/download-file
/en/api-reference/openapi_completion.json get /files/{file_id}/preview
Preview or download uploaded files previously uploaded via the [Upload File](/api-reference/files/upload-file) API. Files can only be accessed if they belong to messages within the requesting application.
# Upload File
Source: https://docs.dify.ai/api-reference/files/upload-file
/en/api-reference/openapi_completion.json post /files/upload
Upload a file for use when sending messages, enabling multimodal understanding of images, documents, audio, and video. Uploaded files are for use by the current end-user only.
# List Datasource Plugins
Source: https://docs.dify.ai/api-reference/knowledge-pipeline/list-datasource-plugins
/en/api-reference/openapi_knowledge.json get /datasets/{dataset_id}/pipeline/datasource-plugins
List all datasource plugins available for a knowledge pipeline. Returns published or draft plugins depending on the `is_published` query parameter.
# Run Datasource Node
Source: https://docs.dify.ai/api-reference/knowledge-pipeline/run-datasource-node
/en/api-reference/openapi_knowledge.json post /datasets/{dataset_id}/pipeline/datasource/nodes/{node_id}/run
Execute a single datasource node within the knowledge pipeline. Returns a streaming response with the node execution results.
# Run Pipeline
Source: https://docs.dify.ai/api-reference/knowledge-pipeline/run-pipeline
/en/api-reference/openapi_knowledge.json post /datasets/{dataset_id}/pipeline/run
Execute the full knowledge pipeline for a knowledge base. Supports both streaming and blocking response modes.
# Upload Pipeline File
Source: https://docs.dify.ai/api-reference/knowledge-pipeline/upload-pipeline-file
/en/api-reference/openapi_knowledge.json post /datasets/pipeline/file-upload
Upload a file for use in a knowledge pipeline. Accepts a single file via `multipart/form-data`.
# Create Metadata Field
Source: https://docs.dify.ai/api-reference/metadata/create-metadata-field
/en/api-reference/openapi_knowledge.json post /datasets/{dataset_id}/metadata
Create a custom metadata field for the knowledge base. Metadata fields can be used to annotate documents with structured information.
# Delete Metadata Field
Source: https://docs.dify.ai/api-reference/metadata/delete-metadata-field
/en/api-reference/openapi_knowledge.json delete /datasets/{dataset_id}/metadata/{metadata_id}
Permanently delete a custom metadata field. Documents using this field will lose their metadata values for it.
# Get Built-in Metadata Fields
Source: https://docs.dify.ai/api-reference/metadata/get-built-in-metadata-fields
/en/api-reference/openapi_knowledge.json get /datasets/{dataset_id}/metadata/built-in
Returns the list of built-in metadata fields provided by the system (e.g., document type, source URL).
# List Metadata Fields
Source: https://docs.dify.ai/api-reference/metadata/list-metadata-fields
/en/api-reference/openapi_knowledge.json get /datasets/{dataset_id}/metadata
Returns the list of all metadata fields (both custom and built-in) for the knowledge base, along with the count of documents using each field.
# Update Built-in Metadata Field
Source: https://docs.dify.ai/api-reference/metadata/update-built-in-metadata-field
/en/api-reference/openapi_knowledge.json post /datasets/{dataset_id}/metadata/built-in/{action}
Enable or disable built-in metadata fields for the knowledge base.
# Update Document Metadata in Batch
Source: https://docs.dify.ai/api-reference/metadata/update-document-metadata-in-batch
/en/api-reference/openapi_knowledge.json post /datasets/{dataset_id}/documents/metadata
Update metadata values for multiple documents at once. Each document in the request receives the specified metadata key-value pairs.
# Update Metadata Field
Source: https://docs.dify.ai/api-reference/metadata/update-metadata-field
/en/api-reference/openapi_knowledge.json patch /datasets/{dataset_id}/metadata/{metadata_id}
Rename a custom metadata field.
# Get Available Models
Source: https://docs.dify.ai/api-reference/models/get-available-models
/en/api-reference/openapi_knowledge.json get /workspaces/current/models/model-types/{model_type}
Retrieve the list of available models by type. Primarily used to query `text-embedding` and `rerank` models for knowledge base configuration.
# Create Knowledge Tag
Source: https://docs.dify.ai/api-reference/tags/create-knowledge-tag
/en/api-reference/openapi_knowledge.json post /datasets/tags
Create a new tag for organizing knowledge bases.
# Create Tag Binding
Source: https://docs.dify.ai/api-reference/tags/create-tag-binding
/en/api-reference/openapi_knowledge.json post /datasets/tags/binding
Bind one or more tags to a knowledge base. A knowledge base can have multiple tags.
# Delete Knowledge Tag
Source: https://docs.dify.ai/api-reference/tags/delete-knowledge-tag
/en/api-reference/openapi_knowledge.json delete /datasets/tags
Permanently delete a knowledge base tag. Does not delete the knowledge bases that were tagged.
# Delete Tag Binding
Source: https://docs.dify.ai/api-reference/tags/delete-tag-binding
/en/api-reference/openapi_knowledge.json post /datasets/tags/unbinding
Remove a tag binding from a knowledge base.
# Get Knowledge Base Tags
Source: https://docs.dify.ai/api-reference/tags/get-knowledge-base-tags
/en/api-reference/openapi_knowledge.json get /datasets/{dataset_id}/tags
Returns the list of tags bound to a specific knowledge base.
# List Knowledge Tags
Source: https://docs.dify.ai/api-reference/tags/list-knowledge-tags
/en/api-reference/openapi_knowledge.json get /datasets/tags
Returns the list of all knowledge base tags in the workspace.
# Update Knowledge Tag
Source: https://docs.dify.ai/api-reference/tags/update-knowledge-tag
/en/api-reference/openapi_knowledge.json patch /datasets/tags
Rename an existing knowledge base tag.
# Convert Audio to Text
Source: https://docs.dify.ai/api-reference/tts/convert-audio-to-text
/en/api-reference/openapi_completion.json post /audio-to-text
Convert audio file to text. Supported formats: `mp3`, `mp4`, `mpeg`, `mpga`, `m4a`, `wav`, `webm`. File size limit is `30 MB`.
# Convert Text to Audio
Source: https://docs.dify.ai/api-reference/tts/convert-text-to-audio
/en/api-reference/openapi_completion.json post /text-to-audio
Convert text to speech.
# Agent Strategy Plugin
Source: https://docs.dify.ai/en/develop-plugin/dev-guides-and-walkthroughs/agent-strategy-plugin
An **Agent Strategy Plugin** helps an LLM carry out tasks like reasoning or decision-making, including choosing and calling tools, as well as handling results. This allows the system to address problems more autonomously.
Below, you’ll see how to develop a plugin that supports **Function Calling** to automatically fetch the current time.
### Prerequisites
* Dify plugin scaffolding tool
* Python environment (version 3.12)
For details on preparing the plugin development tool, see [Initializing the Development Tool](/en/develop-plugin/getting-started/cli).
**Tip**: Run `dify version` in your terminal to confirm that the scaffolding tool is installed.
***
### 1. Initializing the Plugin Template
Run the following command to create a development template for your Agent plugin:
```
dify plugin init
```
Follow the on-screen prompts and refer to the sample comments for guidance.
```bash theme={null}
➜ Dify Plugins Developing dify plugin init
Edit profile of the plugin
Plugin name (press Enter to next step): # Enter the plugin name
Author (press Enter to next step): Author name # Enter the plugin author
Description (press Enter to next step): Description # Enter the plugin description
---
Select the language you want to use for plugin development, and press Enter to con
BTW, you need Python 3.12+ to develop the Plugin if you choose Python.
-> python # Select Python environment
go (not supported yet)
---
Based on the ability you want to extend, we have divided the Plugin into four type
- Tool: It's a tool provider, but not only limited to tools, you can implement an
- Model: Just a model provider, extending others is not allowed.
- Extension: Other times, you may only need a simple http service to extend the fu
- Agent Strategy: Implement your own logics here, just by focusing on Agent itself
What's more, we have provided the template for you, you can choose one of them b
tool
-> agent-strategy # Select Agent strategy template
llm
text-embedding
---
Configure the permissions of the plugin, use up and down to navigate, tab to sel
Backwards Invocation:
Tools:
Enabled: [✔] You can invoke tools inside Dify if it's enabled # Enabled by default
Models:
Enabled: [✔] You can invoke models inside Dify if it's enabled # Enabled by default
LLM: [✔] You can invoke LLM models inside Dify if it's enabled # Enabled by default
Text Embedding: [✘] You can invoke text embedding models inside Dify if it'
Rerank: [✘] You can invoke rerank models inside Dify if it's enabled
...
```
After initialization, you’ll get a folder containing all the resources needed for plugin development. Familiarizing yourself with the overall structure of an Agent Strategy Plugin will streamline the development process:
```text theme={null}
├── GUIDE.md # User guide and documentation
├── PRIVACY.md # Privacy policy and data handling guidelines
├── README.md # Project overview and setup instructions
├── _assets/ # Static assets directory
│ └── icon.svg # Agent strategy provider icon/logo
├── main.py # Main application entry point
├── manifest.yaml # Basic plugin configuration
├── provider/ # Provider configurations directory
│ └── basic_agent.yaml # Your agent provider settings
├── requirements.txt # Python dependencies list
└── strategies/ # Strategy implementation directory
├── basic_agent.py # Basic agent strategy implementation
└── basic_agent.yaml # Basic agent strategy configuration
```
All key functionality for this plugin is in the `strategies/` directory.
***
### 2. Developing the Plugin
Agent Strategy Plugin development revolves around two files:
* **Plugin Declaration**: `strategies/basic_agent.yaml`
* **Plugin Implementation**: `strategies/basic_agent.py`
#### 2.1 Defining Parameters
To build an Agent plugin, start by specifying the necessary parameters in `strategies/basic_agent.yaml`. These parameters define the plugin’s core features, such as calling an LLM or using tools.
We recommend including the following four parameters first:
1. **model**: The large language model to call (e.g., GPT-4, GPT-4o-mini).
2. **tools**: A list of tools that enhance your plugin’s functionality.
3. **query**: The user input or prompt content sent to the model.
4. **maximum\_iterations**: The maximum iteration count to prevent excessive computation.
Example Code:
```yaml theme={null}
identity:
name: basic_agent # the name of the agent_strategy
author: novice # the author of the agent_strategy
label:
en_US: BasicAgent # the engilish label of the agent_strategy
description:
en_US: BasicAgent # the english description of the agent_strategy
parameters:
- name: model # the name of the model parameter
type: model-selector # model-type
scope: tool-call&llm # the scope of the parameter
required: true
label:
en_US: Model
zh_Hans: 模型
pt_BR: Model
- name: tools # the name of the tools parameter
type: array[tools] # the type of tool parameter
required: true
label:
en_US: Tools list
zh_Hans: 工具列表
pt_BR: Tools list
- name: query # the name of the query parameter
type: string # the type of query parameter
required: true
label:
en_US: Query
zh_Hans: 查询
pt_BR: Query
- name: maximum_iterations
type: number
required: false
default: 5
label:
en_US: Maxium Iterations
zh_Hans: 最大迭代次数
pt_BR: Maxium Iterations
max: 50 # if you set the max and min value, the display of the parameter will be a slider
min: 1
extra:
python:
source: strategies/basic_agent.py
```
Once you’ve configured these parameters, the plugin will automatically generate a user-friendly interface so you can easily manage them:
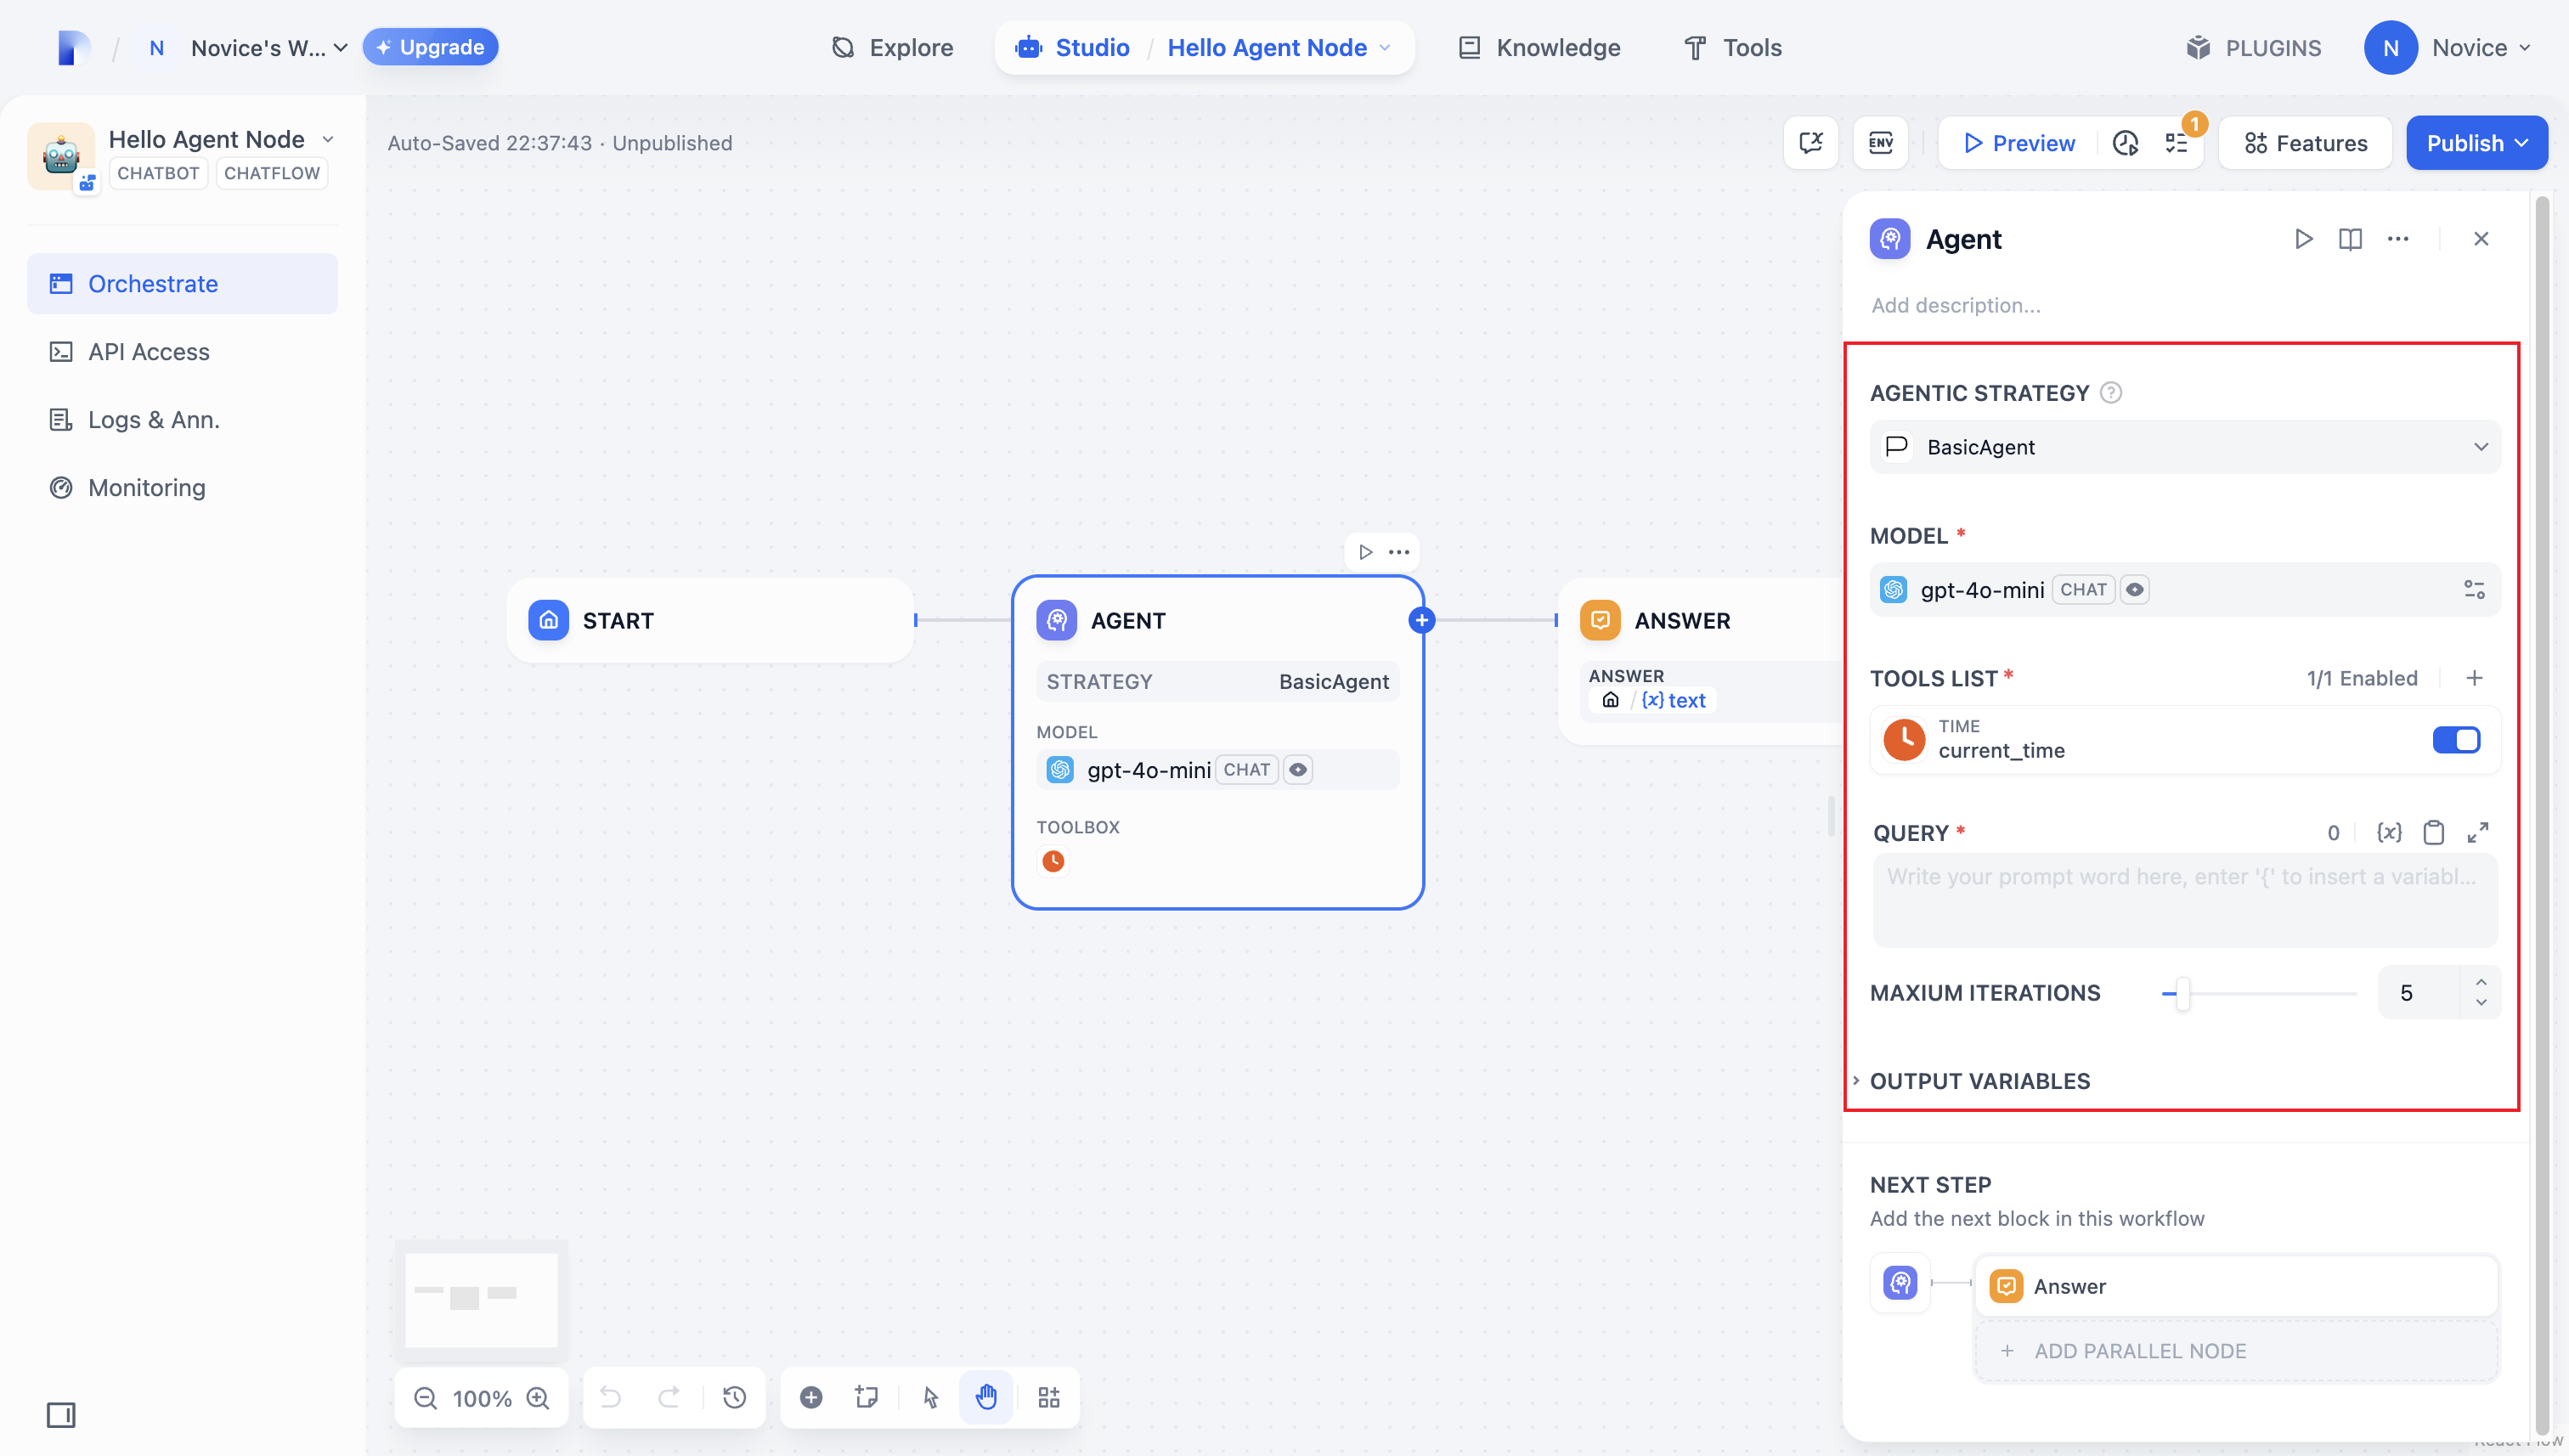
#### 2.2 Retrieving Parameters and Execution
After users fill out these basic fields, your plugin needs to process the submitted parameters. In `strategies/basic_agent.py`, define a parameter class for the Agent, then retrieve and apply these parameters in your logic.
Verify incoming parameters:
```python theme={null}
from dify_plugin.entities.agent import AgentInvokeMessage
from dify_plugin.interfaces.agent import AgentModelConfig, AgentStrategy, ToolEntity
from pydantic import BaseModel
class BasicParams(BaseModel):
maximum_iterations: int
model: AgentModelConfig
tools: list[ToolEntity]
query: str
```
After getting the parameters, the specific business logic is executed:
```python theme={null}
class BasicAgentAgentStrategy(AgentStrategy):
def _invoke(self, parameters: dict[str, Any]) -> Generator[AgentInvokeMessage]:
params = BasicParams(**parameters)
```
### 3. Invoking the Model
In an Agent Strategy Plugin, **invoking the model** is central to the workflow. You can invoke an LLM efficiently using `session.model.llm.invoke()` from the SDK, handling text generation, dialogue, and so forth.
If you want the LLM **handle tools**, ensure it outputs structured parameters to match a tool’s interface. In other words, the LLM must produce input arguments that the tool can accept based on the user’s instructions.
Construct the following parameters:
* model
* prompt\_messages
* tools
* stop
* stream
Example code for method definition:
```python theme={null}
def invoke(
self,
model_config: LLMModelConfig,
prompt_messages: list[PromptMessage],
tools: list[PromptMessageTool] | None = None,
stop: list[str] | None = None,
stream: bool = True,
) -> Generator[LLMResultChunk, None, None] | LLMResult:...
```
To view the complete functionality implementation, please refer to the Example Code for model invocation.
This code achieves the following functionality: after a user inputs a command, the Agent strategy plugin automatically calls the LLM, constructs the necessary parameters for tool invocation based on the generated results, and enables the model to flexibly dispatch integrated tools to efficiently complete complex tasks.

### 4. Handle a Tool
After specifying the tool parameters, the Agent Strategy Plugin must actually call these tools. Use `session.tool.invoke()` to make those requests.
Construct the following parameters:
* provider
* tool\_name
* parameters
Example code for method definition:
```python theme={null}
def invoke(
self,
provider_type: ToolProviderType,
provider: str,
tool_name: str,
parameters: dict[str, Any],
) -> Generator[ToolInvokeMessage, None, None]:...
```
If you’d like the LLM itself to generate the parameters needed for tool calls, you can do so by combining the model’s output with your tool-calling code.
```python theme={null}
tool_instances = (
{tool.identity.name: tool for tool in params.tools} if params.tools else {}
)
for tool_call_id, tool_call_name, tool_call_args in tool_calls:
tool_instance = tool_instances[tool_call_name]
self.session.tool.invoke(
provider_type=ToolProviderType.BUILT_IN,
provider=tool_instance.identity.provider,
tool_name=tool_instance.identity.name,
parameters={**tool_instance.runtime_parameters, **tool_call_args},
)
```
With this in place, your Agent Strategy Plugin can automatically perform **Function Calling**—for instance, retrieving the current time.
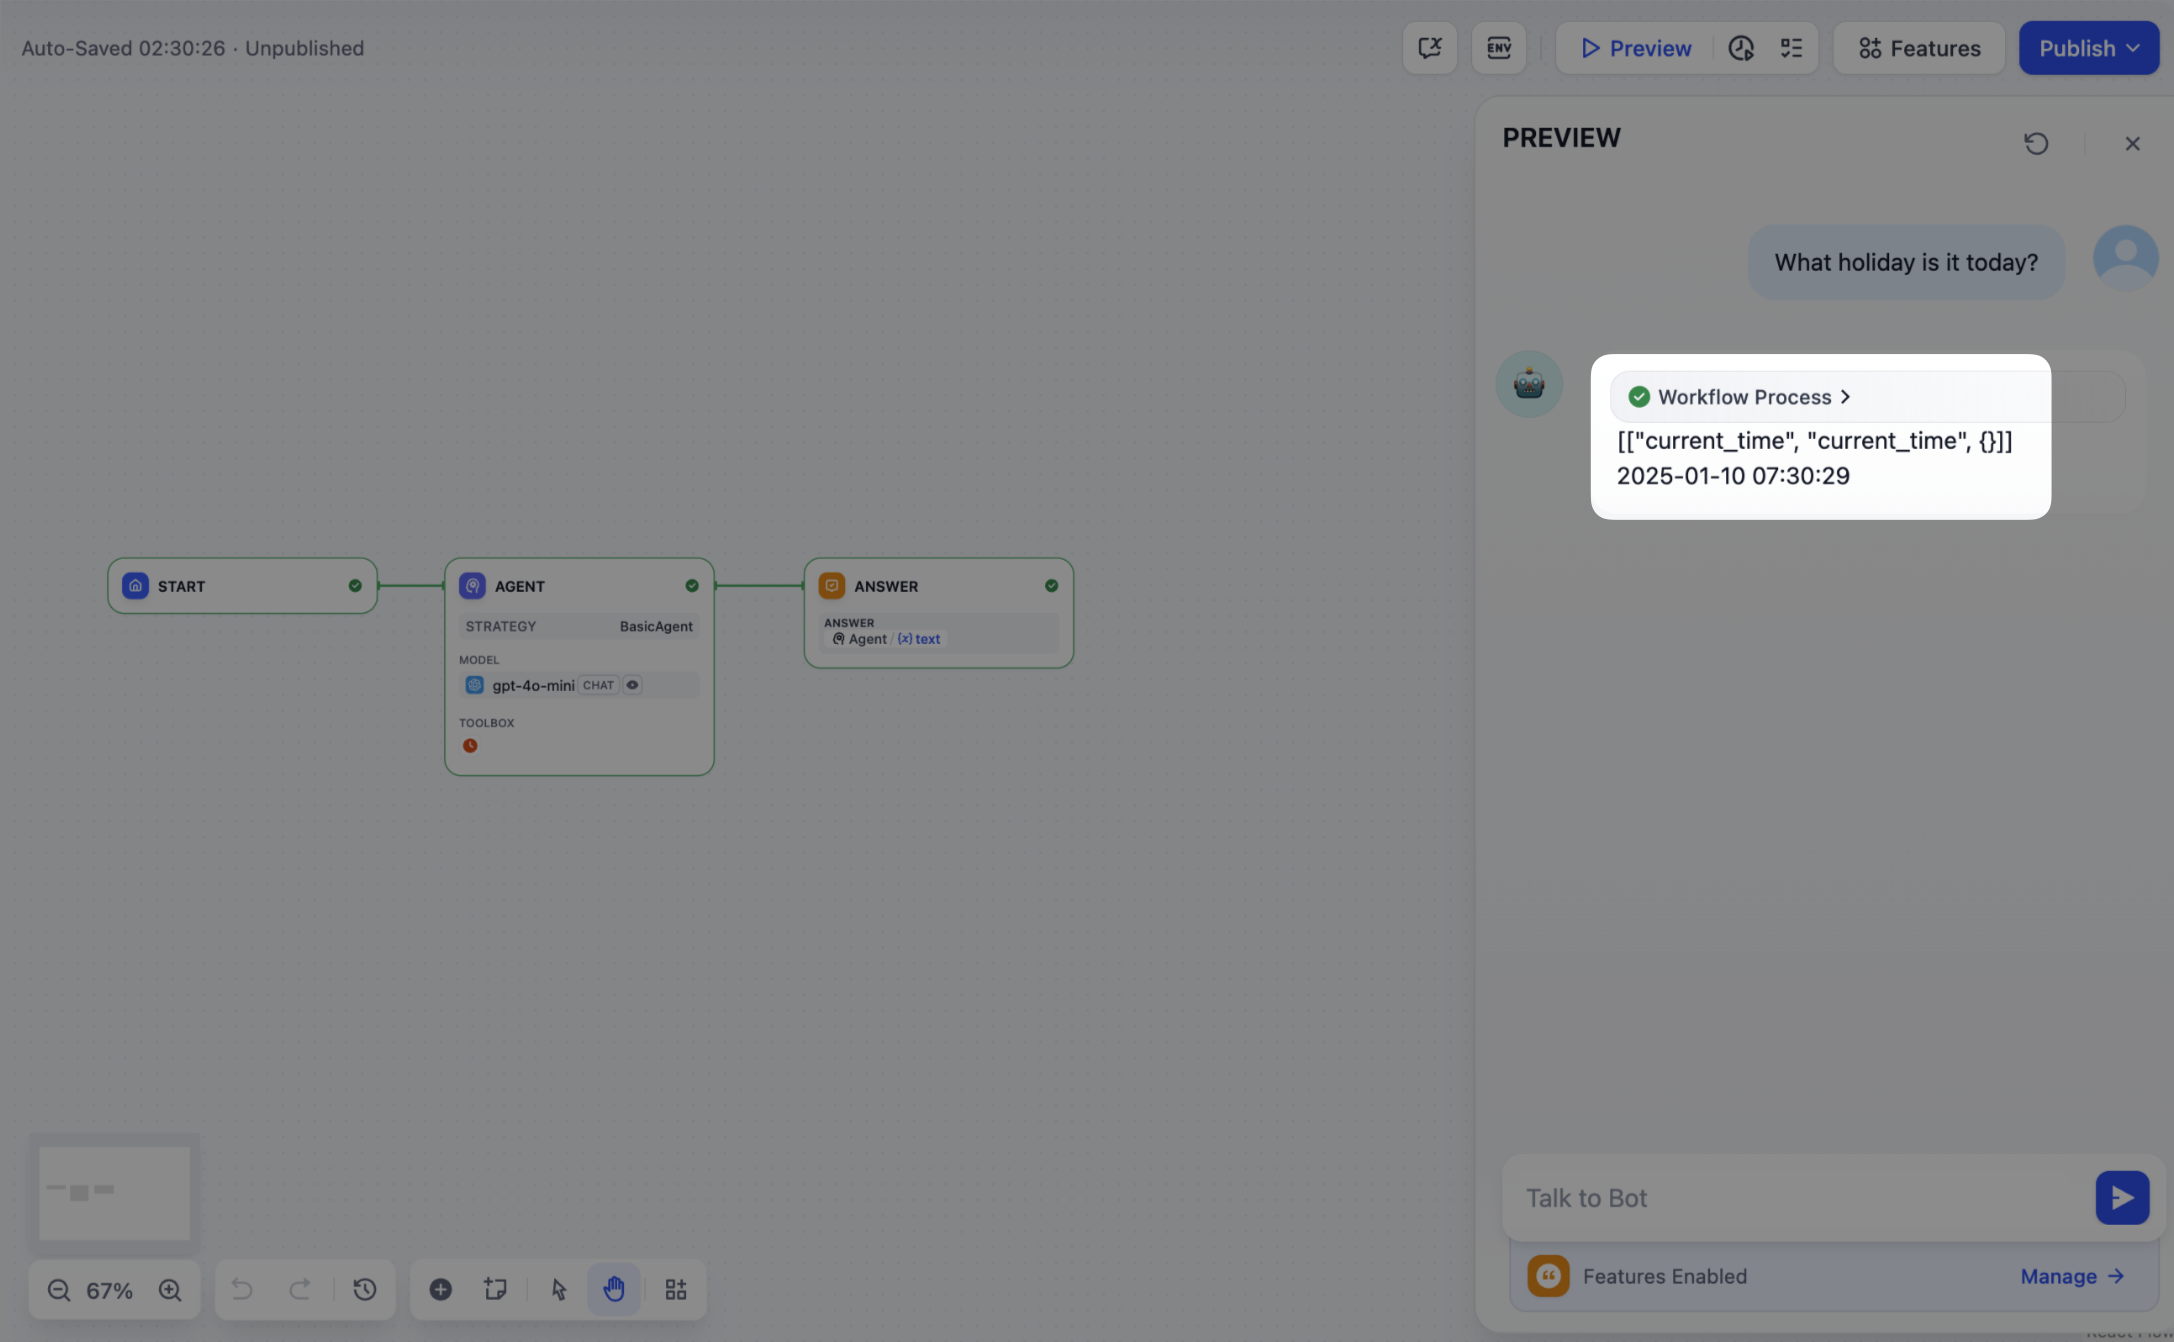
### 5. Creating Logs
Often, multiple steps are necessary to complete a complex task in an **Agent Strategy Plugin**. It’s crucial for developers to track each step’s results, analyze the decision process, and optimize strategy. Using `create_log_message` and `finish_log_message` from the SDK, you can log real-time states before and after calls, aiding in quick problem diagnosis.
For example:
* Log a “starting model call” message before calling the model, clarifying the task’s execution progress.
* Log a “call succeeded” message once the model responds, ensuring the model’s output can be traced end to end.
```python theme={null}
model_log = self.create_log_message(
label=f"{params.model.model} Thought",
data={},
metadata={"start_at": model_started_at, "provider": params.model.provider},
status=ToolInvokeMessage.LogMessage.LogStatus.START,
)
yield model_log
self.session.model.llm.invoke(...)
yield self.finish_log_message(
log=model_log,
data={
"output": response,
"tool_name": tool_call_names,
"tool_input": tool_call_inputs,
},
metadata={
"started_at": model_started_at,
"finished_at": time.perf_counter(),
"elapsed_time": time.perf_counter() - model_started_at,
"provider": params.model.provider,
},
)
```
When the setup is complete, the workflow log will output the execution results:

If multiple rounds of logs occur, you can structure them hierarchically by setting a `parent` parameter in your log calls, making them easier to follow.
Reference method:
```python theme={null}
function_call_round_log = self.create_log_message(
label="Function Call Round1 ",
data={},
metadata={},
)
yield function_call_round_log
model_log = self.create_log_message(
label=f"{params.model.model} Thought",
data={},
metadata={"start_at": model_started_at, "provider": params.model.provider},
status=ToolInvokeMessage.LogMessage.LogStatus.START,
# add parent log
parent=function_call_round_log,
)
yield model_log
```
#### Sample code for agent-plugin functions
#### Invoke Model
The following code demonstrates how to give the Agent strategy plugin the ability to invoke the model:
```python theme={null}
import json
from collections.abc import Generator
from typing import Any, cast
from dify_plugin.entities.agent import AgentInvokeMessage
from dify_plugin.entities.model.llm import LLMModelConfig, LLMResult, LLMResultChunk
from dify_plugin.entities.model.message import (
PromptMessageTool,
UserPromptMessage,
)
from dify_plugin.entities.tool import ToolInvokeMessage, ToolParameter, ToolProviderType
from dify_plugin.interfaces.agent import AgentModelConfig, AgentStrategy, ToolEntity
from pydantic import BaseModel
class BasicParams(BaseModel):
maximum_iterations: int
model: AgentModelConfig
tools: list[ToolEntity]
query: str
class BasicAgentAgentStrategy(AgentStrategy):
def _invoke(self, parameters: dict[str, Any]) -> Generator[AgentInvokeMessage]:
params = BasicParams(**parameters)
chunks: Generator[LLMResultChunk, None, None] | LLMResult = (
self.session.model.llm.invoke(
model_config=LLMModelConfig(**params.model.model_dump(mode="json")),
prompt_messages=[UserPromptMessage(content=params.query)],
tools=[
self._convert_tool_to_prompt_message_tool(tool)
for tool in params.tools
],
stop=params.model.completion_params.get("stop", [])
if params.model.completion_params
else [],
stream=True,
)
)
response = ""
tool_calls = []
tool_instances = (
{tool.identity.name: tool for tool in params.tools} if params.tools else {}
)
for chunk in chunks:
# check if there is any tool call
if self.check_tool_calls(chunk):
tool_calls = self.extract_tool_calls(chunk)
tool_call_names = ";".join([tool_call[1] for tool_call in tool_calls])
try:
tool_call_inputs = json.dumps(
{tool_call[1]: tool_call[2] for tool_call in tool_calls},
ensure_ascii=False,
)
except json.JSONDecodeError:
# ensure ascii to avoid encoding error
tool_call_inputs = json.dumps(
{tool_call[1]: tool_call[2] for tool_call in tool_calls}
)
print(tool_call_names, tool_call_inputs)
if chunk.delta.message and chunk.delta.message.content:
if isinstance(chunk.delta.message.content, list):
for content in chunk.delta.message.content:
response += content.data
print(content.data, end="", flush=True)
else:
response += str(chunk.delta.message.content)
print(str(chunk.delta.message.content), end="", flush=True)
if chunk.delta.usage:
# usage of the model
usage = chunk.delta.usage
yield self.create_text_message(
text=f"{response or json.dumps(tool_calls, ensure_ascii=False)}\n"
)
result = ""
for tool_call_id, tool_call_name, tool_call_args in tool_calls:
tool_instance = tool_instances[tool_call_name]
tool_invoke_responses = self.session.tool.invoke(
provider_type=ToolProviderType.BUILT_IN,
provider=tool_instance.identity.provider,
tool_name=tool_instance.identity.name,
parameters={**tool_instance.runtime_parameters, **tool_call_args},
)
if not tool_instance:
tool_invoke_responses = {
"tool_call_id": tool_call_id,
"tool_call_name": tool_call_name,
"tool_response": f"there is not a tool named {tool_call_name}",
}
else:
# invoke tool
tool_invoke_responses = self.session.tool.invoke(
provider_type=ToolProviderType.BUILT_IN,
provider=tool_instance.identity.provider,
tool_name=tool_instance.identity.name,
parameters={**tool_instance.runtime_parameters, **tool_call_args},
)
result = ""
for tool_invoke_response in tool_invoke_responses:
if tool_invoke_response.type == ToolInvokeMessage.MessageType.TEXT:
result += cast(
ToolInvokeMessage.TextMessage, tool_invoke_response.message
).text
elif (
tool_invoke_response.type == ToolInvokeMessage.MessageType.LINK
):
result += (
f"result link: {cast(ToolInvokeMessage.TextMessage, tool_invoke_response.message).text}."
+ " please tell user to check it."
)
elif tool_invoke_response.type in {
ToolInvokeMessage.MessageType.IMAGE_LINK,
ToolInvokeMessage.MessageType.IMAGE,
}:
result += (
"image has been created and sent to user already, "
+ "you do not need to create it, just tell the user to check it now."
)
elif (
tool_invoke_response.type == ToolInvokeMessage.MessageType.JSON
):
text = json.dumps(
cast(
ToolInvokeMessage.JsonMessage,
tool_invoke_response.message,
).json_object,
ensure_ascii=False,
)
result += f"tool response: {text}."
else:
result += f"tool response: {tool_invoke_response.message!r}."
tool_response = {
"tool_call_id": tool_call_id,
"tool_call_name": tool_call_name,
"tool_response": result,
}
yield self.create_text_message(result)
def _convert_tool_to_prompt_message_tool(
self, tool: ToolEntity
) -> PromptMessageTool:
"""
convert tool to prompt message tool
"""
message_tool = PromptMessageTool(
name=tool.identity.name,
description=tool.description.llm if tool.description else "",
parameters={
"type": "object",
"properties": {},
"required": [],
},
)
parameters = tool.parameters
for parameter in parameters:
if parameter.form != ToolParameter.ToolParameterForm.LLM:
continue
parameter_type = parameter.type
if parameter.type in {
ToolParameter.ToolParameterType.FILE,
ToolParameter.ToolParameterType.FILES,
}:
continue
enum = []
if parameter.type == ToolParameter.ToolParameterType.SELECT:
enum = (
[option.value for option in parameter.options]
if parameter.options
else []
)
message_tool.parameters["properties"][parameter.name] = {
"type": parameter_type,
"description": parameter.llm_description or "",
}
if len(enum) > 0:
message_tool.parameters["properties"][parameter.name]["enum"] = enum
if parameter.required:
message_tool.parameters["required"].append(parameter.name)
return message_tool
def check_tool_calls(self, llm_result_chunk: LLMResultChunk) -> bool:
"""
Check if there is any tool call in llm result chunk
"""
return bool(llm_result_chunk.delta.message.tool_calls)
def extract_tool_calls(
self, llm_result_chunk: LLMResultChunk
) -> list[tuple[str, str, dict[str, Any]]]:
"""
Extract tool calls from llm result chunk
Returns:
List[Tuple[str, str, Dict[str, Any]]]: [(tool_call_id, tool_call_name, tool_call_args)]
"""
tool_calls = []
for prompt_message in llm_result_chunk.delta.message.tool_calls:
args = {}
if prompt_message.function.arguments != "":
args = json.loads(prompt_message.function.arguments)
tool_calls.append(
(
prompt_message.id,
prompt_message.function.name,
args,
)
)
return tool_calls
```
#### Handle Tools
The following code shows how to implement model calls for the Agent strategy plugin and send canonicalized requests to the tool.
```python theme={null}
import json
from collections.abc import Generator
from typing import Any, cast
from dify_plugin.entities.agent import AgentInvokeMessage
from dify_plugin.entities.model.llm import LLMModelConfig, LLMResult, LLMResultChunk
from dify_plugin.entities.model.message import (
PromptMessageTool,
UserPromptMessage,
)
from dify_plugin.entities.tool import ToolInvokeMessage, ToolParameter, ToolProviderType
from dify_plugin.interfaces.agent import AgentModelConfig, AgentStrategy, ToolEntity
from pydantic import BaseModel
class BasicParams(BaseModel):
maximum_iterations: int
model: AgentModelConfig
tools: list[ToolEntity]
query: str
class BasicAgentAgentStrategy(AgentStrategy):
def _invoke(self, parameters: dict[str, Any]) -> Generator[AgentInvokeMessage]:
params = BasicParams(**parameters)
chunks: Generator[LLMResultChunk, None, None] | LLMResult = (
self.session.model.llm.invoke(
model_config=LLMModelConfig(**params.model.model_dump(mode="json")),
prompt_messages=[UserPromptMessage(content=params.query)],
tools=[
self._convert_tool_to_prompt_message_tool(tool)
for tool in params.tools
],
stop=params.model.completion_params.get("stop", [])
if params.model.completion_params
else [],
stream=True,
)
)
response = ""
tool_calls = []
tool_instances = (
{tool.identity.name: tool for tool in params.tools} if params.tools else {}
)
for chunk in chunks:
# check if there is any tool call
if self.check_tool_calls(chunk):
tool_calls = self.extract_tool_calls(chunk)
tool_call_names = ";".join([tool_call[1] for tool_call in tool_calls])
try:
tool_call_inputs = json.dumps(
{tool_call[1]: tool_call[2] for tool_call in tool_calls},
ensure_ascii=False,
)
except json.JSONDecodeError:
# ensure ascii to avoid encoding error
tool_call_inputs = json.dumps(
{tool_call[1]: tool_call[2] for tool_call in tool_calls}
)
print(tool_call_names, tool_call_inputs)
if chunk.delta.message and chunk.delta.message.content:
if isinstance(chunk.delta.message.content, list):
for content in chunk.delta.message.content:
response += content.data
print(content.data, end="", flush=True)
else:
response += str(chunk.delta.message.content)
print(str(chunk.delta.message.content), end="", flush=True)
if chunk.delta.usage:
# usage of the model
usage = chunk.delta.usage
yield self.create_text_message(
text=f"{response or json.dumps(tool_calls, ensure_ascii=False)}\n"
)
result = ""
for tool_call_id, tool_call_name, tool_call_args in tool_calls:
tool_instance = tool_instances[tool_call_name]
tool_invoke_responses = self.session.tool.invoke(
provider_type=ToolProviderType.BUILT_IN,
provider=tool_instance.identity.provider,
tool_name=tool_instance.identity.name,
parameters={**tool_instance.runtime_parameters, **tool_call_args},
)
if not tool_instance:
tool_invoke_responses = {
"tool_call_id": tool_call_id,
"tool_call_name": tool_call_name,
"tool_response": f"there is not a tool named {tool_call_name}",
}
else:
# invoke tool
tool_invoke_responses = self.session.tool.invoke(
provider_type=ToolProviderType.BUILT_IN,
provider=tool_instance.identity.provider,
tool_name=tool_instance.identity.name,
parameters={**tool_instance.runtime_parameters, **tool_call_args},
)
result = ""
for tool_invoke_response in tool_invoke_responses:
if tool_invoke_response.type == ToolInvokeMessage.MessageType.TEXT:
result += cast(
ToolInvokeMessage.TextMessage, tool_invoke_response.message
).text
elif (
tool_invoke_response.type == ToolInvokeMessage.MessageType.LINK
):
result += (
f"result link: {cast(ToolInvokeMessage.TextMessage, tool_invoke_response.message).text}."
+ " please tell user to check it."
)
elif tool_invoke_response.type in {
ToolInvokeMessage.MessageType.IMAGE_LINK,
ToolInvokeMessage.MessageType.IMAGE,
}:
result += (
"image has been created and sent to user already, "
+ "you do not need to create it, just tell the user to check it now."
)
elif (
tool_invoke_response.type == ToolInvokeMessage.MessageType.JSON
):
text = json.dumps(
cast(
ToolInvokeMessage.JsonMessage,
tool_invoke_response.message,
).json_object,
ensure_ascii=False,
)
result += f"tool response: {text}."
else:
result += f"tool response: {tool_invoke_response.message!r}."
tool_response = {
"tool_call_id": tool_call_id,
"tool_call_name": tool_call_name,
"tool_response": result,
}
yield self.create_text_message(result)
def _convert_tool_to_prompt_message_tool(
self, tool: ToolEntity
) -> PromptMessageTool:
"""
convert tool to prompt message tool
"""
message_tool = PromptMessageTool(
name=tool.identity.name,
description=tool.description.llm if tool.description else "",
parameters={
"type": "object",
"properties": {},
"required": [],
},
)
parameters = tool.parameters
for parameter in parameters:
if parameter.form != ToolParameter.ToolParameterForm.LLM:
continue
parameter_type = parameter.type
if parameter.type in {
ToolParameter.ToolParameterType.FILE,
ToolParameter.ToolParameterType.FILES,
}:
continue
enum = []
if parameter.type == ToolParameter.ToolParameterType.SELECT:
enum = (
[option.value for option in parameter.options]
if parameter.options
else []
)
message_tool.parameters["properties"][parameter.name] = {
"type": parameter_type,
"description": parameter.llm_description or "",
}
if len(enum) > 0:
message_tool.parameters["properties"][parameter.name]["enum"] = enum
if parameter.required:
message_tool.parameters["required"].append(parameter.name)
return message_tool
def check_tool_calls(self, llm_result_chunk: LLMResultChunk) -> bool:
"""
Check if there is any tool call in llm result chunk
"""
return bool(llm_result_chunk.delta.message.tool_calls)
def extract_tool_calls(
self, llm_result_chunk: LLMResultChunk
) -> list[tuple[str, str, dict[str, Any]]]:
"""
Extract tool calls from llm result chunk
Returns:
List[Tuple[str, str, Dict[str, Any]]]: [(tool_call_id, tool_call_name, tool_call_args)]
"""
tool_calls = []
for prompt_message in llm_result_chunk.delta.message.tool_calls:
args = {}
if prompt_message.function.arguments != "":
args = json.loads(prompt_message.function.arguments)
tool_calls.append(
(
prompt_message.id,
prompt_message.function.name,
args,
)
)
return tool_calls
```
#### Example of a complete function code
A complete sample plugin code that includes a **invoking model, handling tool** and a **function to output multiple rounds of logs**:
```python theme={null}
import json
import time
from collections.abc import Generator
from typing import Any, cast
from dify_plugin.entities.agent import AgentInvokeMessage
from dify_plugin.entities.model.llm import LLMModelConfig, LLMResult, LLMResultChunk
from dify_plugin.entities.model.message import (
PromptMessageTool,
UserPromptMessage,
)
from dify_plugin.entities.tool import ToolInvokeMessage, ToolParameter, ToolProviderType
from dify_plugin.interfaces.agent import AgentModelConfig, AgentStrategy, ToolEntity
from pydantic import BaseModel
class BasicParams(BaseModel):
maximum_iterations: int
model: AgentModelConfig
tools: list[ToolEntity]
query: str
class BasicAgentAgentStrategy(AgentStrategy):
def _invoke(self, parameters: dict[str, Any]) -> Generator[AgentInvokeMessage]:
params = BasicParams(**parameters)
function_call_round_log = self.create_log_message(
label="Function Call Round1 ",
data={},
metadata={},
)
yield function_call_round_log
model_started_at = time.perf_counter()
model_log = self.create_log_message(
label=f"{params.model.model} Thought",
data={},
metadata={"start_at": model_started_at, "provider": params.model.provider},
status=ToolInvokeMessage.LogMessage.LogStatus.START,
parent=function_call_round_log,
)
yield model_log
chunks: Generator[LLMResultChunk, None, None] | LLMResult = (
self.session.model.llm.invoke(
model_config=LLMModelConfig(**params.model.model_dump(mode="json")),
prompt_messages=[UserPromptMessage(content=params.query)],
tools=[
self._convert_tool_to_prompt_message_tool(tool)
for tool in params.tools
],
stop=params.model.completion_params.get("stop", [])
if params.model.completion_params
else [],
stream=True,
)
)
response = ""
tool_calls = []
tool_instances = (
{tool.identity.name: tool for tool in params.tools} if params.tools else {}
)
tool_call_names = ""
tool_call_inputs = ""
for chunk in chunks:
# check if there is any tool call
if self.check_tool_calls(chunk):
tool_calls = self.extract_tool_calls(chunk)
tool_call_names = ";".join([tool_call[1] for tool_call in tool_calls])
try:
tool_call_inputs = json.dumps(
{tool_call[1]: tool_call[2] for tool_call in tool_calls},
ensure_ascii=False,
)
except json.JSONDecodeError:
# ensure ascii to avoid encoding error
tool_call_inputs = json.dumps(
{tool_call[1]: tool_call[2] for tool_call in tool_calls}
)
print(tool_call_names, tool_call_inputs)
if chunk.delta.message and chunk.delta.message.content:
if isinstance(chunk.delta.message.content, list):
for content in chunk.delta.message.content:
response += content.data
print(content.data, end="", flush=True)
else:
response += str(chunk.delta.message.content)
print(str(chunk.delta.message.content), end="", flush=True)
if chunk.delta.usage:
# usage of the model
usage = chunk.delta.usage
yield self.finish_log_message(
log=model_log,
data={
"output": response,
"tool_name": tool_call_names,
"tool_input": tool_call_inputs,
},
metadata={
"started_at": model_started_at,
"finished_at": time.perf_counter(),
"elapsed_time": time.perf_counter() - model_started_at,
"provider": params.model.provider,
},
)
yield self.create_text_message(
text=f"{response or json.dumps(tool_calls, ensure_ascii=False)}\n"
)
result = ""
for tool_call_id, tool_call_name, tool_call_args in tool_calls:
tool_instance = tool_instances[tool_call_name]
tool_invoke_responses = self.session.tool.invoke(
provider_type=ToolProviderType.BUILT_IN,
provider=tool_instance.identity.provider,
tool_name=tool_instance.identity.name,
parameters={**tool_instance.runtime_parameters, **tool_call_args},
)
if not tool_instance:
tool_invoke_responses = {
"tool_call_id": tool_call_id,
"tool_call_name": tool_call_name,
"tool_response": f"there is not a tool named {tool_call_name}",
}
else:
# invoke tool
tool_invoke_responses = self.session.tool.invoke(
provider_type=ToolProviderType.BUILT_IN,
provider=tool_instance.identity.provider,
tool_name=tool_instance.identity.name,
parameters={**tool_instance.runtime_parameters, **tool_call_args},
)
result = ""
for tool_invoke_response in tool_invoke_responses:
if tool_invoke_response.type == ToolInvokeMessage.MessageType.TEXT:
result += cast(
ToolInvokeMessage.TextMessage, tool_invoke_response.message
).text
elif (
tool_invoke_response.type == ToolInvokeMessage.MessageType.LINK
):
result += (
f"result link: {cast(ToolInvokeMessage.TextMessage, tool_invoke_response.message).text}."
+ " please tell user to check it."
)
elif tool_invoke_response.type in {
ToolInvokeMessage.MessageType.IMAGE_LINK,
ToolInvokeMessage.MessageType.IMAGE,
}:
result += (
"image has been created and sent to user already, "
+ "you do not need to create it, just tell the user to check it now."
)
elif (
tool_invoke_response.type == ToolInvokeMessage.MessageType.JSON
):
text = json.dumps(
cast(
ToolInvokeMessage.JsonMessage,
tool_invoke_response.message,
).json_object,
ensure_ascii=False,
)
result += f"tool response: {text}."
else:
result += f"tool response: {tool_invoke_response.message!r}."
tool_response = {
"tool_call_id": tool_call_id,
"tool_call_name": tool_call_name,
"tool_response": result,
}
yield self.create_text_message(result)
def _convert_tool_to_prompt_message_tool(
self, tool: ToolEntity
) -> PromptMessageTool:
"""
convert tool to prompt message tool
"""
message_tool = PromptMessageTool(
name=tool.identity.name,
description=tool.description.llm if tool.description else "",
parameters={
"type": "object",
"properties": {},
"required": [],
},
)
parameters = tool.parameters
for parameter in parameters:
if parameter.form != ToolParameter.ToolParameterForm.LLM:
continue
parameter_type = parameter.type
if parameter.type in {
ToolParameter.ToolParameterType.FILE,
ToolParameter.ToolParameterType.FILES,
}:
continue
enum = []
if parameter.type == ToolParameter.ToolParameterType.SELECT:
enum = (
[option.value for option in parameter.options]
if parameter.options
else []
)
message_tool.parameters["properties"][parameter.name] = {
"type": parameter_type,
"description": parameter.llm_description or "",
}
if len(enum) > 0:
message_tool.parameters["properties"][parameter.name]["enum"] = enum
if parameter.required:
message_tool.parameters["required"].append(parameter.name)
return message_tool
def check_tool_calls(self, llm_result_chunk: LLMResultChunk) -> bool:
"""
Check if there is any tool call in llm result chunk
"""
return bool(llm_result_chunk.delta.message.tool_calls)
def extract_tool_calls(
self, llm_result_chunk: LLMResultChunk
) -> list[tuple[str, str, dict[str, Any]]]:
"""
Extract tool calls from llm result chunk
Returns:
List[Tuple[str, str, Dict[str, Any]]]: [(tool_call_id, tool_call_name, tool_call_args)]
"""
tool_calls = []
for prompt_message in llm_result_chunk.delta.message.tool_calls:
args = {}
if prompt_message.function.arguments != "":
args = json.loads(prompt_message.function.arguments)
tool_calls.append(
(
prompt_message.id,
prompt_message.function.name,
args,
)
)
return tool_calls
```
### 6. Debugging the Plugin
After finalizing the plugin’s declaration file and implementation code, run `python -m main` in the plugin directory to restart it. Next, confirm the plugin runs correctly. Dify offers remote debugging—go to **Plugin Management** to obtain your debug key and remote server address.
Back in your plugin project, copy `.env.example` to `.env` and insert the relevant remote server and debug key info.
```bash theme={null}
INSTALL_METHOD=remote
REMOTE_INSTALL_URL=debug.dify.ai:5003
REMOTE_INSTALL_KEY=********-****-****-****-************
```
Then run:
```bash theme={null}
python -m main
```
You’ll see the plugin installed in your Workspace, and team members can also access it.
### Packaging the Plugin (Optional)
Once everything works, you can package your plugin by running:
```bash theme={null}
# Replace ./basic_agent/ with your actual plugin project path.
dify plugin package ./basic_agent/
```
A file named `google.difypkg` (for example) appears in your current folder—this is your final plugin package.
**Congratulations!** You’ve fully developed, tested, and packaged your Agent Strategy Plugin.
### Publishing the Plugin (Optional)
You can now upload it to the [Dify Plugins repository](https://github.com/langgenius/dify-plugins). Before doing so, ensure it meets the [Plugin Publishing Guidelines](/en/develop-plugin/publishing/marketplace-listing/release-to-dify-marketplace). Once approved, your code merges into the main branch, and the plugin automatically goes live on the [Dify Marketplace](https://marketplace.dify.ai/).
***
### Further Exploration
Complex tasks often need multiple rounds of thinking and tool calls, typically repeating **model invoke → tool use** until the task ends or a maximum iteration limit is reached. Managing prompts effectively is crucial in this process. Check out the [complete Function Calling implementation](https://github.com/langgenius/dify-official-plugins/blob/main/agent-strategies/cot_agent/strategies/function_calling.py) for a standardized approach to letting models call external tools and handle their outputs.
***
[Edit this page](https://github.com/langgenius/dify-docs/edit/main/en/develop-plugin/dev-guides-and-walkthroughs/agent-strategy-plugin.mdx) | [Report an issue](https://github.com/langgenius/dify-docs/issues/new?template=docs.yml)
# Dify Plugin Development Cheatsheet
Source: https://docs.dify.ai/en/develop-plugin/dev-guides-and-walkthroughs/cheatsheet
A comprehensive reference guide for Dify plugin development, including environment requirements, installation methods, development process, plugin categories and types, common code snippets, and solutions to common issues. Suitable for developers to quickly consult and reference.
### Environment Requirements
* Python version 3.12
* Dify plugin scaffold tool (dify-plugin-daemon)
> Learn more: [Initializing Development Tools](/en/develop-plugin/getting-started/cli)
### Obtaining the Dify Plugin Development Package
[Dify Plugin CLI](https://github.com/langgenius/dify-plugin-daemon/releases)
#### Installation Methods for Different Platforms
**macOS [Brew](https://github.com/langgenius/homebrew-dify) (Global Installation):**
```bash theme={null}
brew tap langgenius/dify
brew install dify
```
After installation, open a new terminal window and enter the `dify version` command. If it outputs the version information, the installation was successful.
**macOS ARM (M Series Chips):**
```bash theme={null}
# Download dify-plugin-darwin-arm64
chmod +x dify-plugin-darwin-arm64
./dify-plugin-darwin-arm64 version
```
**macOS Intel:**
```bash theme={null}
# Download dify-plugin-darwin-amd64
chmod +x dify-plugin-darwin-amd64
./dify-plugin-darwin-amd64 version
```
**Linux:**
```bash theme={null}
# Download dify-plugin-linux-amd64
chmod +x dify-plugin-linux-amd64
./dify-plugin-linux-amd64 version
```
**Global Installation (Recommended):**
```bash theme={null}
# Rename and move to system path
# Example (macOS ARM)
mv dify-plugin-darwin-arm64 dify
sudo mv dify /usr/local/bin/
dify version
```
### Running the Development Package
Here we use `dify` as an example. If you are using a local installation method, please replace the command accordingly, for example `./dify-plugin-darwin-arm64 plugin init`.
### Plugin Development Process
#### 1. Create a New Plugin
```bash theme={null}
./dify plugin init
```
Follow the prompts to complete the basic plugin information configuration
> Learn more: [Dify Plugin Development: Hello World Guide](/en/develop-plugin/dev-guides-and-walkthroughs/tool-plugin)
#### 2. Run in Development Mode
Configure the `.env` file, then run the following command in the plugin directory:
```bash theme={null}
python -m main
```
> Learn more: [Remote Debugging Plugins](/en/develop-plugin/features-and-specs/plugin-types/remote-debug-a-plugin)
#### 3. Packaging and Deployment
Package the plugin:
```bash theme={null}
cd ..
dify plugin package ./yourapp
```
> Learn more: [Publishing Overview](/en/develop-plugin/publishing/marketplace-listing/release-overview)
### Plugin Categories
#### Tool Labels
Category `tag` [class ToolLabelEnum(Enum)](https://github.com/langgenius/dify-plugin-sdks/blob/main/python/dify_plugin/entities/tool.py)
```python theme={null}
class ToolLabelEnum(Enum):
SEARCH = "search"
IMAGE = "image"
VIDEOS = "videos"
WEATHER = "weather"
FINANCE = "finance"
DESIGN = "design"
TRAVEL = "travel"
SOCIAL = "social"
NEWS = "news"
MEDICAL = "medical"
PRODUCTIVITY = "productivity"
EDUCATION = "education"
BUSINESS = "business"
ENTERTAINMENT = "entertainment"
UTILITIES = "utilities"
OTHER = "other"
```
### Plugin Type Reference
Dify supports the development of various types of plugins:
* **Tool plugin**: Integrate third-party APIs and services
> Learn more: [Dify Plugin Development: Hello World Guide](/en/develop-plugin/dev-guides-and-walkthroughs/tool-plugin)
* **Model plugin**: Integrate AI models
> Learn more: [Model Plugin](/en/develop-plugin/features-and-specs/plugin-types/model-designing-rules), [Quick Integration of a New Model](/en/develop-plugin/dev-guides-and-walkthroughs/creating-new-model-provider)
* **Agent strategy plugin**: Customize Agent thinking and decision-making strategies
> Learn more: [Agent Strategy Plugin](/en/develop-plugin/features-and-specs/advanced-development/reverse-invocation)
* **Extension plugin**: Extend Dify platform functionality, such as Endpoints and WebAPP
> Learn more: [Extension Plugin](/en/develop-plugin/dev-guides-and-walkthroughs/endpoint)
* **Data source plugin**: Serve as the document data source and starting point for knowledge pipelines
> Learn more: [Data Source Plugin](/en/develop-plugin/dev-guides-and-walkthroughs/datasource-plugin)
* **Trigger plugin**: Automatically trigger Workflow execution upon third-party events
> Learn more: [Trigger Plugin](/en/develop-plugin/dev-guides-and-walkthroughs/trigger-plugin)
***
[Edit this page](https://github.com/langgenius/dify-docs/edit/main/en/develop-plugin/dev-guides-and-walkthroughs/cheatsheet.mdx) | [Report an issue](https://github.com/langgenius/dify-docs/issues/new?template=docs.yml)
# Model Provider Plugin
Source: https://docs.dify.ai/en/develop-plugin/dev-guides-and-walkthroughs/creating-new-model-provider
This comprehensive guide provides detailed instructions on creating model provider plugins, covering project initialization, directory structure organization, model configuration methods, writing provider code, and implementing model integration with detailed examples of core API implementations.
### Prerequisites
* [Dify CLI](/en/develop-plugin/getting-started/cli)
* Basic Python programming skills and understanding of object-oriented programming
* Familiarity with the API documentation of the model provider you want to integrate
## Step 1: Create and Configure a New Plugin Project
### Initialize the Project
```bash theme={null}
dify plugin init
```
### Choose Model Plugin Template
Select the `LLM` type plugin template from the available options. This template provides a complete code structure for model integration.

### Configure Plugin Permissions
For a model provider plugin, configure the following essential permissions:
* **Models** - Base permission for model operations
* **LLM** - Permission for large language model functionality
* **Storage** - Permission for file operations (if needed)

### Directory Structure Overview
After initialization, your plugin project will have a directory structure similar to this (assuming a provider named `my_provider` supporting LLM and Embedding):
```bash theme={null}
models/my_provider/
├── models # Model implementation and configuration directory
│ ├── llm # LLM type
│ │ ├── _position.yaml (Optional, controls sorting)
│ │ ├── model1.yaml # Configuration for specific model
│ │ └── llm.py # LLM implementation logic
│ └── text_embedding # Embedding type
│ ├── _position.yaml
│ ├── embedding-model.yaml
│ └── text_embedding.py
├── provider # Provider-level code directory
│ └── my_provider.py # Provider credential validation
└── manifest.yaml # Plugin manifest file
```
## Step 2: Understand Model Configuration Methods
Dify supports two model configuration methods that determine how users will interact with your provider's models:
### Predefined Models (`predefined-model`)
These are models that only require unified provider credentials to use. Once a user configures their API key or other authentication details for the provider, they can immediately access all predefined models.
**Example:** The `OpenAI` provider offers predefined models like `gpt-3.5-turbo-0125` and `gpt-4o-2024-05-13`. A user only needs to configure their OpenAI API key once to access all these models.
### Custom Models (`customizable-model`)
These require additional configuration for each specific model instance. This approach is useful when models need individual parameters beyond the provider-level credentials.
**Example:** `Xinference` supports both LLM and Text Embedding, but each model has a unique **model\_uid**. Users must configure this model\_uid separately for each model they want to use.
These configuration methods **can coexist** within a single provider. For instance, a provider might offer some predefined models while also allowing users to add custom models with specific configurations.
## Step 3: Create Model Provider Files
Creating a new model provider involves two main components:
1. **Provider Configuration YAML File** - Defines the provider's basic information, supported model types, and credential requirements
2. **Provider Class Implementation** - Implements authentication validation and other provider-level functionality
***
### 3.1 Create Model Provider Configuration File
The provider configuration is defined in a YAML file that declares the provider's basic information, supported model types, configuration methods, and credential rules. This file will be placed in the root directory of your plugin project.
Here's an annotated example of the `anthropic.yaml` configuration file:
```yaml theme={null}
# Basic provider identification
provider: anthropic # Provider ID (must be unique)
label:
en_US: Anthropic # Display name in UI
description:
en_US: Anthropic's powerful models, such as Claude 3.
zh_Hans: Anthropic 的强大模型,例如 Claude 3。
icon_small:
en_US: icon_s_en.svg # Small icon for provider (displayed in selection UI)
icon_large:
en_US: icon_l_en.svg # Large icon (displayed in detail views)
background: "#F0F0EB" # Background color for provider in UI
# Help information for users
help:
title:
en_US: Get your API Key from Anthropic
zh_Hans: 从 Anthropic 获取 API Key
url:
en_US: https://console.anthropic.com/account/keys
# Supported model types and configuration approach
supported_model_types:
- llm # This provider offers LLM models
configurate_methods:
- predefined-model # Uses predefined models approach
# Provider-level credential form definition
provider_credential_schema:
credential_form_schemas:
- variable: anthropic_api_key # Variable name for API key
label:
en_US: API Key
type: secret-input # Secure input for sensitive data
required: true
placeholder:
zh_Hans: 在此输入你的 API Key
en_US: Enter your API Key
- variable: anthropic_api_url
label:
en_US: API URL
type: text-input # Regular text input
required: false
placeholder:
zh_Hans: 在此输入你的 API URL
en_US: Enter your API URL
# Model configuration
models:
llm: # Configuration for LLM type models
predefined:
- "models/llm/*.yaml" # Pattern to locate model configuration files
position: "models/llm/_position.yaml" # File defining display order
# Implementation file locations
extra:
python:
provider_source: provider/anthropic.py # Provider class implementation
model_sources:
- "models/llm/llm.py" # Model implementation file
```
### Custom Model Configuration
If your provider supports custom models, you need to add a `model_credential_schema` section to define what additional fields users need to configure for each individual model. This is typical for providers that support fine-tuned models or require model-specific parameters.
Here's an example from the OpenAI provider:
```yaml theme={null}
model_credential_schema:
model: # Fine-tuned model name field
label:
en_US: Model Name
zh_Hans: 模型名称
placeholder:
en_US: Enter your model name
zh_Hans: 输入模型名称
credential_form_schemas:
- variable: openai_api_key
label:
en_US: API Key
type: secret-input
required: true
placeholder:
zh_Hans: 在此输入你的 API Key
en_US: Enter your API Key
- variable: openai_organization
label:
zh_Hans: 组织 ID
en_US: Organization
type: text-input
required: false
placeholder:
zh_Hans: 在此输入你的组织 ID
en_US: Enter your Organization ID
# Additional fields as needed...
```
For complete model provider YAML specifications, please refer to the [Model Schema](/en/develop-plugin/features-and-specs/plugin-types/model-schema) documentation.
### 3.2 Write Model Provider Code
Next, create a Python file for your provider class implementation. This file should be placed in the `/provider` directory with a name matching your provider (e.g., `anthropic.py`).
The provider class must inherit from `ModelProvider` and implement at least the `validate_provider_credentials` method:
```python theme={null}
import logging
from dify_plugin.entities.model import ModelType
from dify_plugin.errors.model import CredentialsValidateFailedError
from dify_plugin import ModelProvider
logger = logging.getLogger(__name__)
class AnthropicProvider(ModelProvider):
def validate_provider_credentials(self, credentials: dict) -> None:
"""
Validate provider credentials by testing them against the API.
This method should attempt to make a simple API call to verify
that the credentials are valid.
:param credentials: Provider credentials as defined in the YAML schema
:raises CredentialsValidateFailedError: If validation fails
"""
try:
# Get an instance of the LLM model type and use it to validate credentials
model_instance = self.get_model_instance(ModelType.LLM)
model_instance.validate_credentials(
model="claude-3-opus-20240229",
credentials=credentials
)
except CredentialsValidateFailedError as ex:
# Pass through credential validation errors
raise ex
except Exception as ex:
# Log and re-raise other exceptions
logger.exception(f"{self.get_provider_schema().provider} credentials validate failed")
raise ex
```
The `validate_provider_credentials` method is crucial as it's called whenever a user tries to save their provider credentials in Dify. It should:
1. Attempt to validate the credentials by making a simple API call
2. Return silently if validation succeeds
3. Raise `CredentialsValidateFailedError` with a helpful message if validation fails
#### For Custom Model Providers
For providers that exclusively use custom models (where each model requires its own configuration), you can implement a simpler provider class. For example, with `Xinference`:
```python theme={null}
from dify_plugin import ModelProvider
class XinferenceProvider(ModelProvider):
def validate_provider_credentials(self, credentials: dict) -> None:
"""
For custom-only model providers, validation happens at the model level.
This method exists to satisfy the abstract base class requirement.
"""
pass
```
## Step 4: Implement Model-Specific Code
After setting up your provider, you need to implement the model-specific code that will handle API calls for each model type you support. This involves:
1. Creating model configuration YAML files for each specific model
2. Implementing the model type classes that handle API communication
For detailed instructions on these steps, please refer to:
* [Model Design Rules](/en/develop-plugin/features-and-specs/plugin-types/model-designing-rules) - Standards for integrating predefined models
* [Model Schema](/en/develop-plugin/features-and-specs/plugin-types/model-schema) - Standards for model configuration files
### 4.1 Define Model Configuration (YAML)
For each specific model, create a YAML file in the appropriate model type directory (e.g., `models/llm/`) to define its properties, parameters, and features.
**Example (`claude-3-5-sonnet-20240620.yaml`):**
```yaml theme={null}
model: claude-3-5-sonnet-20240620 # API identifier for the model
label:
en_US: claude-3-5-sonnet-20240620 # Display name in UI
model_type: llm # Must match directory type
features: # Special capabilities
- agent-thought
- vision
- tool-call
- stream-tool-call
- document
model_properties: # Inherent model properties
mode: chat # "chat" or "completion"
context_size: 200000 # Maximum context window
parameter_rules: # User-adjustable parameters
- name: temperature
use_template: temperature # Reference predefined template
- name: top_p
use_template: top_p
- name: max_tokens
use_template: max_tokens
required: true
default: 8192
min: 1
max: 8192
pricing: # Optional pricing information
input: '3.00'
output: '15.00'
unit: '0.000001' # Per million tokens
currency: USD
```
### 4.2 Implement Model Calling Code (Python)
Create a Python file for each model type you're supporting (e.g., `llm.py` in the `models/llm/` directory). This class will handle API communication, parameter transformation, and result formatting.
Here's an example implementation structure for an LLM:
```python theme={null}
import logging
from typing import Union, Generator, Optional, List
from dify_plugin.provider_kits.llm import LargeLanguageModel # Base class
from dify_plugin.provider_kits.llm import LLMResult, LLMResultChunk, LLMUsage # Result classes
from dify_plugin.provider_kits.llm import PromptMessage, PromptMessageTool # Message classes
from dify_plugin.errors.provider_error import InvokeError, InvokeAuthorizationError # Error classes
logger = logging.getLogger(__name__)
class MyProviderLargeLanguageModel(LargeLanguageModel):
def _invoke(self, model: str, credentials: dict, prompt_messages: List[PromptMessage],
model_parameters: dict, tools: Optional[List[PromptMessageTool]] = None,
stop: Optional[List[str]] = None, stream: bool = True,
user: Optional[str] = None) -> Union[LLMResult, Generator[LLMResultChunk, None, None]]:
"""
Core method for invoking the model API.
Parameters:
model: The model identifier to call
credentials: Authentication credentials
prompt_messages: List of messages to send
model_parameters: Parameters like temperature, max_tokens
tools: Optional tool definitions for function calling
stop: Optional list of stop sequences
stream: Whether to stream responses (True) or return complete response (False)
user: Optional user identifier for API tracking
Returns:
If stream=True: Generator yielding LLMResultChunk objects
If stream=False: Complete LLMResult object
"""
# Prepare API request parameters
api_params = self._prepare_api_params(
credentials, model_parameters, prompt_messages, tools, stop
)
try:
# Call appropriate helper method based on streaming preference
if stream:
return self._invoke_stream(model, api_params, user)
else:
return self._invoke_sync(model, api_params, user)
except Exception as e:
# Handle and map errors
self._handle_api_error(e)
def _invoke_stream(self, model: str, api_params: dict, user: Optional[str]) -> Generator[LLMResultChunk, None, None]:
"""Helper method for streaming API calls"""
# Implementation details for streaming calls
pass
def _invoke_sync(self, model: str, api_params: dict, user: Optional[str]) -> LLMResult:
"""Helper method for synchronous API calls"""
# Implementation details for synchronous calls
pass
def validate_credentials(self, model: str, credentials: dict) -> None:
"""
Validate that the credentials work for this specific model.
Called when a user tries to add or modify credentials.
"""
# Implementation for credential validation
pass
def get_num_tokens(self, model: str, credentials: dict,
prompt_messages: List[PromptMessage],
tools: Optional[List[PromptMessageTool]] = None) -> int:
"""
Estimate the number of tokens for given input.
Optional but recommended for accurate cost estimation.
"""
# Implementation for token counting
pass
@property
def _invoke_error_mapping(self) -> dict[type[InvokeError], list[type[Exception]]]:
"""
Define mapping from vendor-specific exceptions to Dify standard exceptions.
This helps standardize error handling across different providers.
"""
return {
InvokeAuthorizationError: [
# List vendor-specific auth errors here
],
# Other error mappings
}
```
The most important method to implement is `_invoke`, which handles the core API communication. This method should:
1. Transform Dify's standardized inputs into the format required by the provider's API
2. Make the API call with proper error handling
3. Transform the API response into Dify's standardized output format
4. Handle both streaming and non-streaming modes
## Step 5: Debug and Test Your Plugin
Dify provides a remote debugging capability that allows you to test your plugin during development:
1. In your Dify instance, go to "Plugin Management" and click "Debug Plugin" to get your debug key and server address
2. Configure your local environment with these values in a `.env` file:
```dotenv theme={null}
INSTALL_METHOD=remote
REMOTE_INSTALL_HOST=
REMOTE_INSTALL_PORT=5003
REMOTE_INSTALL_KEY=****-****-****-****-****
```
3. Run your plugin locally with `python -m main` and test it in Dify
## Step 6: Package and Publish
When your plugin is ready:
1. Package it using the scaffolding tool:
```bash theme={null}
dify plugin package models/
```
2. Test the packaged plugin locally before submitting
3. Submit a pull request to the [Dify official plugins repository](https://github.com/langgenius/dify-official-plugins)
For more details on the publishing process, see the [Publishing Overview](/en/develop-plugin/publishing/marketplace-listing/release-overview).
## Reference Resources
* [Quick Integration of a New Model](/en/develop-plugin/dev-guides-and-walkthroughs/creating-new-model-provider) - How to add new models to existing providers
* [Basic Concepts of Plugin Development](/en/develop-plugin/getting-started/getting-started-dify-plugin) - Return to the plugin development getting started guide
* [Model Schema](/en/develop-plugin/features-and-specs/plugin-types/model-schema) - Learn detailed model configuration specifications
* [General Specifications](/en/develop-plugin/features-and-specs/plugin-types/general-specifications) - Learn about plugin manifest file configuration
* [Dify Plugin SDK Reference](https://github.com/langgenius/dify-plugin-sdks) - Look up base classes, data structures, and error types
***
[Edit this page](https://github.com/langgenius/dify-docs/edit/main/en/develop-plugin/dev-guides-and-walkthroughs/creating-new-model-provider.mdx) | [Report an issue](https://github.com/langgenius/dify-docs/issues/new?template=docs.yml)
# Data Source Plugin
Source: https://docs.dify.ai/en/develop-plugin/dev-guides-and-walkthroughs/datasource-plugin
Data source plugins are a new type of plugin introduced in Dify 1.9.0. In a knowledge pipeline, they serve as the document data source and the starting point for the entire pipeline.
This article describes how to develop a data source plugin, covering plugin architecture, code examples, and debugging methods, to help you quickly develop and launch your data source plugin.
## Prerequisites
Before reading on, ensure you have a basic understanding of the knowledge pipeline and some knowledge of plugin development. You can find relevant information here:
* [Step 2: Knowledge Pipeline Orchestration](/en/use-dify/knowledge/knowledge-pipeline/knowledge-pipeline-orchestration)
* [Dify Plugin Development: Hello World Guide](/en/develop-plugin/dev-guides-and-walkthroughs/tool-plugin)
## **Data Source Plugin Types**
Dify supports three types of data source plugins: web crawler, online document, and online drive. When implementing the plugin code, the class that provides the plugin's functionality must inherit from a specific data source class. Each of the three plugin types corresponds to a different parent class.
To learn how to inherit from a parent class to implement plugin functionality, see [Tool Plugin: Preparing Tool Code](/en/develop-plugin/dev-guides-and-walkthroughs/tool-plugin#4-preparing-tool-code).
Each data source plugin type supports multiple data sources. For example:
* **Web Crawler**: Jina Reader, FireCrawl
* **Online Document**: Notion, Confluence, GitHub
* **Online Drive**: OneDrive, Google Drive, Box, AWS S3, Tencent COS
The relationship between data source types and data source plugin types is illustrated below.
3. **Others**
* **Access API Reference**: If you know coding, you can get an API Key to integrate this workflow directly into your own website or mobile app
* **Open in Explore**: Pin this app to your workspace sidebar for quick access next time
* **Publish as a Tool**: Package your workflow as a plugin so other Agents can use your Email Assistant as a tool
## Monitor Your App
As the creator, you need to understand the status of this assistant. By monitoring and using logs, you can check the health, performance, and costs.
### The Command Center: Monitoring
Click **Monitoring** on the left sidebar to see how your app is performing.
| Name | Explanation |
| :--------------------- | :----------------------------------------------------------------------------------- |
| Total Messages | How many times users interacted with the AI today. It shows how popular your app is. |
| Active Users | The number of unique people engaging with the AI. |
| Token Usage | How much tokens the AI used. Watch for sudden spikes to control costs. |
| Avg. User Interactions | Do the users ask follow-up questions? |
### The Magnifying Glass: Logs
Logs record the details of every single run: time, input, duration, and output. To access detailed records, click Logs in the left sidebar.
**Why Logs?**
* **Debugging**: User says *It doesn't work*? Check the logs to replay the *crime scene* and see exactly which node failed.
* **Performance**: See how long each node took. Find the blocker that is slowing things down.
* **Understand Users**: Read what users are actually asking. Use this real data to update your Knowledge Base or improve your Prompts.
* **Cost Control**: Check exactly how many tokens a specific run cost.
| Name | Explanation |
| :------------------ | :---------------------------------------------------------- |
| Start Time | The time when the workflow was triggered |
| Status | Success or Failure. |
| Run Time | How long the whole process took. |
| Tokens | The tokens consumed by this run. |
| End User or Account | The specific user ID or account that initiated the session. |
| Triggered By | WebApp interface or called via API. |
You can click on each log entry to view more details. For example, you can identify frequently asked user questions and use them to timely update and modify your Knowledge Base.
Building AI app is a new starting point, and this is the core of **LLMOps** (Large language model operations).
1. **Observe**: Look at the Logs. What are users asking? Are they happy with the answers?
2. **Analyze**: Hallucination happens on certain questions or some tools run out often
3. **Optimize**: Go back to the Canvas. Edit the Prompt, add a document to the Knowledge Base, or tweak the workflow logic
4. **Publish**: Release the upgraded version
By repeating this cycle, your Email Assistant gets smarter and faster.
## Thank You
**Thank you for your time and you're now a Dify builder with a new way of thinking:**
```plaintext wrap theme={null}
Break down the task → Choose Nodes and Tools → Connect them with the right logic → Monitor and upgrade
```
Now, feel free to open a template in Dify explore. Break it down, analyze it, or start building a workflow that solves a task in your daily work from the scratch.
May your workload get lighter and your imagination goes higher. Happy building with Dify.
# Get App Info
Source: https://docs.dify.ai/api-reference/applications/get-app-info
/en/api-reference/openapi_completion.json get /info
Retrieve basic information about this application, including name, description, tags, and mode.
# Get App Meta
Source: https://docs.dify.ai/api-reference/applications/get-app-meta
/en/api-reference/openapi_completion.json get /meta
Retrieve metadata about this application, including tool icons and other configuration details.
# Get App Parameters
Source: https://docs.dify.ai/api-reference/applications/get-app-parameters
/en/api-reference/openapi_completion.json get /parameters
Retrieve the application's input form configuration, including feature switches, input parameter names, types, and default values.
# Get App WebApp Settings
Source: https://docs.dify.ai/api-reference/applications/get-app-webapp-settings
/en/api-reference/openapi_completion.json get /site
Retrieve the WebApp settings of this application, including site configuration, theme, and customization options.
# Create Child Chunk
Source: https://docs.dify.ai/api-reference/chunks/create-child-chunk
/en/api-reference/openapi_knowledge.json post /datasets/{dataset_id}/documents/{document_id}/segments/{segment_id}/child_chunks
Create a child chunk under a parent chunk. Only available for documents using the `hierarchical_model` chunking mode.
# Create Chunks
Source: https://docs.dify.ai/api-reference/chunks/create-chunks
/en/api-reference/openapi_knowledge.json post /datasets/{dataset_id}/documents/{document_id}/segments
Create one or more chunks within a document. Each chunk can include optional keywords and an answer field (for QA-mode documents).
# Delete Child Chunk
Source: https://docs.dify.ai/api-reference/chunks/delete-child-chunk
/en/api-reference/openapi_knowledge.json delete /datasets/{dataset_id}/documents/{document_id}/segments/{segment_id}/child_chunks/{child_chunk_id}
Permanently delete a child chunk from its parent chunk.
# Delete Chunk
Source: https://docs.dify.ai/api-reference/chunks/delete-chunk
/en/api-reference/openapi_knowledge.json delete /datasets/{dataset_id}/documents/{document_id}/segments/{segment_id}
Permanently delete a chunk from the document.
# Get Chunk
Source: https://docs.dify.ai/api-reference/chunks/get-chunk
/en/api-reference/openapi_knowledge.json get /datasets/{dataset_id}/documents/{document_id}/segments/{segment_id}
Retrieve detailed information about a specific chunk, including its content, keywords, and indexing status.
# List Child Chunks
Source: https://docs.dify.ai/api-reference/chunks/list-child-chunks
/en/api-reference/openapi_knowledge.json get /datasets/{dataset_id}/documents/{document_id}/segments/{segment_id}/child_chunks
Returns a paginated list of child chunks under a specific parent chunk.
# List Chunks
Source: https://docs.dify.ai/api-reference/chunks/list-chunks
/en/api-reference/openapi_knowledge.json get /datasets/{dataset_id}/documents/{document_id}/segments
Returns a paginated list of chunks within a document. Supports filtering by keyword and status.
# Update Child Chunk
Source: https://docs.dify.ai/api-reference/chunks/update-child-chunk
/en/api-reference/openapi_knowledge.json patch /datasets/{dataset_id}/documents/{document_id}/segments/{segment_id}/child_chunks/{child_chunk_id}
Update the content of an existing child chunk.
# Update Chunk
Source: https://docs.dify.ai/api-reference/chunks/update-chunk
/en/api-reference/openapi_knowledge.json post /datasets/{dataset_id}/documents/{document_id}/segments/{segment_id}
Update a chunk's content, keywords, or answer. Re-triggers indexing for the modified chunk.
# Send Completion Message
Source: https://docs.dify.ai/api-reference/completions/send-completion-message
/en/api-reference/openapi_completion.json post /completion-messages
Send a request to the text generation application.
# Stop Completion Message Generation
Source: https://docs.dify.ai/api-reference/completions/stop-completion-message-generation
/en/api-reference/openapi_completion.json post /completion-messages/{task_id}/stop
Stops a completion message generation task. Only supported in `streaming` mode.
# Delete Document
Source: https://docs.dify.ai/api-reference/documents/delete-document
/en/api-reference/openapi_knowledge.json delete /datasets/{dataset_id}/documents/{document_id}
Permanently delete a document and all its chunks from the knowledge base.
# Download Document
Source: https://docs.dify.ai/api-reference/documents/download-document
/en/api-reference/openapi_knowledge.json get /datasets/{dataset_id}/documents/{document_id}/download
Get a signed download URL for a document's original uploaded file.
# Download Documents as ZIP
Source: https://docs.dify.ai/api-reference/documents/download-documents-as-zip
/en/api-reference/openapi_knowledge.json post /datasets/{dataset_id}/documents/download-zip
Download multiple uploaded-file documents as a single ZIP archive. Accepts up to `100` document IDs.
# Get Document Indexing Status
Source: https://docs.dify.ai/api-reference/documents/get-document-indexing-status
/en/api-reference/openapi_knowledge.json get /datasets/{dataset_id}/documents/{batch}/indexing-status
Check the indexing progress of documents in a batch. Returns the current processing stage and chunk completion counts for each document. Poll this endpoint until `indexing_status` reaches `completed` or `error`. The status progresses through: `waiting` → `parsing` → `cleaning` → `splitting` → `indexing` → `completed`.
# Update Document by File
Source: https://docs.dify.ai/api-reference/documents/update-document-by-file
/en/api-reference/openapi_knowledge.json post /datasets/{dataset_id}/documents/{document_id}/update-by-file
Update an existing document by uploading a new file. Re-triggers indexing — use the returned `batch` ID with [Get Document Indexing Status](/api-reference/documents/get-document-indexing-status) to track progress.
# Update Document by Text
Source: https://docs.dify.ai/api-reference/documents/update-document-by-text
/en/api-reference/openapi_knowledge.json post /datasets/{dataset_id}/documents/{document_id}/update-by-text
Update an existing document's text content, name, or processing configuration. Re-triggers indexing if content changes — use the returned `batch` ID with [Get Document Indexing Status](/api-reference/documents/get-document-indexing-status) to track progress.
# Update Document Status in Batch
Source: https://docs.dify.ai/api-reference/documents/update-document-status-in-batch
/en/api-reference/openapi_knowledge.json patch /datasets/{dataset_id}/documents/status/{action}
Enable, disable, archive, or unarchive multiple documents at once.
# Get End User Info
Source: https://docs.dify.ai/api-reference/end-users/get-end-user-info
/en/api-reference/openapi_completion.json get /end-users/{end_user_id}
Retrieve an end user by ID. Useful when other APIs return an end-user ID (e.g., `created_by` from [Upload File](/api-reference/files/upload-file)).
# List App Feedbacks
Source: https://docs.dify.ai/api-reference/feedback/list-app-feedbacks
/en/api-reference/openapi_completion.json get /app/feedbacks
Retrieve a paginated list of all feedback submitted for messages in this application, including both end-user and admin feedback.
# Submit Message Feedback
Source: https://docs.dify.ai/api-reference/feedback/submit-message-feedback
/en/api-reference/openapi_completion.json post /messages/{message_id}/feedbacks
Submit feedback for a message. End users can rate messages as `like` or `dislike`, and optionally provide text feedback. Pass `null` for `rating` to revoke previously submitted feedback.
# Download File
Source: https://docs.dify.ai/api-reference/files/download-file
/en/api-reference/openapi_completion.json get /files/{file_id}/preview
Preview or download uploaded files previously uploaded via the [Upload File](/api-reference/files/upload-file) API. Files can only be accessed if they belong to messages within the requesting application.
# Upload File
Source: https://docs.dify.ai/api-reference/files/upload-file
/en/api-reference/openapi_completion.json post /files/upload
Upload a file for use when sending messages, enabling multimodal understanding of images, documents, audio, and video. Uploaded files are for use by the current end-user only.
# List Datasource Plugins
Source: https://docs.dify.ai/api-reference/knowledge-pipeline/list-datasource-plugins
/en/api-reference/openapi_knowledge.json get /datasets/{dataset_id}/pipeline/datasource-plugins
List all datasource plugins available for a knowledge pipeline. Returns published or draft plugins depending on the `is_published` query parameter.
# Run Datasource Node
Source: https://docs.dify.ai/api-reference/knowledge-pipeline/run-datasource-node
/en/api-reference/openapi_knowledge.json post /datasets/{dataset_id}/pipeline/datasource/nodes/{node_id}/run
Execute a single datasource node within the knowledge pipeline. Returns a streaming response with the node execution results.
# Run Pipeline
Source: https://docs.dify.ai/api-reference/knowledge-pipeline/run-pipeline
/en/api-reference/openapi_knowledge.json post /datasets/{dataset_id}/pipeline/run
Execute the full knowledge pipeline for a knowledge base. Supports both streaming and blocking response modes.
# Upload Pipeline File
Source: https://docs.dify.ai/api-reference/knowledge-pipeline/upload-pipeline-file
/en/api-reference/openapi_knowledge.json post /datasets/pipeline/file-upload
Upload a file for use in a knowledge pipeline. Accepts a single file via `multipart/form-data`.
# Create Metadata Field
Source: https://docs.dify.ai/api-reference/metadata/create-metadata-field
/en/api-reference/openapi_knowledge.json post /datasets/{dataset_id}/metadata
Create a custom metadata field for the knowledge base. Metadata fields can be used to annotate documents with structured information.
# Delete Metadata Field
Source: https://docs.dify.ai/api-reference/metadata/delete-metadata-field
/en/api-reference/openapi_knowledge.json delete /datasets/{dataset_id}/metadata/{metadata_id}
Permanently delete a custom metadata field. Documents using this field will lose their metadata values for it.
# Get Built-in Metadata Fields
Source: https://docs.dify.ai/api-reference/metadata/get-built-in-metadata-fields
/en/api-reference/openapi_knowledge.json get /datasets/{dataset_id}/metadata/built-in
Returns the list of built-in metadata fields provided by the system (e.g., document type, source URL).
# List Metadata Fields
Source: https://docs.dify.ai/api-reference/metadata/list-metadata-fields
/en/api-reference/openapi_knowledge.json get /datasets/{dataset_id}/metadata
Returns the list of all metadata fields (both custom and built-in) for the knowledge base, along with the count of documents using each field.
# Update Built-in Metadata Field
Source: https://docs.dify.ai/api-reference/metadata/update-built-in-metadata-field
/en/api-reference/openapi_knowledge.json post /datasets/{dataset_id}/metadata/built-in/{action}
Enable or disable built-in metadata fields for the knowledge base.
# Update Document Metadata in Batch
Source: https://docs.dify.ai/api-reference/metadata/update-document-metadata-in-batch
/en/api-reference/openapi_knowledge.json post /datasets/{dataset_id}/documents/metadata
Update metadata values for multiple documents at once. Each document in the request receives the specified metadata key-value pairs.
# Update Metadata Field
Source: https://docs.dify.ai/api-reference/metadata/update-metadata-field
/en/api-reference/openapi_knowledge.json patch /datasets/{dataset_id}/metadata/{metadata_id}
Rename a custom metadata field.
# Get Available Models
Source: https://docs.dify.ai/api-reference/models/get-available-models
/en/api-reference/openapi_knowledge.json get /workspaces/current/models/model-types/{model_type}
Retrieve the list of available models by type. Primarily used to query `text-embedding` and `rerank` models for knowledge base configuration.
# Create Knowledge Tag
Source: https://docs.dify.ai/api-reference/tags/create-knowledge-tag
/en/api-reference/openapi_knowledge.json post /datasets/tags
Create a new tag for organizing knowledge bases.
# Create Tag Binding
Source: https://docs.dify.ai/api-reference/tags/create-tag-binding
/en/api-reference/openapi_knowledge.json post /datasets/tags/binding
Bind one or more tags to a knowledge base. A knowledge base can have multiple tags.
# Delete Knowledge Tag
Source: https://docs.dify.ai/api-reference/tags/delete-knowledge-tag
/en/api-reference/openapi_knowledge.json delete /datasets/tags
Permanently delete a knowledge base tag. Does not delete the knowledge bases that were tagged.
# Delete Tag Binding
Source: https://docs.dify.ai/api-reference/tags/delete-tag-binding
/en/api-reference/openapi_knowledge.json post /datasets/tags/unbinding
Remove a tag binding from a knowledge base.
# Get Knowledge Base Tags
Source: https://docs.dify.ai/api-reference/tags/get-knowledge-base-tags
/en/api-reference/openapi_knowledge.json get /datasets/{dataset_id}/tags
Returns the list of tags bound to a specific knowledge base.
# List Knowledge Tags
Source: https://docs.dify.ai/api-reference/tags/list-knowledge-tags
/en/api-reference/openapi_knowledge.json get /datasets/tags
Returns the list of all knowledge base tags in the workspace.
# Update Knowledge Tag
Source: https://docs.dify.ai/api-reference/tags/update-knowledge-tag
/en/api-reference/openapi_knowledge.json patch /datasets/tags
Rename an existing knowledge base tag.
# Convert Audio to Text
Source: https://docs.dify.ai/api-reference/tts/convert-audio-to-text
/en/api-reference/openapi_completion.json post /audio-to-text
Convert audio file to text. Supported formats: `mp3`, `mp4`, `mpeg`, `mpga`, `m4a`, `wav`, `webm`. File size limit is `30 MB`.
# Convert Text to Audio
Source: https://docs.dify.ai/api-reference/tts/convert-text-to-audio
/en/api-reference/openapi_completion.json post /text-to-audio
Convert text to speech.
# Agent Strategy Plugin
Source: https://docs.dify.ai/en/develop-plugin/dev-guides-and-walkthroughs/agent-strategy-plugin
An **Agent Strategy Plugin** helps an LLM carry out tasks like reasoning or decision-making, including choosing and calling tools, as well as handling results. This allows the system to address problems more autonomously.
Below, you’ll see how to develop a plugin that supports **Function Calling** to automatically fetch the current time.
### Prerequisites
* Dify plugin scaffolding tool
* Python environment (version 3.12)
For details on preparing the plugin development tool, see [Initializing the Development Tool](/en/develop-plugin/getting-started/cli).
**Tip**: Run `dify version` in your terminal to confirm that the scaffolding tool is installed.
***
### 1. Initializing the Plugin Template
Run the following command to create a development template for your Agent plugin:
```
dify plugin init
```
Follow the on-screen prompts and refer to the sample comments for guidance.
```bash theme={null}
➜ Dify Plugins Developing dify plugin init
Edit profile of the plugin
Plugin name (press Enter to next step): # Enter the plugin name
Author (press Enter to next step): Author name # Enter the plugin author
Description (press Enter to next step): Description # Enter the plugin description
---
Select the language you want to use for plugin development, and press Enter to con
BTW, you need Python 3.12+ to develop the Plugin if you choose Python.
-> python # Select Python environment
go (not supported yet)
---
Based on the ability you want to extend, we have divided the Plugin into four type
- Tool: It's a tool provider, but not only limited to tools, you can implement an
- Model: Just a model provider, extending others is not allowed.
- Extension: Other times, you may only need a simple http service to extend the fu
- Agent Strategy: Implement your own logics here, just by focusing on Agent itself
What's more, we have provided the template for you, you can choose one of them b
tool
-> agent-strategy # Select Agent strategy template
llm
text-embedding
---
Configure the permissions of the plugin, use up and down to navigate, tab to sel
Backwards Invocation:
Tools:
Enabled: [✔] You can invoke tools inside Dify if it's enabled # Enabled by default
Models:
Enabled: [✔] You can invoke models inside Dify if it's enabled # Enabled by default
LLM: [✔] You can invoke LLM models inside Dify if it's enabled # Enabled by default
Text Embedding: [✘] You can invoke text embedding models inside Dify if it'
Rerank: [✘] You can invoke rerank models inside Dify if it's enabled
...
```
After initialization, you’ll get a folder containing all the resources needed for plugin development. Familiarizing yourself with the overall structure of an Agent Strategy Plugin will streamline the development process:
```text theme={null}
├── GUIDE.md # User guide and documentation
├── PRIVACY.md # Privacy policy and data handling guidelines
├── README.md # Project overview and setup instructions
├── _assets/ # Static assets directory
│ └── icon.svg # Agent strategy provider icon/logo
├── main.py # Main application entry point
├── manifest.yaml # Basic plugin configuration
├── provider/ # Provider configurations directory
│ └── basic_agent.yaml # Your agent provider settings
├── requirements.txt # Python dependencies list
└── strategies/ # Strategy implementation directory
├── basic_agent.py # Basic agent strategy implementation
└── basic_agent.yaml # Basic agent strategy configuration
```
All key functionality for this plugin is in the `strategies/` directory.
***
### 2. Developing the Plugin
Agent Strategy Plugin development revolves around two files:
* **Plugin Declaration**: `strategies/basic_agent.yaml`
* **Plugin Implementation**: `strategies/basic_agent.py`
#### 2.1 Defining Parameters
To build an Agent plugin, start by specifying the necessary parameters in `strategies/basic_agent.yaml`. These parameters define the plugin’s core features, such as calling an LLM or using tools.
We recommend including the following four parameters first:
1. **model**: The large language model to call (e.g., GPT-4, GPT-4o-mini).
2. **tools**: A list of tools that enhance your plugin’s functionality.
3. **query**: The user input or prompt content sent to the model.
4. **maximum\_iterations**: The maximum iteration count to prevent excessive computation.
Example Code:
```yaml theme={null}
identity:
name: basic_agent # the name of the agent_strategy
author: novice # the author of the agent_strategy
label:
en_US: BasicAgent # the engilish label of the agent_strategy
description:
en_US: BasicAgent # the english description of the agent_strategy
parameters:
- name: model # the name of the model parameter
type: model-selector # model-type
scope: tool-call&llm # the scope of the parameter
required: true
label:
en_US: Model
zh_Hans: 模型
pt_BR: Model
- name: tools # the name of the tools parameter
type: array[tools] # the type of tool parameter
required: true
label:
en_US: Tools list
zh_Hans: 工具列表
pt_BR: Tools list
- name: query # the name of the query parameter
type: string # the type of query parameter
required: true
label:
en_US: Query
zh_Hans: 查询
pt_BR: Query
- name: maximum_iterations
type: number
required: false
default: 5
label:
en_US: Maxium Iterations
zh_Hans: 最大迭代次数
pt_BR: Maxium Iterations
max: 50 # if you set the max and min value, the display of the parameter will be a slider
min: 1
extra:
python:
source: strategies/basic_agent.py
```
Once you’ve configured these parameters, the plugin will automatically generate a user-friendly interface so you can easily manage them:

#### 2.2 Retrieving Parameters and Execution
After users fill out these basic fields, your plugin needs to process the submitted parameters. In `strategies/basic_agent.py`, define a parameter class for the Agent, then retrieve and apply these parameters in your logic.
Verify incoming parameters:
```python theme={null}
from dify_plugin.entities.agent import AgentInvokeMessage
from dify_plugin.interfaces.agent import AgentModelConfig, AgentStrategy, ToolEntity
from pydantic import BaseModel
class BasicParams(BaseModel):
maximum_iterations: int
model: AgentModelConfig
tools: list[ToolEntity]
query: str
```
After getting the parameters, the specific business logic is executed:
```python theme={null}
class BasicAgentAgentStrategy(AgentStrategy):
def _invoke(self, parameters: dict[str, Any]) -> Generator[AgentInvokeMessage]:
params = BasicParams(**parameters)
```
### 3. Invoking the Model
In an Agent Strategy Plugin, **invoking the model** is central to the workflow. You can invoke an LLM efficiently using `session.model.llm.invoke()` from the SDK, handling text generation, dialogue, and so forth.
If you want the LLM **handle tools**, ensure it outputs structured parameters to match a tool’s interface. In other words, the LLM must produce input arguments that the tool can accept based on the user’s instructions.
Construct the following parameters:
* model
* prompt\_messages
* tools
* stop
* stream
Example code for method definition:
```python theme={null}
def invoke(
self,
model_config: LLMModelConfig,
prompt_messages: list[PromptMessage],
tools: list[PromptMessageTool] | None = None,
stop: list[str] | None = None,
stream: bool = True,
) -> Generator[LLMResultChunk, None, None] | LLMResult:...
```
To view the complete functionality implementation, please refer to the Example Code for model invocation.
This code achieves the following functionality: after a user inputs a command, the Agent strategy plugin automatically calls the LLM, constructs the necessary parameters for tool invocation based on the generated results, and enables the model to flexibly dispatch integrated tools to efficiently complete complex tasks.

### 4. Handle a Tool
After specifying the tool parameters, the Agent Strategy Plugin must actually call these tools. Use `session.tool.invoke()` to make those requests.
Construct the following parameters:
* provider
* tool\_name
* parameters
Example code for method definition:
```python theme={null}
def invoke(
self,
provider_type: ToolProviderType,
provider: str,
tool_name: str,
parameters: dict[str, Any],
) -> Generator[ToolInvokeMessage, None, None]:...
```
If you’d like the LLM itself to generate the parameters needed for tool calls, you can do so by combining the model’s output with your tool-calling code.
```python theme={null}
tool_instances = (
{tool.identity.name: tool for tool in params.tools} if params.tools else {}
)
for tool_call_id, tool_call_name, tool_call_args in tool_calls:
tool_instance = tool_instances[tool_call_name]
self.session.tool.invoke(
provider_type=ToolProviderType.BUILT_IN,
provider=tool_instance.identity.provider,
tool_name=tool_instance.identity.name,
parameters={**tool_instance.runtime_parameters, **tool_call_args},
)
```
With this in place, your Agent Strategy Plugin can automatically perform **Function Calling**—for instance, retrieving the current time.

### 5. Creating Logs
Often, multiple steps are necessary to complete a complex task in an **Agent Strategy Plugin**. It’s crucial for developers to track each step’s results, analyze the decision process, and optimize strategy. Using `create_log_message` and `finish_log_message` from the SDK, you can log real-time states before and after calls, aiding in quick problem diagnosis.
For example:
* Log a “starting model call” message before calling the model, clarifying the task’s execution progress.
* Log a “call succeeded” message once the model responds, ensuring the model’s output can be traced end to end.
```python theme={null}
model_log = self.create_log_message(
label=f"{params.model.model} Thought",
data={},
metadata={"start_at": model_started_at, "provider": params.model.provider},
status=ToolInvokeMessage.LogMessage.LogStatus.START,
)
yield model_log
self.session.model.llm.invoke(...)
yield self.finish_log_message(
log=model_log,
data={
"output": response,
"tool_name": tool_call_names,
"tool_input": tool_call_inputs,
},
metadata={
"started_at": model_started_at,
"finished_at": time.perf_counter(),
"elapsed_time": time.perf_counter() - model_started_at,
"provider": params.model.provider,
},
)
```
When the setup is complete, the workflow log will output the execution results:

If multiple rounds of logs occur, you can structure them hierarchically by setting a `parent` parameter in your log calls, making them easier to follow.
Reference method:
```python theme={null}
function_call_round_log = self.create_log_message(
label="Function Call Round1 ",
data={},
metadata={},
)
yield function_call_round_log
model_log = self.create_log_message(
label=f"{params.model.model} Thought",
data={},
metadata={"start_at": model_started_at, "provider": params.model.provider},
status=ToolInvokeMessage.LogMessage.LogStatus.START,
# add parent log
parent=function_call_round_log,
)
yield model_log
```
#### Sample code for agent-plugin functions
#### Invoke Model
The following code demonstrates how to give the Agent strategy plugin the ability to invoke the model:
```python theme={null}
import json
from collections.abc import Generator
from typing import Any, cast
from dify_plugin.entities.agent import AgentInvokeMessage
from dify_plugin.entities.model.llm import LLMModelConfig, LLMResult, LLMResultChunk
from dify_plugin.entities.model.message import (
PromptMessageTool,
UserPromptMessage,
)
from dify_plugin.entities.tool import ToolInvokeMessage, ToolParameter, ToolProviderType
from dify_plugin.interfaces.agent import AgentModelConfig, AgentStrategy, ToolEntity
from pydantic import BaseModel
class BasicParams(BaseModel):
maximum_iterations: int
model: AgentModelConfig
tools: list[ToolEntity]
query: str
class BasicAgentAgentStrategy(AgentStrategy):
def _invoke(self, parameters: dict[str, Any]) -> Generator[AgentInvokeMessage]:
params = BasicParams(**parameters)
chunks: Generator[LLMResultChunk, None, None] | LLMResult = (
self.session.model.llm.invoke(
model_config=LLMModelConfig(**params.model.model_dump(mode="json")),
prompt_messages=[UserPromptMessage(content=params.query)],
tools=[
self._convert_tool_to_prompt_message_tool(tool)
for tool in params.tools
],
stop=params.model.completion_params.get("stop", [])
if params.model.completion_params
else [],
stream=True,
)
)
response = ""
tool_calls = []
tool_instances = (
{tool.identity.name: tool for tool in params.tools} if params.tools else {}
)
for chunk in chunks:
# check if there is any tool call
if self.check_tool_calls(chunk):
tool_calls = self.extract_tool_calls(chunk)
tool_call_names = ";".join([tool_call[1] for tool_call in tool_calls])
try:
tool_call_inputs = json.dumps(
{tool_call[1]: tool_call[2] for tool_call in tool_calls},
ensure_ascii=False,
)
except json.JSONDecodeError:
# ensure ascii to avoid encoding error
tool_call_inputs = json.dumps(
{tool_call[1]: tool_call[2] for tool_call in tool_calls}
)
print(tool_call_names, tool_call_inputs)
if chunk.delta.message and chunk.delta.message.content:
if isinstance(chunk.delta.message.content, list):
for content in chunk.delta.message.content:
response += content.data
print(content.data, end="", flush=True)
else:
response += str(chunk.delta.message.content)
print(str(chunk.delta.message.content), end="", flush=True)
if chunk.delta.usage:
# usage of the model
usage = chunk.delta.usage
yield self.create_text_message(
text=f"{response or json.dumps(tool_calls, ensure_ascii=False)}\n"
)
result = ""
for tool_call_id, tool_call_name, tool_call_args in tool_calls:
tool_instance = tool_instances[tool_call_name]
tool_invoke_responses = self.session.tool.invoke(
provider_type=ToolProviderType.BUILT_IN,
provider=tool_instance.identity.provider,
tool_name=tool_instance.identity.name,
parameters={**tool_instance.runtime_parameters, **tool_call_args},
)
if not tool_instance:
tool_invoke_responses = {
"tool_call_id": tool_call_id,
"tool_call_name": tool_call_name,
"tool_response": f"there is not a tool named {tool_call_name}",
}
else:
# invoke tool
tool_invoke_responses = self.session.tool.invoke(
provider_type=ToolProviderType.BUILT_IN,
provider=tool_instance.identity.provider,
tool_name=tool_instance.identity.name,
parameters={**tool_instance.runtime_parameters, **tool_call_args},
)
result = ""
for tool_invoke_response in tool_invoke_responses:
if tool_invoke_response.type == ToolInvokeMessage.MessageType.TEXT:
result += cast(
ToolInvokeMessage.TextMessage, tool_invoke_response.message
).text
elif (
tool_invoke_response.type == ToolInvokeMessage.MessageType.LINK
):
result += (
f"result link: {cast(ToolInvokeMessage.TextMessage, tool_invoke_response.message).text}."
+ " please tell user to check it."
)
elif tool_invoke_response.type in {
ToolInvokeMessage.MessageType.IMAGE_LINK,
ToolInvokeMessage.MessageType.IMAGE,
}:
result += (
"image has been created and sent to user already, "
+ "you do not need to create it, just tell the user to check it now."
)
elif (
tool_invoke_response.type == ToolInvokeMessage.MessageType.JSON
):
text = json.dumps(
cast(
ToolInvokeMessage.JsonMessage,
tool_invoke_response.message,
).json_object,
ensure_ascii=False,
)
result += f"tool response: {text}."
else:
result += f"tool response: {tool_invoke_response.message!r}."
tool_response = {
"tool_call_id": tool_call_id,
"tool_call_name": tool_call_name,
"tool_response": result,
}
yield self.create_text_message(result)
def _convert_tool_to_prompt_message_tool(
self, tool: ToolEntity
) -> PromptMessageTool:
"""
convert tool to prompt message tool
"""
message_tool = PromptMessageTool(
name=tool.identity.name,
description=tool.description.llm if tool.description else "",
parameters={
"type": "object",
"properties": {},
"required": [],
},
)
parameters = tool.parameters
for parameter in parameters:
if parameter.form != ToolParameter.ToolParameterForm.LLM:
continue
parameter_type = parameter.type
if parameter.type in {
ToolParameter.ToolParameterType.FILE,
ToolParameter.ToolParameterType.FILES,
}:
continue
enum = []
if parameter.type == ToolParameter.ToolParameterType.SELECT:
enum = (
[option.value for option in parameter.options]
if parameter.options
else []
)
message_tool.parameters["properties"][parameter.name] = {
"type": parameter_type,
"description": parameter.llm_description or "",
}
if len(enum) > 0:
message_tool.parameters["properties"][parameter.name]["enum"] = enum
if parameter.required:
message_tool.parameters["required"].append(parameter.name)
return message_tool
def check_tool_calls(self, llm_result_chunk: LLMResultChunk) -> bool:
"""
Check if there is any tool call in llm result chunk
"""
return bool(llm_result_chunk.delta.message.tool_calls)
def extract_tool_calls(
self, llm_result_chunk: LLMResultChunk
) -> list[tuple[str, str, dict[str, Any]]]:
"""
Extract tool calls from llm result chunk
Returns:
List[Tuple[str, str, Dict[str, Any]]]: [(tool_call_id, tool_call_name, tool_call_args)]
"""
tool_calls = []
for prompt_message in llm_result_chunk.delta.message.tool_calls:
args = {}
if prompt_message.function.arguments != "":
args = json.loads(prompt_message.function.arguments)
tool_calls.append(
(
prompt_message.id,
prompt_message.function.name,
args,
)
)
return tool_calls
```
#### Handle Tools
The following code shows how to implement model calls for the Agent strategy plugin and send canonicalized requests to the tool.
```python theme={null}
import json
from collections.abc import Generator
from typing import Any, cast
from dify_plugin.entities.agent import AgentInvokeMessage
from dify_plugin.entities.model.llm import LLMModelConfig, LLMResult, LLMResultChunk
from dify_plugin.entities.model.message import (
PromptMessageTool,
UserPromptMessage,
)
from dify_plugin.entities.tool import ToolInvokeMessage, ToolParameter, ToolProviderType
from dify_plugin.interfaces.agent import AgentModelConfig, AgentStrategy, ToolEntity
from pydantic import BaseModel
class BasicParams(BaseModel):
maximum_iterations: int
model: AgentModelConfig
tools: list[ToolEntity]
query: str
class BasicAgentAgentStrategy(AgentStrategy):
def _invoke(self, parameters: dict[str, Any]) -> Generator[AgentInvokeMessage]:
params = BasicParams(**parameters)
chunks: Generator[LLMResultChunk, None, None] | LLMResult = (
self.session.model.llm.invoke(
model_config=LLMModelConfig(**params.model.model_dump(mode="json")),
prompt_messages=[UserPromptMessage(content=params.query)],
tools=[
self._convert_tool_to_prompt_message_tool(tool)
for tool in params.tools
],
stop=params.model.completion_params.get("stop", [])
if params.model.completion_params
else [],
stream=True,
)
)
response = ""
tool_calls = []
tool_instances = (
{tool.identity.name: tool for tool in params.tools} if params.tools else {}
)
for chunk in chunks:
# check if there is any tool call
if self.check_tool_calls(chunk):
tool_calls = self.extract_tool_calls(chunk)
tool_call_names = ";".join([tool_call[1] for tool_call in tool_calls])
try:
tool_call_inputs = json.dumps(
{tool_call[1]: tool_call[2] for tool_call in tool_calls},
ensure_ascii=False,
)
except json.JSONDecodeError:
# ensure ascii to avoid encoding error
tool_call_inputs = json.dumps(
{tool_call[1]: tool_call[2] for tool_call in tool_calls}
)
print(tool_call_names, tool_call_inputs)
if chunk.delta.message and chunk.delta.message.content:
if isinstance(chunk.delta.message.content, list):
for content in chunk.delta.message.content:
response += content.data
print(content.data, end="", flush=True)
else:
response += str(chunk.delta.message.content)
print(str(chunk.delta.message.content), end="", flush=True)
if chunk.delta.usage:
# usage of the model
usage = chunk.delta.usage
yield self.create_text_message(
text=f"{response or json.dumps(tool_calls, ensure_ascii=False)}\n"
)
result = ""
for tool_call_id, tool_call_name, tool_call_args in tool_calls:
tool_instance = tool_instances[tool_call_name]
tool_invoke_responses = self.session.tool.invoke(
provider_type=ToolProviderType.BUILT_IN,
provider=tool_instance.identity.provider,
tool_name=tool_instance.identity.name,
parameters={**tool_instance.runtime_parameters, **tool_call_args},
)
if not tool_instance:
tool_invoke_responses = {
"tool_call_id": tool_call_id,
"tool_call_name": tool_call_name,
"tool_response": f"there is not a tool named {tool_call_name}",
}
else:
# invoke tool
tool_invoke_responses = self.session.tool.invoke(
provider_type=ToolProviderType.BUILT_IN,
provider=tool_instance.identity.provider,
tool_name=tool_instance.identity.name,
parameters={**tool_instance.runtime_parameters, **tool_call_args},
)
result = ""
for tool_invoke_response in tool_invoke_responses:
if tool_invoke_response.type == ToolInvokeMessage.MessageType.TEXT:
result += cast(
ToolInvokeMessage.TextMessage, tool_invoke_response.message
).text
elif (
tool_invoke_response.type == ToolInvokeMessage.MessageType.LINK
):
result += (
f"result link: {cast(ToolInvokeMessage.TextMessage, tool_invoke_response.message).text}."
+ " please tell user to check it."
)
elif tool_invoke_response.type in {
ToolInvokeMessage.MessageType.IMAGE_LINK,
ToolInvokeMessage.MessageType.IMAGE,
}:
result += (
"image has been created and sent to user already, "
+ "you do not need to create it, just tell the user to check it now."
)
elif (
tool_invoke_response.type == ToolInvokeMessage.MessageType.JSON
):
text = json.dumps(
cast(
ToolInvokeMessage.JsonMessage,
tool_invoke_response.message,
).json_object,
ensure_ascii=False,
)
result += f"tool response: {text}."
else:
result += f"tool response: {tool_invoke_response.message!r}."
tool_response = {
"tool_call_id": tool_call_id,
"tool_call_name": tool_call_name,
"tool_response": result,
}
yield self.create_text_message(result)
def _convert_tool_to_prompt_message_tool(
self, tool: ToolEntity
) -> PromptMessageTool:
"""
convert tool to prompt message tool
"""
message_tool = PromptMessageTool(
name=tool.identity.name,
description=tool.description.llm if tool.description else "",
parameters={
"type": "object",
"properties": {},
"required": [],
},
)
parameters = tool.parameters
for parameter in parameters:
if parameter.form != ToolParameter.ToolParameterForm.LLM:
continue
parameter_type = parameter.type
if parameter.type in {
ToolParameter.ToolParameterType.FILE,
ToolParameter.ToolParameterType.FILES,
}:
continue
enum = []
if parameter.type == ToolParameter.ToolParameterType.SELECT:
enum = (
[option.value for option in parameter.options]
if parameter.options
else []
)
message_tool.parameters["properties"][parameter.name] = {
"type": parameter_type,
"description": parameter.llm_description or "",
}
if len(enum) > 0:
message_tool.parameters["properties"][parameter.name]["enum"] = enum
if parameter.required:
message_tool.parameters["required"].append(parameter.name)
return message_tool
def check_tool_calls(self, llm_result_chunk: LLMResultChunk) -> bool:
"""
Check if there is any tool call in llm result chunk
"""
return bool(llm_result_chunk.delta.message.tool_calls)
def extract_tool_calls(
self, llm_result_chunk: LLMResultChunk
) -> list[tuple[str, str, dict[str, Any]]]:
"""
Extract tool calls from llm result chunk
Returns:
List[Tuple[str, str, Dict[str, Any]]]: [(tool_call_id, tool_call_name, tool_call_args)]
"""
tool_calls = []
for prompt_message in llm_result_chunk.delta.message.tool_calls:
args = {}
if prompt_message.function.arguments != "":
args = json.loads(prompt_message.function.arguments)
tool_calls.append(
(
prompt_message.id,
prompt_message.function.name,
args,
)
)
return tool_calls
```
#### Example of a complete function code
A complete sample plugin code that includes a **invoking model, handling tool** and a **function to output multiple rounds of logs**:
```python theme={null}
import json
import time
from collections.abc import Generator
from typing import Any, cast
from dify_plugin.entities.agent import AgentInvokeMessage
from dify_plugin.entities.model.llm import LLMModelConfig, LLMResult, LLMResultChunk
from dify_plugin.entities.model.message import (
PromptMessageTool,
UserPromptMessage,
)
from dify_plugin.entities.tool import ToolInvokeMessage, ToolParameter, ToolProviderType
from dify_plugin.interfaces.agent import AgentModelConfig, AgentStrategy, ToolEntity
from pydantic import BaseModel
class BasicParams(BaseModel):
maximum_iterations: int
model: AgentModelConfig
tools: list[ToolEntity]
query: str
class BasicAgentAgentStrategy(AgentStrategy):
def _invoke(self, parameters: dict[str, Any]) -> Generator[AgentInvokeMessage]:
params = BasicParams(**parameters)
function_call_round_log = self.create_log_message(
label="Function Call Round1 ",
data={},
metadata={},
)
yield function_call_round_log
model_started_at = time.perf_counter()
model_log = self.create_log_message(
label=f"{params.model.model} Thought",
data={},
metadata={"start_at": model_started_at, "provider": params.model.provider},
status=ToolInvokeMessage.LogMessage.LogStatus.START,
parent=function_call_round_log,
)
yield model_log
chunks: Generator[LLMResultChunk, None, None] | LLMResult = (
self.session.model.llm.invoke(
model_config=LLMModelConfig(**params.model.model_dump(mode="json")),
prompt_messages=[UserPromptMessage(content=params.query)],
tools=[
self._convert_tool_to_prompt_message_tool(tool)
for tool in params.tools
],
stop=params.model.completion_params.get("stop", [])
if params.model.completion_params
else [],
stream=True,
)
)
response = ""
tool_calls = []
tool_instances = (
{tool.identity.name: tool for tool in params.tools} if params.tools else {}
)
tool_call_names = ""
tool_call_inputs = ""
for chunk in chunks:
# check if there is any tool call
if self.check_tool_calls(chunk):
tool_calls = self.extract_tool_calls(chunk)
tool_call_names = ";".join([tool_call[1] for tool_call in tool_calls])
try:
tool_call_inputs = json.dumps(
{tool_call[1]: tool_call[2] for tool_call in tool_calls},
ensure_ascii=False,
)
except json.JSONDecodeError:
# ensure ascii to avoid encoding error
tool_call_inputs = json.dumps(
{tool_call[1]: tool_call[2] for tool_call in tool_calls}
)
print(tool_call_names, tool_call_inputs)
if chunk.delta.message and chunk.delta.message.content:
if isinstance(chunk.delta.message.content, list):
for content in chunk.delta.message.content:
response += content.data
print(content.data, end="", flush=True)
else:
response += str(chunk.delta.message.content)
print(str(chunk.delta.message.content), end="", flush=True)
if chunk.delta.usage:
# usage of the model
usage = chunk.delta.usage
yield self.finish_log_message(
log=model_log,
data={
"output": response,
"tool_name": tool_call_names,
"tool_input": tool_call_inputs,
},
metadata={
"started_at": model_started_at,
"finished_at": time.perf_counter(),
"elapsed_time": time.perf_counter() - model_started_at,
"provider": params.model.provider,
},
)
yield self.create_text_message(
text=f"{response or json.dumps(tool_calls, ensure_ascii=False)}\n"
)
result = ""
for tool_call_id, tool_call_name, tool_call_args in tool_calls:
tool_instance = tool_instances[tool_call_name]
tool_invoke_responses = self.session.tool.invoke(
provider_type=ToolProviderType.BUILT_IN,
provider=tool_instance.identity.provider,
tool_name=tool_instance.identity.name,
parameters={**tool_instance.runtime_parameters, **tool_call_args},
)
if not tool_instance:
tool_invoke_responses = {
"tool_call_id": tool_call_id,
"tool_call_name": tool_call_name,
"tool_response": f"there is not a tool named {tool_call_name}",
}
else:
# invoke tool
tool_invoke_responses = self.session.tool.invoke(
provider_type=ToolProviderType.BUILT_IN,
provider=tool_instance.identity.provider,
tool_name=tool_instance.identity.name,
parameters={**tool_instance.runtime_parameters, **tool_call_args},
)
result = ""
for tool_invoke_response in tool_invoke_responses:
if tool_invoke_response.type == ToolInvokeMessage.MessageType.TEXT:
result += cast(
ToolInvokeMessage.TextMessage, tool_invoke_response.message
).text
elif (
tool_invoke_response.type == ToolInvokeMessage.MessageType.LINK
):
result += (
f"result link: {cast(ToolInvokeMessage.TextMessage, tool_invoke_response.message).text}."
+ " please tell user to check it."
)
elif tool_invoke_response.type in {
ToolInvokeMessage.MessageType.IMAGE_LINK,
ToolInvokeMessage.MessageType.IMAGE,
}:
result += (
"image has been created and sent to user already, "
+ "you do not need to create it, just tell the user to check it now."
)
elif (
tool_invoke_response.type == ToolInvokeMessage.MessageType.JSON
):
text = json.dumps(
cast(
ToolInvokeMessage.JsonMessage,
tool_invoke_response.message,
).json_object,
ensure_ascii=False,
)
result += f"tool response: {text}."
else:
result += f"tool response: {tool_invoke_response.message!r}."
tool_response = {
"tool_call_id": tool_call_id,
"tool_call_name": tool_call_name,
"tool_response": result,
}
yield self.create_text_message(result)
def _convert_tool_to_prompt_message_tool(
self, tool: ToolEntity
) -> PromptMessageTool:
"""
convert tool to prompt message tool
"""
message_tool = PromptMessageTool(
name=tool.identity.name,
description=tool.description.llm if tool.description else "",
parameters={
"type": "object",
"properties": {},
"required": [],
},
)
parameters = tool.parameters
for parameter in parameters:
if parameter.form != ToolParameter.ToolParameterForm.LLM:
continue
parameter_type = parameter.type
if parameter.type in {
ToolParameter.ToolParameterType.FILE,
ToolParameter.ToolParameterType.FILES,
}:
continue
enum = []
if parameter.type == ToolParameter.ToolParameterType.SELECT:
enum = (
[option.value for option in parameter.options]
if parameter.options
else []
)
message_tool.parameters["properties"][parameter.name] = {
"type": parameter_type,
"description": parameter.llm_description or "",
}
if len(enum) > 0:
message_tool.parameters["properties"][parameter.name]["enum"] = enum
if parameter.required:
message_tool.parameters["required"].append(parameter.name)
return message_tool
def check_tool_calls(self, llm_result_chunk: LLMResultChunk) -> bool:
"""
Check if there is any tool call in llm result chunk
"""
return bool(llm_result_chunk.delta.message.tool_calls)
def extract_tool_calls(
self, llm_result_chunk: LLMResultChunk
) -> list[tuple[str, str, dict[str, Any]]]:
"""
Extract tool calls from llm result chunk
Returns:
List[Tuple[str, str, Dict[str, Any]]]: [(tool_call_id, tool_call_name, tool_call_args)]
"""
tool_calls = []
for prompt_message in llm_result_chunk.delta.message.tool_calls:
args = {}
if prompt_message.function.arguments != "":
args = json.loads(prompt_message.function.arguments)
tool_calls.append(
(
prompt_message.id,
prompt_message.function.name,
args,
)
)
return tool_calls
```
### 6. Debugging the Plugin
After finalizing the plugin’s declaration file and implementation code, run `python -m main` in the plugin directory to restart it. Next, confirm the plugin runs correctly. Dify offers remote debugging—go to **Plugin Management** to obtain your debug key and remote server address.

Back in your plugin project, copy `.env.example` to `.env` and insert the relevant remote server and debug key info.
```bash theme={null}
INSTALL_METHOD=remote
REMOTE_INSTALL_URL=debug.dify.ai:5003
REMOTE_INSTALL_KEY=********-****-****-****-************
```
Then run:
```bash theme={null}
python -m main
```
You’ll see the plugin installed in your Workspace, and team members can also access it.

### Packaging the Plugin (Optional)
Once everything works, you can package your plugin by running:
```bash theme={null}
# Replace ./basic_agent/ with your actual plugin project path.
dify plugin package ./basic_agent/
```
A file named `google.difypkg` (for example) appears in your current folder—this is your final plugin package.
**Congratulations!** You’ve fully developed, tested, and packaged your Agent Strategy Plugin.
### Publishing the Plugin (Optional)
You can now upload it to the [Dify Plugins repository](https://github.com/langgenius/dify-plugins). Before doing so, ensure it meets the [Plugin Publishing Guidelines](/en/develop-plugin/publishing/marketplace-listing/release-to-dify-marketplace). Once approved, your code merges into the main branch, and the plugin automatically goes live on the [Dify Marketplace](https://marketplace.dify.ai/).
***
### Further Exploration
Complex tasks often need multiple rounds of thinking and tool calls, typically repeating **model invoke → tool use** until the task ends or a maximum iteration limit is reached. Managing prompts effectively is crucial in this process. Check out the [complete Function Calling implementation](https://github.com/langgenius/dify-official-plugins/blob/main/agent-strategies/cot_agent/strategies/function_calling.py) for a standardized approach to letting models call external tools and handle their outputs.
***
[Edit this page](https://github.com/langgenius/dify-docs/edit/main/en/develop-plugin/dev-guides-and-walkthroughs/agent-strategy-plugin.mdx) | [Report an issue](https://github.com/langgenius/dify-docs/issues/new?template=docs.yml)
# Dify Plugin Development Cheatsheet
Source: https://docs.dify.ai/en/develop-plugin/dev-guides-and-walkthroughs/cheatsheet
A comprehensive reference guide for Dify plugin development, including environment requirements, installation methods, development process, plugin categories and types, common code snippets, and solutions to common issues. Suitable for developers to quickly consult and reference.
### Environment Requirements
* Python version 3.12
* Dify plugin scaffold tool (dify-plugin-daemon)
> Learn more: [Initializing Development Tools](/en/develop-plugin/getting-started/cli)
### Obtaining the Dify Plugin Development Package
[Dify Plugin CLI](https://github.com/langgenius/dify-plugin-daemon/releases)
#### Installation Methods for Different Platforms
**macOS [Brew](https://github.com/langgenius/homebrew-dify) (Global Installation):**
```bash theme={null}
brew tap langgenius/dify
brew install dify
```
After installation, open a new terminal window and enter the `dify version` command. If it outputs the version information, the installation was successful.
**macOS ARM (M Series Chips):**
```bash theme={null}
# Download dify-plugin-darwin-arm64
chmod +x dify-plugin-darwin-arm64
./dify-plugin-darwin-arm64 version
```
**macOS Intel:**
```bash theme={null}
# Download dify-plugin-darwin-amd64
chmod +x dify-plugin-darwin-amd64
./dify-plugin-darwin-amd64 version
```
**Linux:**
```bash theme={null}
# Download dify-plugin-linux-amd64
chmod +x dify-plugin-linux-amd64
./dify-plugin-linux-amd64 version
```
**Global Installation (Recommended):**
```bash theme={null}
# Rename and move to system path
# Example (macOS ARM)
mv dify-plugin-darwin-arm64 dify
sudo mv dify /usr/local/bin/
dify version
```
### Running the Development Package
Here we use `dify` as an example. If you are using a local installation method, please replace the command accordingly, for example `./dify-plugin-darwin-arm64 plugin init`.
### Plugin Development Process
#### 1. Create a New Plugin
```bash theme={null}
./dify plugin init
```
Follow the prompts to complete the basic plugin information configuration
> Learn more: [Dify Plugin Development: Hello World Guide](/en/develop-plugin/dev-guides-and-walkthroughs/tool-plugin)
#### 2. Run in Development Mode
Configure the `.env` file, then run the following command in the plugin directory:
```bash theme={null}
python -m main
```
> Learn more: [Remote Debugging Plugins](/en/develop-plugin/features-and-specs/plugin-types/remote-debug-a-plugin)
#### 3. Packaging and Deployment
Package the plugin:
```bash theme={null}
cd ..
dify plugin package ./yourapp
```
> Learn more: [Publishing Overview](/en/develop-plugin/publishing/marketplace-listing/release-overview)
### Plugin Categories
#### Tool Labels
Category `tag` [class ToolLabelEnum(Enum)](https://github.com/langgenius/dify-plugin-sdks/blob/main/python/dify_plugin/entities/tool.py)
```python theme={null}
class ToolLabelEnum(Enum):
SEARCH = "search"
IMAGE = "image"
VIDEOS = "videos"
WEATHER = "weather"
FINANCE = "finance"
DESIGN = "design"
TRAVEL = "travel"
SOCIAL = "social"
NEWS = "news"
MEDICAL = "medical"
PRODUCTIVITY = "productivity"
EDUCATION = "education"
BUSINESS = "business"
ENTERTAINMENT = "entertainment"
UTILITIES = "utilities"
OTHER = "other"
```
### Plugin Type Reference
Dify supports the development of various types of plugins:
* **Tool plugin**: Integrate third-party APIs and services
> Learn more: [Dify Plugin Development: Hello World Guide](/en/develop-plugin/dev-guides-and-walkthroughs/tool-plugin)
* **Model plugin**: Integrate AI models
> Learn more: [Model Plugin](/en/develop-plugin/features-and-specs/plugin-types/model-designing-rules), [Quick Integration of a New Model](/en/develop-plugin/dev-guides-and-walkthroughs/creating-new-model-provider)
* **Agent strategy plugin**: Customize Agent thinking and decision-making strategies
> Learn more: [Agent Strategy Plugin](/en/develop-plugin/features-and-specs/advanced-development/reverse-invocation)
* **Extension plugin**: Extend Dify platform functionality, such as Endpoints and WebAPP
> Learn more: [Extension Plugin](/en/develop-plugin/dev-guides-and-walkthroughs/endpoint)
* **Data source plugin**: Serve as the document data source and starting point for knowledge pipelines
> Learn more: [Data Source Plugin](/en/develop-plugin/dev-guides-and-walkthroughs/datasource-plugin)
* **Trigger plugin**: Automatically trigger Workflow execution upon third-party events
> Learn more: [Trigger Plugin](/en/develop-plugin/dev-guides-and-walkthroughs/trigger-plugin)
***
[Edit this page](https://github.com/langgenius/dify-docs/edit/main/en/develop-plugin/dev-guides-and-walkthroughs/cheatsheet.mdx) | [Report an issue](https://github.com/langgenius/dify-docs/issues/new?template=docs.yml)
# Model Provider Plugin
Source: https://docs.dify.ai/en/develop-plugin/dev-guides-and-walkthroughs/creating-new-model-provider
This comprehensive guide provides detailed instructions on creating model provider plugins, covering project initialization, directory structure organization, model configuration methods, writing provider code, and implementing model integration with detailed examples of core API implementations.
### Prerequisites
* [Dify CLI](/en/develop-plugin/getting-started/cli)
* Basic Python programming skills and understanding of object-oriented programming
* Familiarity with the API documentation of the model provider you want to integrate
## Step 1: Create and Configure a New Plugin Project
### Initialize the Project
```bash theme={null}
dify plugin init
```
### Choose Model Plugin Template
Select the `LLM` type plugin template from the available options. This template provides a complete code structure for model integration.

### Configure Plugin Permissions
For a model provider plugin, configure the following essential permissions:
* **Models** - Base permission for model operations
* **LLM** - Permission for large language model functionality
* **Storage** - Permission for file operations (if needed)

### Directory Structure Overview
After initialization, your plugin project will have a directory structure similar to this (assuming a provider named `my_provider` supporting LLM and Embedding):
```bash theme={null}
models/my_provider/
├── models # Model implementation and configuration directory
│ ├── llm # LLM type
│ │ ├── _position.yaml (Optional, controls sorting)
│ │ ├── model1.yaml # Configuration for specific model
│ │ └── llm.py # LLM implementation logic
│ └── text_embedding # Embedding type
│ ├── _position.yaml
│ ├── embedding-model.yaml
│ └── text_embedding.py
├── provider # Provider-level code directory
│ └── my_provider.py # Provider credential validation
└── manifest.yaml # Plugin manifest file
```
## Step 2: Understand Model Configuration Methods
Dify supports two model configuration methods that determine how users will interact with your provider's models:
### Predefined Models (`predefined-model`)
These are models that only require unified provider credentials to use. Once a user configures their API key or other authentication details for the provider, they can immediately access all predefined models.
**Example:** The `OpenAI` provider offers predefined models like `gpt-3.5-turbo-0125` and `gpt-4o-2024-05-13`. A user only needs to configure their OpenAI API key once to access all these models.
### Custom Models (`customizable-model`)
These require additional configuration for each specific model instance. This approach is useful when models need individual parameters beyond the provider-level credentials.
**Example:** `Xinference` supports both LLM and Text Embedding, but each model has a unique **model\_uid**. Users must configure this model\_uid separately for each model they want to use.
These configuration methods **can coexist** within a single provider. For instance, a provider might offer some predefined models while also allowing users to add custom models with specific configurations.
## Step 3: Create Model Provider Files
Creating a new model provider involves two main components:
1. **Provider Configuration YAML File** - Defines the provider's basic information, supported model types, and credential requirements
2. **Provider Class Implementation** - Implements authentication validation and other provider-level functionality
***
### 3.1 Create Model Provider Configuration File
The provider configuration is defined in a YAML file that declares the provider's basic information, supported model types, configuration methods, and credential rules. This file will be placed in the root directory of your plugin project.
Here's an annotated example of the `anthropic.yaml` configuration file:
```yaml theme={null}
# Basic provider identification
provider: anthropic # Provider ID (must be unique)
label:
en_US: Anthropic # Display name in UI
description:
en_US: Anthropic's powerful models, such as Claude 3.
zh_Hans: Anthropic 的强大模型,例如 Claude 3。
icon_small:
en_US: icon_s_en.svg # Small icon for provider (displayed in selection UI)
icon_large:
en_US: icon_l_en.svg # Large icon (displayed in detail views)
background: "#F0F0EB" # Background color for provider in UI
# Help information for users
help:
title:
en_US: Get your API Key from Anthropic
zh_Hans: 从 Anthropic 获取 API Key
url:
en_US: https://console.anthropic.com/account/keys
# Supported model types and configuration approach
supported_model_types:
- llm # This provider offers LLM models
configurate_methods:
- predefined-model # Uses predefined models approach
# Provider-level credential form definition
provider_credential_schema:
credential_form_schemas:
- variable: anthropic_api_key # Variable name for API key
label:
en_US: API Key
type: secret-input # Secure input for sensitive data
required: true
placeholder:
zh_Hans: 在此输入你的 API Key
en_US: Enter your API Key
- variable: anthropic_api_url
label:
en_US: API URL
type: text-input # Regular text input
required: false
placeholder:
zh_Hans: 在此输入你的 API URL
en_US: Enter your API URL
# Model configuration
models:
llm: # Configuration for LLM type models
predefined:
- "models/llm/*.yaml" # Pattern to locate model configuration files
position: "models/llm/_position.yaml" # File defining display order
# Implementation file locations
extra:
python:
provider_source: provider/anthropic.py # Provider class implementation
model_sources:
- "models/llm/llm.py" # Model implementation file
```
### Custom Model Configuration
If your provider supports custom models, you need to add a `model_credential_schema` section to define what additional fields users need to configure for each individual model. This is typical for providers that support fine-tuned models or require model-specific parameters.
Here's an example from the OpenAI provider:
```yaml theme={null}
model_credential_schema:
model: # Fine-tuned model name field
label:
en_US: Model Name
zh_Hans: 模型名称
placeholder:
en_US: Enter your model name
zh_Hans: 输入模型名称
credential_form_schemas:
- variable: openai_api_key
label:
en_US: API Key
type: secret-input
required: true
placeholder:
zh_Hans: 在此输入你的 API Key
en_US: Enter your API Key
- variable: openai_organization
label:
zh_Hans: 组织 ID
en_US: Organization
type: text-input
required: false
placeholder:
zh_Hans: 在此输入你的组织 ID
en_US: Enter your Organization ID
# Additional fields as needed...
```
For complete model provider YAML specifications, please refer to the [Model Schema](/en/develop-plugin/features-and-specs/plugin-types/model-schema) documentation.
### 3.2 Write Model Provider Code
Next, create a Python file for your provider class implementation. This file should be placed in the `/provider` directory with a name matching your provider (e.g., `anthropic.py`).
The provider class must inherit from `ModelProvider` and implement at least the `validate_provider_credentials` method:
```python theme={null}
import logging
from dify_plugin.entities.model import ModelType
from dify_plugin.errors.model import CredentialsValidateFailedError
from dify_plugin import ModelProvider
logger = logging.getLogger(__name__)
class AnthropicProvider(ModelProvider):
def validate_provider_credentials(self, credentials: dict) -> None:
"""
Validate provider credentials by testing them against the API.
This method should attempt to make a simple API call to verify
that the credentials are valid.
:param credentials: Provider credentials as defined in the YAML schema
:raises CredentialsValidateFailedError: If validation fails
"""
try:
# Get an instance of the LLM model type and use it to validate credentials
model_instance = self.get_model_instance(ModelType.LLM)
model_instance.validate_credentials(
model="claude-3-opus-20240229",
credentials=credentials
)
except CredentialsValidateFailedError as ex:
# Pass through credential validation errors
raise ex
except Exception as ex:
# Log and re-raise other exceptions
logger.exception(f"{self.get_provider_schema().provider} credentials validate failed")
raise ex
```
The `validate_provider_credentials` method is crucial as it's called whenever a user tries to save their provider credentials in Dify. It should:
1. Attempt to validate the credentials by making a simple API call
2. Return silently if validation succeeds
3. Raise `CredentialsValidateFailedError` with a helpful message if validation fails
#### For Custom Model Providers
For providers that exclusively use custom models (where each model requires its own configuration), you can implement a simpler provider class. For example, with `Xinference`:
```python theme={null}
from dify_plugin import ModelProvider
class XinferenceProvider(ModelProvider):
def validate_provider_credentials(self, credentials: dict) -> None:
"""
For custom-only model providers, validation happens at the model level.
This method exists to satisfy the abstract base class requirement.
"""
pass
```
## Step 4: Implement Model-Specific Code
After setting up your provider, you need to implement the model-specific code that will handle API calls for each model type you support. This involves:
1. Creating model configuration YAML files for each specific model
2. Implementing the model type classes that handle API communication
For detailed instructions on these steps, please refer to:
* [Model Design Rules](/en/develop-plugin/features-and-specs/plugin-types/model-designing-rules) - Standards for integrating predefined models
* [Model Schema](/en/develop-plugin/features-and-specs/plugin-types/model-schema) - Standards for model configuration files
### 4.1 Define Model Configuration (YAML)
For each specific model, create a YAML file in the appropriate model type directory (e.g., `models/llm/`) to define its properties, parameters, and features.
**Example (`claude-3-5-sonnet-20240620.yaml`):**
```yaml theme={null}
model: claude-3-5-sonnet-20240620 # API identifier for the model
label:
en_US: claude-3-5-sonnet-20240620 # Display name in UI
model_type: llm # Must match directory type
features: # Special capabilities
- agent-thought
- vision
- tool-call
- stream-tool-call
- document
model_properties: # Inherent model properties
mode: chat # "chat" or "completion"
context_size: 200000 # Maximum context window
parameter_rules: # User-adjustable parameters
- name: temperature
use_template: temperature # Reference predefined template
- name: top_p
use_template: top_p
- name: max_tokens
use_template: max_tokens
required: true
default: 8192
min: 1
max: 8192
pricing: # Optional pricing information
input: '3.00'
output: '15.00'
unit: '0.000001' # Per million tokens
currency: USD
```
### 4.2 Implement Model Calling Code (Python)
Create a Python file for each model type you're supporting (e.g., `llm.py` in the `models/llm/` directory). This class will handle API communication, parameter transformation, and result formatting.
Here's an example implementation structure for an LLM:
```python theme={null}
import logging
from typing import Union, Generator, Optional, List
from dify_plugin.provider_kits.llm import LargeLanguageModel # Base class
from dify_plugin.provider_kits.llm import LLMResult, LLMResultChunk, LLMUsage # Result classes
from dify_plugin.provider_kits.llm import PromptMessage, PromptMessageTool # Message classes
from dify_plugin.errors.provider_error import InvokeError, InvokeAuthorizationError # Error classes
logger = logging.getLogger(__name__)
class MyProviderLargeLanguageModel(LargeLanguageModel):
def _invoke(self, model: str, credentials: dict, prompt_messages: List[PromptMessage],
model_parameters: dict, tools: Optional[List[PromptMessageTool]] = None,
stop: Optional[List[str]] = None, stream: bool = True,
user: Optional[str] = None) -> Union[LLMResult, Generator[LLMResultChunk, None, None]]:
"""
Core method for invoking the model API.
Parameters:
model: The model identifier to call
credentials: Authentication credentials
prompt_messages: List of messages to send
model_parameters: Parameters like temperature, max_tokens
tools: Optional tool definitions for function calling
stop: Optional list of stop sequences
stream: Whether to stream responses (True) or return complete response (False)
user: Optional user identifier for API tracking
Returns:
If stream=True: Generator yielding LLMResultChunk objects
If stream=False: Complete LLMResult object
"""
# Prepare API request parameters
api_params = self._prepare_api_params(
credentials, model_parameters, prompt_messages, tools, stop
)
try:
# Call appropriate helper method based on streaming preference
if stream:
return self._invoke_stream(model, api_params, user)
else:
return self._invoke_sync(model, api_params, user)
except Exception as e:
# Handle and map errors
self._handle_api_error(e)
def _invoke_stream(self, model: str, api_params: dict, user: Optional[str]) -> Generator[LLMResultChunk, None, None]:
"""Helper method for streaming API calls"""
# Implementation details for streaming calls
pass
def _invoke_sync(self, model: str, api_params: dict, user: Optional[str]) -> LLMResult:
"""Helper method for synchronous API calls"""
# Implementation details for synchronous calls
pass
def validate_credentials(self, model: str, credentials: dict) -> None:
"""
Validate that the credentials work for this specific model.
Called when a user tries to add or modify credentials.
"""
# Implementation for credential validation
pass
def get_num_tokens(self, model: str, credentials: dict,
prompt_messages: List[PromptMessage],
tools: Optional[List[PromptMessageTool]] = None) -> int:
"""
Estimate the number of tokens for given input.
Optional but recommended for accurate cost estimation.
"""
# Implementation for token counting
pass
@property
def _invoke_error_mapping(self) -> dict[type[InvokeError], list[type[Exception]]]:
"""
Define mapping from vendor-specific exceptions to Dify standard exceptions.
This helps standardize error handling across different providers.
"""
return {
InvokeAuthorizationError: [
# List vendor-specific auth errors here
],
# Other error mappings
}
```
The most important method to implement is `_invoke`, which handles the core API communication. This method should:
1. Transform Dify's standardized inputs into the format required by the provider's API
2. Make the API call with proper error handling
3. Transform the API response into Dify's standardized output format
4. Handle both streaming and non-streaming modes
## Step 5: Debug and Test Your Plugin
Dify provides a remote debugging capability that allows you to test your plugin during development:
1. In your Dify instance, go to "Plugin Management" and click "Debug Plugin" to get your debug key and server address
2. Configure your local environment with these values in a `.env` file:
```dotenv theme={null}
INSTALL_METHOD=remote
REMOTE_INSTALL_HOST=
REMOTE_INSTALL_PORT=5003
REMOTE_INSTALL_KEY=****-****-****-****-****
```
3. Run your plugin locally with `python -m main` and test it in Dify
## Step 6: Package and Publish
When your plugin is ready:
1. Package it using the scaffolding tool:
```bash theme={null}
dify plugin package models/
```
2. Test the packaged plugin locally before submitting
3. Submit a pull request to the [Dify official plugins repository](https://github.com/langgenius/dify-official-plugins)
For more details on the publishing process, see the [Publishing Overview](/en/develop-plugin/publishing/marketplace-listing/release-overview).
## Reference Resources
* [Quick Integration of a New Model](/en/develop-plugin/dev-guides-and-walkthroughs/creating-new-model-provider) - How to add new models to existing providers
* [Basic Concepts of Plugin Development](/en/develop-plugin/getting-started/getting-started-dify-plugin) - Return to the plugin development getting started guide
* [Model Schema](/en/develop-plugin/features-and-specs/plugin-types/model-schema) - Learn detailed model configuration specifications
* [General Specifications](/en/develop-plugin/features-and-specs/plugin-types/general-specifications) - Learn about plugin manifest file configuration
* [Dify Plugin SDK Reference](https://github.com/langgenius/dify-plugin-sdks) - Look up base classes, data structures, and error types
***
[Edit this page](https://github.com/langgenius/dify-docs/edit/main/en/develop-plugin/dev-guides-and-walkthroughs/creating-new-model-provider.mdx) | [Report an issue](https://github.com/langgenius/dify-docs/issues/new?template=docs.yml)
# Data Source Plugin
Source: https://docs.dify.ai/en/develop-plugin/dev-guides-and-walkthroughs/datasource-plugin
Data source plugins are a new type of plugin introduced in Dify 1.9.0. In a knowledge pipeline, they serve as the document data source and the starting point for the entire pipeline.
This article describes how to develop a data source plugin, covering plugin architecture, code examples, and debugging methods, to help you quickly develop and launch your data source plugin.
## Prerequisites
Before reading on, ensure you have a basic understanding of the knowledge pipeline and some knowledge of plugin development. You can find relevant information here:
* [Step 2: Knowledge Pipeline Orchestration](/en/use-dify/knowledge/knowledge-pipeline/knowledge-pipeline-orchestration)
* [Dify Plugin Development: Hello World Guide](/en/develop-plugin/dev-guides-and-walkthroughs/tool-plugin)
## **Data Source Plugin Types**
Dify supports three types of data source plugins: web crawler, online document, and online drive. When implementing the plugin code, the class that provides the plugin's functionality must inherit from a specific data source class. Each of the three plugin types corresponds to a different parent class.
To learn how to inherit from a parent class to implement plugin functionality, see [Tool Plugin: Preparing Tool Code](/en/develop-plugin/dev-guides-and-walkthroughs/tool-plugin#4-preparing-tool-code).
Each data source plugin type supports multiple data sources. For example:
* **Web Crawler**: Jina Reader, FireCrawl
* **Online Document**: Notion, Confluence, GitHub
* **Online Drive**: OneDrive, Google Drive, Box, AWS S3, Tencent COS
The relationship between data source types and data source plugin types is illustrated below.
![Data Source Type]() ## Develop a Data Source Plugin
### Create a Data Source Plugin
You can use the scaffolding command-line tool to create a data source plugin by selecting the `datasource` type. After completing the setup, the command-line tool will automatically generate the plugin project code.
```powershell theme={null}
dify plugin init
```
## Develop a Data Source Plugin
### Create a Data Source Plugin
You can use the scaffolding command-line tool to create a data source plugin by selecting the `datasource` type. After completing the setup, the command-line tool will automatically generate the plugin project code.
```powershell theme={null}
dify plugin init
```
![Datasource Plugin Init]() Typically, a data source plugin does not need to use other features of the Dify platform, so no additional permissions are required.
#### Data Source Plugin Structure
A data source plugin consists of three main components:
* The `manifest.yaml` file: Describes the basic information about the plugin.
* The `provider` directory: Contains the plugin provider's description and authentication implementation code.
* The `datasources` directory: Contains the description and core logic for fetching data from the data source.
```
├── _assets
│ └── icon.svg
├── datasources
│ ├── your_datasource.py
│ └── your_datasource.yaml
├── main.py
├── manifest.yaml
├── PRIVACY.md
├── provider
│ ├── your_datasource.py
│ └── your_datasource.yaml
├── README.md
└── requirements.txt
```
#### Set the Correct Version and Tag
* In the `manifest.yaml` file, set the minimum supported Dify version as follows:
```yaml theme={null}
minimum_dify_version: 1.9.0
```
* In the `manifest.yaml` file, add the following tag to display the plugin under the data source category in the Dify Marketplace:
```yaml theme={null}
tags:
- rag
```
* In the `requirements.txt` file, set the plugin SDK version used for data source plugin development as follows:
```yaml theme={null}
dify-plugin>=0.5.0,<0.6.0
```
### Add the Data Source Provider
#### Create the Provider YAML File
The content of a provider YAML file is essentially the same as that for tool plugins, with only the following two differences:
```yaml theme={null}
# Specify the provider type for the data source plugin: online_drive, online_document, or website_crawl
provider_type: online_drive # online_document, website_crawl
# Specify data sources
datasources:
- datasources/PluginName.yaml
```
For more about creating a provider YAML file, see [Tool Plugin: Completing Third-Party Service Credentials](/en/develop-plugin/dev-guides-and-walkthroughs/tool-plugin#2-completing-third-party-service-credentials).
Data source plugins support authentication via OAuth 2.0 or API Key.
To configure OAuth, see [Add OAuth Support to Your Tool Plugin](/en/develop-plugin/dev-guides-and-walkthroughs/tool-oauth).
#### Create the Provider Code File
* When using API Key authentication mode, the provider code file for data source plugins is identical to that for tool plugins. You only need to change the parent class inherited by the provider class to `DatasourceProvider`.
```python theme={null}
class YourDatasourceProvider(DatasourceProvider):
def _validate_credentials(self, credentials: Mapping[str, Any]) -> None:
try:
"""
IMPLEMENT YOUR VALIDATION HERE
"""
except Exception as e:
raise ToolProviderCredentialValidationError(str(e))
```
* When using OAuth authentication mode, data source plugins differ slightly from tool plugins. When obtaining access permissions via OAuth, data source plugins can simultaneously return the username and avatar to be displayed on the frontend. Therefore, `_oauth_get_credentials` and `_oauth_refresh_credentials` need to return a `DatasourceOAuthCredentials` type that contains `name`, `avatar_url`, `expires_at`, and `credentials`.
The `DatasourceOAuthCredentials` class is defined as follows and must be set to the corresponding type when returned:
```python theme={null}
class DatasourceOAuthCredentials(BaseModel):
name: str | None = Field(None, description="The name of the OAuth credential")
avatar_url: str | None = Field(None, description="The avatar url of the OAuth")
credentials: Mapping[str, Any] = Field(..., description="The credentials of the OAuth")
expires_at: int | None = Field(
default=-1,
description="""The expiration timestamp (in seconds since Unix epoch, UTC) of the credentials.
Set to -1 or None if the credentials do not expire.""",
)
```
The function signatures for `_oauth_get_authorization_url`, `_oauth_get_credentials`, and `_oauth_refresh_credentials` are as follows:
```python theme={null}
def _oauth_get_authorization_url(self, redirect_uri: str, system_credentials: Mapping[str, Any]) -> str:
"""
Generate the authorization URL for {{ .PluginName }} OAuth.
"""
try:
"""
IMPLEMENT YOUR AUTHORIZATION URL GENERATION HERE
"""
except Exception as e:
raise DatasourceOAuthError(str(e))
return ""
```
```python theme={null}
def _oauth_get_credentials(
self, redirect_uri: str, system_credentials: Mapping[str, Any], request: Request
) -> DatasourceOAuthCredentials:
"""
Exchange code for access_token.
"""
try:
"""
IMPLEMENT YOUR CREDENTIALS EXCHANGE HERE
"""
except Exception as e:
raise DatasourceOAuthError(str(e))
return DatasourceOAuthCredentials(
name="",
avatar_url="",
expires_at=-1,
credentials={},
)
```
```python theme={null}
def _oauth_refresh_credentials(
self, redirect_uri: str, system_credentials: Mapping[str, Any], credentials: Mapping[str, Any]
) -> DatasourceOAuthCredentials:
"""
Refresh the credentials
"""
return DatasourceOAuthCredentials(
name="",
avatar_url="",
expires_at=-1,
credentials={},
)
```
### Add the Data Source
The YAML file format and data source code format vary across the three types of data sources.
#### Web Crawler
In the provider YAML file for a web crawler data source plugin, `output_schema` must always return four parameters: `source_url`, `content`, `title`, and `description`.
```yaml theme={null}
output_schema:
type: object
properties:
source_url:
type: string
description: the source url of the website
content:
type: string
description: the content from the website
title:
type: string
description: the title of the website
"description":
type: string
description: the description of the website
```
In the main logic code for a web crawler plugin, the class must inherit from `WebsiteCrawlDatasource` and implement the `_get_website_crawl` method. You then need to use the `create_crawl_message` method to return the web crawl message.
To crawl multiple web pages and return them in batches, you can set `WebSiteInfo.status` to `processing` and use the `create_crawl_message` method to return each batch of crawled pages. After all pages have been crawled, set `WebSiteInfo.status` to `completed`.
```python theme={null}
class YourDataSource(WebsiteCrawlDatasource):
def _get_website_crawl(
self, datasource_parameters: dict[str, Any]
) -> Generator[ToolInvokeMessage, None, None]:
crawl_res = WebSiteInfo(web_info_list=[], status="", total=0, completed=0)
crawl_res.status = "processing"
yield self.create_crawl_message(crawl_res)
### your crawl logic
...
crawl_res.status = "completed"
crawl_res.web_info_list = [
WebSiteInfoDetail(
title="",
source_url="",
description="",
content="",
)
]
crawl_res.total = 1
crawl_res.completed = 1
yield self.create_crawl_message(crawl_res)
```
#### Online Document
The return value for an online document data source plugin must include at least a `content` field to represent the document's content. For example:
```yaml theme={null}
output_schema:
type: object
properties:
workspace_id:
type: string
description: workspace id
page_id:
type: string
description: page id
content:
type: string
description: page content
```
In the main logic code for an online document plugin, the class must inherit from `OnlineDocumentDatasource` and implement two methods: `_get_pages` and `_get_content`.
When a user runs the plugin, it first calls the `_get_pages` method to retrieve a list of documents. After the user selects a document from the list, it then calls the `_get_content` method to fetch the document's content.
```python theme={null}
def _get_pages(self, datasource_parameters: dict[str, Any]) -> DatasourceGetPagesResponse:
# your get pages logic
response = requests.get(url, headers=headers, params=params, timeout=30)
pages = []
for item in response.json().get("results", []):
page = OnlineDocumentPage(
page_name=item.get("title", ""),
page_id=item.get("id", ""),
type="page",
last_edited_time=item.get("version", {}).get("createdAt", ""),
parent_id=item.get("parentId", ""),
page_icon=None,
)
pages.append(page)
online_document_info = OnlineDocumentInfo(
workspace_name=workspace_name,
workspace_icon=workspace_icon,
workspace_id=workspace_id,
pages=[page],
total=pages.length(),
)
return DatasourceGetPagesResponse(result=[online_document_info])
```
```python theme={null}
def _get_content(self, page: GetOnlineDocumentPageContentRequest) -> Generator[DatasourceMessage, None, None]:
# your fetch content logic, example
response = requests.get(url, headers=headers, params=params, timeout=30)
...
yield self.create_variable_message("content", "")
yield self.create_variable_message("page_id", "")
yield self.create_variable_message("workspace_id", "")
```
#### Online Drive
An online drive data source plugin returns a file, so it must adhere to the following specification:
```yaml theme={null}
output_schema:
type: object
properties:
file:
$ref: "https://dify.ai/schemas/v1/file.json"
```
In the main logic code for an online drive plugin, the class must inherit from `OnlineDriveDatasource` and implement two methods: `_browse_files` and `_download_file`.
When a user runs the plugin, it first calls `_browse_files` to get a file list. At this point, `prefix` is empty, indicating a request for the root directory's file list. The file list contains both folder and file type variables. If the user opens a folder, the `_browse_files` method is called again. At this point, the `prefix` in `OnlineDriveBrowseFilesRequest` will be the folder ID used to retrieve the file list within that folder.
After a user selects a file, the plugin uses the `_download_file` method and the file ID to get the file's content. You can use the `_get_mime_type_from_filename` method to get the file's MIME type, allowing the pipeline to handle different file types appropriately.
When the file list contains multiple files, you can set `OnlineDriveFileBucket.is_truncated` to `True` and set `OnlineDriveFileBucket.next_page_parameters` to the parameters needed to fetch the next page of the file list, such as the next page's request ID or URL, depending on the service provider.
```python theme={null}
def _browse_files(
self, request: OnlineDriveBrowseFilesRequest
) -> OnlineDriveBrowseFilesResponse:
credentials = self.runtime.credentials
bucket_name = request.bucket
prefix = request.prefix or "" # Allow empty prefix for root folder; When you browse the folder, the prefix is the folder id
max_keys = request.max_keys or 10
next_page_parameters = request.next_page_parameters or {}
files = []
files.append(OnlineDriveFile(
id="",
name="",
size=0,
type="folder" # or "file"
))
return OnlineDriveBrowseFilesResponse(result=[
OnlineDriveFileBucket(
bucket="",
files=files,
is_truncated=False,
next_page_parameters={}
)
])
```
```python theme={null}
def _download_file(self, request: OnlineDriveDownloadFileRequest) -> Generator[DatasourceMessage, None, None]:
credentials = self.runtime.credentials
file_id = request.id
file_content = bytes()
file_name = ""
mime_type = self._get_mime_type_from_filename(file_name)
yield self.create_blob_message(file_content, meta={
"file_name": file_name,
"mime_type": mime_type
})
def _get_mime_type_from_filename(self, filename: str) -> str:
"""Determine MIME type from file extension."""
import mimetypes
mime_type, _ = mimetypes.guess_type(filename)
return mime_type or "application/octet-stream"
```
For storage services like AWS S3, the `prefix`, `bucket`, and `id` variables have special uses and can be applied flexibly as needed during development:
* `prefix`: Represents the file path prefix. For example, `prefix=container1/folder1/` retrieves the files or file list from the `folder1` folder in the `container1` bucket.
* `bucket`: Represents the file bucket. For example, `bucket=container1` retrieves the files or file list in the `container1` bucket. This field can be left blank for non-standard S3 protocol drives.
* `id`: Since the `_download_file` method does not use the `prefix` variable, the full file path must be included in the `id`. For example, `id=container1/folder1/file1.txt` indicates retrieving the `file1.txt` file from the `folder1` folder in the `container1` bucket.
You can refer to the specific implementations of the [official Google Drive plugin](https://github.com/langgenius/dify-official-plugins/blob/main/datasources/google_cloud_storage/datasources/google_cloud_storage.py) and the [official AWS S3 plugin](https://github.com/langgenius/dify-official-plugins/blob/main/datasources/aws_s3_storage/datasources/aws_s3_storage.py).
## Debug the Plugin
Data source plugins support two debugging methods: remote debugging or installing as a local plugin for debugging. Note the following:
* If the plugin uses OAuth authentication, the `redirect_uri` for remote debugging differs from that of a local plugin. Update the relevant configuration in your service provider's OAuth App accordingly.
* While data source plugins support single-step debugging, we still recommend testing them in a complete knowledge pipeline to ensure full functionality.
## Final Checks
Before packaging and publishing, make sure you've completed all of the following:
* Set the minimum supported Dify version to `1.9.0`.
* Set the SDK version to `dify-plugin>=0.5.0,<0.6.0`.
* Write the `README.md` and `PRIVACY.md` files.
* Include only English content in the code files.
* Replace the default icon with the data source provider's logo.
## Package and Publish
In the plugin directory, run the following command to generate a `.difypkg` plugin package:
```
dify plugin package . -o your_datasource.difypkg
```
Next, you can:
* Import and use the plugin in your Dify environment.
* Publish the plugin to Dify Marketplace by submitting a pull request.
For the plugin publishing process, see [Publishing Plugins](/en/develop-plugin/publishing/marketplace-listing/release-overview).
***
[Edit this page](https://github.com/langgenius/dify-docs/edit/main/en/develop-plugin/dev-guides-and-walkthroughs/datasource-plugin.mdx) | [Report an issue](https://github.com/langgenius/dify-docs/issues/new?template=docs.yml)
# Develop A Slack Bot Plugin
Source: https://docs.dify.ai/en/develop-plugin/dev-guides-and-walkthroughs/develop-a-slack-bot-plugin
This guide provides a complete walkthrough for developing a Slack Bot plugin, covering project initialization, configuration form editing, feature implementation, debugging, endpoint setup, verification, and packaging. You'll need the Dify plugin scaffolding tool and a pre-created Slack App to build an AI-powered chatbot on Slack.
**What You’ll Learn:**
Gain a solid understanding of how to build a Slack Bot that’s powered by AI—one that can respond to user questions right inside Slack. If you haven't developed a plugin before, we recommend reading the [Plugin Development Quick Start Guide](/en/develop-plugin/dev-guides-and-walkthroughs/tool-plugin) first.
### Project Background
The Dify plugin ecosystem focuses on making integrations simpler and more accessible. In this guide, we’ll use Slack as an example, walking you through the process of developing a Slack Bot plugin. This allows your team to chat directly with an LLM within Slack, significantly improving how efficiently they can use AI.
Slack is an open, real-time communication platform with a robust API. Among its features is a webhook-based event system, which is quite straightforward to develop on. We’ll leverage this system to create a Slack Bot plugin, illustrated in the diagram below:
> To avoid confusion, the following concepts are explained:
>
> * **Slack Bot** A chatbot on the Slack platform, acting as a virtual user you can interact with in real-time.
> * **Slack Bot Plugin** A plugin in the Dify Marketplace that connects a Dify application with Slack. This guide focuses on how to develop that plugin.
**How It Works (A Simple Overview):**
1. **Send a Message to the Slack Bot**
When a user in Slack sends a message to the Bot, the Slack Bot immediately issues a webhook request to the Dify platform.
2. **Forward the Message to the Slack Bot Plugin**
The Dify platform triggers the Slack Bot plugin, which relays the details to the Dify application—similar to entering a recipient’s address in an email system. By setting up a Slack webhook address through Slack’s API and entering it in the Slack Bot plugin, you establish this connection. The plugin then processes the Slack request and sends it on to the Dify application, where the LLM analyzes the user’s input and generates a response.
3. **Return the Response to Slack**
Once the Slack Bot plugin receives the reply from the Dify application, it sends the LLM’s answer back through the same route to the Slack Bot. Users in Slack then see a more intelligent, interactive experience right where they’re chatting.
### Prerequisites
* **Dify plugin developing tool**: For more information, see [Initializing the Development Tool](/en/develop-plugin/getting-started/cli).
* **Python environment (version 3.12)**: Refer to the [Python official downloads page](https://www.python.org/downloads/) or ask an LLM for a complete setup guide.
* Create a Slack App and Get an OAuth Token
Go to the [Slack API platform](https://api.slack.com/apps), create a Slack app from scratch, and pick the workspace where it will be deployed.
1. **Enable Webhooks:**
2. **Install the App in Your Slack Workspace:**
3. **Obtain an OAuth Token** for future plugin development:

### 1. Developing the Plugin
Now we’ll dive into the actual coding. Before starting, make sure you’ve read [Quick Start: Developing an Extension Plugin](/en/develop-plugin/dev-guides-and-walkthroughs/endpoint) or have already built a Dify plugin before.
#### 1.1 Initialize the Project
Run the following command to set up your plugin development environment:
```bash theme={null}
dify plugin init
```
Follow the prompts to provide basic project info. Select the `extension` template, and grant both `Apps` and `Endpoints` permissions.
For additional details on reverse-invoking Dify services within a plugin, see [Reverse Invocation: App](/en/develop-plugin/features-and-specs/advanced-development/reverse-invocation-app).

#### 1.2 Edit the Configuration Form
This plugin needs to know which Dify app should handle the replies, as well as the Slack App token to authenticate the bot’s responses. Therefore, you’ll add these two fields to the plugin’s form.
Modify the YAML file in the group directory—for example, `group/slack.yaml`. The form’s filename is determined by the info you provided when creating the plugin, so adjust it accordingly.
**Sample Code:**
`slack.yaml`
```yaml theme={null}
settings:
- name: bot_token
type: secret-input
required: true
label:
en_US: Bot Token
zh_Hans: Bot Token
pt_BR: Token do Bot
ja_JP: Bot Token
placeholder:
en_US: Please input your Bot Token
zh_Hans: 请输入你的 Bot Token
pt_BR: Por favor, insira seu Token do Bot
ja_JP: ボットトークンを入力してください
- name: allow_retry
type: boolean
required: false
label:
en_US: Allow Retry
zh_Hans: 允许重试
pt_BR: Permitir Retentativas
ja_JP: 再試行を許可
default: false
- name: app
type: app-selector
required: true
label:
en_US: App
zh_Hans: 应用
pt_BR: App
ja_JP: アプリ
placeholder:
en_US: the app you want to use to answer Slack messages
zh_Hans: 你想要用来回答 Slack 消息的应用
pt_BR: o app que você deseja usar para responder mensagens do Slack
ja_JP: あなたが Slack メッセージに回答するために使用するアプリ
endpoints:
- endpoints/slack.yaml
```
Explanation of the Configuration Fields:
```
- name: app
type: app-selector
scope: chat
```
* **type**: Set to app-selector, which allows users to forward messages to a specific Dify app when using this plugin.
* **scope**: Set to chat, meaning the plugin can only interact with app types such as agent, chatbot, or chatflow.
Finally, in the `endpoints/slack.yaml` file, change the request method to POST to handle incoming Slack messages properly.
**Sample Code:**
`endpoints/slack.yaml`
```yaml theme={null}
path: "/"
method: "POST"
extra:
python:
source: "endpoints/slack.py"
```
### 2. Edit the function code
Modify the `endpoints/slack.py` file and add the following code:
```python theme={null}
import json
import traceback
from typing import Mapping
from werkzeug import Request, Response
from dify_plugin import Endpoint
from slack_sdk import WebClient
from slack_sdk.errors import SlackApiError
class SlackEndpoint(Endpoint):
def _invoke(self, r: Request, values: Mapping, settings: Mapping) -> Response:
"""
Invokes the endpoint with the given request.
"""
retry_num = r.headers.get("X-Slack-Retry-Num")
if (not settings.get("allow_retry") and (r.headers.get("X-Slack-Retry-Reason") == "http_timeout" or ((retry_num is not None and int(retry_num) > 0)))):
return Response(status=200, response="ok")
data = r.get_json()
# Handle Slack URL verification challenge
if data.get("type") == "url_verification":
return Response(
response=json.dumps({"challenge": data.get("challenge")}),
status=200,
content_type="application/json"
)
if (data.get("type") == "event_callback"):
event = data.get("event")
if (event.get("type") == "app_mention"):
message = event.get("text", "")
if message.startswith("<@"):
message = message.split("> ", 1)[1] if "> " in message else message
channel = event.get("channel", "")
blocks = event.get("blocks", [])
blocks[0]["elements"][0]["elements"] = blocks[0].get("elements")[0].get("elements")[1:]
token = settings.get("bot_token")
client = WebClient(token=token)
try:
response = self.session.app.chat.invoke(
app_id=settings["app"]["app_id"],
query=message,
inputs={},
response_mode="blocking",
)
try:
blocks[0]["elements"][0]["elements"][0]["text"] = response.get("answer")
result = client.chat_postMessage(
channel=channel,
text=response.get("answer"),
blocks=blocks
)
return Response(
status=200,
response=json.dumps(result),
content_type="application/json"
)
except SlackApiError as e:
raise e
except Exception as e:
err = traceback.format_exc()
return Response(
status=200,
response="Sorry, I'm having trouble processing your request. Please try again later." + str(err),
content_type="text/plain",
)
else:
return Response(status=200, response="ok")
else:
return Response(status=200, response="ok")
else:
return Response(status=200, response="ok")
```
### 3. Debug the Plugin
Go to the Dify platform and obtain the remote debugging address and key for your plugin.
Back in your plugin project, copy the `.env.example` file and rename it to `.env`.
```bash theme={null}
INSTALL_METHOD=remote
REMOTE_INSTALL_URL=debug.dify.ai:5003
REMOTE_INSTALL_KEY=********-****-****-****-************
```
Run `python -m main` to start the plugin. You should now see your plugin installed in the Workspace on Dify’s plugin management page. Other team members will also be able to access it.
```bash theme={null}
python -m main
```
#### Configure the Plugin Endpoint
From the plugin management page in Dify, locate the newly installed test plugin and create a new endpoint. Provide a name, a Bot token, and select the app you want to connect.
After saving, a **POST** request URL is generated:

Next, complete the Slack App setup:
1. **Enable Event Subscriptions**
Paste the POST request URL you generated above.
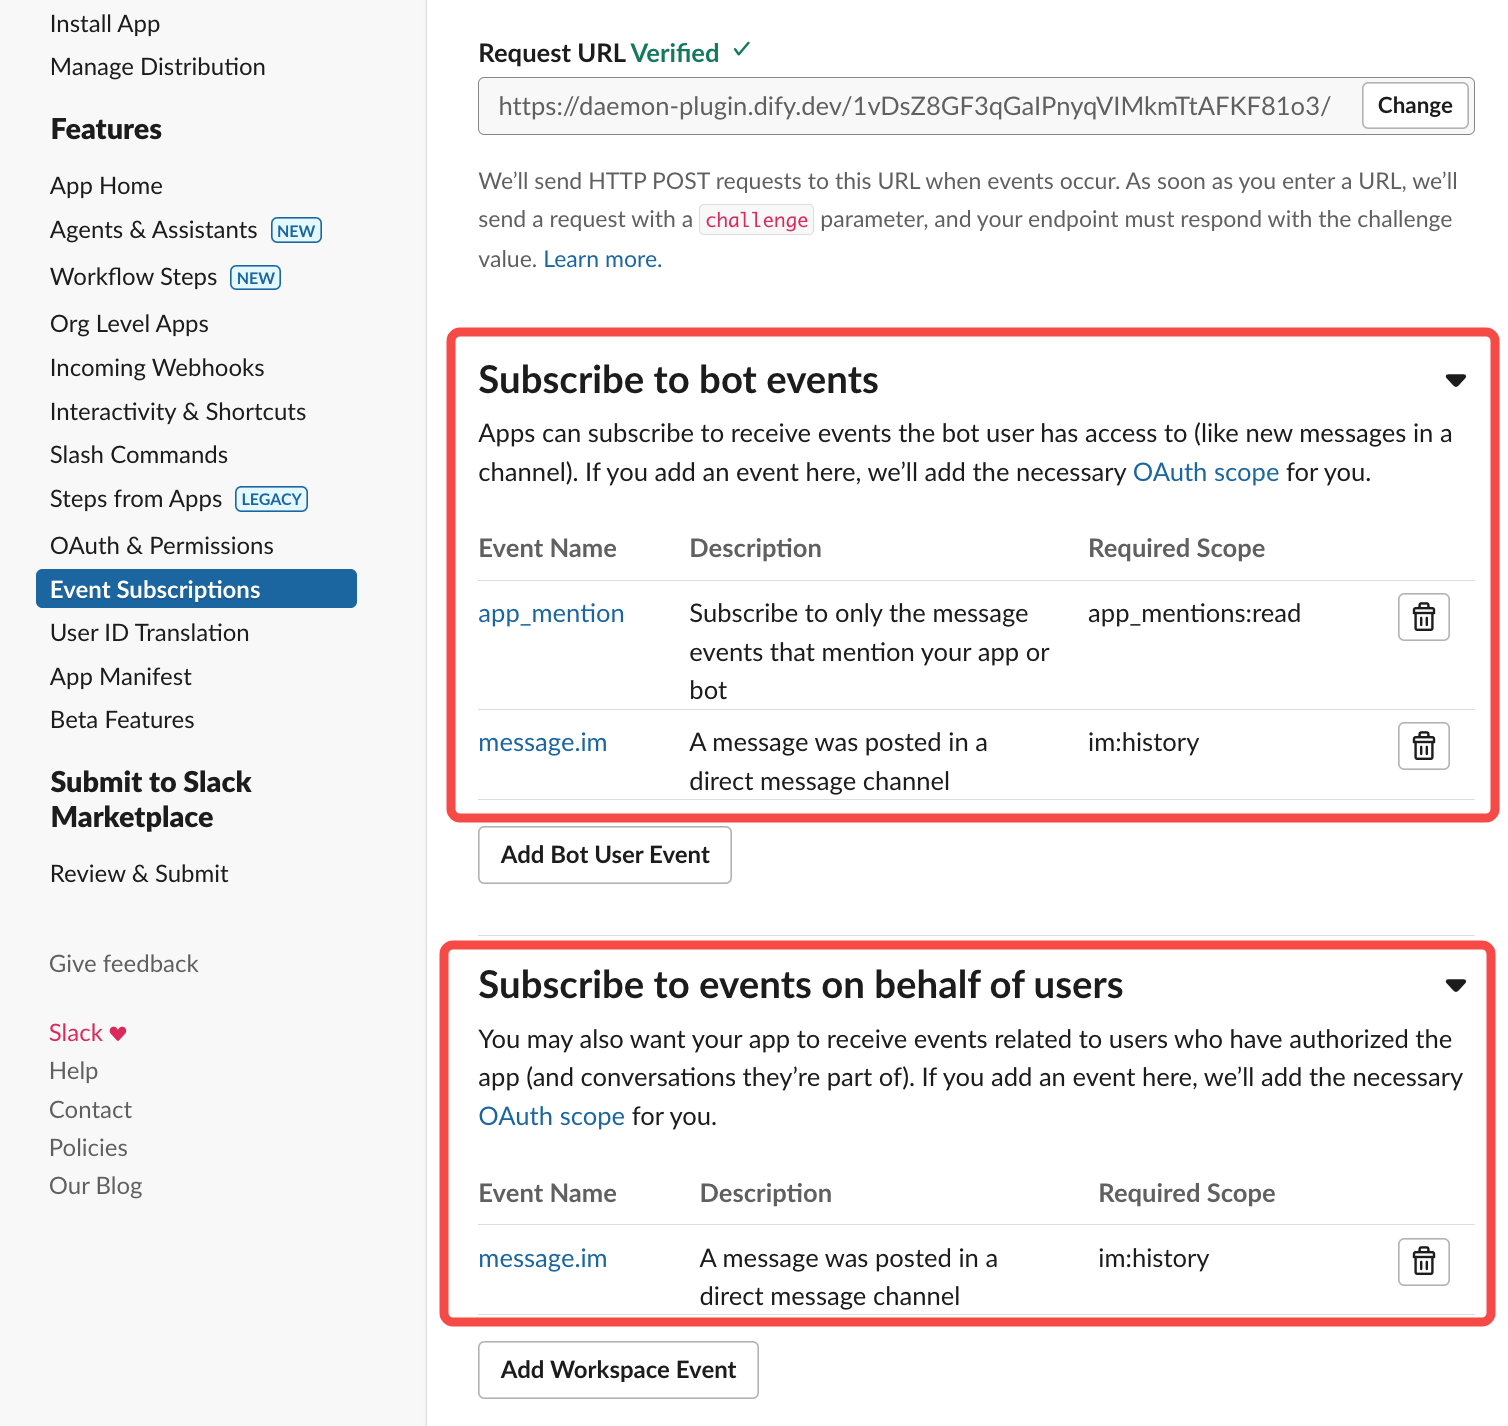
2. **Grant Required Permissions**
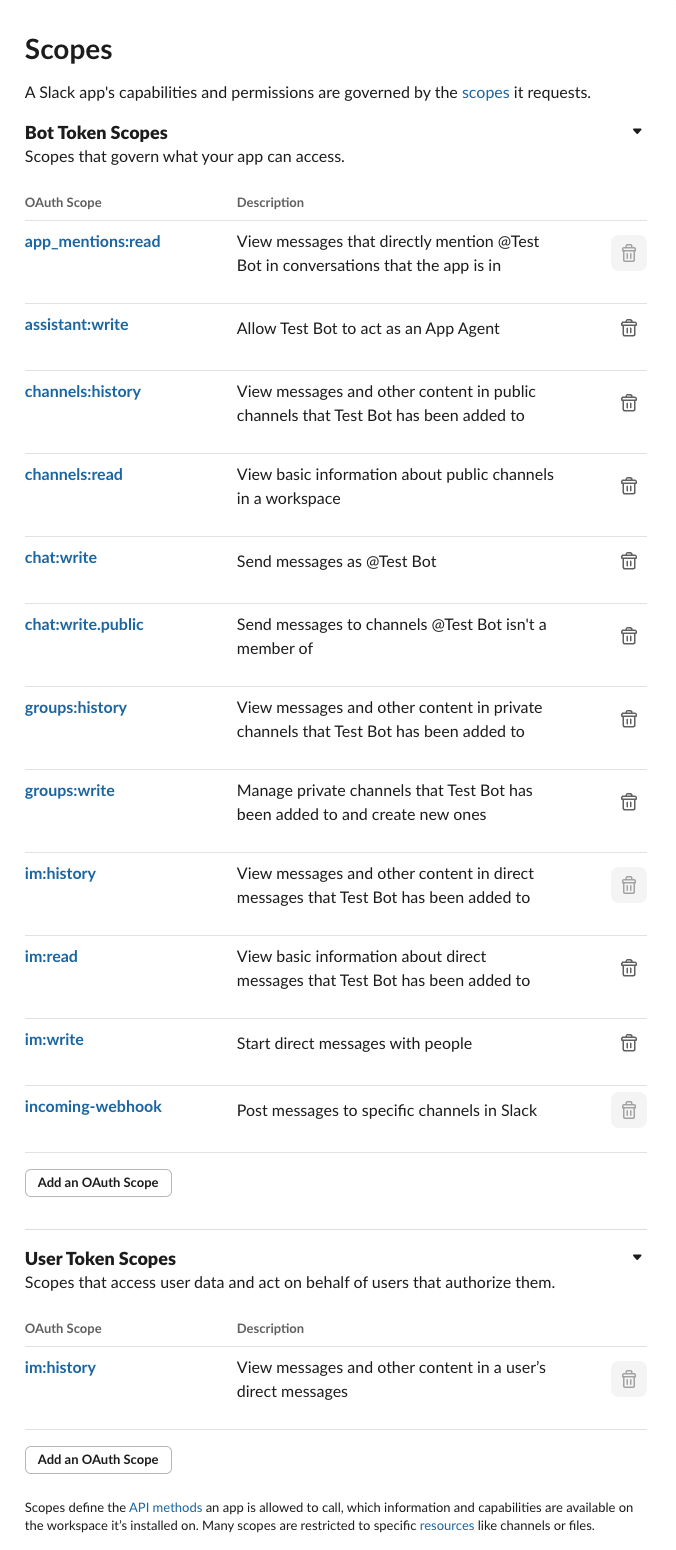
***
### 4. Verify the Plugin
In your code, `self.session.app.chat.invoke` is used to call the Dify application, passing in parameters such as `app_id` and `query`. The response is then returned to the Slack Bot. Run `python -m main` again to restart your plugin for debugging, and check whether Slack correctly displays the Dify App’s reply:
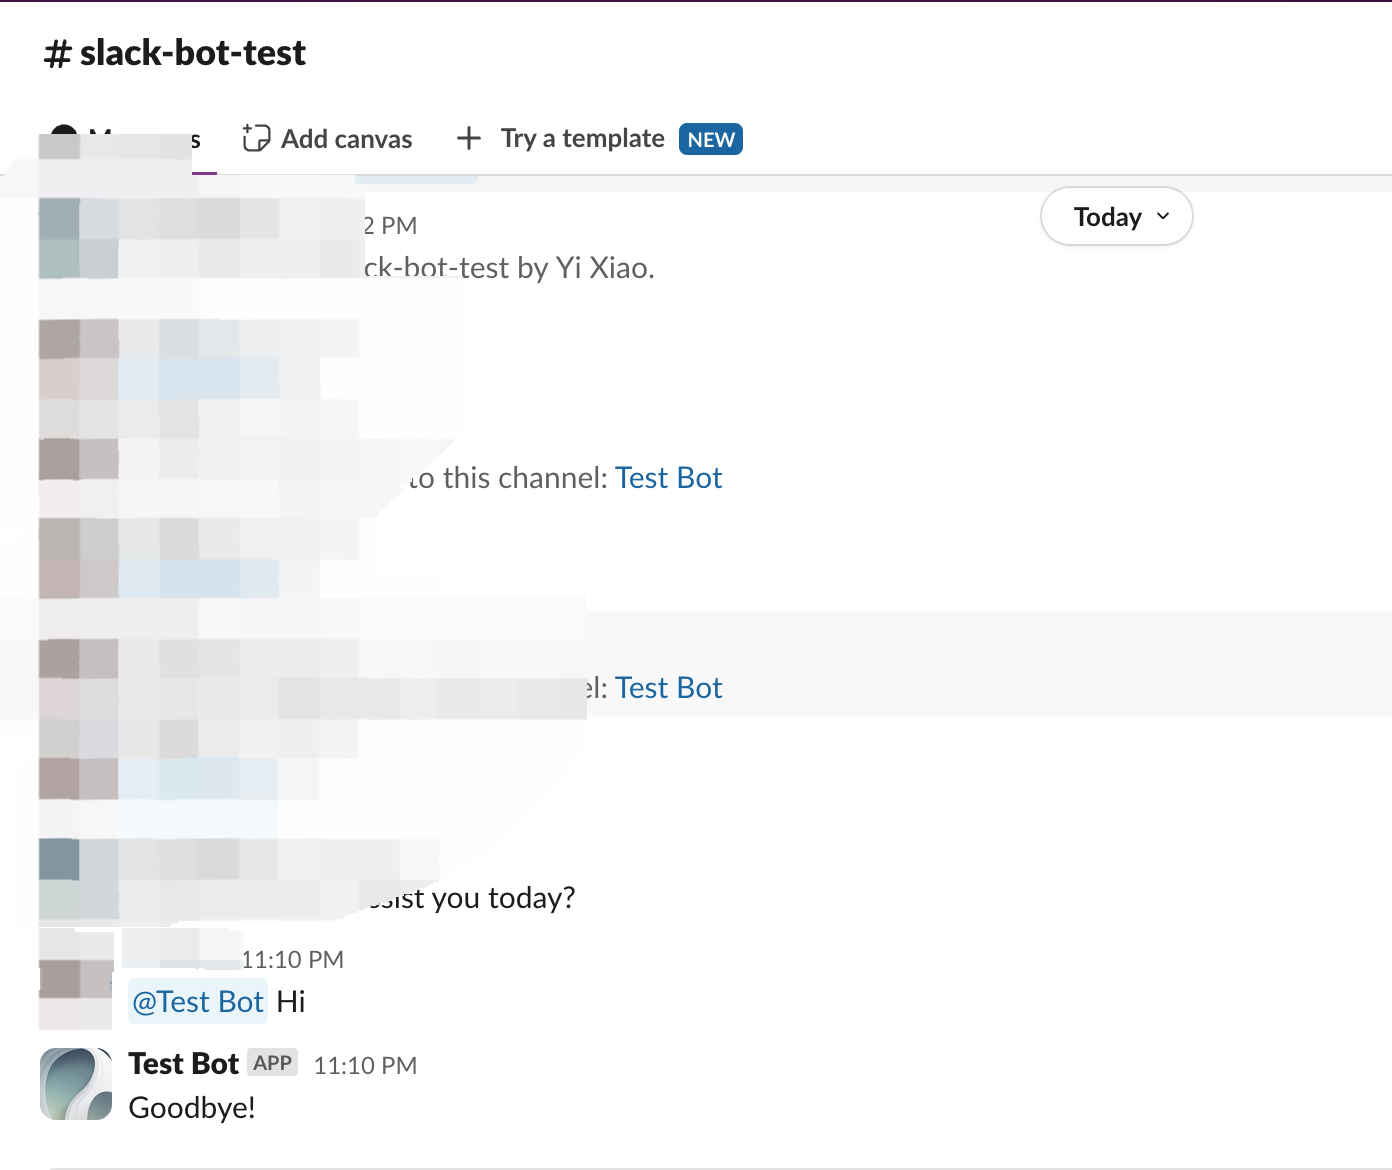
***
### 5. Package the Plugin (Optional)
Once you confirm that the plugin works correctly, you can package and name it via the following command. After it runs, you’ll find a `slack_bot.difypkg` file in the current directory—your final plugin package. For detailed packaging steps, refer to [Package as a Local File and Share](/en/develop-plugin/publishing/marketplace-listing/release-by-file).
```bash theme={null}
# Replace ./slack_bot with your actual plugin project path.
dify plugin package ./slack_bot
```
Congratulations! You’ve successfully developed, tested, and packaged a plugin!
***
### 6. Publish the Plugin (Optional)
You can now upload it to the [Dify Marketplace repository](https://github.com/langgenius/dify-plugins) for public release. Before publishing, ensure your plugin meets the [Publishing to Dify Marketplace Guidelines](/en/develop-plugin/publishing/marketplace-listing/release-to-dify-marketplace). Once approved, your code is merged into the main branch, and the plugin goes live on the [Dify Marketplace](https://marketplace.dify.ai/).
***
## Related Resources
* [Plugin Development Basics](/en/develop-plugin/getting-started/getting-started-dify-plugin) - Comprehensive overview of Dify plugin development
* [Plugin Development Quick Start Guide](/en/develop-plugin/dev-guides-and-walkthroughs/tool-plugin) - Start developing plugins from scratch
* [Develop an Extension Plugin](/en/develop-plugin/dev-guides-and-walkthroughs/endpoint) - Learn about extension plugin development
* [Reverse Invocation of Dify Services](/en/develop-plugin/features-and-specs/advanced-development/reverse-invocation) - Understand how to call Dify platform capabilities
* [Reverse Invocation: App](/en/develop-plugin/features-and-specs/advanced-development/reverse-invocation-app) - Learn how to call apps within the platform
* [Publishing Plugins](/en/develop-plugin/publishing/marketplace-listing/release-overview) - Learn the publishing process
* [Publishing to Dify Marketplace](/en/develop-plugin/publishing/marketplace-listing/release-to-dify-marketplace) - Marketplace publishing guide
* [Endpoint Detailed Definition](/en/develop-plugin/dev-guides-and-walkthroughs/endpoint) - Detailed Endpoint definition
### Further Reading
For a complete Dify plugin project example, visit the [GitHub repository](https://github.com/langgenius/dify-plugins). You’ll also find additional plugins with full source code and implementation details.
If you want to explore more about plugin development, check the following:
**Quick Starts:**
* [Develop an Extension Plugin](/en/develop-plugin/dev-guides-and-walkthroughs/endpoint)
* [Develop a Model Plugin](/en/develop-plugin/dev-guides-and-walkthroughs/creating-new-model-provider)
* [Bundle Plugins: Packaging Multiple Plugins](/en/develop-plugin/features-and-specs/advanced-development/bundle)
**Plugin Interface Docs:**
* [Defining Plugin Information via Manifest File](/en/develop-plugin/features-and-specs/plugin-types/plugin-info-by-manifest) - Manifest structure
* [Endpoint](/en/develop-plugin/dev-guides-and-walkthroughs/endpoint) - Endpoint detailed definition
* [Reverse Invocation](/en/develop-plugin/features-and-specs/advanced-development/reverse-invocation) - Reverse-calling Dify capabilities
* [General Specifications](/en/develop-plugin/features-and-specs/plugin-types/general-specifications) - Tool specifications
* [Model Schema](/en/develop-plugin/features-and-specs/plugin-types/model-schema) - Model
***
[Edit this page](https://github.com/langgenius/dify-docs/edit/main/en/develop-plugin/dev-guides-and-walkthroughs/develop-a-slack-bot-plugin.mdx) | [Report an issue](https://github.com/langgenius/dify-docs/issues/new?template=docs.yml)
# 10-Minute Guide to Building Dify Plugins
Source: https://docs.dify.ai/en/develop-plugin/dev-guides-and-walkthroughs/develop-flomo-plugin
Learn how to build a functional Dify plugin that connects with Flomo note-taking service in just 10 minutes
## What you'll build
By the end of this guide, you'll have created a Dify plugin that:
* Connects to the Flomo note-taking API
* Allows users to save notes from AI conversations directly to Flomo
* Handles authentication and error states properly
* Is ready for distribution in the Dify Marketplace
10 minutes
Basic Python knowledge and a Flomo account
## Step 1: Install the Dify CLI and create a project
```bash theme={null}
brew tap langgenius/dify
brew install dify
```
Get the latest Dify CLI from the [Dify GitHub releases page](https://github.com/langgenius/dify-plugin-daemon/releases)
```bash theme={null}
# Download appropriate version
chmod +x dify-plugin-linux-amd64
mv dify-plugin-linux-amd64 dify
sudo mv dify /usr/local/bin/
```
Verify installation:
```bash theme={null}
dify version
```
Create a new plugin project using:
```bash theme={null}
dify plugin init
```
Follow the prompts to set up your plugin:
* Name it "flomo"
* Select "tool" as the plugin type
* Complete other required fields
```bash theme={null}
cd flomo
```
This will create the basic structure for your plugin with all necessary files.
## Step 2: Define your plugin manifest
The manifest.yaml file defines your plugin's metadata, permissions, and capabilities.
Create a `manifest.yaml` file:
```yaml theme={null}
version: 0.0.4
type: plugin
author: yourname
label:
en_US: Flomo
zh_Hans: Flomo 浮墨笔记
created_at: "2023-10-01T00:00:00Z"
icon: icon.png
resource:
memory: 67108864 # 64MB
permission:
storage:
enabled: false
plugins:
tools:
- flomo.yaml
meta:
version: 0.0.1
arch:
- amd64
- arm64
runner:
language: python
version: 3.12
entrypoint: main
```
## Step 3: Create the tool definition
Create a `flomo.yaml` file to define your tool interface:
```yaml theme={null}
identity:
author: yourname
name: flomo
label:
en_US: Flomo Note
zh_Hans: Flomo 浮墨笔记
description:
human:
en_US: Add notes to your Flomo account directly from Dify.
zh_Hans: 直接从Dify添加笔记到您的Flomo账户。
llm: >
A tool that allows users to save notes to Flomo. Use this tool when users want to save important information from the conversation. The tool accepts a 'content' parameter that contains the text to be saved as a note.
credential_schema:
api_url:
type: string
required: true
label:
en_US: API URL
zh_Hans: API URL
human_description:
en_US: Flomo API URL from your Flomo account settings.
zh_Hans: 从您的Flomo账户设置中获取的API URL。
tool_schema:
content:
type: string
required: true
label:
en_US: Note Content
zh_Hans: 笔记内容
human_description:
en_US: Content to save as a note in Flomo.
zh_Hans: 要保存为Flomo笔记的内容。
```
## Step 4: Implement core utility functions
Create a utility module in `utils/flomo_utils.py` for API interaction:
```python utils/flomo_utils.py theme={null}
import requests
def send_flomo_note(api_url: str, content: str) -> None:
"""
Send a note to Flomo via the API URL. Raises requests.RequestException on network errors,
and ValueError on invalid status codes or input.
"""
api_url = api_url.strip()
if not api_url:
raise ValueError("API URL is required and cannot be empty.")
if not api_url.startswith('https://flomoapp.com/iwh/'):
raise ValueError(
"API URL should be in the format: https://flomoapp.com/iwh/{token}/{secret}/"
)
if not content:
raise ValueError("Content cannot be empty.")
headers = {'Content-Type': 'application/json'}
response = requests.post(api_url, json={"content": content}, headers=headers, timeout=10)
if response.status_code != 200:
raise ValueError(f"API URL is not valid. Received status code: {response.status_code}")
```
## Step 5: Implement the Tool Provider
The Tool Provider handles credential validation. Create `provider/flomo.py`:
```python provider/flomo.py theme={null}
from typing import Any
from dify_plugin import ToolProvider
from dify_plugin.errors.tool import ToolProviderCredentialValidationError
import requests
from utils.flomo_utils import send_flomo_note
class FlomoProvider(ToolProvider):
def _validate_credentials(self, credentials: dict[str, Any]) -> None:
try:
api_url = credentials.get('api_url', '').strip()
# Use utility for validation and sending test note
send_flomo_note(api_url, "Hello, #flomo https://flomoapp.com")
except ValueError as e:
raise ToolProviderCredentialValidationError(str(e))
except requests.RequestException as e:
raise ToolProviderCredentialValidationError(f"Connection error: {str(e)}")
```
## Step 6: Implement the Tool
The Tool class handles actual API calls when the user invokes the plugin. Create `tools/flomo.py`:
```python tools/flomo.py theme={null}
from collections.abc import Generator
from typing import Any
from dify_plugin import Tool
from dify_plugin.entities.tool import ToolInvokeMessage
import requests
from utils.flomo_utils import send_flomo_note
class FlomoTool(Tool):
def _invoke(self, tool_parameters: dict[str, Any]) -> Generator[ToolInvokeMessage]:
content = tool_parameters.get("content", "")
api_url = self.runtime.credentials.get("api_url", "")
try:
send_flomo_note(api_url, content)
except ValueError as e:
yield self.create_text_message(str(e))
return
except requests.RequestException as e:
yield self.create_text_message(f"Connection error: {str(e)}")
return
# Return success message and structured data
yield self.create_text_message(
"Note created successfully! Your content has been sent to Flomo."
)
yield self.create_json_message({
"status": "success",
"content": content,
})
```
Always handle exceptions gracefully and return user-friendly error messages. Remember that your plugin represents your brand in the Dify ecosystem.
## Step 7: Test your plugin
Copy the example environment file:
```bash theme={null}
cp .env.example .env
```
Edit the `.env` file with your Dify environment details:
```
INSTALL_METHOD=remote
REMOTE_INSTALL_HOST=debug-plugin.dify.dev
REMOTE_INSTALL_PORT=5003
REMOTE_INSTALL_KEY=your_debug_key
```
You can find your debug key and host in the Dify dashboard: click the "Plugins" icon in the top right corner, then click the debug icon. In the pop-up window, copy the "API Key" and "Host Address".
```bash theme={null}
pip install -r requirements.txt
python -m main
```
Your plugin will connect to your Dify instance in debug mode.
In your Dify instance, navigate to plugins and find your debugging plugin (marked as "debugging").
Add your Flomo API credentials and test sending a note.
## Step 8: Package and distribute
When you're ready to share your plugin:
```bash theme={null}
dify plugin package ./
```
This creates a `plugin.difypkg` file you can upload to the Dify Marketplace.
## FAQ and Troubleshooting
Make sure your `.env` file is properly configured and you're using the correct debug key.
Double-check your Flomo API URL format. It should be in the form: `https://flomoapp.com/iwh/{token}/{secret}/`
Ensure all required files are present and the manifest.yaml structure is valid.
## Summary
You've built a functioning Dify plugin that connects with an external API service! This same pattern works for integrating with thousands of services - from databases and search engines to productivity tools and custom APIs.
Write your README.md in English (en\_US) describing functionality, setup, and usage examples
Create additional README files like `readme/README_zh_Hans.md` for other languages
Add a privacy policy (PRIVACY.md) if publishing your plugin
Include comprehensive examples in documentation
Test thoroughly with various document sizes and formats
***
[Edit this page](https://github.com/langgenius/dify-docs/edit/main/en/develop-plugin/dev-guides-and-walkthroughs/develop-flomo-plugin.mdx) | [Report an issue](https://github.com/langgenius/dify-docs/issues/new?template=docs.yml)
# Building a Markdown Exporter Plugin
Source: https://docs.dify.ai/en/develop-plugin/dev-guides-and-walkthroughs/develop-md-exporter
Learn how to create a plugin that exports conversations to different document formats
## What you'll build
In this guide, you'll learn how to build a practical Dify plugin that exports conversations into popular document formats. By the end, your plugin will:
* Convert markdown text to Word documents (.docx)
* Export conversations as PDF files
* Handle file creation with proper formatting
* Provide a clean user experience for document exports
15 minutes
Basic Python knowledge and familiarity with document manipulation libraries
## Step 1: Set up your environment
```bash theme={null}
brew tap langgenius/dify
brew install dify
```
Get the latest Dify CLI from the [Dify GitHub releases page](https://github.com/langgenius/dify-plugin-daemon/releases)
```bash theme={null}
# Download appropriate version
chmod +x dify-plugin-linux-amd64
mv dify-plugin-linux-amd64 dify
sudo mv dify /usr/local/bin/
```
Verify installation:
```bash theme={null}
dify version
```
Initialize a new plugin project:
```bash theme={null}
dify plugin init
```
Follow the prompts:
* Name: "md\_exporter"
* Type: "tool"
* Complete other details as prompted
## Step 2: Define plugin manifest
Create the `manifest.yaml` file to define your plugin's metadata:
```yaml theme={null}
version: 0.0.4
type: plugin
author: your_username
label:
en_US: Markdown Exporter
zh_Hans: Markdown导出工具
created_at: "2025-09-30T00:00:00Z"
icon: icon.png
resource:
memory: 134217728 # 128MB
permission:
storage:
enabled: true # We need storage for temp files
plugins:
tools:
- word_export.yaml
- pdf_export.yaml
meta:
version: 0.0.1
arch:
- amd64
- arm64
runner:
language: python
version: 3.12
entrypoint: main
```
## Step 3: Define the Word export tool
Create a `word_export.yaml` file to define the Word document export tool:
```yaml theme={null}
identity:
author: your_username
name: word_export
label:
en_US: Export to Word
zh_Hans: 导出为Word文档
description:
human:
en_US: Export conversation content to a Word document (.docx)
zh_Hans: 将对话内容导出为Word文档(.docx)
llm: >
A tool that converts markdown text to a Word document (.docx) format.
Use this tool when the user wants to save or export the conversation
content as a Word document. The input text should be in markdown format.
credential_schema: {} # No credentials needed
tool_schema:
markdown_content:
type: string
required: true
label:
en_US: Markdown Content
zh_Hans: Markdown内容
human_description:
en_US: The markdown content to convert to Word format
zh_Hans: 要转换为Word格式的Markdown内容
document_name:
type: string
required: false
label:
en_US: Document Name
zh_Hans: 文档名称
human_description:
en_US: Name for the exported document (without extension)
zh_Hans: 导出文档的名称(无需扩展名)
```
## Step 4: Define the PDF export tool
Create a `pdf_export.yaml` file for PDF exports:
```yaml theme={null}
identity:
author: your_username
name: pdf_export
label:
en_US: Export to PDF
zh_Hans: 导出为PDF文档
description:
human:
en_US: Export conversation content to a PDF document
zh_Hans: 将对话内容导出为PDF文档
llm: >
A tool that converts markdown text to a PDF document.
Use this tool when the user wants to save or export the conversation
content as a PDF file. The input text should be in markdown format.
credential_schema: {} # No credentials needed
tool_schema:
markdown_content:
type: string
required: true
label:
en_US: Markdown Content
zh_Hans: Markdown内容
human_description:
en_US: The markdown content to convert to PDF format
zh_Hans: 要转换为PDF格式的Markdown内容
document_name:
type: string
required: false
label:
en_US: Document Name
zh_Hans: 文档名称
human_description:
en_US: Name for the exported document (without extension)
zh_Hans: 导出文档的名称(无需扩展名)
```
## Step 5: Install required dependencies
Create or update `requirements.txt` with the necessary libraries:
```text theme={null}
python-docx>=0.8.11
markdown>=3.4.1
weasyprint>=59.0
beautifulsoup4>=4.12.2
```
## Step 6: Implement the Word export functionality
Create a utility module in `utils/docx_utils.py`:
```python utils/docx_utils.py theme={null}
import os
import tempfile
import uuid
from docx import Document
from docx.shared import Pt
from docx.enum.text import WD_PARAGRAPH_ALIGNMENT
import markdown
from bs4 import BeautifulSoup
def convert_markdown_to_docx(markdown_text, document_name=None):
"""
Convert markdown text to a Word document and return the file path
"""
if not document_name:
document_name = f"exported_document_{uuid.uuid4().hex[:8]}"
# Convert markdown to HTML
html = markdown.markdown(markdown_text)
soup = BeautifulSoup(html, 'html.parser')
# Create a new Word document
doc = Document()
# Process HTML elements and add to document
for element in soup.find_all(['h1', 'h2', 'h3', 'h4', 'p', 'ul', 'ol']):
if element.name == 'h1':
heading = doc.add_heading(element.text.strip(), level=1)
heading.alignment = WD_PARAGRAPH_ALIGNMENT.CENTER
elif element.name == 'h2':
doc.add_heading(element.text.strip(), level=2)
elif element.name == 'h3':
doc.add_heading(element.text.strip(), level=3)
elif element.name == 'h4':
doc.add_heading(element.text.strip(), level=4)
elif element.name == 'p':
paragraph = doc.add_paragraph(element.text.strip())
elif element.name in ('ul', 'ol'):
for li in element.find_all('li'):
doc.add_paragraph(li.text.strip(), style='ListBullet')
# Create temp directory if it doesn't exist
temp_dir = tempfile.gettempdir()
if not os.path.exists(temp_dir):
os.makedirs(temp_dir)
# Save the document
file_path = os.path.join(temp_dir, f"{document_name}.docx")
doc.save(file_path)
return file_path
```
## Step 7: Implement the PDF export functionality
Create a utility module in `utils/pdf_utils.py`:
```python utils/pdf_utils.py theme={null}
import os
import tempfile
import uuid
import markdown
from weasyprint import HTML, CSS
from weasyprint.text.fonts import FontConfiguration
def convert_markdown_to_pdf(markdown_text, document_name=None):
"""
Convert markdown text to a PDF document and return the file path
"""
if not document_name:
document_name = f"exported_document_{uuid.uuid4().hex[:8]}"
# Convert markdown to HTML
html_content = markdown.markdown(markdown_text)
# Add basic styling
styled_html = f"""
{document_name}
{html_content}
"""
# Create temp directory if it doesn't exist
temp_dir = tempfile.gettempdir()
if not os.path.exists(temp_dir):
os.makedirs(temp_dir)
# Output file path
file_path = os.path.join(temp_dir, f"{document_name}.pdf")
# Configure fonts
font_config = FontConfiguration()
# Render PDF
HTML(string=styled_html).write_pdf(
file_path,
stylesheets=[],
font_config=font_config
)
return file_path
```
## Step 8: Create tool implementations
First, create the Word export tool in `tools/word_export.py`:
```python tools/word_export.py theme={null}
import os
import base64
from collections.abc import Generator
from typing import Any
from dify_plugin import Tool
from dify_plugin.entities.tool import ToolInvokeMessage
from utils.docx_utils import convert_markdown_to_docx
class WordExportTool(Tool):
def _invoke(self, tool_parameters: dict[str, Any]) -> Generator[ToolInvokeMessage]:
# Extract parameters
markdown_content = tool_parameters.get("markdown_content", "")
document_name = tool_parameters.get("document_name", "exported_document")
if not markdown_content:
yield self.create_text_message("Error: No content provided for export.")
return
try:
# Convert markdown to Word
file_path = convert_markdown_to_docx(markdown_content, document_name)
# Read the file as binary
with open(file_path, 'rb') as file:
file_content = file.read()
# Encode as base64
file_base64 = base64.b64encode(file_content).decode('utf-8')
# Return success message and file
yield self.create_text_message(
f"Document exported successfully as Word (.docx) format."
)
yield self.create_file_message(
file_name=f"{document_name}.docx",
file_content=file_base64,
mime_type="application/vnd.openxmlformats-officedocument.wordprocessingml.document"
)
except Exception as e:
yield self.create_text_message(f"Error exporting to Word: {str(e)}")
return
```
Next, create the PDF export tool in `tools/pdf_export.py`:
```python tools/pdf_export.py theme={null}
import os
import base64
from collections.abc import Generator
from typing import Any
from dify_plugin import Tool
from dify_plugin.entities.tool import ToolInvokeMessage
from utils.pdf_utils import convert_markdown_to_pdf
class PDFExportTool(Tool):
def _invoke(self, tool_parameters: dict[str, Any]) -> Generator[ToolInvokeMessage]:
# Extract parameters
markdown_content = tool_parameters.get("markdown_content", "")
document_name = tool_parameters.get("document_name", "exported_document")
if not markdown_content:
yield self.create_text_message("Error: No content provided for export.")
return
try:
# Convert markdown to PDF
file_path = convert_markdown_to_pdf(markdown_content, document_name)
# Read the file as binary
with open(file_path, 'rb') as file:
file_content = file.read()
# Encode as base64
file_base64 = base64.b64encode(file_content).decode('utf-8')
# Return success message and file
yield self.create_text_message(
f"Document exported successfully as PDF format."
)
yield self.create_file_message(
file_name=f"{document_name}.pdf",
file_content=file_base64,
mime_type="application/pdf"
)
except Exception as e:
yield self.create_text_message(f"Error exporting to PDF: {str(e)}")
return
```
## Step 9: Create the entrypoint
Create a `main.py` file at the root of your project:
```python main.py theme={null}
from dify_plugin import PluginRunner
from tools.word_export import WordExportTool
from tools.pdf_export import PDFExportTool
plugin = PluginRunner(
tools=[
WordExportTool(),
PDFExportTool(),
],
providers=[] # No credential providers needed
)
```
## Step 10: Test your plugin
First, create your `.env` file from the template:
```bash theme={null}
cp .env.example .env
```
Configure it with your Dify environment details:
```
INSTALL_METHOD=remote
REMOTE_INSTALL_HOST=debug-plugin.dify.dev
REMOTE_INSTALL_PORT=5003
REMOTE_INSTALL_KEY=your_debug_key
```
```bash theme={null}
pip install -r requirements.txt
```
```bash theme={null}
python -m main
```
## Step 11: Package for distribution
When you're ready to share your plugin:
```bash theme={null}
dify plugin package ./
```
This creates a `plugin.difypkg` file for distribution.
## Creative use cases
Use this plugin to convert analysis summaries into professional reports for clients
Export coaching or consulting session notes as formatted documents
## Beyond the basics
Here are some interesting ways to extend this plugin:
* **Custom templates**: Add company branding or personalized styles
* **Multi-format support**: Expand to export as HTML, Markdown, or other formats
* **Image handling**: Process and include images from conversations
* **Table support**: Implement proper formatting for data tables
* **Collaborative editing**: Add integration with Google Docs or similar platforms
The core challenge in document conversion is maintaining formatting and structure. The approach used in this plugin first converts markdown to HTML (an intermediate format), then processes that HTML into the target format.
This two-step process provides flexibility—you could extend it to support additional formats by simply adding new output modules that work with the HTML representation.
For PDF generation, WeasyPrint was chosen because it offers high-quality PDF rendering with CSS support. For Word documents, python-docx provides granular control over document structure.
## Summary
You've built a practical plugin that adds real value to the Dify platform by enabling users to export conversations in professional document formats. This functionality bridges the gap between AI conversations and traditional document workflows.
Write your README.md in English (en\_US) describing functionality, setup, and usage examples
Create additional README files like `readme/README_zh_Hans.md` for other languages
Add a privacy policy (PRIVACY.md) if publishing your plugin
Include comprehensive examples in documentation
Test thoroughly with various document sizes and formats
***
[Edit this page](https://github.com/langgenius/dify-docs/edit/main/en/develop-plugin/dev-guides-and-walkthroughs/develop-md-exporter.mdx) | [Report an issue](https://github.com/langgenius/dify-docs/issues/new?template=docs.yml)
# Build Tool Plugins for Multimodal Data Processing in Knowledge Pipelines
Source: https://docs.dify.ai/en/develop-plugin/dev-guides-and-walkthroughs/develop-multimodal-data-processing-tool
In knowledge pipelines, the Knowledge Base node supports input in two multimodal data formats: `multimodal-Parent-Child` and `multimodal-General`.
When developing a tool plugin for multimodal data processing, to ensure that the plugin's multimodal output (such as text, images, audio, video, etc.) can be correctly recognized and embedded by the Knowledge Base node, you need to complete the following configuration:
* **In the tool code file**, call the tool session interface to upload files and construct the `files` object.
* **In the tool provider YAML file**, declare the `output_schema` as either `multimodal-Parent-Child` or `multimodal-General`.
## Upload Files and Construct File Objects
When processing multimodal data (such as images), you need to first upload the file using Dify's tool session tool to obtain the file metadata.
The following example uses the official Dify plugin, **Dify Extractor**, to demonstrate how to upload a file and construct a `files` object.
```python theme={null}
# Upload the file using the tool session
file_res = self._tool.session.file.upload(
file_name, # filename
file_blob, # file binary data
mime_type, # MIME type, e.g., "image/png"
)
# Generate a Markdown image reference using the file preview URL
image_url = f""
```
The upload interface returns an `UploadFileResponse` object containing the file information. Its structure is as follows:
```python theme={null}
from enum import Enum
from pydantic import BaseModel
class UploadFileResponse(BaseModel):
class Type(str, Enum):
DOCUMENT = "document"
IMAGE = "image"
VIDEO = "video"
AUDIO = "audio"
@classmethod
def from_mime_type(cls, mime_type: str):
if mime_type.startswith("image/"):
return cls.IMAGE
if mime_type.startswith("video/"):
return cls.VIDEO
if mime_type.startswith("audio/"):
return cls.AUDIO
return cls.DOCUMENT
id: str
name: str
size: int
extension: str
mime_type: str
type: Type | None = None
preview_url: str | None = None
```
You can map the file information (such as `name`, `size`, `extension`, `mime_type`, etc.) to the `files` field in the multimodal output structure.
```yaml multimodal_parent_child_structure highlight={22-62} expandable theme={null}
{
"$id": "https://dify.ai/schemas/v1/multimodal_parent_child_structure.json",
"$schema": "http://json-schema.org/draft-07/schema#",
"version": "1.0.0",
"type": "object",
"title": "Multimodal Parent-Child Structure",
"description": "Schema for multimodal parent-child structure (v1)",
"properties": {
"parent_mode": {
"type": "string",
"description": "The mode of parent-child relationship"
},
"parent_child_chunks": {
"type": "array",
"items": {
"type": "object",
"properties": {
"parent_content": {
"type": "string",
"description": "The parent content"
},
"files": {
"type": "array",
"items": {
"type": "object",
"properties": {
"name": {
"type": "string",
"description": "file name"
},
"size": {
"type": "number",
"description": "file size"
},
"extension": {
"type": "string",
"description": "file extension"
},
"type": {
"type": "string",
"description": "file type"
},
"mime_type": {
"type": "string",
"description": "file mime type"
},
"transfer_method": {
"type": "string",
"description": "file transfer method"
},
"url": {
"type": "string",
"description": "file url"
},
"related_id": {
"type": "string",
"description": "file related id"
}
},
"required": ["name", "size", "extension", "type", "mime_type", "transfer_method", "url", "related_id"]
},
"description": "List of files"
},
"child_contents": {
"type": "array",
"items": {
"type": "string"
},
"description": "List of child contents"
}
},
"required": ["parent_content", "child_contents"]
},
"description": "List of parent-child chunk pairs"
}
},
"required": ["parent_mode", "parent_child_chunks"]
}
```
```yaml multimodal_general_structure highlight={18-56} expandable theme={null}
{
"$id": "https://dify.ai/schemas/v1/multimodal_general_structure.json",
"$schema": "http://json-schema.org/draft-07/schema#",
"version": "1.0.0",
"type": "array",
"title": "Multimodal General Structure",
"description": "Schema for multimodal general structure (v1) - array of objects",
"properties": {
"general_chunks": {
"type": "array",
"items": {
"type": "object",
"properties": {
"content": {
"type": "string",
"description": "The content"
},
"files": {
"type": "array",
"items": {
"type": "object",
"properties": {
"name": {
"type": "string",
"description": "file name"
},
"size": {
"type": "number",
"description": "file size"
},
"extension": {
"type": "string",
"description": "file extension"
},
"type": {
"type": "string",
"description": "file type"
},
"mime_type": {
"type": "string",
"description": "file mime type"
},
"transfer_method": {
"type": "string",
"description": "file transfer method"
},
"url": {
"type": "string",
"description": "file url"
},
"related_id": {
"type": "string",
"description": "file related id"
}
},
"description": "List of files"
}
}
},
"required": ["content"]
},
"description": "List of content and files"
}
}
}
```
## Declare Multimodal Output Structure
The structure of multimodal data is defined by Dify's official JSON schema.
To enable the Knowledge Base node to recognize the plugin's multimodal output type, you need to point the `result` field under `output_schema` in the plugin's provider YAML file to the corresponding official schema URL.
```yaml theme={null}
output_schema:
type: object
properties:
result:
# multimodal-Parent-Child
$ref: "https://dify.ai/schemas/v1/multimodal_parent_child_structure.json"
# multimodal-General
# $ref: "https://dify.ai/schemas/v1/multimodal_general_structure.json"
```
Taking `multimodal-Parent-Child` as an example, a complete YAML configuration is as follows:
```yaml expandable theme={null}
identity:
name: multimodal_tool
author: langgenius
label:
en_US: multimodal tool
zh_Hans: 多模态提取器
pt_BR: multimodal tool
description:
human:
en_US: Process documents into multimodal-Parent-Child chunk structures
zh_Hans: 将文档处理为多模态父子分块结构
pt_BR: Processar documentos em estruturas de divisão pai-filho
llm: Processes documents into hierarchical multimodal-Parent-Child chunk structures
parameters:
- name: input_text
human_description:
en_US: The text you want to chunk.
zh_Hans: 输入文本
pt_BR: Conteúdo de Entrada
label:
en_US: Input Content
zh_Hans: 输入文本
pt_BR: Conteúdo de Entrada
llm_description: The text you want to chunk.
required: true
type: string
form: llm
output_schema:
type: object
properties:
result:
$ref: "https://dify.ai/schemas/v1/multimodal_parent_child_structure.json"
extra:
python:
source: tools/parent_child_chunk.py
```
# Neko Cat Endpoint
Source: https://docs.dify.ai/en/develop-plugin/dev-guides-and-walkthroughs/endpoint
Authors Yeuoly, Allen. This document details the structure and implementation of Endpoints in Dify plugins, using the Neko Cat project as an example. It covers defining Endpoint groups, configuring interfaces, implementing the _invoke method, and handling requests and responses. The document explains the meaning and usage of various YAML configuration fields.
# Endpoint
This document uses the [Neko Cat](/en/develop-plugin/dev-guides-and-walkthroughs/endpoint) project as an example to explain the structure of Endpoints within a plugin. Endpoints are HTTP interfaces exposed by the plugin, which can be used for integration with external systems. For the complete plugin code, please refer to the [GitHub repository](https://github.com/langgenius/dify-plugin-sdks/tree/main/python/examples/neko).
### Group Definition
An `Endpoint` group is a collection of multiple `Endpoints`. When creating a new `Endpoint` within a Dify plugin, you might need to fill in the following configuration.
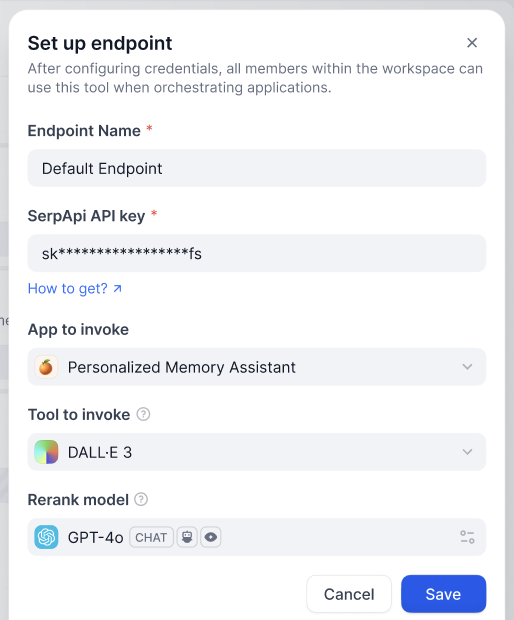
Besides the `Endpoint Name`, you can add new form items by writing the group's configuration information. After clicking save, you can see the multiple interfaces it contains, which will use the same configuration information.
#### **Structure**
* `settings` (map\[string] [ProviderConfig](/en/develop-plugin/features-and-specs/plugin-types/general-specifications#providerconfig)): Endpoint configuration definition.
* `endpoints` (list\[string], required): Points to the specific `endpoint` interface definitions.
```yaml theme={null}
settings:
api_key:
type: secret-input
required: true
label:
en_US: API key
zh_Hans: API key
ja_Jp: API key
pt_BR: API key
placeholder:
en_US: Please input your API key
zh_Hans: 请输入你的 API key
ja_Jp: あなたの API key を入れてください
pt_BR: Por favor, insira sua chave API
endpoints:
- endpoints/duck.yaml
- endpoints/neko.yaml
```
### Interface Definition
* `path` (string): Follows the Werkzeug interface standard.
* `method` (string): Interface method, only supports `HEAD`, `GET`, `POST`, `PUT`, `DELETE`, `OPTIONS`.
* `extra` (object): Configuration information beyond the basic details.
* `python` (object)
* `source` (string): The source code that implements this interface.
```yaml theme={null}
path: "/duck/"
method: "GET"
extra:
python:
source: "endpoints/duck.py"
```
### Interface Implementation
You need to implement a subclass that inherits from `dify_plugin.Endpoint` and implement the `_invoke` method.
* **Input Parameters**
* `r` (Request): The `Request` object from `werkzeug`.
* `values` (Mapping): Path parameters parsed from the path.
* `settings` (Mapping): Configuration information for this `Endpoint`.
* **Return**
* A `Response` object from `werkzeug`, supports streaming responses.
* Directly returning a string is not supported.
Example code:
```python theme={null}
import json
from typing import Mapping
from werkzeug import Request, Response
from dify_plugin import Endpoint
class Duck(Endpoint):
def _invoke(self, r: Request, values: Mapping, settings: Mapping) -> Response:
"""
Invokes the endpoint with the given request.
"""
app_id = values["app_id"]
def generator():
yield f"{app_id}
Typically, a data source plugin does not need to use other features of the Dify platform, so no additional permissions are required.
#### Data Source Plugin Structure
A data source plugin consists of three main components:
* The `manifest.yaml` file: Describes the basic information about the plugin.
* The `provider` directory: Contains the plugin provider's description and authentication implementation code.
* The `datasources` directory: Contains the description and core logic for fetching data from the data source.
```
├── _assets
│ └── icon.svg
├── datasources
│ ├── your_datasource.py
│ └── your_datasource.yaml
├── main.py
├── manifest.yaml
├── PRIVACY.md
├── provider
│ ├── your_datasource.py
│ └── your_datasource.yaml
├── README.md
└── requirements.txt
```
#### Set the Correct Version and Tag
* In the `manifest.yaml` file, set the minimum supported Dify version as follows:
```yaml theme={null}
minimum_dify_version: 1.9.0
```
* In the `manifest.yaml` file, add the following tag to display the plugin under the data source category in the Dify Marketplace:
```yaml theme={null}
tags:
- rag
```
* In the `requirements.txt` file, set the plugin SDK version used for data source plugin development as follows:
```yaml theme={null}
dify-plugin>=0.5.0,<0.6.0
```
### Add the Data Source Provider
#### Create the Provider YAML File
The content of a provider YAML file is essentially the same as that for tool plugins, with only the following two differences:
```yaml theme={null}
# Specify the provider type for the data source plugin: online_drive, online_document, or website_crawl
provider_type: online_drive # online_document, website_crawl
# Specify data sources
datasources:
- datasources/PluginName.yaml
```
For more about creating a provider YAML file, see [Tool Plugin: Completing Third-Party Service Credentials](/en/develop-plugin/dev-guides-and-walkthroughs/tool-plugin#2-completing-third-party-service-credentials).
Data source plugins support authentication via OAuth 2.0 or API Key.
To configure OAuth, see [Add OAuth Support to Your Tool Plugin](/en/develop-plugin/dev-guides-and-walkthroughs/tool-oauth).
#### Create the Provider Code File
* When using API Key authentication mode, the provider code file for data source plugins is identical to that for tool plugins. You only need to change the parent class inherited by the provider class to `DatasourceProvider`.
```python theme={null}
class YourDatasourceProvider(DatasourceProvider):
def _validate_credentials(self, credentials: Mapping[str, Any]) -> None:
try:
"""
IMPLEMENT YOUR VALIDATION HERE
"""
except Exception as e:
raise ToolProviderCredentialValidationError(str(e))
```
* When using OAuth authentication mode, data source plugins differ slightly from tool plugins. When obtaining access permissions via OAuth, data source plugins can simultaneously return the username and avatar to be displayed on the frontend. Therefore, `_oauth_get_credentials` and `_oauth_refresh_credentials` need to return a `DatasourceOAuthCredentials` type that contains `name`, `avatar_url`, `expires_at`, and `credentials`.
The `DatasourceOAuthCredentials` class is defined as follows and must be set to the corresponding type when returned:
```python theme={null}
class DatasourceOAuthCredentials(BaseModel):
name: str | None = Field(None, description="The name of the OAuth credential")
avatar_url: str | None = Field(None, description="The avatar url of the OAuth")
credentials: Mapping[str, Any] = Field(..., description="The credentials of the OAuth")
expires_at: int | None = Field(
default=-1,
description="""The expiration timestamp (in seconds since Unix epoch, UTC) of the credentials.
Set to -1 or None if the credentials do not expire.""",
)
```
The function signatures for `_oauth_get_authorization_url`, `_oauth_get_credentials`, and `_oauth_refresh_credentials` are as follows:
```python theme={null}
def _oauth_get_authorization_url(self, redirect_uri: str, system_credentials: Mapping[str, Any]) -> str:
"""
Generate the authorization URL for {{ .PluginName }} OAuth.
"""
try:
"""
IMPLEMENT YOUR AUTHORIZATION URL GENERATION HERE
"""
except Exception as e:
raise DatasourceOAuthError(str(e))
return ""
```
```python theme={null}
def _oauth_get_credentials(
self, redirect_uri: str, system_credentials: Mapping[str, Any], request: Request
) -> DatasourceOAuthCredentials:
"""
Exchange code for access_token.
"""
try:
"""
IMPLEMENT YOUR CREDENTIALS EXCHANGE HERE
"""
except Exception as e:
raise DatasourceOAuthError(str(e))
return DatasourceOAuthCredentials(
name="",
avatar_url="",
expires_at=-1,
credentials={},
)
```
```python theme={null}
def _oauth_refresh_credentials(
self, redirect_uri: str, system_credentials: Mapping[str, Any], credentials: Mapping[str, Any]
) -> DatasourceOAuthCredentials:
"""
Refresh the credentials
"""
return DatasourceOAuthCredentials(
name="",
avatar_url="",
expires_at=-1,
credentials={},
)
```
### Add the Data Source
The YAML file format and data source code format vary across the three types of data sources.
#### Web Crawler
In the provider YAML file for a web crawler data source plugin, `output_schema` must always return four parameters: `source_url`, `content`, `title`, and `description`.
```yaml theme={null}
output_schema:
type: object
properties:
source_url:
type: string
description: the source url of the website
content:
type: string
description: the content from the website
title:
type: string
description: the title of the website
"description":
type: string
description: the description of the website
```
In the main logic code for a web crawler plugin, the class must inherit from `WebsiteCrawlDatasource` and implement the `_get_website_crawl` method. You then need to use the `create_crawl_message` method to return the web crawl message.
To crawl multiple web pages and return them in batches, you can set `WebSiteInfo.status` to `processing` and use the `create_crawl_message` method to return each batch of crawled pages. After all pages have been crawled, set `WebSiteInfo.status` to `completed`.
```python theme={null}
class YourDataSource(WebsiteCrawlDatasource):
def _get_website_crawl(
self, datasource_parameters: dict[str, Any]
) -> Generator[ToolInvokeMessage, None, None]:
crawl_res = WebSiteInfo(web_info_list=[], status="", total=0, completed=0)
crawl_res.status = "processing"
yield self.create_crawl_message(crawl_res)
### your crawl logic
...
crawl_res.status = "completed"
crawl_res.web_info_list = [
WebSiteInfoDetail(
title="",
source_url="",
description="",
content="",
)
]
crawl_res.total = 1
crawl_res.completed = 1
yield self.create_crawl_message(crawl_res)
```
#### Online Document
The return value for an online document data source plugin must include at least a `content` field to represent the document's content. For example:
```yaml theme={null}
output_schema:
type: object
properties:
workspace_id:
type: string
description: workspace id
page_id:
type: string
description: page id
content:
type: string
description: page content
```
In the main logic code for an online document plugin, the class must inherit from `OnlineDocumentDatasource` and implement two methods: `_get_pages` and `_get_content`.
When a user runs the plugin, it first calls the `_get_pages` method to retrieve a list of documents. After the user selects a document from the list, it then calls the `_get_content` method to fetch the document's content.
```python theme={null}
def _get_pages(self, datasource_parameters: dict[str, Any]) -> DatasourceGetPagesResponse:
# your get pages logic
response = requests.get(url, headers=headers, params=params, timeout=30)
pages = []
for item in response.json().get("results", []):
page = OnlineDocumentPage(
page_name=item.get("title", ""),
page_id=item.get("id", ""),
type="page",
last_edited_time=item.get("version", {}).get("createdAt", ""),
parent_id=item.get("parentId", ""),
page_icon=None,
)
pages.append(page)
online_document_info = OnlineDocumentInfo(
workspace_name=workspace_name,
workspace_icon=workspace_icon,
workspace_id=workspace_id,
pages=[page],
total=pages.length(),
)
return DatasourceGetPagesResponse(result=[online_document_info])
```
```python theme={null}
def _get_content(self, page: GetOnlineDocumentPageContentRequest) -> Generator[DatasourceMessage, None, None]:
# your fetch content logic, example
response = requests.get(url, headers=headers, params=params, timeout=30)
...
yield self.create_variable_message("content", "")
yield self.create_variable_message("page_id", "")
yield self.create_variable_message("workspace_id", "")
```
#### Online Drive
An online drive data source plugin returns a file, so it must adhere to the following specification:
```yaml theme={null}
output_schema:
type: object
properties:
file:
$ref: "https://dify.ai/schemas/v1/file.json"
```
In the main logic code for an online drive plugin, the class must inherit from `OnlineDriveDatasource` and implement two methods: `_browse_files` and `_download_file`.
When a user runs the plugin, it first calls `_browse_files` to get a file list. At this point, `prefix` is empty, indicating a request for the root directory's file list. The file list contains both folder and file type variables. If the user opens a folder, the `_browse_files` method is called again. At this point, the `prefix` in `OnlineDriveBrowseFilesRequest` will be the folder ID used to retrieve the file list within that folder.
After a user selects a file, the plugin uses the `_download_file` method and the file ID to get the file's content. You can use the `_get_mime_type_from_filename` method to get the file's MIME type, allowing the pipeline to handle different file types appropriately.
When the file list contains multiple files, you can set `OnlineDriveFileBucket.is_truncated` to `True` and set `OnlineDriveFileBucket.next_page_parameters` to the parameters needed to fetch the next page of the file list, such as the next page's request ID or URL, depending on the service provider.
```python theme={null}
def _browse_files(
self, request: OnlineDriveBrowseFilesRequest
) -> OnlineDriveBrowseFilesResponse:
credentials = self.runtime.credentials
bucket_name = request.bucket
prefix = request.prefix or "" # Allow empty prefix for root folder; When you browse the folder, the prefix is the folder id
max_keys = request.max_keys or 10
next_page_parameters = request.next_page_parameters or {}
files = []
files.append(OnlineDriveFile(
id="",
name="",
size=0,
type="folder" # or "file"
))
return OnlineDriveBrowseFilesResponse(result=[
OnlineDriveFileBucket(
bucket="",
files=files,
is_truncated=False,
next_page_parameters={}
)
])
```
```python theme={null}
def _download_file(self, request: OnlineDriveDownloadFileRequest) -> Generator[DatasourceMessage, None, None]:
credentials = self.runtime.credentials
file_id = request.id
file_content = bytes()
file_name = ""
mime_type = self._get_mime_type_from_filename(file_name)
yield self.create_blob_message(file_content, meta={
"file_name": file_name,
"mime_type": mime_type
})
def _get_mime_type_from_filename(self, filename: str) -> str:
"""Determine MIME type from file extension."""
import mimetypes
mime_type, _ = mimetypes.guess_type(filename)
return mime_type or "application/octet-stream"
```
For storage services like AWS S3, the `prefix`, `bucket`, and `id` variables have special uses and can be applied flexibly as needed during development:
* `prefix`: Represents the file path prefix. For example, `prefix=container1/folder1/` retrieves the files or file list from the `folder1` folder in the `container1` bucket.
* `bucket`: Represents the file bucket. For example, `bucket=container1` retrieves the files or file list in the `container1` bucket. This field can be left blank for non-standard S3 protocol drives.
* `id`: Since the `_download_file` method does not use the `prefix` variable, the full file path must be included in the `id`. For example, `id=container1/folder1/file1.txt` indicates retrieving the `file1.txt` file from the `folder1` folder in the `container1` bucket.
You can refer to the specific implementations of the [official Google Drive plugin](https://github.com/langgenius/dify-official-plugins/blob/main/datasources/google_cloud_storage/datasources/google_cloud_storage.py) and the [official AWS S3 plugin](https://github.com/langgenius/dify-official-plugins/blob/main/datasources/aws_s3_storage/datasources/aws_s3_storage.py).
## Debug the Plugin
Data source plugins support two debugging methods: remote debugging or installing as a local plugin for debugging. Note the following:
* If the plugin uses OAuth authentication, the `redirect_uri` for remote debugging differs from that of a local plugin. Update the relevant configuration in your service provider's OAuth App accordingly.
* While data source plugins support single-step debugging, we still recommend testing them in a complete knowledge pipeline to ensure full functionality.
## Final Checks
Before packaging and publishing, make sure you've completed all of the following:
* Set the minimum supported Dify version to `1.9.0`.
* Set the SDK version to `dify-plugin>=0.5.0,<0.6.0`.
* Write the `README.md` and `PRIVACY.md` files.
* Include only English content in the code files.
* Replace the default icon with the data source provider's logo.
## Package and Publish
In the plugin directory, run the following command to generate a `.difypkg` plugin package:
```
dify plugin package . -o your_datasource.difypkg
```
Next, you can:
* Import and use the plugin in your Dify environment.
* Publish the plugin to Dify Marketplace by submitting a pull request.
For the plugin publishing process, see [Publishing Plugins](/en/develop-plugin/publishing/marketplace-listing/release-overview).
***
[Edit this page](https://github.com/langgenius/dify-docs/edit/main/en/develop-plugin/dev-guides-and-walkthroughs/datasource-plugin.mdx) | [Report an issue](https://github.com/langgenius/dify-docs/issues/new?template=docs.yml)
# Develop A Slack Bot Plugin
Source: https://docs.dify.ai/en/develop-plugin/dev-guides-and-walkthroughs/develop-a-slack-bot-plugin
This guide provides a complete walkthrough for developing a Slack Bot plugin, covering project initialization, configuration form editing, feature implementation, debugging, endpoint setup, verification, and packaging. You'll need the Dify plugin scaffolding tool and a pre-created Slack App to build an AI-powered chatbot on Slack.
**What You’ll Learn:**
Gain a solid understanding of how to build a Slack Bot that’s powered by AI—one that can respond to user questions right inside Slack. If you haven't developed a plugin before, we recommend reading the [Plugin Development Quick Start Guide](/en/develop-plugin/dev-guides-and-walkthroughs/tool-plugin) first.
### Project Background
The Dify plugin ecosystem focuses on making integrations simpler and more accessible. In this guide, we’ll use Slack as an example, walking you through the process of developing a Slack Bot plugin. This allows your team to chat directly with an LLM within Slack, significantly improving how efficiently they can use AI.
Slack is an open, real-time communication platform with a robust API. Among its features is a webhook-based event system, which is quite straightforward to develop on. We’ll leverage this system to create a Slack Bot plugin, illustrated in the diagram below:

> To avoid confusion, the following concepts are explained:
>
> * **Slack Bot** A chatbot on the Slack platform, acting as a virtual user you can interact with in real-time.
> * **Slack Bot Plugin** A plugin in the Dify Marketplace that connects a Dify application with Slack. This guide focuses on how to develop that plugin.
**How It Works (A Simple Overview):**
1. **Send a Message to the Slack Bot**
When a user in Slack sends a message to the Bot, the Slack Bot immediately issues a webhook request to the Dify platform.
2. **Forward the Message to the Slack Bot Plugin**
The Dify platform triggers the Slack Bot plugin, which relays the details to the Dify application—similar to entering a recipient’s address in an email system. By setting up a Slack webhook address through Slack’s API and entering it in the Slack Bot plugin, you establish this connection. The plugin then processes the Slack request and sends it on to the Dify application, where the LLM analyzes the user’s input and generates a response.
3. **Return the Response to Slack**
Once the Slack Bot plugin receives the reply from the Dify application, it sends the LLM’s answer back through the same route to the Slack Bot. Users in Slack then see a more intelligent, interactive experience right where they’re chatting.
### Prerequisites
* **Dify plugin developing tool**: For more information, see [Initializing the Development Tool](/en/develop-plugin/getting-started/cli).
* **Python environment (version 3.12)**: Refer to the [Python official downloads page](https://www.python.org/downloads/) or ask an LLM for a complete setup guide.
* Create a Slack App and Get an OAuth Token
Go to the [Slack API platform](https://api.slack.com/apps), create a Slack app from scratch, and pick the workspace where it will be deployed.

1. **Enable Webhooks:**

2. **Install the App in Your Slack Workspace:**

3. **Obtain an OAuth Token** for future plugin development:

### 1. Developing the Plugin
Now we’ll dive into the actual coding. Before starting, make sure you’ve read [Quick Start: Developing an Extension Plugin](/en/develop-plugin/dev-guides-and-walkthroughs/endpoint) or have already built a Dify plugin before.
#### 1.1 Initialize the Project
Run the following command to set up your plugin development environment:
```bash theme={null}
dify plugin init
```
Follow the prompts to provide basic project info. Select the `extension` template, and grant both `Apps` and `Endpoints` permissions.
For additional details on reverse-invoking Dify services within a plugin, see [Reverse Invocation: App](/en/develop-plugin/features-and-specs/advanced-development/reverse-invocation-app).

#### 1.2 Edit the Configuration Form
This plugin needs to know which Dify app should handle the replies, as well as the Slack App token to authenticate the bot’s responses. Therefore, you’ll add these two fields to the plugin’s form.
Modify the YAML file in the group directory—for example, `group/slack.yaml`. The form’s filename is determined by the info you provided when creating the plugin, so adjust it accordingly.
**Sample Code:**
`slack.yaml`
```yaml theme={null}
settings:
- name: bot_token
type: secret-input
required: true
label:
en_US: Bot Token
zh_Hans: Bot Token
pt_BR: Token do Bot
ja_JP: Bot Token
placeholder:
en_US: Please input your Bot Token
zh_Hans: 请输入你的 Bot Token
pt_BR: Por favor, insira seu Token do Bot
ja_JP: ボットトークンを入力してください
- name: allow_retry
type: boolean
required: false
label:
en_US: Allow Retry
zh_Hans: 允许重试
pt_BR: Permitir Retentativas
ja_JP: 再試行を許可
default: false
- name: app
type: app-selector
required: true
label:
en_US: App
zh_Hans: 应用
pt_BR: App
ja_JP: アプリ
placeholder:
en_US: the app you want to use to answer Slack messages
zh_Hans: 你想要用来回答 Slack 消息的应用
pt_BR: o app que você deseja usar para responder mensagens do Slack
ja_JP: あなたが Slack メッセージに回答するために使用するアプリ
endpoints:
- endpoints/slack.yaml
```
Explanation of the Configuration Fields:
```
- name: app
type: app-selector
scope: chat
```
* **type**: Set to app-selector, which allows users to forward messages to a specific Dify app when using this plugin.
* **scope**: Set to chat, meaning the plugin can only interact with app types such as agent, chatbot, or chatflow.
Finally, in the `endpoints/slack.yaml` file, change the request method to POST to handle incoming Slack messages properly.
**Sample Code:**
`endpoints/slack.yaml`
```yaml theme={null}
path: "/"
method: "POST"
extra:
python:
source: "endpoints/slack.py"
```
### 2. Edit the function code
Modify the `endpoints/slack.py` file and add the following code:
```python theme={null}
import json
import traceback
from typing import Mapping
from werkzeug import Request, Response
from dify_plugin import Endpoint
from slack_sdk import WebClient
from slack_sdk.errors import SlackApiError
class SlackEndpoint(Endpoint):
def _invoke(self, r: Request, values: Mapping, settings: Mapping) -> Response:
"""
Invokes the endpoint with the given request.
"""
retry_num = r.headers.get("X-Slack-Retry-Num")
if (not settings.get("allow_retry") and (r.headers.get("X-Slack-Retry-Reason") == "http_timeout" or ((retry_num is not None and int(retry_num) > 0)))):
return Response(status=200, response="ok")
data = r.get_json()
# Handle Slack URL verification challenge
if data.get("type") == "url_verification":
return Response(
response=json.dumps({"challenge": data.get("challenge")}),
status=200,
content_type="application/json"
)
if (data.get("type") == "event_callback"):
event = data.get("event")
if (event.get("type") == "app_mention"):
message = event.get("text", "")
if message.startswith("<@"):
message = message.split("> ", 1)[1] if "> " in message else message
channel = event.get("channel", "")
blocks = event.get("blocks", [])
blocks[0]["elements"][0]["elements"] = blocks[0].get("elements")[0].get("elements")[1:]
token = settings.get("bot_token")
client = WebClient(token=token)
try:
response = self.session.app.chat.invoke(
app_id=settings["app"]["app_id"],
query=message,
inputs={},
response_mode="blocking",
)
try:
blocks[0]["elements"][0]["elements"][0]["text"] = response.get("answer")
result = client.chat_postMessage(
channel=channel,
text=response.get("answer"),
blocks=blocks
)
return Response(
status=200,
response=json.dumps(result),
content_type="application/json"
)
except SlackApiError as e:
raise e
except Exception as e:
err = traceback.format_exc()
return Response(
status=200,
response="Sorry, I'm having trouble processing your request. Please try again later." + str(err),
content_type="text/plain",
)
else:
return Response(status=200, response="ok")
else:
return Response(status=200, response="ok")
else:
return Response(status=200, response="ok")
```
### 3. Debug the Plugin
Go to the Dify platform and obtain the remote debugging address and key for your plugin.

Back in your plugin project, copy the `.env.example` file and rename it to `.env`.
```bash theme={null}
INSTALL_METHOD=remote
REMOTE_INSTALL_URL=debug.dify.ai:5003
REMOTE_INSTALL_KEY=********-****-****-****-************
```
Run `python -m main` to start the plugin. You should now see your plugin installed in the Workspace on Dify’s plugin management page. Other team members will also be able to access it.
```bash theme={null}
python -m main
```
#### Configure the Plugin Endpoint
From the plugin management page in Dify, locate the newly installed test plugin and create a new endpoint. Provide a name, a Bot token, and select the app you want to connect.

After saving, a **POST** request URL is generated:

Next, complete the Slack App setup:
1. **Enable Event Subscriptions**

Paste the POST request URL you generated above.

2. **Grant Required Permissions**

***
### 4. Verify the Plugin
In your code, `self.session.app.chat.invoke` is used to call the Dify application, passing in parameters such as `app_id` and `query`. The response is then returned to the Slack Bot. Run `python -m main` again to restart your plugin for debugging, and check whether Slack correctly displays the Dify App’s reply:

***
### 5. Package the Plugin (Optional)
Once you confirm that the plugin works correctly, you can package and name it via the following command. After it runs, you’ll find a `slack_bot.difypkg` file in the current directory—your final plugin package. For detailed packaging steps, refer to [Package as a Local File and Share](/en/develop-plugin/publishing/marketplace-listing/release-by-file).
```bash theme={null}
# Replace ./slack_bot with your actual plugin project path.
dify plugin package ./slack_bot
```
Congratulations! You’ve successfully developed, tested, and packaged a plugin!
***
### 6. Publish the Plugin (Optional)
You can now upload it to the [Dify Marketplace repository](https://github.com/langgenius/dify-plugins) for public release. Before publishing, ensure your plugin meets the [Publishing to Dify Marketplace Guidelines](/en/develop-plugin/publishing/marketplace-listing/release-to-dify-marketplace). Once approved, your code is merged into the main branch, and the plugin goes live on the [Dify Marketplace](https://marketplace.dify.ai/).
***
## Related Resources
* [Plugin Development Basics](/en/develop-plugin/getting-started/getting-started-dify-plugin) - Comprehensive overview of Dify plugin development
* [Plugin Development Quick Start Guide](/en/develop-plugin/dev-guides-and-walkthroughs/tool-plugin) - Start developing plugins from scratch
* [Develop an Extension Plugin](/en/develop-plugin/dev-guides-and-walkthroughs/endpoint) - Learn about extension plugin development
* [Reverse Invocation of Dify Services](/en/develop-plugin/features-and-specs/advanced-development/reverse-invocation) - Understand how to call Dify platform capabilities
* [Reverse Invocation: App](/en/develop-plugin/features-and-specs/advanced-development/reverse-invocation-app) - Learn how to call apps within the platform
* [Publishing Plugins](/en/develop-plugin/publishing/marketplace-listing/release-overview) - Learn the publishing process
* [Publishing to Dify Marketplace](/en/develop-plugin/publishing/marketplace-listing/release-to-dify-marketplace) - Marketplace publishing guide
* [Endpoint Detailed Definition](/en/develop-plugin/dev-guides-and-walkthroughs/endpoint) - Detailed Endpoint definition
### Further Reading
For a complete Dify plugin project example, visit the [GitHub repository](https://github.com/langgenius/dify-plugins). You’ll also find additional plugins with full source code and implementation details.
If you want to explore more about plugin development, check the following:
**Quick Starts:**
* [Develop an Extension Plugin](/en/develop-plugin/dev-guides-and-walkthroughs/endpoint)
* [Develop a Model Plugin](/en/develop-plugin/dev-guides-and-walkthroughs/creating-new-model-provider)
* [Bundle Plugins: Packaging Multiple Plugins](/en/develop-plugin/features-and-specs/advanced-development/bundle)
**Plugin Interface Docs:**
* [Defining Plugin Information via Manifest File](/en/develop-plugin/features-and-specs/plugin-types/plugin-info-by-manifest) - Manifest structure
* [Endpoint](/en/develop-plugin/dev-guides-and-walkthroughs/endpoint) - Endpoint detailed definition
* [Reverse Invocation](/en/develop-plugin/features-and-specs/advanced-development/reverse-invocation) - Reverse-calling Dify capabilities
* [General Specifications](/en/develop-plugin/features-and-specs/plugin-types/general-specifications) - Tool specifications
* [Model Schema](/en/develop-plugin/features-and-specs/plugin-types/model-schema) - Model
***
[Edit this page](https://github.com/langgenius/dify-docs/edit/main/en/develop-plugin/dev-guides-and-walkthroughs/develop-a-slack-bot-plugin.mdx) | [Report an issue](https://github.com/langgenius/dify-docs/issues/new?template=docs.yml)
# 10-Minute Guide to Building Dify Plugins
Source: https://docs.dify.ai/en/develop-plugin/dev-guides-and-walkthroughs/develop-flomo-plugin
Learn how to build a functional Dify plugin that connects with Flomo note-taking service in just 10 minutes
## What you'll build
By the end of this guide, you'll have created a Dify plugin that:
* Connects to the Flomo note-taking API
* Allows users to save notes from AI conversations directly to Flomo
* Handles authentication and error states properly
* Is ready for distribution in the Dify Marketplace
10 minutes
Basic Python knowledge and a Flomo account
## Step 1: Install the Dify CLI and create a project
```bash theme={null}
brew tap langgenius/dify
brew install dify
```
Get the latest Dify CLI from the [Dify GitHub releases page](https://github.com/langgenius/dify-plugin-daemon/releases)
```bash theme={null}
# Download appropriate version
chmod +x dify-plugin-linux-amd64
mv dify-plugin-linux-amd64 dify
sudo mv dify /usr/local/bin/
```
Verify installation:
```bash theme={null}
dify version
```
Create a new plugin project using:
```bash theme={null}
dify plugin init
```
Follow the prompts to set up your plugin:
* Name it "flomo"
* Select "tool" as the plugin type
* Complete other required fields
```bash theme={null}
cd flomo
```
This will create the basic structure for your plugin with all necessary files.
## Step 2: Define your plugin manifest
The manifest.yaml file defines your plugin's metadata, permissions, and capabilities.
Create a `manifest.yaml` file:
```yaml theme={null}
version: 0.0.4
type: plugin
author: yourname
label:
en_US: Flomo
zh_Hans: Flomo 浮墨笔记
created_at: "2023-10-01T00:00:00Z"
icon: icon.png
resource:
memory: 67108864 # 64MB
permission:
storage:
enabled: false
plugins:
tools:
- flomo.yaml
meta:
version: 0.0.1
arch:
- amd64
- arm64
runner:
language: python
version: 3.12
entrypoint: main
```
## Step 3: Create the tool definition
Create a `flomo.yaml` file to define your tool interface:
```yaml theme={null}
identity:
author: yourname
name: flomo
label:
en_US: Flomo Note
zh_Hans: Flomo 浮墨笔记
description:
human:
en_US: Add notes to your Flomo account directly from Dify.
zh_Hans: 直接从Dify添加笔记到您的Flomo账户。
llm: >
A tool that allows users to save notes to Flomo. Use this tool when users want to save important information from the conversation. The tool accepts a 'content' parameter that contains the text to be saved as a note.
credential_schema:
api_url:
type: string
required: true
label:
en_US: API URL
zh_Hans: API URL
human_description:
en_US: Flomo API URL from your Flomo account settings.
zh_Hans: 从您的Flomo账户设置中获取的API URL。
tool_schema:
content:
type: string
required: true
label:
en_US: Note Content
zh_Hans: 笔记内容
human_description:
en_US: Content to save as a note in Flomo.
zh_Hans: 要保存为Flomo笔记的内容。
```
## Step 4: Implement core utility functions
Create a utility module in `utils/flomo_utils.py` for API interaction:
```python utils/flomo_utils.py theme={null}
import requests
def send_flomo_note(api_url: str, content: str) -> None:
"""
Send a note to Flomo via the API URL. Raises requests.RequestException on network errors,
and ValueError on invalid status codes or input.
"""
api_url = api_url.strip()
if not api_url:
raise ValueError("API URL is required and cannot be empty.")
if not api_url.startswith('https://flomoapp.com/iwh/'):
raise ValueError(
"API URL should be in the format: https://flomoapp.com/iwh/{token}/{secret}/"
)
if not content:
raise ValueError("Content cannot be empty.")
headers = {'Content-Type': 'application/json'}
response = requests.post(api_url, json={"content": content}, headers=headers, timeout=10)
if response.status_code != 200:
raise ValueError(f"API URL is not valid. Received status code: {response.status_code}")
```
## Step 5: Implement the Tool Provider
The Tool Provider handles credential validation. Create `provider/flomo.py`:
```python provider/flomo.py theme={null}
from typing import Any
from dify_plugin import ToolProvider
from dify_plugin.errors.tool import ToolProviderCredentialValidationError
import requests
from utils.flomo_utils import send_flomo_note
class FlomoProvider(ToolProvider):
def _validate_credentials(self, credentials: dict[str, Any]) -> None:
try:
api_url = credentials.get('api_url', '').strip()
# Use utility for validation and sending test note
send_flomo_note(api_url, "Hello, #flomo https://flomoapp.com")
except ValueError as e:
raise ToolProviderCredentialValidationError(str(e))
except requests.RequestException as e:
raise ToolProviderCredentialValidationError(f"Connection error: {str(e)}")
```
## Step 6: Implement the Tool
The Tool class handles actual API calls when the user invokes the plugin. Create `tools/flomo.py`:
```python tools/flomo.py theme={null}
from collections.abc import Generator
from typing import Any
from dify_plugin import Tool
from dify_plugin.entities.tool import ToolInvokeMessage
import requests
from utils.flomo_utils import send_flomo_note
class FlomoTool(Tool):
def _invoke(self, tool_parameters: dict[str, Any]) -> Generator[ToolInvokeMessage]:
content = tool_parameters.get("content", "")
api_url = self.runtime.credentials.get("api_url", "")
try:
send_flomo_note(api_url, content)
except ValueError as e:
yield self.create_text_message(str(e))
return
except requests.RequestException as e:
yield self.create_text_message(f"Connection error: {str(e)}")
return
# Return success message and structured data
yield self.create_text_message(
"Note created successfully! Your content has been sent to Flomo."
)
yield self.create_json_message({
"status": "success",
"content": content,
})
```
Always handle exceptions gracefully and return user-friendly error messages. Remember that your plugin represents your brand in the Dify ecosystem.
## Step 7: Test your plugin
Copy the example environment file:
```bash theme={null}
cp .env.example .env
```
Edit the `.env` file with your Dify environment details:
```
INSTALL_METHOD=remote
REMOTE_INSTALL_HOST=debug-plugin.dify.dev
REMOTE_INSTALL_PORT=5003
REMOTE_INSTALL_KEY=your_debug_key
```
You can find your debug key and host in the Dify dashboard: click the "Plugins" icon in the top right corner, then click the debug icon. In the pop-up window, copy the "API Key" and "Host Address".
```bash theme={null}
pip install -r requirements.txt
python -m main
```
Your plugin will connect to your Dify instance in debug mode.
In your Dify instance, navigate to plugins and find your debugging plugin (marked as "debugging").
Add your Flomo API credentials and test sending a note.
## Step 8: Package and distribute
When you're ready to share your plugin:
```bash theme={null}
dify plugin package ./
```
This creates a `plugin.difypkg` file you can upload to the Dify Marketplace.
## FAQ and Troubleshooting
Make sure your `.env` file is properly configured and you're using the correct debug key.
Double-check your Flomo API URL format. It should be in the form: `https://flomoapp.com/iwh/{token}/{secret}/`
Ensure all required files are present and the manifest.yaml structure is valid.
## Summary
You've built a functioning Dify plugin that connects with an external API service! This same pattern works for integrating with thousands of services - from databases and search engines to productivity tools and custom APIs.
Write your README.md in English (en\_US) describing functionality, setup, and usage examples
Create additional README files like `readme/README_zh_Hans.md` for other languages
Add a privacy policy (PRIVACY.md) if publishing your plugin
Include comprehensive examples in documentation
Test thoroughly with various document sizes and formats
***
[Edit this page](https://github.com/langgenius/dify-docs/edit/main/en/develop-plugin/dev-guides-and-walkthroughs/develop-flomo-plugin.mdx) | [Report an issue](https://github.com/langgenius/dify-docs/issues/new?template=docs.yml)
# Building a Markdown Exporter Plugin
Source: https://docs.dify.ai/en/develop-plugin/dev-guides-and-walkthroughs/develop-md-exporter
Learn how to create a plugin that exports conversations to different document formats
## What you'll build
In this guide, you'll learn how to build a practical Dify plugin that exports conversations into popular document formats. By the end, your plugin will:
* Convert markdown text to Word documents (.docx)
* Export conversations as PDF files
* Handle file creation with proper formatting
* Provide a clean user experience for document exports
15 minutes
Basic Python knowledge and familiarity with document manipulation libraries
## Step 1: Set up your environment
```bash theme={null}
brew tap langgenius/dify
brew install dify
```
Get the latest Dify CLI from the [Dify GitHub releases page](https://github.com/langgenius/dify-plugin-daemon/releases)
```bash theme={null}
# Download appropriate version
chmod +x dify-plugin-linux-amd64
mv dify-plugin-linux-amd64 dify
sudo mv dify /usr/local/bin/
```
Verify installation:
```bash theme={null}
dify version
```
Initialize a new plugin project:
```bash theme={null}
dify plugin init
```
Follow the prompts:
* Name: "md\_exporter"
* Type: "tool"
* Complete other details as prompted
## Step 2: Define plugin manifest
Create the `manifest.yaml` file to define your plugin's metadata:
```yaml theme={null}
version: 0.0.4
type: plugin
author: your_username
label:
en_US: Markdown Exporter
zh_Hans: Markdown导出工具
created_at: "2025-09-30T00:00:00Z"
icon: icon.png
resource:
memory: 134217728 # 128MB
permission:
storage:
enabled: true # We need storage for temp files
plugins:
tools:
- word_export.yaml
- pdf_export.yaml
meta:
version: 0.0.1
arch:
- amd64
- arm64
runner:
language: python
version: 3.12
entrypoint: main
```
## Step 3: Define the Word export tool
Create a `word_export.yaml` file to define the Word document export tool:
```yaml theme={null}
identity:
author: your_username
name: word_export
label:
en_US: Export to Word
zh_Hans: 导出为Word文档
description:
human:
en_US: Export conversation content to a Word document (.docx)
zh_Hans: 将对话内容导出为Word文档(.docx)
llm: >
A tool that converts markdown text to a Word document (.docx) format.
Use this tool when the user wants to save or export the conversation
content as a Word document. The input text should be in markdown format.
credential_schema: {} # No credentials needed
tool_schema:
markdown_content:
type: string
required: true
label:
en_US: Markdown Content
zh_Hans: Markdown内容
human_description:
en_US: The markdown content to convert to Word format
zh_Hans: 要转换为Word格式的Markdown内容
document_name:
type: string
required: false
label:
en_US: Document Name
zh_Hans: 文档名称
human_description:
en_US: Name for the exported document (without extension)
zh_Hans: 导出文档的名称(无需扩展名)
```
## Step 4: Define the PDF export tool
Create a `pdf_export.yaml` file for PDF exports:
```yaml theme={null}
identity:
author: your_username
name: pdf_export
label:
en_US: Export to PDF
zh_Hans: 导出为PDF文档
description:
human:
en_US: Export conversation content to a PDF document
zh_Hans: 将对话内容导出为PDF文档
llm: >
A tool that converts markdown text to a PDF document.
Use this tool when the user wants to save or export the conversation
content as a PDF file. The input text should be in markdown format.
credential_schema: {} # No credentials needed
tool_schema:
markdown_content:
type: string
required: true
label:
en_US: Markdown Content
zh_Hans: Markdown内容
human_description:
en_US: The markdown content to convert to PDF format
zh_Hans: 要转换为PDF格式的Markdown内容
document_name:
type: string
required: false
label:
en_US: Document Name
zh_Hans: 文档名称
human_description:
en_US: Name for the exported document (without extension)
zh_Hans: 导出文档的名称(无需扩展名)
```
## Step 5: Install required dependencies
Create or update `requirements.txt` with the necessary libraries:
```text theme={null}
python-docx>=0.8.11
markdown>=3.4.1
weasyprint>=59.0
beautifulsoup4>=4.12.2
```
## Step 6: Implement the Word export functionality
Create a utility module in `utils/docx_utils.py`:
```python utils/docx_utils.py theme={null}
import os
import tempfile
import uuid
from docx import Document
from docx.shared import Pt
from docx.enum.text import WD_PARAGRAPH_ALIGNMENT
import markdown
from bs4 import BeautifulSoup
def convert_markdown_to_docx(markdown_text, document_name=None):
"""
Convert markdown text to a Word document and return the file path
"""
if not document_name:
document_name = f"exported_document_{uuid.uuid4().hex[:8]}"
# Convert markdown to HTML
html = markdown.markdown(markdown_text)
soup = BeautifulSoup(html, 'html.parser')
# Create a new Word document
doc = Document()
# Process HTML elements and add to document
for element in soup.find_all(['h1', 'h2', 'h3', 'h4', 'p', 'ul', 'ol']):
if element.name == 'h1':
heading = doc.add_heading(element.text.strip(), level=1)
heading.alignment = WD_PARAGRAPH_ALIGNMENT.CENTER
elif element.name == 'h2':
doc.add_heading(element.text.strip(), level=2)
elif element.name == 'h3':
doc.add_heading(element.text.strip(), level=3)
elif element.name == 'h4':
doc.add_heading(element.text.strip(), level=4)
elif element.name == 'p':
paragraph = doc.add_paragraph(element.text.strip())
elif element.name in ('ul', 'ol'):
for li in element.find_all('li'):
doc.add_paragraph(li.text.strip(), style='ListBullet')
# Create temp directory if it doesn't exist
temp_dir = tempfile.gettempdir()
if not os.path.exists(temp_dir):
os.makedirs(temp_dir)
# Save the document
file_path = os.path.join(temp_dir, f"{document_name}.docx")
doc.save(file_path)
return file_path
```
## Step 7: Implement the PDF export functionality
Create a utility module in `utils/pdf_utils.py`:
```python utils/pdf_utils.py theme={null}
import os
import tempfile
import uuid
import markdown
from weasyprint import HTML, CSS
from weasyprint.text.fonts import FontConfiguration
def convert_markdown_to_pdf(markdown_text, document_name=None):
"""
Convert markdown text to a PDF document and return the file path
"""
if not document_name:
document_name = f"exported_document_{uuid.uuid4().hex[:8]}"
# Convert markdown to HTML
html_content = markdown.markdown(markdown_text)
# Add basic styling
styled_html = f"""
{document_name}
{html_content}
"""
# Create temp directory if it doesn't exist
temp_dir = tempfile.gettempdir()
if not os.path.exists(temp_dir):
os.makedirs(temp_dir)
# Output file path
file_path = os.path.join(temp_dir, f"{document_name}.pdf")
# Configure fonts
font_config = FontConfiguration()
# Render PDF
HTML(string=styled_html).write_pdf(
file_path,
stylesheets=[],
font_config=font_config
)
return file_path
```
## Step 8: Create tool implementations
First, create the Word export tool in `tools/word_export.py`:
```python tools/word_export.py theme={null}
import os
import base64
from collections.abc import Generator
from typing import Any
from dify_plugin import Tool
from dify_plugin.entities.tool import ToolInvokeMessage
from utils.docx_utils import convert_markdown_to_docx
class WordExportTool(Tool):
def _invoke(self, tool_parameters: dict[str, Any]) -> Generator[ToolInvokeMessage]:
# Extract parameters
markdown_content = tool_parameters.get("markdown_content", "")
document_name = tool_parameters.get("document_name", "exported_document")
if not markdown_content:
yield self.create_text_message("Error: No content provided for export.")
return
try:
# Convert markdown to Word
file_path = convert_markdown_to_docx(markdown_content, document_name)
# Read the file as binary
with open(file_path, 'rb') as file:
file_content = file.read()
# Encode as base64
file_base64 = base64.b64encode(file_content).decode('utf-8')
# Return success message and file
yield self.create_text_message(
f"Document exported successfully as Word (.docx) format."
)
yield self.create_file_message(
file_name=f"{document_name}.docx",
file_content=file_base64,
mime_type="application/vnd.openxmlformats-officedocument.wordprocessingml.document"
)
except Exception as e:
yield self.create_text_message(f"Error exporting to Word: {str(e)}")
return
```
Next, create the PDF export tool in `tools/pdf_export.py`:
```python tools/pdf_export.py theme={null}
import os
import base64
from collections.abc import Generator
from typing import Any
from dify_plugin import Tool
from dify_plugin.entities.tool import ToolInvokeMessage
from utils.pdf_utils import convert_markdown_to_pdf
class PDFExportTool(Tool):
def _invoke(self, tool_parameters: dict[str, Any]) -> Generator[ToolInvokeMessage]:
# Extract parameters
markdown_content = tool_parameters.get("markdown_content", "")
document_name = tool_parameters.get("document_name", "exported_document")
if not markdown_content:
yield self.create_text_message("Error: No content provided for export.")
return
try:
# Convert markdown to PDF
file_path = convert_markdown_to_pdf(markdown_content, document_name)
# Read the file as binary
with open(file_path, 'rb') as file:
file_content = file.read()
# Encode as base64
file_base64 = base64.b64encode(file_content).decode('utf-8')
# Return success message and file
yield self.create_text_message(
f"Document exported successfully as PDF format."
)
yield self.create_file_message(
file_name=f"{document_name}.pdf",
file_content=file_base64,
mime_type="application/pdf"
)
except Exception as e:
yield self.create_text_message(f"Error exporting to PDF: {str(e)}")
return
```
## Step 9: Create the entrypoint
Create a `main.py` file at the root of your project:
```python main.py theme={null}
from dify_plugin import PluginRunner
from tools.word_export import WordExportTool
from tools.pdf_export import PDFExportTool
plugin = PluginRunner(
tools=[
WordExportTool(),
PDFExportTool(),
],
providers=[] # No credential providers needed
)
```
## Step 10: Test your plugin
First, create your `.env` file from the template:
```bash theme={null}
cp .env.example .env
```
Configure it with your Dify environment details:
```
INSTALL_METHOD=remote
REMOTE_INSTALL_HOST=debug-plugin.dify.dev
REMOTE_INSTALL_PORT=5003
REMOTE_INSTALL_KEY=your_debug_key
```
```bash theme={null}
pip install -r requirements.txt
```
```bash theme={null}
python -m main
```
## Step 11: Package for distribution
When you're ready to share your plugin:
```bash theme={null}
dify plugin package ./
```
This creates a `plugin.difypkg` file for distribution.
## Creative use cases
Use this plugin to convert analysis summaries into professional reports for clients
Export coaching or consulting session notes as formatted documents
## Beyond the basics
Here are some interesting ways to extend this plugin:
* **Custom templates**: Add company branding or personalized styles
* **Multi-format support**: Expand to export as HTML, Markdown, or other formats
* **Image handling**: Process and include images from conversations
* **Table support**: Implement proper formatting for data tables
* **Collaborative editing**: Add integration with Google Docs or similar platforms
The core challenge in document conversion is maintaining formatting and structure. The approach used in this plugin first converts markdown to HTML (an intermediate format), then processes that HTML into the target format.
This two-step process provides flexibility—you could extend it to support additional formats by simply adding new output modules that work with the HTML representation.
For PDF generation, WeasyPrint was chosen because it offers high-quality PDF rendering with CSS support. For Word documents, python-docx provides granular control over document structure.
## Summary
You've built a practical plugin that adds real value to the Dify platform by enabling users to export conversations in professional document formats. This functionality bridges the gap between AI conversations and traditional document workflows.
Write your README.md in English (en\_US) describing functionality, setup, and usage examples
Create additional README files like `readme/README_zh_Hans.md` for other languages
Add a privacy policy (PRIVACY.md) if publishing your plugin
Include comprehensive examples in documentation
Test thoroughly with various document sizes and formats
***
[Edit this page](https://github.com/langgenius/dify-docs/edit/main/en/develop-plugin/dev-guides-and-walkthroughs/develop-md-exporter.mdx) | [Report an issue](https://github.com/langgenius/dify-docs/issues/new?template=docs.yml)
# Build Tool Plugins for Multimodal Data Processing in Knowledge Pipelines
Source: https://docs.dify.ai/en/develop-plugin/dev-guides-and-walkthroughs/develop-multimodal-data-processing-tool
In knowledge pipelines, the Knowledge Base node supports input in two multimodal data formats: `multimodal-Parent-Child` and `multimodal-General`.
When developing a tool plugin for multimodal data processing, to ensure that the plugin's multimodal output (such as text, images, audio, video, etc.) can be correctly recognized and embedded by the Knowledge Base node, you need to complete the following configuration:
* **In the tool code file**, call the tool session interface to upload files and construct the `files` object.
* **In the tool provider YAML file**, declare the `output_schema` as either `multimodal-Parent-Child` or `multimodal-General`.
## Upload Files and Construct File Objects
When processing multimodal data (such as images), you need to first upload the file using Dify's tool session tool to obtain the file metadata.
The following example uses the official Dify plugin, **Dify Extractor**, to demonstrate how to upload a file and construct a `files` object.
```python theme={null}
# Upload the file using the tool session
file_res = self._tool.session.file.upload(
file_name, # filename
file_blob, # file binary data
mime_type, # MIME type, e.g., "image/png"
)
# Generate a Markdown image reference using the file preview URL
image_url = f""
```
The upload interface returns an `UploadFileResponse` object containing the file information. Its structure is as follows:
```python theme={null}
from enum import Enum
from pydantic import BaseModel
class UploadFileResponse(BaseModel):
class Type(str, Enum):
DOCUMENT = "document"
IMAGE = "image"
VIDEO = "video"
AUDIO = "audio"
@classmethod
def from_mime_type(cls, mime_type: str):
if mime_type.startswith("image/"):
return cls.IMAGE
if mime_type.startswith("video/"):
return cls.VIDEO
if mime_type.startswith("audio/"):
return cls.AUDIO
return cls.DOCUMENT
id: str
name: str
size: int
extension: str
mime_type: str
type: Type | None = None
preview_url: str | None = None
```
You can map the file information (such as `name`, `size`, `extension`, `mime_type`, etc.) to the `files` field in the multimodal output structure.
```yaml multimodal_parent_child_structure highlight={22-62} expandable theme={null}
{
"$id": "https://dify.ai/schemas/v1/multimodal_parent_child_structure.json",
"$schema": "http://json-schema.org/draft-07/schema#",
"version": "1.0.0",
"type": "object",
"title": "Multimodal Parent-Child Structure",
"description": "Schema for multimodal parent-child structure (v1)",
"properties": {
"parent_mode": {
"type": "string",
"description": "The mode of parent-child relationship"
},
"parent_child_chunks": {
"type": "array",
"items": {
"type": "object",
"properties": {
"parent_content": {
"type": "string",
"description": "The parent content"
},
"files": {
"type": "array",
"items": {
"type": "object",
"properties": {
"name": {
"type": "string",
"description": "file name"
},
"size": {
"type": "number",
"description": "file size"
},
"extension": {
"type": "string",
"description": "file extension"
},
"type": {
"type": "string",
"description": "file type"
},
"mime_type": {
"type": "string",
"description": "file mime type"
},
"transfer_method": {
"type": "string",
"description": "file transfer method"
},
"url": {
"type": "string",
"description": "file url"
},
"related_id": {
"type": "string",
"description": "file related id"
}
},
"required": ["name", "size", "extension", "type", "mime_type", "transfer_method", "url", "related_id"]
},
"description": "List of files"
},
"child_contents": {
"type": "array",
"items": {
"type": "string"
},
"description": "List of child contents"
}
},
"required": ["parent_content", "child_contents"]
},
"description": "List of parent-child chunk pairs"
}
},
"required": ["parent_mode", "parent_child_chunks"]
}
```
```yaml multimodal_general_structure highlight={18-56} expandable theme={null}
{
"$id": "https://dify.ai/schemas/v1/multimodal_general_structure.json",
"$schema": "http://json-schema.org/draft-07/schema#",
"version": "1.0.0",
"type": "array",
"title": "Multimodal General Structure",
"description": "Schema for multimodal general structure (v1) - array of objects",
"properties": {
"general_chunks": {
"type": "array",
"items": {
"type": "object",
"properties": {
"content": {
"type": "string",
"description": "The content"
},
"files": {
"type": "array",
"items": {
"type": "object",
"properties": {
"name": {
"type": "string",
"description": "file name"
},
"size": {
"type": "number",
"description": "file size"
},
"extension": {
"type": "string",
"description": "file extension"
},
"type": {
"type": "string",
"description": "file type"
},
"mime_type": {
"type": "string",
"description": "file mime type"
},
"transfer_method": {
"type": "string",
"description": "file transfer method"
},
"url": {
"type": "string",
"description": "file url"
},
"related_id": {
"type": "string",
"description": "file related id"
}
},
"description": "List of files"
}
}
},
"required": ["content"]
},
"description": "List of content and files"
}
}
}
```
## Declare Multimodal Output Structure
The structure of multimodal data is defined by Dify's official JSON schema.
To enable the Knowledge Base node to recognize the plugin's multimodal output type, you need to point the `result` field under `output_schema` in the plugin's provider YAML file to the corresponding official schema URL.
```yaml theme={null}
output_schema:
type: object
properties:
result:
# multimodal-Parent-Child
$ref: "https://dify.ai/schemas/v1/multimodal_parent_child_structure.json"
# multimodal-General
# $ref: "https://dify.ai/schemas/v1/multimodal_general_structure.json"
```
Taking `multimodal-Parent-Child` as an example, a complete YAML configuration is as follows:
```yaml expandable theme={null}
identity:
name: multimodal_tool
author: langgenius
label:
en_US: multimodal tool
zh_Hans: 多模态提取器
pt_BR: multimodal tool
description:
human:
en_US: Process documents into multimodal-Parent-Child chunk structures
zh_Hans: 将文档处理为多模态父子分块结构
pt_BR: Processar documentos em estruturas de divisão pai-filho
llm: Processes documents into hierarchical multimodal-Parent-Child chunk structures
parameters:
- name: input_text
human_description:
en_US: The text you want to chunk.
zh_Hans: 输入文本
pt_BR: Conteúdo de Entrada
label:
en_US: Input Content
zh_Hans: 输入文本
pt_BR: Conteúdo de Entrada
llm_description: The text you want to chunk.
required: true
type: string
form: llm
output_schema:
type: object
properties:
result:
$ref: "https://dify.ai/schemas/v1/multimodal_parent_child_structure.json"
extra:
python:
source: tools/parent_child_chunk.py
```
# Neko Cat Endpoint
Source: https://docs.dify.ai/en/develop-plugin/dev-guides-and-walkthroughs/endpoint
Authors Yeuoly, Allen. This document details the structure and implementation of Endpoints in Dify plugins, using the Neko Cat project as an example. It covers defining Endpoint groups, configuring interfaces, implementing the _invoke method, and handling requests and responses. The document explains the meaning and usage of various YAML configuration fields.
# Endpoint
This document uses the [Neko Cat](/en/develop-plugin/dev-guides-and-walkthroughs/endpoint) project as an example to explain the structure of Endpoints within a plugin. Endpoints are HTTP interfaces exposed by the plugin, which can be used for integration with external systems. For the complete plugin code, please refer to the [GitHub repository](https://github.com/langgenius/dify-plugin-sdks/tree/main/python/examples/neko).
### Group Definition
An `Endpoint` group is a collection of multiple `Endpoints`. When creating a new `Endpoint` within a Dify plugin, you might need to fill in the following configuration.

Besides the `Endpoint Name`, you can add new form items by writing the group's configuration information. After clicking save, you can see the multiple interfaces it contains, which will use the same configuration information.

#### **Structure**
* `settings` (map\[string] [ProviderConfig](/en/develop-plugin/features-and-specs/plugin-types/general-specifications#providerconfig)): Endpoint configuration definition.
* `endpoints` (list\[string], required): Points to the specific `endpoint` interface definitions.
```yaml theme={null}
settings:
api_key:
type: secret-input
required: true
label:
en_US: API key
zh_Hans: API key
ja_Jp: API key
pt_BR: API key
placeholder:
en_US: Please input your API key
zh_Hans: 请输入你的 API key
ja_Jp: あなたの API key を入れてください
pt_BR: Por favor, insira sua chave API
endpoints:
- endpoints/duck.yaml
- endpoints/neko.yaml
```
### Interface Definition
* `path` (string): Follows the Werkzeug interface standard.
* `method` (string): Interface method, only supports `HEAD`, `GET`, `POST`, `PUT`, `DELETE`, `OPTIONS`.
* `extra` (object): Configuration information beyond the basic details.
* `python` (object)
* `source` (string): The source code that implements this interface.
```yaml theme={null}
path: "/duck/"
method: "GET"
extra:
python:
source: "endpoints/duck.py"
```
### Interface Implementation
You need to implement a subclass that inherits from `dify_plugin.Endpoint` and implement the `_invoke` method.
* **Input Parameters**
* `r` (Request): The `Request` object from `werkzeug`.
* `values` (Mapping): Path parameters parsed from the path.
* `settings` (Mapping): Configuration information for this `Endpoint`.
* **Return**
* A `Response` object from `werkzeug`, supports streaming responses.
* Directly returning a string is not supported.
Example code:
```python theme={null}
import json
from typing import Mapping
from werkzeug import Request, Response
from dify_plugin import Endpoint
class Duck(Endpoint):
def _invoke(self, r: Request, values: Mapping, settings: Mapping) -> Response:
"""
Invokes the endpoint with the given request.
"""
app_id = values["app_id"]
def generator():
yield f"{app_id}
"
return Response(generator(), status=200, content_type="text/html")
```
## Notes
* Endpoints are only instantiated when the plugin is called; they are not long-running services.
* Pay attention to security when developing Endpoints and avoid executing dangerous operations.
* Endpoints can be used to handle Webhook callbacks or provide interfaces for other systems to connect.
If you are learning plugin development, it is recommended to first read the [Getting Started with Plugin Development](/en/develop-plugin/dev-guides-and-walkthroughs/tool-plugin) and the [Developer Cheatsheet](/en/develop-plugin/dev-guides-and-walkthroughs/cheatsheet).
## Related Resources
* [Basic Concepts of Plugin Development](/en/develop-plugin/getting-started/getting-started-dify-plugin) - Understand the overall architecture of plugin development.
* [Neko Cat Example](/en/develop-plugin/dev-guides-and-walkthroughs/endpoint) - An example of extension plugin development.
* [General Specifications Definition](/en/develop-plugin/features-and-specs/plugin-types/general-specifications) - Understand common structures like ProviderConfig.
* [Develop a Slack Bot Plugin Example](/en/develop-plugin/dev-guides-and-walkthroughs/develop-a-slack-bot-plugin) - Another plugin development example.
* [Getting Started with Plugin Development](/en/develop-plugin/dev-guides-and-walkthroughs/tool-plugin) - Develop a plugin from scratch.
* [Reverse Invocation of Dify Services](/en/develop-plugin/features-and-specs/advanced-development/reverse-invocation-app) - Learn how to use the reverse invocation feature.
***
[Edit this page](https://github.com/langgenius/dify-docs/edit/main/en/develop-plugin/dev-guides-and-walkthroughs/endpoint.mdx) | [Report an issue](https://github.com/langgenius/dify-docs/issues/new?template=docs.yml)
# Add OAuth Support to Your Tool Plugin
Source: https://docs.dify.ai/en/develop-plugin/dev-guides-and-walkthroughs/tool-oauth
![OAuth Authorize Example]() This guide teaches you how to build [OAuth](https://oauth.net/2/) support into your tool plugin.
OAuth is a better way to authorize tool plugins that need to access user data from third-party services, like Gmail or GitHub. Instead of requiring the user to manually enter API keys, OAuth lets the tool act on behalf of the user with their explicit consent.
## Background
OAuth in Dify involves **two separate flows** that developers should understand and design for.
### Flow 1: OAuth Client Setup (Admin / Developer Flow)
On Dify Cloud, Dify team would create OAuth apps for popular tool plugins and set up OAuth clients, saving users the trouble to configure this themselves.
Admins of Self-Hosted Dify instances must go through this setup flow.
Dify instance's admins or developers first need to register an OAuth app at the third-party service as a trusted application. From this, they'll be able to obtain the necessary credentials to configure the Dify tool provider as an OAuth client.
As an example, here are the steps to setting up an OAuth client for Dify's Gmail tool provider:
1. Go to [Google Cloud Console](https://console.cloud.google.com) and create a new project, or select existing one
2. Enable the required APIs (e.g., Gmail API)
1. Navigate to **APIs & Services** > **OAuth consent screen**
2. Choose **External** user type for public plugins
3. Fill in application name, user support email, and developer contact
4. Add authorized domains if needed
5. For testing: Add test users in the **Test users** section
1. Go to **APIs & Services** > **Credentials**
2. Click **Create Credentials** > **OAuth 2.0 Client IDs**
3. Choose **Web application** type
4. A`client_id` and a`client_secret` will be generated. Save these as the credentials.
Enter the client\_id and client\_secret on the OAuth Client configuration popup to set up the tool provider as a client.
This guide teaches you how to build [OAuth](https://oauth.net/2/) support into your tool plugin.
OAuth is a better way to authorize tool plugins that need to access user data from third-party services, like Gmail or GitHub. Instead of requiring the user to manually enter API keys, OAuth lets the tool act on behalf of the user with their explicit consent.
## Background
OAuth in Dify involves **two separate flows** that developers should understand and design for.
### Flow 1: OAuth Client Setup (Admin / Developer Flow)
On Dify Cloud, Dify team would create OAuth apps for popular tool plugins and set up OAuth clients, saving users the trouble to configure this themselves.
Admins of Self-Hosted Dify instances must go through this setup flow.
Dify instance's admins or developers first need to register an OAuth app at the third-party service as a trusted application. From this, they'll be able to obtain the necessary credentials to configure the Dify tool provider as an OAuth client.
As an example, here are the steps to setting up an OAuth client for Dify's Gmail tool provider:
1. Go to [Google Cloud Console](https://console.cloud.google.com) and create a new project, or select existing one
2. Enable the required APIs (e.g., Gmail API)
1. Navigate to **APIs & Services** > **OAuth consent screen**
2. Choose **External** user type for public plugins
3. Fill in application name, user support email, and developer contact
4. Add authorized domains if needed
5. For testing: Add test users in the **Test users** section
1. Go to **APIs & Services** > **Credentials**
2. Click **Create Credentials** > **OAuth 2.0 Client IDs**
3. Choose **Web application** type
4. A`client_id` and a`client_secret` will be generated. Save these as the credentials.
Enter the client\_id and client\_secret on the OAuth Client configuration popup to set up the tool provider as a client.
![OAuth Client Settings Dialog]() Register the redirect URI generated by Dify on the Google OAuth Client's page:
Register the redirect URI generated by Dify on the Google OAuth Client's page:
![OAuth Google Redirect URI]() Dify displays the `redirect_uri` in the OAuth Client configuration popup. It usually follows the format:
```bash theme={null}
https://{your-dify-domain}/console/api/oauth/plugin/{plugin-id}/{provider-name}/{tool-name}/callback
```
For self-hosted Dify, the `your-dify-domain` should be consistent with the `CONSOLE_WEB_URL`.
Each service has unique requirements, so always consult the specific OAuth documentation for the services you're integrating with.
### Flow 2: User Authorization (Dify User Flow)
After configuring OAuth clients, individual Dify users can now authorize your plugin to access their personal accounts.
Dify displays the `redirect_uri` in the OAuth Client configuration popup. It usually follows the format:
```bash theme={null}
https://{your-dify-domain}/console/api/oauth/plugin/{plugin-id}/{provider-name}/{tool-name}/callback
```
For self-hosted Dify, the `your-dify-domain` should be consistent with the `CONSOLE_WEB_URL`.
Each service has unique requirements, so always consult the specific OAuth documentation for the services you're integrating with.
### Flow 2: User Authorization (Dify User Flow)
After configuring OAuth clients, individual Dify users can now authorize your plugin to access their personal accounts.
![OAuth User Authorization]() ## Implementation
### 1. Define OAuth Schema in Provider Manifest
The `oauth_schema` section of the provider manifest definitions tells Dify what credentials your plugin OAuth needs and what the OAuth flow will produce. Two schemas are required for setting up OAuth:
#### client\_schema
Defines the input for OAuth client setup:
```yaml gmail.yaml theme={null}
oauth_schema:
client_schema:
- name: "client_id"
type: "secret-input"
required: true
url: "https://developers.google.com/identity/protocols/oauth2"
- name: "client_secret"
type: "secret-input"
required: true
```
The `url` field links directly to help documentations for the third-party service. This helps confused admins / developers.
#### credentials\_schema
Specifies what the user authorization flow produces (Dify manages these automatically):
```yaml theme={null}
# also under oauth_schema
credentials_schema:
- name: "access_token"
type: "secret-input"
- name: "refresh_token"
type: "secret-input"
- name: "expires_at"
type: "secret-input"
```
Include both `oauth_schema` and `credentials_for_provider` to offer OAuth + API key auth options.
### 2. Complete Required OAuth Methods in Tool Provider
Add these imports to where your `ToolProvider` is implemented:
```python theme={null}
from dify_plugin.entities.oauth import ToolOAuthCredentials
from dify_plugin.errors.tool import ToolProviderCredentialValidationError, ToolProviderOAuthError
```
Your `ToolProvider` class must implement these three OAuth methods (taking `GmailProvider` as an example):
Under no circumstances should the `client_secret` be returned in the credentials of `ToolOAuthCredentials`, as this could lead to security issues.
```python _oauth_get_authorization_url expandable theme={null}
def _oauth_get_authorization_url(self, redirect_uri: str, system_credentials: Mapping[str, Any]) -> str:
"""
Generate the authorization URL using credentials from OAuth Client Setup Flow.
This URL is where users grant permissions.
"""
# Generate random state for CSRF protection (recommended for all OAuth flows)
state = secrets.token_urlsafe(16)
# Define Gmail-specific scopes - request minimal necessary permissions
scope = "read:user read:data" # Replace with your required scopes
# Assemble Gmail-specific payload
params = {
"client_id": system_credentials["client_id"], # From OAuth Client Setup
"redirect_uri": redirect_uri, # Dify generates this - DON'T modify
"scope": scope,
"response_type": "code", # Standard OAuth authorization code flow
"access_type": "offline", # Critical: gets refresh token (if supported)
"prompt": "consent", # Forces reauth when scopes change (if supported)
"state": state, # CSRF protection
}
return f"{self._AUTH_URL}?{urllib.parse.urlencode(params)}"
```
```python _oauth_get_credentials expandable theme={null}
def _oauth_get_credentials(
self, redirect_uri: str, system_credentials: Mapping[str, Any], request: Request
) -> ToolOAuthCredentials:
"""
Exchange authorization code for access token and refresh token. This is called
to creates ONE credential set for one account connection
"""
# Extract authorization code from OAuth callback
code = request.args.get("code")
if not code:
raise ToolProviderOAuthError("Authorization code not provided")
# Check for authorization errors from OAuth provider
error = request.args.get("error")
if error:
error_description = request.args.get("error_description", "")
raise ToolProviderOAuthError(f"OAuth authorization failed: {error} - {error_description}")
# Exchange authorization code for tokens using OAuth Client Setup credentials
# Assemble Gmail-specific payload
data = {
"client_id": system_credentials["client_id"], # From OAuth Client Setup
"client_secret": system_credentials["client_secret"], # From OAuth Client Setup
"code": code, # From user's authorization
"grant_type": "authorization_code", # Standard OAuth flow type
"redirect_uri": redirect_uri, # Must exactly match authorization URL
}
headers = {"Content-Type": "application/x-www-form-urlencoded"}
try:
response = requests.post(
self._TOKEN_URL,
data=data,
headers=headers,
timeout=10
)
response.raise_for_status()
token_data = response.json()
# Handle OAuth provider errors in response
if "error" in token_data:
error_desc = token_data.get('error_description', token_data['error'])
raise ToolProviderOAuthError(f"Token exchange failed: {error_desc}")
access_token = token_data.get("access_token")
if not access_token:
raise ToolProviderOAuthError("No access token received from provider")
# Build credentials dict matching your credentials_schema
credentials = {
"access_token": access_token,
"token_type": token_data.get("token_type", "Bearer"),
}
# Include refresh token if provided (critical for long-term access)
refresh_token = token_data.get("refresh_token")
if refresh_token:
credentials["refresh_token"] = refresh_token
# Handle token expiration - some providers don't provide expires_in
expires_in = token_data.get("expires_in", 3600) # Default to 1 hour
expires_at = int(time.time()) + expires_in
return ToolOAuthCredentials(credentials=credentials, expires_at=expires_at)
except requests.RequestException as e:
raise ToolProviderOAuthError(f"Network error during token exchange: {str(e)}")
except Exception as e:
raise ToolProviderOAuthError(f"Failed to exchange authorization code: {str(e)}")
```
```python _oauth_refresh_credentials theme={null}
def _oauth_refresh_credentials(
self, redirect_uri: str, system_credentials: Mapping[str, Any], credentials: Mapping[str, Any]
) -> ToolOAuthCredentials:
"""
Refresh the credentials using refresh token.
Dify calls this automatically when tokens expire
"""
refresh_token = credentials.get("refresh_token")
if not refresh_token:
raise ToolProviderOAuthError("No refresh token available")
# Standard OAuth refresh token flow
data = {
"client_id": system_credentials["client_id"], # From OAuth Client Setup
"client_secret": system_credentials["client_secret"], # From OAuth Client Setup
"refresh_token": refresh_token, # From previous authorization
"grant_type": "refresh_token", # OAuth refresh flow
}
headers = {"Content-Type": "application/x-www-form-urlencoded"}
try:
response = requests.post(
self._TOKEN_URL,
data=data,
headers=headers,
timeout=10
)
response.raise_for_status()
token_data = response.json()
# Handle refresh errors
if "error" in token_data:
error_desc = token_data.get('error_description', token_data['error'])
raise ToolProviderOAuthError(f"Token refresh failed: {error_desc}")
access_token = token_data.get("access_token")
if not access_token:
raise ToolProviderOAuthError("No access token received from provider")
# Build new credentials, preserving existing refresh token
new_credentials = {
"access_token": access_token,
"token_type": token_data.get("token_type", "Bearer"),
"refresh_token": refresh_token, # Keep existing refresh token
}
# Handle token expiration
expires_in = token_data.get("expires_in", 3600)
# update refresh token if new one provided
new_refresh_token = token_data.get("refresh_token")
if new_refresh_token:
new_credentials["refresh_token"] = new_refresh_token
# Calculate new expiration timestamp for Dify's token management
expires_at = int(time.time()) + expires_in
return ToolOAuthCredentials(credentials=new_credentials, expires_at=expires_at)
except requests.RequestException as e:
raise ToolProviderOAuthError(f"Network error during token refresh: {str(e)}")
except Exception as e:
raise ToolProviderOAuthError(f"Failed to refresh credentials: {str(e)}")
```
### 3. Access Tokens in Your Tools
You may use OAuth credentials to make authenticated API calls in your `Tool` implementation like so:
```python theme={null}
class YourTool(BuiltinTool):
def _invoke(self, user_id: str, tool_parameters: dict[str, Any]) -> ToolInvokeMessage:
if self.runtime.credential_type == CredentialType.OAUTH:
access_token = self.runtime.credentials["access_token"]
response = requests.get("https://api.service.com/data",
headers={"Authorization": f"Bearer {access_token}"})
return self.create_text_message(response.text)
```
`self.runtime.credentials` automatically provides the current user's tokens. Dify handles refresh automatically.
For plugins that support both OAuth and API\_KEY authentication, you can use `self.runtime.credential_type` to differentiate between the two authentication types.
### 4. Specify the Correct Versions
Previous versions of the plugin SDK and Dify do not support OAuth authentication. Therefore, you need to set the plugin SDK version to:
```
dify_plugin>=0.4.2,<0.5.0.
```
In `manifest.yaml`, add the minimum Dify version:
```yaml theme={null}
meta:
version: 0.0.1
arch:
- amd64
- arm64
runner:
language: python
version: "3.12"
entrypoint: main
minimum_dify_version: 1.7.1
```
***
[Edit this page](https://github.com/langgenius/dify-docs/edit/main/en/develop-plugin/dev-guides-and-walkthroughs/tool-oauth.mdx) | [Report an issue](https://github.com/langgenius/dify-docs/issues/new?template=docs.yml)
# Tool Plugin
Source: https://docs.dify.ai/en/develop-plugin/dev-guides-and-walkthroughs/tool-plugin
This document provides detailed instructions on how to develop tool plugins for Dify, using Google Search as an example to demonstrate a complete tool plugin development process. The content includes plugin initialization, template selection, tool provider configuration file definition, adding third-party service credentials, tool functionality code implementation, debugging, and packaging for release.
Tools refer to third-party services that can be called by Chatflow / Workflow / Agent-type applications, providing complete API implementation capabilities to enhance Dify applications. For example, adding extra features like online search, image generation, and more.
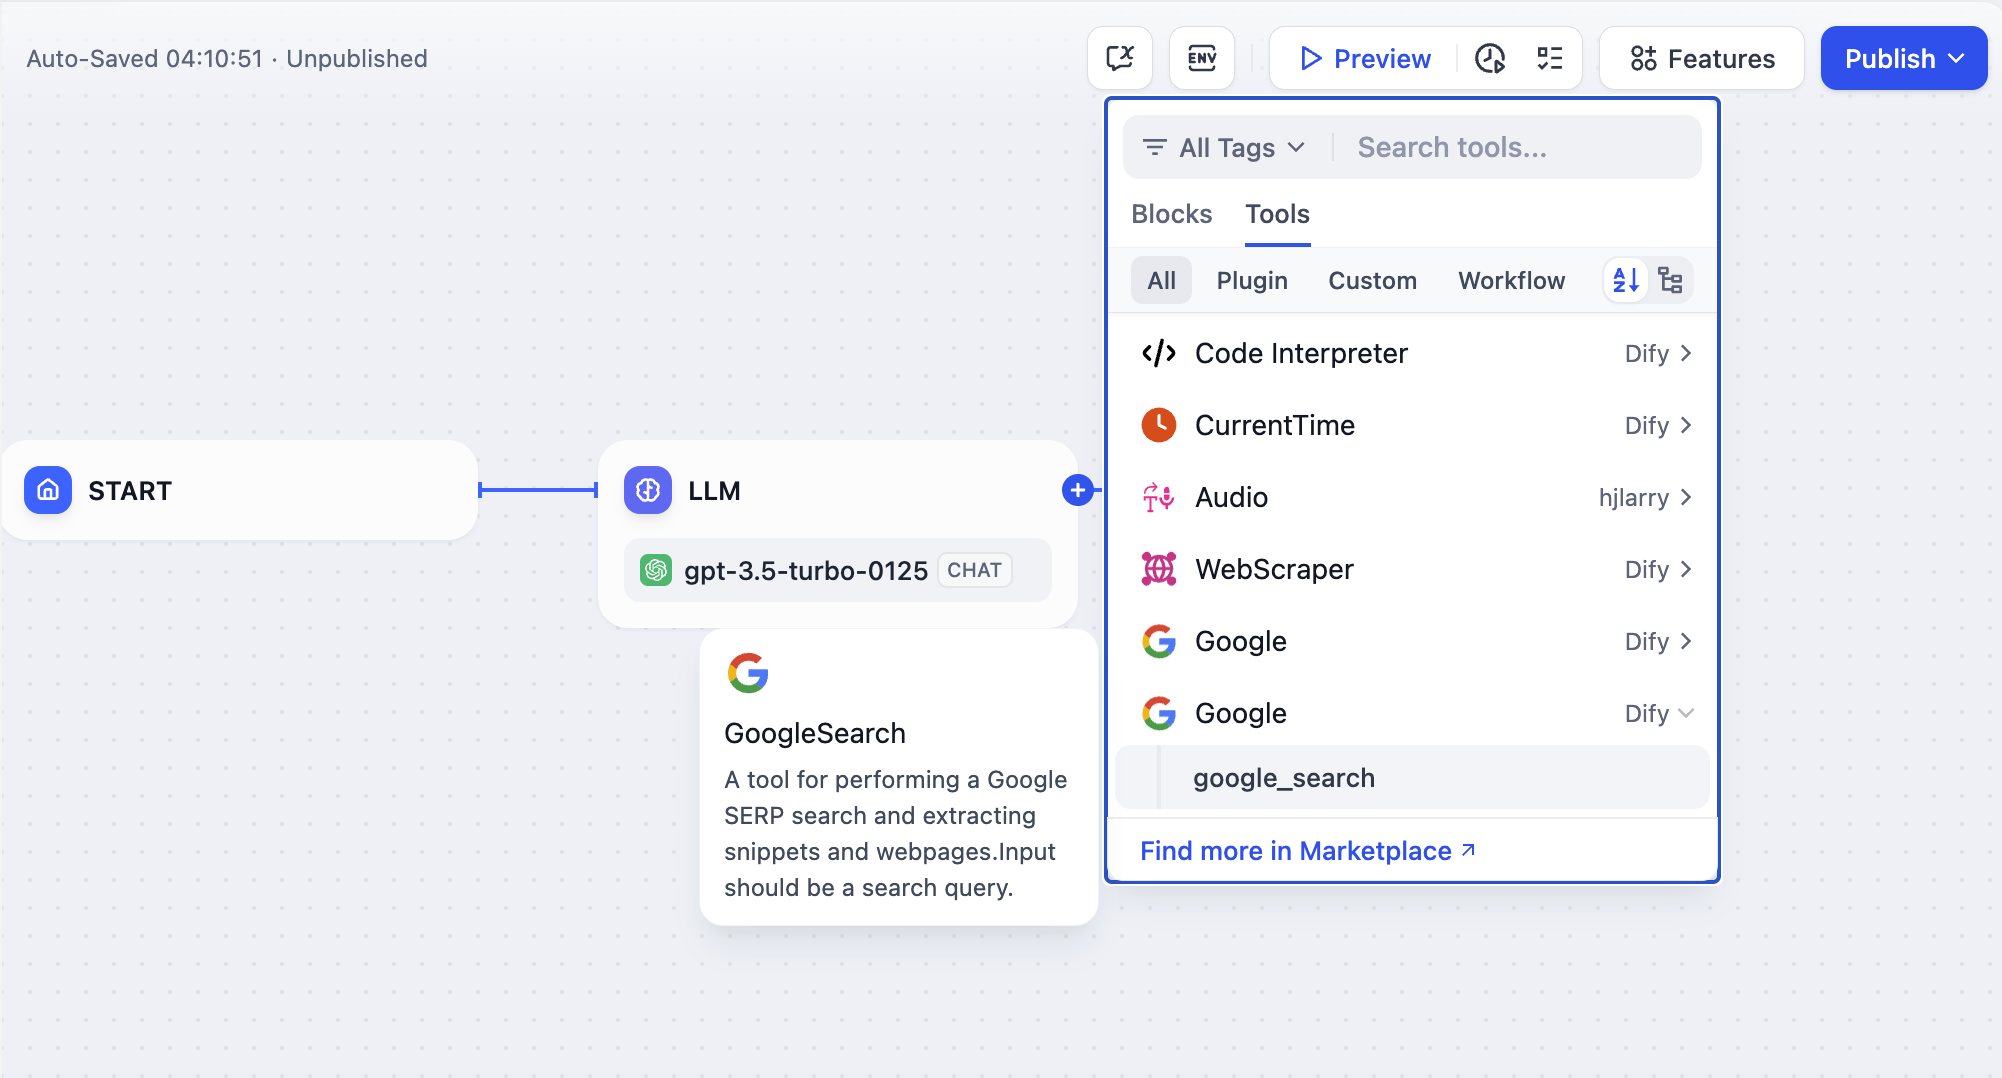
In this article, **"Tool Plugin"** refers to a complete project that includes tool provider files, functional code, and other structures. A tool provider can include multiple Tools (which can be understood as additional features provided within a single tool), structured as follows:
```
- Tool Provider
- Tool A
- Tool B
```
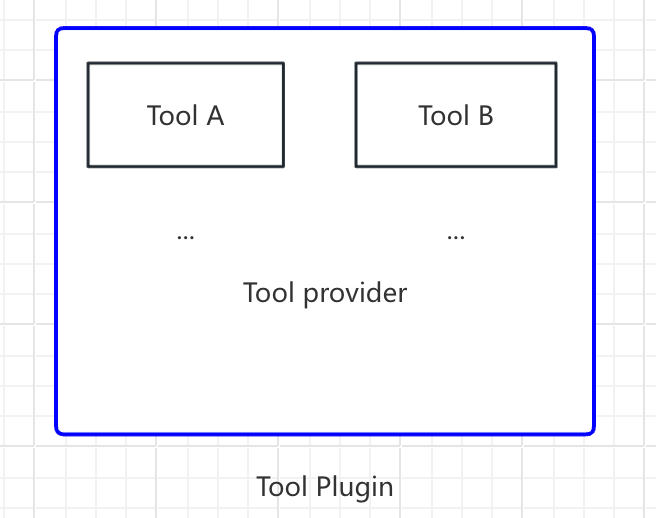
This article will use `Google Search` as an example to demonstrate how to quickly develop a tool plugin.
### Prerequisites
* Dify plugin scaffolding tool
* Python environment (version 3.12)
For detailed instructions on how to prepare the plugin development scaffolding tool, please refer to [Initializing Development Tools](/en/develop-plugin/getting-started/cli). If you are developing a plugin for the first time, it is recommended to read [Dify Plugin Development: Hello World Guide](/en/develop-plugin/dev-guides-and-walkthroughs/tool-plugin) first.
### Creating a New Project
Run the scaffolding command line tool to create a new Dify plugin project.
```bash theme={null}
./dify-plugin-darwin-arm64 plugin init
```
If you have renamed the binary file to `dify` and copied it to the `/usr/local/bin` path, you can run the following command to create a new plugin project:
```bash theme={null}
dify plugin init
```
> In the following text, `dify` will be used as a command line example. If you encounter any issues, please replace the `dify` command with the path to the command line tool.
### Choosing Plugin Type and Template
All templates in the scaffolding tool provide complete code projects. In this example, select the `Tool` plugin.
> If you are already familiar with plugin development and do not need to rely on templates, you can refer to the [General Specifications](/en/develop-plugin/features-and-specs/plugin-types/general-specifications) guide to complete the development of different types of plugins.
#### Configuring Plugin Permissions
The plugin also needs permissions to read from the Dify platform. Grant the following permissions to this example plugin:
* Tools
* Apps
* Enable persistent storage Storage, allocate default size storage
* Allow registering Endpoints
> Use the arrow keys in the terminal to select permissions, and use the "Tab" button to grant permissions.
After checking all permission items, press Enter to complete the plugin creation. The system will automatically generate the plugin project code.
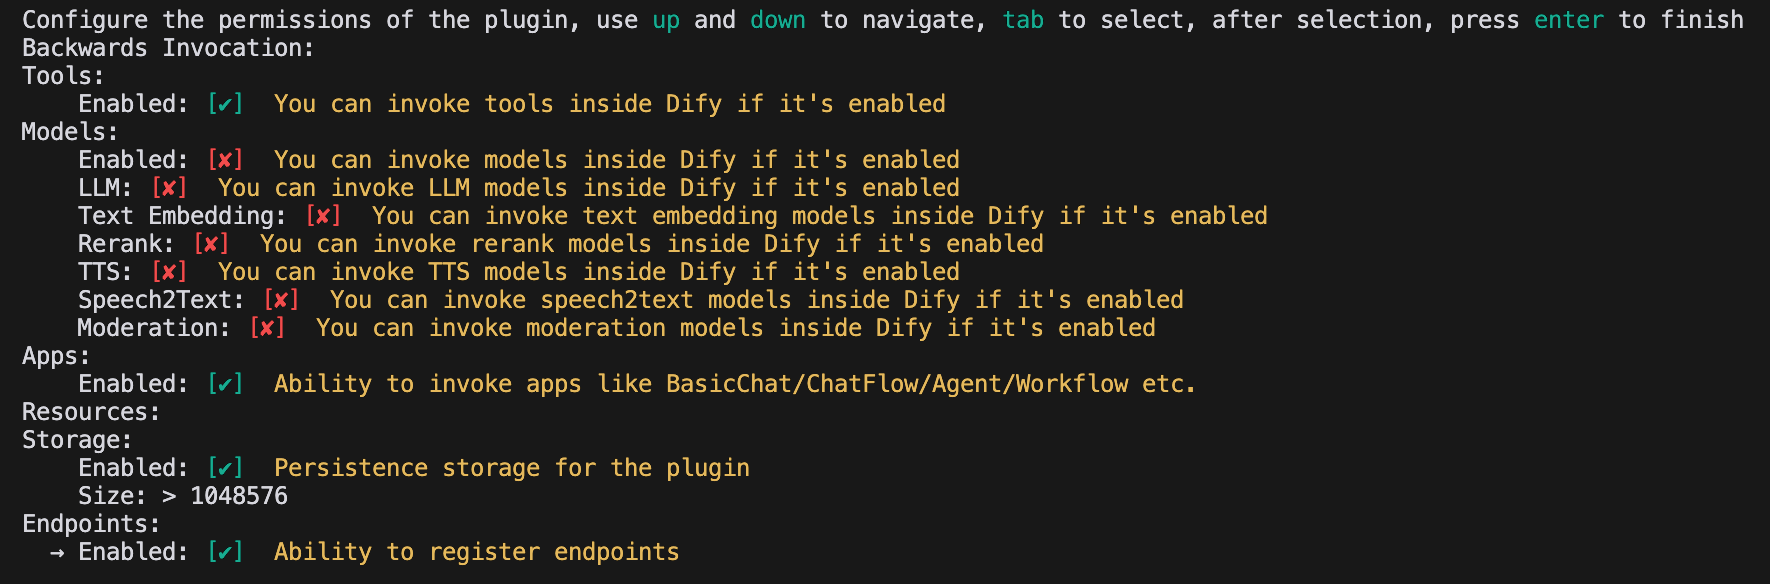
### Developing the Tool Plugin
#### 1. Creating the Tool Provider File
The tool provider file is a yaml format file, which can be understood as the basic configuration entry for the tool plugin, used to provide necessary authorization information to the tool.
Go to the `/provider` path in the plugin template project and rename the yaml file to `google.yaml`. This `yaml` file will contain information about the tool provider, including the provider's name, icon, author, and other details. This information will be displayed when installing the plugin.
**Example Code**
```yaml theme={null}
identity: # Basic information of the tool provider
author: Your-name # Author
name: google # Name, unique, cannot have the same name as other providers
label: # Label, for frontend display
en_US: Google # English label
zh_Hans: Google # Chinese label
description: # Description, for frontend display
en_US: Google # English description
zh_Hans: Google # Chinese description
icon: icon.svg # Tool icon, needs to be placed in the _assets folder
tags: # Tags, for frontend display
- search
```
Make sure the file path is in the `/tools` directory, with the complete path as follows:
```yaml theme={null}
plugins:
tools:
- 'google.yaml'
```
Where `google.yaml` needs to use its absolute path in the plugin project. In this example, it is located in the project root directory. The identity field in the YAML file is explained as follows: `identity` contains basic information about the tool provider, including author, name, label, description, icon, etc.
* The icon needs to be an attachment resource and needs to be placed in the `_assets` folder in the project root directory.
* Tags can help users quickly find plugins through categories. Below are all the currently supported tags.
```python theme={null}
class ToolLabelEnum(Enum):
SEARCH = 'search'
IMAGE = 'image'
VIDEOS = 'videos'
WEATHER = 'weather'
FINANCE = 'finance'
DESIGN = 'design'
TRAVEL = 'travel'
SOCIAL = 'social'
NEWS = 'news'
MEDICAL = 'medical'
PRODUCTIVITY = 'productivity'
EDUCATION = 'education'
BUSINESS = 'business'
ENTERTAINMENT = 'entertainment'
UTILITIES = 'utilities'
OTHER = 'other'
```
#### **2. Completing Third-Party Service Credentials**
For development convenience, we choose to use the Google Search API provided by the third-party service `SerpApi`. `SerpApi` requires an API Key for use, so we need to add the `credentials_for_provider` field in the `yaml` file.
The complete code is as follows:
```yaml theme={null}
identity:
author: Dify
name: google
label:
en_US: Google
zh_Hans: Google
pt_BR: Google
description:
en_US: Google
zh_Hans: GoogleSearch
pt_BR: Google
icon: icon.svg
tags:
- search
credentials_for_provider: #Add credentials_for_provider field
serpapi_api_key:
type: secret-input
required: true
label:
en_US: SerpApi API key
zh_Hans: SerpApi API key
placeholder:
en_US: Please input your SerpApi API key
zh_Hans: Please enter your SerpApi API key
help:
en_US: Get your SerpApi API key from SerpApi
zh_Hans: Get your SerpApi API key from SerpApi
url: https://serpapi.com/manage-api-key
tools:
- tools/google_search.yaml
extra:
python:
source: google.py
```
* The sub-level structure of `credentials_for_provider` needs to meet the requirements of [General Specifications](/en/develop-plugin/features-and-specs/plugin-types/general-specifications).
* You need to specify which tools the provider includes. This example only includes one `tools/google_search.yaml` file.
* As a provider, in addition to defining its basic information, you also need to implement some of its code logic, so you need to specify its implementation logic. In this example, we put the code file for the functionality in `google.py`, but we won't implement it yet, but instead write the code for `google_search` first.
#### 3. Filling in the Tool YAML File
A tool plugin can have multiple tool functions, and each tool function needs a `yaml` file for description, including basic information about the tool function, parameters, output, etc.
Still using the `GoogleSearch` tool as an example, create a new `google_search.yaml` file in the `/tools` folder.
```yaml theme={null}
identity:
name: google_search
author: Dify
label:
en_US: GoogleSearch
zh_Hans: Google Search
pt_BR: GoogleSearch
description:
human:
en_US: A tool for performing a Google SERP search and extracting snippets and webpages. Input should be a search query.
zh_Hans: A tool for performing a Google SERP search and extracting snippets and webpages. Input should be a search query.
pt_BR: A tool for performing a Google SERP search and extracting snippets and webpages. Input should be a search query.
llm: A tool for performing a Google SERP search and extracting snippets and webpages. Input should be a search query.
parameters:
- name: query
type: string
required: true
label:
en_US: Query string
zh_Hans: Query string
pt_BR: Query string
human_description:
en_US: used for searching
zh_Hans: used for searching web content
pt_BR: used for searching
llm_description: key words for searching
form: llm
extra:
python:
source: tools/google_search.py
```
* `identity` contains basic information about the tool, including name, author, label, description, etc.
* `parameters` parameter list
* `name` (required) parameter name, unique, cannot have the same name as other parameters.
* `type` (required) parameter type, currently supports `string`, `number`, `boolean`, `select`, `secret-input` five types, corresponding to string, number, boolean, dropdown, encrypted input box. For sensitive information, please use the `secret-input` type.
* `label` (required) parameter label, for frontend display.
* `form` (required) form type, currently supports `llm`, `form` two types.
* In Agent applications, `llm` means that the parameter is inferred by the LLM itself, `form` means that parameters can be preset in advance to use this tool.
* In Workflow applications, both `llm` and `form` need to be filled in by the frontend, but `llm` parameters will be used as input variables for the tool node.
* `required` whether required
* In `llm` mode, if the parameter is required, the Agent will be required to infer this parameter.
* In `form` mode, if the parameter is required, the user will be required to fill in this parameter on the frontend before the conversation begins.
* `options` parameter options
* In `llm` mode, Dify will pass all options to the LLM, and the LLM can infer based on these options.
* In `form` mode, when `type` is `select`, the frontend will display these options.
* `default` default value.
* `min` minimum value, can be set when the parameter type is `number`.
* `max` maximum value, can be set when the parameter type is `number`.
* `human_description` introduction for frontend display, supports multiple languages.
* `placeholder` prompt text for the input field, can be set when the form type is `form` and the parameter type is `string`, `number`, `secret-input`, supports multiple languages.
* `llm_description` introduction passed to the LLM. To make the LLM better understand this parameter, please write as detailed information as possible about this parameter here, so that the LLM can understand the parameter.
#### 4. Preparing Tool Code
After filling in the configuration information for the tool, you can start writing the code for the tool's functionality, implementing the logical purpose of the tool. Create `google_search.py` in the `/tools` directory with the following content:
```python theme={null}
from collections.abc import Generator
from typing import Any
import requests
from dify_plugin import Tool
from dify_plugin.entities.tool import ToolInvokeMessage
SERP_API_URL = "https://serpapi.com/search"
class GoogleSearchTool(Tool):
def _parse_response(self, response: dict) -> dict:
result = {}
if "knowledge_graph" in response:
result["title"] = response["knowledge_graph"].get("title", "")
result["description"] = response["knowledge_graph"].get("description", "")
if "organic_results" in response:
result["organic_results"] = [
{
"title": item.get("title", ""),
"link": item.get("link", ""),
"snippet": item.get("snippet", ""),
}
for item in response["organic_results"]
]
return result
def _invoke(self, tool_parameters: dict[str, Any]) -> Generator[ToolInvokeMessage]:
params = {
"api_key": self.runtime.credentials["serpapi_api_key"],
"q": tool_parameters["query"],
"engine": "google",
"google_domain": "google.com",
"gl": "us",
"hl": "en",
}
response = requests.get(url=SERP_API_URL, params=params, timeout=5)
response.raise_for_status()
valuable_res = self._parse_response(response.json())
yield self.create_json_message(valuable_res)
```
This example means requesting `serpapi` and using `self.create_json_message` to return a formatted `json` data string. If you want to learn more about return data types, you can refer to the [Remote Debugging Plugins](/en/develop-plugin/features-and-specs/plugin-types/remote-debug-a-plugin) and [Persistent Storage KV](/en/develop-plugin/features-and-specs/plugin-types/persistent-storage-kv) documents.
#### 5. Completing the Tool Provider Code
Finally, you need to create an implementation code for the provider to implement the credential validation logic. If credential validation fails, a `ToolProviderCredentialValidationError` exception will be thrown. After validation succeeds, the `google_search` tool service will be correctly requested.
Create a `google.py` file in the `/provider` directory with the following content:
```python theme={null}
from typing import Any
from dify_plugin import ToolProvider
from dify_plugin.errors.tool import ToolProviderCredentialValidationError
from tools.google_search import GoogleSearchTool
class GoogleProvider(ToolProvider):
def _validate_credentials(self, credentials: dict[str, Any]) -> None:
try:
for _ in GoogleSearchTool.from_credentials(credentials).invoke(
tool_parameters={"query": "test", "result_type": "link"},
):
pass
except Exception as e:
raise ToolProviderCredentialValidationError(str(e))
```
### Debugging the Plugin
After completing plugin development, you need to test whether the plugin can function properly. Dify provides a convenient remote debugging method to help you quickly verify the plugin's functionality in a test environment.
Go to the ["Plugin Management"](https://cloud.dify.ai/plugins) page to obtain the remote server address and debugging Key.

Return to the plugin project, copy the `.env.example` file and rename it to `.env`, then fill in the remote server address and debugging Key information you obtained.
`.env` file:
```bash theme={null}
INSTALL_METHOD=remote
REMOTE_INSTALL_URL=debug.dify.ai:5003
REMOTE_INSTALL_KEY=********-****-****-****-************
```
Run the `python -m main` command to start the plugin. On the plugins page, you can see that the plugin has been installed in the Workspace, and other members of the team can also access the plugin.

### Packaging the Plugin (Optional)
After confirming that the plugin can run normally, you can package and name the plugin using the following command line tool. After running, you will discover a `google.difypkg` file in the current folder, which is the final plugin package.
```bash theme={null}
# Replace ./google with the actual path of the plugin project
dify plugin package ./google
```
Congratulations, you have completed the entire process of developing, debugging, and packaging a tool-type plugin!
### Publishing the Plugin (Optional)
If you want to publish the plugin to the Dify Marketplace, please ensure that your plugin follows the specifications in [Publish to Dify Marketplace](/en/develop-plugin/publishing/marketplace-listing/release-to-dify-marketplace). After passing the review, the code will be merged into the main branch and automatically launched to the [Dify Marketplace](https://marketplace.dify.ai/).
[Publishing Overview](/en/develop-plugin/publishing/marketplace-listing/release-overview)
### Explore More
#### **Quick Start:**
* [Developing Extension Plugins](/en/develop-plugin/dev-guides-and-walkthroughs/endpoint)
* [Developing Model Plugins](/en/develop-plugin/dev-guides-and-walkthroughs/creating-new-model-provider)
* [Bundle Plugins: Packaging Multiple Plugins](/en/develop-plugin/features-and-specs/advanced-development/bundle)
#### **Plugin Interface Documentation:**
* [General Specifications](/en/develop-plugin/features-and-specs/plugin-types/general-specifications) - Manifest Structure and Tool Specifications
* [Endpoint](/en/develop-plugin/dev-guides-and-walkthroughs/endpoint) - Detailed Endpoint Definition
* [Reverse Invocation](/en/develop-plugin/features-and-specs/advanced-development/reverse-invocation) - Reverse Invocation of Dify Capabilities
* [Model Schema](/en/develop-plugin/features-and-specs/plugin-types/model-schema) - Models
* [Agent Plugins](/en/develop-plugin/features-and-specs/advanced-development/reverse-invocation) - Extending Agent Strategies
## Next Learning Steps
* [Remote Debugging Plugins](/en/develop-plugin/features-and-specs/plugin-types/remote-debug-a-plugin) - Learn more advanced debugging techniques
* [Persistent Storage](/en/develop-plugin/features-and-specs/plugin-types/persistent-storage-kv) - Learn how to use data storage in plugins
* [Slack Bot Plugin Development Example](/en/develop-plugin/dev-guides-and-walkthroughs/develop-a-slack-bot-plugin) - View a more complex plugin development case
* [Tool Plugin](/en/develop-plugin/features-and-specs/plugin-types/tool) - Explore advanced features of tool plugins
***
[Edit this page](https://github.com/langgenius/dify-docs/edit/main/en/develop-plugin/dev-guides-and-walkthroughs/tool-plugin.mdx) | [Report an issue](https://github.com/langgenius/dify-docs/issues/new?template=docs.yml)
# Trigger Plugin
Source: https://docs.dify.ai/en/develop-plugin/dev-guides-and-walkthroughs/trigger-plugin
## What Is a Trigger Plugin?
Triggers were introduced in Dify v1.10.0 as a new type of start node. Unlike functional nodes such as Code, Tool, or Knowledge Retrieval, the purpose of a trigger is to **convert third-party events into an input format that Dify can recognize and process**.
## Implementation
### 1. Define OAuth Schema in Provider Manifest
The `oauth_schema` section of the provider manifest definitions tells Dify what credentials your plugin OAuth needs and what the OAuth flow will produce. Two schemas are required for setting up OAuth:
#### client\_schema
Defines the input for OAuth client setup:
```yaml gmail.yaml theme={null}
oauth_schema:
client_schema:
- name: "client_id"
type: "secret-input"
required: true
url: "https://developers.google.com/identity/protocols/oauth2"
- name: "client_secret"
type: "secret-input"
required: true
```
The `url` field links directly to help documentations for the third-party service. This helps confused admins / developers.
#### credentials\_schema
Specifies what the user authorization flow produces (Dify manages these automatically):
```yaml theme={null}
# also under oauth_schema
credentials_schema:
- name: "access_token"
type: "secret-input"
- name: "refresh_token"
type: "secret-input"
- name: "expires_at"
type: "secret-input"
```
Include both `oauth_schema` and `credentials_for_provider` to offer OAuth + API key auth options.
### 2. Complete Required OAuth Methods in Tool Provider
Add these imports to where your `ToolProvider` is implemented:
```python theme={null}
from dify_plugin.entities.oauth import ToolOAuthCredentials
from dify_plugin.errors.tool import ToolProviderCredentialValidationError, ToolProviderOAuthError
```
Your `ToolProvider` class must implement these three OAuth methods (taking `GmailProvider` as an example):
Under no circumstances should the `client_secret` be returned in the credentials of `ToolOAuthCredentials`, as this could lead to security issues.
```python _oauth_get_authorization_url expandable theme={null}
def _oauth_get_authorization_url(self, redirect_uri: str, system_credentials: Mapping[str, Any]) -> str:
"""
Generate the authorization URL using credentials from OAuth Client Setup Flow.
This URL is where users grant permissions.
"""
# Generate random state for CSRF protection (recommended for all OAuth flows)
state = secrets.token_urlsafe(16)
# Define Gmail-specific scopes - request minimal necessary permissions
scope = "read:user read:data" # Replace with your required scopes
# Assemble Gmail-specific payload
params = {
"client_id": system_credentials["client_id"], # From OAuth Client Setup
"redirect_uri": redirect_uri, # Dify generates this - DON'T modify
"scope": scope,
"response_type": "code", # Standard OAuth authorization code flow
"access_type": "offline", # Critical: gets refresh token (if supported)
"prompt": "consent", # Forces reauth when scopes change (if supported)
"state": state, # CSRF protection
}
return f"{self._AUTH_URL}?{urllib.parse.urlencode(params)}"
```
```python _oauth_get_credentials expandable theme={null}
def _oauth_get_credentials(
self, redirect_uri: str, system_credentials: Mapping[str, Any], request: Request
) -> ToolOAuthCredentials:
"""
Exchange authorization code for access token and refresh token. This is called
to creates ONE credential set for one account connection
"""
# Extract authorization code from OAuth callback
code = request.args.get("code")
if not code:
raise ToolProviderOAuthError("Authorization code not provided")
# Check for authorization errors from OAuth provider
error = request.args.get("error")
if error:
error_description = request.args.get("error_description", "")
raise ToolProviderOAuthError(f"OAuth authorization failed: {error} - {error_description}")
# Exchange authorization code for tokens using OAuth Client Setup credentials
# Assemble Gmail-specific payload
data = {
"client_id": system_credentials["client_id"], # From OAuth Client Setup
"client_secret": system_credentials["client_secret"], # From OAuth Client Setup
"code": code, # From user's authorization
"grant_type": "authorization_code", # Standard OAuth flow type
"redirect_uri": redirect_uri, # Must exactly match authorization URL
}
headers = {"Content-Type": "application/x-www-form-urlencoded"}
try:
response = requests.post(
self._TOKEN_URL,
data=data,
headers=headers,
timeout=10
)
response.raise_for_status()
token_data = response.json()
# Handle OAuth provider errors in response
if "error" in token_data:
error_desc = token_data.get('error_description', token_data['error'])
raise ToolProviderOAuthError(f"Token exchange failed: {error_desc}")
access_token = token_data.get("access_token")
if not access_token:
raise ToolProviderOAuthError("No access token received from provider")
# Build credentials dict matching your credentials_schema
credentials = {
"access_token": access_token,
"token_type": token_data.get("token_type", "Bearer"),
}
# Include refresh token if provided (critical for long-term access)
refresh_token = token_data.get("refresh_token")
if refresh_token:
credentials["refresh_token"] = refresh_token
# Handle token expiration - some providers don't provide expires_in
expires_in = token_data.get("expires_in", 3600) # Default to 1 hour
expires_at = int(time.time()) + expires_in
return ToolOAuthCredentials(credentials=credentials, expires_at=expires_at)
except requests.RequestException as e:
raise ToolProviderOAuthError(f"Network error during token exchange: {str(e)}")
except Exception as e:
raise ToolProviderOAuthError(f"Failed to exchange authorization code: {str(e)}")
```
```python _oauth_refresh_credentials theme={null}
def _oauth_refresh_credentials(
self, redirect_uri: str, system_credentials: Mapping[str, Any], credentials: Mapping[str, Any]
) -> ToolOAuthCredentials:
"""
Refresh the credentials using refresh token.
Dify calls this automatically when tokens expire
"""
refresh_token = credentials.get("refresh_token")
if not refresh_token:
raise ToolProviderOAuthError("No refresh token available")
# Standard OAuth refresh token flow
data = {
"client_id": system_credentials["client_id"], # From OAuth Client Setup
"client_secret": system_credentials["client_secret"], # From OAuth Client Setup
"refresh_token": refresh_token, # From previous authorization
"grant_type": "refresh_token", # OAuth refresh flow
}
headers = {"Content-Type": "application/x-www-form-urlencoded"}
try:
response = requests.post(
self._TOKEN_URL,
data=data,
headers=headers,
timeout=10
)
response.raise_for_status()
token_data = response.json()
# Handle refresh errors
if "error" in token_data:
error_desc = token_data.get('error_description', token_data['error'])
raise ToolProviderOAuthError(f"Token refresh failed: {error_desc}")
access_token = token_data.get("access_token")
if not access_token:
raise ToolProviderOAuthError("No access token received from provider")
# Build new credentials, preserving existing refresh token
new_credentials = {
"access_token": access_token,
"token_type": token_data.get("token_type", "Bearer"),
"refresh_token": refresh_token, # Keep existing refresh token
}
# Handle token expiration
expires_in = token_data.get("expires_in", 3600)
# update refresh token if new one provided
new_refresh_token = token_data.get("refresh_token")
if new_refresh_token:
new_credentials["refresh_token"] = new_refresh_token
# Calculate new expiration timestamp for Dify's token management
expires_at = int(time.time()) + expires_in
return ToolOAuthCredentials(credentials=new_credentials, expires_at=expires_at)
except requests.RequestException as e:
raise ToolProviderOAuthError(f"Network error during token refresh: {str(e)}")
except Exception as e:
raise ToolProviderOAuthError(f"Failed to refresh credentials: {str(e)}")
```
### 3. Access Tokens in Your Tools
You may use OAuth credentials to make authenticated API calls in your `Tool` implementation like so:
```python theme={null}
class YourTool(BuiltinTool):
def _invoke(self, user_id: str, tool_parameters: dict[str, Any]) -> ToolInvokeMessage:
if self.runtime.credential_type == CredentialType.OAUTH:
access_token = self.runtime.credentials["access_token"]
response = requests.get("https://api.service.com/data",
headers={"Authorization": f"Bearer {access_token}"})
return self.create_text_message(response.text)
```
`self.runtime.credentials` automatically provides the current user's tokens. Dify handles refresh automatically.
For plugins that support both OAuth and API\_KEY authentication, you can use `self.runtime.credential_type` to differentiate between the two authentication types.
### 4. Specify the Correct Versions
Previous versions of the plugin SDK and Dify do not support OAuth authentication. Therefore, you need to set the plugin SDK version to:
```
dify_plugin>=0.4.2,<0.5.0.
```
In `manifest.yaml`, add the minimum Dify version:
```yaml theme={null}
meta:
version: 0.0.1
arch:
- amd64
- arm64
runner:
language: python
version: "3.12"
entrypoint: main
minimum_dify_version: 1.7.1
```
***
[Edit this page](https://github.com/langgenius/dify-docs/edit/main/en/develop-plugin/dev-guides-and-walkthroughs/tool-oauth.mdx) | [Report an issue](https://github.com/langgenius/dify-docs/issues/new?template=docs.yml)
# Tool Plugin
Source: https://docs.dify.ai/en/develop-plugin/dev-guides-and-walkthroughs/tool-plugin
This document provides detailed instructions on how to develop tool plugins for Dify, using Google Search as an example to demonstrate a complete tool plugin development process. The content includes plugin initialization, template selection, tool provider configuration file definition, adding third-party service credentials, tool functionality code implementation, debugging, and packaging for release.
Tools refer to third-party services that can be called by Chatflow / Workflow / Agent-type applications, providing complete API implementation capabilities to enhance Dify applications. For example, adding extra features like online search, image generation, and more.

In this article, **"Tool Plugin"** refers to a complete project that includes tool provider files, functional code, and other structures. A tool provider can include multiple Tools (which can be understood as additional features provided within a single tool), structured as follows:
```
- Tool Provider
- Tool A
- Tool B
```

This article will use `Google Search` as an example to demonstrate how to quickly develop a tool plugin.
### Prerequisites
* Dify plugin scaffolding tool
* Python environment (version 3.12)
For detailed instructions on how to prepare the plugin development scaffolding tool, please refer to [Initializing Development Tools](/en/develop-plugin/getting-started/cli). If you are developing a plugin for the first time, it is recommended to read [Dify Plugin Development: Hello World Guide](/en/develop-plugin/dev-guides-and-walkthroughs/tool-plugin) first.
### Creating a New Project
Run the scaffolding command line tool to create a new Dify plugin project.
```bash theme={null}
./dify-plugin-darwin-arm64 plugin init
```
If you have renamed the binary file to `dify` and copied it to the `/usr/local/bin` path, you can run the following command to create a new plugin project:
```bash theme={null}
dify plugin init
```
> In the following text, `dify` will be used as a command line example. If you encounter any issues, please replace the `dify` command with the path to the command line tool.
### Choosing Plugin Type and Template
All templates in the scaffolding tool provide complete code projects. In this example, select the `Tool` plugin.
> If you are already familiar with plugin development and do not need to rely on templates, you can refer to the [General Specifications](/en/develop-plugin/features-and-specs/plugin-types/general-specifications) guide to complete the development of different types of plugins.

#### Configuring Plugin Permissions
The plugin also needs permissions to read from the Dify platform. Grant the following permissions to this example plugin:
* Tools
* Apps
* Enable persistent storage Storage, allocate default size storage
* Allow registering Endpoints
> Use the arrow keys in the terminal to select permissions, and use the "Tab" button to grant permissions.
After checking all permission items, press Enter to complete the plugin creation. The system will automatically generate the plugin project code.

### Developing the Tool Plugin
#### 1. Creating the Tool Provider File
The tool provider file is a yaml format file, which can be understood as the basic configuration entry for the tool plugin, used to provide necessary authorization information to the tool.
Go to the `/provider` path in the plugin template project and rename the yaml file to `google.yaml`. This `yaml` file will contain information about the tool provider, including the provider's name, icon, author, and other details. This information will be displayed when installing the plugin.
**Example Code**
```yaml theme={null}
identity: # Basic information of the tool provider
author: Your-name # Author
name: google # Name, unique, cannot have the same name as other providers
label: # Label, for frontend display
en_US: Google # English label
zh_Hans: Google # Chinese label
description: # Description, for frontend display
en_US: Google # English description
zh_Hans: Google # Chinese description
icon: icon.svg # Tool icon, needs to be placed in the _assets folder
tags: # Tags, for frontend display
- search
```
Make sure the file path is in the `/tools` directory, with the complete path as follows:
```yaml theme={null}
plugins:
tools:
- 'google.yaml'
```
Where `google.yaml` needs to use its absolute path in the plugin project. In this example, it is located in the project root directory. The identity field in the YAML file is explained as follows: `identity` contains basic information about the tool provider, including author, name, label, description, icon, etc.
* The icon needs to be an attachment resource and needs to be placed in the `_assets` folder in the project root directory.
* Tags can help users quickly find plugins through categories. Below are all the currently supported tags.
```python theme={null}
class ToolLabelEnum(Enum):
SEARCH = 'search'
IMAGE = 'image'
VIDEOS = 'videos'
WEATHER = 'weather'
FINANCE = 'finance'
DESIGN = 'design'
TRAVEL = 'travel'
SOCIAL = 'social'
NEWS = 'news'
MEDICAL = 'medical'
PRODUCTIVITY = 'productivity'
EDUCATION = 'education'
BUSINESS = 'business'
ENTERTAINMENT = 'entertainment'
UTILITIES = 'utilities'
OTHER = 'other'
```
#### **2. Completing Third-Party Service Credentials**
For development convenience, we choose to use the Google Search API provided by the third-party service `SerpApi`. `SerpApi` requires an API Key for use, so we need to add the `credentials_for_provider` field in the `yaml` file.
The complete code is as follows:
```yaml theme={null}
identity:
author: Dify
name: google
label:
en_US: Google
zh_Hans: Google
pt_BR: Google
description:
en_US: Google
zh_Hans: GoogleSearch
pt_BR: Google
icon: icon.svg
tags:
- search
credentials_for_provider: #Add credentials_for_provider field
serpapi_api_key:
type: secret-input
required: true
label:
en_US: SerpApi API key
zh_Hans: SerpApi API key
placeholder:
en_US: Please input your SerpApi API key
zh_Hans: Please enter your SerpApi API key
help:
en_US: Get your SerpApi API key from SerpApi
zh_Hans: Get your SerpApi API key from SerpApi
url: https://serpapi.com/manage-api-key
tools:
- tools/google_search.yaml
extra:
python:
source: google.py
```
* The sub-level structure of `credentials_for_provider` needs to meet the requirements of [General Specifications](/en/develop-plugin/features-and-specs/plugin-types/general-specifications).
* You need to specify which tools the provider includes. This example only includes one `tools/google_search.yaml` file.
* As a provider, in addition to defining its basic information, you also need to implement some of its code logic, so you need to specify its implementation logic. In this example, we put the code file for the functionality in `google.py`, but we won't implement it yet, but instead write the code for `google_search` first.
#### 3. Filling in the Tool YAML File
A tool plugin can have multiple tool functions, and each tool function needs a `yaml` file for description, including basic information about the tool function, parameters, output, etc.
Still using the `GoogleSearch` tool as an example, create a new `google_search.yaml` file in the `/tools` folder.
```yaml theme={null}
identity:
name: google_search
author: Dify
label:
en_US: GoogleSearch
zh_Hans: Google Search
pt_BR: GoogleSearch
description:
human:
en_US: A tool for performing a Google SERP search and extracting snippets and webpages. Input should be a search query.
zh_Hans: A tool for performing a Google SERP search and extracting snippets and webpages. Input should be a search query.
pt_BR: A tool for performing a Google SERP search and extracting snippets and webpages. Input should be a search query.
llm: A tool for performing a Google SERP search and extracting snippets and webpages. Input should be a search query.
parameters:
- name: query
type: string
required: true
label:
en_US: Query string
zh_Hans: Query string
pt_BR: Query string
human_description:
en_US: used for searching
zh_Hans: used for searching web content
pt_BR: used for searching
llm_description: key words for searching
form: llm
extra:
python:
source: tools/google_search.py
```
* `identity` contains basic information about the tool, including name, author, label, description, etc.
* `parameters` parameter list
* `name` (required) parameter name, unique, cannot have the same name as other parameters.
* `type` (required) parameter type, currently supports `string`, `number`, `boolean`, `select`, `secret-input` five types, corresponding to string, number, boolean, dropdown, encrypted input box. For sensitive information, please use the `secret-input` type.
* `label` (required) parameter label, for frontend display.
* `form` (required) form type, currently supports `llm`, `form` two types.
* In Agent applications, `llm` means that the parameter is inferred by the LLM itself, `form` means that parameters can be preset in advance to use this tool.
* In Workflow applications, both `llm` and `form` need to be filled in by the frontend, but `llm` parameters will be used as input variables for the tool node.
* `required` whether required
* In `llm` mode, if the parameter is required, the Agent will be required to infer this parameter.
* In `form` mode, if the parameter is required, the user will be required to fill in this parameter on the frontend before the conversation begins.
* `options` parameter options
* In `llm` mode, Dify will pass all options to the LLM, and the LLM can infer based on these options.
* In `form` mode, when `type` is `select`, the frontend will display these options.
* `default` default value.
* `min` minimum value, can be set when the parameter type is `number`.
* `max` maximum value, can be set when the parameter type is `number`.
* `human_description` introduction for frontend display, supports multiple languages.
* `placeholder` prompt text for the input field, can be set when the form type is `form` and the parameter type is `string`, `number`, `secret-input`, supports multiple languages.
* `llm_description` introduction passed to the LLM. To make the LLM better understand this parameter, please write as detailed information as possible about this parameter here, so that the LLM can understand the parameter.
#### 4. Preparing Tool Code
After filling in the configuration information for the tool, you can start writing the code for the tool's functionality, implementing the logical purpose of the tool. Create `google_search.py` in the `/tools` directory with the following content:
```python theme={null}
from collections.abc import Generator
from typing import Any
import requests
from dify_plugin import Tool
from dify_plugin.entities.tool import ToolInvokeMessage
SERP_API_URL = "https://serpapi.com/search"
class GoogleSearchTool(Tool):
def _parse_response(self, response: dict) -> dict:
result = {}
if "knowledge_graph" in response:
result["title"] = response["knowledge_graph"].get("title", "")
result["description"] = response["knowledge_graph"].get("description", "")
if "organic_results" in response:
result["organic_results"] = [
{
"title": item.get("title", ""),
"link": item.get("link", ""),
"snippet": item.get("snippet", ""),
}
for item in response["organic_results"]
]
return result
def _invoke(self, tool_parameters: dict[str, Any]) -> Generator[ToolInvokeMessage]:
params = {
"api_key": self.runtime.credentials["serpapi_api_key"],
"q": tool_parameters["query"],
"engine": "google",
"google_domain": "google.com",
"gl": "us",
"hl": "en",
}
response = requests.get(url=SERP_API_URL, params=params, timeout=5)
response.raise_for_status()
valuable_res = self._parse_response(response.json())
yield self.create_json_message(valuable_res)
```
This example means requesting `serpapi` and using `self.create_json_message` to return a formatted `json` data string. If you want to learn more about return data types, you can refer to the [Remote Debugging Plugins](/en/develop-plugin/features-and-specs/plugin-types/remote-debug-a-plugin) and [Persistent Storage KV](/en/develop-plugin/features-and-specs/plugin-types/persistent-storage-kv) documents.
#### 5. Completing the Tool Provider Code
Finally, you need to create an implementation code for the provider to implement the credential validation logic. If credential validation fails, a `ToolProviderCredentialValidationError` exception will be thrown. After validation succeeds, the `google_search` tool service will be correctly requested.
Create a `google.py` file in the `/provider` directory with the following content:
```python theme={null}
from typing import Any
from dify_plugin import ToolProvider
from dify_plugin.errors.tool import ToolProviderCredentialValidationError
from tools.google_search import GoogleSearchTool
class GoogleProvider(ToolProvider):
def _validate_credentials(self, credentials: dict[str, Any]) -> None:
try:
for _ in GoogleSearchTool.from_credentials(credentials).invoke(
tool_parameters={"query": "test", "result_type": "link"},
):
pass
except Exception as e:
raise ToolProviderCredentialValidationError(str(e))
```
### Debugging the Plugin
After completing plugin development, you need to test whether the plugin can function properly. Dify provides a convenient remote debugging method to help you quickly verify the plugin's functionality in a test environment.
Go to the ["Plugin Management"](https://cloud.dify.ai/plugins) page to obtain the remote server address and debugging Key.

Return to the plugin project, copy the `.env.example` file and rename it to `.env`, then fill in the remote server address and debugging Key information you obtained.
`.env` file:
```bash theme={null}
INSTALL_METHOD=remote
REMOTE_INSTALL_URL=debug.dify.ai:5003
REMOTE_INSTALL_KEY=********-****-****-****-************
```
Run the `python -m main` command to start the plugin. On the plugins page, you can see that the plugin has been installed in the Workspace, and other members of the team can also access the plugin.

### Packaging the Plugin (Optional)
After confirming that the plugin can run normally, you can package and name the plugin using the following command line tool. After running, you will discover a `google.difypkg` file in the current folder, which is the final plugin package.
```bash theme={null}
# Replace ./google with the actual path of the plugin project
dify plugin package ./google
```
Congratulations, you have completed the entire process of developing, debugging, and packaging a tool-type plugin!
### Publishing the Plugin (Optional)
If you want to publish the plugin to the Dify Marketplace, please ensure that your plugin follows the specifications in [Publish to Dify Marketplace](/en/develop-plugin/publishing/marketplace-listing/release-to-dify-marketplace). After passing the review, the code will be merged into the main branch and automatically launched to the [Dify Marketplace](https://marketplace.dify.ai/).
[Publishing Overview](/en/develop-plugin/publishing/marketplace-listing/release-overview)
### Explore More
#### **Quick Start:**
* [Developing Extension Plugins](/en/develop-plugin/dev-guides-and-walkthroughs/endpoint)
* [Developing Model Plugins](/en/develop-plugin/dev-guides-and-walkthroughs/creating-new-model-provider)
* [Bundle Plugins: Packaging Multiple Plugins](/en/develop-plugin/features-and-specs/advanced-development/bundle)
#### **Plugin Interface Documentation:**
* [General Specifications](/en/develop-plugin/features-and-specs/plugin-types/general-specifications) - Manifest Structure and Tool Specifications
* [Endpoint](/en/develop-plugin/dev-guides-and-walkthroughs/endpoint) - Detailed Endpoint Definition
* [Reverse Invocation](/en/develop-plugin/features-and-specs/advanced-development/reverse-invocation) - Reverse Invocation of Dify Capabilities
* [Model Schema](/en/develop-plugin/features-and-specs/plugin-types/model-schema) - Models
* [Agent Plugins](/en/develop-plugin/features-and-specs/advanced-development/reverse-invocation) - Extending Agent Strategies
## Next Learning Steps
* [Remote Debugging Plugins](/en/develop-plugin/features-and-specs/plugin-types/remote-debug-a-plugin) - Learn more advanced debugging techniques
* [Persistent Storage](/en/develop-plugin/features-and-specs/plugin-types/persistent-storage-kv) - Learn how to use data storage in plugins
* [Slack Bot Plugin Development Example](/en/develop-plugin/dev-guides-and-walkthroughs/develop-a-slack-bot-plugin) - View a more complex plugin development case
* [Tool Plugin](/en/develop-plugin/features-and-specs/plugin-types/tool) - Explore advanced features of tool plugins
***
[Edit this page](https://github.com/langgenius/dify-docs/edit/main/en/develop-plugin/dev-guides-and-walkthroughs/tool-plugin.mdx) | [Report an issue](https://github.com/langgenius/dify-docs/issues/new?template=docs.yml)
# Trigger Plugin
Source: https://docs.dify.ai/en/develop-plugin/dev-guides-and-walkthroughs/trigger-plugin
## What Is a Trigger Plugin?
Triggers were introduced in Dify v1.10.0 as a new type of start node. Unlike functional nodes such as Code, Tool, or Knowledge Retrieval, the purpose of a trigger is to **convert third-party events into an input format that Dify can recognize and process**.
![Trigger Plugin Intro]() For example, if you configure Dify as the `new email` event receiver in Gmail, every time you receive a new email, Gmail automatically sends an event to Dify that can be used to trigger a workflow. However:
* Gmail's original event format is not compatible with Dify's input format.
* There are thousands of platforms worldwide, each with its own unique event format.
Therefore, we need trigger plugins to define and parse these events from different platforms and in various formats, and to unify them into an input format that Dify can accept.
## Technical Overview
Dify triggers are implemented based on webhooks, a widely adopted mechanism across the web. Many mainstream SaaS platforms (like GitHub, Slack, and Linear) support webhooks with comprehensive developer documentation.
A webhook can be understood as an HTTP-based event dispatcher. **Once an event-receiving address is configured, these SaaS platforms automatically push event data to the target server whenever a subscribed event occurs.**
To handle webhook events from different platforms in a unified way, Dify defines two core concepts: **Subscription** and **Event**.
* **Subscription**: Webhook-based event dispatch requires **registering Dify's network address on a third-party platform's developer console as the target server. In Dify, this configuration process is called a *Subscription*.**
* **Event**: A platform may send multiple types of events—such as *email received*, *email deleted*, or *email marked as read*—all of which are pushed to the registered address. A trigger plugin can handle multiple event types, with each event corresponding to a plugin trigger node in a Dify workflow.
## Plugin Development
The development process for a trigger plugin is consistent with that of other plugin types (Tool, Data Source, Model, etc.).
You can create a development template using the `dify plugin init` command. The generated file structure follows the standard plugin format specification.
```
├── _assets
│ └── icon.svg
├── events
│ └── star
│ ├── star_created.py
│ └── star_created.yaml
├── main.py
├── manifest.yaml
├── provider
│ ├── github.py
│ └── github.yaml
├── README.md
├── PRIVACY.md
└── requirements.txt
```
* `manifest.yaml`: Describes the plugin's basic metadata.
* `provider` directory: Contains the provider's metadata, the code for creating subscriptions, and the code for classifying events after receiving webhook requests.
* **`events` directory: Contains the code for event handling and filtering, which supports local event filtering at the node level. You can create subdirectories to group related events.**
For trigger plugins, the minimum required Dify version must be set to `1.10.0`, and the SDK version must be `>= 0.6.0`.
Next, we'll use GitHub as an example to illustrate the development process of a trigger plugin.
### Subscription Creation
Webhook configuration methods vary significantly across mainstream SaaS platforms:
* Some platforms (such as GitHub) support API-based webhook configuration. For these platforms, once OAuth authentication is completed, Dify can automatically set up the webhook.
* Other platforms (such as Notion) do not provide a webhook configuration API and may require users to perform manual authentication.
To accommodate these differences, we divide the subscription process into two parts: the **Subscription Constructor** and the **Subscription** itself.
For platforms like Notion, creating a subscription requires the user to manually copy the callback URL provided by Dify and paste it into their Notion workspace to complete the webhook setup. This process corresponds to the **Paste URL to create a new subscription** option in the Dify interface.
For example, if you configure Dify as the `new email` event receiver in Gmail, every time you receive a new email, Gmail automatically sends an event to Dify that can be used to trigger a workflow. However:
* Gmail's original event format is not compatible with Dify's input format.
* There are thousands of platforms worldwide, each with its own unique event format.
Therefore, we need trigger plugins to define and parse these events from different platforms and in various formats, and to unify them into an input format that Dify can accept.
## Technical Overview
Dify triggers are implemented based on webhooks, a widely adopted mechanism across the web. Many mainstream SaaS platforms (like GitHub, Slack, and Linear) support webhooks with comprehensive developer documentation.
A webhook can be understood as an HTTP-based event dispatcher. **Once an event-receiving address is configured, these SaaS platforms automatically push event data to the target server whenever a subscribed event occurs.**
To handle webhook events from different platforms in a unified way, Dify defines two core concepts: **Subscription** and **Event**.
* **Subscription**: Webhook-based event dispatch requires **registering Dify's network address on a third-party platform's developer console as the target server. In Dify, this configuration process is called a *Subscription*.**
* **Event**: A platform may send multiple types of events—such as *email received*, *email deleted*, or *email marked as read*—all of which are pushed to the registered address. A trigger plugin can handle multiple event types, with each event corresponding to a plugin trigger node in a Dify workflow.
## Plugin Development
The development process for a trigger plugin is consistent with that of other plugin types (Tool, Data Source, Model, etc.).
You can create a development template using the `dify plugin init` command. The generated file structure follows the standard plugin format specification.
```
├── _assets
│ └── icon.svg
├── events
│ └── star
│ ├── star_created.py
│ └── star_created.yaml
├── main.py
├── manifest.yaml
├── provider
│ ├── github.py
│ └── github.yaml
├── README.md
├── PRIVACY.md
└── requirements.txt
```
* `manifest.yaml`: Describes the plugin's basic metadata.
* `provider` directory: Contains the provider's metadata, the code for creating subscriptions, and the code for classifying events after receiving webhook requests.
* **`events` directory: Contains the code for event handling and filtering, which supports local event filtering at the node level. You can create subdirectories to group related events.**
For trigger plugins, the minimum required Dify version must be set to `1.10.0`, and the SDK version must be `>= 0.6.0`.
Next, we'll use GitHub as an example to illustrate the development process of a trigger plugin.
### Subscription Creation
Webhook configuration methods vary significantly across mainstream SaaS platforms:
* Some platforms (such as GitHub) support API-based webhook configuration. For these platforms, once OAuth authentication is completed, Dify can automatically set up the webhook.
* Other platforms (such as Notion) do not provide a webhook configuration API and may require users to perform manual authentication.
To accommodate these differences, we divide the subscription process into two parts: the **Subscription Constructor** and the **Subscription** itself.
For platforms like Notion, creating a subscription requires the user to manually copy the callback URL provided by Dify and paste it into their Notion workspace to complete the webhook setup. This process corresponds to the **Paste URL to create a new subscription** option in the Dify interface.
![Paste URL to Create a New Subscription]() To implement subscription creation via manual URL pasting, you need to modify two files: `github.yaml` and `github.py`.
Since GitHub webhooks use an encryption mechanism, a secret key is required to decrypt and validate incoming requests. Therefore, you need to declare `webhook_secret` in `github.yaml`.
```yaml theme={null}
subscription_schema:
- name: "webhook_secret"
type: "secret-input"
required: false
label:
zh_Hans: "Webhook Secret"
en_US: "Webhook Secret"
ja_JP: "Webhookシークレット"
help:
en_US: "Optional webhook secret for validating GitHub webhook requests"
ja_JP: "GitHub Webhookリクエストの検証用のオプションのWebhookシークレット"
zh_Hans: "可选的用于验证 GitHub webhook 请求的 webhook 密钥"
```
First, we need to implement the `dispatch_event` interface. All requests sent to the callback URL are processed by this interface, and the processed events will be displayed in the **Request Logs** section for debugging and verification.
To implement subscription creation via manual URL pasting, you need to modify two files: `github.yaml` and `github.py`.
Since GitHub webhooks use an encryption mechanism, a secret key is required to decrypt and validate incoming requests. Therefore, you need to declare `webhook_secret` in `github.yaml`.
```yaml theme={null}
subscription_schema:
- name: "webhook_secret"
type: "secret-input"
required: false
label:
zh_Hans: "Webhook Secret"
en_US: "Webhook Secret"
ja_JP: "Webhookシークレット"
help:
en_US: "Optional webhook secret for validating GitHub webhook requests"
ja_JP: "GitHub Webhookリクエストの検証用のオプションのWebhookシークレット"
zh_Hans: "可选的用于验证 GitHub webhook 请求的 webhook 密钥"
```
First, we need to implement the `dispatch_event` interface. All requests sent to the callback URL are processed by this interface, and the processed events will be displayed in the **Request Logs** section for debugging and verification.
![Manual Setup]() In the code, you can retrieve the `webhook_secret` declared in `github.yaml` via `subscription.properties`.
The `dispatch_event` method needs to determine the event type based on the request content. In the example below, this event extraction is handled by the `_dispatch_trigger_event` method.
For the complete code sample, see [Dify's GitHub trigger plugin](https://github.com/langgenius/dify-plugin-sdks/tree/main/python/examples/github_trigger).
```python theme={null}
class GithubTrigger(Trigger):
"""Handle GitHub webhook event dispatch."""
def _dispatch_event(self, subscription: Subscription, request: Request) -> EventDispatch:
webhook_secret = subscription.properties.get("webhook_secret")
if webhook_secret:
self._validate_signature(request=request, webhook_secret=webhook_secret)
event_type: str | None = request.headers.get("X-GitHub-Event")
if not event_type:
raise TriggerDispatchError("Missing GitHub event type header")
payload: Mapping[str, Any] = self._validate_payload(request)
response = Response(response='{"status": "ok"}', status=200, mimetype="application/json")
event: str = self._dispatch_trigger_event(event_type=event_type, payload=payload)
return EventDispatch(events=[event] if event else [], response=response)
```
### Event Handling
Once an event is extracted, the corresponding implementation must filter the original HTTP request and transform it into an input format that Dify workflows can accept.
Taking the Issue event as an example, you can define the event and its implementation through `events/issues/issues.yaml` and `events/issues/issues.py`, respectively. The event's output can be defined in the `output_schema` section of `issues.yaml`, which follows the same JSON Schema specification as tool plugins.
```yaml theme={null}
identity:
name: issues
author: langgenius
label:
en_US: Issues
zh_Hans: 议题
ja_JP: イシュー
description:
en_US: Unified issues event with actions filter
zh_Hans: 带 actions 过滤的统一 issues 事件
ja_JP: アクションフィルタ付きの統合イシューイベント
output_schema:
type: object
properties:
action:
type: string
issue:
type: object
description: The issue itself
extra:
python:
source: events/issues/issues.py
```
```python theme={null}
from collections.abc import Mapping
from typing import Any
from werkzeug import Request
from dify_plugin.entities.trigger import Variables
from dify_plugin.errors.trigger import EventIgnoreError
from dify_plugin.interfaces.trigger import Event
class IssuesUnifiedEvent(Event):
"""Unified Issues event. Filters by actions and common issue attributes."""
def _on_event(self, request: Request, parameters: Mapping[str, Any], payload: Mapping[str, Any]) -> Variables:
payload = request.get_json()
if not payload:
raise ValueError("No payload received")
allowed_actions = parameters.get("actions") or []
action = payload.get("action")
if allowed_actions and action not in allowed_actions:
raise EventIgnoreError()
issue = payload.get("issue")
if not isinstance(issue, Mapping):
raise ValueError("No issue in payload")
return Variables(variables={**payload})
```
### Event Filtering
To filter out certain events—for example, to focus only on Issue events with a specific label—you can add `parameters` to the event definition in `issues.yaml`. Then, in the `_on_event` method, you can throw an `EventIgnoreError` exception to filter out events that do not meet the configured criteria.
```yaml theme={null}
parameters:
- name: added_label
label:
en_US: Added Label
zh_Hans: 添加的标签
ja_JP: 追加されたラベル
type: string
required: false
description:
en_US: "Only trigger if these specific labels were added (e.g., critical, priority-high, security, comma-separated). Leave empty to trigger for any label addition."
zh_Hans: "仅当添加了这些特定标签时触发(例如:critical, priority-high, security,逗号分隔)。留空则对任何标签添加触发。"
ja_JP: "これらの特定のラベルが追加された場合のみトリガー(例: critical, priority-high, security,カンマ区切り)。空の場合は任意のラベル追加でトリガー。"
```
```python theme={null}
def _check_added_label(self, payload: Mapping[str, Any], added_label_param: str | None) -> None:
"""Check if the added label matches the allowed labels"""
if not added_label_param:
return
allowed_labels = [label.strip() for label in added_label_param.split(",") if label.strip()]
if not allowed_labels:
return
# The payload contains the label that was added
label = payload.get("label", {})
label_name = label.get("name", "")
if label_name not in allowed_labels:
raise EventIgnoreError()
def _on_event(self, request: Request, parameters: Mapping[str, Any], payload: Mapping[str, Any]) -> Variables:
# ...
# Apply all filters
self._check_added_label(payload, parameters.get("added_label"))
return Variables(variables={**payload})
```
### Subscription Creation via OAuth or API Key
To enable automatic subscription creation via OAuth or API key, you need to modify the `github.yaml` and `github.py` files.
In `github.yaml`, add the following fields.
```yaml theme={null}
subscription_constructor:
parameters:
- name: "repository"
label:
en_US: "Repository"
zh_Hans: "仓库"
ja_JP: "リポジトリ"
type: "dynamic-select"
required: true
placeholder:
en_US: "owner/repo"
zh_Hans: "owner/repo"
ja_JP: "owner/repo"
help:
en_US: "GitHub repository in format owner/repo (e.g., microsoft/vscode)"
zh_Hans: "GitHub 仓库,格式为 owner/repo(例如:microsoft/vscode)"
ja_JP: "GitHubリポジトリは owner/repo 形式で入力してください(例: microsoft/vscode)"
credentials_schema:
access_tokens:
help:
en_US: Get your Access Tokens from GitHub
ja_JP: GitHub からアクセストークンを取得してください
zh_Hans: 从 GitHub 获取您的 Access Tokens
label:
en_US: Access Tokens
ja_JP: アクセストークン
zh_Hans: Access Tokens
placeholder:
en_US: Please input your GitHub Access Tokens
ja_JP: GitHub のアクセストークンを入力してください
zh_Hans: 请输入你的 GitHub Access Tokens
required: true
type: secret-input
url: https://github.com/settings/tokens?type=beta
extra:
python:
source: provider/github.py
```
`subscription_constructor` is a concept abstracted by Dify to define how a subscription is constructed. It includes the following fields:
* `parameters` (optional): Defines the parameters required to create a subscription, such as the event types to subscribe to or the target GitHub repository
* `credentials_schema` (optional): Declares the required credentials for creating a subscription with an API key or access token, such as `access_tokens` for GitHub.
* `oauth_schema` (optional): Required for implementing subscription creation via OAuth. For details on how to define it, see [Add OAuth Support to Your Tool Plugin](/en/develop-plugin/dev-guides-and-walkthroughs/tool-oauth).
In `github.py`, create a `Constructor` class to implement the automatic subscription logic.
```python theme={null}
class GithubSubscriptionConstructor(TriggerSubscriptionConstructor):
"""Manage GitHub trigger subscriptions."""
def _validate_api_key(self, credentials: Mapping[str, Any]) -> None:
# ...
def _create_subscription(
self,
endpoint: str,
parameters: Mapping[str, Any],
credentials: Mapping[str, Any],
credential_type: CredentialType,
) -> Subscription:
repository = parameters.get("repository")
if not repository:
raise ValueError("repository is required (format: owner/repo)")
try:
owner, repo = repository.split("/")
except ValueError:
raise ValueError("repository must be in format 'owner/repo'") from None
events: list[str] = parameters.get("events", [])
webhook_secret = uuid.uuid4().hex
url = f"https://api.github.com/repos/{owner}/{repo}/hooks"
headers = {
"Authorization": f"Bearer {credentials.get('access_tokens')}",
"Accept": "application/vnd.github+json",
}
webhook_data = {
"name": "web",
"active": True,
"events": events,
"config": {"url": endpoint, "content_type": "json", "insecure_ssl": "0", "secret": webhook_secret},
}
try:
response = requests.post(url, json=webhook_data, headers=headers, timeout=10)
except requests.RequestException as exc:
raise SubscriptionError(f"Network error while creating webhook: {exc}", error_code="NETWORK_ERROR") from exc
if response.status_code == 201:
webhook = response.json()
return Subscription(
expires_at=int(time.time()) + self._WEBHOOK_TTL,
endpoint=endpoint,
parameters=parameters,
properties={
"external_id": str(webhook["id"]),
"repository": repository,
"events": events,
"webhook_secret": webhook_secret,
"active": webhook.get("active", True),
},
)
response_data: dict[str, Any] = response.json() if response.content else {}
error_msg = response_data.get("message", "Unknown error")
error_details = response_data.get("errors", [])
detailed_error = f"Failed to create GitHub webhook: {error_msg}"
if error_details:
detailed_error += f" Details: {error_details}"
raise SubscriptionError(
detailed_error,
error_code="WEBHOOK_CREATION_FAILED",
external_response=response_data,
)
```
***
Once you have modified these two files, you'll see the **Create with API Key** option in the Dify interface.
Automatic subscription creation via OAuth can also be implemented in the same `Constructor` class: by adding an `oauth_schema` field under `subscription_constructor`, you can enable OAuth authentication.
In the code, you can retrieve the `webhook_secret` declared in `github.yaml` via `subscription.properties`.
The `dispatch_event` method needs to determine the event type based on the request content. In the example below, this event extraction is handled by the `_dispatch_trigger_event` method.
For the complete code sample, see [Dify's GitHub trigger plugin](https://github.com/langgenius/dify-plugin-sdks/tree/main/python/examples/github_trigger).
```python theme={null}
class GithubTrigger(Trigger):
"""Handle GitHub webhook event dispatch."""
def _dispatch_event(self, subscription: Subscription, request: Request) -> EventDispatch:
webhook_secret = subscription.properties.get("webhook_secret")
if webhook_secret:
self._validate_signature(request=request, webhook_secret=webhook_secret)
event_type: str | None = request.headers.get("X-GitHub-Event")
if not event_type:
raise TriggerDispatchError("Missing GitHub event type header")
payload: Mapping[str, Any] = self._validate_payload(request)
response = Response(response='{"status": "ok"}', status=200, mimetype="application/json")
event: str = self._dispatch_trigger_event(event_type=event_type, payload=payload)
return EventDispatch(events=[event] if event else [], response=response)
```
### Event Handling
Once an event is extracted, the corresponding implementation must filter the original HTTP request and transform it into an input format that Dify workflows can accept.
Taking the Issue event as an example, you can define the event and its implementation through `events/issues/issues.yaml` and `events/issues/issues.py`, respectively. The event's output can be defined in the `output_schema` section of `issues.yaml`, which follows the same JSON Schema specification as tool plugins.
```yaml theme={null}
identity:
name: issues
author: langgenius
label:
en_US: Issues
zh_Hans: 议题
ja_JP: イシュー
description:
en_US: Unified issues event with actions filter
zh_Hans: 带 actions 过滤的统一 issues 事件
ja_JP: アクションフィルタ付きの統合イシューイベント
output_schema:
type: object
properties:
action:
type: string
issue:
type: object
description: The issue itself
extra:
python:
source: events/issues/issues.py
```
```python theme={null}
from collections.abc import Mapping
from typing import Any
from werkzeug import Request
from dify_plugin.entities.trigger import Variables
from dify_plugin.errors.trigger import EventIgnoreError
from dify_plugin.interfaces.trigger import Event
class IssuesUnifiedEvent(Event):
"""Unified Issues event. Filters by actions and common issue attributes."""
def _on_event(self, request: Request, parameters: Mapping[str, Any], payload: Mapping[str, Any]) -> Variables:
payload = request.get_json()
if not payload:
raise ValueError("No payload received")
allowed_actions = parameters.get("actions") or []
action = payload.get("action")
if allowed_actions and action not in allowed_actions:
raise EventIgnoreError()
issue = payload.get("issue")
if not isinstance(issue, Mapping):
raise ValueError("No issue in payload")
return Variables(variables={**payload})
```
### Event Filtering
To filter out certain events—for example, to focus only on Issue events with a specific label—you can add `parameters` to the event definition in `issues.yaml`. Then, in the `_on_event` method, you can throw an `EventIgnoreError` exception to filter out events that do not meet the configured criteria.
```yaml theme={null}
parameters:
- name: added_label
label:
en_US: Added Label
zh_Hans: 添加的标签
ja_JP: 追加されたラベル
type: string
required: false
description:
en_US: "Only trigger if these specific labels were added (e.g., critical, priority-high, security, comma-separated). Leave empty to trigger for any label addition."
zh_Hans: "仅当添加了这些特定标签时触发(例如:critical, priority-high, security,逗号分隔)。留空则对任何标签添加触发。"
ja_JP: "これらの特定のラベルが追加された場合のみトリガー(例: critical, priority-high, security,カンマ区切り)。空の場合は任意のラベル追加でトリガー。"
```
```python theme={null}
def _check_added_label(self, payload: Mapping[str, Any], added_label_param: str | None) -> None:
"""Check if the added label matches the allowed labels"""
if not added_label_param:
return
allowed_labels = [label.strip() for label in added_label_param.split(",") if label.strip()]
if not allowed_labels:
return
# The payload contains the label that was added
label = payload.get("label", {})
label_name = label.get("name", "")
if label_name not in allowed_labels:
raise EventIgnoreError()
def _on_event(self, request: Request, parameters: Mapping[str, Any], payload: Mapping[str, Any]) -> Variables:
# ...
# Apply all filters
self._check_added_label(payload, parameters.get("added_label"))
return Variables(variables={**payload})
```
### Subscription Creation via OAuth or API Key
To enable automatic subscription creation via OAuth or API key, you need to modify the `github.yaml` and `github.py` files.
In `github.yaml`, add the following fields.
```yaml theme={null}
subscription_constructor:
parameters:
- name: "repository"
label:
en_US: "Repository"
zh_Hans: "仓库"
ja_JP: "リポジトリ"
type: "dynamic-select"
required: true
placeholder:
en_US: "owner/repo"
zh_Hans: "owner/repo"
ja_JP: "owner/repo"
help:
en_US: "GitHub repository in format owner/repo (e.g., microsoft/vscode)"
zh_Hans: "GitHub 仓库,格式为 owner/repo(例如:microsoft/vscode)"
ja_JP: "GitHubリポジトリは owner/repo 形式で入力してください(例: microsoft/vscode)"
credentials_schema:
access_tokens:
help:
en_US: Get your Access Tokens from GitHub
ja_JP: GitHub からアクセストークンを取得してください
zh_Hans: 从 GitHub 获取您的 Access Tokens
label:
en_US: Access Tokens
ja_JP: アクセストークン
zh_Hans: Access Tokens
placeholder:
en_US: Please input your GitHub Access Tokens
ja_JP: GitHub のアクセストークンを入力してください
zh_Hans: 请输入你的 GitHub Access Tokens
required: true
type: secret-input
url: https://github.com/settings/tokens?type=beta
extra:
python:
source: provider/github.py
```
`subscription_constructor` is a concept abstracted by Dify to define how a subscription is constructed. It includes the following fields:
* `parameters` (optional): Defines the parameters required to create a subscription, such as the event types to subscribe to or the target GitHub repository
* `credentials_schema` (optional): Declares the required credentials for creating a subscription with an API key or access token, such as `access_tokens` for GitHub.
* `oauth_schema` (optional): Required for implementing subscription creation via OAuth. For details on how to define it, see [Add OAuth Support to Your Tool Plugin](/en/develop-plugin/dev-guides-and-walkthroughs/tool-oauth).
In `github.py`, create a `Constructor` class to implement the automatic subscription logic.
```python theme={null}
class GithubSubscriptionConstructor(TriggerSubscriptionConstructor):
"""Manage GitHub trigger subscriptions."""
def _validate_api_key(self, credentials: Mapping[str, Any]) -> None:
# ...
def _create_subscription(
self,
endpoint: str,
parameters: Mapping[str, Any],
credentials: Mapping[str, Any],
credential_type: CredentialType,
) -> Subscription:
repository = parameters.get("repository")
if not repository:
raise ValueError("repository is required (format: owner/repo)")
try:
owner, repo = repository.split("/")
except ValueError:
raise ValueError("repository must be in format 'owner/repo'") from None
events: list[str] = parameters.get("events", [])
webhook_secret = uuid.uuid4().hex
url = f"https://api.github.com/repos/{owner}/{repo}/hooks"
headers = {
"Authorization": f"Bearer {credentials.get('access_tokens')}",
"Accept": "application/vnd.github+json",
}
webhook_data = {
"name": "web",
"active": True,
"events": events,
"config": {"url": endpoint, "content_type": "json", "insecure_ssl": "0", "secret": webhook_secret},
}
try:
response = requests.post(url, json=webhook_data, headers=headers, timeout=10)
except requests.RequestException as exc:
raise SubscriptionError(f"Network error while creating webhook: {exc}", error_code="NETWORK_ERROR") from exc
if response.status_code == 201:
webhook = response.json()
return Subscription(
expires_at=int(time.time()) + self._WEBHOOK_TTL,
endpoint=endpoint,
parameters=parameters,
properties={
"external_id": str(webhook["id"]),
"repository": repository,
"events": events,
"webhook_secret": webhook_secret,
"active": webhook.get("active", True),
},
)
response_data: dict[str, Any] = response.json() if response.content else {}
error_msg = response_data.get("message", "Unknown error")
error_details = response_data.get("errors", [])
detailed_error = f"Failed to create GitHub webhook: {error_msg}"
if error_details:
detailed_error += f" Details: {error_details}"
raise SubscriptionError(
detailed_error,
error_code="WEBHOOK_CREATION_FAILED",
external_response=response_data,
)
```
***
Once you have modified these two files, you'll see the **Create with API Key** option in the Dify interface.
Automatic subscription creation via OAuth can also be implemented in the same `Constructor` class: by adding an `oauth_schema` field under `subscription_constructor`, you can enable OAuth authentication.
![OAuth & API Key Options]() ## Explore More
The interface definitions and implementation methods of core classes in trigger plugin development are as follows.
### Trigger
```python theme={null}
class Trigger(ABC):
@abstractmethod
def _dispatch_event(self, subscription: Subscription, request: Request) -> EventDispatch:
"""
Internal method to implement event dispatch logic.
Subclasses must override this method to handle incoming webhook events.
Implementation checklist:
1. Validate the webhook request:
- Check signature/HMAC using properties when you create the subscription from subscription.properties
- Verify request is from expected source
2. Extract event information:
- Parse event type from headers or body
- Extract relevant payload data
3. Return EventDispatch with:
- events: List of Event names to invoke (can be single or multiple)
- response: Appropriate HTTP response for the webhook
Args:
subscription: The Subscription object with endpoint and properties fields
request: Incoming webhook HTTP request
Returns:
EventDispatch: Event dispatch routing information
Raises:
TriggerValidationError: For security validation failures
TriggerDispatchError: For parsing or routing errors
"""
raise NotImplementedError("This plugin should implement `_dispatch_event` method to enable event dispatch")
```
### TriggerSubscriptionConstructor
```python theme={null}
class TriggerSubscriptionConstructor(ABC, OAuthProviderProtocol):
# OPTIONAL
def _validate_api_key(self, credentials: Mapping[str, Any]) -> None:
raise NotImplementedError(
"This plugin should implement `_validate_api_key` method to enable credentials validation"
)
# OPTIONAL
def _oauth_get_authorization_url(self, redirect_uri: str, system_credentials: Mapping[str, Any]) -> str:
raise NotImplementedError(
"The trigger you are using does not support OAuth, please implement `_oauth_get_authorization_url` method"
)
# OPTIONAL
def _oauth_get_credentials(
self, redirect_uri: str, system_credentials: Mapping[str, Any], request: Request
) -> TriggerOAuthCredentials:
raise NotImplementedError(
"The trigger you are using does not support OAuth, please implement `_oauth_get_credentials` method"
)
# OPTIONAL
def _oauth_refresh_credentials(
self, redirect_uri: str, system_credentials: Mapping[str, Any], credentials: Mapping[str, Any]
) -> OAuthCredentials:
raise NotImplementedError(
"The trigger you are using does not support OAuth, please implement `_oauth_refresh_credentials` method"
)
@abstractmethod
def _create_subscription(
self,
endpoint: str,
parameters: Mapping[str, Any],
credentials: Mapping[str, Any],
credential_type: CredentialType,
) -> Subscription:
"""
Internal method to implement subscription logic.
Subclasses must override this method to handle subscription creation.
Implementation checklist:
1. Use the endpoint parameter provided by Dify
2. Register webhook with external service using their API
3. Store all necessary information in Subscription.properties for future operations(e.g., dispatch_event)
4. Return Subscription with:
- expires_at: Set appropriate expiration time
- endpoint: The webhook endpoint URL allocated by Dify for receiving events, same with the endpoint parameter
- parameters: The parameters of the subscription
- properties: All configuration and external IDs
Args:
endpoint: The webhook endpoint URL allocated by Dify for receiving events
parameters: Subscription creation parameters
credentials: Authentication credentials
credential_type: The type of the credentials, e.g., "api-key", "oauth2", "unauthorized"
Returns:
Subscription: Subscription details with metadata for future operations
Raises:
SubscriptionError: For operational failures (API errors, invalid credentials)
ValueError: For programming errors (missing required params)
"""
raise NotImplementedError(
"This plugin should implement `_create_subscription` method to enable event subscription"
)
@abstractmethod
def _delete_subscription(
self, subscription: Subscription, credentials: Mapping[str, Any], credential_type: CredentialType
) -> UnsubscribeResult:
"""
Internal method to implement unsubscription logic.
Subclasses must override this method to handle subscription removal.
Implementation guidelines:
1. Extract necessary IDs from subscription.properties (e.g., external_id)
2. Use credentials and credential_type to call external service API to delete the webhook
3. Handle common errors (not found, unauthorized, etc.)
4. Always return UnsubscribeResult with detailed status
5. Never raise exceptions for operational failures - use UnsubscribeResult.success=False
Args:
subscription: The Subscription object with endpoint and properties fields
Returns:
UnsubscribeResult: Always returns result, never raises for operational failures
"""
raise NotImplementedError(
"This plugin should implement `_delete_subscription` method to enable event unsubscription"
)
@abstractmethod
def _refresh_subscription(
self, subscription: Subscription, credentials: Mapping[str, Any], credential_type: CredentialType
) -> Subscription:
"""
Internal method to implement subscription refresh logic.
Subclasses must override this method to handle simple expiration extension.
Implementation patterns:
1. For webhooks without expiration (e.g., GitHub):
- Update the Subscription.expires_at=-1 then Dify will never call this method again
2. For lease-based subscriptions (e.g., Microsoft Graph):
- Use the information in Subscription.properties to call service's lease renewal API if available
- Handle renewal limits (some services limit renewal count)
- Update the Subscription.properties and Subscription.expires_at for next time renewal if needed
Args:
subscription: Current subscription with properties
credential_type: The type of the credentials, e.g., "api-key", "oauth2", "unauthorized"
credentials: Current authentication credentials from credentials_schema.
For API key auth, according to `credentials_schema` defined in the YAML.
For OAuth auth, according to `oauth_schema.credentials_schema` defined in the YAML.
For unauthorized auth, there is no credentials.
Returns:
Subscription: Same subscription with extended expiration
or new properties and expires_at for next time renewal
Raises:
SubscriptionError: For operational failures (API errors, invalid credentials)
"""
raise NotImplementedError("This plugin should implement `_refresh` method to enable subscription refresh")
# OPTIONAL
def _fetch_parameter_options(
self, parameter: str, credentials: Mapping[str, Any], credential_type: CredentialType
) -> list[ParameterOption]:
"""
Fetch the parameter options of the trigger.
Implementation guidelines:
When you need to fetch parameter options from an external service, use the credentials
and credential_type to call the external service API, then return the options to Dify
for user selection.
Args:
parameter: The parameter name for which to fetch options
credentials: Authentication credentials for the external service
credential_type: The type of credentials (e.g., "api-key", "oauth2", "unauthorized")
Returns:
list[ParameterOption]: A list of available options for the parameter
Examples:
GitHub Repositories:
>>> result = provider.fetch_parameter_options(parameter="repository")
>>> print(result) # [ParameterOption(label="owner/repo", value="owner/repo")]
Slack Channels:
>>> result = provider.fetch_parameter_options(parameter="channel")
>>> print(result)
```
### Event
```python theme={null}
class Event(ABC):
@abstractmethod
def _on_event(self, request: Request, parameters: Mapping[str, Any], payload: Mapping[str, Any]) -> Variables:
"""
Transform the incoming webhook request into structured Variables.
This method should:
1. Parse the webhook payload from the request
2. Apply filtering logic based on parameters
3. Extract relevant data matching the output_schema
4. Return a structured Variables object
Args:
request: The incoming webhook HTTP request containing the raw payload.
Use request.get_json() to parse JSON body.
parameters: User-configured parameters for filtering and transformation
(e.g., label filters, regex patterns, threshold values).
These come from the subscription configuration.
payload: The decoded payload from previous step `Trigger.dispatch_event`.
It will be delivered into `_on_event` method.
Returns:
Variables: Structured variables matching the output_schema
defined in the event's YAML configuration.
Raises:
EventIgnoreError: When the event should be filtered out based on parameters
ValueError: When the payload is invalid or missing required fields
Example:
>>> def _on_event(self, request, parameters):
... payload = request.get_json()
...
... # Apply filters
... if not self._matches_filters(payload, parameters):
... raise EventIgnoreError()
...
... # Transform data
... return Variables(variables={
... "title": payload["issue"]["title"],
... "author": payload["issue"]["user"]["login"],
... "url": payload["issue"]["html_url"],
... })
"""
def _fetch_parameter_options(self, parameter: str) -> list[ParameterOption]:
"""
Fetch the parameter options of the trigger.
To be implemented by subclasses.
Also, it's optional to implement, that's why it's not an abstract method.
"""
raise NotImplementedError(
"This plugin should implement `_fetch_parameter_options` method to enable dynamic select parameter"
)
```
***
[Edit this page](https://github.com/langgenius/dify-docs/edit/main/en/develop-plugin/dev-guides-and-walkthroughs/trigger-plugin.mdx) | [Report an issue](https://github.com/langgenius/dify-docs/issues/new?template=docs.yml)
# Bundle Plugin Package
Source: https://docs.dify.ai/en/develop-plugin/features-and-specs/advanced-development/bundle
This document introduces the concept and development method of Bundle plugin packages. Bundle plugin packages can aggregate multiple plugins together, supporting three types (Marketplace, GitHub, and Package). The document details the entire process of creating a Bundle project, adding different types of dependencies, and packaging the Bundle project.
A Bundle plugin package is a collection of multiple plugins. It allows packaging several plugins within a single plugin, enabling batch installation and providing more powerful services.
You can use the Dify CLI tool to package multiple plugins into a Bundle. Bundle plugin packages come in three types:
* `Marketplace` type. Stores the plugin's ID and version information. During import, the specific plugin package will be downloaded from the Dify Marketplace.
* `GitHub` type. Stores the GitHub repository address, release version number, and asset filename. During import, Dify will access the corresponding GitHub repository to download the plugin package.
* `Package` type. The plugin package is stored directly within the Bundle. It does not store reference sources, but this might lead to a larger Bundle package size.
### Prerequisites
* Dify plugin scaffolding tool
* Python environment (version 3.12)
For detailed instructions on how to prepare the plugin development scaffolding tool, please refer to [Initialize Development Tools](/en/develop-plugin/getting-started/cli).
### Create a Bundle Project
In the current directory, run the scaffolding command-line tool to create a new plugin package project.
```bash theme={null}
./dify-plugin-darwin-arm64 bundle init
```
If you have renamed the binary file to `dify` and copied it to the `/usr/local/bin` path, you can run the following command to create a new plugin project:
```bash theme={null}
dify bundle init
```
#### 1. Fill in Plugin Information
Follow the prompts to configure the plugin name, author information, and plugin description. If you are collaborating as a team, you can also enter the organization name as the author.
> The name must be 1-128 characters long and can only contain letters, numbers, hyphens, and underscores.

After filling in the information and pressing Enter, the Bundle plugin project directory will be automatically created.

#### 2. Add Dependencies
* **Marketplace**
Execute the following command:
```bash theme={null}
dify-plugin bundle append marketplace . --marketplace_pattern=langgenius/openai:0.0.1
```
Where `marketplace_pattern` is the reference to the plugin in the marketplace, in the format `organization_name/plugin_name:version_number`.
* **GitHub**
Execute the following command:
```bash theme={null}
dify-plugin bundle append github . --repo_pattern=langgenius/openai:0.0.1/openai.difypkg
```
Where `repo_pattern` is the reference to the plugin on GitHub, in the format `organization_name/repository_name:release/asset_name`.
* **Package**
Execute the following command:
```bash theme={null}
dify-plugin bundle append package . --package_path=./openai.difypkg
```
Where `package_path` is the directory of the plugin package.
### Package the Bundle Project
Run the following command to package the Bundle plugin:
```bash theme={null}
dify-plugin bundle package ./bundle
```
After executing the command, a `bundle.difybndl` file will be automatically created in the current directory. This file is the final packaged result.
***
[Edit this page](https://github.com/langgenius/dify-docs/edit/main/en/develop-plugin/features-and-specs/advanced-development/bundle.mdx) | [Report an issue](https://github.com/langgenius/dify-docs/issues/new?template=docs.yml)
# Integrating Custom Models
Source: https://docs.dify.ai/en/develop-plugin/features-and-specs/advanced-development/customizable-model
This document details how to integrate custom models into Dify, using the Xinference model as an example. It covers the complete process, including creating model provider files, writing code based on model type, implementing model invocation logic, handling exceptions, debugging, and publishing. It specifically details the implementation of core methods like LLM invocation, token calculation, credential validation, and parameter generation.
A **custom model** refers to an LLM that you deploy or configure on your own. This document uses the [Xinference model](https://inference.readthedocs.io/en/latest/) as an example to demonstrate how to integrate a custom model into your **model plugin**.
By default, a custom model automatically includes two parameters—its **model type** and **model name**—and does not require additional definitions in the provider YAML file.
You do not need to implement `validate_provider_credential` in your provider configuration file. During runtime, based on the user’s choice of model type or model name, Dify automatically calls the corresponding model layer’s `validate_credentials` method to verify credentials.
## Integrating a Custom Model Plugin
Below are the steps to integrate a custom model:
1. **Create a Model Provider File**\
Identify the model types your custom model will include.
2. **Create Code Files by Model Type**\
Depending on the model’s type (e.g., `llm` or `text_embedding`), create separate code files. Ensure that each model type is organized into distinct logical layers for easier maintenance and future expansion.
3. **Develop the Model Invocation Logic**\
Within each model-type module, create a Python file named for that model type (for example, `llm.py`). Define a class in the file that implements the specific model logic, conforming to the system’s model interface specifications.
4. **Debug the Plugin**\
Write unit and integration tests for the new provider functionality, ensuring that all components work as intended.
***
### 1. **Create a Model Provider File**
In your plugin’s `/provider` directory, create a `xinference.yaml` file.
The `Xinference` family of models supports **LLM**, **Text Embedding**, and **Rerank** model types, so your `xinference.yaml` must include all three.
**Example:**
```yaml theme={null}
provider: xinference # Identifies the provider
label: # Display name; can set both en_US (English) and zh_Hans (Chinese). If zh_Hans is not set, en_US is used by default.
en_US: Xorbits Inference
icon_small: # Small icon; store in the _assets folder of this provider’s directory. The same multi-language logic applies as with label.
en_US: icon_s_en.svg
icon_large: # Large icon
en_US: icon_l_en.svg
help: # Help information
title:
en_US: How to deploy Xinference
zh_Hans: 如何部署 Xinference
url:
en_US: https://github.com/xorbitsai/inference
supported_model_types: # Model types Xinference supports: LLM/Text Embedding/Rerank
- llm
- text-embedding
- rerank
configurate_methods: # Xinference is locally deployed and does not offer predefined models. Refer to its documentation to learn which model to use. Thus, we choose a customizable-model approach.
- customizable-model
provider_credential_schema:
credential_form_schemas:
```
Next, define the `provider_credential_schema`. Since `Xinference` supports text-generation, embeddings, and reranking models, you can configure it as follows:
```yaml theme={null}
provider_credential_schema:
credential_form_schemas:
- variable: model_type
type: select
label:
en_US: Model type
zh_Hans: 模型类型
required: true
options:
- value: text-generation
label:
en_US: Language Model
zh_Hans: 语言模型
- value: embeddings
label:
en_US: Text Embedding
- value: reranking
label:
en_US: Rerank
```
Every model in Xinference requires a `model_name`:
```yaml theme={null}
- variable: model_name
type: text-input
label:
en_US: Model name
zh_Hans: 模型名称
required: true
placeholder:
zh_Hans: 填写模型名称
en_US: Input model name
```
Because Xinference must be locally deployed, users need to supply the server address (server\_url) and model UID. For instance:
```yaml theme={null}
- variable: server_url
label:
zh_Hans: 服务器 URL
en_US: Server url
type: text-input
required: true
placeholder:
zh_Hans: 在此输入 Xinference 的服务器地址,如 https://example.com/xxx
en_US: Enter the url of your Xinference, for example https://example.com/xxx
- variable: model_uid
label:
zh_Hans: 模型 UID
en_US: Model uid
type: text-input
required: true
placeholder:
zh_Hans: 在此输入你的 Model UID
en_US: Enter the model uid
```
Once you’ve defined these parameters, the YAML configuration for your custom model provider is complete. Next, create the functional code files for each model defined in this config.
### 2. Develop the Model Code
Since Xinference supports llm, rerank, speech2text, and tts, you should create corresponding directories under /models, each containing its respective feature code.
Below is an example for an llm-type model. You’d create a file named llm.py, then define a class—such as XinferenceAILargeLanguageModel—that extends \_\_base.large\_language\_model.LargeLanguageModel. This class should include:
* **LLM Invocation**
The core method for invoking the LLM, supporting both streaming and synchronous responses:
```python theme={null}
def _invoke(
self,
model: str,
credentials: dict,
prompt_messages: list[PromptMessage],
model_parameters: dict,
tools: Optional[list[PromptMessageTool]] = None,
stop: Optional[list[str]] = None,
stream: bool = True,
user: Optional[str] = None
) -> Union[LLMResult, Generator]:
"""
Invoke the large language model.
:param model: model name
:param credentials: model credentials
:param prompt_messages: prompt messages
:param model_parameters: model parameters
:param tools: tools for tool calling
:param stop: stop words
:param stream: determines if response is streamed
:param user: unique user id
:return: full response or a chunk generator
"""
```
You’ll need two separate functions to handle streaming and synchronous responses. Python treats any function containing `yield` as a generator returning type `Generator`, so it’s best to split them:
```yaml theme={null}
def _invoke(self, stream: bool, **kwargs) -> Union[LLMResult, Generator]:
if stream:
return self._handle_stream_response(**kwargs)
return self._handle_sync_response(**kwargs)
def _handle_stream_response(self, **kwargs) -> Generator:
for chunk in response:
yield chunk
def _handle_sync_response(self, **kwargs) -> LLMResult:
return LLMResult(**response)
```
* **Pre-calculating Input Tokens**
If your model doesn’t provide a token-counting interface, simply return 0:
```python theme={null}
def get_num_tokens(
self,
model: str,
credentials: dict,
prompt_messages: list[PromptMessage],
tools: Optional[list[PromptMessageTool]] = None
) -> int:
"""
Get the number of tokens for the given prompt messages.
"""
return 0
```
Alternatively, you can call `self._get_num_tokens_by_gpt2(text: str)` from the `AIModel` base class, which uses a GPT-2 tokenizer. Remember this is an approximation and may not match your model exactly.
* **Validating Model Credentials**
Similar to provider-level credential checks, but scoped to a single model:
```python theme={null}
def validate_credentials(self, model: str, credentials: dict) -> None:
"""
Validate model credentials.
"""
```
* **Dynamic Model Parameters Schema**
Unlike [predefined models](/en/develop-plugin/features-and-specs/plugin-types/model-schema), no YAML is defining which parameters a model supports. You must generate a parameter schema dynamically.
For example, Xinference supports `max_tokens`, `temperature`, and `top_p`. Some other providers (e.g., `OpenLLM`) may support parameters like `top_k` only for certain models. This means you need to adapt your schema to each model’s capabilities:
```python theme={null}
def get_customizable_model_schema(self, model: str, credentials: dict) -> AIModelEntity | None:
"""
used to define customizable model schema
"""
rules = [
ParameterRule(
name='temperature', type=ParameterType.FLOAT,
use_template='temperature',
label=I18nObject(
zh_Hans='温度', en_US='Temperature'
)
),
ParameterRule(
name='top_p', type=ParameterType.FLOAT,
use_template='top_p',
label=I18nObject(
zh_Hans='Top P', en_US='Top P'
)
),
ParameterRule(
name='max_tokens', type=ParameterType.INT,
use_template='max_tokens',
min=1,
default=512,
label=I18nObject(
zh_Hans='最大生成长度', en_US='Max Tokens'
)
)
]
# if model is A, add top_k to rules
if model == 'A':
rules.append(
ParameterRule(
name='top_k', type=ParameterType.INT,
use_template='top_k',
min=1,
default=50,
label=I18nObject(
zh_Hans='Top K', en_US='Top K'
)
)
)
"""
some NOT IMPORTANT code here
"""
entity = AIModelEntity(
model=model,
label=I18nObject(
en_US=model
),
fetch_from=FetchFrom.CUSTOMIZABLE_MODEL,
model_type=model_type,
model_properties={
ModelPropertyKey.MODE: ModelType.LLM,
},
parameter_rules=rules
)
return entity
```
* **Error Mapping**
When an error occurs during model invocation, map it to the appropriate InvokeError type recognized by the runtime. This lets Dify handle different errors in a standardized manner:
Runtime Errors:
```
• `InvokeConnectionError`
• `InvokeServerUnavailableError`
• `InvokeRateLimitError`
• `InvokeAuthorizationError`
• `InvokeBadRequestError`
```
```python theme={null}
@property
def _invoke_error_mapping(self) -> dict[type[InvokeError], list[type[Exception]]]:
"""
Map model invocation errors to unified error types.
The key is the error type thrown to the caller.
The value is the error type thrown by the model, which needs to be mapped to a
unified Dify error for consistent handling.
"""
# return {
# InvokeConnectionError: [requests.exceptions.ConnectionError],
# ...
# }
```
For more details on interface methods, see the [Model Documentation](https://docs.dify.ai/zh/develop-plugin/features-and-specs/plugin-types/model-schema).
To view the complete code files discussed in this guide, visit the [GitHub Repository](https://github.com/langgenius/dify-official-plugins/tree/main/models/xinference).
### 3. Debug the Plugin
After finishing development, test the plugin to ensure it runs correctly. For more details, refer to:
### 4. Publish the Plugin
If you’d like to list this plugin on the Dify Marketplace, see:
Publish to Dify Marketplace
## Explore More
**Quick Start:**
* [Develop Extension Plugin](/en/develop-plugin/features-and-specs/plugin-types/general-specifications)
* [Develop Tool Plugin](/en/develop-plugin/dev-guides-and-walkthroughs/tool-plugin)
* [Bundle Plugins: Package Multiple Plugins](/en/develop-plugin/features-and-specs/advanced-development/bundle)
**Plugins Endpoint Docs:**
* [Manifest](/en/develop-plugin/features-and-specs/plugin-types/plugin-info-by-manifest) Structure
* [Endpoint](/en/develop-plugin/dev-guides-and-walkthroughs/endpoint) Definitions
* [Reverse-Invocation of the Dify Service](/en/develop-plugin/features-and-specs/advanced-development/reverse-invocation)
* [Tools](/en/develop-plugin/features-and-specs/plugin-types/tool)
* [Models](/en/develop-plugin/features-and-specs/plugin-types/model-schema)
***
[Edit this page](https://github.com/langgenius/dify-docs/edit/main/en/develop-plugin/features-and-specs/advanced-development/customizable-model.mdx) | [Report an issue](https://github.com/langgenius/dify-docs/issues/new?template=docs.yml)
# Reverse Invocation of Dify Services
Source: https://docs.dify.ai/en/develop-plugin/features-and-specs/advanced-development/reverse-invocation
This document briefly introduces the reverse invocation capability of Dify plugins, meaning plugins can call specified services within the main Dify platform. It lists four types of modules that can be invoked, App (access App data), Model (call model capabilities within the platform), Tool (call other tool plugins within the platform), and Node (call nodes within a Chatflow/Workflow application).
Plugins can freely call some services within the main Dify platform to enhance their capabilities.
### Callable Dify Modules
* [App](/en/develop-plugin/features-and-specs/advanced-development/reverse-invocation-app)
Plugins can access data from Apps within the Dify platform.
* [Model](/en/develop-plugin/features-and-specs/advanced-development/reverse-invocation-model)
Plugins can reverse invoke LLM capabilities within the Dify platform, including all model types and functions within the platform, such as TTS, Rerank, etc.
* [Tool](/en/develop-plugin/features-and-specs/advanced-development/reverse-invocation-tool)
Plugins can call other tool-type plugins within the Dify platform.
* [Node](/en/develop-plugin/features-and-specs/advanced-development/reverse-invocation-node)
Plugins can call nodes within a specific Chatflow/Workflow application in the Dify platform.
## Related Resources
* [Develop Extension Plugins](/en/develop-plugin/dev-guides-and-walkthroughs/endpoint) - Learn how to develop plugins that integrate with external systems
* [Develop a Slack Bot Plugin](/en/develop-plugin/dev-guides-and-walkthroughs/develop-a-slack-bot-plugin) - An example of using reverse invocation to integrate with the Slack platform
* [Bundle Type Plugins](/en/develop-plugin/features-and-specs/advanced-development/bundle) - Learn how to package multiple plugins that use reverse invocation
* [Using Persistent Storage](/en/develop-plugin/features-and-specs/plugin-types/persistent-storage-kv) - Enhance plugin capabilities through KV storage
***
[Edit this page](https://github.com/langgenius/dify-docs/edit/main/en/develop-plugin/features-and-specs/advanced-development/reverse-invocation.mdx) | [Report an issue](https://github.com/langgenius/dify-docs/issues/new?template=docs.yml)
# App
Source: https://docs.dify.ai/en/develop-plugin/features-and-specs/advanced-development/reverse-invocation-app
This document details how plugins can reverse invoke App services within the Dify platform. It covers three types of interfaces Chat interface (for Chatbot/Agent/Chatflow applications), Workflow interface, and Completion interface, providing entry points, invocation specifications, and practical code examples for each.
Reverse invoking an App means that a plugin can access data from an App within Dify. This module supports both streaming and non-streaming App calls. If you are unfamiliar with the basic concepts of reverse invocation, please first read [Reverse Invocation of Dify Services](/en/develop-plugin/features-and-specs/advanced-development/reverse-invocation).
**Interface Types:**
* For `Chatbot/Agent/Chatflow` type applications, they are all chat-based applications and thus share the same input and output parameter types. Therefore, they can be uniformly treated as the **Chat Interface.**
* For Workflow applications, they occupy a separate **Workflow Interface.**
* For Completion (text generation application) applications, they occupy a separate **Completion Interface**.
Please note that plugins are only allowed to access Apps within the Workspace where the plugin resides.
### Calling the Chat Interface
#### **Entry Point**
```python theme={null}
self.session.app.chat
```
#### **Interface Specification**
```python theme={null}
def invoke(
self,
app_id: str,
inputs: dict,
response_mode: Literal["streaming", "blocking"],
conversation_id: str,
files: list,
) -> Generator[dict, None, None] | dict:
pass
```
When `response_mode` is `streaming`, this interface will directly return `Generator[dict]`. Otherwise, it returns `dict`. For specific interface fields, please refer to the return results of `ServiceApi`.
#### **Use Case**
We can call a Chat type App within an `Endpoint` and return the result directly.
```python theme={null}
import json
from typing import Mapping
from werkzeug import Request, Response
from dify_plugin import Endpoint
class Duck(Endpoint):
def _invoke(self, r: Request, values: Mapping, settings: Mapping) -> Response:
"""
Invokes the endpoint with the given request.
"""
app_id = values["app_id"]
def generator():
# Note: The original example incorrectly called self.session.app.workflow.invoke
# It should call self.session.app.chat.invoke for a chat app.
# Assuming a chat app is intended here based on the section title.
response = self.session.app.chat.invoke(
app_id=app_id,
inputs={}, # Provide actual inputs as needed
response_mode="streaming",
conversation_id="some-conversation-id", # Provide a conversation ID if needed
files=[]
)
for data in response:
yield f"{json.dumps(data)}
## Explore More
The interface definitions and implementation methods of core classes in trigger plugin development are as follows.
### Trigger
```python theme={null}
class Trigger(ABC):
@abstractmethod
def _dispatch_event(self, subscription: Subscription, request: Request) -> EventDispatch:
"""
Internal method to implement event dispatch logic.
Subclasses must override this method to handle incoming webhook events.
Implementation checklist:
1. Validate the webhook request:
- Check signature/HMAC using properties when you create the subscription from subscription.properties
- Verify request is from expected source
2. Extract event information:
- Parse event type from headers or body
- Extract relevant payload data
3. Return EventDispatch with:
- events: List of Event names to invoke (can be single or multiple)
- response: Appropriate HTTP response for the webhook
Args:
subscription: The Subscription object with endpoint and properties fields
request: Incoming webhook HTTP request
Returns:
EventDispatch: Event dispatch routing information
Raises:
TriggerValidationError: For security validation failures
TriggerDispatchError: For parsing or routing errors
"""
raise NotImplementedError("This plugin should implement `_dispatch_event` method to enable event dispatch")
```
### TriggerSubscriptionConstructor
```python theme={null}
class TriggerSubscriptionConstructor(ABC, OAuthProviderProtocol):
# OPTIONAL
def _validate_api_key(self, credentials: Mapping[str, Any]) -> None:
raise NotImplementedError(
"This plugin should implement `_validate_api_key` method to enable credentials validation"
)
# OPTIONAL
def _oauth_get_authorization_url(self, redirect_uri: str, system_credentials: Mapping[str, Any]) -> str:
raise NotImplementedError(
"The trigger you are using does not support OAuth, please implement `_oauth_get_authorization_url` method"
)
# OPTIONAL
def _oauth_get_credentials(
self, redirect_uri: str, system_credentials: Mapping[str, Any], request: Request
) -> TriggerOAuthCredentials:
raise NotImplementedError(
"The trigger you are using does not support OAuth, please implement `_oauth_get_credentials` method"
)
# OPTIONAL
def _oauth_refresh_credentials(
self, redirect_uri: str, system_credentials: Mapping[str, Any], credentials: Mapping[str, Any]
) -> OAuthCredentials:
raise NotImplementedError(
"The trigger you are using does not support OAuth, please implement `_oauth_refresh_credentials` method"
)
@abstractmethod
def _create_subscription(
self,
endpoint: str,
parameters: Mapping[str, Any],
credentials: Mapping[str, Any],
credential_type: CredentialType,
) -> Subscription:
"""
Internal method to implement subscription logic.
Subclasses must override this method to handle subscription creation.
Implementation checklist:
1. Use the endpoint parameter provided by Dify
2. Register webhook with external service using their API
3. Store all necessary information in Subscription.properties for future operations(e.g., dispatch_event)
4. Return Subscription with:
- expires_at: Set appropriate expiration time
- endpoint: The webhook endpoint URL allocated by Dify for receiving events, same with the endpoint parameter
- parameters: The parameters of the subscription
- properties: All configuration and external IDs
Args:
endpoint: The webhook endpoint URL allocated by Dify for receiving events
parameters: Subscription creation parameters
credentials: Authentication credentials
credential_type: The type of the credentials, e.g., "api-key", "oauth2", "unauthorized"
Returns:
Subscription: Subscription details with metadata for future operations
Raises:
SubscriptionError: For operational failures (API errors, invalid credentials)
ValueError: For programming errors (missing required params)
"""
raise NotImplementedError(
"This plugin should implement `_create_subscription` method to enable event subscription"
)
@abstractmethod
def _delete_subscription(
self, subscription: Subscription, credentials: Mapping[str, Any], credential_type: CredentialType
) -> UnsubscribeResult:
"""
Internal method to implement unsubscription logic.
Subclasses must override this method to handle subscription removal.
Implementation guidelines:
1. Extract necessary IDs from subscription.properties (e.g., external_id)
2. Use credentials and credential_type to call external service API to delete the webhook
3. Handle common errors (not found, unauthorized, etc.)
4. Always return UnsubscribeResult with detailed status
5. Never raise exceptions for operational failures - use UnsubscribeResult.success=False
Args:
subscription: The Subscription object with endpoint and properties fields
Returns:
UnsubscribeResult: Always returns result, never raises for operational failures
"""
raise NotImplementedError(
"This plugin should implement `_delete_subscription` method to enable event unsubscription"
)
@abstractmethod
def _refresh_subscription(
self, subscription: Subscription, credentials: Mapping[str, Any], credential_type: CredentialType
) -> Subscription:
"""
Internal method to implement subscription refresh logic.
Subclasses must override this method to handle simple expiration extension.
Implementation patterns:
1. For webhooks without expiration (e.g., GitHub):
- Update the Subscription.expires_at=-1 then Dify will never call this method again
2. For lease-based subscriptions (e.g., Microsoft Graph):
- Use the information in Subscription.properties to call service's lease renewal API if available
- Handle renewal limits (some services limit renewal count)
- Update the Subscription.properties and Subscription.expires_at for next time renewal if needed
Args:
subscription: Current subscription with properties
credential_type: The type of the credentials, e.g., "api-key", "oauth2", "unauthorized"
credentials: Current authentication credentials from credentials_schema.
For API key auth, according to `credentials_schema` defined in the YAML.
For OAuth auth, according to `oauth_schema.credentials_schema` defined in the YAML.
For unauthorized auth, there is no credentials.
Returns:
Subscription: Same subscription with extended expiration
or new properties and expires_at for next time renewal
Raises:
SubscriptionError: For operational failures (API errors, invalid credentials)
"""
raise NotImplementedError("This plugin should implement `_refresh` method to enable subscription refresh")
# OPTIONAL
def _fetch_parameter_options(
self, parameter: str, credentials: Mapping[str, Any], credential_type: CredentialType
) -> list[ParameterOption]:
"""
Fetch the parameter options of the trigger.
Implementation guidelines:
When you need to fetch parameter options from an external service, use the credentials
and credential_type to call the external service API, then return the options to Dify
for user selection.
Args:
parameter: The parameter name for which to fetch options
credentials: Authentication credentials for the external service
credential_type: The type of credentials (e.g., "api-key", "oauth2", "unauthorized")
Returns:
list[ParameterOption]: A list of available options for the parameter
Examples:
GitHub Repositories:
>>> result = provider.fetch_parameter_options(parameter="repository")
>>> print(result) # [ParameterOption(label="owner/repo", value="owner/repo")]
Slack Channels:
>>> result = provider.fetch_parameter_options(parameter="channel")
>>> print(result)
```
### Event
```python theme={null}
class Event(ABC):
@abstractmethod
def _on_event(self, request: Request, parameters: Mapping[str, Any], payload: Mapping[str, Any]) -> Variables:
"""
Transform the incoming webhook request into structured Variables.
This method should:
1. Parse the webhook payload from the request
2. Apply filtering logic based on parameters
3. Extract relevant data matching the output_schema
4. Return a structured Variables object
Args:
request: The incoming webhook HTTP request containing the raw payload.
Use request.get_json() to parse JSON body.
parameters: User-configured parameters for filtering and transformation
(e.g., label filters, regex patterns, threshold values).
These come from the subscription configuration.
payload: The decoded payload from previous step `Trigger.dispatch_event`.
It will be delivered into `_on_event` method.
Returns:
Variables: Structured variables matching the output_schema
defined in the event's YAML configuration.
Raises:
EventIgnoreError: When the event should be filtered out based on parameters
ValueError: When the payload is invalid or missing required fields
Example:
>>> def _on_event(self, request, parameters):
... payload = request.get_json()
...
... # Apply filters
... if not self._matches_filters(payload, parameters):
... raise EventIgnoreError()
...
... # Transform data
... return Variables(variables={
... "title": payload["issue"]["title"],
... "author": payload["issue"]["user"]["login"],
... "url": payload["issue"]["html_url"],
... })
"""
def _fetch_parameter_options(self, parameter: str) -> list[ParameterOption]:
"""
Fetch the parameter options of the trigger.
To be implemented by subclasses.
Also, it's optional to implement, that's why it's not an abstract method.
"""
raise NotImplementedError(
"This plugin should implement `_fetch_parameter_options` method to enable dynamic select parameter"
)
```
***
[Edit this page](https://github.com/langgenius/dify-docs/edit/main/en/develop-plugin/dev-guides-and-walkthroughs/trigger-plugin.mdx) | [Report an issue](https://github.com/langgenius/dify-docs/issues/new?template=docs.yml)
# Bundle Plugin Package
Source: https://docs.dify.ai/en/develop-plugin/features-and-specs/advanced-development/bundle
This document introduces the concept and development method of Bundle plugin packages. Bundle plugin packages can aggregate multiple plugins together, supporting three types (Marketplace, GitHub, and Package). The document details the entire process of creating a Bundle project, adding different types of dependencies, and packaging the Bundle project.
A Bundle plugin package is a collection of multiple plugins. It allows packaging several plugins within a single plugin, enabling batch installation and providing more powerful services.
You can use the Dify CLI tool to package multiple plugins into a Bundle. Bundle plugin packages come in three types:
* `Marketplace` type. Stores the plugin's ID and version information. During import, the specific plugin package will be downloaded from the Dify Marketplace.
* `GitHub` type. Stores the GitHub repository address, release version number, and asset filename. During import, Dify will access the corresponding GitHub repository to download the plugin package.
* `Package` type. The plugin package is stored directly within the Bundle. It does not store reference sources, but this might lead to a larger Bundle package size.
### Prerequisites
* Dify plugin scaffolding tool
* Python environment (version 3.12)
For detailed instructions on how to prepare the plugin development scaffolding tool, please refer to [Initialize Development Tools](/en/develop-plugin/getting-started/cli).
### Create a Bundle Project
In the current directory, run the scaffolding command-line tool to create a new plugin package project.
```bash theme={null}
./dify-plugin-darwin-arm64 bundle init
```
If you have renamed the binary file to `dify` and copied it to the `/usr/local/bin` path, you can run the following command to create a new plugin project:
```bash theme={null}
dify bundle init
```
#### 1. Fill in Plugin Information
Follow the prompts to configure the plugin name, author information, and plugin description. If you are collaborating as a team, you can also enter the organization name as the author.
> The name must be 1-128 characters long and can only contain letters, numbers, hyphens, and underscores.

After filling in the information and pressing Enter, the Bundle plugin project directory will be automatically created.

#### 2. Add Dependencies
* **Marketplace**
Execute the following command:
```bash theme={null}
dify-plugin bundle append marketplace . --marketplace_pattern=langgenius/openai:0.0.1
```
Where `marketplace_pattern` is the reference to the plugin in the marketplace, in the format `organization_name/plugin_name:version_number`.
* **GitHub**
Execute the following command:
```bash theme={null}
dify-plugin bundle append github . --repo_pattern=langgenius/openai:0.0.1/openai.difypkg
```
Where `repo_pattern` is the reference to the plugin on GitHub, in the format `organization_name/repository_name:release/asset_name`.
* **Package**
Execute the following command:
```bash theme={null}
dify-plugin bundle append package . --package_path=./openai.difypkg
```
Where `package_path` is the directory of the plugin package.
### Package the Bundle Project
Run the following command to package the Bundle plugin:
```bash theme={null}
dify-plugin bundle package ./bundle
```
After executing the command, a `bundle.difybndl` file will be automatically created in the current directory. This file is the final packaged result.
***
[Edit this page](https://github.com/langgenius/dify-docs/edit/main/en/develop-plugin/features-and-specs/advanced-development/bundle.mdx) | [Report an issue](https://github.com/langgenius/dify-docs/issues/new?template=docs.yml)
# Integrating Custom Models
Source: https://docs.dify.ai/en/develop-plugin/features-and-specs/advanced-development/customizable-model
This document details how to integrate custom models into Dify, using the Xinference model as an example. It covers the complete process, including creating model provider files, writing code based on model type, implementing model invocation logic, handling exceptions, debugging, and publishing. It specifically details the implementation of core methods like LLM invocation, token calculation, credential validation, and parameter generation.
A **custom model** refers to an LLM that you deploy or configure on your own. This document uses the [Xinference model](https://inference.readthedocs.io/en/latest/) as an example to demonstrate how to integrate a custom model into your **model plugin**.
By default, a custom model automatically includes two parameters—its **model type** and **model name**—and does not require additional definitions in the provider YAML file.
You do not need to implement `validate_provider_credential` in your provider configuration file. During runtime, based on the user’s choice of model type or model name, Dify automatically calls the corresponding model layer’s `validate_credentials` method to verify credentials.
## Integrating a Custom Model Plugin
Below are the steps to integrate a custom model:
1. **Create a Model Provider File**\
Identify the model types your custom model will include.
2. **Create Code Files by Model Type**\
Depending on the model’s type (e.g., `llm` or `text_embedding`), create separate code files. Ensure that each model type is organized into distinct logical layers for easier maintenance and future expansion.
3. **Develop the Model Invocation Logic**\
Within each model-type module, create a Python file named for that model type (for example, `llm.py`). Define a class in the file that implements the specific model logic, conforming to the system’s model interface specifications.
4. **Debug the Plugin**\
Write unit and integration tests for the new provider functionality, ensuring that all components work as intended.
***
### 1. **Create a Model Provider File**
In your plugin’s `/provider` directory, create a `xinference.yaml` file.
The `Xinference` family of models supports **LLM**, **Text Embedding**, and **Rerank** model types, so your `xinference.yaml` must include all three.
**Example:**
```yaml theme={null}
provider: xinference # Identifies the provider
label: # Display name; can set both en_US (English) and zh_Hans (Chinese). If zh_Hans is not set, en_US is used by default.
en_US: Xorbits Inference
icon_small: # Small icon; store in the _assets folder of this provider’s directory. The same multi-language logic applies as with label.
en_US: icon_s_en.svg
icon_large: # Large icon
en_US: icon_l_en.svg
help: # Help information
title:
en_US: How to deploy Xinference
zh_Hans: 如何部署 Xinference
url:
en_US: https://github.com/xorbitsai/inference
supported_model_types: # Model types Xinference supports: LLM/Text Embedding/Rerank
- llm
- text-embedding
- rerank
configurate_methods: # Xinference is locally deployed and does not offer predefined models. Refer to its documentation to learn which model to use. Thus, we choose a customizable-model approach.
- customizable-model
provider_credential_schema:
credential_form_schemas:
```
Next, define the `provider_credential_schema`. Since `Xinference` supports text-generation, embeddings, and reranking models, you can configure it as follows:
```yaml theme={null}
provider_credential_schema:
credential_form_schemas:
- variable: model_type
type: select
label:
en_US: Model type
zh_Hans: 模型类型
required: true
options:
- value: text-generation
label:
en_US: Language Model
zh_Hans: 语言模型
- value: embeddings
label:
en_US: Text Embedding
- value: reranking
label:
en_US: Rerank
```
Every model in Xinference requires a `model_name`:
```yaml theme={null}
- variable: model_name
type: text-input
label:
en_US: Model name
zh_Hans: 模型名称
required: true
placeholder:
zh_Hans: 填写模型名称
en_US: Input model name
```
Because Xinference must be locally deployed, users need to supply the server address (server\_url) and model UID. For instance:
```yaml theme={null}
- variable: server_url
label:
zh_Hans: 服务器 URL
en_US: Server url
type: text-input
required: true
placeholder:
zh_Hans: 在此输入 Xinference 的服务器地址,如 https://example.com/xxx
en_US: Enter the url of your Xinference, for example https://example.com/xxx
- variable: model_uid
label:
zh_Hans: 模型 UID
en_US: Model uid
type: text-input
required: true
placeholder:
zh_Hans: 在此输入你的 Model UID
en_US: Enter the model uid
```
Once you’ve defined these parameters, the YAML configuration for your custom model provider is complete. Next, create the functional code files for each model defined in this config.
### 2. Develop the Model Code
Since Xinference supports llm, rerank, speech2text, and tts, you should create corresponding directories under /models, each containing its respective feature code.
Below is an example for an llm-type model. You’d create a file named llm.py, then define a class—such as XinferenceAILargeLanguageModel—that extends \_\_base.large\_language\_model.LargeLanguageModel. This class should include:
* **LLM Invocation**
The core method for invoking the LLM, supporting both streaming and synchronous responses:
```python theme={null}
def _invoke(
self,
model: str,
credentials: dict,
prompt_messages: list[PromptMessage],
model_parameters: dict,
tools: Optional[list[PromptMessageTool]] = None,
stop: Optional[list[str]] = None,
stream: bool = True,
user: Optional[str] = None
) -> Union[LLMResult, Generator]:
"""
Invoke the large language model.
:param model: model name
:param credentials: model credentials
:param prompt_messages: prompt messages
:param model_parameters: model parameters
:param tools: tools for tool calling
:param stop: stop words
:param stream: determines if response is streamed
:param user: unique user id
:return: full response or a chunk generator
"""
```
You’ll need two separate functions to handle streaming and synchronous responses. Python treats any function containing `yield` as a generator returning type `Generator`, so it’s best to split them:
```yaml theme={null}
def _invoke(self, stream: bool, **kwargs) -> Union[LLMResult, Generator]:
if stream:
return self._handle_stream_response(**kwargs)
return self._handle_sync_response(**kwargs)
def _handle_stream_response(self, **kwargs) -> Generator:
for chunk in response:
yield chunk
def _handle_sync_response(self, **kwargs) -> LLMResult:
return LLMResult(**response)
```
* **Pre-calculating Input Tokens**
If your model doesn’t provide a token-counting interface, simply return 0:
```python theme={null}
def get_num_tokens(
self,
model: str,
credentials: dict,
prompt_messages: list[PromptMessage],
tools: Optional[list[PromptMessageTool]] = None
) -> int:
"""
Get the number of tokens for the given prompt messages.
"""
return 0
```
Alternatively, you can call `self._get_num_tokens_by_gpt2(text: str)` from the `AIModel` base class, which uses a GPT-2 tokenizer. Remember this is an approximation and may not match your model exactly.
* **Validating Model Credentials**
Similar to provider-level credential checks, but scoped to a single model:
```python theme={null}
def validate_credentials(self, model: str, credentials: dict) -> None:
"""
Validate model credentials.
"""
```
* **Dynamic Model Parameters Schema**
Unlike [predefined models](/en/develop-plugin/features-and-specs/plugin-types/model-schema), no YAML is defining which parameters a model supports. You must generate a parameter schema dynamically.
For example, Xinference supports `max_tokens`, `temperature`, and `top_p`. Some other providers (e.g., `OpenLLM`) may support parameters like `top_k` only for certain models. This means you need to adapt your schema to each model’s capabilities:
```python theme={null}
def get_customizable_model_schema(self, model: str, credentials: dict) -> AIModelEntity | None:
"""
used to define customizable model schema
"""
rules = [
ParameterRule(
name='temperature', type=ParameterType.FLOAT,
use_template='temperature',
label=I18nObject(
zh_Hans='温度', en_US='Temperature'
)
),
ParameterRule(
name='top_p', type=ParameterType.FLOAT,
use_template='top_p',
label=I18nObject(
zh_Hans='Top P', en_US='Top P'
)
),
ParameterRule(
name='max_tokens', type=ParameterType.INT,
use_template='max_tokens',
min=1,
default=512,
label=I18nObject(
zh_Hans='最大生成长度', en_US='Max Tokens'
)
)
]
# if model is A, add top_k to rules
if model == 'A':
rules.append(
ParameterRule(
name='top_k', type=ParameterType.INT,
use_template='top_k',
min=1,
default=50,
label=I18nObject(
zh_Hans='Top K', en_US='Top K'
)
)
)
"""
some NOT IMPORTANT code here
"""
entity = AIModelEntity(
model=model,
label=I18nObject(
en_US=model
),
fetch_from=FetchFrom.CUSTOMIZABLE_MODEL,
model_type=model_type,
model_properties={
ModelPropertyKey.MODE: ModelType.LLM,
},
parameter_rules=rules
)
return entity
```
* **Error Mapping**
When an error occurs during model invocation, map it to the appropriate InvokeError type recognized by the runtime. This lets Dify handle different errors in a standardized manner:
Runtime Errors:
```
• `InvokeConnectionError`
• `InvokeServerUnavailableError`
• `InvokeRateLimitError`
• `InvokeAuthorizationError`
• `InvokeBadRequestError`
```
```python theme={null}
@property
def _invoke_error_mapping(self) -> dict[type[InvokeError], list[type[Exception]]]:
"""
Map model invocation errors to unified error types.
The key is the error type thrown to the caller.
The value is the error type thrown by the model, which needs to be mapped to a
unified Dify error for consistent handling.
"""
# return {
# InvokeConnectionError: [requests.exceptions.ConnectionError],
# ...
# }
```
For more details on interface methods, see the [Model Documentation](https://docs.dify.ai/zh/develop-plugin/features-and-specs/plugin-types/model-schema).
To view the complete code files discussed in this guide, visit the [GitHub Repository](https://github.com/langgenius/dify-official-plugins/tree/main/models/xinference).
### 3. Debug the Plugin
After finishing development, test the plugin to ensure it runs correctly. For more details, refer to:
### 4. Publish the Plugin
If you’d like to list this plugin on the Dify Marketplace, see:
Publish to Dify Marketplace
## Explore More
**Quick Start:**
* [Develop Extension Plugin](/en/develop-plugin/features-and-specs/plugin-types/general-specifications)
* [Develop Tool Plugin](/en/develop-plugin/dev-guides-and-walkthroughs/tool-plugin)
* [Bundle Plugins: Package Multiple Plugins](/en/develop-plugin/features-and-specs/advanced-development/bundle)
**Plugins Endpoint Docs:**
* [Manifest](/en/develop-plugin/features-and-specs/plugin-types/plugin-info-by-manifest) Structure
* [Endpoint](/en/develop-plugin/dev-guides-and-walkthroughs/endpoint) Definitions
* [Reverse-Invocation of the Dify Service](/en/develop-plugin/features-and-specs/advanced-development/reverse-invocation)
* [Tools](/en/develop-plugin/features-and-specs/plugin-types/tool)
* [Models](/en/develop-plugin/features-and-specs/plugin-types/model-schema)
***
[Edit this page](https://github.com/langgenius/dify-docs/edit/main/en/develop-plugin/features-and-specs/advanced-development/customizable-model.mdx) | [Report an issue](https://github.com/langgenius/dify-docs/issues/new?template=docs.yml)
# Reverse Invocation of Dify Services
Source: https://docs.dify.ai/en/develop-plugin/features-and-specs/advanced-development/reverse-invocation
This document briefly introduces the reverse invocation capability of Dify plugins, meaning plugins can call specified services within the main Dify platform. It lists four types of modules that can be invoked, App (access App data), Model (call model capabilities within the platform), Tool (call other tool plugins within the platform), and Node (call nodes within a Chatflow/Workflow application).
Plugins can freely call some services within the main Dify platform to enhance their capabilities.
### Callable Dify Modules
* [App](/en/develop-plugin/features-and-specs/advanced-development/reverse-invocation-app)
Plugins can access data from Apps within the Dify platform.
* [Model](/en/develop-plugin/features-and-specs/advanced-development/reverse-invocation-model)
Plugins can reverse invoke LLM capabilities within the Dify platform, including all model types and functions within the platform, such as TTS, Rerank, etc.
* [Tool](/en/develop-plugin/features-and-specs/advanced-development/reverse-invocation-tool)
Plugins can call other tool-type plugins within the Dify platform.
* [Node](/en/develop-plugin/features-and-specs/advanced-development/reverse-invocation-node)
Plugins can call nodes within a specific Chatflow/Workflow application in the Dify platform.
## Related Resources
* [Develop Extension Plugins](/en/develop-plugin/dev-guides-and-walkthroughs/endpoint) - Learn how to develop plugins that integrate with external systems
* [Develop a Slack Bot Plugin](/en/develop-plugin/dev-guides-and-walkthroughs/develop-a-slack-bot-plugin) - An example of using reverse invocation to integrate with the Slack platform
* [Bundle Type Plugins](/en/develop-plugin/features-and-specs/advanced-development/bundle) - Learn how to package multiple plugins that use reverse invocation
* [Using Persistent Storage](/en/develop-plugin/features-and-specs/plugin-types/persistent-storage-kv) - Enhance plugin capabilities through KV storage
***
[Edit this page](https://github.com/langgenius/dify-docs/edit/main/en/develop-plugin/features-and-specs/advanced-development/reverse-invocation.mdx) | [Report an issue](https://github.com/langgenius/dify-docs/issues/new?template=docs.yml)
# App
Source: https://docs.dify.ai/en/develop-plugin/features-and-specs/advanced-development/reverse-invocation-app
This document details how plugins can reverse invoke App services within the Dify platform. It covers three types of interfaces Chat interface (for Chatbot/Agent/Chatflow applications), Workflow interface, and Completion interface, providing entry points, invocation specifications, and practical code examples for each.
Reverse invoking an App means that a plugin can access data from an App within Dify. This module supports both streaming and non-streaming App calls. If you are unfamiliar with the basic concepts of reverse invocation, please first read [Reverse Invocation of Dify Services](/en/develop-plugin/features-and-specs/advanced-development/reverse-invocation).
**Interface Types:**
* For `Chatbot/Agent/Chatflow` type applications, they are all chat-based applications and thus share the same input and output parameter types. Therefore, they can be uniformly treated as the **Chat Interface.**
* For Workflow applications, they occupy a separate **Workflow Interface.**
* For Completion (text generation application) applications, they occupy a separate **Completion Interface**.
Please note that plugins are only allowed to access Apps within the Workspace where the plugin resides.
### Calling the Chat Interface
#### **Entry Point**
```python theme={null}
self.session.app.chat
```
#### **Interface Specification**
```python theme={null}
def invoke(
self,
app_id: str,
inputs: dict,
response_mode: Literal["streaming", "blocking"],
conversation_id: str,
files: list,
) -> Generator[dict, None, None] | dict:
pass
```
When `response_mode` is `streaming`, this interface will directly return `Generator[dict]`. Otherwise, it returns `dict`. For specific interface fields, please refer to the return results of `ServiceApi`.
#### **Use Case**
We can call a Chat type App within an `Endpoint` and return the result directly.
```python theme={null}
import json
from typing import Mapping
from werkzeug import Request, Response
from dify_plugin import Endpoint
class Duck(Endpoint):
def _invoke(self, r: Request, values: Mapping, settings: Mapping) -> Response:
"""
Invokes the endpoint with the given request.
"""
app_id = values["app_id"]
def generator():
# Note: The original example incorrectly called self.session.app.workflow.invoke
# It should call self.session.app.chat.invoke for a chat app.
# Assuming a chat app is intended here based on the section title.
response = self.session.app.chat.invoke(
app_id=app_id,
inputs={}, # Provide actual inputs as needed
response_mode="streaming",
conversation_id="some-conversation-id", # Provide a conversation ID if needed
files=[]
)
for data in response:
yield f"{json.dumps(data)}
"
return Response(generator(), status=200, content_type="text/html")
```
### Calling the Workflow Interface
#### **Entry Point**
```python theme={null}
self.session.app.workflow
```
#### **Interface Specification**
```python theme={null}
def invoke(
self,
app_id: str,
inputs: dict,
response_mode: Literal["streaming", "blocking"],
files: list,
) -> Generator[dict, None, None] | dict:
pass
```
### Calling the Completion Interface
#### **Entry Point**
```python theme={null}
self.session.app.completion
```
**Interface Specification**
```python theme={null}
def invoke(
self,
app_id: str,
inputs: dict,
response_mode: Literal["streaming", "blocking"],
files: list,
) -> Generator[dict, None, None] | dict:
pass
```
## Related Resources
* [Reverse Invocation of Dify Services](/en/develop-plugin/features-and-specs/advanced-development/reverse-invocation) - Understand the fundamental concepts of reverse invocation
* [Reverse Invocation Model](/en/develop-plugin/features-and-specs/advanced-development/reverse-invocation-model) - Learn how to call model capabilities within the platform
* [Reverse Invocation Tool](/en/develop-plugin/features-and-specs/advanced-development/reverse-invocation-tool) - Learn how to call other plugins
* [Develop a Slack Bot Plugin](/en/develop-plugin/dev-guides-and-walkthroughs/develop-a-slack-bot-plugin) - A practical application case using reverse invocation
* [Develop Extension Plugins](/en/develop-plugin/dev-guides-and-walkthroughs/endpoint) - Learn how to develop extension plugins
***
[Edit this page](https://github.com/langgenius/dify-docs/edit/main/en/develop-plugin/features-and-specs/advanced-development/reverse-invocation-app.mdx) | [Report an issue](https://github.com/langgenius/dify-docs/issues/new?template=docs.yml)
# Reverse Invocation Model
Source: https://docs.dify.ai/en/develop-plugin/features-and-specs/advanced-development/reverse-invocation-model
This document details how plugins can reverse invoke model services within the Dify platform. It covers specific methods for reverse invoking LLM, Summary, TextEmbedding, Rerank, TTS, Speech2Text, and Moderation models. Each model invocation includes its entry point, interface parameter descriptions, practical usage code examples, and best practice recommendations for invoking models.
Reverse invoking a Model refers to the ability of a plugin to call Dify's internal LLM capabilities, including all model types and functions within the platform, such as TTS, Rerank, etc. If you are not familiar with the basic concepts of reverse invocation, please read [Reverse Invocation of Dify Services](/en/develop-plugin/features-and-specs/advanced-development/reverse-invocation) first.
However, please note that invoking a model requires passing a `ModelConfig` type parameter. Its structure can be referenced in the [General Specifications Definition](/en/develop-plugin/features-and-specs/plugin-types/general-specifications), and this structure will have slight differences for different types of models.
For example, for `LLM` type models, it also needs to include `completion_params` and `mode` parameters. You can manually construct this structure or use `model-selector` type parameters or configurations.
### Invoke LLM
#### **Entry Point**
```python theme={null}
self.session.model.llm
```
#### **Endpoint**
```python theme={null}
def invoke(
self,
model_config: LLMModelConfig,
prompt_messages: list[PromptMessage],
tools: list[PromptMessageTool] | None = None,
stop: list[str] | None = None,
stream: bool = True,
) -> Generator[LLMResultChunk, None, None] | LLMResult:
pass
```
Please note that if the model you are invoking does not have `tool_call` capability, the `tools` passed here will not take effect.
#### **Use Case**
If you want to invoke OpenAI's `gpt-4o-mini` model within a `Tool`, please refer to the following example code:
```python theme={null}
from collections.abc import Generator
from typing import Any
from dify_plugin import Tool
from dify_plugin.entities.model.llm import LLMModelConfig
from dify_plugin.entities.tool import ToolInvokeMessage
from dify_plugin.entities.model.message import SystemPromptMessage, UserPromptMessage
class LLMTool(Tool):
def _invoke(self, tool_parameters: dict[str, Any]) -> Generator[ToolInvokeMessage]:
response = self.session.model.llm.invoke(
model_config=LLMModelConfig(
provider='openai',
model='gpt-4o-mini',
mode='chat',
completion_params={}
),
prompt_messages=[
SystemPromptMessage(
content='you are a helpful assistant'
),
UserPromptMessage(
content=tool_parameters.get('query')
)
],
stream=True
)
for chunk in response:
if chunk.delta.message:
assert isinstance(chunk.delta.message.content, str)
yield self.create_text_message(text=chunk.delta.message.content)
```
Note that the `query` parameter from `tool_parameters` is passed in the code.
### **Best Practice**
It is not recommended to manually construct `LLMModelConfig`. Instead, allow users to select the model they want to use on the UI. In this case, you can modify the tool's parameter list by adding a `model` parameter as follows:
```yaml theme={null}
identity:
name: llm
author: Dify
label:
en_US: LLM
zh_Hans: LLM
pt_BR: LLM
description:
human:
en_US: A tool for invoking a large language model
zh_Hans: 用于调用大型语言模型的工具
pt_BR: A tool for invoking a large language model
llm: A tool for invoking a large language model
parameters:
- name: prompt
type: string
required: true
label:
en_US: Prompt string
zh_Hans: 提示字符串
pt_BR: Prompt string
human_description:
en_US: used for searching
zh_Hans: 用于搜索网页内容
pt_BR: used for searching
llm_description: key words for searching
form: llm
- name: model
type: model-selector
scope: llm
required: true
label:
en_US: Model
zh_Hans: 使用的模型
pt_BR: Model
human_description:
en_US: Model
zh_Hans: 使用的模型
pt_BR: Model
llm_description: which Model to invoke
form: form
extra:
python:
source: tools/llm.py
```
Please note that in this example, the `scope` of `model` is specified as `llm`. This means the user can only select `llm` type parameters. Thus, the code from the previous use case can be modified as follows:
```python theme={null}
from collections.abc import Generator
from typing import Any
from dify_plugin import Tool
from dify_plugin.entities.model.llm import LLMModelConfig
from dify_plugin.entities.tool import ToolInvokeMessage
from dify_plugin.entities.model.message import SystemPromptMessage, UserPromptMessage
class LLMTool(Tool):
def _invoke(self, tool_parameters: dict[str, Any]) -> Generator[ToolInvokeMessage]:
response = self.session.model.llm.invoke(
model_config=tool_parameters.get('model'),
prompt_messages=[
SystemPromptMessage(
content='you are a helpful assistant'
),
UserPromptMessage(
content=tool_parameters.get('query') # Assuming 'query' is still needed, otherwise use 'prompt' from parameters
)
],
stream=True
)
for chunk in response:
if chunk.delta.message:
assert isinstance(chunk.delta.message.content, str)
yield self.create_text_message(text=chunk.delta.message.content)
```
### Invoke Summary
You can request this endpoint to summarize a piece of text. It will use the system model within your current workspace to summarize the text.
**Entry Point**
```python theme={null}
self.session.model.summary
```
**Endpoint**
* `text` is the text to be summarized.
* `instruction` is the additional instruction you want to add, allowing you to summarize the text stylistically.
```python theme={null}
def invoke(
self, text: str, instruction: str,
) -> str:
```
### Invoke TextEmbedding
**Entry Point**
```python theme={null}
self.session.model.text_embedding
```
**Endpoint**
```python theme={null}
def invoke(
self, model_config: TextEmbeddingResult, texts: list[str]
) -> TextEmbeddingResult:
pass
```
### Invoke Rerank
**Entry Point**
```python theme={null}
self.session.model.rerank
```
**Endpoint**
```python theme={null}
def invoke(
self, model_config: RerankModelConfig, docs: list[str], query: str
) -> RerankResult:
pass
```
### Invoke TTS
**Entry Point**
```python theme={null}
self.session.model.tts
```
**Endpoint**
```python theme={null}
def invoke(
self, model_config: TTSModelConfig, content_text: str
) -> Generator[bytes, None, None]:
pass
```
Please note that the `bytes` stream returned by the `tts` endpoint is an `mp3` audio byte stream. Each iteration returns a complete audio segment. If you want to perform more in-depth processing tasks, please choose an appropriate library.
### Invoke Speech2Text
**Entry Point**
```python theme={null}
self.session.model.speech2text
```
**Endpoint**
```python theme={null}
def invoke(
self, model_config: Speech2TextModelConfig, file: IO[bytes]
) -> str:
pass
```
Where `file` is an audio file encoded in `mp3` format.
### Invoke Moderation
**Entry Point**
```python theme={null}
self.session.model.moderation
```
**Endpoint**
```python theme={null}
def invoke(self, model_config: ModerationModelConfig, text: str) -> bool:
pass
```
If this endpoint returns `true`, it indicates that the `text` contains sensitive content.
## Related Resources
* [Reverse Invocation of Dify Services](/en/develop-plugin/features-and-specs/advanced-development/reverse-invocation) - Understand the fundamental concepts of reverse invocation
* [Reverse Invocation of App](/en/develop-plugin/features-and-specs/advanced-development/reverse-invocation-app) - Learn how to invoke Apps within the platform
* [Reverse Invocation of Tool](/en/develop-plugin/features-and-specs/advanced-development/reverse-invocation-tool) - Learn how to invoke other plugins
* [Model Plugin Development Guide](/en/develop-plugin/dev-guides-and-walkthroughs/creating-new-model-provider) - Learn how to develop custom model plugins
* [Model Designing Rules](/en/develop-plugin/features-and-specs/plugin-types/model-designing-rules) - Understand the design principles of model plugins
***
[Edit this page](https://github.com/langgenius/dify-docs/edit/main/en/develop-plugin/features-and-specs/advanced-development/reverse-invocation-model.mdx) | [Report an issue](https://github.com/langgenius/dify-docs/issues/new?template=docs.yml)
# Node
Source: https://docs.dify.ai/en/develop-plugin/features-and-specs/advanced-development/reverse-invocation-node
This document describes how plugins can reverse invoke the functionality of Chatflow/Workflow application nodes within the Dify platform. It primarily covers the invocation methods for two specific nodes, ParameterExtractor and QuestionClassifier. The document details the entry points, interface parameters, and example code for invoking these two nodes.
Reverse invoking a Node means that a plugin can access the capabilities of certain nodes within a Dify Chatflow/Workflow application.
The `ParameterExtractor` and `QuestionClassifier` nodes in `Workflow` encapsulate complex Prompt and code logic, enabling tasks that are difficult to solve with hardcoding through LLMs. Plugins can call these two nodes.
### Calling the Parameter Extractor Node
#### **Entry Point**
```python theme={null}
self.session.workflow_node.parameter_extractor
```
#### **Interface**
```python theme={null}
def invoke(
self,
parameters: list[ParameterConfig],
model: ModelConfig,
query: str,
instruction: str = "",
) -> NodeResponse
pass
```
Here, `parameters` is a list of parameters to be extracted, `model` conforms to the `LLMModelConfig` specification, `query` is the source text for parameter extraction, and `instruction` provides any additional instructions that might be needed for the LLM. For the structure of `NodeResponse`, please refer to this [document](/en/develop-plugin/features-and-specs/plugin-types/general-specifications.mdx#noderesponse).
#### **Use Case**
To extract a person's name from a conversation, you can refer to the following code:
```python theme={null}
from collections.abc import Generator
from dify_plugin.entities.tool import ToolInvokeMessage
from dify_plugin import Tool
from dify_plugin.entities.workflow_node import ModelConfig, ParameterConfig, NodeResponse # Assuming NodeResponse is importable
class ParameterExtractorTool(Tool):
def _invoke(
self, tool_parameters: dict
) -> Generator[ToolInvokeMessage, None, None]:
response: NodeResponse = self.session.workflow_node.parameter_extractor.invoke(
parameters=[
ParameterConfig(
name="name",
description="name of the person",
required=True,
type="string",
)
],
model=ModelConfig(
provider="langgenius/openai/openai",
name="gpt-4o-mini",
completion_params={},
),
query="My name is John Doe",
instruction="Extract the name of the person",
)
# Assuming NodeResponse has an 'outputs' attribute which is a dictionary
extracted_name = response.outputs.get("name", "Name not found")
yield self.create_text_message(extracted_name)
```
### Calling the Question Classifier Node
#### **Entry Point**
```python theme={null}
self.session.workflow_node.question_classifier
```
#### **Interface**
```python theme={null}
def invoke(
self,
classes: list[ClassConfig], # Assuming ClassConfig is defined/imported
model: ModelConfig,
query: str,
instruction: str = "",
) -> NodeResponse:
pass
```
The interface parameters are consistent with `ParameterExtractor`. The final result is stored in `NodeResponse.outputs['class_name']`.
***
[Edit this page](https://github.com/langgenius/dify-docs/edit/main/en/develop-plugin/features-and-specs/advanced-development/reverse-invocation-node.mdx) | [Report an issue](https://github.com/langgenius/dify-docs/issues/new?template=docs.yml)
# Tool
Source: https://docs.dify.ai/en/develop-plugin/features-and-specs/advanced-development/reverse-invocation-tool
This document details how plugins can reverse invoke Tool services within the Dify platform. It covers three types of tool invocation methods calling installed tools (Built-in Tool), calling Workflow as Tool, and calling custom tools (Custom Tool). Each method includes corresponding entry points and interface parameter descriptions.
Reverse invoking a Tool means that a plugin can call other tool-type plugins within the Dify platform. If you are unfamiliar with the basic concepts of reverse invocation, please first read [Reverse Invocation of Dify Services](/en/develop-plugin/features-and-specs/advanced-development/reverse-invocation).
Consider the following scenarios:
* A tool-type plugin has implemented a function, but the result is not as expected, requiring post-processing of the data.
* A task requires a web scraper, and you want the flexibility to choose the scraping service.
* You need to aggregate results from multiple tools, but it's difficult to handle using a Workflow application.
In these cases, you need to call other existing tools within your plugin. These tools might be from the marketplace, a self-built Workflow as a Tool, or a custom tool.
These requirements can be met by calling the `self.session.tool` field of the plugin.
### Calling Installed Tools
Allows the plugin to call various tools installed in the current Workspace, including other tool-type plugins.
**Entry Point**
```python theme={null}
self.session.tool
```
**Interface**
```python theme={null}
def invoke_builtin_tool(
self, provider: str, tool_name: str, parameters: dict[str, Any]
) -> Generator[ToolInvokeMessage, None, None]:
pass
```
Here, `provider` is the plugin ID plus the tool provider name, formatted like `langgenius/google/google`. `tool_name` is the specific tool name, and `parameters` are the arguments passed to the tool.
### Calling Workflow as Tool
For more information on Workflow as Tool, please refer to the [Tool Plugin documentation](/en/develop-plugin/dev-guides-and-walkthroughs/tool-plugin).
**Entry Point**
```python theme={null}
self.session.tool
```
**Interface**
```python theme={null}
def invoke_workflow_tool(
self, provider: str, tool_name: str, parameters: dict[str, Any]
) -> Generator[ToolInvokeMessage, None, None]:
pass
```
In this case, `provider` is the ID of this tool, and `tool_name` is specified during the creation of the tool.
### Calling Custom Tool
**Entry Point**
```python theme={null}
self.session.tool
```
**Interface**
```python theme={null}
def invoke_api_tool(
self, provider: str, tool_name: str, parameters: dict[str, Any]
) -> Generator[ToolInvokeMessage, None, None]:
pass
```
Here, `provider` is the ID of this tool, and `tool_name` is the `operation_id` from the OpenAPI specification. If it doesn't exist, it's the `tool_name` automatically generated by Dify, which can be found on the tool management page.
## Related Resources
* [Reverse Invocation of Dify Services](/en/develop-plugin/features-and-specs/advanced-development/reverse-invocation) - Understand the fundamental concepts of reverse invocation
* [Reverse Invocation App](/en/develop-plugin/features-and-specs/advanced-development/reverse-invocation-app) - Learn how to call Apps within the platform
* [Reverse Invocation Model](/en/develop-plugin/features-and-specs/advanced-development/reverse-invocation-model) - Learn how to call model capabilities within the platform
* [Tool Plugin Development Guide](/en/develop-plugin/dev-guides-and-walkthroughs/tool-plugin) - Learn how to develop tool plugins
* [Advanced Tool Plugins](/en/develop-plugin/dev-guides-and-walkthroughs/tool-plugin) - Learn about advanced features like Workflow as Tool
***
[Edit this page](https://github.com/langgenius/dify-docs/edit/main/en/develop-plugin/features-and-specs/advanced-development/reverse-invocation-tool.mdx) | [Report an issue](https://github.com/langgenius/dify-docs/issues/new?template=docs.yml)
# General Specs
Source: https://docs.dify.ai/en/develop-plugin/features-and-specs/plugin-types/general-specifications
This article will briefly introduce common structures in plugin development. During development, it is strongly recommended to read this alongside [Basic Concepts of Plugin Development](/en/develop-plugin/getting-started/getting-started-dify-plugin) and the [Developer Cheatsheet](/en/develop-plugin/getting-started/cli) for a better understanding of the overall architecture.
### Path Specifications
When filling in file paths in Manifest or any yaml files, follow these two specifications depending on the type of file:
* If the target file is a multimedia file such as an image or video, for example when filling in the plugin's `icon`, you should place these files in the `_assets` folder under the plugin's root directory.
* If the target file is a regular text file, such as `.py` or `.yaml` code files, you should fill in the absolute path of the file within the plugin project.
### Common Structures
When defining plugins, there are some data structures that can be shared between tools, models, and Endpoints. These shared structures are defined here.
#### I18nObject
`I18nObject` is an internationalization structure that conforms to the [IETF BCP 47](https://tools.ietf.org/html/bcp47) standard. Currently, four languages are supported:
English (United States)
Simplified Chinese
Japanese
Portuguese (Brazil)
#### ProviderConfig
`ProviderConfig` is a common provider form structure, applicable to both `Tool` and `Endpoint`
Form item name
Display labels following [IETF BCP 47](https://tools.ietf.org/html/bcp47) standard
Form field type - determines how the field will be rendered in the UI
Optional range specification, varies based on the value of `type`
Whether the field cannot be empty
Default value, only supports basic types: `float`, `int`, `string`
Available options, only used when type is `select`
Help document link label, following [IETF BCP 47](https://tools.ietf.org/html/bcp47)
Help document link
Placeholder text in multiple languages, following [IETF BCP 47](https://tools.ietf.org/html/bcp47)
#### ProviderConfigOption(object)
The value of the option
Display label for the option, following [IETF BCP 47](https://tools.ietf.org/html/bcp47)
#### ProviderConfigType(string)
Configuration information that will be encrypted
Plain text input field
Dropdown selection field
Switch/toggle control
Model configuration selector, including provider name, model name, model parameters, etc.
Application ID selector
Tool configuration selector, including tool provider, name, parameters, etc.
Dataset selector (TBD)
#### ProviderConfigScope(string)
When `type` is `model-selector`:
All model types
Large Language Models only
Text embedding models only
Reranking models only
Text-to-speech models only
Speech-to-text models only
Content moderation models only
Vision models only
When `type` is `app-selector`:
All application types
Chat applications only
Workflow applications only
Completion applications only
When `type` is `tool-selector`:
All tool types
Plugin tools only
API tools only
Workflow tools only
#### ModelConfig
Model provider name containing plugin\_id, in the form of `langgenius/openai/openai`
Specific model name
Enumeration of model types, refer to the [Model Design Rules](/en/develop-plugin/features-and-specs/plugin-types/model-designing-rules#modeltype) document
#### NodeResponse
Variables that are finally input to the node
Output results of the node
Data generated during node execution
#### ToolSelector
Tool provider name
Tool name
Tool description
Tool configuration information
Parameters that need LLM reasoning
Parameter name
Parameter type
Whether the parameter is required
Parameter description
Default value
Available options for the parameter
## Related Resources
* [Basic Concepts of Plugin Development](/en/develop-plugin/getting-started/getting-started-dify-plugin) - Comprehensive understanding of Dify plugin development
* [Developer Cheatsheet](/en/develop-plugin/dev-guides-and-walkthroughs/cheatsheet) - Quick reference for common commands and concepts in plugin development
* [Tool Plugin Development Details](/en/develop-plugin/dev-guides-and-walkthroughs/tool-plugin) - Understanding how to define plugin information and the tool plugin development process
* [Model Design Rules](/en/develop-plugin/features-and-specs/plugin-types/model-designing-rules) - Understanding the standards for model configuration
***
[Edit this page](https://github.com/langgenius/dify-docs/edit/main/en/develop-plugin/features-and-specs/plugin-types/general-specifications.mdx) | [Report an issue](https://github.com/langgenius/dify-docs/issues/new?template=docs.yml)
# Model Specs
Source: https://docs.dify.ai/en/develop-plugin/features-and-specs/plugin-types/model-designing-rules
This document defines in detail the core concepts and structures for Dify model plugin development, including model providers (Provider), AI model entities (AIModelEntity), model types (ModelType), configuration methods (ConfigurateMethod), model features (ModelFeature), parameter rules (ParameterRule), price configuration (PriceConfig), and detailed data structure specifications for various credential modes.
* Model provider rules are based on the [Provider](#provider) entity.
* Model rules are based on the [AIModelEntity](#aimodelentity) entity.
> All entities below are based on `Pydantic BaseModel`, and can be found in the `entities` module.
### Provider
Provider identifier, e.g.: `openai`
Provider display name, i18n, can set both `en_US` (English) and `zh_Hans` (Chinese) languages
Chinese label, if not set, will default to using `en_US`
English label
Provider description, i18n
Chinese description
English description
Provider small icon, stored in the `_assets` directory under the corresponding provider implementation directory
Chinese icon
English icon
Provider large icon, stored in the `_assets` directory under the corresponding provider implementation directory
Chinese icon
English icon
Background color value, e.g.: #FFFFFF, if empty, will display the frontend default color value
Help information
Help title, i18n
Chinese title
English title
Help link, i18n
Chinese link
English link
Supported model types
Configuration methods
Provider credential specifications
Model credential specifications
### AIModelEntity
Model identifier, e.g.: `gpt-3.5-turbo`
Model display name, i18n, can set both `en_US` (English) and `zh_Hans` (Chinese) languages
Chinese label
English label
Model type
List of supported features
Model properties
Mode (available for model type `llm`)
Context size (available for model types `llm` and `text-embedding`)
Maximum number of chunks (available for model types `text-embedding` and `moderation`)
Maximum file upload limit, unit: MB. (available for model type `speech2text`)
Supported file extension formats, e.g.: mp3,mp4 (available for model type `speech2text`)
Default voice, required: alloy,echo,fable,onyx,nova,shimmer (available for model type `tts`)
List of available voices (available for model type `tts`)
Voice model
Voice model display name
Supported languages for voice model
Word limit for single conversion, defaults to paragraph segmentation (available for model type `tts`)
Supported audio file extension formats, e.g.: mp3,wav (available for model type `tts`)
Number of concurrent tasks supported for text-to-audio conversion (available for model type `tts`)
Maximum characters per chunk (available for model type `moderation`)
Model call parameter rules
Pricing information
Whether deprecated. If deprecated, the model list will no longer display it, but those already configured can continue to be used. Default is False.
### ModelType
Text generation model
Text embedding model
Rerank model
Speech to text
Text to speech
Content moderation
### ConfigurateMethod
Predefined model - Indicates that the user only needs to configure unified provider credentials to use predefined models under the provider.
Customizable model - The user needs to add credential configuration for each model.
Fetch from remote - Similar to the `predefined-model` configuration method, only unified provider credentials are needed, but the models are fetched from the provider using the credential information.
### ModelFeature
Agent reasoning, generally models over 70B have chain-of-thought capabilities.
Vision, i.e.: image understanding.
Tool calling
Multiple tool calling
Streaming tool calling
### FetchFrom
Predefined model
Remote model
### LLMMode
Text completion
Chat
### ParameterRule
Actual parameter name for model call
Use template
> For details on using templates, you can refer to the examples in [Creating a New Model Provider](/en/develop-plugin/dev-guides-and-walkthroughs/creating-new-model-provider).
There are 5 pre-configured variable content templates by default:
* `temperature`
* `top_p`
* `frequency_penalty`
* `presence_penalty`
* `max_tokens`
You can directly set the template variable name in `use_template`, which will use the default configuration from entities.defaults.PARAMETER\_RULE\_TEMPLATE without needing to set any parameters other than `name` and `use_template`. If additional configuration parameters are set, they will override the default configuration. You can refer to `openai/llm/gpt-3.5-turbo.yaml` for examples.
Label, i18n
Chinese label
English label
Parameter type
Integer
Floating point
String
Boolean
Help information
Chinese help information
English help information
Whether required, default is False
Default value
Minimum value, only applicable to numeric types
Maximum value, only applicable to numeric types
Precision, decimal places to retain, only applicable to numeric types
Dropdown option values, only applicable when `type` is `string`, if not set or is null, then option values are not restricted
### PriceConfig
Input unit price, i.e., Prompt unit price
Output unit price, i.e., returned content unit price
Price unit, e.g., if priced per 1M tokens, then the unit token number corresponding to the unit price is `0.000001`
Currency unit
### ProviderCredentialSchema
Credential form specifications
### ModelCredentialSchema
Model identifier, default variable name is `model`
Model form item display name
English
Chinese
Model prompt content
English
Chinese
Credential form specifications
### CredentialFormSchema
Form item variable name
Form item label
English
Chinese
Form item type
Whether required
Default value
Form item attribute specific to `select` or `radio`, defines dropdown content
Form item attribute specific to `text-input`, form item placeholder
English
Chinese
Form item attribute specific to `text-input`, defines maximum input length, 0 means no limit
Display when other form item values meet conditions, empty means always display
#### FormType
Text input component
Password input component
Single-select dropdown
Radio component
Switch component, only supports `true` and `false`
#### FormOption
Label
English
Chinese
Dropdown option value
Display when other form item values meet conditions, empty means always display
#### FormShowOnObject
Other form item variable name
Other form item variable value
## Related Resources
* [Model Architecture Details](/en/develop-plugin/features-and-specs/plugin-types/model-schema) - Deep dive into the architecture specifications of model plugins
* [Quickly Integrate a New Model](/en/develop-plugin/dev-guides-and-walkthroughs/creating-new-model-provider) - Learn how to apply these rules to add new models
* [General Specifications](/en/develop-plugin/features-and-specs/plugin-types/general-specifications) - Understand the configuration of plugin manifest files
* [Create a New Model Provider](/en/develop-plugin/dev-guides-and-walkthroughs/creating-new-model-provider) - Develop brand new model provider plugins
***
[Edit this page](https://github.com/langgenius/dify-docs/edit/main/en/develop-plugin/features-and-specs/plugin-types/model-designing-rules.mdx) | [Report an issue](https://github.com/langgenius/dify-docs/issues/new?template=docs.yml)
# Model API Interface
Source: https://docs.dify.ai/en/develop-plugin/features-and-specs/plugin-types/model-schema
Comprehensive guide to the Dify model plugin API including implementation requirements for LLM, TextEmbedding, Rerank, Speech2text, and Text2speech models, with detailed specifications for all related data structures.
## Introduction
This document details the interfaces and data structures required to implement Dify model plugins. It serves as a technical reference for developers integrating AI models with the Dify platform.
Before diving into this API reference, we recommend first reading the [Model Design Rules](/en/develop-plugin/features-and-specs/plugin-types/model-designing-rules) and [Model Plugin Introduction](/en/develop-plugin/features-and-specs/plugin-types/model-designing-rules) for conceptual understanding.
Learn how to implement model provider classes for different AI service providers
Implementation details for the five supported model types: LLM, Embedding, Rerank, Speech2Text, and Text2Speech
Comprehensive reference for all data structures used in the model API
Guidelines for proper error mapping and exception handling
## Model Provider
Every model provider must inherit from the `__base.model_provider.ModelProvider` base class and implement the credential validation interface.
### Provider Credential Validation
```python Core Implementation theme={null}
def validate_provider_credentials(self, credentials: dict) -> None:
"""
Validate provider credentials by making a test API call
Parameters:
credentials: Provider credentials as defined in `provider_credential_schema`
Raises:
CredentialsValidateFailedError: If validation fails
"""
try:
# Example implementation - validate using an LLM model instance
model_instance = self.get_model_instance(ModelType.LLM)
model_instance.validate_credentials(
model="example-model",
credentials=credentials
)
except Exception as ex:
logger.exception(f"Credential validation failed")
raise CredentialsValidateFailedError(f"Invalid credentials: {str(ex)}")
```
```python Custom Model Provider theme={null}
class XinferenceProvider(Provider):
def validate_provider_credentials(self, credentials: dict) -> None:
"""
For custom-only model providers, a simple implementation is sufficient
as validation happens at the model level
"""
pass
```
Credential information as defined in the provider's YAML configuration under `provider_credential_schema`.
Typically includes fields like `api_key`, `organization_id`, etc.
If validation fails, your implementation must raise a `CredentialsValidateFailedError` exception. This ensures proper error handling in the Dify UI.
For predefined model providers, you should implement a thorough validation method that verifies the credentials work with your API. For custom model providers (where each model has its own credentials), a simplified implementation is sufficient.
## Models
Dify supports five distinct model types, each requiring implementation of specific interfaces. However, all model types share some common requirements.
### Common Interfaces
Every model implementation, regardless of type, must implement these two fundamental methods:
#### 1. Model Credential Validation
```python Implementation theme={null}
def validate_credentials(self, model: str, credentials: dict) -> None:
"""
Validate that the provided credentials work with the specified model
Parameters:
model: The specific model identifier (e.g., "gpt-4")
credentials: Authentication details for the model
Raises:
CredentialsValidateFailedError: If validation fails
"""
try:
# Make a lightweight API call to verify credentials
# Example: List available models or check account status
response = self._api_client.validate_api_key(credentials["api_key"])
# Verify the specific model is available if applicable
if model not in response.get("available_models", []):
raise CredentialsValidateFailedError(f"Model {model} is not available")
except ApiException as e:
raise CredentialsValidateFailedError(str(e))
```
The specific model identifier to validate (e.g., "gpt-4", "claude-3-opus")
Credential information as defined in the provider's configuration
#### 2. Error Mapping
```python Implementation theme={null}
@property
def _invoke_error_mapping(self) -> dict[type[InvokeError], list[type[Exception]]]:
"""
Map provider-specific exceptions to standardized Dify error types
Returns:
Dictionary mapping Dify error types to lists of provider exception types
"""
return {
InvokeConnectionError: [
requests.exceptions.ConnectionError,
requests.exceptions.Timeout,
ConnectionRefusedError
],
InvokeServerUnavailableError: [
ServiceUnavailableError,
HTTPStatusError
],
InvokeRateLimitError: [
RateLimitExceededError,
QuotaExceededError
],
InvokeAuthorizationError: [
AuthenticationError,
InvalidAPIKeyError,
PermissionDeniedError
],
InvokeBadRequestError: [
InvalidRequestError,
ValidationError
]
}
```
Network connection failures, timeouts
Service provider is down or unavailable
Rate limits or quota limits reached
Authentication or permission issues
Invalid parameters or requests
You can alternatively raise these standardized error types directly in your code instead of relying on the error mapping. This approach gives you more control over error messages.
### LLM Implementation
To implement a Large Language Model provider, inherit from the `__base.large_language_model.LargeLanguageModel` base class and implement these methods:
#### 1. Model Invocation
This core method handles both streaming and non-streaming API calls to language models.
```python Core Implementation theme={null}
def _invoke(
self,
model: str,
credentials: dict,
prompt_messages: list[PromptMessage],
model_parameters: dict,
tools: Optional[list[PromptMessageTool]] = None,
stop: Optional[list[str]] = None,
stream: bool = True,
user: Optional[str] = None
) -> Union[LLMResult, Generator[LLMResultChunk, None, None]]:
"""
Invoke the language model
"""
# Prepare API parameters
api_params = self._prepare_api_parameters(
model,
credentials,
prompt_messages,
model_parameters,
tools,
stop
)
try:
# Choose between streaming and non-streaming implementation
if stream:
return self._invoke_stream(model, api_params, user)
else:
return self._invoke_sync(model, api_params, user)
except Exception as e:
# Map errors using the error mapping property
self._handle_api_error(e)
# Helper methods for streaming and non-streaming calls
def _invoke_stream(self, model, api_params, user):
# Implement streaming call and yield chunks
pass
def _invoke_sync(self, model, api_params, user):
# Implement synchronous call and return complete result
pass
```
Model identifier (e.g., "gpt-4", "claude-3")
Authentication credentials for the API
Message list in Dify's standardized format:
* For `completion` models: Include a single `UserPromptMessage`
* For `chat` models: Include `SystemPromptMessage`, `UserPromptMessage`, `AssistantPromptMessage`, `ToolPromptMessage` as needed
Model-specific parameters (temperature, top\_p, etc.) as defined in the model's YAML configuration
Tool definitions for function calling capabilities
Stop sequences that will halt model generation when encountered
Whether to return a streaming response
User identifier for API monitoring
A generator yielding chunks of the response as they become available
A complete response object with the full generated text
We recommend implementing separate helper methods for streaming and non-streaming calls to keep your code organized and maintainable.
#### 2. Token Counting
```python Implementation theme={null}
def get_num_tokens(
self,
model: str,
credentials: dict,
prompt_messages: list[PromptMessage],
tools: Optional[list[PromptMessageTool]] = None
) -> int:
"""
Calculate the number of tokens in the prompt
"""
# Convert prompt_messages to the format expected by the tokenizer
text = self._convert_messages_to_text(prompt_messages)
try:
# Use the appropriate tokenizer for this model
tokenizer = self._get_tokenizer(model)
return len(tokenizer.encode(text))
except Exception:
# Fall back to a generic tokenizer
return self._get_num_tokens_by_gpt2(text)
```
If the model doesn't provide a tokenizer, you can use the base class's `_get_num_tokens_by_gpt2(text)` method for a reasonable approximation.
#### 3. Custom Model Schema (Optional)
```python Implementation theme={null}
def get_customizable_model_schema(
self,
model: str,
credentials: dict
) -> Optional[AIModelEntity]:
"""
Get parameter schema for custom models
"""
# For fine-tuned models, you might return the base model's schema
if model.startswith("ft:"):
base_model = self._extract_base_model(model)
return self._get_predefined_model_schema(base_model)
# For standard models, return None to use the predefined schema
return None
```
This method is only necessary for providers that support custom models. It allows custom models to inherit parameter rules from base models.
### TextEmbedding Implementation
Text embedding models convert text into high-dimensional vectors that capture semantic meaning, which is useful for retrieval, similarity search, and classification.
To implement a Text Embedding provider, inherit from the `__base.text_embedding_model.TextEmbeddingModel` base class:
#### 1. Core Embedding Method
```python Implementation theme={null}
def _invoke(
self,
model: str,
credentials: dict,
texts: list[str],
user: Optional[str] = None
) -> TextEmbeddingResult:
"""
Generate embedding vectors for multiple texts
"""
# Set up API client with credentials
client = self._get_client(credentials)
# Handle batching if needed
batch_size = self._get_batch_size(model)
all_embeddings = []
total_tokens = 0
start_time = time.time()
# Process in batches to avoid API limits
for i in range(0, len(texts), batch_size):
batch = texts[i:i+batch_size]
# Make API call to the embeddings endpoint
response = client.embeddings.create(
model=model,
input=batch,
user=user
)
# Extract embeddings from response
batch_embeddings = [item.embedding for item in response.data]
all_embeddings.extend(batch_embeddings)
# Track token usage
total_tokens += response.usage.total_tokens
# Calculate usage metrics
elapsed_time = time.time() - start_time
usage = self._create_embedding_usage(
model=model,
tokens=total_tokens,
latency=elapsed_time
)
return TextEmbeddingResult(
model=model,
embeddings=all_embeddings,
usage=usage
)
```
Embedding model identifier
Authentication credentials for the embedding service
List of text inputs to embed
User identifier for API monitoring
A structured response containing:
* model: The model used for embedding
* embeddings: List of embedding vectors corresponding to input texts
* usage: Metadata about token usage and costs
#### 2. Token Counting Method
```python Implementation theme={null}
def get_num_tokens(
self,
model: str,
credentials: dict,
texts: list[str]
) -> int:
"""
Calculate the number of tokens in the texts to be embedded
"""
# Join all texts to estimate token count
combined_text = " ".join(texts)
try:
# Use the appropriate tokenizer for this model
tokenizer = self._get_tokenizer(model)
return len(tokenizer.encode(combined_text))
except Exception:
# Fall back to a generic tokenizer
return self._get_num_tokens_by_gpt2(combined_text)
```
For embedding models, accurate token counting is important for cost estimation, but not critical for functionality. The `_get_num_tokens_by_gpt2` method provides a reasonable approximation for most models.
### Rerank Implementation
Reranking models help improve search quality by re-ordering a set of candidate documents based on their relevance to a query, typically after an initial retrieval phase.
To implement a Reranking provider, inherit from the `__base.rerank_model.RerankModel` base class:
```python Implementation theme={null}
def _invoke(
self,
model: str,
credentials: dict,
query: str,
docs: list[str],
score_threshold: Optional[float] = None,
top_n: Optional[int] = None,
user: Optional[str] = None
) -> RerankResult:
"""
Rerank documents based on relevance to the query
"""
# Set up API client with credentials
client = self._get_client(credentials)
# Prepare request data
request_data = {
"query": query,
"documents": docs,
}
# Call reranking API endpoint
response = client.rerank(
model=model,
**request_data,
user=user
)
# Process results
ranked_results = []
for i, result in enumerate(response.results):
# Create RerankDocument for each result
doc = RerankDocument(
index=result.document_index, # Original index in docs list
text=docs[result.document_index], # Original text
score=result.relevance_score # Relevance score
)
ranked_results.append(doc)
# Sort by score in descending order
ranked_results.sort(key=lambda x: x.score, reverse=True)
# Apply score threshold filtering if specified
if score_threshold is not None:
ranked_results = [doc for doc in ranked_results if doc.score >= score_threshold]
# Apply top_n limit if specified
if top_n is not None and top_n > 0:
ranked_results = ranked_results[:top_n]
return RerankResult(
model=model,
docs=ranked_results
)
```
Reranking model identifier
Authentication credentials for the API
The search query text
List of document texts to be reranked
Optional minimum score threshold for filtering results
Optional limit on number of results to return
User identifier for API monitoring
A structured response containing:
* model: The model used for reranking
* docs: List of RerankDocument objects with index, text, and score
Reranking can be computationally expensive, especially with large document sets. Implement batching for large document collections to avoid timeouts or excessive resource consumption.
### Speech2Text Implementation
Speech-to-text models convert spoken language from audio files into written text, enabling applications like transcription services, voice commands, and accessibility features.
To implement a Speech-to-Text provider, inherit from the `__base.speech2text_model.Speech2TextModel` base class:
```python Implementation theme={null}
def _invoke(
self,
model: str,
credentials: dict,
file: IO[bytes],
user: Optional[str] = None
) -> str:
"""
Convert speech audio to text
"""
# Set up API client with credentials
client = self._get_client(credentials)
try:
# Determine the file format
file_format = self._detect_audio_format(file)
# Prepare the file for API submission
# Most APIs require either a file path or binary data
audio_data = file.read()
# Call the speech-to-text API
response = client.audio.transcriptions.create(
model=model,
file=("audio.mp3", audio_data), # Adjust filename based on actual format
user=user
)
# Extract and return the transcribed text
return response.text
except Exception as e:
# Map to appropriate error type
self._handle_api_error(e)
finally:
# Reset file pointer for potential reuse
file.seek(0)
```
```python Helper Methods theme={null}
def _detect_audio_format(self, file: IO[bytes]) -> str:
"""
Detect the audio format based on file header
"""
# Read the first few bytes to check the file signature
header = file.read(12)
file.seek(0) # Reset file pointer
# Check for common audio format signatures
if header.startswith(b'RIFF') and header[8:12] == b'WAVE':
return 'wav'
elif header.startswith(b'ID3') or header.startswith(b'\xFF\xFB'):
return 'mp3'
elif header.startswith(b'OggS'):
return 'ogg'
elif header.startswith(b'fLaC'):
return 'flac'
else:
# Default or additional format checks
return 'mp3' # Default assumption
```
Speech-to-text model identifier
Authentication credentials for the API
Binary file object containing the audio to transcribe
User identifier for API monitoring
The transcribed text from the audio file
Audio format detection is important for proper handling of different file types. Consider implementing a helper method to detect the format from the file header as shown in the example.
Some speech-to-text APIs have file size limitations. Consider implementing chunking for large audio files if necessary.
### Text2Speech Implementation
Text-to-speech models convert written text into natural-sounding speech, enabling applications such as voice assistants, screen readers, and audio content generation.
To implement a Text-to-Speech provider, inherit from the `__base.text2speech_model.Text2SpeechModel` base class:
```python Implementation theme={null}
def _invoke(
self,
model: str,
credentials: dict,
content_text: str,
streaming: bool,
user: Optional[str] = None
) -> Union[bytes, Generator[bytes, None, None]]:
"""
Convert text to speech audio
"""
# Set up API client with credentials
client = self._get_client(credentials)
# Get voice settings based on model
voice = self._get_voice_for_model(model)
try:
# Choose implementation based on streaming preference
if streaming:
return self._stream_audio(
client=client,
model=model,
text=content_text,
voice=voice,
user=user
)
else:
return self._generate_complete_audio(
client=client,
model=model,
text=content_text,
voice=voice,
user=user
)
except Exception as e:
self._handle_api_error(e)
```
```python Helper Methods theme={null}
def _stream_audio(self, client, model, text, voice, user=None):
"""
Implementation for streaming audio output
"""
# Make API request with stream=True
response = client.audio.speech.create(
model=model,
voice=voice,
input=text,
stream=True,
user=user
)
# Yield chunks as they arrive
for chunk in response:
if chunk:
yield chunk
def _generate_complete_audio(self, client, model, text, voice, user=None):
"""
Implementation for complete audio file generation
"""
# Make API request for complete audio
response = client.audio.speech.create(
model=model,
voice=voice,
input=text,
user=user
)
# Get audio data as bytes
audio_data = response.content
return audio_data
```
Text-to-speech model identifier
Authentication credentials for the API
Text content to be converted to speech
Whether to return streaming audio or complete file
User identifier for API monitoring
A generator yielding audio chunks as they become available
Complete audio data as bytes
Most text-to-speech APIs require you to specify a voice along with the model. Consider implementing a mapping between Dify's model identifiers and the provider's voice options.
Long text inputs may need to be chunked for better speech synthesis quality. Consider implementing text preprocessing to handle punctuation, numbers, and special characters properly.
### Moderation Implementation
Moderation models analyze content for potentially harmful, inappropriate, or unsafe material, helping maintain platform safety and content policies.
To implement a Moderation provider, inherit from the `__base.moderation_model.ModerationModel` base class:
```python Implementation theme={null}
def _invoke(
self,
model: str,
credentials: dict,
text: str,
user: Optional[str] = None
) -> bool:
"""
Analyze text for harmful content
Returns:
bool: False if the text is safe, True if it contains harmful content
"""
# Set up API client with credentials
client = self._get_client(credentials)
try:
# Call moderation API
response = client.moderations.create(
model=model,
input=text,
user=user
)
# Check if any categories were flagged
result = response.results[0]
# Return True if flagged in any category, False if safe
return result.flagged
except Exception as e:
# Log the error but default to safe if there's an API issue
# This is a conservative approach - production systems might want
# different fallback behavior
logger.error(f"Moderation API error: {str(e)}")
return False
```
```python Detailed Implementation theme={null}
def _invoke(
self,
model: str,
credentials: dict,
text: str,
user: Optional[str] = None
) -> bool:
"""
Analyze text for harmful content with detailed category checking
"""
# Set up API client with credentials
client = self._get_client(credentials)
try:
# Call moderation API
response = client.moderations.create(
model=model,
input=text,
user=user
)
# Get detailed category results
result = response.results[0]
categories = result.categories
# Check specific categories based on your application's needs
# For example, you might want to flag certain categories but not others
critical_violations = [
categories.harassment,
categories.hate,
categories.self_harm,
categories.sexual,
categories.violence
]
# Flag content if any critical category is violated
return any(critical_violations)
except Exception as e:
self._handle_api_error(e)
# Default to safe in case of error
return False
```
Moderation model identifier
Authentication credentials for the API
Text content to be analyzed
User identifier for API monitoring
Boolean indicating content safety:
* False: The content is safe
* True: The content contains harmful material
Moderation is often used as a safety mechanism. Consider the implications of false negatives (letting harmful content through) versus false positives (blocking safe content) when implementing your solution.
Many moderation APIs provide detailed category scores rather than just a binary result. Consider extending this implementation to return more detailed information about specific categories of harmful content if your application needs it.
### Entities
#### PromptMessageRole
Message role
```python theme={null}
class PromptMessageRole(Enum):
"""
Enum class for prompt message.
"""
SYSTEM = "system"
USER = "user"
ASSISTANT = "assistant"
TOOL = "tool"
```
#### PromptMessageContentType
Message content type, divided into plain text and images.
```python theme={null}
class PromptMessageContentType(Enum):
"""
Enum class for prompt message content type.
"""
TEXT = 'text'
IMAGE = 'image'
```
#### PromptMessageContent
Message content base class, used only for parameter declaration, cannot be initialized.
```python theme={null}
class PromptMessageContent(BaseModel):
"""
Model class for prompt message content.
"""
type: PromptMessageContentType
data: str # Content data
```
Currently supports two types: text and images, and can support text and multiple images simultaneously.
You need to initialize `TextPromptMessageContent` and `ImagePromptMessageContent` separately.
#### TextPromptMessageContent
```python theme={null}
class TextPromptMessageContent(PromptMessageContent):
"""
Model class for text prompt message content.
"""
type: PromptMessageContentType = PromptMessageContentType.TEXT
```
When passing in text and images, text needs to be constructed as this entity as part of the `content` list.
#### ImagePromptMessageContent
```python theme={null}
class ImagePromptMessageContent(PromptMessageContent):
"""
Model class for image prompt message content.
"""
class DETAIL(Enum):
LOW = 'low'
HIGH = 'high'
type: PromptMessageContentType = PromptMessageContentType.IMAGE
detail: DETAIL = DETAIL.LOW # Resolution
```
When passing in text and images, images need to be constructed as this entity as part of the `content` list.
`data` can be a `url` or an image `base64` encoded string.
#### PromptMessage
Base class for all Role message bodies, used only for parameter declaration, cannot be initialized.
```python theme={null}
class PromptMessage(ABC, BaseModel):
"""
Model class for prompt message.
"""
role: PromptMessageRole # Message role
content: Optional[str | list[PromptMessageContent]] = None # Supports two types: string and content list. The content list is for multimodal needs, see PromptMessageContent for details.
name: Optional[str] = None # Name, optional.
```
#### UserPromptMessage
UserMessage message body, represents user messages.
```python theme={null}
class UserPromptMessage(PromptMessage):
"""
Model class for user prompt message.
"""
role: PromptMessageRole = PromptMessageRole.USER
```
#### AssistantPromptMessage
Represents model response messages, typically used for `few-shots` or chat history input.
```python theme={null}
class AssistantPromptMessage(PromptMessage):
"""
Model class for assistant prompt message.
"""
class ToolCall(BaseModel):
"""
Model class for assistant prompt message tool call.
"""
class ToolCallFunction(BaseModel):
"""
Model class for assistant prompt message tool call function.
"""
name: str # Tool name
arguments: str # Tool parameters
id: str # Tool ID, only effective for OpenAI tool call, a unique ID for tool invocation, the same tool can be called multiple times
type: str # Default is function
function: ToolCallFunction # Tool call information
role: PromptMessageRole = PromptMessageRole.ASSISTANT
tool_calls: list[ToolCall] = [] # Model's tool call results (only returned when tools are passed in and the model decides to call them)
```
Here `tool_calls` is the list of `tool call` returned by the model after passing in `tools` to the model.
#### SystemPromptMessage
Represents system messages, typically used to set system instructions for the model.
```python theme={null}
class SystemPromptMessage(PromptMessage):
"""
Model class for system prompt message.
"""
role: PromptMessageRole = PromptMessageRole.SYSTEM
```
#### ToolPromptMessage
Represents tool messages, used to pass results to the model for next-step planning after a tool has been executed.
```python theme={null}
class ToolPromptMessage(PromptMessage):
"""
Model class for tool prompt message.
"""
role: PromptMessageRole = PromptMessageRole.TOOL
tool_call_id: str # Tool call ID, if OpenAI tool call is not supported, you can also pass in the tool name
```
The base class's `content` passes in the tool execution result.
#### PromptMessageTool
```python theme={null}
class PromptMessageTool(BaseModel):
"""
Model class for prompt message tool.
"""
name: str # Tool name
description: str # Tool description
parameters: dict # Tool parameters dict
```
***
#### LLMResult
```python theme={null}
class LLMResult(BaseModel):
"""
Model class for llm result.
"""
model: str # Actually used model
prompt_messages: list[PromptMessage] # Prompt message list
message: AssistantPromptMessage # Reply message
usage: LLMUsage # Tokens used and cost information
system_fingerprint: Optional[str] = None # Request fingerprint, refer to OpenAI parameter definition
```
#### LLMResultChunkDelta
Delta entity within each iteration in streaming response
```python theme={null}
class LLMResultChunkDelta(BaseModel):
"""
Model class for llm result chunk delta.
"""
index: int # Sequence number
message: AssistantPromptMessage # Reply message
usage: Optional[LLMUsage] = None # Tokens used and cost information, only returned in the last message
finish_reason: Optional[str] = None # Completion reason, only returned in the last message
```
#### LLMResultChunk
Iteration entity in streaming response
```python theme={null}
class LLMResultChunk(BaseModel):
"""
Model class for llm result chunk.
"""
model: str # Actually used model
prompt_messages: list[PromptMessage] # Prompt message list
system_fingerprint: Optional[str] = None # Request fingerprint, refer to OpenAI parameter definition
delta: LLMResultChunkDelta # Changes in content for each iteration
```
#### LLMUsage
```python theme={null}
class LLMUsage(ModelUsage):
"""
Model class for llm usage.
"""
prompt_tokens: int # Tokens used by prompt
prompt_unit_price: Decimal # Prompt unit price
prompt_price_unit: Decimal # Prompt price unit, i.e., unit price based on how many tokens
prompt_price: Decimal # Prompt cost
completion_tokens: int # Tokens used by completion
completion_unit_price: Decimal # Completion unit price
completion_price_unit: Decimal # Completion price unit, i.e., unit price based on how many tokens
completion_price: Decimal # Completion cost
total_tokens: int # Total tokens used
total_price: Decimal # Total cost
currency: str # Currency unit
latency: float # Request time (s)
```
***
#### TextEmbeddingResult
```python theme={null}
class TextEmbeddingResult(BaseModel):
"""
Model class for text embedding result.
"""
model: str # Actually used model
embeddings: list[list[float]] # Embedding vector list, corresponding to the input texts list
usage: EmbeddingUsage # Usage information
```
#### EmbeddingUsage
```python theme={null}
class EmbeddingUsage(ModelUsage):
"""
Model class for embedding usage.
"""
tokens: int # Tokens used
total_tokens: int # Total tokens used
unit_price: Decimal # Unit price
price_unit: Decimal # Price unit, i.e., unit price based on how many tokens
total_price: Decimal # Total cost
currency: str # Currency unit
latency: float # Request time (s)
```
***
#### RerankResult
```python theme={null}
class RerankResult(BaseModel):
"""
Model class for rerank result.
"""
model: str # Actually used model
docs: list[RerankDocument] # List of reranked segments
```
#### RerankDocument
```python theme={null}
class RerankDocument(BaseModel):
"""
Model class for rerank document.
"""
index: int # Original sequence number
text: str # Segment text content
score: float # Score
```
## Related Resources
* [Model Design Rules](/en/develop-plugin/features-and-specs/plugin-types/model-designing-rules) - Understand the standards for model configuration
* [Model Plugin Introduction](/en/develop-plugin/features-and-specs/plugin-types/model-designing-rules) - Quickly understand the basic concepts of model plugins
* [Quickly Integrate a New Model](/en/develop-plugin/dev-guides-and-walkthroughs/creating-new-model-provider) - Learn how to add new models to existing providers
* [Create a New Model Provider](/en/develop-plugin/dev-guides-and-walkthroughs/creating-new-model-provider) - Learn how to develop brand new model providers
***
[Edit this page](https://github.com/langgenius/dify-docs/edit/main/en/develop-plugin/features-and-specs/plugin-types/model-schema.mdx) | [Report an issue](https://github.com/langgenius/dify-docs/issues/new?template=docs.yml)
# Multilingual README
Source: https://docs.dify.ai/en/develop-plugin/features-and-specs/plugin-types/multilingual-readme
This article introduces the file specifications for Dify plugins' multilingual READMEs and their display rule in Dify Marketplace.
You can create multilingual READMEs for your plugin, which will be displayed in [Dify Marketplace](https://marketplace.dify.ai) and other locations based on the user's preferred language.
### README **File Specifications**
| **Language** | Required | Filename | Path | **Description** |
| :------------------ | :------- | :-------------------------- | :----------------------------------------------------- | :--------------------------------------------------------------- |
| **English** | Yes | `README.md` | Plugin root directory | / |
| **Other Languages** | No | `README_.md` | In the `readme` folder under the plugin root directory | Currently supports Japanese, Portuguese, and Simplified Chinese. |
Here's an example of the directory structure:
```bash theme={null}
...
├── main.py
├── manifest.yaml
├── readme
│ ├── README_ja_JP.md
│ ├── README_pt_BR.md
│ └── README_zh_Hans.md
├── README.md
...
```
### How Multilingual READMEs are Displayed **in Marketplace**
When your plugin has a README in the user's preferred language, the plugin's detail page in Dify Marketplace will display that language version of the README.
![Plugin Details Page En]() ***
[Edit this page](https://github.com/langgenius/dify-docs/edit/main/en/develop-plugin/features-and-specs/plugin-types/multilingual-readme.mdx) | [Report an issue](https://github.com/langgenius/dify-docs/issues/new?template=docs.yml)
# Persistent Storage
Source: https://docs.dify.ai/en/develop-plugin/features-and-specs/plugin-types/persistent-storage-kv
Learn how to implement persistent storage in your Dify plugins using the built-in key-value database to maintain state across interactions.
## Overview
Most plugin tools and endpoints operate in a stateless, single-round interaction model:
1. Receive a request
2. Process data
3. Return a response
4. End the interaction
However, many real-world applications require maintaining state across multiple interactions. This is where **persistent storage** becomes essential.
The persistent storage mechanism allows plugins to store data persistently within the same workspace, enabling stateful applications and memory features.
Dify currently provides a key-value (KV) storage system for plugins, with plans to introduce more flexible and powerful storage interfaces in the future based on developer needs.
## Accessing Storage
All storage operations are performed through the `storage` object available in your plugin's session:
```python theme={null}
# Access the storage interface
storage = self.session.storage
```
## Storage Operations
### Storing Data
Store data with the `set` method:
```python theme={null}
def set(self, key: str, val: bytes) -> None:
"""
Store data in persistent storage
Parameters:
key: Unique identifier for your data
val: Binary data to store (bytes)
"""
pass
```
The value must be in `bytes` format. This provides flexibility to store various types of data, including files.
#### Example: Storing Different Data Types
```python theme={null}
# String data (must convert to bytes)
storage.set("user_name", "John Doe".encode('utf-8'))
# JSON data
import json
user_data = {"name": "John", "age": 30, "preferences": ["AI", "NLP"]}
storage.set("user_data", json.dumps(user_data).encode('utf-8'))
# File data
with open("image.jpg", "rb") as f:
image_data = f.read()
storage.set("profile_image", image_data)
```
### Retrieving Data
Retrieve stored data with the `get` method:
```python theme={null}
def get(self, key: str) -> bytes:
"""
Retrieve data from persistent storage
Parameters:
key: Unique identifier for your data
Returns:
The stored data as bytes, or None if key doesn't exist
"""
pass
```
#### Example: Retrieving and Converting Data
```python theme={null}
# Retrieving string data
name_bytes = storage.get("user_name")
if name_bytes:
name = name_bytes.decode('utf-8')
print(f"Retrieved name: {name}")
# Retrieving JSON data
import json
user_data_bytes = storage.get("user_data")
if user_data_bytes:
user_data = json.loads(user_data_bytes.decode('utf-8'))
print(f"User preferences: {user_data['preferences']}")
```
### Deleting Data
Delete stored data with the `delete` method:
```python theme={null}
def delete(self, key: str) -> None:
"""
Delete data from persistent storage
Parameters:
key: Unique identifier for the data to delete
"""
pass
```
## Best Practices
Create a consistent naming scheme for your keys to avoid conflicts and make your code more maintainable.
Always check if data exists before processing it, as the key might not be found.
Convert complex objects to JSON or other serialized formats before storing.
Wrap storage operations in try/except blocks to handle potential errors gracefully.
## Common Use Cases
* **User Preferences**: Store user settings and preferences between sessions
* **Conversation History**: Maintain context from previous conversations
* **API Tokens**: Store authentication tokens securely
* **Cached Data**: Store frequently accessed data to reduce API calls
* **File Storage**: Store user-uploaded files or generated content
***
[Edit this page](https://github.com/langgenius/dify-docs/edit/main/en/develop-plugin/features-and-specs/plugin-types/persistent-storage-kv.mdx) | [Report an issue](https://github.com/langgenius/dify-docs/issues/new?template=docs.yml)
# Manifest
Source: https://docs.dify.ai/en/develop-plugin/features-and-specs/plugin-types/plugin-info-by-manifest
The Manifest is a YAML-compliant file that defines the most basic information of a **plugin**, including but not limited to the plugin name, author, included tools, models, etc. For the overall architecture of the plugin, please refer to [Basic Concepts of Plugin Development](/en/develop-plugin/getting-started/getting-started-dify-plugin) and [Developer Cheatsheet](/en/develop-plugin/dev-guides-and-walkthroughs/cheatsheet).
If the format of this file is incorrect, the parsing and packaging process of the plugin will fail.
### Code Example
Below is a simple example of a Manifest file. The meaning and function of each data item will be explained later.
For reference code of other plugins, please refer to the [GitHub code repository](https://github.com/langgenius/dify-official-plugins/blob/main/tools/google/manifest.yaml).
```yaml theme={null}
version: 0.0.1
type: "plugin"
author: "Yeuoly"
name: "neko"
label:
en_US: "Neko"
created_at: "2024-07-12T08:03:44.658609186Z"
icon: "icon.svg"
resource:
memory: 1048576
permission:
tool:
enabled: true
model:
enabled: true
llm: true
endpoint:
enabled: true
app:
enabled: true
storage:
enabled: true
size: 1048576
plugins:
endpoints:
- "provider/neko.yaml"
meta:
version: 0.0.1
arch:
- "amd64"
- "arm64"
runner:
language: "python"
version: "3.12"
entrypoint: "main"
privacy: "./privacy.md"
```
### Structure
The version of the plugin.
Plugin type, currently only `plugin` is supported, `bundle` will be supported in the future.
Author, defined as the organization name in the Marketplace.
Multilingual name.
Creation time, required by the Marketplace not to be later than the current time.
Icon path.
Resources to apply for.
Maximum memory usage, mainly related to AWS Lambda resource application on SaaS, unit in bytes.
Permission application.
Permission for reverse invocation of tools.
Whether to enable tool permissions.
Permission for reverse invocation of models.
Whether to enable model permissions.
Whether to enable large language model permissions.
Whether to enable text embedding model permissions.
Whether to enable rerank model permissions.
Whether to enable text-to-speech model permissions.
Whether to enable speech-to-text model permissions.
Whether to enable content moderation model permissions.
Permission for reverse invocation of nodes.
Whether to enable node permissions.
Permission to register `endpoint`.
Whether to enable endpoint permissions.
Permission for reverse invocation of `app`.
Whether to enable app permissions.
Permission to apply for persistent storage.
Whether to enable storage permissions.
Maximum allowed persistent memory size, unit in bytes.
A list of `yaml` files for the specific capabilities extended by the plugin. Absolute path within the plugin package. For example, if you need to extend a model, you need to define a file similar to `openai.yaml`, fill in the file path here, and the file at this path must actually exist, otherwise packaging will fail.
Extending both tools and models simultaneously is not allowed.
Having no extensions is not allowed.
Extending both models and Endpoints simultaneously is not allowed.
Currently, only one provider is supported for each type of extension.
Plugin extension for [Tool](/en/develop-plugin/dev-guides-and-walkthroughs/tool-plugin) providers.
Plugin extension for [Model](/en/develop-plugin/features-and-specs/plugin-types/model-designing-rules) providers.
Plugin extension for [Endpoints](/en/develop-plugin/dev-guides-and-walkthroughs/develop-a-slack-bot-plugin) providers.
Plugin extension for [Agent Strategy](/en/develop-plugin/features-and-specs/advanced-development/reverse-invocation) providers.
Metadata for the plugin.
`manifest` format version, initial version `0.0.1`.
Supported architectures, currently only `amd64` and `arm64` are supported.
Runtime configuration.
Programming language. Currently only Python is supported.
Language version, currently only `3.12` is supported.
Program entry point, should be `main` under Python.
Specifies the relative path or URL of the plugin's privacy policy file, e.g., `"./privacy.md"` or `"https://your-web/privacy"`. If you plan to list the plugin on the Dify Marketplace, **this field is required** to provide clear user data usage and privacy statements. For detailed filling guidelines, please refer to [Plugin Privacy Data Protection Guidelines](/en/develop-plugin/publishing/standards/privacy-protection-guidelines).
***
[Edit this page](https://github.com/langgenius/dify-docs/edit/main/en/develop-plugin/features-and-specs/plugin-types/plugin-info-by-manifest.mdx) | [Report an issue](https://github.com/langgenius/dify-docs/issues/new?template=docs.yml)
# Plugin Logging
Source: https://docs.dify.ai/en/develop-plugin/features-and-specs/plugin-types/plugin-logging
As a plugin developer, you may want to print arbitrary strings to logs during plugin processing for development or debugging purposes.
For this purpose, the plugin SDK implements a handler for Python's standard `logging` library. By using this, you can output any string to both the **standard output during remote debugging** and the **plugin daemon container logs** (community edition only).
## Sample
Import `plugin_logger_handler` and add it to your logger as a handler. Below is a sample code for a tool plugin.
```python theme={null}
from collections.abc import Generator
from typing import Any
from dify_plugin import Tool
from dify_plugin.entities.tool import ToolInvokeMessage
# Import logging and custom handler
import logging
from dify_plugin.config.logger_format import plugin_logger_handler
# Set up logging with the custom handler
logger = logging.getLogger(__name__)
logger.setLevel(logging.INFO)
logger.addHandler(plugin_logger_handler)
class LoggerDemoTool(Tool):
def _invoke(self, tool_parameters: dict[str, Any]) -> Generator[ToolInvokeMessage]:
# Log messages with different severity levels
logger.info("This is an INFO log message.")
logger.warning("This is a WARNING log message.")
logger.error("This is an ERROR log message.")
yield self.create_text_message("Hello, Dify!")
```
***
[Edit this page](https://github.com/langgenius/dify-docs/edit/main/en/develop-plugin/features-and-specs/plugin-types/plugin-logging.mdx) | [Report an issue](https://github.com/langgenius/dify-docs/issues/new?template=docs.yml)
# Plugin Debugging
Source: https://docs.dify.ai/en/develop-plugin/features-and-specs/plugin-types/remote-debug-a-plugin
This document introduces how to use Dify's remote debugging feature to test plugins. It provides detailed instructions on obtaining debugging information, configuring environment variable files, starting plugin remote debugging, and verifying plugin installation status. Through this method, developers can test plugins in the Dify environment in real-time while developing locally.
After completing plugin development, the next step is to test whether the plugin can function properly. Dify provides a convenient remote debugging method to help you quickly verify plugin functionality in a test environment.
Go to the ["Plugin Management"](https://cloud.dify.ai/plugins) page to obtain the remote server address and debugging Key.

Return to the plugin project, copy the `.env.example` file and rename it to `.env`, then fill in the remote server address and debugging Key information you obtained.
`.env` file:
```bash theme={null}
INSTALL_METHOD=remote
REMOTE_INSTALL_URL=debug.dify.ai:5003
REMOTE_INSTALL_KEY=********-****-****-****-************
```
Run the `python -m main` command to start the plugin. On the plugins page, you can see that the plugin has been installed in the Workspace, and other members of the team can also access the plugin.
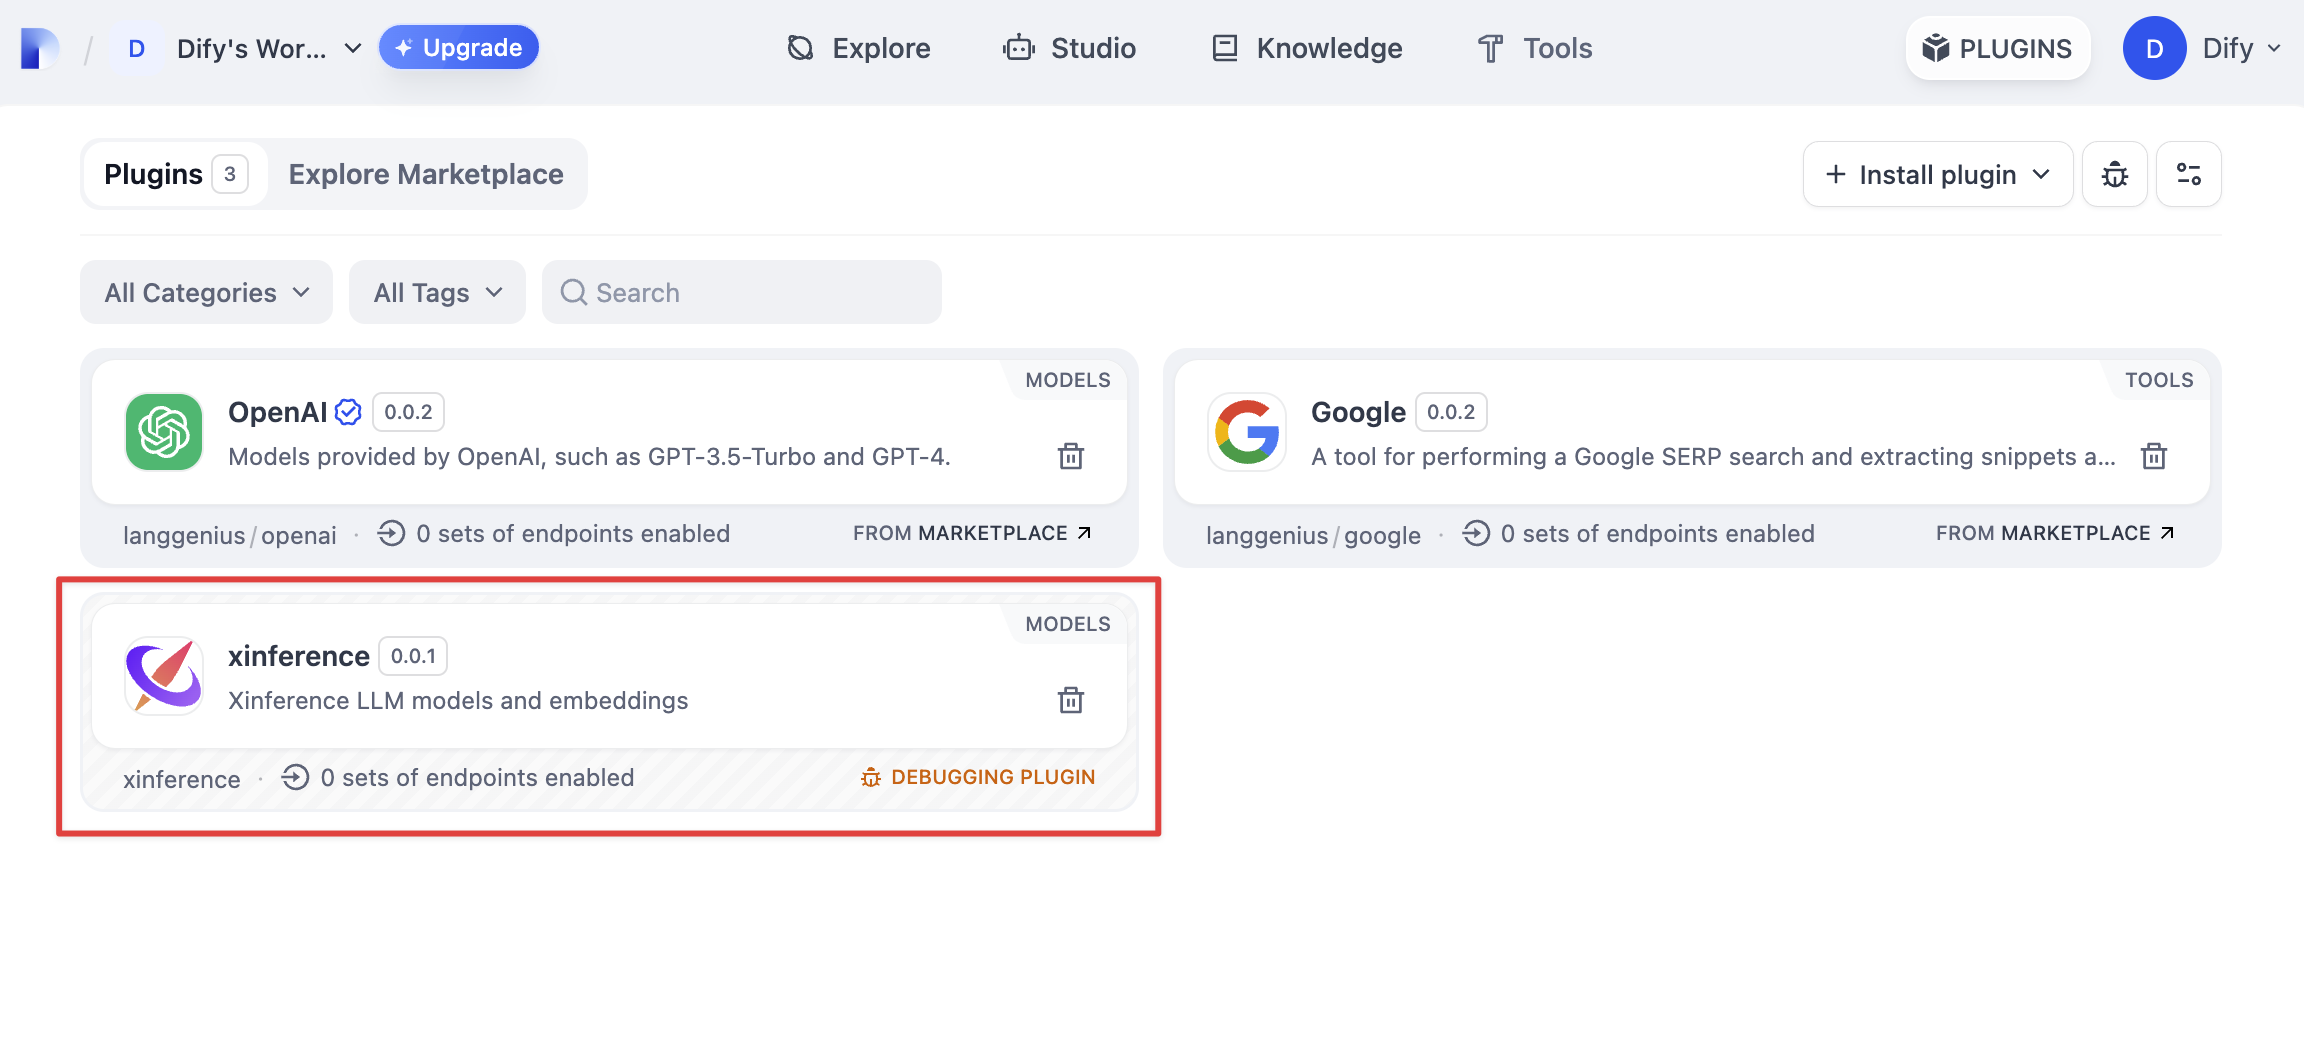
***
[Edit this page](https://github.com/langgenius/dify-docs/edit/main/en/develop-plugin/features-and-specs/plugin-types/remote-debug-a-plugin.mdx) | [Report an issue](https://github.com/langgenius/dify-docs/issues/new?template=docs.yml)
# Tool Return
Source: https://docs.dify.ai/en/develop-plugin/features-and-specs/plugin-types/tool
This document provides a detailed introduction to the data structure and usage of Tools in Dify plugins. It covers how to return different types of messages (image URLs, links, text, files, JSON), how to create variable and streaming variable messages, and how to define tool output variable schemas for reference in workflows.
## Overview
Before diving into the detailed interface documentation, make sure you have a general understanding of the tool integration process for Dify plugins.
Return different types of messages such as text, links, images, and JSON
Create and manipulate variables for workflow integration
Define custom output variables for workflow references
## Data Structure
### Message Return
Dify supports various message types such as `text`, `links`, `images`, `file BLOBs`, and `JSON`. These messages can be returned through specialized interfaces.
By default, a tool's output in a workflow includes three fixed variables: `files`, `text`, and `json`. The methods below help you populate these variables with appropriate content.
While you can use methods like `create_image_message` to return an image, tools also support custom output variables, making it more convenient to reference specific data in a workflow.
### Message Types
```python Image URL theme={null}
def create_image_message(self, image: str) -> ToolInvokeMessage:
"""
Return an image URL message
Dify will automatically download the image from the provided URL
and display it to the user.
Args:
image: URL to an image file
Returns:
ToolInvokeMessage: Message object for the tool response
"""
pass
```
```python Link theme={null}
def create_link_message(self, link: str) -> ToolInvokeMessage:
"""
Return a clickable link message
Args:
link: URL to be displayed as a clickable link
Returns:
ToolInvokeMessage: Message object for the tool response
"""
pass
```
```python Text theme={null}
def create_text_message(self, text: str) -> ToolInvokeMessage:
"""
Return a text message
Args:
text: Text content to be displayed
Returns:
ToolInvokeMessage: Message object for the tool response
"""
pass
```
```python File theme={null}
def create_blob_message(self, blob: bytes, meta: dict = None) -> ToolInvokeMessage:
"""
Return a file blob message
For returning raw file data such as images, audio, video,
or documents (PPT, Word, Excel, etc.)
Args:
blob: Raw file data in bytes
meta: File metadata dictionary. Include 'mime_type' to specify
the file type, otherwise 'octet/stream' will be used
Returns:
ToolInvokeMessage: Message object for the tool response
"""
pass
```
```python JSON theme={null}
def create_json_message(self, json: dict) -> ToolInvokeMessage:
"""
Return a formatted JSON message
Useful for data transmission between workflow nodes.
In agent mode, most LLMs can read and understand JSON data.
Args:
json: Python dictionary to be serialized as JSON
Returns:
ToolInvokeMessage: Message object for the tool response
"""
pass
```
URL to an image that will be downloaded and displayed
URL to be displayed as a clickable link
Text content to be displayed
Raw file data in bytes format
File metadata including:
* `mime_type`: The MIME type of the file (e.g., "image/png")
* Other metadata relevant to the file
Python dictionary to be serialized as JSON
When working with file blobs, always specify the `mime_type` in the `meta` dictionary to ensure proper handling of the file. For example: `{"mime_type": "image/png"}`.
### Variables
```python Standard Variable theme={null}
from typing import Any
def create_variable_message(self, variable_name: str, variable_value: Any) -> ToolInvokeMessage:
"""
Create a named variable for workflow integration
For non-streaming output variables. If multiple instances with the
same name are created, the latest one overrides previous values.
Args:
variable_name: Name of the variable to create
variable_value: Value of the variable (any Python data type)
Returns:
ToolInvokeMessage: Message object for the tool response
"""
pass
```
```python Streaming Variable theme={null}
def create_stream_variable_message(
self, variable_name: str, variable_value: str
) -> ToolInvokeMessage:
"""
Create a streaming variable with typewriter effect
When referenced in an answer node in a chatflow application,
the text will be output with a typewriter effect.
Args:
variable_name: Name of the variable to create
variable_value: String value to stream (only strings supported)
Returns:
ToolInvokeMessage: Message object for the tool response
"""
pass
```
Name of the variable to be created or updated
Value to assign to the variable:
* For standard variables: Any Python data type
* For streaming variables: String data only
The streaming variable method (`create_stream_variable_message`) currently only supports string data. Complex data types cannot be streamed with the typewriter effect.
## Custom Output Variables
To reference a tool's output variables in a workflow application, you need to define which variables might be output. This is done using the [JSON Schema](https://json-schema.org/) format in your tool's manifest.
### Defining Output Schema
```yaml Tool Manifest with Output Schema theme={null}
identity:
author: example_author
name: example_tool
label:
en_US: Example Tool
zh_Hans: 示例工具
ja_JP: ツール例
pt_BR: Ferramenta de exemplo
description:
human:
en_US: A simple tool that returns a name
zh_Hans: 返回名称的简单工具
ja_JP: 名前を返す簡単なツール
pt_BR: Uma ferramenta simples que retorna um nome
llm: A simple tool that returns a name variable
output_schema:
type: object
properties:
name:
type: string
description: "The name returned by the tool"
age:
type: integer
description: "The age returned by the tool"
profile:
type: object
properties:
interests:
type: array
items:
type: string
location:
type: string
```
The root object defining your tool's output schema
Must be "object" for tool output schemas
Dictionary of all possible output variables
Definition for each output variable, including its type and description
Even with an output schema defined, you still need to actually return a variable using `create_variable_message()` in your implementation code. Otherwise, the workflow will receive `None` for that variable.
### Example Implementation
```python Basic Variable Example theme={null}
def run(self, inputs):
# Process inputs and generate a name
generated_name = "Alice"
# Return the name as a variable that matches the output_schema
return self.create_variable_message("name", generated_name)
```
```python Complex Structure Example theme={null}
def run(self, inputs):
# Generate complex structured data
user_data = {
"name": "Bob",
"age": 30,
"profile": {
"interests": ["coding", "reading", "hiking"],
"location": "San Francisco"
}
}
# Return individual variables
self.create_variable_message("name", user_data["name"])
self.create_variable_message("age", user_data["age"])
self.create_variable_message("profile", user_data["profile"])
# Also return a text message for display
return self.create_text_message(f"User {user_data['name']} processed successfully")
```
For complex workflows, you can define multiple output variables and return them all. This gives workflow designers more flexibility when using your tool.
## Examples
### Complete Tool Implementation
```python Weather Forecast Tool theme={null}
import requests
from typing import Any
class WeatherForecastTool:
def run(self, inputs: dict) -> Any:
# Get location from inputs
location = inputs.get("location", "London")
try:
# Call weather API (example only)
weather_data = self._get_weather_data(location)
# Create variables for workflow use
self.create_variable_message("temperature", weather_data["temperature"])
self.create_variable_message("conditions", weather_data["conditions"])
self.create_variable_message("forecast", weather_data["forecast"])
# Create a JSON message for data transmission
self.create_json_message(weather_data)
# Create an image message for the weather map
self.create_image_message(weather_data["map_url"])
# Return a formatted text response
return self.create_text_message(
f"Weather in {location}: {weather_data['temperature']}°C, {weather_data['conditions']}. "
f"Forecast: {weather_data['forecast']}"
)
except Exception as e:
# Handle errors gracefully
return self.create_text_message(f"Error retrieving weather data: {str(e)}")
def _get_weather_data(self, location: str) -> dict:
# Mock implementation - in a real tool, this would call a weather API
return {
"location": location,
"temperature": 22,
"conditions": "Partly Cloudy",
"forecast": "Sunny with occasional showers tomorrow",
"map_url": "https://example.com/weather-map.png"
}
```
When designing tools, consider both the direct output (what the user sees) and the variable output (what other workflow nodes can use). This separation provides flexibility in how your tool is used.
***
[Edit this page](https://github.com/langgenius/dify-docs/edit/main/en/develop-plugin/features-and-specs/plugin-types/tool.mdx) | [Report an issue](https://github.com/langgenius/dify-docs/issues/new?template=docs.yml)
# CLI
Source: https://docs.dify.ai/en/develop-plugin/getting-started/cli
Command Line Interface for Dify Plugin Development
Set up and package your Dify plugins using the Command Line Interface (CLI). The CLI provides a streamlined way to manage your plugin development workflow, from initialization to packaging.
This guide will instruct you on how to use the CLI for Dify plugin development.
## Prerequisites
Before you begin, ensure you have the following installed:
* Python version 3.12
* Dify CLI
* Homebrew (for Mac users)
## Create a Dify Plugin Project
```bash theme={null}
brew tap langgenius/dify
brew install dify
```
Get the latest Dify CLI from the [Dify GitHub releases page](https://github.com/langgenius/dify-plugin-daemon/releases)
```bash theme={null}
# Download dify-plugin-darwin-arm64
chmod +x dify-plugin-darwin-arm64
mv dify-plugin-darwin-arm64 dify
sudo mv dify /usr/local/bin/
```
Now you have successfully installed the Dify CLI. You can verify the installation by running:
```bash theme={null}
dify version
```
You can create a new Dify plugin project using the following command:
```bash theme={null}
dify plugin init
```
Fill in the required fields when prompted:
```bash theme={null}
Edit profile of the plugin
Plugin name (press Enter to next step): hello-world
Author (press Enter to next step): langgenius
Description (press Enter to next step): hello world example
Repository URL (Optional) (press Enter to next step): Repository URL (Optional)
Enable multilingual README: [✔] English is required by default
Languages to generate:
English: [✔] (required)
→ 简体中文 (Simplified Chinese): [✔]
日本語 (Japanese): [✘]
Português (Portuguese - Brazil): [✘]
Controls:
↑/↓ Navigate • Space/Tab Toggle selection • Enter Next step
```
Choose `python` and hit Enter to proceed with the Python plugin template.
```bash theme={null}
Select the type of plugin you want to create, and press `Enter` to continue
Before starting, here's some basic knowledge about Plugin types in Dify:
- Tool: Tool Providers like Google Search, Stable Diffusion, etc. Used to perform specific tasks.
- Model: Model Providers like OpenAI, Anthropic, etc. Use their models to enhance AI capabilities.
- Endpoint: Similar to Service API in Dify and Ingress in Kubernetes. Extend HTTP services as endpoints with custom logi
- Agent Strategy: Implement your own agent strategies like Function Calling, ReAct, ToT, CoT, etc.
Based on the ability you want to extend, Plugins are divided into four types: Tool, Model, Extension, and Agent Strategy
- Tool: A tool provider that can also implement endpoints. For example, building a Discord Bot requires both Sending and
- Model: Strictly for model providers, no other extensions allowed.
- Extension: For simple HTTP services that extend functionality.
- Agent Strategy: Implement custom agent logic with a focused approach.
We've provided templates to help you get started. Choose one of the options below:
-> tool
agent-strategy
llm
text-embedding
rerank
tts
speech2text
moderation
extension
```
Enter the default dify version, leave it blank to use the latest version:
```bash theme={null}
Edit minimal Dify version requirement, leave it blank by default
Minimal Dify version (press Enter to next step):
```
Now you are ready to go! The CLI will create a new directory with the plugin name you provided, and set up the basic structure for your plugin.
```bash theme={null}
cd hello-world
```
## Run the Plugin
Make sure you are in the hello-world directory
```bash theme={null}
cp .env.example .env
```
Edit the `.env` file to set your plugin's environment variables, such as API keys or other configurations. You can find these variables in the Dify dashboard. Log in to your Dify environment, click the “Plugins” icon in the top right corner, then click the debug icon (or something that looks like a bug). In the pop-up window, copy the “API Key” and “Host Address”. (Please refer to your local corresponding screenshot, which shows the interface for obtaining the key and host address)
```bash theme={null}
INSTALL_METHOD=remote
REMOTE_INSTALL_HOST=debug-plugin.dify.dev
REMOTE_INSTALL_PORT=5003
REMOTE_INSTALL_KEY=********-****-****-****-************
```
Now you can run your plugin locally using the following command:
```bash theme={null}
pip install -r requirements.txt
python -m main
```
***
[Edit this page](https://github.com/langgenius/dify-docs/edit/main/en/develop-plugin/getting-started/cli.mdx) | [Report an issue](https://github.com/langgenius/dify-docs/issues/new?template=docs.yml)
# Dify Plugin
Source: https://docs.dify.ai/en/develop-plugin/getting-started/getting-started-dify-plugin
Dify plugins are modular components that enhance AI applications with additional capabilities. They allow you to integrate external services, custom functions, and specialized tools into your Dify-built AI applications.
***
[Edit this page](https://github.com/langgenius/dify-docs/edit/main/en/develop-plugin/features-and-specs/plugin-types/multilingual-readme.mdx) | [Report an issue](https://github.com/langgenius/dify-docs/issues/new?template=docs.yml)
# Persistent Storage
Source: https://docs.dify.ai/en/develop-plugin/features-and-specs/plugin-types/persistent-storage-kv
Learn how to implement persistent storage in your Dify plugins using the built-in key-value database to maintain state across interactions.
## Overview
Most plugin tools and endpoints operate in a stateless, single-round interaction model:
1. Receive a request
2. Process data
3. Return a response
4. End the interaction
However, many real-world applications require maintaining state across multiple interactions. This is where **persistent storage** becomes essential.
The persistent storage mechanism allows plugins to store data persistently within the same workspace, enabling stateful applications and memory features.
Dify currently provides a key-value (KV) storage system for plugins, with plans to introduce more flexible and powerful storage interfaces in the future based on developer needs.
## Accessing Storage
All storage operations are performed through the `storage` object available in your plugin's session:
```python theme={null}
# Access the storage interface
storage = self.session.storage
```
## Storage Operations
### Storing Data
Store data with the `set` method:
```python theme={null}
def set(self, key: str, val: bytes) -> None:
"""
Store data in persistent storage
Parameters:
key: Unique identifier for your data
val: Binary data to store (bytes)
"""
pass
```
The value must be in `bytes` format. This provides flexibility to store various types of data, including files.
#### Example: Storing Different Data Types
```python theme={null}
# String data (must convert to bytes)
storage.set("user_name", "John Doe".encode('utf-8'))
# JSON data
import json
user_data = {"name": "John", "age": 30, "preferences": ["AI", "NLP"]}
storage.set("user_data", json.dumps(user_data).encode('utf-8'))
# File data
with open("image.jpg", "rb") as f:
image_data = f.read()
storage.set("profile_image", image_data)
```
### Retrieving Data
Retrieve stored data with the `get` method:
```python theme={null}
def get(self, key: str) -> bytes:
"""
Retrieve data from persistent storage
Parameters:
key: Unique identifier for your data
Returns:
The stored data as bytes, or None if key doesn't exist
"""
pass
```
#### Example: Retrieving and Converting Data
```python theme={null}
# Retrieving string data
name_bytes = storage.get("user_name")
if name_bytes:
name = name_bytes.decode('utf-8')
print(f"Retrieved name: {name}")
# Retrieving JSON data
import json
user_data_bytes = storage.get("user_data")
if user_data_bytes:
user_data = json.loads(user_data_bytes.decode('utf-8'))
print(f"User preferences: {user_data['preferences']}")
```
### Deleting Data
Delete stored data with the `delete` method:
```python theme={null}
def delete(self, key: str) -> None:
"""
Delete data from persistent storage
Parameters:
key: Unique identifier for the data to delete
"""
pass
```
## Best Practices
Create a consistent naming scheme for your keys to avoid conflicts and make your code more maintainable.
Always check if data exists before processing it, as the key might not be found.
Convert complex objects to JSON or other serialized formats before storing.
Wrap storage operations in try/except blocks to handle potential errors gracefully.
## Common Use Cases
* **User Preferences**: Store user settings and preferences between sessions
* **Conversation History**: Maintain context from previous conversations
* **API Tokens**: Store authentication tokens securely
* **Cached Data**: Store frequently accessed data to reduce API calls
* **File Storage**: Store user-uploaded files or generated content
***
[Edit this page](https://github.com/langgenius/dify-docs/edit/main/en/develop-plugin/features-and-specs/plugin-types/persistent-storage-kv.mdx) | [Report an issue](https://github.com/langgenius/dify-docs/issues/new?template=docs.yml)
# Manifest
Source: https://docs.dify.ai/en/develop-plugin/features-and-specs/plugin-types/plugin-info-by-manifest
The Manifest is a YAML-compliant file that defines the most basic information of a **plugin**, including but not limited to the plugin name, author, included tools, models, etc. For the overall architecture of the plugin, please refer to [Basic Concepts of Plugin Development](/en/develop-plugin/getting-started/getting-started-dify-plugin) and [Developer Cheatsheet](/en/develop-plugin/dev-guides-and-walkthroughs/cheatsheet).
If the format of this file is incorrect, the parsing and packaging process of the plugin will fail.
### Code Example
Below is a simple example of a Manifest file. The meaning and function of each data item will be explained later.
For reference code of other plugins, please refer to the [GitHub code repository](https://github.com/langgenius/dify-official-plugins/blob/main/tools/google/manifest.yaml).
```yaml theme={null}
version: 0.0.1
type: "plugin"
author: "Yeuoly"
name: "neko"
label:
en_US: "Neko"
created_at: "2024-07-12T08:03:44.658609186Z"
icon: "icon.svg"
resource:
memory: 1048576
permission:
tool:
enabled: true
model:
enabled: true
llm: true
endpoint:
enabled: true
app:
enabled: true
storage:
enabled: true
size: 1048576
plugins:
endpoints:
- "provider/neko.yaml"
meta:
version: 0.0.1
arch:
- "amd64"
- "arm64"
runner:
language: "python"
version: "3.12"
entrypoint: "main"
privacy: "./privacy.md"
```
### Structure
The version of the plugin.
Plugin type, currently only `plugin` is supported, `bundle` will be supported in the future.
Author, defined as the organization name in the Marketplace.
Multilingual name.
Creation time, required by the Marketplace not to be later than the current time.
Icon path.
Resources to apply for.
Maximum memory usage, mainly related to AWS Lambda resource application on SaaS, unit in bytes.
Permission application.
Permission for reverse invocation of tools.
Whether to enable tool permissions.
Permission for reverse invocation of models.
Whether to enable model permissions.
Whether to enable large language model permissions.
Whether to enable text embedding model permissions.
Whether to enable rerank model permissions.
Whether to enable text-to-speech model permissions.
Whether to enable speech-to-text model permissions.
Whether to enable content moderation model permissions.
Permission for reverse invocation of nodes.
Whether to enable node permissions.
Permission to register `endpoint`.
Whether to enable endpoint permissions.
Permission for reverse invocation of `app`.
Whether to enable app permissions.
Permission to apply for persistent storage.
Whether to enable storage permissions.
Maximum allowed persistent memory size, unit in bytes.
A list of `yaml` files for the specific capabilities extended by the plugin. Absolute path within the plugin package. For example, if you need to extend a model, you need to define a file similar to `openai.yaml`, fill in the file path here, and the file at this path must actually exist, otherwise packaging will fail.
Extending both tools and models simultaneously is not allowed.
Having no extensions is not allowed.
Extending both models and Endpoints simultaneously is not allowed.
Currently, only one provider is supported for each type of extension.
Plugin extension for [Tool](/en/develop-plugin/dev-guides-and-walkthroughs/tool-plugin) providers.
Plugin extension for [Model](/en/develop-plugin/features-and-specs/plugin-types/model-designing-rules) providers.
Plugin extension for [Endpoints](/en/develop-plugin/dev-guides-and-walkthroughs/develop-a-slack-bot-plugin) providers.
Plugin extension for [Agent Strategy](/en/develop-plugin/features-and-specs/advanced-development/reverse-invocation) providers.
Metadata for the plugin.
`manifest` format version, initial version `0.0.1`.
Supported architectures, currently only `amd64` and `arm64` are supported.
Runtime configuration.
Programming language. Currently only Python is supported.
Language version, currently only `3.12` is supported.
Program entry point, should be `main` under Python.
Specifies the relative path or URL of the plugin's privacy policy file, e.g., `"./privacy.md"` or `"https://your-web/privacy"`. If you plan to list the plugin on the Dify Marketplace, **this field is required** to provide clear user data usage and privacy statements. For detailed filling guidelines, please refer to [Plugin Privacy Data Protection Guidelines](/en/develop-plugin/publishing/standards/privacy-protection-guidelines).
***
[Edit this page](https://github.com/langgenius/dify-docs/edit/main/en/develop-plugin/features-and-specs/plugin-types/plugin-info-by-manifest.mdx) | [Report an issue](https://github.com/langgenius/dify-docs/issues/new?template=docs.yml)
# Plugin Logging
Source: https://docs.dify.ai/en/develop-plugin/features-and-specs/plugin-types/plugin-logging
As a plugin developer, you may want to print arbitrary strings to logs during plugin processing for development or debugging purposes.
For this purpose, the plugin SDK implements a handler for Python's standard `logging` library. By using this, you can output any string to both the **standard output during remote debugging** and the **plugin daemon container logs** (community edition only).
## Sample
Import `plugin_logger_handler` and add it to your logger as a handler. Below is a sample code for a tool plugin.
```python theme={null}
from collections.abc import Generator
from typing import Any
from dify_plugin import Tool
from dify_plugin.entities.tool import ToolInvokeMessage
# Import logging and custom handler
import logging
from dify_plugin.config.logger_format import plugin_logger_handler
# Set up logging with the custom handler
logger = logging.getLogger(__name__)
logger.setLevel(logging.INFO)
logger.addHandler(plugin_logger_handler)
class LoggerDemoTool(Tool):
def _invoke(self, tool_parameters: dict[str, Any]) -> Generator[ToolInvokeMessage]:
# Log messages with different severity levels
logger.info("This is an INFO log message.")
logger.warning("This is a WARNING log message.")
logger.error("This is an ERROR log message.")
yield self.create_text_message("Hello, Dify!")
```
***
[Edit this page](https://github.com/langgenius/dify-docs/edit/main/en/develop-plugin/features-and-specs/plugin-types/plugin-logging.mdx) | [Report an issue](https://github.com/langgenius/dify-docs/issues/new?template=docs.yml)
# Plugin Debugging
Source: https://docs.dify.ai/en/develop-plugin/features-and-specs/plugin-types/remote-debug-a-plugin
This document introduces how to use Dify's remote debugging feature to test plugins. It provides detailed instructions on obtaining debugging information, configuring environment variable files, starting plugin remote debugging, and verifying plugin installation status. Through this method, developers can test plugins in the Dify environment in real-time while developing locally.
After completing plugin development, the next step is to test whether the plugin can function properly. Dify provides a convenient remote debugging method to help you quickly verify plugin functionality in a test environment.
Go to the ["Plugin Management"](https://cloud.dify.ai/plugins) page to obtain the remote server address and debugging Key.

Return to the plugin project, copy the `.env.example` file and rename it to `.env`, then fill in the remote server address and debugging Key information you obtained.
`.env` file:
```bash theme={null}
INSTALL_METHOD=remote
REMOTE_INSTALL_URL=debug.dify.ai:5003
REMOTE_INSTALL_KEY=********-****-****-****-************
```
Run the `python -m main` command to start the plugin. On the plugins page, you can see that the plugin has been installed in the Workspace, and other members of the team can also access the plugin.

***
[Edit this page](https://github.com/langgenius/dify-docs/edit/main/en/develop-plugin/features-and-specs/plugin-types/remote-debug-a-plugin.mdx) | [Report an issue](https://github.com/langgenius/dify-docs/issues/new?template=docs.yml)
# Tool Return
Source: https://docs.dify.ai/en/develop-plugin/features-and-specs/plugin-types/tool
This document provides a detailed introduction to the data structure and usage of Tools in Dify plugins. It covers how to return different types of messages (image URLs, links, text, files, JSON), how to create variable and streaming variable messages, and how to define tool output variable schemas for reference in workflows.
## Overview
Before diving into the detailed interface documentation, make sure you have a general understanding of the tool integration process for Dify plugins.
Return different types of messages such as text, links, images, and JSON
Create and manipulate variables for workflow integration
Define custom output variables for workflow references
## Data Structure
### Message Return
Dify supports various message types such as `text`, `links`, `images`, `file BLOBs`, and `JSON`. These messages can be returned through specialized interfaces.
By default, a tool's output in a workflow includes three fixed variables: `files`, `text`, and `json`. The methods below help you populate these variables with appropriate content.
While you can use methods like `create_image_message` to return an image, tools also support custom output variables, making it more convenient to reference specific data in a workflow.
### Message Types
```python Image URL theme={null}
def create_image_message(self, image: str) -> ToolInvokeMessage:
"""
Return an image URL message
Dify will automatically download the image from the provided URL
and display it to the user.
Args:
image: URL to an image file
Returns:
ToolInvokeMessage: Message object for the tool response
"""
pass
```
```python Link theme={null}
def create_link_message(self, link: str) -> ToolInvokeMessage:
"""
Return a clickable link message
Args:
link: URL to be displayed as a clickable link
Returns:
ToolInvokeMessage: Message object for the tool response
"""
pass
```
```python Text theme={null}
def create_text_message(self, text: str) -> ToolInvokeMessage:
"""
Return a text message
Args:
text: Text content to be displayed
Returns:
ToolInvokeMessage: Message object for the tool response
"""
pass
```
```python File theme={null}
def create_blob_message(self, blob: bytes, meta: dict = None) -> ToolInvokeMessage:
"""
Return a file blob message
For returning raw file data such as images, audio, video,
or documents (PPT, Word, Excel, etc.)
Args:
blob: Raw file data in bytes
meta: File metadata dictionary. Include 'mime_type' to specify
the file type, otherwise 'octet/stream' will be used
Returns:
ToolInvokeMessage: Message object for the tool response
"""
pass
```
```python JSON theme={null}
def create_json_message(self, json: dict) -> ToolInvokeMessage:
"""
Return a formatted JSON message
Useful for data transmission between workflow nodes.
In agent mode, most LLMs can read and understand JSON data.
Args:
json: Python dictionary to be serialized as JSON
Returns:
ToolInvokeMessage: Message object for the tool response
"""
pass
```
URL to an image that will be downloaded and displayed
URL to be displayed as a clickable link
Text content to be displayed
Raw file data in bytes format
File metadata including:
* `mime_type`: The MIME type of the file (e.g., "image/png")
* Other metadata relevant to the file
Python dictionary to be serialized as JSON
When working with file blobs, always specify the `mime_type` in the `meta` dictionary to ensure proper handling of the file. For example: `{"mime_type": "image/png"}`.
### Variables
```python Standard Variable theme={null}
from typing import Any
def create_variable_message(self, variable_name: str, variable_value: Any) -> ToolInvokeMessage:
"""
Create a named variable for workflow integration
For non-streaming output variables. If multiple instances with the
same name are created, the latest one overrides previous values.
Args:
variable_name: Name of the variable to create
variable_value: Value of the variable (any Python data type)
Returns:
ToolInvokeMessage: Message object for the tool response
"""
pass
```
```python Streaming Variable theme={null}
def create_stream_variable_message(
self, variable_name: str, variable_value: str
) -> ToolInvokeMessage:
"""
Create a streaming variable with typewriter effect
When referenced in an answer node in a chatflow application,
the text will be output with a typewriter effect.
Args:
variable_name: Name of the variable to create
variable_value: String value to stream (only strings supported)
Returns:
ToolInvokeMessage: Message object for the tool response
"""
pass
```
Name of the variable to be created or updated
Value to assign to the variable:
* For standard variables: Any Python data type
* For streaming variables: String data only
The streaming variable method (`create_stream_variable_message`) currently only supports string data. Complex data types cannot be streamed with the typewriter effect.
## Custom Output Variables
To reference a tool's output variables in a workflow application, you need to define which variables might be output. This is done using the [JSON Schema](https://json-schema.org/) format in your tool's manifest.
### Defining Output Schema
```yaml Tool Manifest with Output Schema theme={null}
identity:
author: example_author
name: example_tool
label:
en_US: Example Tool
zh_Hans: 示例工具
ja_JP: ツール例
pt_BR: Ferramenta de exemplo
description:
human:
en_US: A simple tool that returns a name
zh_Hans: 返回名称的简单工具
ja_JP: 名前を返す簡単なツール
pt_BR: Uma ferramenta simples que retorna um nome
llm: A simple tool that returns a name variable
output_schema:
type: object
properties:
name:
type: string
description: "The name returned by the tool"
age:
type: integer
description: "The age returned by the tool"
profile:
type: object
properties:
interests:
type: array
items:
type: string
location:
type: string
```
The root object defining your tool's output schema
Must be "object" for tool output schemas
Dictionary of all possible output variables
Definition for each output variable, including its type and description
Even with an output schema defined, you still need to actually return a variable using `create_variable_message()` in your implementation code. Otherwise, the workflow will receive `None` for that variable.
### Example Implementation
```python Basic Variable Example theme={null}
def run(self, inputs):
# Process inputs and generate a name
generated_name = "Alice"
# Return the name as a variable that matches the output_schema
return self.create_variable_message("name", generated_name)
```
```python Complex Structure Example theme={null}
def run(self, inputs):
# Generate complex structured data
user_data = {
"name": "Bob",
"age": 30,
"profile": {
"interests": ["coding", "reading", "hiking"],
"location": "San Francisco"
}
}
# Return individual variables
self.create_variable_message("name", user_data["name"])
self.create_variable_message("age", user_data["age"])
self.create_variable_message("profile", user_data["profile"])
# Also return a text message for display
return self.create_text_message(f"User {user_data['name']} processed successfully")
```
For complex workflows, you can define multiple output variables and return them all. This gives workflow designers more flexibility when using your tool.
## Examples
### Complete Tool Implementation
```python Weather Forecast Tool theme={null}
import requests
from typing import Any
class WeatherForecastTool:
def run(self, inputs: dict) -> Any:
# Get location from inputs
location = inputs.get("location", "London")
try:
# Call weather API (example only)
weather_data = self._get_weather_data(location)
# Create variables for workflow use
self.create_variable_message("temperature", weather_data["temperature"])
self.create_variable_message("conditions", weather_data["conditions"])
self.create_variable_message("forecast", weather_data["forecast"])
# Create a JSON message for data transmission
self.create_json_message(weather_data)
# Create an image message for the weather map
self.create_image_message(weather_data["map_url"])
# Return a formatted text response
return self.create_text_message(
f"Weather in {location}: {weather_data['temperature']}°C, {weather_data['conditions']}. "
f"Forecast: {weather_data['forecast']}"
)
except Exception as e:
# Handle errors gracefully
return self.create_text_message(f"Error retrieving weather data: {str(e)}")
def _get_weather_data(self, location: str) -> dict:
# Mock implementation - in a real tool, this would call a weather API
return {
"location": location,
"temperature": 22,
"conditions": "Partly Cloudy",
"forecast": "Sunny with occasional showers tomorrow",
"map_url": "https://example.com/weather-map.png"
}
```
When designing tools, consider both the direct output (what the user sees) and the variable output (what other workflow nodes can use). This separation provides flexibility in how your tool is used.
***
[Edit this page](https://github.com/langgenius/dify-docs/edit/main/en/develop-plugin/features-and-specs/plugin-types/tool.mdx) | [Report an issue](https://github.com/langgenius/dify-docs/issues/new?template=docs.yml)
# CLI
Source: https://docs.dify.ai/en/develop-plugin/getting-started/cli
Command Line Interface for Dify Plugin Development
Set up and package your Dify plugins using the Command Line Interface (CLI). The CLI provides a streamlined way to manage your plugin development workflow, from initialization to packaging.
This guide will instruct you on how to use the CLI for Dify plugin development.
## Prerequisites
Before you begin, ensure you have the following installed:
* Python version 3.12
* Dify CLI
* Homebrew (for Mac users)
## Create a Dify Plugin Project
```bash theme={null}
brew tap langgenius/dify
brew install dify
```
Get the latest Dify CLI from the [Dify GitHub releases page](https://github.com/langgenius/dify-plugin-daemon/releases)
```bash theme={null}
# Download dify-plugin-darwin-arm64
chmod +x dify-plugin-darwin-arm64
mv dify-plugin-darwin-arm64 dify
sudo mv dify /usr/local/bin/
```
Now you have successfully installed the Dify CLI. You can verify the installation by running:
```bash theme={null}
dify version
```
You can create a new Dify plugin project using the following command:
```bash theme={null}
dify plugin init
```
Fill in the required fields when prompted:
```bash theme={null}
Edit profile of the plugin
Plugin name (press Enter to next step): hello-world
Author (press Enter to next step): langgenius
Description (press Enter to next step): hello world example
Repository URL (Optional) (press Enter to next step): Repository URL (Optional)
Enable multilingual README: [✔] English is required by default
Languages to generate:
English: [✔] (required)
→ 简体中文 (Simplified Chinese): [✔]
日本語 (Japanese): [✘]
Português (Portuguese - Brazil): [✘]
Controls:
↑/↓ Navigate • Space/Tab Toggle selection • Enter Next step
```
Choose `python` and hit Enter to proceed with the Python plugin template.
```bash theme={null}
Select the type of plugin you want to create, and press `Enter` to continue
Before starting, here's some basic knowledge about Plugin types in Dify:
- Tool: Tool Providers like Google Search, Stable Diffusion, etc. Used to perform specific tasks.
- Model: Model Providers like OpenAI, Anthropic, etc. Use their models to enhance AI capabilities.
- Endpoint: Similar to Service API in Dify and Ingress in Kubernetes. Extend HTTP services as endpoints with custom logi
- Agent Strategy: Implement your own agent strategies like Function Calling, ReAct, ToT, CoT, etc.
Based on the ability you want to extend, Plugins are divided into four types: Tool, Model, Extension, and Agent Strategy
- Tool: A tool provider that can also implement endpoints. For example, building a Discord Bot requires both Sending and
- Model: Strictly for model providers, no other extensions allowed.
- Extension: For simple HTTP services that extend functionality.
- Agent Strategy: Implement custom agent logic with a focused approach.
We've provided templates to help you get started. Choose one of the options below:
-> tool
agent-strategy
llm
text-embedding
rerank
tts
speech2text
moderation
extension
```
Enter the default dify version, leave it blank to use the latest version:
```bash theme={null}
Edit minimal Dify version requirement, leave it blank by default
Minimal Dify version (press Enter to next step):
```
Now you are ready to go! The CLI will create a new directory with the plugin name you provided, and set up the basic structure for your plugin.
```bash theme={null}
cd hello-world
```
## Run the Plugin
Make sure you are in the hello-world directory
```bash theme={null}
cp .env.example .env
```
Edit the `.env` file to set your plugin's environment variables, such as API keys or other configurations. You can find these variables in the Dify dashboard. Log in to your Dify environment, click the “Plugins” icon in the top right corner, then click the debug icon (or something that looks like a bug). In the pop-up window, copy the “API Key” and “Host Address”. (Please refer to your local corresponding screenshot, which shows the interface for obtaining the key and host address)
```bash theme={null}
INSTALL_METHOD=remote
REMOTE_INSTALL_HOST=debug-plugin.dify.dev
REMOTE_INSTALL_PORT=5003
REMOTE_INSTALL_KEY=********-****-****-****-************
```
Now you can run your plugin locally using the following command:
```bash theme={null}
pip install -r requirements.txt
python -m main
```
***
[Edit this page](https://github.com/langgenius/dify-docs/edit/main/en/develop-plugin/getting-started/cli.mdx) | [Report an issue](https://github.com/langgenius/dify-docs/issues/new?template=docs.yml)
# Dify Plugin
Source: https://docs.dify.ai/en/develop-plugin/getting-started/getting-started-dify-plugin
Dify plugins are modular components that enhance AI applications with additional capabilities. They allow you to integrate external services, custom functions, and specialized tools into your Dify-built AI applications.
![Marketplace]() Through plugins, your AI applications can:
* Connect to external APIs
* Process different types of data
* Perform specialized calculations
* Execute real-world actions
## Types of Plugins
Package and manage AI models as plugins
Learn more
Build specialized capabilities for Agents and workflows
Learn more
Create custom reasoning strategies for autonomous Agents
Learn more
Implement integration with external services through HTTP Webhooks
Learn more
## Additional Resources
Tools and techniques for efficient plugin development
Package and share your plugins with the Dify community
Technical specifications and documentation
Communicate with other developers and contribute to the ecosystem
***
[Edit this page](https://github.com/langgenius/dify-docs/edit/main/en/develop-plugin/getting-started/getting-started-dify-plugin.mdx) | [Report an issue](https://github.com/langgenius/dify-docs/issues/new?template=docs.yml)
# Frequently Asked Questions
Source: https://docs.dify.ai/en/develop-plugin/publishing/faq/faq
This document answers common questions about Dify plugin development and installation, including how to resolve plugin upload failures (by modifying the author field) and how to handle verification exceptions during plugin installation (by setting the FORCE_VERIFYING_SIGNATURE environment variable).
## What should I do if the plugin upload fails during installation?
**Error Details**: An error message `PluginDaemonBadRequestError: plugin_unique_identifier is not valid` appears.
**Solution**: Modify the `author` field in the `manifest.yaml` file under the plugin project and the `.yaml` file under the `/provider` path to your GitHub ID.
Rerun the plugin packaging command and install the new plugin package.
## How should I handle exceptions encountered during plugin installation?
**Problem Description**: An exception message is encountered during plugin installation: `plugin verification has been enabled, and the plugin you want to install has a bad signature`. How should this be handled?
**Solution**: Add the field `FORCE_VERIFYING_SIGNATURE=false` to the end of the `/docker/.env` configuration file. Then, run the following commands to restart the Dify service:
```bash theme={null}
cd docker
docker compose down
docker compose up -d
```
After adding this field, the Dify platform will allow the installation of all plugins not listed (reviewed) on the Dify Marketplace, which may pose security risks.
It is recommended to install plugins in a testing/sandbox environment first and confirm their safety before installing them in a production environment.
***
[Edit this page](https://github.com/langgenius/dify-docs/edit/main/en/develop-plugin/publishing/faq/faq.mdx) | [Report an issue](https://github.com/langgenius/dify-docs/issues/new?template=docs.yml)
# Automatically Publish Plugins via PR
Source: https://docs.dify.ai/en/develop-plugin/publishing/marketplace-listing/plugin-auto-publish-pr
This document describes how to automate the release process of Dify plugins using GitHub Actions, including configuration steps, parameter descriptions, and usage methods, helping plugin developers streamline the release process without manual intervention.
### Background
Updating plugins that others are actively using can be tedious. Traditionally, you would need to modify code, bump versions, push changes, create branches, package files, and submit PRs manually - a repetitive process that slows down development.
Thus, we have created **Plugin Auto-PR**, a GitHub Actions workflow that automates the entire process. Now you can package, push, and create PRs with a single action, focusing on building great plugins.
### Concepts
#### GitHub Actions
GitHub Actions automates your development tasks in GitHub.
**How it works**: When triggered (e.g., by a code push), it runs your workflow in a cloud-based virtual machine, handling everything from build to deployment automatically.

**Limits**:
* Public repositories: Unlimited
* Private repositories: 2000 minutes per month
#### Plugin Auto-PR
**How it works**:
1. Workflow triggers when you push code to the main branch of your plugin source repository
2. Workflow reads plugin information from the `manifest.yaml` file
3. Automatically packages the plugin as a `.difypkg` file
4. Pushes the packaged file to your forked `dify-plugins` repository
5. Creates a new branch and commits changes
6. Automatically creates a PR to merge into the upstream repository
### Prerequisites
#### Repository
* You already have your own plugin source code repository (e.g., `your-name/plugin-source`)
* You already have your own forked plugin repository (e.g., `your-name/dify-plugins`)
* Your forked repository already has the plugin directory structure:
```
dify-plugins/
└── your-author-name
└── plugin-name
```
#### Permission
This workflow requires appropriate permissions to function:
* You need to create a GitHub Personal Access Token (PAT) with sufficient permissions
* The PAT must have permission to push code to your forked repository
* The PAT must have permission to create PRs to the upstream repository
### Parameters and Configuration
#### Setup Requirements
To get started with auto-publishing, you will need two key components:
**manifest.yaml file**: This file drives the automation process:
* `name`: Your plugin’s name (affects package and branch names)
* `version`: Semantic version number (increment with each release)
* `author`: Your GitHub username (determines repository paths)
**PLUGIN\_ACTION Secret**: You need to add this secret to your plugin source repository:
* Value: Must be a Personal Access Token (PAT) with sufficient permissions
* Permission: Ability to push branches to your forked repository and create PRs to the upstream repository
#### Automatically-Generated Parameters
Once set up, the workflow automatically handles these parameters:
* GitHub username: Read from the `author` field in `manifest.yaml`
* Author folder name: Consistent with the `author` field
* Plugin name: Read from the `name` field in `manifest.yaml`
* Branch name: `bump-{plugin-name}-plugin-{version}`
* Package filename: `{plugin-name}-{version}.difypkg`
* PR title and content: Automatically generated based on plugin name and version
### Step-by-Step Guide
Ensure you have forked the official `dify-plugins` repository and have your own plugin source repository.
Navigate to your plugin source repository, click **Settings > Secrets and variables > Actions > New repository secret**, and create a GitHub Secret:
* Name: `PLUGIN_ACTION`
* Value: GitHub Personal Access Token (PAT) with write permissions to the target repository (`your-name/dify-plugins`)

Create a `.github/workflows/` directory in your repository, create a file named `plugin-publish.yml` in this directory, and copy the following content into the file:
```yaml theme={null}
# .github/workflows/auto-pr.yml
name: Auto Create PR on Main Push
on:
push:
branches: [ main ] # Trigger on push to main
jobs:
create_pr: # Renamed job for clarity
runs-on: ubuntu-latest
steps:
- name: Checkout code
uses: actions/checkout@v3
- name: Print working directory # Kept for debugging
run: |
pwd
ls -la
- name: Download CLI tool
run: |
# Create bin directory in runner temp
mkdir -p $RUNNER_TEMP/bin
cd $RUNNER_TEMP/bin
# Download CLI tool
wget https://github.com/langgenius/dify-plugin-daemon/releases/latest/download/dify-plugin-linux-amd64
chmod +x dify-plugin-linux-amd64
# Show download location and file
echo "CLI tool location:"
pwd
ls -la dify-plugin-linux-amd64
- name: Get basic info from manifest # Changed step name and content
id: get_basic_info
run: |
PLUGIN_NAME=$(grep "^name:" manifest.yaml | cut -d' ' -f2)
echo "Plugin name: $PLUGIN_NAME"
echo "plugin_name=$PLUGIN_NAME" >> $GITHUB_OUTPUT
VERSION=$(grep "^version:" manifest.yaml | cut -d' ' -f2)
echo "Plugin version: $VERSION"
echo "version=$VERSION" >> $GITHUB_OUTPUT
# If the author's name is not your github username, you can change the author here
AUTHOR=$(grep "^author:" manifest.yaml | cut -d' ' -f2)
echo "Plugin author: $AUTHOR"
echo "author=$AUTHOR" >> $GITHUB_OUTPUT
- name: Package Plugin
id: package
run: |
# Use the downloaded CLI tool to package
cd $GITHUB_WORKSPACE
# Use variables for package name
PACKAGE_NAME="${{ steps.get_basic_info.outputs.plugin_name }}-${{ steps.get_basic_info.outputs.version }}.difypkg"
# Use CLI from runner temp
$RUNNER_TEMP/bin/dify-plugin-linux-amd64 plugin package . -o "$PACKAGE_NAME"
# Show packaging result
echo "Package result:"
ls -la "$PACKAGE_NAME"
echo "package_name=$PACKAGE_NAME" >> $GITHUB_OUTPUT
# Show full file path and directory structure (kept for debugging)
echo "\\nFull file path:"
pwd
echo "\\nDirectory structure:"
tree || ls -R
- name: Checkout target repo
uses: actions/checkout@v3
with:
# Use author variable for repository
repository: ${{steps.get_basic_info.outputs.author}}/dify-plugins
path: dify-plugins
token: ${{ secrets.PLUGIN_ACTION }}
fetch-depth: 1 # Fetch only the last commit to speed up checkout
persist-credentials: true # Persist credentials for subsequent git operations
- name: Prepare and create PR
run: |
# Debug info (kept)
echo "Debug: Current directory $(pwd)"
# Use variable for package name
PACKAGE_NAME="${{ steps.get_basic_info.outputs.plugin_name }}-${{ steps.get_basic_info.outputs.version }}.difypkg"
echo "Debug: Package name: $PACKAGE_NAME"
ls -la
# Move the packaged file to the target directory using variables
mkdir -p dify-plugins/${{ steps.get_basic_info.outputs.author }}/${{ steps.get_basic_info.outputs.plugin_name }}
mv "$PACKAGE_NAME" dify-plugins/${{ steps.get_basic_info.outputs.author }}/${{ steps.get_basic_info.outputs.plugin_name }}/
# Enter the target repository directory
cd dify-plugins
# Configure git
git config user.name "GitHub Actions"
git config user.email "actions@github.com"
# Ensure we are on the latest main branch
git fetch origin main
git checkout main
git pull origin main
# Create and switch to a new branch using variables and new naming convention
BRANCH_NAME="bump-${{ steps.get_basic_info.outputs.plugin_name }}-plugin-${{ steps.get_basic_info.outputs.version }}"
git checkout -b "$BRANCH_NAME"
# Add and commit changes (using git add .)
git add .
git status # for debugging
# Use variables in commit message
git commit -m "bump ${{ steps.get_basic_info.outputs.plugin_name }} plugin to version ${{ steps.get_basic_info.outputs.version }}"
# Push to remote (use force just in case the branch existed before from a failed run)
git push -u origin "$BRANCH_NAME" --force
# Confirm branch has been pushed and wait for sync (GitHub API might need a moment)
git branch -a
echo "Waiting for branch to sync..."
sleep 10 # Wait 10 seconds for branch sync
- name: Create PR via GitHub API
env:
GH_TOKEN: ${{ secrets.PLUGIN_ACTION }} # Use the provided token for authentication
run: |
gh pr create \
--repo langgenius/dify-plugins \
--head "${{ steps.get_basic_info.outputs.author }}:${{ steps.get_basic_info.outputs.plugin_name }}-${{ steps.get_basic_info.outputs.version }}" \
--base main \
--title "bump ${{ steps.get_basic_info.outputs.plugin_name }} plugin to version ${{ steps.get_basic_info.outputs.version }}" \
--body "bump ${{ steps.get_basic_info.outputs.plugin_name }} plugin package to version ${{ steps.get_basic_info.outputs.version }}
Changes:
- Updated plugin package file" || echo "PR already exists or creation skipped." # Handle cases where PR already exists
- name: Print environment info # Kept for debugging
run: |
echo "GITHUB_WORKSPACE: $GITHUB_WORKSPACE"
echo "Current directory contents:"
ls -R
```
Ensure those following fields are correctly set:
```yaml theme={null}
version: 0.0.x # Version number
author: your-github-username # GitHub username/Author name
name: your-plugin-name # Plugin name
```
### Usage Guide
#### First-time Setup
When setting up the auto-publish workflow for the first time, complete these steps:
1. Ensure you have forked the official `dify-plugins` repository
2. Ensure your plugin source repository structure is correct
3. Set up the `PLUGIN_ACTION Secret` in your plugin source repository
4. Create the workflow file `.github/workflows/plugin-publish.yml`
5. Ensure the `name` and `author` fields in the `manifest.yaml` file are correctly configured
#### Subsequent Update
To publish new versions after setup:
1. Modify the code
2. Update the `version` field in `manifest.yaml`

3. Push all changes to the main branch
4. Wait for GitHub Actions to complete packaging, branch creation, and PR submission
### Outcome
When you push code to the main branch of your plugin source repository, GitHub Actions will automatically execute the publishing process:
* Package the plugin in `{plugin-name}-{version}.difypkg` format
* Push the packaged file to the target repository
* Create a PR to merge into the fork repository

### Example Repository
See [example repository](https://github.com/Yevanchen/exa-in-dify) to understand configuration and best practices.
***
[Edit this page](https://github.com/langgenius/dify-docs/edit/main/en/develop-plugin/publishing/marketplace-listing/plugin-auto-publish-pr.mdx) | [Report an issue](https://github.com/langgenius/dify-docs/issues/new?template=docs.yml)
# Package as Local File and Share
Source: https://docs.dify.ai/en/develop-plugin/publishing/marketplace-listing/release-by-file
This document provides detailed steps on how to package a Dify plugin project as a local file and share it with others. It covers the preparation work before packaging a plugin, using the Dify plugin development tool to execute packaging commands, how to install the generated .difypkg file, and how to share plugin files with other users.
After completing plugin development, you can package the plugin project as a local file and share it with others. After obtaining the plugin file, it can be installed into a Dify Workspace. If you haven't developed a plugin yet, you can refer to the [Plugin Development: Hello World Guide](/en/develop-plugin/dev-guides-and-walkthroughs/tool-plugin).
* **Features**:
* Not dependent on online platforms, **quick and flexible** way to share plugins.
* Suitable for **private plugins** or **internal testing**.
* **Publishing Process**:
* Package the plugin project as a local file.
* Upload the file on the Dify plugins page to install the plugin.
This article will introduce how to package a plugin project as a local file and how to install a plugin using a local file.
### Prerequisites
* **Dify Plugin Development Tool**, for detailed instructions, please refer to [Initializing Development Tools](/en/develop-plugin/getting-started/cli).
After configuration, enter the `dify version` command in the terminal to check if it outputs version information to confirm that the necessary development tools have been installed.
### Packaging the Plugin
> Before packaging the plugin, please ensure that the `author` field in the plugin's `manifest.yaml` file and the `.yaml` file under the `/provider` path is consistent with your GitHub ID. For detailed information about the manifest file, please refer to [General Specifications](/en/develop-plugin/features-and-specs/plugin-types/general-specifications).
After completing the plugin project development, make sure you have completed the [remote debugging test](/en/develop-plugin/features-and-specs/plugin-types/remote-debug-a-plugin). Navigate to the directory above your plugin project and run the following plugin packaging command:
```bash theme={null}
dify plugin package ./your_plugin_project
```
After running the command, a file with the `.difypkg` extension will be generated in the current path.

### Installing the Plugin
Visit the Dify plugin management page, click **Install Plugin** in the upper right corner → **Via Local File** to install, or drag and drop the plugin file to a blank area of the page to install the plugin.
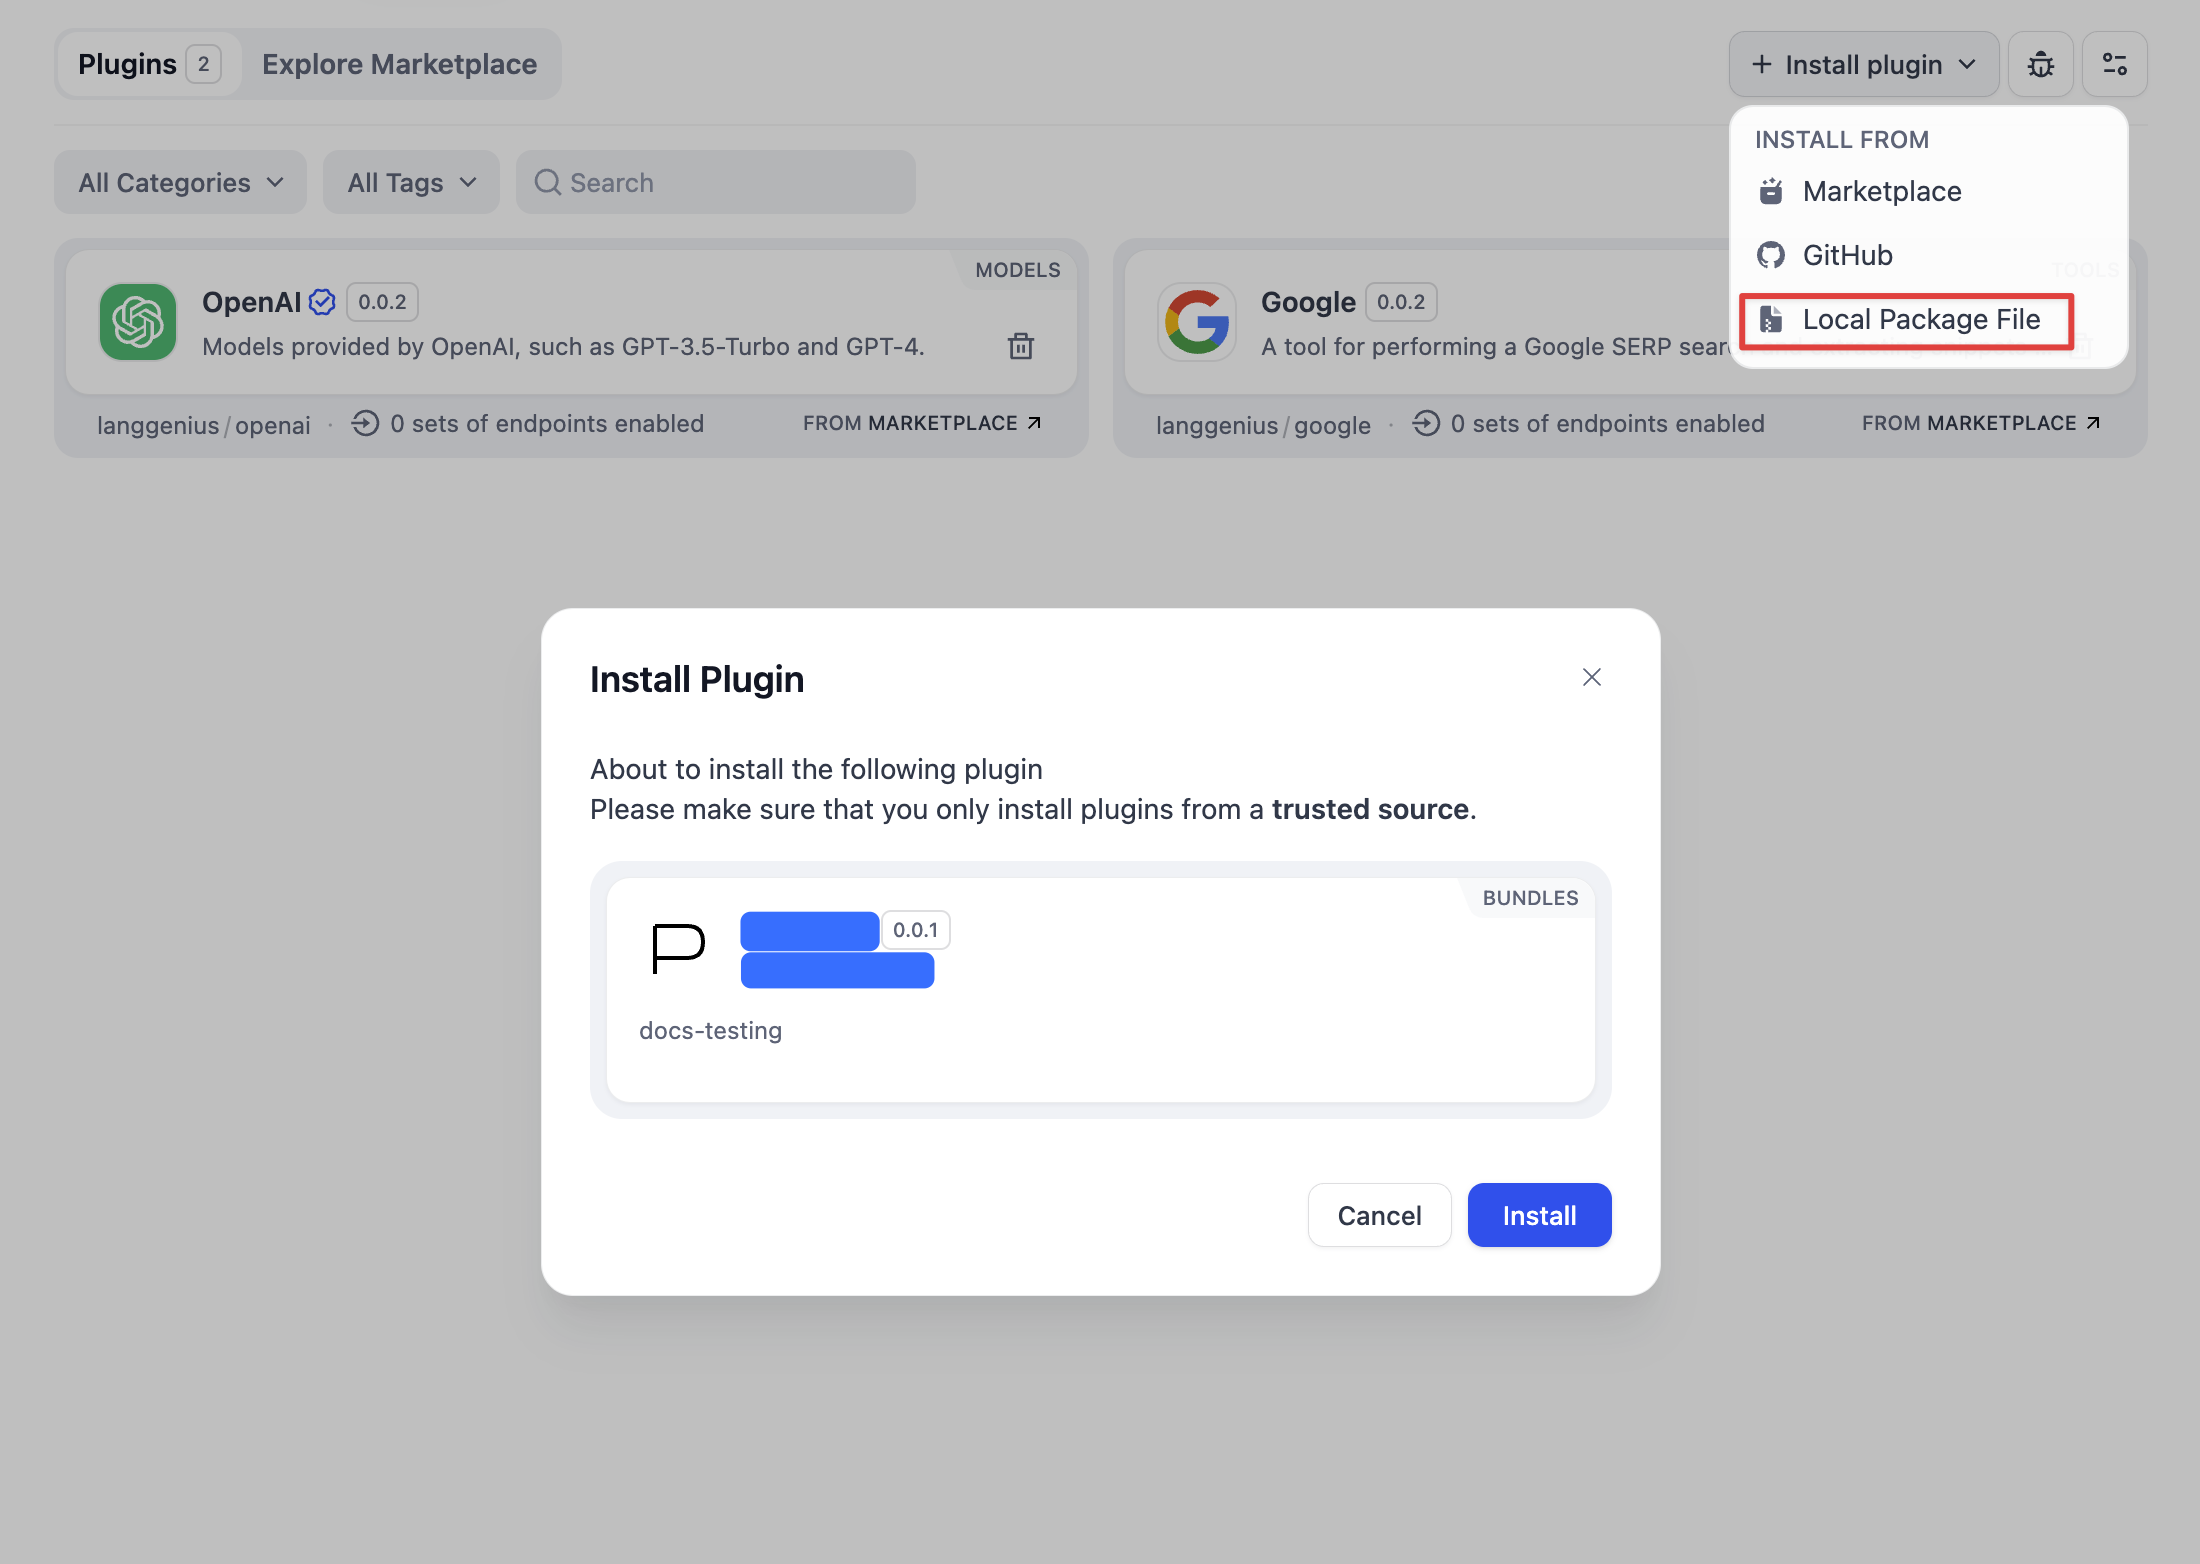
### Publishing the Plugin
You can share the plugin file with others or upload it to the internet for others to download. If you want to share your plugin more widely, you can consider:
1. [Publish to Individual GitHub Repository](/en/develop-plugin/publishing/marketplace-listing/release-to-individual-github-repo) - Share the plugin through GitHub
2. [Publish to Dify Marketplace](/en/develop-plugin/publishing/marketplace-listing/release-to-dify-marketplace) - Publish the plugin on the official marketplace
## Related Resources
* [Publishing Plugins](/en/develop-plugin/publishing/marketplace-listing/release-overview) - Learn about various publishing methods
* [Initializing Development Tools](/en/develop-plugin/getting-started/cli) - Configure plugin development environment
* [Remote Debugging Plugins](/en/develop-plugin/features-and-specs/plugin-types/remote-debug-a-plugin) - Learn plugin debugging methods
* [General Specifications](/en/develop-plugin/features-and-specs/plugin-types/general-specifications) - Define plugin metadata
* [Plugin Development: Hello World Guide](/en/develop-plugin/dev-guides-and-walkthroughs/tool-plugin) - Develop a plugin from scratch
***
[Edit this page](https://github.com/langgenius/dify-docs/edit/main/en/develop-plugin/publishing/marketplace-listing/release-by-file.mdx) | [Report an issue](https://github.com/langgenius/dify-docs/issues/new?template=docs.yml)
# Publishing Plugins
Source: https://docs.dify.ai/en/develop-plugin/publishing/marketplace-listing/release-overview
This document introduces three ways to publish Dify plugins - official Marketplace, open-source GitHub repository, and local plugin file package. It details the characteristics, publishing process, and applicable scenarios for each method, and provides specific publishing recommendations to meet the needs of different developers.
### Publishing Methods
To meet the publishing needs of different developers, Dify provides the following three plugin publishing methods. Before publishing, please ensure that you have completed the development and testing of your plugin, and have read [Basic Concepts of Plugin Development](/en/develop-plugin/getting-started/getting-started-dify-plugin) and [Plugin Developer Guidelines](/en/develop-plugin/publishing/standards/contributor-covenant-code-of-conduct).
#### **1. Marketplace**
**Introduction**: The official plugin marketplace provided by Dify, where users can browse, search, and install various plugins with one click.
**Features**:
* Plugins are reviewed before going online, ensuring they are **safe and reliable**.
* Can be directly installed in personal or team **Workspaces**.
**Publishing Process**:
* Submit the plugin project to the **Dify Marketplace** [code repository](https://github.com/langgenius/dify-plugins).
* After official review, the plugin will be publicly available in the marketplace for other users to install and use.
For detailed instructions, please refer to:
[Publish to Dify Marketplace](/en/develop-plugin/publishing/marketplace-listing/release-to-dify-marketplace)
#### 2. **GitHub Repository**
**Introduction**: Open-source or host your plugin on **GitHub** for others to view, download, and install.
**Features**:
* Convenient for **version management** and **open-source sharing**.
* Users can install directly via the plugin link, without platform review.
**Publishing Process**:
* Push the plugin code to a GitHub repository.
* Share the repository link, users can integrate the plugin into their **Dify Workspace** through the link.
For detailed instructions, please refer to:
[Publish to Individual GitHub Repository](/en/develop-plugin/publishing/marketplace-listing/release-to-individual-github-repo)
#### 3. Plugin File Package (Local Installation)
**Introduction**: Package the plugin as a local file (such as `.difypkg` format) and share it for others to install.
**Features**:
* Not dependent on online platforms, **quick and flexible** way to share plugins.
* Suitable for **private plugins** or **internal testing**.
**Publishing Process**:
* Package the plugin project as a local file.
* Click **Upload Plugin** on the Dify plugins page and select the local file to install the plugin.
You can package your plugin project as a local file and share it with others. After uploading the file on the plugins page, you can install the plugin into your Dify Workspace.
For detailed instructions, please refer to:
[Package as Local File and Share](/en/develop-plugin/publishing/marketplace-listing/release-by-file)
### **Publishing Recommendations**
* **Want to promote your plugin** → **Recommended to use Marketplace**, ensuring plugin quality through official review and increasing exposure.
* **Open-source sharing project** → **Recommended to use GitHub**, convenient for version management and community collaboration.
* **Quick distribution or internal testing** → **Recommended to use plugin files**, simple and efficient way to install and share.
## Related Resources
* [Basic Concepts of Plugin Development](/en/develop-plugin/getting-started/getting-started-dify-plugin) - Comprehensive understanding of Dify plugin development
* [Plugin Developer Guidelines](/en/develop-plugin/publishing/standards/contributor-covenant-code-of-conduct) - Understand the standards for plugin submission
* [Plugin Privacy Data Protection Guide](/en/develop-plugin/publishing/standards/privacy-protection-guidelines) - Understand the requirements for writing privacy policies
* [General Specifications](/en/develop-plugin/features-and-specs/plugin-types/general-specifications) - Understand the configuration of plugin manifest files
***
[Edit this page](https://github.com/langgenius/dify-docs/edit/main/en/develop-plugin/publishing/marketplace-listing/release-overview.mdx) | [Report an issue](https://github.com/langgenius/dify-docs/issues/new?template=docs.yml)
# Publish to Dify Marketplace
Source: https://docs.dify.ai/en/develop-plugin/publishing/marketplace-listing/release-to-dify-marketplace
This guide provides detailed instructions on the complete process of publishing plugins to the Dify Marketplace, including submitting PRs, the review process, post-release maintenance, and other key steps and considerations.
Dify Marketplace welcomes plugin submissions from partners and community developers. Your contributions will further enrich the possibilities of Dify plugins. This guide provides a clear publishing process and best practice recommendations to help your plugin get published smoothly and bring value to the community. If you haven't developed a plugin yet, you can refer to the [Plugin Development: Hello World Guide](/en/develop-plugin/dev-guides-and-walkthroughs/tool-plugin).
Please follow these steps to submit your plugin Pull Request (PR) to the [GitHub repository](https://github.com/langgenius/dify-plugins) for review. After approval, your plugin will be officially launched on the Dify Marketplace.
### Plugin Publishing Process
Publishing a plugin to the Dify Marketplace involves the following steps:
1. Complete plugin development and testing according to the [Plugin Developer Guidelines](/en/develop-plugin/publishing/standards/contributor-covenant-code-of-conduct);
2. Write a privacy policy for the plugin according to the [Plugin Privacy Data Protection Guide](/en/develop-plugin/publishing/standards/privacy-protection-guidelines), and include the file path or URL of the privacy policy in the plugin [General Specifications](/en/develop-plugin/features-and-specs/plugin-types/general-specifications);
3. Complete plugin packaging;
4. Fork the [Dify Plugins](https://github.com/langgenius/dify-plugins) code repository;
5. Create your personal or organization folder in the repository and upload the packaged `.difypkg` file to your folder;
6. Submit a Pull Request (PR) following the PR Template format in GitHub and wait for review;
7. After the review is approved, the plugin code will be merged into the Main branch, and the plugin will be automatically launched on the [Dify Marketplace](https://marketplace.dify.ai/).
Plugin submission, review, and publication flow chart:
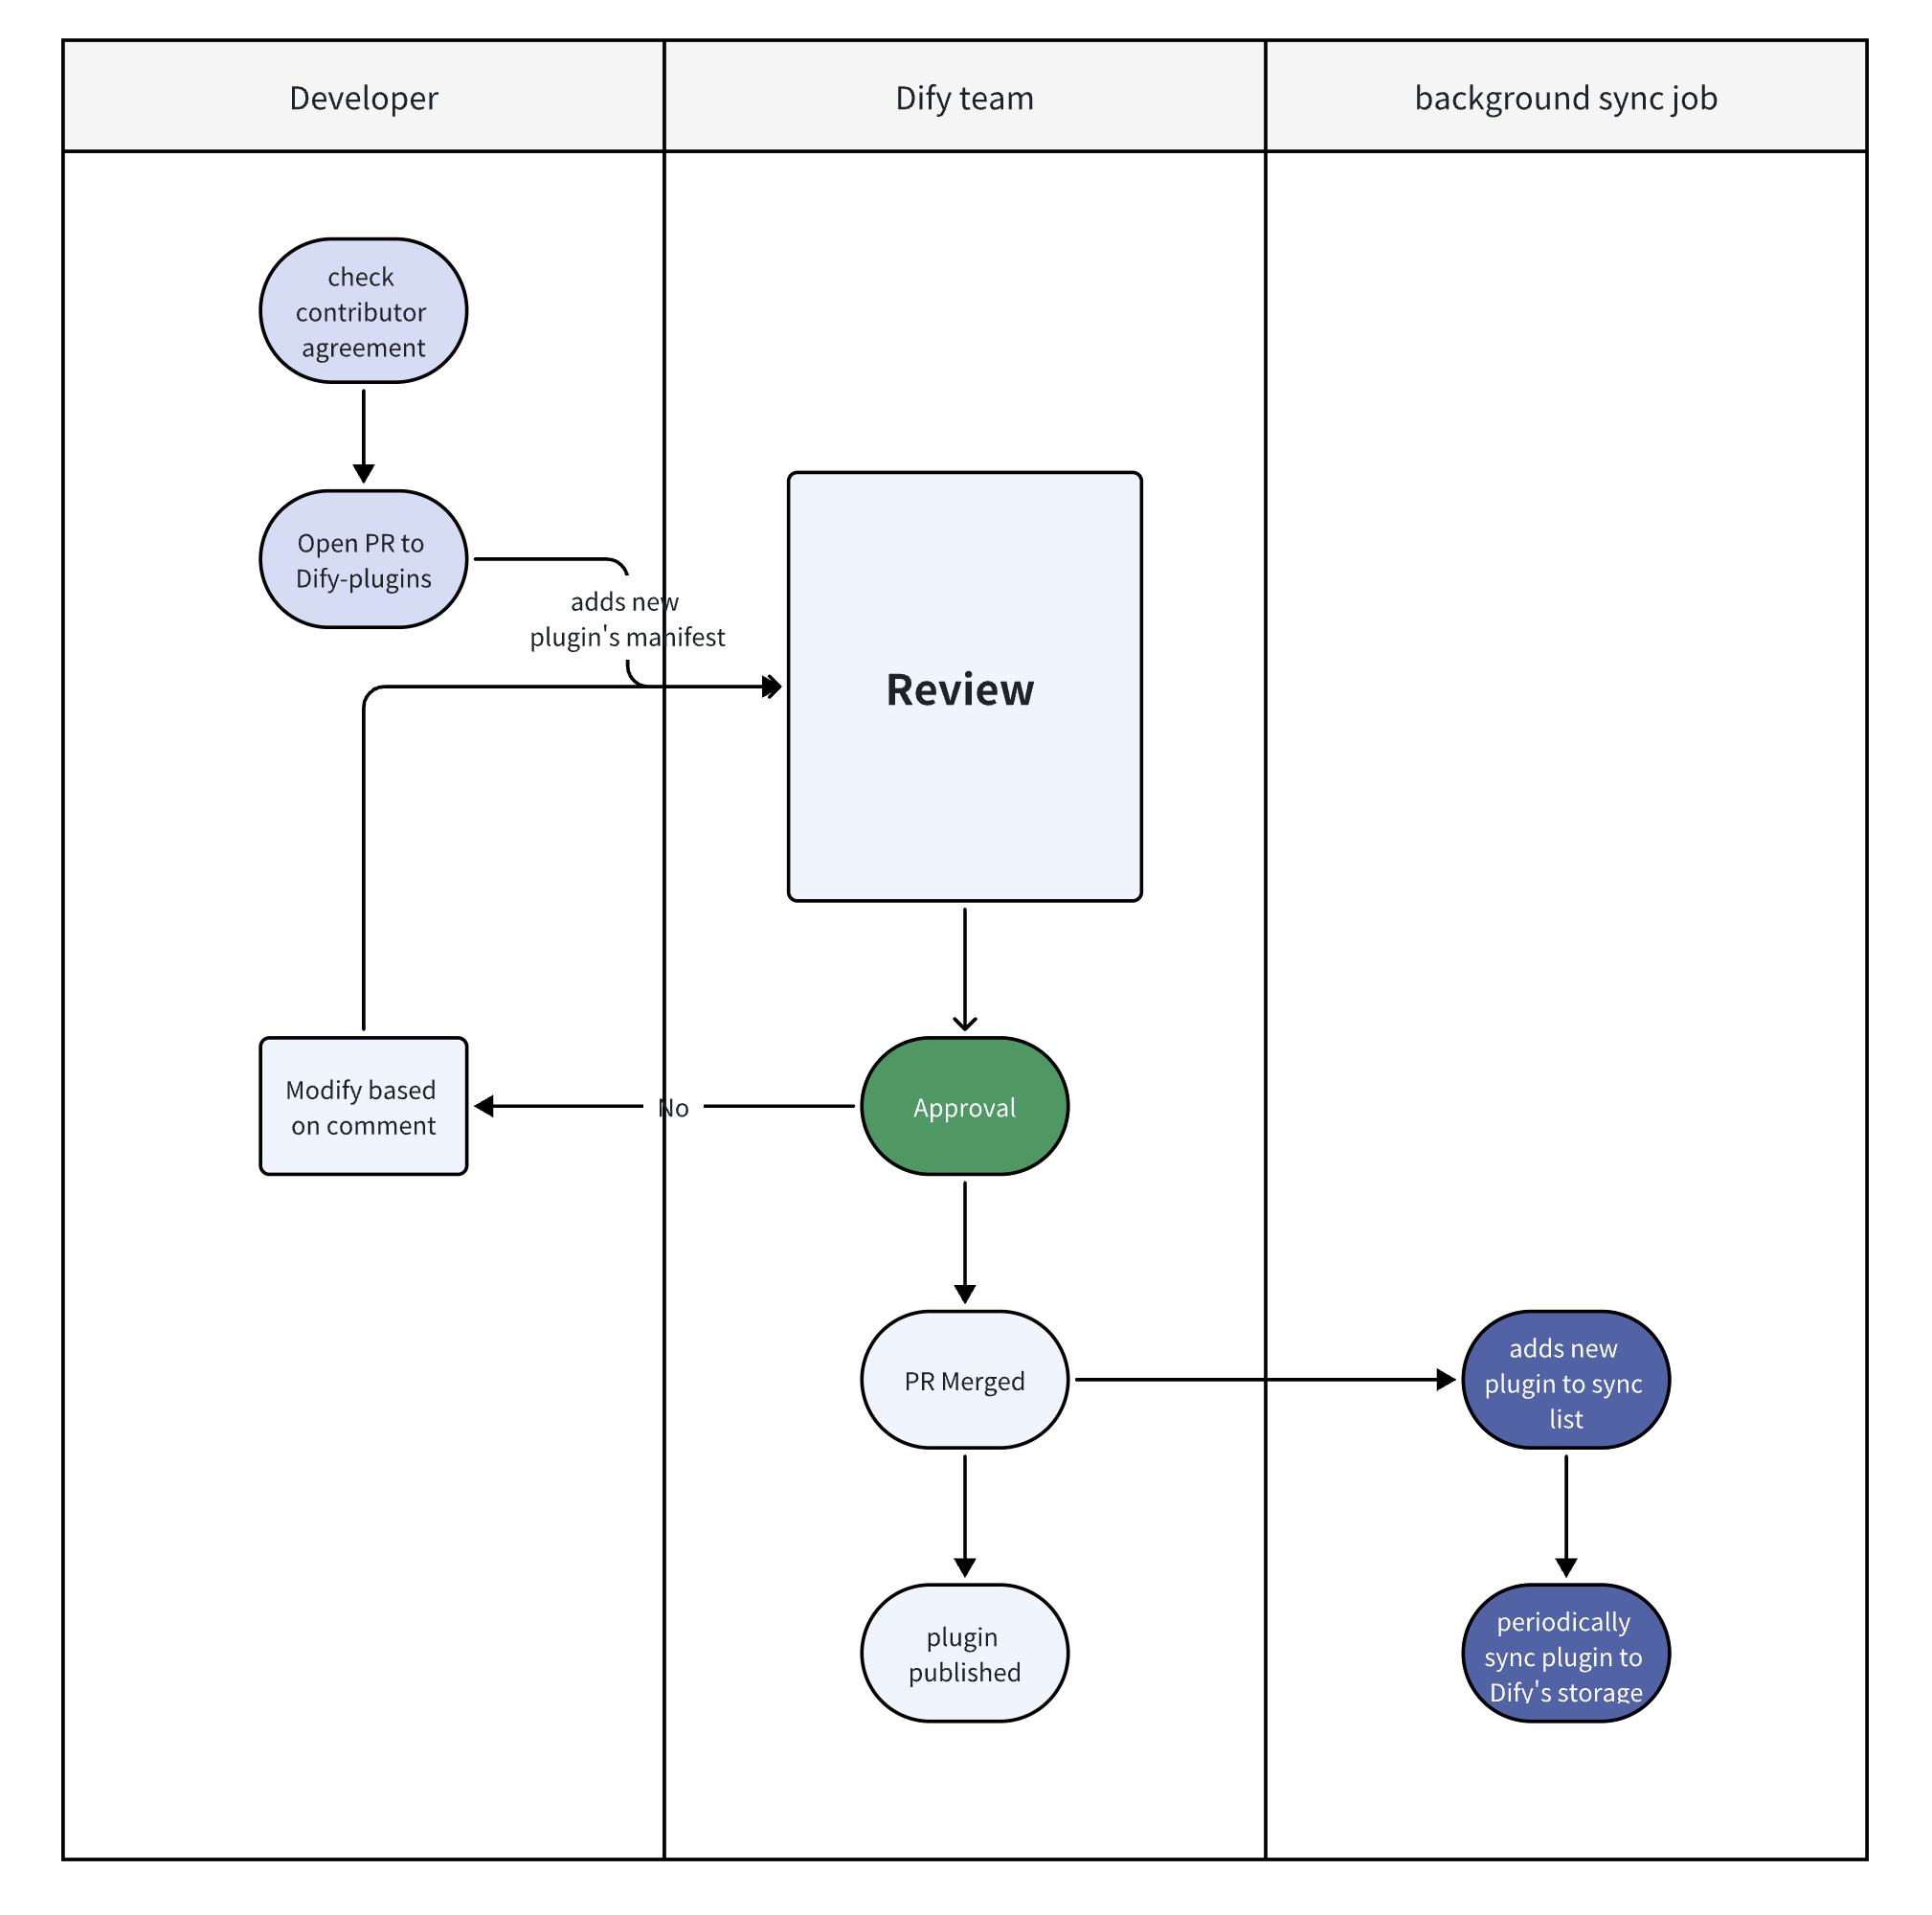
> **Note**: The Contributor Agreement in the above diagram refers to the [Plugin Developer Guidelines](/en/develop-plugin/publishing/standards/contributor-covenant-code-of-conduct).
***
### During Pull Request (PR) Review
Actively respond to reviewer questions and feedback:
* PR comments unresolved within **14 days** will be marked as stale (can be reopened).
* PR comments unresolved within **30 days** will be closed (cannot be reopened, a new PR needs to be created).
***
### **After Pull Request (PR) Approval**
**1. Ongoing Maintenance**
* Address user-reported issues and feature requests.
* Migrate plugins when significant API changes occur:
* Dify will publish change notifications and migration instructions in advance.
* Dify engineers can provide migration support.
**2. Restrictions during the Marketplace Public Beta Testing Phase**
* Avoid introducing breaking changes to existing plugins.
***
### Review Process
**1. Review Order**
* PRs are processed on a **first-come, first-reviewed** basis. Review will begin within 1 week. If there is a delay, reviewers will notify the PR author via comments.
**2. Review Focus**
* Check if the plugin name, description, and setup instructions are clear and instructive.
* Check if the plugin's [General Specifications](/en/develop-plugin/features-and-specs/plugin-types/general-specifications) meets format standards and includes valid author contact information.
**3. Plugin Functionality and Relevance**
* Test plugins according to the [Plugin Development Guide](/en/develop-plugin/getting-started/getting-started-dify-plugin).
* Ensure the plugin has a reasonable purpose in the Dify ecosystem.
[Dify.AI](https://dify.ai/) reserves the right to accept or reject plugin submissions.
***
### Frequently Asked Questions
1. **How to determine if a plugin is unique?**
Example: A Google search plugin that only adds multilingual versions should be considered an optimization of an existing plugin. However, if the plugin implements significant functional improvements (such as optimized batch processing or error handling), it can be submitted as a new plugin.
2. **What if my PR is marked as stale or closed?**
PRs marked as stale can be reopened after addressing feedback. Closed PRs (over 30 days) require creating a new PR.
3. **Can I update plugins during the Beta testing phase?**
Yes, but breaking changes should be avoided.
## Related Resources
* [Publishing Plugins](/en/develop-plugin/publishing/marketplace-listing/release-overview) - Learn about various publishing methods
* [Plugin Developer Guidelines](/en/develop-plugin/publishing/standards/contributor-covenant-code-of-conduct) - Plugin submission standards
* [Plugin Privacy Data Protection Guide](/en/develop-plugin/publishing/standards/privacy-protection-guidelines) - Privacy policy writing requirements
* [Package as Local File and Share](/en/develop-plugin/publishing/marketplace-listing/release-by-file) - Plugin packaging methods
* [General Specifications](/en/develop-plugin/features-and-specs/plugin-types/general-specifications) - Define plugin metadata
***
[Edit this page](https://github.com/langgenius/dify-docs/edit/main/en/develop-plugin/publishing/marketplace-listing/release-to-dify-marketplace.mdx) | [Report an issue](https://github.com/langgenius/dify-docs/issues/new?template=docs.yml)
# Publish to Individual GitHub Repository
Source: https://docs.dify.ai/en/develop-plugin/publishing/marketplace-listing/release-to-individual-github-repo
This document provides detailed instructions on how to publish Dify plugins to a personal GitHub repository, including preparation work, initializing a local plugin repository, connecting to a remote repository, uploading plugin files, packaging plugin code, and the complete process of installing plugins via GitHub. This method allows developers to fully manage their own plugin code and updates.
### Publish Methods
To accommodate the various publishing needs of developers, Dify provides three plugin publish methods:
#### **1. Marketplace**
**Introduction**: The official Dify plugin marketplace allows users to browse, search, and install a variety of plugins with just one click.
**Features**:
* Plugins become available after passing a review, ensuring they are **trustworthy** and **high-quality**.
* Can be installed directly into an individual or team **Workspaces**.
**Publication Process**:
* Submit the plugin project to the **Dify Marketplace** [code repository](https://github.com/langgenius/dify-plugins).
* After an official review, the plugin will be publicly released in the marketplace for other users to install and use.
For detailed instructions, please refer to:
#### 2. **GitHub Repository**
**Introduction**: Open-source or host the plugin on **GitHub** makes it easy for others to view, download, and install.
**Features**:
* Convenient for **version management** and **open-source sharing**.
* Users can install the plugin directly via a link, bypassing platform review.
**Publication Process**:
* Push the plugin code to a GitHub repository.
* Share the repository link, users can integrate the plugin into their **Dify Workspace** through the link.
For detailed instructions, please refer to:
#### Plugin File (Local Installation)
**Introduction**: Package the plugin as a local file (e.g., `.difypkg` format) and share it for others to install.
**Features**:
* Does not depend on an online platform, enabling **quick and flexible** sharing of plugins.
* Suitable for **private plugins** or **internal testing**.
**Publication Process**:
* Package the plugin project as a local file.
* Click **Upload Plugin** on the Dify plugin page and select the local file to install the plugin.
You can package the plugin project as a local file and share it with others. After uploading the file on the plugin page, the plugin can be installed into the Dify Workspace.
For detailed instructions, please refer to:
### **Publication Recommendations**
* **Looking to promote a plugin** → **Recommended to use the Marketplace**, ensuring plugin quality through official review and increasing exposure.
* **Open-source sharing project** → **Recommended to use GitHub**, convenient for version management and community collaboration.
* **Quick distribution or internal testing** → **Recommended to use plugin file**, allowing for straightforward and efficient installation and sharing.
***
[Edit this page](https://github.com/langgenius/dify-docs/edit/main/en/develop-plugin/publishing/marketplace-listing/release-to-individual-github-repo.mdx) | [Report an issue](https://github.com/langgenius/dify-docs/issues/new?template=docs.yml)
# Plugin Development Guidelines
Source: https://docs.dify.ai/en/develop-plugin/publishing/standards/contributor-covenant-code-of-conduct
To ensure the quality of all plugins in the Dify Marketplace and provide a consistent, high-quality experience for Dify Marketplace users, you must adhere to all requirements outlined in these Plugin Development Guidelines when submitting a plugin for review. By submitting a plugin, **you acknowledge that you have read, understood, and agree to comply with all the following terms**. Following these guidelines will help your plugin get reviewed faster.
## 1. Plugin Value and Uniqueness
* **Focus on Generative AI**: Ensure the core functionality of your plugin focuses on the Generative AI domain and provides distinct and significant value to Dify users. This may include:
* Integrating new models, tools, or services.
* Offering unique data sources or processing capabilities to enhance AI applications.
* Simplifying or automating AI-related workflows on the Dify platform.
* Providing innovative supporting functions for AI application development.
* **Avoid Functional Duplication**: Submitted plugins **must not** duplicate or closely resemble existing plugins in the Marketplace. Each published plugin must be unique and independent to ensure the best experience for users.
* **Meaningful Updates**: For plugin updates, **ensure new features or services** are introduced that are not already available in the current version.
* **PR Submission Advice**: We **recommend** including a brief explanation in your pull request to clarify why the new plugin is needed.
## 2. Plugin Functionality Checklist
* **Unique Name**: Ensure your plugin name is unique by searching the plugin directory beforehand.
* **Brand Alignment**: Plugin name must match the plugin's branding.
* **Functionality Verification**: Test the plugin thoroughly before submission and confirm it works as intended. For details, refer to [Remote Debug a Plugin](/en/develop-plugin/features-and-specs/plugin-types/remote-debug-a-plugin). The plugin must be production-ready.
* **README Requirements**:
* Setup instructions and usage guidance.
* Any necessary code, APIs, credentials, or information required to connect the plugin.
* Do **not** include irrelevant content or links.
* Do **not** use exaggerated, promotional language, or unverifiable claims.
* Do **not** include advertisements of any kind (including self-promotion or display ads).
* Do **not** include misleading, offensive, or defamatory content.
* Do **not** expose real user names or data in screenshots.
* Do **not** link to 404 pages or pages that return errors.
* Avoid excessive spelling or punctuation errors.
* **User Data Use**: Use collected data only for connecting services and improving plugin functionality.
* **Error Clarity**: Mark required fields and provide clear error messages that help users understand issues.
* **Authentication Settings**: If authentication is needed, include the full configuration steps—do not omit them.
* **Privacy Policy**: Prepare a privacy policy document or online URL in accordance with the [Privacy Guidelines](/en/develop-plugin/publishing/standards/privacy-protection-guidelines).
* **Performance**: Plugins must operate efficiently and must not degrade the performance of Dify or user systems.
* **Credential Security**: API keys or other credentials must be stored and transmitted securely. Avoid hardcoding them or exposing them to unauthorized parties.
## 3. Language Requirements
* **English as Primary Language**: Since Dify Marketplace serves a global audience, **English must be the primary language** for all user-facing text (plugin names, descriptions, field names, labels, help text, error messages).
* **Multilingual Support Encouraged**: Supporting multiple languages is encouraged.
## 4. Prohibited and Restricted Plugins
* **Prohibited: Misleading or Malicious Behavior**\
Plugins must not mislead users. Do not create plugins for spamming, phishing, or sending unsolicited messages. Attempts to deceive the review process, steal user data, or impersonate users will result in removal and possible bans from future submissions.
* **Prohibited: Offensive Content**\
Plugins must not contain violent content, hate speech, discrimination, or disrespect toward global cultures, religions, or users.
* **Prohibited: Financial Transactions**\
Plugins must not facilitate any financial transactions, asset transfers, or payment processing. This includes token or asset ownership transfers in blockchain/crypto applications.
* **Restricted: Plugins with Frequent Defects**\
Thoroughly test your plugin to avoid critical bugs. Repeated submissions with defects may lead to delays or penalties.
* **Restricted: Unnecessary Plugin Splitting**\
Do not create multiple plugins for features that share the same API and authentication unless each is clearly a standalone product or service. Prefer integrating features into one high-level plugin.
* **Restricted: Duplicate Submissions**\
Avoid repeatedly submitting essentially identical plugins. Doing so may delay reviews or result in rejection.
## 5. Plugin Monetization
* \*\*Dify Marketplace currently only supports **free** plugins.
* **Future Policy**: Policies for monetization and pricing models will be announced in the future.
## 6. Trademarks and Intellectual Property
* **Authorization Required**: Ensure you have rights to use any logos or trademarks submitted.
* **Verification Rights**: We may ask you to prove you have permission if third-party logos are used—especially if they clearly belong to known brands.
* **Violation Consequences**: Dify reserves the right to ask for changes or remove the plugin if unauthorized use is found. Complaints from rights holders may also result in removal.
* **Dify Logos Forbidden**: You may not use Dify's own logos.
* **Image Standards**: Do not submit low-quality, distorted, or poorly cropped images. The review team may request replacements.
* **Icon Restrictions**: Icons must not contain misleading, offensive, or malicious visuals.
## 7. Plugin Updates and Version Management
* **Responsible Updates**: Clearly communicate breaking changes in descriptions or via external channels (e.g., GitHub Release Notes).
* **Encouraged Maintenance**: Update regularly to fix bugs, match Dify platform changes, or respond to updates from third-party services—especially for security.
* **Deprecation Notice**: If discontinuing a plugin, notify users in advance (e.g., timeline and plan in the plugin description) and suggest alternatives if available.
## 8. Plugin Maintenance and Support
* **Owner Responsibility**: Plugin owners are responsible for technical support and maintenance.
* **Support Channel Required**: Owners must provide **at least one** support channel (GitHub repo or email) for feedback during review and publication.
* **Handling Unmaintained Plugins**: If a plugin lacks maintenance and the owner does not respond after reasonable notification, Dify may:
* Add "Maintenance Lacking" or "Potential Risk" tags.
* Restrict new installs.
* Eventually unpublish the plugin.
## 9. Privacy and Data Compliance
* **Disclosure Required**: You **must declare** whether your plugin collects any user personal data. See the [Privacy Guidelines](/en/develop-plugin/publishing/standards/privacy-protection-guidelines).
* **Simple Data Listing**: If collecting data, briefly list types (e.g., username, email, device ID, location). No need for exhaustive detail.
* **Privacy Policy**: You **must provide** a privacy policy link stating:
* What information is collected.
* How it is used.
* What is shared with third parties (with their privacy links if applicable).
* **Review Focus**:
* **Formal Check**: Make sure you declare what data you collect.
* **Sensitive Data Scan**: Plugins collecting sensitive data (e.g., health, finance, children's info) require additional scrutiny.
* **Malicious Behavior Scan**: Plugins must not collect or upload user data without consent.
***
## 10. Review and Discretion
* **Right to Reject/Remove**: If requirements, privacy standards, or related policies are unmet, Dify may reject or remove your plugin. This includes abuse of the review process or data misuse.
* **Timely Review**: The Dify review team will aim to review plugins within a reasonable time, depending on volume and complexity.
* **Communication**: We may reach out through the support channel you provide—please ensure it is active.
## Related Resources
* [Basic Concepts of Plugin Development](/en/develop-plugin/getting-started/getting-started-dify-plugin) - Learn the basics of plugin development
* [Publishing Plugins](/en/develop-plugin/publishing/marketplace-listing/release-overview) - Overview of the plugin publishing process
* [Plugin Privacy Data Protection Guide](/en/develop-plugin/publishing/standards/privacy-protection-guidelines) - Guide for writing privacy policies
* [Publish to Dify Marketplace](/en/develop-plugin/publishing/marketplace-listing/release-to-dify-marketplace) - Publish plugins on the official marketplace
* [Remote Debugging Plugins](/en/develop-plugin/features-and-specs/plugin-types/remote-debug-a-plugin) - Plugin debugging guide
***
[Edit this page](https://github.com/langgenius/dify-docs/edit/main/en/develop-plugin/publishing/standards/contributor-covenant-code-of-conduct.mdx) | [Report an issue](https://github.com/langgenius/dify-docs/issues/new?template=docs.yml)
# Plugin Privacy Policy Guidelines
Source: https://docs.dify.ai/en/develop-plugin/publishing/standards/privacy-protection-guidelines
This document describes guidelines for developers on how to write a privacy policy when submitting plugins to the Dify Marketplace. It includes how to identify and list the types of personal data collected (direct identification information, indirect identification information, combined information), how to fill out the plugin privacy policy, how to include the privacy policy statement in the Manifest file, and answers to related common questions.
When you are submitting your Plugin to Dify Marketplace, you are required to be transparent in how you handle user data. The following guidelines focus on how to address privacy-related questions and user data processing for your plugin.
Center your privacy policy around the following points:
**Does your plugin collect and use any user personal data?** If it does, please list the types of data collected.
> “Personal data” refers to any information that can identify a specific individual—either on its own or when combined with other data—such as information used to locate, contact, or otherwise target a unique person.
#### 1. List the types of data collected
**Type A:** **Direct Identifiers**
* Name (e.g., full name, first name, last name)
* Email address
* Phone number
* Home address or other physical address
* Government-issued identification numbers (e.g., Social Security number, passport number, driver's license number)
**Type B**: **Indirect Identifiers**
* Device identifiers (e.g., IMEI, MAC address, device ID)
* IP address
* Location data (e.g., GPS coordinates, city, region)
* Online identifiers (e.g., cookies, advertising IDs)
* Usernames
* Profile pictures
* Biometric data (e.g., fingerprints, facial recognition data)
* Web browsing history
* Purchase history
* Health information
* Financial information
**Type C: Data that can be combined with other data to identify an individual:**
* Age
* Gender
* Occupation
* Interests
While your plugin may not collect any personal information, you also need to make sure the use of third-party services within your plugin may involve data collection or processing. As the plugin developer, you are responsible for disclosing all data collection activities associated within your plugin, including those performed by third-party services. Thus, make sure to read through the privacy policy of the third-party service and verify any data collected by your plugin is claimed in your submission.
For example, if the plugin you are developing involves Slack services, make sure to reference [Slack’s privacy policy](https://slack.com/trust/privacy/privacy-policy) in your plugin’s privacy policy statement and clearly disclose the data collection practices.
#### **2. Submit the most up to date Privacy Policy of your Plugin**
**The Privacy Policy** should contain:
* What types of data are collected.
* How the collected data is used.
* Whether any data is shared with third parties, and if so, identify those third parties and provide links to their privacy policies.
* If you have no clue of how to write a privacy policy, you can also check the privacy policy of Plugins issued by Dify Team.
#### 3. Introducing a privacy policy statement within the plugin Manifest file
For detailed instructions on filling out specific fields, please refer to the [General Specifications](/en/develop-plugin/features-and-specs/plugin-types/general-specifications) documentation.
**FAQ**
1. **What does "collect and use" mean regarding user personal data? Are there any common examples of how personal data is collected and used in any Plugin?**
"Collect and use" user data generally refers to the collection, transmission, use, or sharing of user data. Common examples of how products may handle personal or sensitive user data include:
* Using forms that gather any kind of personally identifiable information.
* Implementing login features, even when using third-party authentication services.
* Collecting information about input or resources that may contain personally identifiable information.
* Implementing analytics to track user behavior, interactions, and usage patterns.
* Storing communication data like messages, chat logs, or email addresses.
* Accessing user profiles or data from connected social media accounts.
* Collecting health and fitness data such as activity levels, heart rate, or medical information.
* Storing search queries or tracking browsing behavior.
* Processing financial information including bank details, credit scores, or transaction history.
## Related Resources
* [Publishing Overview](/en/develop-plugin/publishing/marketplace-listing/release-overview) - Understand the plugin publishing process
* [Publish to Dify Marketplace](/en/develop-plugin/publishing/marketplace-listing/release-to-dify-marketplace) - Learn how to submit plugins to the official marketplace
* [Plugin Developer Guidelines](/en/develop-plugin/publishing/standards/contributor-covenant-code-of-conduct) - Understand plugin submission guidelines
* [General Specifications](/en/develop-plugin/features-and-specs/plugin-types/general-specifications) - Plugin metadata configuration
***
[Edit this page](https://github.com/langgenius/dify-docs/edit/main/en/develop-plugin/publishing/standards/privacy-protection-guidelines.mdx) | [Report an issue](https://github.com/langgenius/dify-docs/issues/new?template=docs.yml)
# Signing Plugins for Third-Party Signature Verification
Source: https://docs.dify.ai/en/develop-plugin/publishing/standards/third-party-signature-verification
This document describes how to enable and use the third-party signature verification feature in the Dify Community Edition, including key pair generation, plugin signing and verification, and environment configuration steps, enabling administrators to securely install plugins not available on the Dify Marketplace.
***
## title:
This feature is available only in the Dify Community Edition. Third-party signature verification is not currently supported on Dify Cloud Edition.
Third-party signature verification allows Dify administrators to safely approve the installation of plugins not listed on the Dify Marketplace without completely disabling signature verification. This supports the following scenarios for example:
* Dify administrators can add a signature to a plugin sent by the developer once it has been approved.
* Plugin developers can add a signature to their plugin and publish it along with the public key for Dify administrators who cannot disable signature verification.
Both Dify administrators and plugin developers can add a signature to a plugin using a pre-generated key pair. Additionally, administrators can configure Dify to enforce signature verification using specific public keys during plugin installation.
## Generating a Key Pair for Signing and Verification
Generate a new key pair for adding and verifying the plugin's signature with the following command:
```bash theme={null}
dify signature generate -f your_key_pair
```
After running this command, two files will be generated in the current directory:
* **Private Key**: `your_key_pair.private.pem`
* **Public Key**: `your_key_pair.public.pem`
The private key is used to sign the plugin, and the public key is used to verify the plugin's signature.
Keep the private key secure. If it is compromised, an attacker could add a valid signature to any plugin, which would compromise Dify's security.
## Adding a Signature to the Plugin and Veriyfing It
Add a signature to your plugin by running the following command. Note that you must specify the **plugin file to sign** and the **private key**:
```bash theme={null}
dify signature sign your_plugin_project.difypkg -p your_key_pair.private.pem
```
After executing the command, a new plugin file will be generated in the same directory with `signed` added to its original filename: `your_plugin_project.signed.difypkg`
You can verify that the plugin has been correctly signed using this command. Here, you need to specify the **signed plugin file** and the **public key**:
```bash theme={null}
dify signature verify your_plugin_project.signed.difypkg -p your_key_pair.public.pem
```
If you omit the public key argument, verification will use the Dify Marketplace public key. In that case, signature verification will fail for any plugin file not downloaded from the Dify Marketplace.
## Enabling Third-Party Signature Verification
Dify administrators can enforce signature verification using pre-approved public keys before installing a plugin.
### Placing the Public Key
Place the **public key** corresponding to the private key used for signing in a location that the plugin daemon can access.
For example, create a `public_keys` directory under `docker/volumes/plugin_daemon` and copy the public key file there:
```bash theme={null}
mkdir docker/volumes/plugin_daemon/public_keys
cp your_key_pair.public.pem docker/volumes/plugin_daemon/public_keys
```
### Environment Variable Configuration
In the `plugin_daemon` container, configure the following environment variables:
* `THIRD_PARTY_SIGNATURE_VERIFICATION_ENABLED`
* Enables third-party signature verification.
* Set this to `true` to enable the feature.
* `THIRD_PARTY_SIGNATURE_VERIFICATION_PUBLIC_KEYS`
* Specifies the path(s) to the public key file(s) used for signature verification.
* You can list multiple public key files separated by commas.
Below is an example of a Docker Compose override file (`docker-compose.override.yaml`) configuring these variables:
```yaml theme={null}
services:
plugin_daemon:
environment:
FORCE_VERIFYING_SIGNATURE: true
THIRD_PARTY_SIGNATURE_VERIFICATION_ENABLED: true
THIRD_PARTY_SIGNATURE_VERIFICATION_PUBLIC_KEYS: /app/storage/public_keys/your_key_pair.public.pem
```
Note that `docker/volumes/plugin_daemon` is mounted to `/app/storage` in the `plugin_daemon` container. Ensure that the path specified in `THIRD_PARTY_SIGNATURE_VERIFICATION_PUBLIC_KEYS` corresponds to the path inside the container.
To apply these changes, restart the Dify service:
```bash theme={null}
cd docker
docker compose down
docker compose up -d
```
After restarting the service, the third-party signature verification feature will be enabled in the current Community Edition environment.
***
[Edit this page](https://github.com/langgenius/dify-docs/edit/main/en/develop-plugin/publishing/standards/third-party-signature-verification.mdx) | [Report an issue](https://github.com/langgenius/dify-docs/issues/new?template=docs.yml)
Through plugins, your AI applications can:
* Connect to external APIs
* Process different types of data
* Perform specialized calculations
* Execute real-world actions
## Types of Plugins
Package and manage AI models as plugins
Learn more
Build specialized capabilities for Agents and workflows
Learn more
Create custom reasoning strategies for autonomous Agents
Learn more
Implement integration with external services through HTTP Webhooks
Learn more
## Additional Resources
Tools and techniques for efficient plugin development
Package and share your plugins with the Dify community
Technical specifications and documentation
Communicate with other developers and contribute to the ecosystem
***
[Edit this page](https://github.com/langgenius/dify-docs/edit/main/en/develop-plugin/getting-started/getting-started-dify-plugin.mdx) | [Report an issue](https://github.com/langgenius/dify-docs/issues/new?template=docs.yml)
# Frequently Asked Questions
Source: https://docs.dify.ai/en/develop-plugin/publishing/faq/faq
This document answers common questions about Dify plugin development and installation, including how to resolve plugin upload failures (by modifying the author field) and how to handle verification exceptions during plugin installation (by setting the FORCE_VERIFYING_SIGNATURE environment variable).
## What should I do if the plugin upload fails during installation?
**Error Details**: An error message `PluginDaemonBadRequestError: plugin_unique_identifier is not valid` appears.
**Solution**: Modify the `author` field in the `manifest.yaml` file under the plugin project and the `.yaml` file under the `/provider` path to your GitHub ID.
Rerun the plugin packaging command and install the new plugin package.
## How should I handle exceptions encountered during plugin installation?
**Problem Description**: An exception message is encountered during plugin installation: `plugin verification has been enabled, and the plugin you want to install has a bad signature`. How should this be handled?
**Solution**: Add the field `FORCE_VERIFYING_SIGNATURE=false` to the end of the `/docker/.env` configuration file. Then, run the following commands to restart the Dify service:
```bash theme={null}
cd docker
docker compose down
docker compose up -d
```
After adding this field, the Dify platform will allow the installation of all plugins not listed (reviewed) on the Dify Marketplace, which may pose security risks.
It is recommended to install plugins in a testing/sandbox environment first and confirm their safety before installing them in a production environment.
***
[Edit this page](https://github.com/langgenius/dify-docs/edit/main/en/develop-plugin/publishing/faq/faq.mdx) | [Report an issue](https://github.com/langgenius/dify-docs/issues/new?template=docs.yml)
# Automatically Publish Plugins via PR
Source: https://docs.dify.ai/en/develop-plugin/publishing/marketplace-listing/plugin-auto-publish-pr
This document describes how to automate the release process of Dify plugins using GitHub Actions, including configuration steps, parameter descriptions, and usage methods, helping plugin developers streamline the release process without manual intervention.
### Background
Updating plugins that others are actively using can be tedious. Traditionally, you would need to modify code, bump versions, push changes, create branches, package files, and submit PRs manually - a repetitive process that slows down development.
Thus, we have created **Plugin Auto-PR**, a GitHub Actions workflow that automates the entire process. Now you can package, push, and create PRs with a single action, focusing on building great plugins.
### Concepts
#### GitHub Actions
GitHub Actions automates your development tasks in GitHub.
**How it works**: When triggered (e.g., by a code push), it runs your workflow in a cloud-based virtual machine, handling everything from build to deployment automatically.

**Limits**:
* Public repositories: Unlimited
* Private repositories: 2000 minutes per month
#### Plugin Auto-PR
**How it works**:
1. Workflow triggers when you push code to the main branch of your plugin source repository
2. Workflow reads plugin information from the `manifest.yaml` file
3. Automatically packages the plugin as a `.difypkg` file
4. Pushes the packaged file to your forked `dify-plugins` repository
5. Creates a new branch and commits changes
6. Automatically creates a PR to merge into the upstream repository
### Prerequisites
#### Repository
* You already have your own plugin source code repository (e.g., `your-name/plugin-source`)
* You already have your own forked plugin repository (e.g., `your-name/dify-plugins`)
* Your forked repository already has the plugin directory structure:
```
dify-plugins/
└── your-author-name
└── plugin-name
```
#### Permission
This workflow requires appropriate permissions to function:
* You need to create a GitHub Personal Access Token (PAT) with sufficient permissions
* The PAT must have permission to push code to your forked repository
* The PAT must have permission to create PRs to the upstream repository
### Parameters and Configuration
#### Setup Requirements
To get started with auto-publishing, you will need two key components:
**manifest.yaml file**: This file drives the automation process:
* `name`: Your plugin’s name (affects package and branch names)
* `version`: Semantic version number (increment with each release)
* `author`: Your GitHub username (determines repository paths)
**PLUGIN\_ACTION Secret**: You need to add this secret to your plugin source repository:
* Value: Must be a Personal Access Token (PAT) with sufficient permissions
* Permission: Ability to push branches to your forked repository and create PRs to the upstream repository
#### Automatically-Generated Parameters
Once set up, the workflow automatically handles these parameters:
* GitHub username: Read from the `author` field in `manifest.yaml`
* Author folder name: Consistent with the `author` field
* Plugin name: Read from the `name` field in `manifest.yaml`
* Branch name: `bump-{plugin-name}-plugin-{version}`
* Package filename: `{plugin-name}-{version}.difypkg`
* PR title and content: Automatically generated based on plugin name and version
### Step-by-Step Guide
Ensure you have forked the official `dify-plugins` repository and have your own plugin source repository.
Navigate to your plugin source repository, click **Settings > Secrets and variables > Actions > New repository secret**, and create a GitHub Secret:
* Name: `PLUGIN_ACTION`
* Value: GitHub Personal Access Token (PAT) with write permissions to the target repository (`your-name/dify-plugins`)

Create a `.github/workflows/` directory in your repository, create a file named `plugin-publish.yml` in this directory, and copy the following content into the file:
```yaml theme={null}
# .github/workflows/auto-pr.yml
name: Auto Create PR on Main Push
on:
push:
branches: [ main ] # Trigger on push to main
jobs:
create_pr: # Renamed job for clarity
runs-on: ubuntu-latest
steps:
- name: Checkout code
uses: actions/checkout@v3
- name: Print working directory # Kept for debugging
run: |
pwd
ls -la
- name: Download CLI tool
run: |
# Create bin directory in runner temp
mkdir -p $RUNNER_TEMP/bin
cd $RUNNER_TEMP/bin
# Download CLI tool
wget https://github.com/langgenius/dify-plugin-daemon/releases/latest/download/dify-plugin-linux-amd64
chmod +x dify-plugin-linux-amd64
# Show download location and file
echo "CLI tool location:"
pwd
ls -la dify-plugin-linux-amd64
- name: Get basic info from manifest # Changed step name and content
id: get_basic_info
run: |
PLUGIN_NAME=$(grep "^name:" manifest.yaml | cut -d' ' -f2)
echo "Plugin name: $PLUGIN_NAME"
echo "plugin_name=$PLUGIN_NAME" >> $GITHUB_OUTPUT
VERSION=$(grep "^version:" manifest.yaml | cut -d' ' -f2)
echo "Plugin version: $VERSION"
echo "version=$VERSION" >> $GITHUB_OUTPUT
# If the author's name is not your github username, you can change the author here
AUTHOR=$(grep "^author:" manifest.yaml | cut -d' ' -f2)
echo "Plugin author: $AUTHOR"
echo "author=$AUTHOR" >> $GITHUB_OUTPUT
- name: Package Plugin
id: package
run: |
# Use the downloaded CLI tool to package
cd $GITHUB_WORKSPACE
# Use variables for package name
PACKAGE_NAME="${{ steps.get_basic_info.outputs.plugin_name }}-${{ steps.get_basic_info.outputs.version }}.difypkg"
# Use CLI from runner temp
$RUNNER_TEMP/bin/dify-plugin-linux-amd64 plugin package . -o "$PACKAGE_NAME"
# Show packaging result
echo "Package result:"
ls -la "$PACKAGE_NAME"
echo "package_name=$PACKAGE_NAME" >> $GITHUB_OUTPUT
# Show full file path and directory structure (kept for debugging)
echo "\\nFull file path:"
pwd
echo "\\nDirectory structure:"
tree || ls -R
- name: Checkout target repo
uses: actions/checkout@v3
with:
# Use author variable for repository
repository: ${{steps.get_basic_info.outputs.author}}/dify-plugins
path: dify-plugins
token: ${{ secrets.PLUGIN_ACTION }}
fetch-depth: 1 # Fetch only the last commit to speed up checkout
persist-credentials: true # Persist credentials for subsequent git operations
- name: Prepare and create PR
run: |
# Debug info (kept)
echo "Debug: Current directory $(pwd)"
# Use variable for package name
PACKAGE_NAME="${{ steps.get_basic_info.outputs.plugin_name }}-${{ steps.get_basic_info.outputs.version }}.difypkg"
echo "Debug: Package name: $PACKAGE_NAME"
ls -la
# Move the packaged file to the target directory using variables
mkdir -p dify-plugins/${{ steps.get_basic_info.outputs.author }}/${{ steps.get_basic_info.outputs.plugin_name }}
mv "$PACKAGE_NAME" dify-plugins/${{ steps.get_basic_info.outputs.author }}/${{ steps.get_basic_info.outputs.plugin_name }}/
# Enter the target repository directory
cd dify-plugins
# Configure git
git config user.name "GitHub Actions"
git config user.email "actions@github.com"
# Ensure we are on the latest main branch
git fetch origin main
git checkout main
git pull origin main
# Create and switch to a new branch using variables and new naming convention
BRANCH_NAME="bump-${{ steps.get_basic_info.outputs.plugin_name }}-plugin-${{ steps.get_basic_info.outputs.version }}"
git checkout -b "$BRANCH_NAME"
# Add and commit changes (using git add .)
git add .
git status # for debugging
# Use variables in commit message
git commit -m "bump ${{ steps.get_basic_info.outputs.plugin_name }} plugin to version ${{ steps.get_basic_info.outputs.version }}"
# Push to remote (use force just in case the branch existed before from a failed run)
git push -u origin "$BRANCH_NAME" --force
# Confirm branch has been pushed and wait for sync (GitHub API might need a moment)
git branch -a
echo "Waiting for branch to sync..."
sleep 10 # Wait 10 seconds for branch sync
- name: Create PR via GitHub API
env:
GH_TOKEN: ${{ secrets.PLUGIN_ACTION }} # Use the provided token for authentication
run: |
gh pr create \
--repo langgenius/dify-plugins \
--head "${{ steps.get_basic_info.outputs.author }}:${{ steps.get_basic_info.outputs.plugin_name }}-${{ steps.get_basic_info.outputs.version }}" \
--base main \
--title "bump ${{ steps.get_basic_info.outputs.plugin_name }} plugin to version ${{ steps.get_basic_info.outputs.version }}" \
--body "bump ${{ steps.get_basic_info.outputs.plugin_name }} plugin package to version ${{ steps.get_basic_info.outputs.version }}
Changes:
- Updated plugin package file" || echo "PR already exists or creation skipped." # Handle cases where PR already exists
- name: Print environment info # Kept for debugging
run: |
echo "GITHUB_WORKSPACE: $GITHUB_WORKSPACE"
echo "Current directory contents:"
ls -R
```
Ensure those following fields are correctly set:
```yaml theme={null}
version: 0.0.x # Version number
author: your-github-username # GitHub username/Author name
name: your-plugin-name # Plugin name
```
### Usage Guide
#### First-time Setup
When setting up the auto-publish workflow for the first time, complete these steps:
1. Ensure you have forked the official `dify-plugins` repository
2. Ensure your plugin source repository structure is correct
3. Set up the `PLUGIN_ACTION Secret` in your plugin source repository
4. Create the workflow file `.github/workflows/plugin-publish.yml`
5. Ensure the `name` and `author` fields in the `manifest.yaml` file are correctly configured
#### Subsequent Update
To publish new versions after setup:
1. Modify the code
2. Update the `version` field in `manifest.yaml`

3. Push all changes to the main branch
4. Wait for GitHub Actions to complete packaging, branch creation, and PR submission
### Outcome
When you push code to the main branch of your plugin source repository, GitHub Actions will automatically execute the publishing process:
* Package the plugin in `{plugin-name}-{version}.difypkg` format
* Push the packaged file to the target repository
* Create a PR to merge into the fork repository

### Example Repository
See [example repository](https://github.com/Yevanchen/exa-in-dify) to understand configuration and best practices.
***
[Edit this page](https://github.com/langgenius/dify-docs/edit/main/en/develop-plugin/publishing/marketplace-listing/plugin-auto-publish-pr.mdx) | [Report an issue](https://github.com/langgenius/dify-docs/issues/new?template=docs.yml)
# Package as Local File and Share
Source: https://docs.dify.ai/en/develop-plugin/publishing/marketplace-listing/release-by-file
This document provides detailed steps on how to package a Dify plugin project as a local file and share it with others. It covers the preparation work before packaging a plugin, using the Dify plugin development tool to execute packaging commands, how to install the generated .difypkg file, and how to share plugin files with other users.
After completing plugin development, you can package the plugin project as a local file and share it with others. After obtaining the plugin file, it can be installed into a Dify Workspace. If you haven't developed a plugin yet, you can refer to the [Plugin Development: Hello World Guide](/en/develop-plugin/dev-guides-and-walkthroughs/tool-plugin).
* **Features**:
* Not dependent on online platforms, **quick and flexible** way to share plugins.
* Suitable for **private plugins** or **internal testing**.
* **Publishing Process**:
* Package the plugin project as a local file.
* Upload the file on the Dify plugins page to install the plugin.
This article will introduce how to package a plugin project as a local file and how to install a plugin using a local file.
### Prerequisites
* **Dify Plugin Development Tool**, for detailed instructions, please refer to [Initializing Development Tools](/en/develop-plugin/getting-started/cli).
After configuration, enter the `dify version` command in the terminal to check if it outputs version information to confirm that the necessary development tools have been installed.
### Packaging the Plugin
> Before packaging the plugin, please ensure that the `author` field in the plugin's `manifest.yaml` file and the `.yaml` file under the `/provider` path is consistent with your GitHub ID. For detailed information about the manifest file, please refer to [General Specifications](/en/develop-plugin/features-and-specs/plugin-types/general-specifications).
After completing the plugin project development, make sure you have completed the [remote debugging test](/en/develop-plugin/features-and-specs/plugin-types/remote-debug-a-plugin). Navigate to the directory above your plugin project and run the following plugin packaging command:
```bash theme={null}
dify plugin package ./your_plugin_project
```
After running the command, a file with the `.difypkg` extension will be generated in the current path.

### Installing the Plugin
Visit the Dify plugin management page, click **Install Plugin** in the upper right corner → **Via Local File** to install, or drag and drop the plugin file to a blank area of the page to install the plugin.

### Publishing the Plugin
You can share the plugin file with others or upload it to the internet for others to download. If you want to share your plugin more widely, you can consider:
1. [Publish to Individual GitHub Repository](/en/develop-plugin/publishing/marketplace-listing/release-to-individual-github-repo) - Share the plugin through GitHub
2. [Publish to Dify Marketplace](/en/develop-plugin/publishing/marketplace-listing/release-to-dify-marketplace) - Publish the plugin on the official marketplace
## Related Resources
* [Publishing Plugins](/en/develop-plugin/publishing/marketplace-listing/release-overview) - Learn about various publishing methods
* [Initializing Development Tools](/en/develop-plugin/getting-started/cli) - Configure plugin development environment
* [Remote Debugging Plugins](/en/develop-plugin/features-and-specs/plugin-types/remote-debug-a-plugin) - Learn plugin debugging methods
* [General Specifications](/en/develop-plugin/features-and-specs/plugin-types/general-specifications) - Define plugin metadata
* [Plugin Development: Hello World Guide](/en/develop-plugin/dev-guides-and-walkthroughs/tool-plugin) - Develop a plugin from scratch
***
[Edit this page](https://github.com/langgenius/dify-docs/edit/main/en/develop-plugin/publishing/marketplace-listing/release-by-file.mdx) | [Report an issue](https://github.com/langgenius/dify-docs/issues/new?template=docs.yml)
# Publishing Plugins
Source: https://docs.dify.ai/en/develop-plugin/publishing/marketplace-listing/release-overview
This document introduces three ways to publish Dify plugins - official Marketplace, open-source GitHub repository, and local plugin file package. It details the characteristics, publishing process, and applicable scenarios for each method, and provides specific publishing recommendations to meet the needs of different developers.
### Publishing Methods
To meet the publishing needs of different developers, Dify provides the following three plugin publishing methods. Before publishing, please ensure that you have completed the development and testing of your plugin, and have read [Basic Concepts of Plugin Development](/en/develop-plugin/getting-started/getting-started-dify-plugin) and [Plugin Developer Guidelines](/en/develop-plugin/publishing/standards/contributor-covenant-code-of-conduct).
#### **1. Marketplace**
**Introduction**: The official plugin marketplace provided by Dify, where users can browse, search, and install various plugins with one click.
**Features**:
* Plugins are reviewed before going online, ensuring they are **safe and reliable**.
* Can be directly installed in personal or team **Workspaces**.
**Publishing Process**:
* Submit the plugin project to the **Dify Marketplace** [code repository](https://github.com/langgenius/dify-plugins).
* After official review, the plugin will be publicly available in the marketplace for other users to install and use.
For detailed instructions, please refer to:
[Publish to Dify Marketplace](/en/develop-plugin/publishing/marketplace-listing/release-to-dify-marketplace)
#### 2. **GitHub Repository**
**Introduction**: Open-source or host your plugin on **GitHub** for others to view, download, and install.
**Features**:
* Convenient for **version management** and **open-source sharing**.
* Users can install directly via the plugin link, without platform review.
**Publishing Process**:
* Push the plugin code to a GitHub repository.
* Share the repository link, users can integrate the plugin into their **Dify Workspace** through the link.
For detailed instructions, please refer to:
[Publish to Individual GitHub Repository](/en/develop-plugin/publishing/marketplace-listing/release-to-individual-github-repo)
#### 3. Plugin File Package (Local Installation)
**Introduction**: Package the plugin as a local file (such as `.difypkg` format) and share it for others to install.
**Features**:
* Not dependent on online platforms, **quick and flexible** way to share plugins.
* Suitable for **private plugins** or **internal testing**.
**Publishing Process**:
* Package the plugin project as a local file.
* Click **Upload Plugin** on the Dify plugins page and select the local file to install the plugin.
You can package your plugin project as a local file and share it with others. After uploading the file on the plugins page, you can install the plugin into your Dify Workspace.
For detailed instructions, please refer to:
[Package as Local File and Share](/en/develop-plugin/publishing/marketplace-listing/release-by-file)
### **Publishing Recommendations**
* **Want to promote your plugin** → **Recommended to use Marketplace**, ensuring plugin quality through official review and increasing exposure.
* **Open-source sharing project** → **Recommended to use GitHub**, convenient for version management and community collaboration.
* **Quick distribution or internal testing** → **Recommended to use plugin files**, simple and efficient way to install and share.
## Related Resources
* [Basic Concepts of Plugin Development](/en/develop-plugin/getting-started/getting-started-dify-plugin) - Comprehensive understanding of Dify plugin development
* [Plugin Developer Guidelines](/en/develop-plugin/publishing/standards/contributor-covenant-code-of-conduct) - Understand the standards for plugin submission
* [Plugin Privacy Data Protection Guide](/en/develop-plugin/publishing/standards/privacy-protection-guidelines) - Understand the requirements for writing privacy policies
* [General Specifications](/en/develop-plugin/features-and-specs/plugin-types/general-specifications) - Understand the configuration of plugin manifest files
***
[Edit this page](https://github.com/langgenius/dify-docs/edit/main/en/develop-plugin/publishing/marketplace-listing/release-overview.mdx) | [Report an issue](https://github.com/langgenius/dify-docs/issues/new?template=docs.yml)
# Publish to Dify Marketplace
Source: https://docs.dify.ai/en/develop-plugin/publishing/marketplace-listing/release-to-dify-marketplace
This guide provides detailed instructions on the complete process of publishing plugins to the Dify Marketplace, including submitting PRs, the review process, post-release maintenance, and other key steps and considerations.
Dify Marketplace welcomes plugin submissions from partners and community developers. Your contributions will further enrich the possibilities of Dify plugins. This guide provides a clear publishing process and best practice recommendations to help your plugin get published smoothly and bring value to the community. If you haven't developed a plugin yet, you can refer to the [Plugin Development: Hello World Guide](/en/develop-plugin/dev-guides-and-walkthroughs/tool-plugin).
Please follow these steps to submit your plugin Pull Request (PR) to the [GitHub repository](https://github.com/langgenius/dify-plugins) for review. After approval, your plugin will be officially launched on the Dify Marketplace.
### Plugin Publishing Process
Publishing a plugin to the Dify Marketplace involves the following steps:
1. Complete plugin development and testing according to the [Plugin Developer Guidelines](/en/develop-plugin/publishing/standards/contributor-covenant-code-of-conduct);
2. Write a privacy policy for the plugin according to the [Plugin Privacy Data Protection Guide](/en/develop-plugin/publishing/standards/privacy-protection-guidelines), and include the file path or URL of the privacy policy in the plugin [General Specifications](/en/develop-plugin/features-and-specs/plugin-types/general-specifications);
3. Complete plugin packaging;
4. Fork the [Dify Plugins](https://github.com/langgenius/dify-plugins) code repository;
5. Create your personal or organization folder in the repository and upload the packaged `.difypkg` file to your folder;
6. Submit a Pull Request (PR) following the PR Template format in GitHub and wait for review;
7. After the review is approved, the plugin code will be merged into the Main branch, and the plugin will be automatically launched on the [Dify Marketplace](https://marketplace.dify.ai/).
Plugin submission, review, and publication flow chart:

> **Note**: The Contributor Agreement in the above diagram refers to the [Plugin Developer Guidelines](/en/develop-plugin/publishing/standards/contributor-covenant-code-of-conduct).
***
### During Pull Request (PR) Review
Actively respond to reviewer questions and feedback:
* PR comments unresolved within **14 days** will be marked as stale (can be reopened).
* PR comments unresolved within **30 days** will be closed (cannot be reopened, a new PR needs to be created).
***
### **After Pull Request (PR) Approval**
**1. Ongoing Maintenance**
* Address user-reported issues and feature requests.
* Migrate plugins when significant API changes occur:
* Dify will publish change notifications and migration instructions in advance.
* Dify engineers can provide migration support.
**2. Restrictions during the Marketplace Public Beta Testing Phase**
* Avoid introducing breaking changes to existing plugins.
***
### Review Process
**1. Review Order**
* PRs are processed on a **first-come, first-reviewed** basis. Review will begin within 1 week. If there is a delay, reviewers will notify the PR author via comments.
**2. Review Focus**
* Check if the plugin name, description, and setup instructions are clear and instructive.
* Check if the plugin's [General Specifications](/en/develop-plugin/features-and-specs/plugin-types/general-specifications) meets format standards and includes valid author contact information.
**3. Plugin Functionality and Relevance**
* Test plugins according to the [Plugin Development Guide](/en/develop-plugin/getting-started/getting-started-dify-plugin).
* Ensure the plugin has a reasonable purpose in the Dify ecosystem.
[Dify.AI](https://dify.ai/) reserves the right to accept or reject plugin submissions.
***
### Frequently Asked Questions
1. **How to determine if a plugin is unique?**
Example: A Google search plugin that only adds multilingual versions should be considered an optimization of an existing plugin. However, if the plugin implements significant functional improvements (such as optimized batch processing or error handling), it can be submitted as a new plugin.
2. **What if my PR is marked as stale or closed?**
PRs marked as stale can be reopened after addressing feedback. Closed PRs (over 30 days) require creating a new PR.
3. **Can I update plugins during the Beta testing phase?**
Yes, but breaking changes should be avoided.
## Related Resources
* [Publishing Plugins](/en/develop-plugin/publishing/marketplace-listing/release-overview) - Learn about various publishing methods
* [Plugin Developer Guidelines](/en/develop-plugin/publishing/standards/contributor-covenant-code-of-conduct) - Plugin submission standards
* [Plugin Privacy Data Protection Guide](/en/develop-plugin/publishing/standards/privacy-protection-guidelines) - Privacy policy writing requirements
* [Package as Local File and Share](/en/develop-plugin/publishing/marketplace-listing/release-by-file) - Plugin packaging methods
* [General Specifications](/en/develop-plugin/features-and-specs/plugin-types/general-specifications) - Define plugin metadata
***
[Edit this page](https://github.com/langgenius/dify-docs/edit/main/en/develop-plugin/publishing/marketplace-listing/release-to-dify-marketplace.mdx) | [Report an issue](https://github.com/langgenius/dify-docs/issues/new?template=docs.yml)
# Publish to Individual GitHub Repository
Source: https://docs.dify.ai/en/develop-plugin/publishing/marketplace-listing/release-to-individual-github-repo
This document provides detailed instructions on how to publish Dify plugins to a personal GitHub repository, including preparation work, initializing a local plugin repository, connecting to a remote repository, uploading plugin files, packaging plugin code, and the complete process of installing plugins via GitHub. This method allows developers to fully manage their own plugin code and updates.
### Publish Methods
To accommodate the various publishing needs of developers, Dify provides three plugin publish methods:
#### **1. Marketplace**
**Introduction**: The official Dify plugin marketplace allows users to browse, search, and install a variety of plugins with just one click.
**Features**:
* Plugins become available after passing a review, ensuring they are **trustworthy** and **high-quality**.
* Can be installed directly into an individual or team **Workspaces**.
**Publication Process**:
* Submit the plugin project to the **Dify Marketplace** [code repository](https://github.com/langgenius/dify-plugins).
* After an official review, the plugin will be publicly released in the marketplace for other users to install and use.
For detailed instructions, please refer to:
#### 2. **GitHub Repository**
**Introduction**: Open-source or host the plugin on **GitHub** makes it easy for others to view, download, and install.
**Features**:
* Convenient for **version management** and **open-source sharing**.
* Users can install the plugin directly via a link, bypassing platform review.
**Publication Process**:
* Push the plugin code to a GitHub repository.
* Share the repository link, users can integrate the plugin into their **Dify Workspace** through the link.
For detailed instructions, please refer to:
#### Plugin File (Local Installation)
**Introduction**: Package the plugin as a local file (e.g., `.difypkg` format) and share it for others to install.
**Features**:
* Does not depend on an online platform, enabling **quick and flexible** sharing of plugins.
* Suitable for **private plugins** or **internal testing**.
**Publication Process**:
* Package the plugin project as a local file.
* Click **Upload Plugin** on the Dify plugin page and select the local file to install the plugin.
You can package the plugin project as a local file and share it with others. After uploading the file on the plugin page, the plugin can be installed into the Dify Workspace.
For detailed instructions, please refer to:
### **Publication Recommendations**
* **Looking to promote a plugin** → **Recommended to use the Marketplace**, ensuring plugin quality through official review and increasing exposure.
* **Open-source sharing project** → **Recommended to use GitHub**, convenient for version management and community collaboration.
* **Quick distribution or internal testing** → **Recommended to use plugin file**, allowing for straightforward and efficient installation and sharing.
***
[Edit this page](https://github.com/langgenius/dify-docs/edit/main/en/develop-plugin/publishing/marketplace-listing/release-to-individual-github-repo.mdx) | [Report an issue](https://github.com/langgenius/dify-docs/issues/new?template=docs.yml)
# Plugin Development Guidelines
Source: https://docs.dify.ai/en/develop-plugin/publishing/standards/contributor-covenant-code-of-conduct
To ensure the quality of all plugins in the Dify Marketplace and provide a consistent, high-quality experience for Dify Marketplace users, you must adhere to all requirements outlined in these Plugin Development Guidelines when submitting a plugin for review. By submitting a plugin, **you acknowledge that you have read, understood, and agree to comply with all the following terms**. Following these guidelines will help your plugin get reviewed faster.
## 1. Plugin Value and Uniqueness
* **Focus on Generative AI**: Ensure the core functionality of your plugin focuses on the Generative AI domain and provides distinct and significant value to Dify users. This may include:
* Integrating new models, tools, or services.
* Offering unique data sources or processing capabilities to enhance AI applications.
* Simplifying or automating AI-related workflows on the Dify platform.
* Providing innovative supporting functions for AI application development.
* **Avoid Functional Duplication**: Submitted plugins **must not** duplicate or closely resemble existing plugins in the Marketplace. Each published plugin must be unique and independent to ensure the best experience for users.
* **Meaningful Updates**: For plugin updates, **ensure new features or services** are introduced that are not already available in the current version.
* **PR Submission Advice**: We **recommend** including a brief explanation in your pull request to clarify why the new plugin is needed.
## 2. Plugin Functionality Checklist
* **Unique Name**: Ensure your plugin name is unique by searching the plugin directory beforehand.
* **Brand Alignment**: Plugin name must match the plugin's branding.
* **Functionality Verification**: Test the plugin thoroughly before submission and confirm it works as intended. For details, refer to [Remote Debug a Plugin](/en/develop-plugin/features-and-specs/plugin-types/remote-debug-a-plugin). The plugin must be production-ready.
* **README Requirements**:
* Setup instructions and usage guidance.
* Any necessary code, APIs, credentials, or information required to connect the plugin.
* Do **not** include irrelevant content or links.
* Do **not** use exaggerated, promotional language, or unverifiable claims.
* Do **not** include advertisements of any kind (including self-promotion or display ads).
* Do **not** include misleading, offensive, or defamatory content.
* Do **not** expose real user names or data in screenshots.
* Do **not** link to 404 pages or pages that return errors.
* Avoid excessive spelling or punctuation errors.
* **User Data Use**: Use collected data only for connecting services and improving plugin functionality.
* **Error Clarity**: Mark required fields and provide clear error messages that help users understand issues.
* **Authentication Settings**: If authentication is needed, include the full configuration steps—do not omit them.
* **Privacy Policy**: Prepare a privacy policy document or online URL in accordance with the [Privacy Guidelines](/en/develop-plugin/publishing/standards/privacy-protection-guidelines).
* **Performance**: Plugins must operate efficiently and must not degrade the performance of Dify or user systems.
* **Credential Security**: API keys or other credentials must be stored and transmitted securely. Avoid hardcoding them or exposing them to unauthorized parties.
## 3. Language Requirements
* **English as Primary Language**: Since Dify Marketplace serves a global audience, **English must be the primary language** for all user-facing text (plugin names, descriptions, field names, labels, help text, error messages).
* **Multilingual Support Encouraged**: Supporting multiple languages is encouraged.
## 4. Prohibited and Restricted Plugins
* **Prohibited: Misleading or Malicious Behavior**\
Plugins must not mislead users. Do not create plugins for spamming, phishing, or sending unsolicited messages. Attempts to deceive the review process, steal user data, or impersonate users will result in removal and possible bans from future submissions.
* **Prohibited: Offensive Content**\
Plugins must not contain violent content, hate speech, discrimination, or disrespect toward global cultures, religions, or users.
* **Prohibited: Financial Transactions**\
Plugins must not facilitate any financial transactions, asset transfers, or payment processing. This includes token or asset ownership transfers in blockchain/crypto applications.
* **Restricted: Plugins with Frequent Defects**\
Thoroughly test your plugin to avoid critical bugs. Repeated submissions with defects may lead to delays or penalties.
* **Restricted: Unnecessary Plugin Splitting**\
Do not create multiple plugins for features that share the same API and authentication unless each is clearly a standalone product or service. Prefer integrating features into one high-level plugin.
* **Restricted: Duplicate Submissions**\
Avoid repeatedly submitting essentially identical plugins. Doing so may delay reviews or result in rejection.
## 5. Plugin Monetization
* \*\*Dify Marketplace currently only supports **free** plugins.
* **Future Policy**: Policies for monetization and pricing models will be announced in the future.
## 6. Trademarks and Intellectual Property
* **Authorization Required**: Ensure you have rights to use any logos or trademarks submitted.
* **Verification Rights**: We may ask you to prove you have permission if third-party logos are used—especially if they clearly belong to known brands.
* **Violation Consequences**: Dify reserves the right to ask for changes or remove the plugin if unauthorized use is found. Complaints from rights holders may also result in removal.
* **Dify Logos Forbidden**: You may not use Dify's own logos.
* **Image Standards**: Do not submit low-quality, distorted, or poorly cropped images. The review team may request replacements.
* **Icon Restrictions**: Icons must not contain misleading, offensive, or malicious visuals.
## 7. Plugin Updates and Version Management
* **Responsible Updates**: Clearly communicate breaking changes in descriptions or via external channels (e.g., GitHub Release Notes).
* **Encouraged Maintenance**: Update regularly to fix bugs, match Dify platform changes, or respond to updates from third-party services—especially for security.
* **Deprecation Notice**: If discontinuing a plugin, notify users in advance (e.g., timeline and plan in the plugin description) and suggest alternatives if available.
## 8. Plugin Maintenance and Support
* **Owner Responsibility**: Plugin owners are responsible for technical support and maintenance.
* **Support Channel Required**: Owners must provide **at least one** support channel (GitHub repo or email) for feedback during review and publication.
* **Handling Unmaintained Plugins**: If a plugin lacks maintenance and the owner does not respond after reasonable notification, Dify may:
* Add "Maintenance Lacking" or "Potential Risk" tags.
* Restrict new installs.
* Eventually unpublish the plugin.
## 9. Privacy and Data Compliance
* **Disclosure Required**: You **must declare** whether your plugin collects any user personal data. See the [Privacy Guidelines](/en/develop-plugin/publishing/standards/privacy-protection-guidelines).
* **Simple Data Listing**: If collecting data, briefly list types (e.g., username, email, device ID, location). No need for exhaustive detail.
* **Privacy Policy**: You **must provide** a privacy policy link stating:
* What information is collected.
* How it is used.
* What is shared with third parties (with their privacy links if applicable).
* **Review Focus**:
* **Formal Check**: Make sure you declare what data you collect.
* **Sensitive Data Scan**: Plugins collecting sensitive data (e.g., health, finance, children's info) require additional scrutiny.
* **Malicious Behavior Scan**: Plugins must not collect or upload user data without consent.
***
## 10. Review and Discretion
* **Right to Reject/Remove**: If requirements, privacy standards, or related policies are unmet, Dify may reject or remove your plugin. This includes abuse of the review process or data misuse.
* **Timely Review**: The Dify review team will aim to review plugins within a reasonable time, depending on volume and complexity.
* **Communication**: We may reach out through the support channel you provide—please ensure it is active.
## Related Resources
* [Basic Concepts of Plugin Development](/en/develop-plugin/getting-started/getting-started-dify-plugin) - Learn the basics of plugin development
* [Publishing Plugins](/en/develop-plugin/publishing/marketplace-listing/release-overview) - Overview of the plugin publishing process
* [Plugin Privacy Data Protection Guide](/en/develop-plugin/publishing/standards/privacy-protection-guidelines) - Guide for writing privacy policies
* [Publish to Dify Marketplace](/en/develop-plugin/publishing/marketplace-listing/release-to-dify-marketplace) - Publish plugins on the official marketplace
* [Remote Debugging Plugins](/en/develop-plugin/features-and-specs/plugin-types/remote-debug-a-plugin) - Plugin debugging guide
***
[Edit this page](https://github.com/langgenius/dify-docs/edit/main/en/develop-plugin/publishing/standards/contributor-covenant-code-of-conduct.mdx) | [Report an issue](https://github.com/langgenius/dify-docs/issues/new?template=docs.yml)
# Plugin Privacy Policy Guidelines
Source: https://docs.dify.ai/en/develop-plugin/publishing/standards/privacy-protection-guidelines
This document describes guidelines for developers on how to write a privacy policy when submitting plugins to the Dify Marketplace. It includes how to identify and list the types of personal data collected (direct identification information, indirect identification information, combined information), how to fill out the plugin privacy policy, how to include the privacy policy statement in the Manifest file, and answers to related common questions.
When you are submitting your Plugin to Dify Marketplace, you are required to be transparent in how you handle user data. The following guidelines focus on how to address privacy-related questions and user data processing for your plugin.
Center your privacy policy around the following points:
**Does your plugin collect and use any user personal data?** If it does, please list the types of data collected.
> “Personal data” refers to any information that can identify a specific individual—either on its own or when combined with other data—such as information used to locate, contact, or otherwise target a unique person.
#### 1. List the types of data collected
**Type A:** **Direct Identifiers**
* Name (e.g., full name, first name, last name)
* Email address
* Phone number
* Home address or other physical address
* Government-issued identification numbers (e.g., Social Security number, passport number, driver's license number)
**Type B**: **Indirect Identifiers**
* Device identifiers (e.g., IMEI, MAC address, device ID)
* IP address
* Location data (e.g., GPS coordinates, city, region)
* Online identifiers (e.g., cookies, advertising IDs)
* Usernames
* Profile pictures
* Biometric data (e.g., fingerprints, facial recognition data)
* Web browsing history
* Purchase history
* Health information
* Financial information
**Type C: Data that can be combined with other data to identify an individual:**
* Age
* Gender
* Occupation
* Interests
While your plugin may not collect any personal information, you also need to make sure the use of third-party services within your plugin may involve data collection or processing. As the plugin developer, you are responsible for disclosing all data collection activities associated within your plugin, including those performed by third-party services. Thus, make sure to read through the privacy policy of the third-party service and verify any data collected by your plugin is claimed in your submission.
For example, if the plugin you are developing involves Slack services, make sure to reference [Slack’s privacy policy](https://slack.com/trust/privacy/privacy-policy) in your plugin’s privacy policy statement and clearly disclose the data collection practices.
#### **2. Submit the most up to date Privacy Policy of your Plugin**
**The Privacy Policy** should contain:
* What types of data are collected.
* How the collected data is used.
* Whether any data is shared with third parties, and if so, identify those third parties and provide links to their privacy policies.
* If you have no clue of how to write a privacy policy, you can also check the privacy policy of Plugins issued by Dify Team.
#### 3. Introducing a privacy policy statement within the plugin Manifest file
For detailed instructions on filling out specific fields, please refer to the [General Specifications](/en/develop-plugin/features-and-specs/plugin-types/general-specifications) documentation.
**FAQ**
1. **What does "collect and use" mean regarding user personal data? Are there any common examples of how personal data is collected and used in any Plugin?**
"Collect and use" user data generally refers to the collection, transmission, use, or sharing of user data. Common examples of how products may handle personal or sensitive user data include:
* Using forms that gather any kind of personally identifiable information.
* Implementing login features, even when using third-party authentication services.
* Collecting information about input or resources that may contain personally identifiable information.
* Implementing analytics to track user behavior, interactions, and usage patterns.
* Storing communication data like messages, chat logs, or email addresses.
* Accessing user profiles or data from connected social media accounts.
* Collecting health and fitness data such as activity levels, heart rate, or medical information.
* Storing search queries or tracking browsing behavior.
* Processing financial information including bank details, credit scores, or transaction history.
## Related Resources
* [Publishing Overview](/en/develop-plugin/publishing/marketplace-listing/release-overview) - Understand the plugin publishing process
* [Publish to Dify Marketplace](/en/develop-plugin/publishing/marketplace-listing/release-to-dify-marketplace) - Learn how to submit plugins to the official marketplace
* [Plugin Developer Guidelines](/en/develop-plugin/publishing/standards/contributor-covenant-code-of-conduct) - Understand plugin submission guidelines
* [General Specifications](/en/develop-plugin/features-and-specs/plugin-types/general-specifications) - Plugin metadata configuration
***
[Edit this page](https://github.com/langgenius/dify-docs/edit/main/en/develop-plugin/publishing/standards/privacy-protection-guidelines.mdx) | [Report an issue](https://github.com/langgenius/dify-docs/issues/new?template=docs.yml)
# Signing Plugins for Third-Party Signature Verification
Source: https://docs.dify.ai/en/develop-plugin/publishing/standards/third-party-signature-verification
This document describes how to enable and use the third-party signature verification feature in the Dify Community Edition, including key pair generation, plugin signing and verification, and environment configuration steps, enabling administrators to securely install plugins not available on the Dify Marketplace.
***
## title:
This feature is available only in the Dify Community Edition. Third-party signature verification is not currently supported on Dify Cloud Edition.
Third-party signature verification allows Dify administrators to safely approve the installation of plugins not listed on the Dify Marketplace without completely disabling signature verification. This supports the following scenarios for example:
* Dify administrators can add a signature to a plugin sent by the developer once it has been approved.
* Plugin developers can add a signature to their plugin and publish it along with the public key for Dify administrators who cannot disable signature verification.
Both Dify administrators and plugin developers can add a signature to a plugin using a pre-generated key pair. Additionally, administrators can configure Dify to enforce signature verification using specific public keys during plugin installation.
## Generating a Key Pair for Signing and Verification
Generate a new key pair for adding and verifying the plugin's signature with the following command:
```bash theme={null}
dify signature generate -f your_key_pair
```
After running this command, two files will be generated in the current directory:
* **Private Key**: `your_key_pair.private.pem`
* **Public Key**: `your_key_pair.public.pem`
The private key is used to sign the plugin, and the public key is used to verify the plugin's signature.
Keep the private key secure. If it is compromised, an attacker could add a valid signature to any plugin, which would compromise Dify's security.
## Adding a Signature to the Plugin and Veriyfing It
Add a signature to your plugin by running the following command. Note that you must specify the **plugin file to sign** and the **private key**:
```bash theme={null}
dify signature sign your_plugin_project.difypkg -p your_key_pair.private.pem
```
After executing the command, a new plugin file will be generated in the same directory with `signed` added to its original filename: `your_plugin_project.signed.difypkg`
You can verify that the plugin has been correctly signed using this command. Here, you need to specify the **signed plugin file** and the **public key**:
```bash theme={null}
dify signature verify your_plugin_project.signed.difypkg -p your_key_pair.public.pem
```
If you omit the public key argument, verification will use the Dify Marketplace public key. In that case, signature verification will fail for any plugin file not downloaded from the Dify Marketplace.
## Enabling Third-Party Signature Verification
Dify administrators can enforce signature verification using pre-approved public keys before installing a plugin.
### Placing the Public Key
Place the **public key** corresponding to the private key used for signing in a location that the plugin daemon can access.
For example, create a `public_keys` directory under `docker/volumes/plugin_daemon` and copy the public key file there:
```bash theme={null}
mkdir docker/volumes/plugin_daemon/public_keys
cp your_key_pair.public.pem docker/volumes/plugin_daemon/public_keys
```
### Environment Variable Configuration
In the `plugin_daemon` container, configure the following environment variables:
* `THIRD_PARTY_SIGNATURE_VERIFICATION_ENABLED`
* Enables third-party signature verification.
* Set this to `true` to enable the feature.
* `THIRD_PARTY_SIGNATURE_VERIFICATION_PUBLIC_KEYS`
* Specifies the path(s) to the public key file(s) used for signature verification.
* You can list multiple public key files separated by commas.
Below is an example of a Docker Compose override file (`docker-compose.override.yaml`) configuring these variables:
```yaml theme={null}
services:
plugin_daemon:
environment:
FORCE_VERIFYING_SIGNATURE: true
THIRD_PARTY_SIGNATURE_VERIFICATION_ENABLED: true
THIRD_PARTY_SIGNATURE_VERIFICATION_PUBLIC_KEYS: /app/storage/public_keys/your_key_pair.public.pem
```
Note that `docker/volumes/plugin_daemon` is mounted to `/app/storage` in the `plugin_daemon` container. Ensure that the path specified in `THIRD_PARTY_SIGNATURE_VERIFICATION_PUBLIC_KEYS` corresponds to the path inside the container.
To apply these changes, restart the Dify service:
```bash theme={null}
cd docker
docker compose down
docker compose up -d
```
After restarting the service, the third-party signature verification feature will be enabled in the current Community Edition environment.
***
[Edit this page](https://github.com/langgenius/dify-docs/edit/main/en/develop-plugin/publishing/standards/third-party-signature-verification.mdx) | [Report an issue](https://github.com/langgenius/dify-docs/issues/new?template=docs.yml)